Close
0%
0%

The Mathboard

A side keyboard for scientists and engineers

Public Chat
Similar projects worth following
The Mathboard is a side keyboard that simplifies typing of mathematical equations. It is released under GNU GPL 3 and CERN-OHL-S v2, and can be built or modified by anyone. For instructions and documentation, head over to the github: https://github.com/nup002/Mathboard/tree/version_2

The Mathboard can output plaintext Unicode, LaTeX codes, and Microsoft Office equations editor codes.

The Mathboard gives you effortless access to the Greek alphabet plus more than 80 of the most commonly used mathematical operators. Gone are the days of looking up Unicode symbols on Google or clicking around in the Office equation editor!

The ultimate goal of the Mathboard is to make my life easier, and to help others like me in process. I often write equations, and I have long been frustrated by the amount of time spent looking up special Unicode symbols on Google, clicking around in the Equations Editor in Word or Powerpoint, and looking up LaTeX math codes. I feel like I would save time if I had a keyboard that could insert the correct symbols, operators, and LaTeX codes automatically.

The Mathboard does all this. In its current version it is functional, and can be built by anyone who desires to do so. The largest problem for anyone who wants to build one for themselves will be producing the keycaps. I plan on eventually selling keycap sets (as well as Mathboard parts or kits) online.

  • Approaching a professional product

    Magne Lauritzen01/10/2025 at 22:36 0 comments

    Many changes have been made since the previous log update. All parts, including the enclosure, electronics, and keycaps, have seen improvements. This log will give a brief overview of these changes and discuss the future plans for this project.

    .

    Keycaps

    I was lucky to find Loic from 3dkeycap.com, who has been an invaluable resource and has spearheaded the development of the keycaps. Thanks to his efforts the Mathboard now uses low profile keycaps which helps make it appear sleeker. The colorful keycaps are resin-printed, again all thanks to Loic. The keycap graphics are UV printed as on the previous version and appear to be quite rugged. The graphics do not come off during regular use, but time will tell how long they really last. It will of course be possible to buy replacement keycaps.

    Enclosure

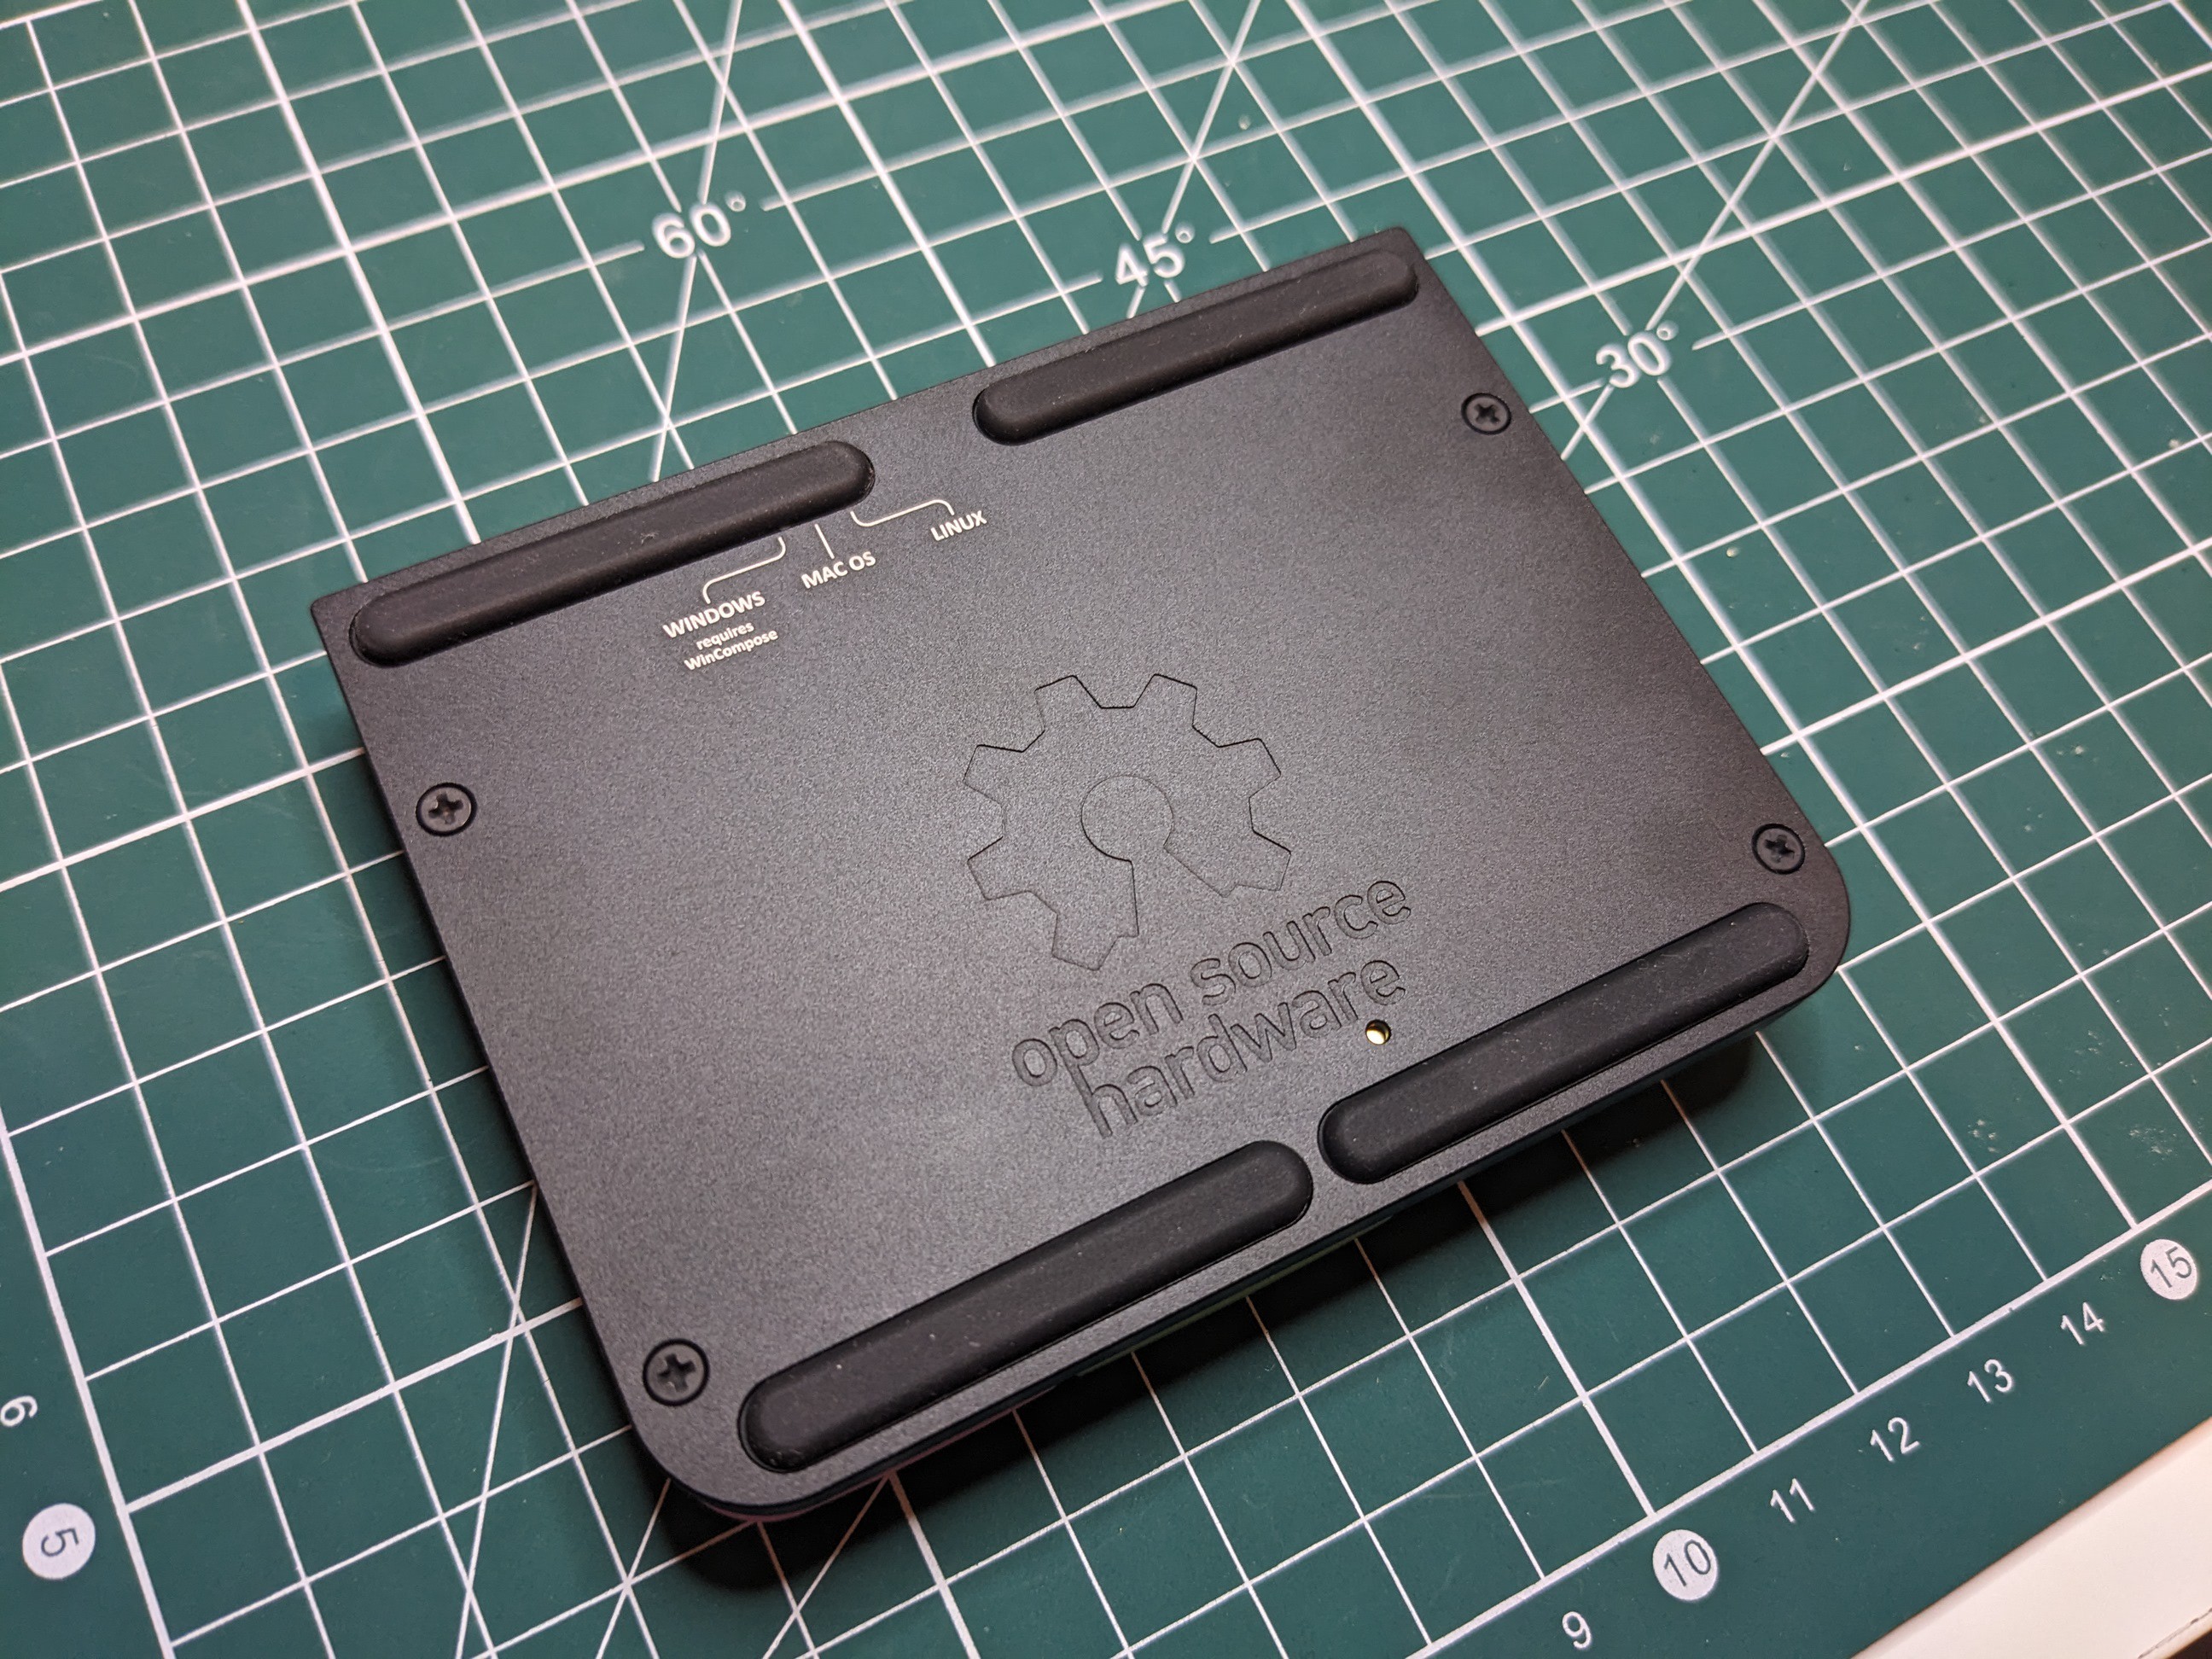
    The enclosure has seen a massive upgrade. While the previous version was 3D-printed, the new Mathboard uses a solid aluminum enclosure, anodized to a matte black, and laser marked to give a rather clean surface finish. It also makes it feel sturdier and gives a much more professional feel to the Mathboard than the previous 3D-printed enclosure did. Finding a reliable and cost-effective supplier for this case was a challenge. I contacted about a dozen local machine shops who were happy to provide me with quotes, but whose prices were so astronomical I was forced to look elsewhere. Via alibaba I found a machine shop that could have them manufactured for about 4x cheaper than any of the local manufacturers. It is upsetting how far we are from local manufacturing of consumer goods being economically viable.

    PCB

    The PCB now integrates the microcontroller directly, instead of being a soldered-on module as in the previous version. This allows the Mathboard to be much thinner and made it possible to place the USB port on the back of the Mathboard instead of on its side. The PCB is designed in KiCAD and manufactured/populated by JLCPCB.

    Future plans

    So, what's next for the Mathboard? I plan on making it commercially available in 2025. I will therefore have to look into new aspects of this project: How to start a company, register a trademark, doing international ecommerce, and much more. I am grateful to have such an interesting project to work on which teaches me how to do all these things!  

  • Mathboard Version 1 pre-release

    Magne Lauritzen03/23/2024 at 15:58 0 comments

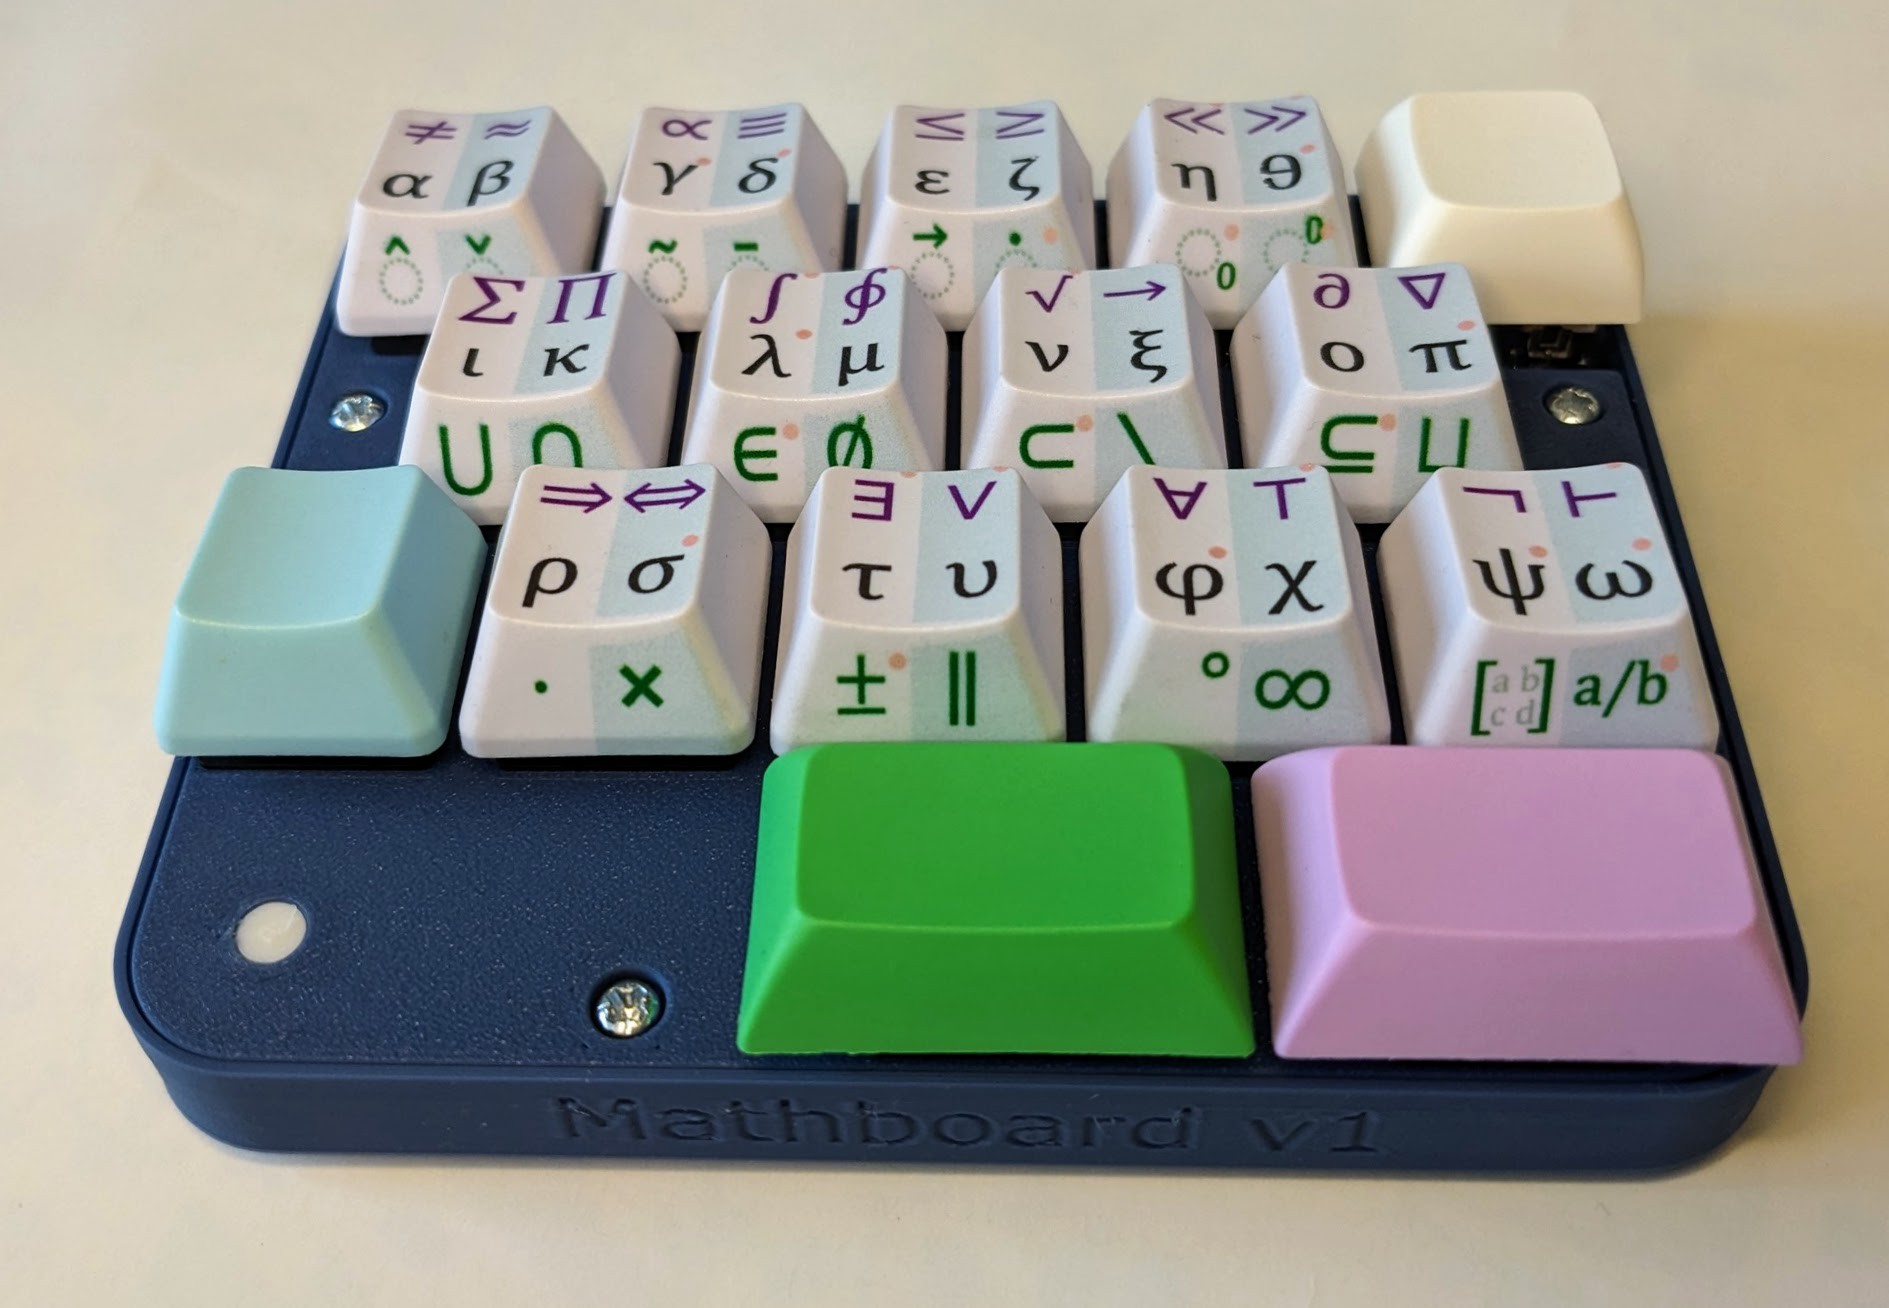
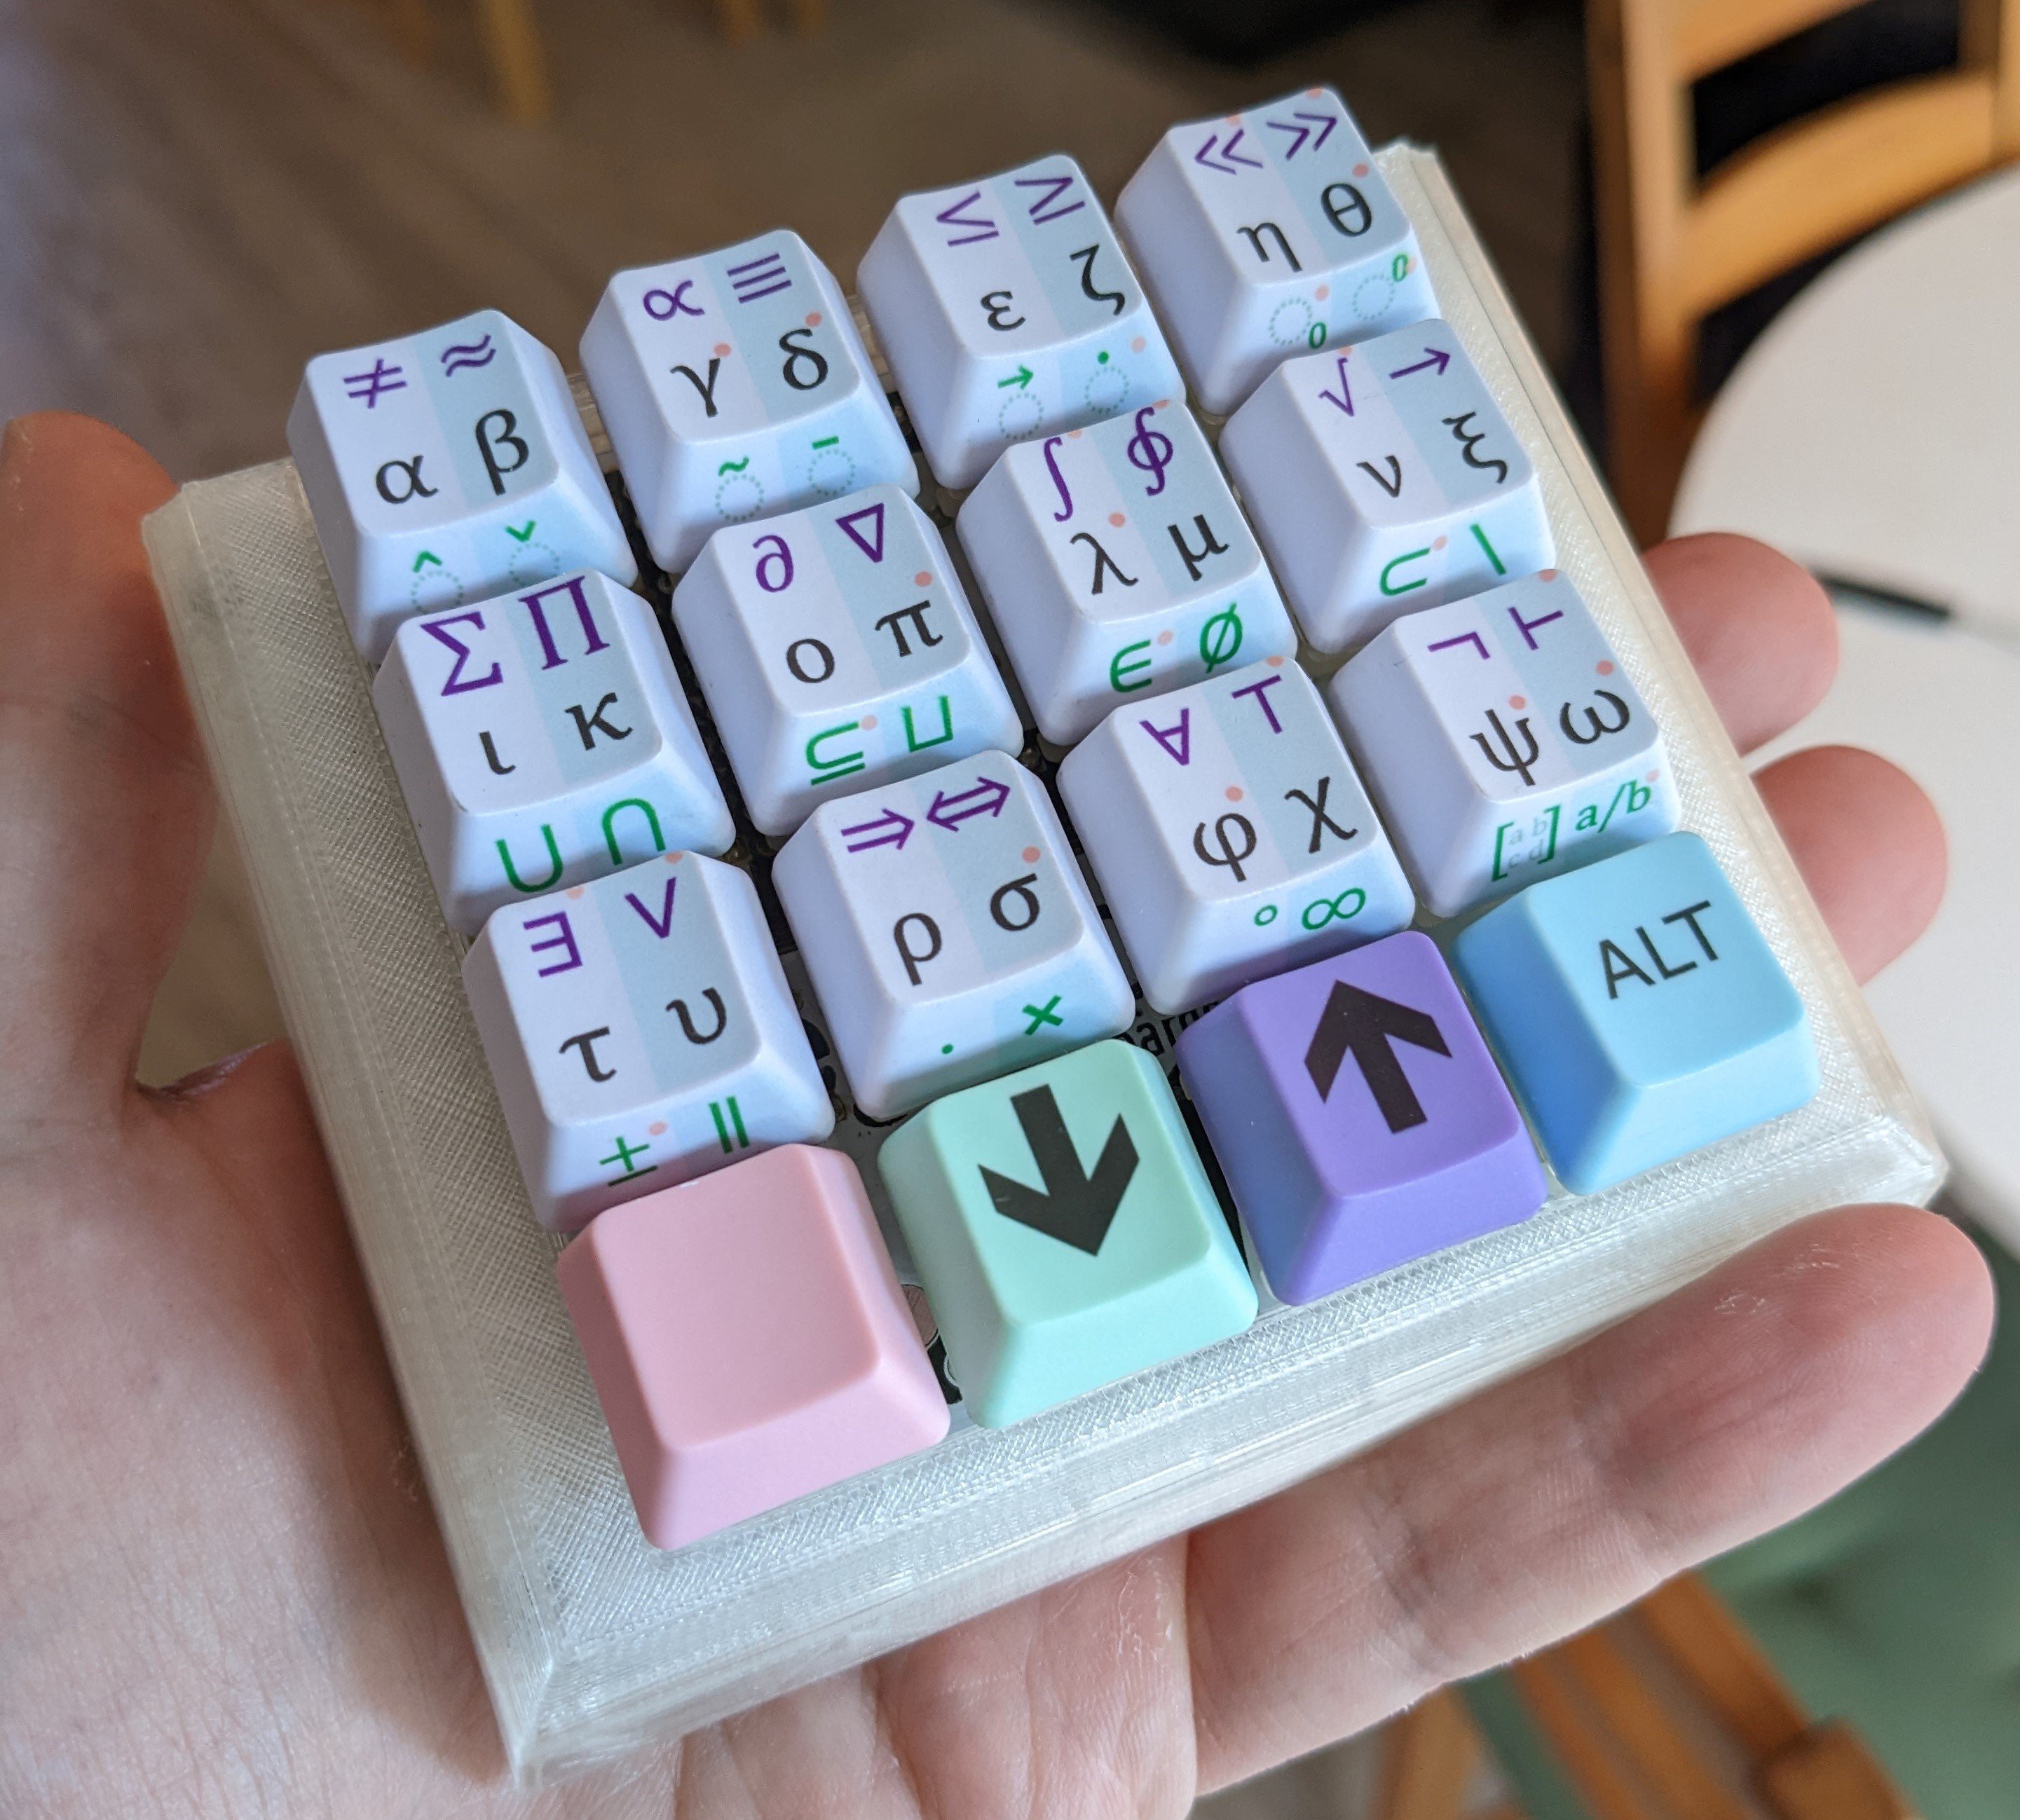
    The Mathboard has a new look! 

    Since the previous update more than one year ago, I have been working on a fully custom design for the Mathboard. The prototype Mathboard was simply an off-the-shelf 4x4 macropad, which served me well for evaluating the feasability of the project, and for developing the firmware on hardware that I could be confident in. 

    Once the prototype was finished and I was confident that what I wanted to build was feasible, I got started on a custom design, the result of which you see above. It has a fully custom PCB and a 3D-printed case. In the spirit of open source hardware, all the design files are available on the project github and the Mathboard can be made with a minimum of tools.

    The PCB

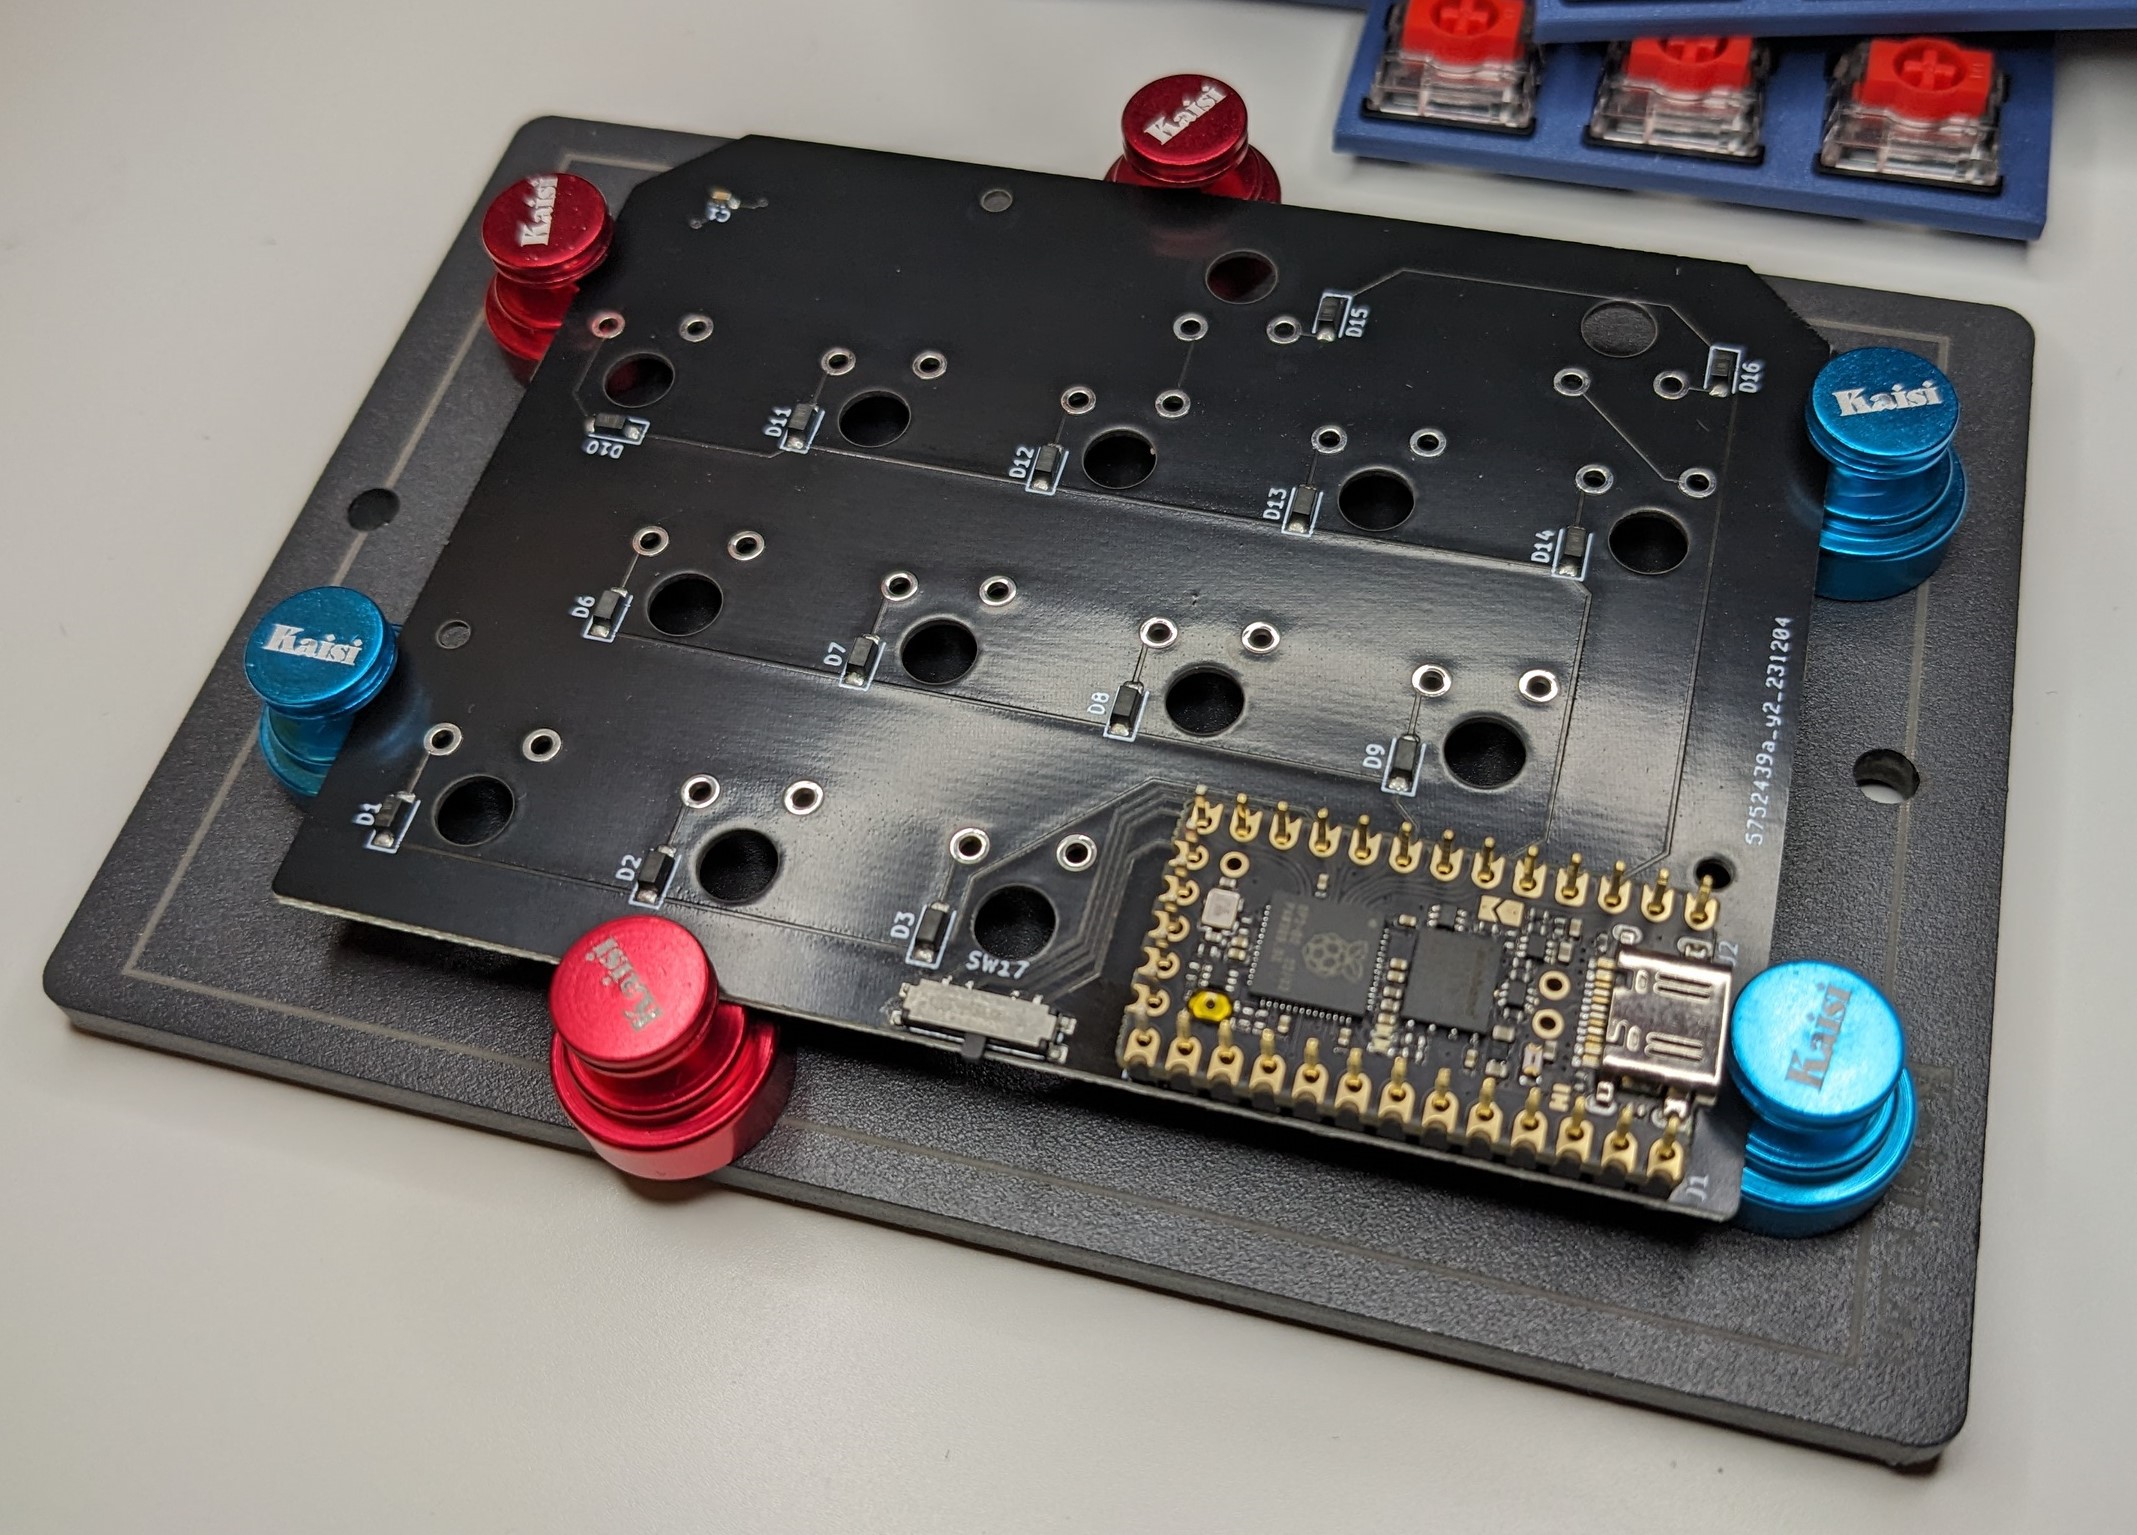
    The Mathboard uses a custom PCB that I designed in KiCAD and had produced with a rapid PCB prototype manufacturer. Keyboard PCBs are typically simple things, and this is no exception. Just a bunch of key switches, diodes, a status LED, a small 3-way switch, and pin headers for the microcontroller. In the image below you see the bottom of the PCB with the microcontroller already mounted. The microcontroller is Helios, an RP2040 board from 0xCB. I went for this particular microcontroller because of its size, cost, and large flash memory. 

    The Case

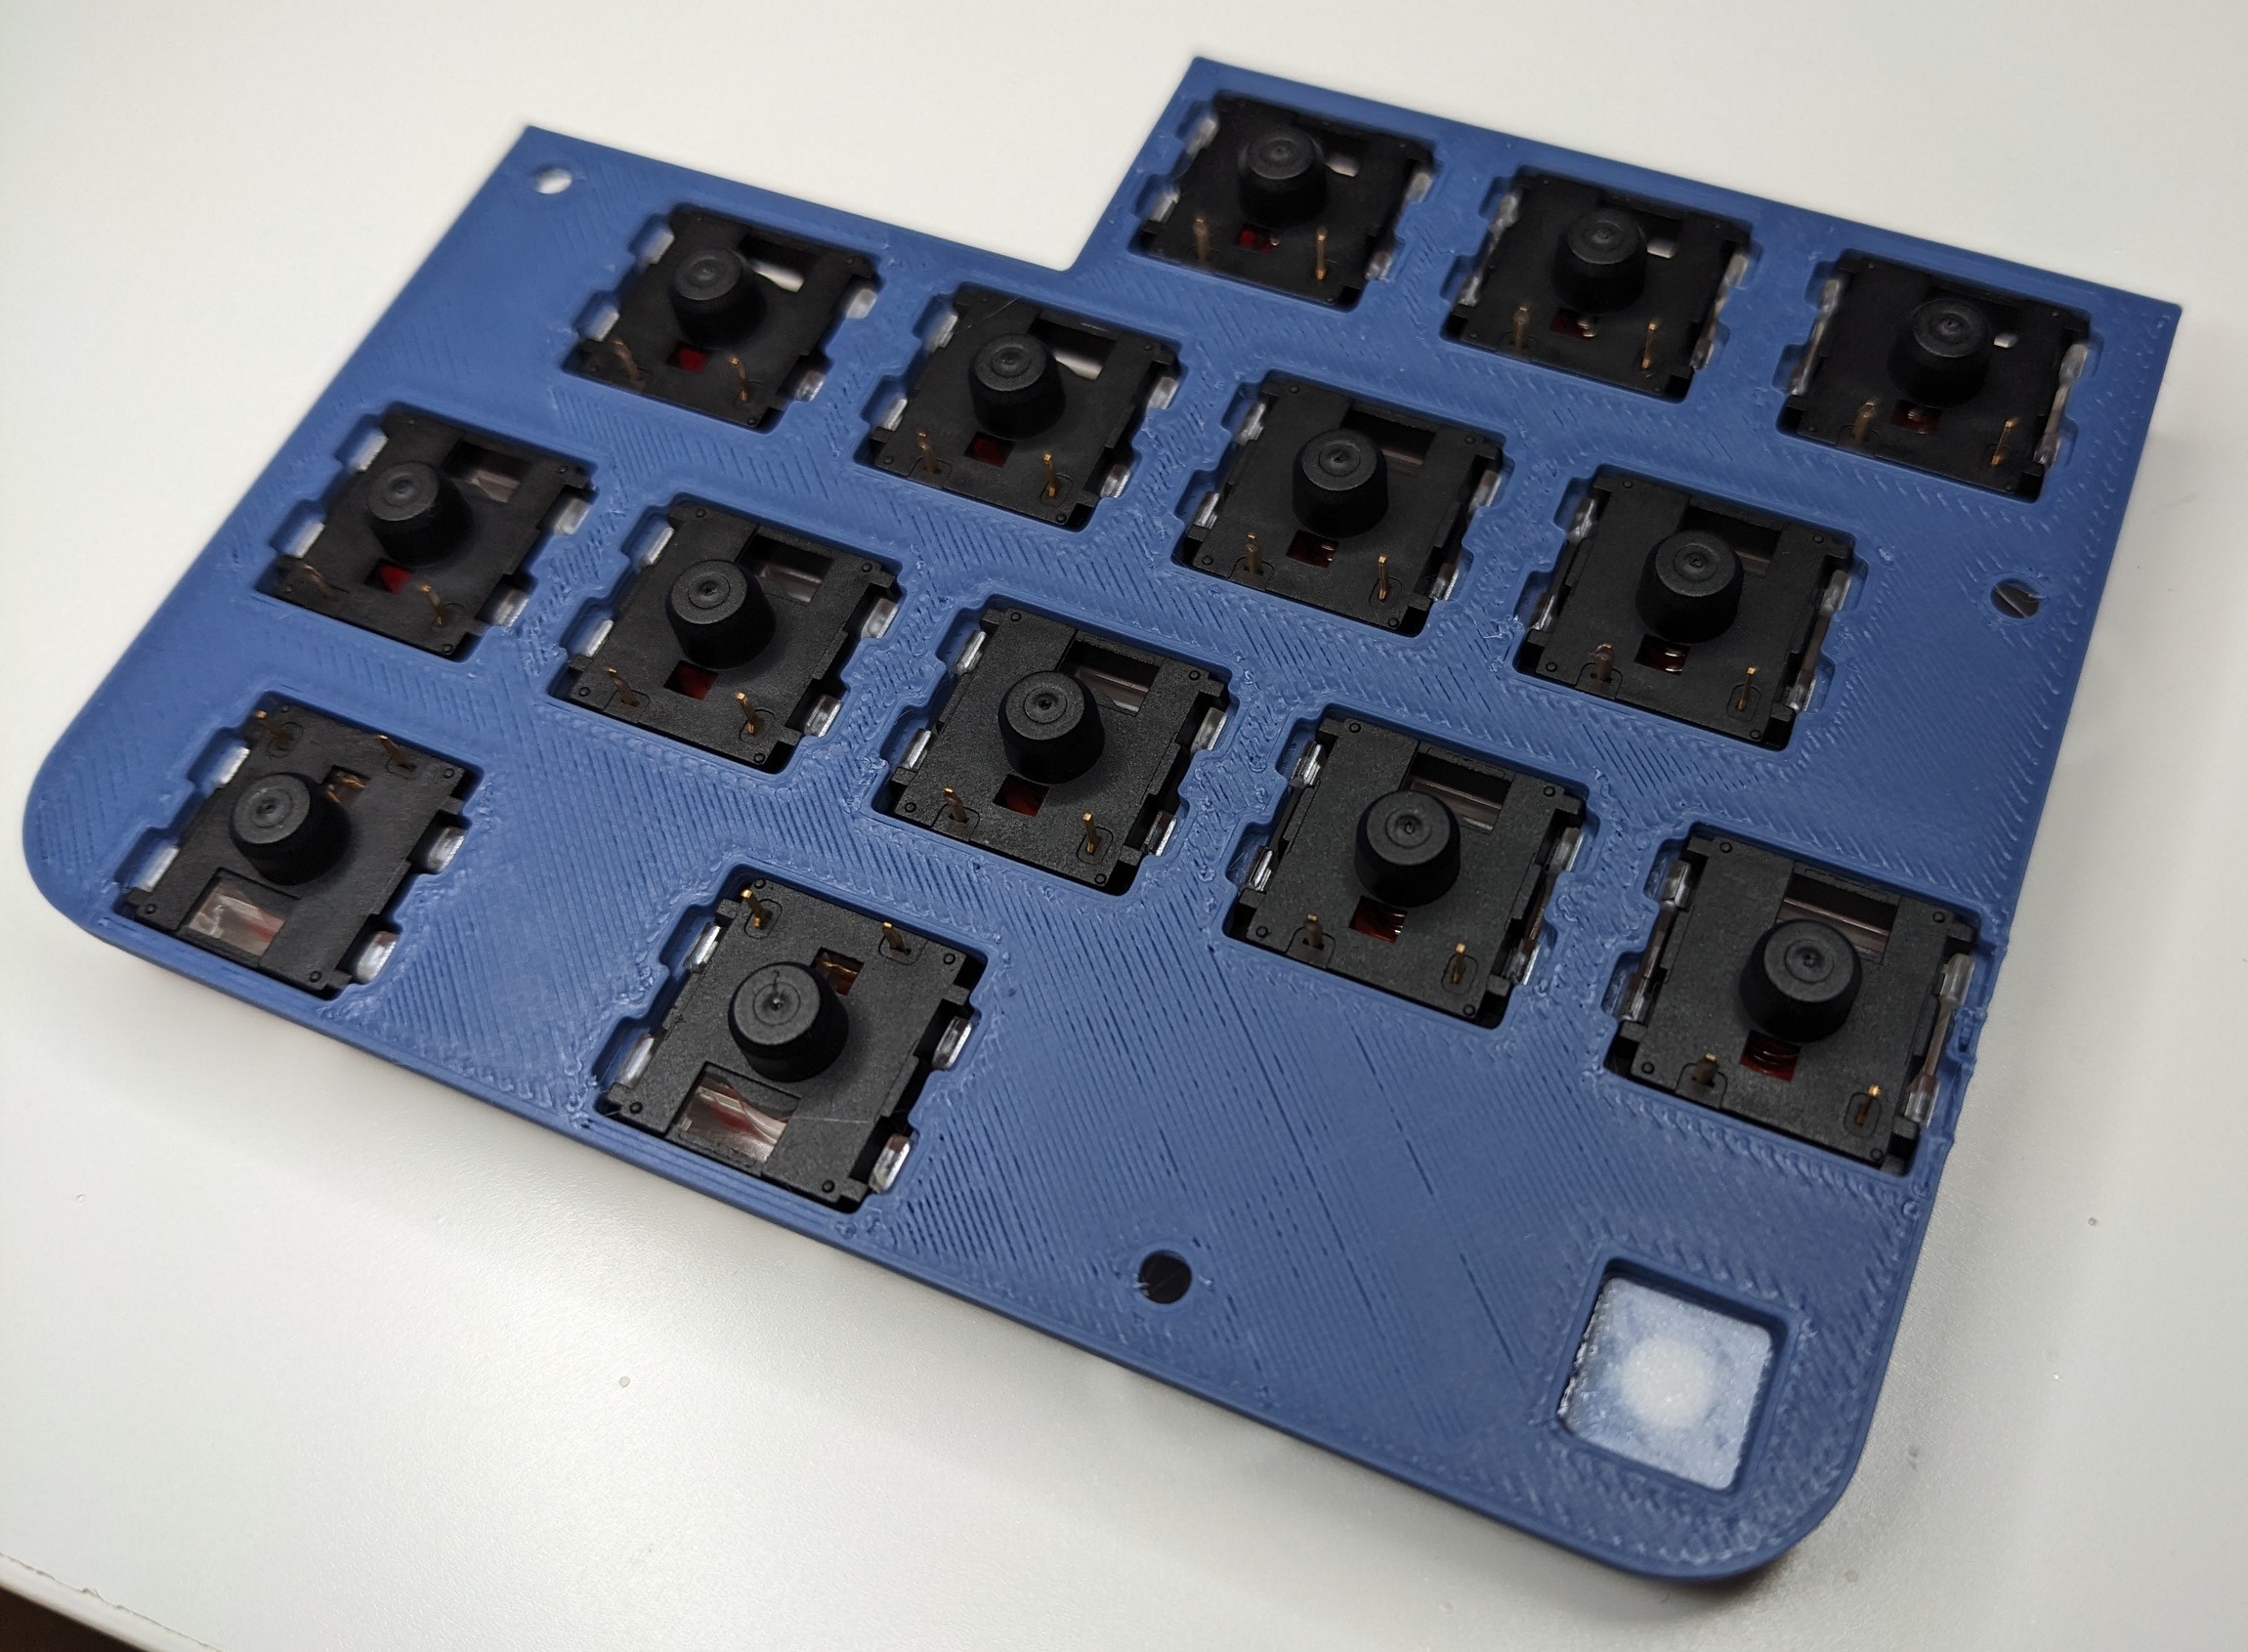
    The case was designed in Fusion 360 and reiterated upon a few times until I arrived at a result I was happy with. The case consists of a bottom part and a lid. The Gateron V2 low profile key switches snaps into place and ensures they are perfectly aligned when soldering them to the PCB.

    A small white LED diffuser can be seen in the bottom right corner in the above image. This was simply 3D printed with white PLA and glued onto the blue case with cyanoacrylate glue (aka "super glue").

  • Keycap durability test

    Magne Lauritzen01/17/2023 at 13:39 0 comments

    I investigated the durability of the UV-printed keycaps of the Mathboard. The results were surprising.

    I wanted to know if UV printing is a feasible method for creating the custom keycaps for the Mathboard. The process works well, but I did not know if the prints are durable. It would be a shame if the keycaps lose their decals from normal use.

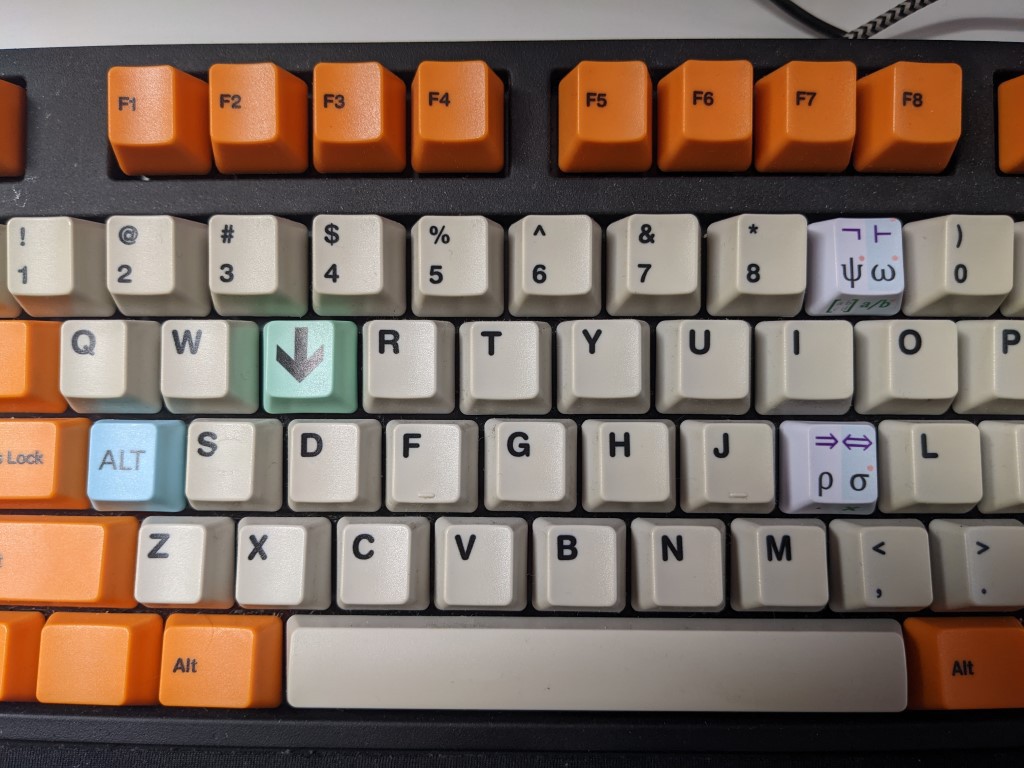
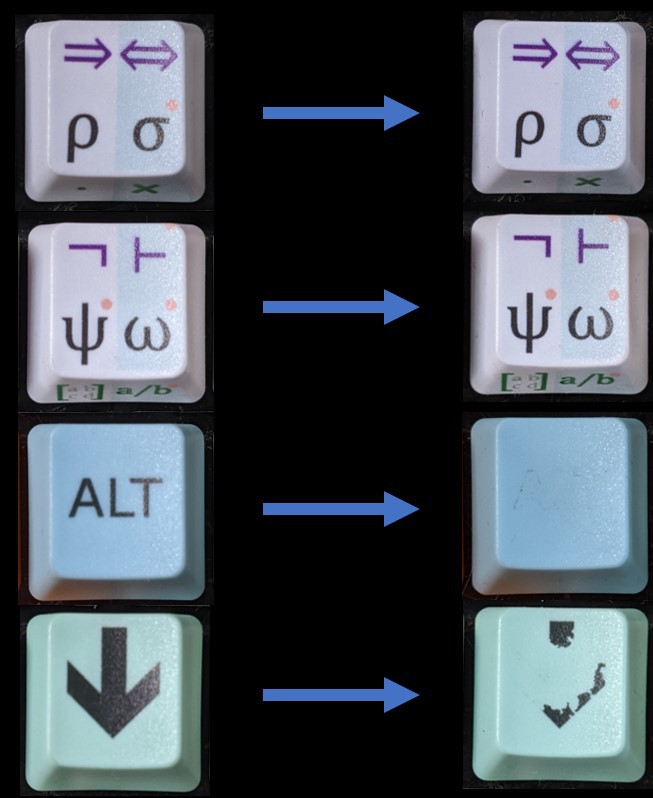
    I placed four Mathboard keycaps on my regular keyboard. I spaced them out evenly so that they would get roughly the same amount of use:

    After only one week of normal use, the colored keycaps had nearly completely lost their decals. The white keycaps were in perfect condition.

    I think this an interesting result. If anyone knows why UV prints applied to the keycaps made from colored plastic seems to adhere worse, let me know. For now, it tells me that UV printing is not feasible for the colored keycaps, but that it appears to work very well on the white keycaps. Even after months of daily use, they are looking like just came out of the printer.

  • Keycaps!

    Magne Lauritzen09/25/2022 at 19:22 1 comment

    I received the custom keycaps for the Mathboard today. They were made using a UV printer by a German maker I met at Nantes Maker Campus 2022. He has been kind enough to help me out with getting my design onto the keycaps.

    The result looks pretty good!

    If you have a UV printer and want to make these keycaps yourself, the .svg files are available at the Mathboard Github repository:

    https://github.com/nup002/Mathboard/tree/main/hardware/keycaps/decals

  • Going open source

    Magne Lauritzen08/22/2022 at 08:54 0 comments

    In the spirit of open source, I have set up a Github repository for the Mathboard. Here you will find the source code, prebuilt firmware binaries, and keycap decals.

    Hope it may be useful to someone!

    https://github.com/nup002/Mathboard

  • Deciding on the layout

    Magne Lauritzen08/01/2022 at 19:24 0 comments

    The apparently simple task of deciding which symbols go where on the math keyboard has been more challenging than I had anticipated.

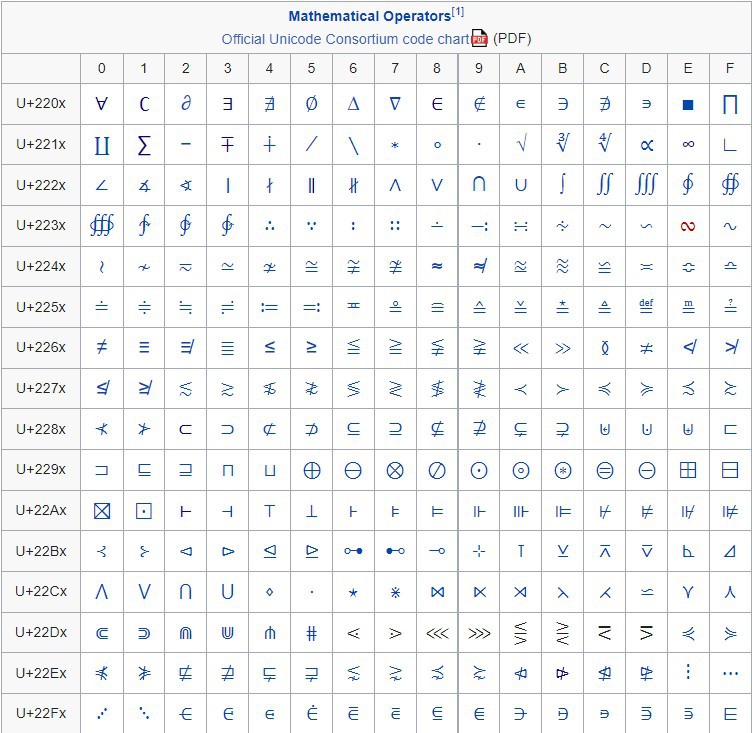
    The main problem is lack of real-estate. Consider that the keyboard only has 16 buttons, while Wikipedia lists hundreds of mathematical Unicode symbols:

    Clearly, it will not be possible to fit every mathematical symbol on the math keyboard. We have two ways of approaching this problem:

    1. Fit more than one symbol on each button
    2. Focus on the most-used symbols

    The second solution is a bit more tricky because it requires us to make a decision about which symbols common enough to be granted a spot on the math keyboard. 

    Fitting several symbols per button

    This approach is easy. Everyone is already used to the concept of keyboard buttons having more than one symbol. Just look at the number row, for example. They all have numbers and symbols on each button.

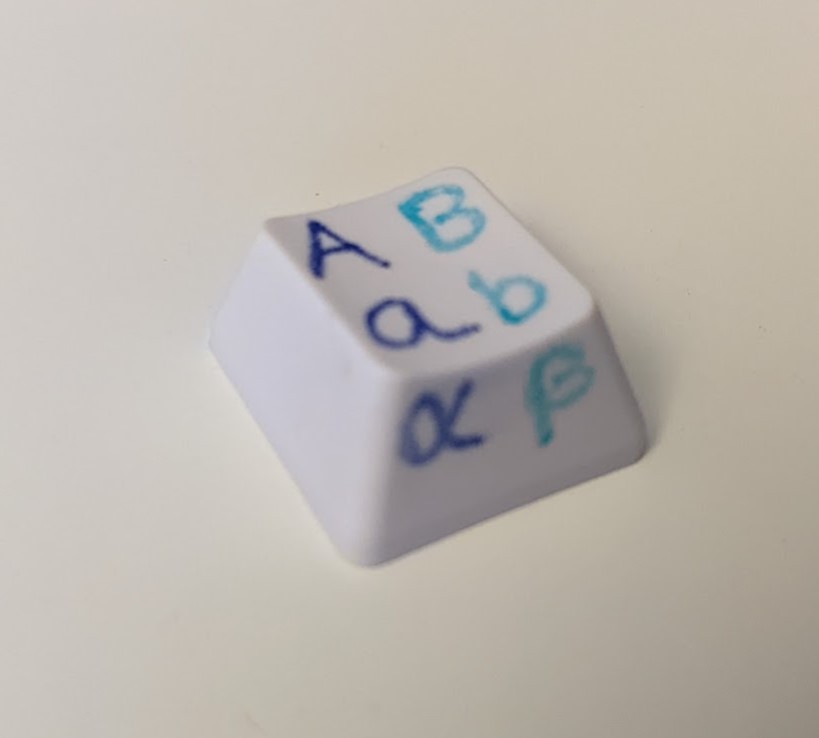
    For the mathematical keyboard, I decided to fit 6 symbols per button. This may sound like it will get confusing very quickly, but I think it'll work fine. I take advtantage of the fact that the keycaps have a sloped front so one can see symbols printed on the front face. 

    A single button
    A single keycap showing the locations of the 6 symbols that it can fit.

    The button is separated into two columns of symbols: A blue A-column, and a cyan B-column. f you simply press the button, you get a. If you hold Shift while pressing the button, you get A. If you hold Alt while pressing the button, you get α, the front-facing symbol. The same is true for the cyan B-coloumn, which is accessed by holding down Opt. So, Opt+button gives b. Opt+Shift+button gives B. And Opt+Alt+button gives β.

    Therefore, by giving up only 3 buttons for Shift, Alt, and Opt, we can fit 6 times as many symbols on the remaining 13 buttons. And by a lucky coincidence we can exactly fit the 26 greek letters by placing two on each button! Perfect.

    We can push this approach even further by allowing certain symbols to have multiple different versions accessible by double-tapping, triple-tapping, or even quadruble-tapping the same button. This is useful for certain symbols like roots (√, ∛, ∜) and integrals (∫, ∬, ∭). It can also be used to negate symbols (∈∉, ∃∄), or to access uppercase-versions of letters (δΔ, θΘ, σΣ).

    Selecting the most commonly used symbols

    This part has been difficult. The goal of the math keyboard is to be as useful as possible to as many people as possible, which means that the symbols that go on the keyboard must be the most commonly used ones. But what is a "common" symbol? I decided to refer to Wikipedia on this matter, with their excellent Glossary of Mathematical Symbols.

    From this article and based on my own experience, I decided on the following groups of symbols (with a few examples in paranthesis):

    • Greek letters (α, β, γ)
    • Comparisons and equivalence (≠, ≈, ≪)
    • Algebra and calculus (∑, ∫, √)
    • Set theory (⋂, ∈, ⊂)
    • Logic (⇔, ∃, ¬)
    • Diacritics and supscripts (◌̂, ◌̃, ◌⁰)
    • Various others (⋅, ±, ∞)

    These groups should hopefully cover most of what a regular mathematician, phycisist, or engineer will need. It is of course likely that many users will miss a few special symbols that they need often, but this is unavoidable.

    The layout

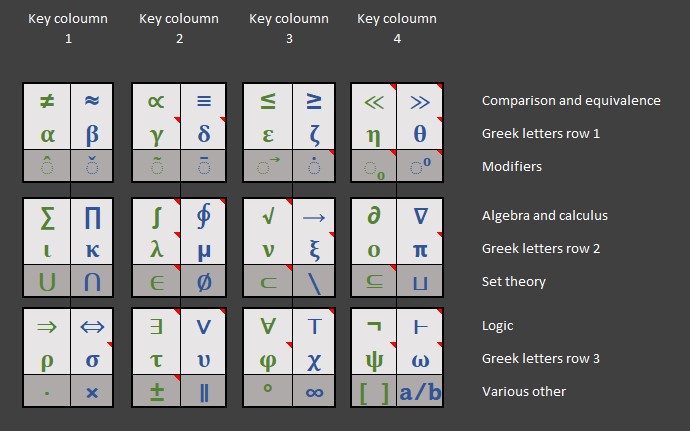
    I eventually decided on the following layout:

    Each key is separated into a light 2x2 top face and a dark 2x1 front face. Each key also has a green main section and blue Alt section.

    The symbols with a red triangle in corner has additional symbols accessible by multi-tapping the key. Double-tapping greek letters gives their uppercase versions if they differ from the Latin alphabet. So double-tapping σ will give you Σ, but double tapping α does nothing since that would...

    Read more »

  • Motivation

    Magne Lauritzen07/05/2022 at 10:18 0 comments

    This log entry relates to the motivation behind creating the mathematical keyboard.


    When you want to type mathematical equations on a computer, you have a set of options.

    • Type it in LaTeX
    • Type it in the Microsoft Office or Apache Open Office equations editor
    • Type it in plaintext for simple equations like α ≤ β ± 2 °C

    The TL;DR is:

    • LaTeX is really flexible but requires practice and memorization of codes
    • Equation editors are flexible but requires a lot of clicking around in menus
    • Plaintext requires copypasting from a source for each symbol 

    In each case, the mathematical keyboard will save the user time by reducing the amount of memorization, clicking, or copypasting, by simply having the codes, symbols, and operators available with a single keystroke.


    Typing in LaTeX

    Of the three, typing in LaTeX is the most flexible and has long been the standard in many scientific fields like mathematics and physics. The downside to LaTeX is that it requires you to memorize LaTeX codes. Often these codes are logical, like `\alpha` to get α, or `\plusminus` to get ±. Other times they can be a bit more obscure, like `\ngtr` for ≯ . And when you get into limits, sup/subscripts, and advanced formatting it quickly gets messy. Let's look at what's needed to type the Fourier Transform definition:

    The LaTeX code for this equation looks as follows:

    \hat{f}(\xi) = \int_{-\infty}^{\infty} f(x)\ e^{-i 2\pi \xi x}\,dx,\quad \forall\ \xi \in \mathbb R

     If you have never written equations in LaTeX this can seem daunting. Many new users of LaTeX spend a good chunk of their time looking up the codes for the symbols they need, and how to make sure they appear in the way they want them to. You'll usually see undergraduate and graduate students alike with LaTeX cheat sheets covering the walls of their study area. A keyboard that automatically writes the correct  codes for commonly used symbols and operators might save them some time.

    Typing in an equations editor

    Typing in the Microsoft Office or Apache Open Office equations editor has the benefit of much of the same flexibility as LaTeX, but with the need for copious amount of clicking around in menus. Typing the Fourier Transform definition in the Word equations editor took me 46 mouse clicks in 5 different menus, and that's the best case after some practice. All this time spent clicking around and looking for the correct symbols in different menus could be reduced by the mathematical keyboard.

    Typing in plaintext

    The Unicode standard defines a large set of mathematical symbols, and it is therefore possible to type simple equations alongside the regular text. This is very useful when you just want to, for example, remind the reader that σ = ±2.2 or that ε ∈ ℂ . You can even define slightly more advanced equations, but there is a limit due to the lack of Unicode support for superscript, subscript, and much more. But if we try to write the Fourier Transform in plaintext we get:

    f̂(ξ) = ∫_(-∞)^∞ f(x)e^(-i2πξx) dx, ∀ ξ∈R 

     Doesn't look too great, but it works. The downside to typing in plaintext is that almost none of the symbols are available to you on a typical keyboard layout. When did you last see a keyboard with an integral sign on it? You will either need to copypaste every symbol from a source like Wikipedia, or memorize their 4-character Unicodes. For example, typing in Alt+222B gives you ∫. But this also requires you have a keyboard with a numpad, which isn't that common anymore. A mathematical keyboard would be hugely useful when you want to type plaintext equations.

View all 7 project logs

  • 1
    Instructions for building your own Mathboard

    All instructions can be found in the official documentation.

View all instructions

Enjoy this project?

Share

Discussions

Similar Projects

Does this project spark your interest?

Become a member to follow this project and never miss any updates