thpoll
-
The First Working PCB Design
03/28/2023 at 06:35 • 0 comments
Nobody is perfect...
My first take on a full size keyboard PCB failed after I realized some major design flaws (just after finishing).
So I decided doing it more step-by-step and came up with the `Poly Keyboard Atom`. One PCB per key. The `Atoms` are compatible with Cherry MX key switches (3 or 5 pins).
![]()
Yes, we are at version 2.1, I already tinkered around quite a bit and as you could see from the first picture I missed some pull-up resistors, so it took some time to get this little PCB design right.
The rendering is missing the tiny OLED display with the name `P34107` which has 72x40 pixels. It is connected to the `Atom` via a flexible cable that first goes through the RGB slit (turned out that just some key switches have a wide-enough LED slit) of the key switch and then through the PCB via the cutout.
Unfortunately, the flex cable is not long enough, so it has to be extended. To do that you need some low temperature solder paste (eg. something that melts around 138 centigrade) and a hot air rework station to solder the two flex cables together.
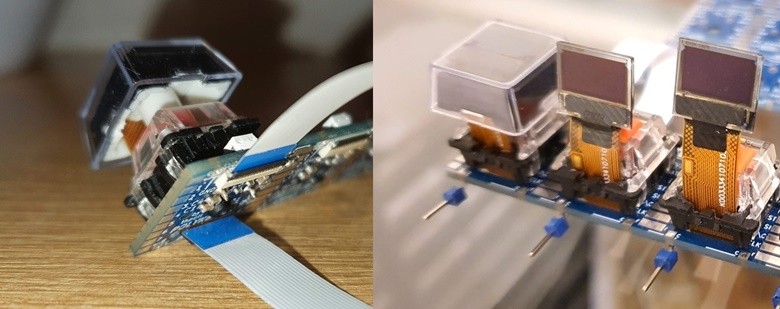
Some more pictures for a clearer view (here 4 Atoms in a row):
![]() On the first photo the flexible cable was still a bit too long, I'm still experimenting here a bit, but it looks like an extra of 30mm is close to ideal.
On the first photo the flexible cable was still a bit too long, I'm still experimenting here a bit, but it looks like an extra of 30mm is close to ideal.By looking at the PCB design, you will recognize that the key switch is mounted south-facing so that we can abuse the LED slit of the key switch and get the flexible cable from the OLED display through that slit (and the PCB, since the connector for the FPC is on the backside - on purpose, the flexible cable needs some space to move).
Still, I wanted to have individual LEDs so I added a "north-facing" `WS2812B-Mini` which might need a little opening in the keyboard plate if you don't have transparent key-switch housings. Of course the LED is entirely optional, everything will work without the LED, or I could just add them for the "outer-edge" keys and use them for background lightning when covered by the plate.
Here is a brief pin-out of the Poly Keyboard Atom PCB:
![]()
-
A Short History of the Project (so far...)
03/28/2023 at 06:27 • 0 comments")
Yeah what a mess... but that's not how it started.
I was actually just experimenting with displays/Arduino and coincidentally found out that one of these displays had the size of a keycap (it was a 0.49" 64x32 OLED display on a PCB with an I2C interface):
![]()
The size was less than 1U (19.05mm), but still too big to fit into an ordinary keycap as the get smaller towards the top.
Therefore, I just 3D printed some custom ones with transparent PETG:
![]() The keycaps are in fact not as blurry as they look like on the picture.
The keycaps are in fact not as blurry as they look like on the picture.After some experiments, I figured out that it was possible to control an arbitrary number of displays by settings the SCL (clock) line via a shift register so that only the displays I want to update really receive a clock impulse (that means that all shift register outputs are connected to the displays SCLs). On top of that the shift register can be controlled via SPI, which saved my from the effort of writing the bit-bang code...
Smol Display You Need!
So that worked, but I was not really satisfied with the 3D printed keycaps, as they are a bit strange if you are thinking about building a full keyboard, which at this stage became a fixed idea.
It took me some time to find even smaller displays, but luckily I came across this 0.42" OLED display which is sold in bigger quantities on Alibaba for about 1$ each!
![]()
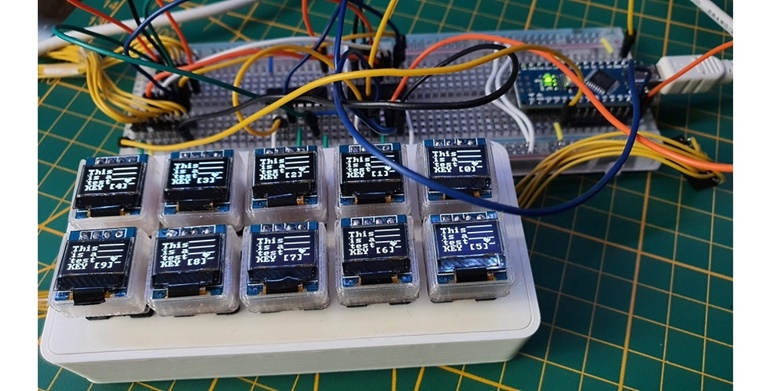
Stripboard with ESP32
My first breadboard setup was controlled by an ESP32 I wanted to try out, and I spent a felt infinity to control the brightness. Eventually, it worked out and I decided to solder together this stripboard you saw at the beginning for a 4 key/display setup:
![]()
These 0.42" displays only support SPI and that's why I switched to used the shift register to pick the right CS line which in the end felt much better than the hack with the I2C SCL line.
Switch to STM32 MCU
After some early attempts of writing the key input and HID code myself using some Arduino libraries I did more research of what people usually use for custom keyboards and came across QMK Firmware. It has been used for countless keyboards including DIY and more commercial projects, so I figured that it would be a perfect fit for my project
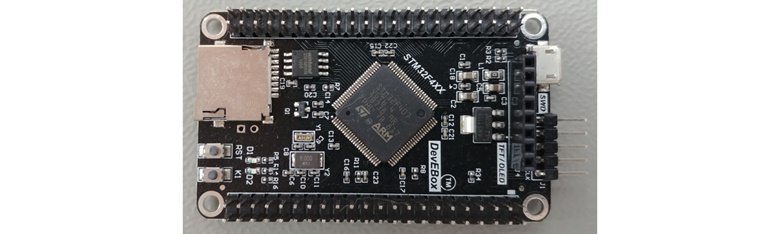
As it turned out, QMK does not support the architecture of ESP32, only AVR and ARM based chips which made me switch to the quite powerful STM32F407 (for dev purpose I thought it would be good to have plenty of IO pins, at that time some STM chips were still available for 'normal' prices).
Unfortunately, I had to add support for the STM32F407 myself, but the QMK community was very helpful and provided enough guidance to get that chip support into the repository. Yay!
![]()
Just before the chip shortage started to ramp up I got my board, 2 years later the price tag has reached heights beyond comprehension.
Maybe it's not a surprise, but I switched again the MCU to the RP2040, but that will be part of another post!


 On the first photo the flexible cable was still a bit too long, I'm still experimenting here a bit, but it looks like an extra of 30mm is close to ideal.
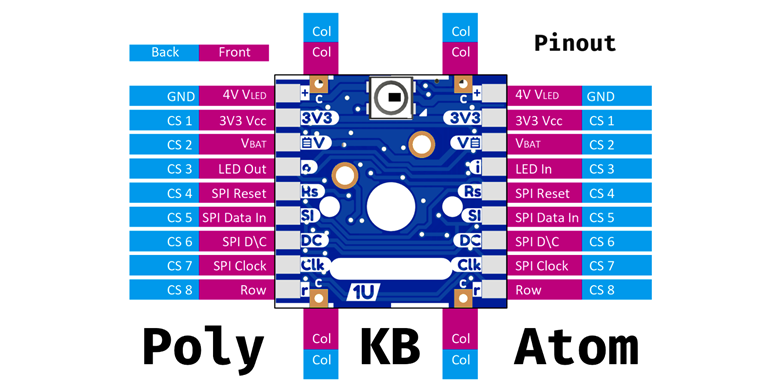
")
 The keycaps are in fact not as blurry as they look like on the picture.