thpoll
-
Flashing both halves at once! And more ;)
06/06/2026 at 10:13 • 0 commentsThis is the one I'm quietly proud of! Until now, updating meant pulling the repo or dragging a .uf2 onto both sides. The usual procedure: Boothloader mode, copy .uf2, wait for reboot, unplug and plug the other side, and repeat... no more!
1: My host app now checks GitHub on startup and tells you when there's a new version for the host app and the firmware.
![]()
![]()
2: The best part: The keyboard can now update itself in place!
So it first downloads the firmware and puts it into a staging area in the flash memory on both halves. If the checksum matches, it applies the new firmware and reboots. So no more unplugging or bootloader mode, just click the update and ... done!
![]()
It's brand new, so I'm still shaking out the edge cases — but the basic loop, "there's an update, click & done", works end to end. It took quite some time, and I made heavy use of AI assistance to find out the details for this feature, but now as it works, it is really cool.
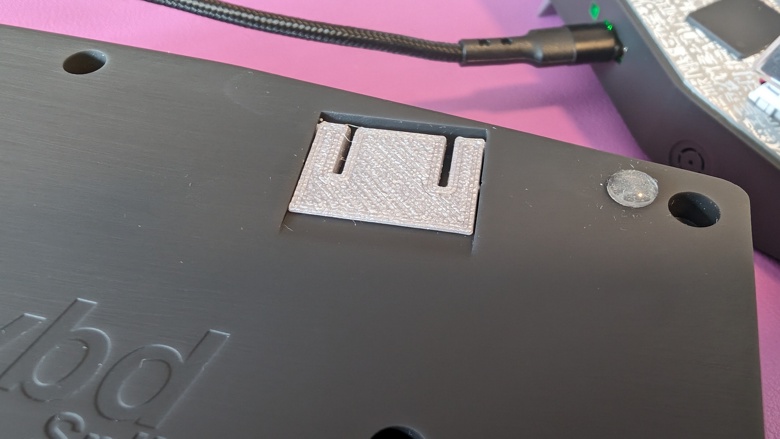
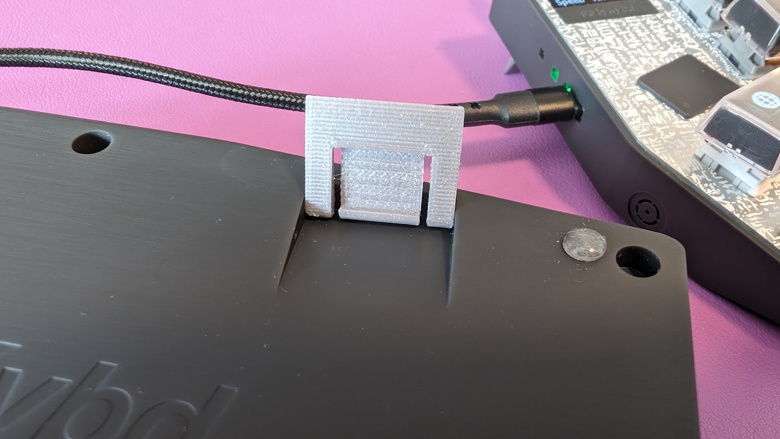
Hardware in the loop (HIL)
Since this new firmware update feature needed a lot of actual testing on the hardware, I thought about a way to get automated testing on the hardware without me always pressing buttons and plugging in cables. As there is no complete RP2040 hardware emulator, I built a little hardware test station out of a Raspberry Pi 4 (in its own repo now). Both keyboard halves, so the real hardware is wired to it, and it can press the reset / BOOTSEL pads electronically — no fingers required (in case needed): https://github.com/thpoll83/polykybd-ctnd
There is a GitHub action on the firmware repo, so that every push kicks off a cloud build, and the Pi takes that firmware, flashes both halves on real hardware, and runs a whole suite of HID tests on its own — while I'm off doing something else! It cannot yet verify the rendering (I need a camera) on the keys, but that is maybe the next logical step.
New Uniode Emoji handling
![]()
Before, I used 2 hard-coded layers for the most common Unicode emojis, but I wasn't that happy, as it left little room for expansion.
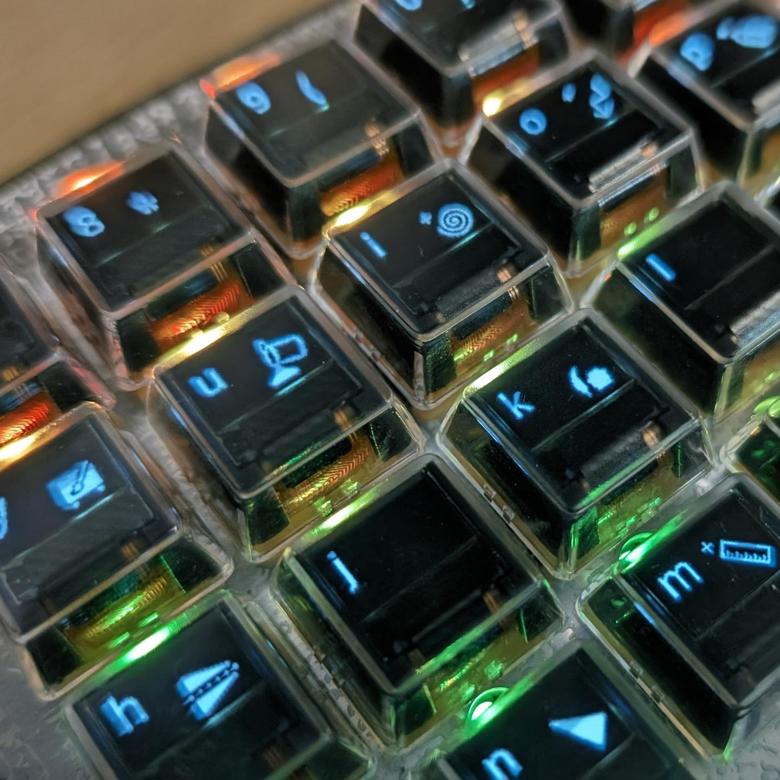
There's now a single dedicated emoji layer: more than a thousand emojis, sorted into a dozen categories — Smileys, Gestures, People & Jobs, Animals, Nature, Weather, Food, Travel, Sports, Tools & Objects, and more. The top row of keys turns into category tabs (each tab shows the first emoji of its group), with arrow keys on the left and right to walk through multiple pages (for the bigger categories). Tap a key, and it types that emoji via Unicode input 🥰
Not every emoji on earth 🌍 made it in yet, but the common ones are there — and adding more is now just a configuration thing (as long as the Noto Emoji font supports it). Some things do not make a lot of sense for me at this moment: E.g. skin tone shading and color stuff doesn't look great on b/w OLED displays indeed.
On top of that, the pixel font organization got an overhaul — the ~99 hand-written font-conversion commands are now a single config file, and glyphs use full 32-bit codepoints (instead of 16-bit with shifts to keep the actual 32-bit codepoint in the 2-byte character). That's why growing the emoji/symbol set is a one-liner now instead of an afternoon.
That's it - a bit more to show than last time. And as mentioned before, a lot of this came together fast thanks to AI pair-coding.
Thanks for reading, and for the support 🙏
Thomas
-
A few very busy weeks
05/15/2026 at 13:16 • 0 comments![]()
Three repos, and a lot of commits. This one covers firmware, the polyhost software, and the font converter tool — all moving at the same time. Buckle up.
Firmware: RGB Matrix Keys That Actually Feel Good
This was just an annoying little detail I never had time to address: Holding the brightness or hue key now does what you'd expect: it repeats. There's a short initial delay before the repeat kicks in, and then it goes at a comfortable rate. The other change: adjustments no longer write to EEPROM on every single step. The save happens when you release the key. If you're holding it down, you're still deciding — no point wearing out the EEPROM mid-adjustment. With that, I introduced a wider EEPROM read/write cleanup. Only update what is needed, when it is needed :)
Firmware: Suspension Fix
This was the other little annoying detail: When suspending, the RGB matrix sometimes stayed on for the slave side (and also the status displays under some circumstances). I thought the logic was clear; however, I could only figure it out until I made a video of it. There, I could see that it did turn off, but just for the fraction of a second, and then turned on again. After realizing that the synchronization reset the flag again, the fix was also clear.
Adafruit-GFX-Library: Added HarfBuzz
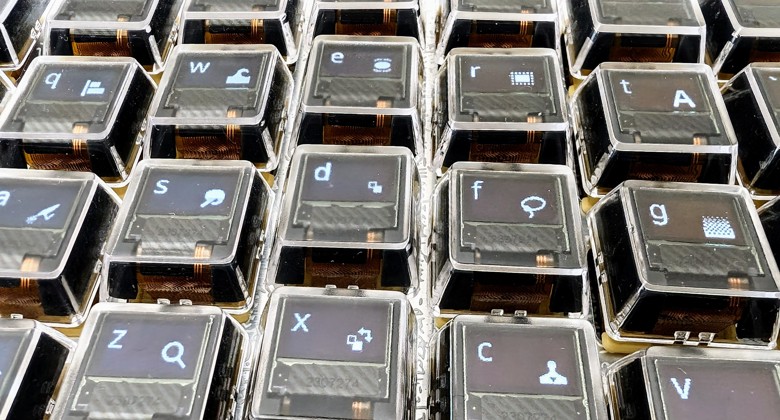
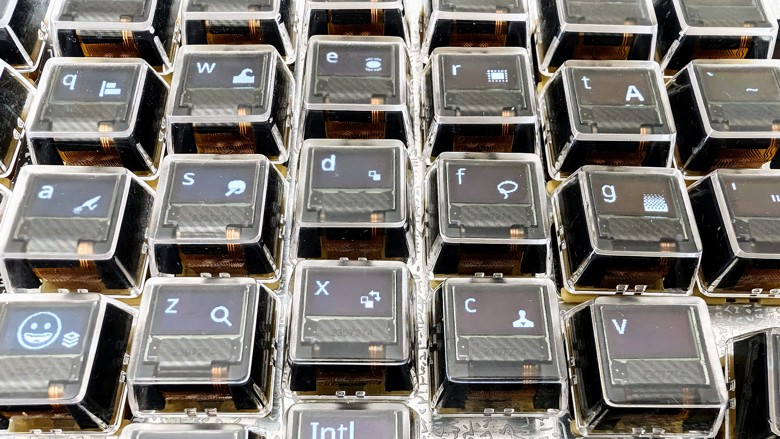
As most readers of my posts know, I do use a modified version of the Adafruit-GFX-Library. The included fontconvert is the tool that converts TTF/OTF fonts into the C header format the GFX library uses for the keycap displays. Until now, each Unicode codepoint was rendered independently. That works fine for most Latin and CJK characters, but it falls apart for Arabic ligatures, Indic conjuncts, emoji sequences, and anything else where multiple codepoints combine into a single rendered glyph.
HarfBuzz fixes this. You can now pass a sequence of codepoints, and the shaper figures out what glyphs they produce, handles combining and reordering, and feeds the results to FreeType for rendering. The output ends up correctly in the GFX bitmap format. This opens the door to a lot of new features. For example, I can now render country flags like Unicode country flags we know - in black and white, of course ;) Granted, it is difficult for some flags and impossible to distinguish all, but it is a nice touch. I still have to integrate that on the firmware side, but my excitement over this feature is really big. To make these flags visually appealing, there is now also an outline rendering, and all kinds of correction possibilities: Gamma, brightness, unsharp masking, ... all these new features were added with the help of AI coding. Here is the result:
![]()
PolyHost: Breaking Free From VIA
I already hinted that in the last post. Since QMK already split from VIA some time ago, I decided to support the dynamic layer setup with my host program. So, you can now change key assignments on the fly without VIA or VIAL (and, with that, I can update to future QMK versions more easily - no hop via the VIAL repository or adding some custom VIA stuff). I already showed it last time, but here is the basic working version:
![]() There is still work left for all the actions, like layer change etc. But I have a good feeling about it.
There is still work left for all the actions, like layer change etc. But I have a good feeling about it.PolyHost: Unit Tests
Again, thanks to AI, I could create a big batch of new tests: device settings, key handling, overlay data, the keymap model, the KLE parser, and the Unicode cache all now have coverage.
PolyHost: Caching Overlays and organizing in an MRU
This is also a feature I wanted to introduce for more than a year. Instead of transferring all overlay images again and again, I just store them once and later send a mapping telling the keyboard where to read the overlay from. So the host has to remember the same mappings and has to decide when to override overlays since the storage is limited, and that is why I use an MRU to make that decision. This feature needed quite some debugging — overlays kept showing up in the wrong places, but I have it now in good shape. It might still need a few fixes, but that is fine. The reason why I do this is that for the mappings, I only need to send 1 or 2 HID messages instead of 10+, avoiding a glitch in the keyboard input (which is the most important).
This time, the update was very technical on the software side. I hope you still enjoyed!
Thomas
-
Steps towards CE Certification & Performance Improvements
02/13/2026 at 10:09 • 0 comments![]()
I have been going back and forth for a very long time on how to get the CE certification done, and decided to join https://early.smander.com/getsmandered-round-0/ to finally get this step done. My hesitation comes from the scary price tags I heard from the CE test labs I contacted. I hope with Smander, I can achieve that without much overhead lending the experience in this process, which I don't have yet. It also feels good to follow a guideline :) Apart from my worries around certification, I have some updates to share:
Increased HID throughput!
In the past, I always felt some slight delay when a new overlay gets streamed to the PolyKybd. This is the known limitation, that HID (in FullSpeed USB2.0) can only transfer one report per msec - so it is deterministic, but also very slow. As I might have mentioned, the host program, therefore, already reduces the data that needs to be transferred to the very minimum. When reading the pixmaps for the program shortcuts, the host program prepares the binary representation of all 4 methods and then chooses the one resulting in the smallest number of bytes:- Plain bytes (so 8 pixels per byte, as these are monochrome pixmaps), which is really only the best option if there is a repeating bit pattern over the whole display. So this is very rare, but the first thing I started with, and it is still supported.
- RLE compressed. So basically counting how many set and cleard pixel are followed by each other. This is almost always better as the plain bytes (except for the mentioned on/off patterns)
- Region of Interest. So, only sending the rectangle that needs to be updated. And this method comes in two flavors: RLE compressed and uncompressed.
While sending only the region of interest (ROI) updates, the number of bytes is greatly reduced. However, a program with shortcuts on a lot of keys can still result in more than 100 HID messages that need to be sent to the PolyKybd. Next to the limitation of one HID report per msec, I also have to decompress the data (and stitch in the ROIs) on the PolyKybd, which also takes some time. For a while, I have been looking for alternatives to get some high speed communication going with QMK, but it looks like this is rather involved, and I haven't found any project doing that. It looks like it would need some rewrite of QMK's USB stack. Still, I managed to do the following:
Activate the second core of the RP2040!
Right, there are two cores on an RP204,0 and QMK only uses one. When starting my research on that, I could not find any reference of a QMK project doing that, so I started my own implementation with the help of the Pico-SDK. It was a rather painful process that also needed some inline assembler... Just after finishing this tricky task, I found out that there is a module called dual-rp, which lets you run some QMK callbacks on the other core. Nevertheless, I'm really happy with my own implementation as I can control exactly the stack usage of the second code (which I keep as low as 128 bytes, as I cannot waste too much RAM for that) and decide precisely what is executed. In my case, the RLE decompression! With that, I can now offload the buffer I got from HID to the second core (core1) and do not block execution, resulting in faster updates when receiving overlay data. I wish I could show you some screenshots, because I'm rather excited about this improvement. Just believe: It's great!
Increase HID report size
QMK uses 32 bytes HID reports and it is possible to increase that to 64 bytes while still staying USB 2.0 compliant. Increasing, however, meant to break VIA compatibility and also needed a QMK modification in the TMK core, which was unnecessary until now. All other code lives in the keyboard's "user space".
The hesitation to give up VIA was quite significant, not because it is particularly great, but because it is convenient to update keymaps. So I, in fact, did a little GUI prototype before really deciding to give up VIA. In the end dared to do so. Also, QMK separated from VIA a while ago, so this will make updates easier, which is a nice addition on top. With switching to 64 bytes, the HID throughput got doubled, further reducing shortcut update time.
Extending the host program for dynamic keymaps
![]() This is my in-progress keyboard layout editor that is now needed, and I would say it will be in a working state rather soon. I'm very pleased that this worked out smoothly, and I can soon update my layout without VIA. Great!
This is my in-progress keyboard layout editor that is now needed, and I would say it will be in a working state rather soon. I'm very pleased that this worked out smoothly, and I can soon update my layout without VIA. Great!PolyCorne Split42
Apart from that, I had some time around Christmas to tinker around and made a Corne Split42 variant of the PolyKybd, which still needs to be tested (I need more time). However, I will give you a small sneak-peak here:
![]()
Best, Thomas
-
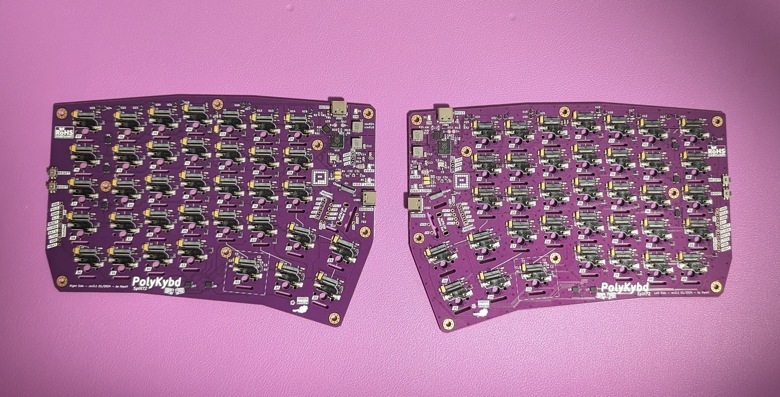
Revised PCB, and other stuff
12/27/2025 at 18:18 • 0 comments![]()
Actually, this is a year-old post that I never published. Please excuse the delay (there are always reasons...), and you may already know by now, but here is the post now:
Even though I already have a fully working PCB (v 3.1), there was yet another revision needed!
As mentioned in the previous post, I had to verify all components for RoHS compliance (needed for CE compliance).
All parts used were advertised as RoHS compliant on the JLC/LCSC website. However, that website only acts as a reseller, and I have to verify the data provided by the manufacturer. Most components thankfully mention compliance in the datasheet, in some cases, I got the certificates from the manufacturer's website. One certificate was emailed to me on request! For a few parts, I couldn't find any evidence for RoHS compliance, and my emails stayed unanswered, so I had to find replacements. That is all done now!
Apart from that, I picked a better quality (well, at least I hope) stepping voltage regulator to make sure there is no issue with that component in the certification process. This was at least some advice from my CE consultant.
Other changes I made, since I was already at it:
- Plated slots for the flex cable slots 🤘 (I asked for that earlier, but in the past, there was a max length limit of 6,3mm that only recently was lifted). That means the edges are smoother. There were no issues with rough edges so far, but I think it will improve the cable's lifetime.
- Improved solder pads for the hot swap sockets of the key switches. I brought that issue up on some social media channels earlier: As it turns out, there is quite a lot of stress on the pads when inserting the key switches. One of my testers had one instance where a pad detached from the PCB. While it was possible to push the socket back in, and the pad (fortunately) stayed connected, it is far away from great:
![]()
After some searching, I found out that this is not uncommon:
![]()
This picture is from a keyboard PCB vendor that is even offering a repair guide to solder on some bodge wires.
My first idea was to increase the size of the pad for higher adhesion and cover the extra area with the silkscreen. After asking around some more on social media, I got to know that adding vias and attaching the copper to a plated hole on both sides will stitch everything together even further.
To sum up the combined solution:
- Bigger copper areas, partially covered by the silkscreen
- Copper on the front side connected to the backside via the plated hole
- Additionally, stitch together copper from front and back using vias![]()
Alright, this is already a year old, and I'm using that PCB version ever since. With that, I can tell you that the improved footprint works well, and I am also very satisfied with the plated holes for the flex cables!
Thanks for your ongoing interest! Thomas
-
Diffusers, Software, CE Stuff and a Video!
12/27/2025 at 18:16 • 0 commentsThere was a long summer break, but I'm still working on this project. So let me give you an overview of what happened.
RGB Light Diffusers
![]()
![]()
Maybe these look like nothing, but they do a good job of making the RGB light more ambient. It's a bit of a pain adding these to every key, but apart from the better lighting conditions, these little pieces make the plate more dustproof, so why not add these?
![]()
Software Refactoring
Why? Because of inconsistencies around how different languages displayed characters that can be pressed in combination with the right ALT (Also Alt Gr) key. While this does not exist on a US keyboard, for almost every European layout, there are some extra glyphs like ¼, ½, or €, that can be pressed together with the right ALT key.
Some examples on a Greek layout:
![]()
I did display them already, but it was not uniform across different languages, and these required some tricks in the spreadsheet, which I addressed now. The spreadsheet looks a bit different now and contains some configuration values for displaying characters.
Apart from that, I now added an outline (clearing pixels) when displaying overlays, so that those icons stand out a bit and are not connected to the letters/glyphs. In the code, I called that courtyard clearing. Maybe I can make that even a bit thicker. See here:
![]()
And the same without overlays:
![]()
CE-Certification Preparations
In order to sell the PolyKybd in the EU, it needs to be CE-certified. For that, I do have some homework to do, for example, checking if every component I used is RoHS compliant (does not contain bad stuff like lead, halogen, etc). In case the manufacturer's datasheet does not mention conformance, I need to look for an alternative part that is certified. Another point will be the EMC (electromagnetic compatibility) test, to make sure the keyboard does not harm/interfere with its electromagnetic environment. This is a bit of a pain point, and I'm already in touch with a consultant to prepare as much as possible.
Video!
Apart from that, I made a video that has been uploaded to the crowd-supply YouTube channel: https://youtu.be/pXc64xxlNH0?si=81lD2oQMmqeYyKZz
I had no idea how to start, but I wanted some camera moves around the keyboard. After a bit of meditation, I decided to abuse the kids' Lego train to do that, and I put that rig together:
![]() After some trial and error, I came up with a slow and steady moving contraption (the Lego locomotive is too fast), and thanks to the stabilization feature of my smartphone, I got a stable video when the camera moved. The close-ups are still not as sharp and dust-free as I wanted them to be (oh my god, I really cleaned it and got rid of grains with the compressed air spray, but..). In the end, I decided that it was good enough and I'm quite happy with the result. It is even available in 4k :)
Here is another picture of the tower for the static takes:
After some trial and error, I came up with a slow and steady moving contraption (the Lego locomotive is too fast), and thanks to the stabilization feature of my smartphone, I got a stable video when the camera moved. The close-ups are still not as sharp and dust-free as I wanted them to be (oh my god, I really cleaned it and got rid of grains with the compressed air spray, but..). In the end, I decided that it was good enough and I'm quite happy with the result. It is even available in 4k :)
Here is another picture of the tower for the static takes:
![]()
What Else?
Thanks to my supporter jkolo I have some more research hardware to look at, but this is a thing for after the first release of the PolyKybd...
Best, Thomas
-
Program Context Driven Shortcut Overlays
05/24/2024 at 16:53 • 0 comments![]()
For a long time, I have been talking about this topic, finally, it's here and I love it!
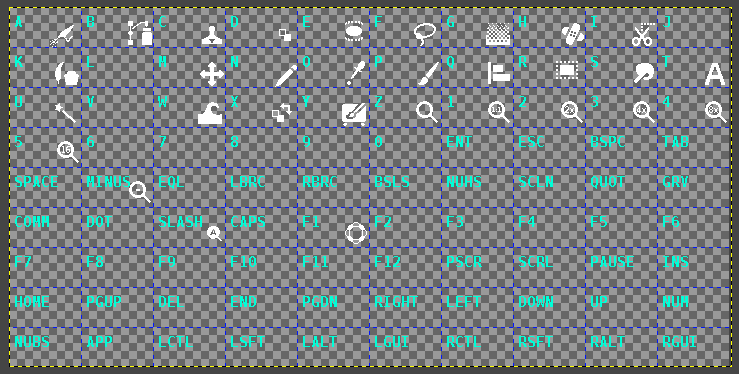
The missing piece was the code that loads overlays depending on the active window. The mapping is stored in a yaml file that looks like this:
Gimp:
  overlay: overlays/gimp_template.png
  app: gimp-2.*
Inkscape:
  overlay: overlays/inkscape_template.mods.png
  app: inkscape.*
  title: .*Inkscape
KiCad PcbNew:
  overlay: overlays/kicad_pcb_template.png
  app: kicad.*
  title: PCB Editor
The fields `app` and `title` are regular expressions (Python). If these match, the `overlay` will be loaded (which can be a list of entries a la [a, b, c]). At least one of the two has to be present. The first entry that matches `app` and `title` will be displayed. The name/key of the block is just used for debugging.
The overlay can be png, gif, jpeg, bmp or whatever Qt allows to load (currently it needs an alpha channel all the time, but this restriction should go away, however, I recommend png as it has lossless compression and you can always have an alpha channel).
The white pixels will be read and turned on. Everything else is ignored. If the name contains ".mods." like "overlays/inkscape_template.mods.png" then the code will split the RGBA channels to the following scheme:
R: shortcuts to display with CTRL
G: shortcuts to Display with SHIFT
B: shortcuts to display with ALT
A: shortcuts to display when no modifier is pressedIn case the name contains ".combo.mods." then the shortcuts will be used for the following modifier combinations:
R: shortcuts to display with CTRL + SHIFT
G: shortcuts to Display with CTRL + ALT
B: shortcuts to display with ALT + SHIFT
A: shortcuts to display with GUI key (not yet, hopefull y soon)For now, I decided to not support CTRL + ALT + SHIFT as it is rather rare, but you can try to convince me (pls. write a comment).
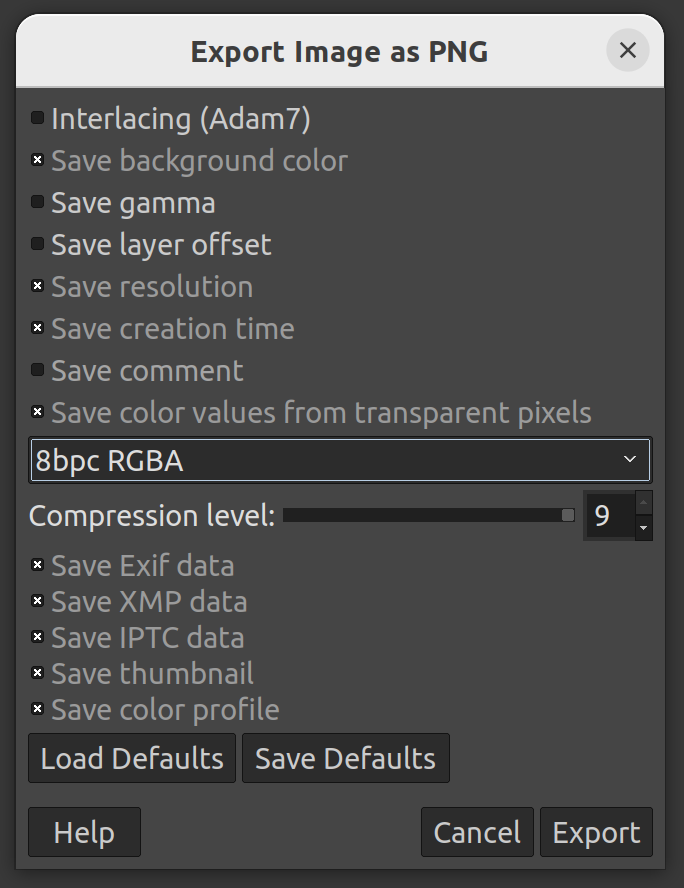
Save the pixel color values even if the alpha channel makes it transparent and set the format to 8-bit RGBA. If you export a png in Gimp there is a dialog to do so (always set "Save color values from transparent pixels"):
![]()
(I first used the Gimp command `decompose` to split up to RGBA channels and before saving the command `compose` can be used again to make a single image out of it - make sure that there are no other channels present, otherwise compose will fail). You can take a look at my gimp files in the "overlays" folder as a reference.
What's now missing, are more overlay files with all the icons needed. I now have the following:
- Chrome
- KiCad
- Gimp (partially, there are really a lot!)
- Inkscape
- JetBrains IDEs
- VS Code
Would be great to have an automatic way for the icon collection...
One More Word On Platform Support
While my current Python library `PyWinCtl` (to make program context shortcuts possible) supports active window reporting for Windows, MacOSX and XDesktop, it lacks an implementation for Wayland.
Today, I came across this sample https://github.com/luisbocanegra/plasma-cursor-eyes that uses a KWin script to report the cursor position to Python, changing that to report the active window should work in the same way, so I'm looking forward to that!
Enjoy your weekend,
Thomas
-
How The Protocol Works
04/21/2024 at 16:46 • 0 comments![]()
To communicate with the PolyKybd, I can depend on QMK to give me HID messages, the so-called reports. All I have to do is to add the raw_hid_receive callback:
void raw_hid_receive(uint8_t *data, uint8_t length)
Even though the callback provides a length parameter, all reports have a fixed size of 32 bytes. For larger packages, you must slice your data on the host side and transfer it in junks.
I started my protocol with a single identifier byte 'P' (because why not) followed by the actual command.
For instance, P0 means: send your identification. P1 means: Send me your currently active language. The PolyKybd answers with "P0.PolyKybd Split72" or with "P1.EN". The dot after the command character means that the command has been understood (the first 2 bytes are always echoed). In contrast, the keyboard replies with "P1!" if there is a problem providing the requested data. Simple :)
However, when supporting VIA (eg. to configure the keyboard layout via the web-browser), I have to stick to the VIA convention. Here, the first byte is already the command and there are 3 different kinds of custom commands (instead of a 'P'):
id_custom_set_value = 0x07
id_custom_get_value = 0x08
id_custom_save = 0x09If the host sends any of these 3 reserved commands VIA will not do anything, but pass on the data to the via_custom_value_command_kb callback:
void via_custom_value_command_kb(uint8_t *data, uint8_t length)
So my solution is to accept either the 'P' or 0x09 (in case of VIA) and the rest can stay as it is (I’m not supporting the 2 other custom command bytes as they are meaningless for now).
So what are the other commands next to P0 and P1?
P2:
Send a list of supported languages, which is a comma-separated list that might span over multiple reports:
P2.EN,DE,FR,ES,...
P3:
Change the language - followed by a byte with the language to use (the index refers to the order as the languages were reported with P2)
P4:
Send a key overlay - followed by a byte for the keycode (so the key mapping) and another one for the modifier key (is this overlay active with Ctrl or Alt?) Since multiple reports ( 15 ) are needed for a single overlay (72x40px), there is one more byte indicating which of the 15 segments is currently sent.
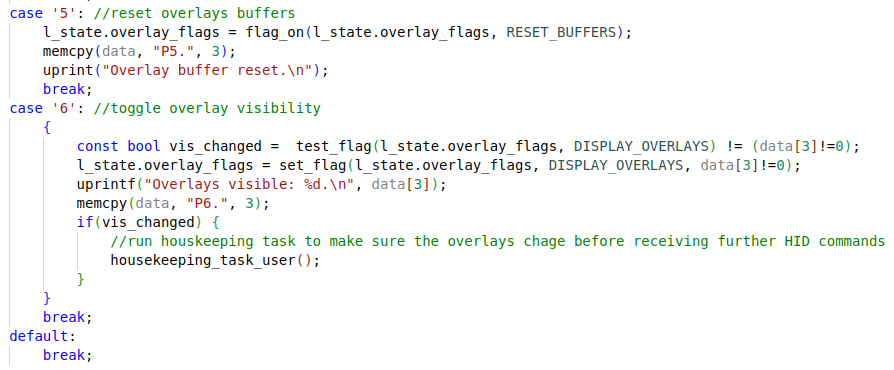
P5:
Reset the overlay buffer (in fact just the usage buffer).
P6:
Followed by a byte to enable (anything != 0) or disable ( == 0) the overlays (whatever is in the current overlay buffer).
That's it for now, but I will need more commands soon.
Refactoring
As I had to transfer the overlays also to the other side, I decided to refactor the communication code. It was already hard to maintain.
It grew complex since I had issues with some of the synchronized data having toggled bits. So I added here and there mechanisms to double-check. It was never bullet-proof and once in a while, some of the displays didn't turn off (plus other small issues).
At some point, I added a crc32 checksum to my custom messages and was surprised to see that there were failures.
First I suspected the cable but it could be also related to the PCB layout. Or could it be something else?
It took me ages to realize that also QMK split communication uses a checksum (crc8). But I'm not sure if that is done on all data packages. I also suspect that crc8 is not enough for longer messages. While I never saw wrong keys reported from the slave side, I could see the wrong layer information for a fracture of a second on the slave side.
When finally refactoring, I got rid of my extra checks and just added a crc32 to every message sent. In case of an error, I just send it again. Layer information, modifiers etc. are now transferred with my own messages (and the QMK split transport for those is disabled).
With that change, I couldn't see any issues like the ones I had before. Even after setting the transfer speed to 2 times faster, everything works fine.
Now adding a piece of code for transferring the overlays to the other side was rather straightforward. And here the result:
![]()
![]()
![]()
I have not yet added the code to respect the modifiers for these overlays, but that will be the next thing to do.
Hopefully, you liked this update!
Don't forget to sign up at the Crowd supply pre-launch page: https://www.crowdsupply.com/polykybd/polykybd
Best Thomas
-
Shortcut Overlays!
04/02/2024 at 21:30 • 0 comments![]()
Alright, so this was a bit harder than expected and I was suffering quite a bit!
Nevertheless, I'm glad to show you the first program shortcuts that have been sent from the computer to the keyboard:
![]()
Some of you might have noticed right away: These are GIMP shortcuts and as I found out... They are quite useful! I looked them up on a cheat sheet first. Not anymore!! 😁
Its satisfying to see the last of the 3 use cases (next to different languages and arbitrary layouts) I originally planned, come to life.
Of course, there is still a lot of work to be done, but as usual step by step.
I organize the shortcuts in images with space for 90 (10x9) keys with each having the full 72x40px resolution. By intention, I decided to pick the full resolution and not just some space for the overlay as this host-driven fully graphical approach feels more powerful than the text-based rendering from the PolyKybd itself. With that, I could do a lot of customizations (different fonts, text sizes, etc...) on the fly without pre-programming it into the firmware.
Here is my current example:
![]()
It's not complete, but it works for my current test scenario.
There are 3 more images needed as the shortcuts usually differ if you press CTRL, ALT or SHIFT. Maybe I put just all together into an image using the RGB channels for the version when pressing the modifiers and the alpha channel for the shortcuts without modifiers.
So why was it so difficult? Good question. I chose Phyton for the host program, so it can be easily changed by everyone and can potentially run on every platform without the need of compilers etc. While I did some work with Python in the past, I never had to deal with image manipulation before.
This is, where my problem started. Without getting into too much detail: It was not easy to find images libraries that work on Windows, Linux and Mac, that have no namespace collision issue a la PIL and Pillow and run together with Qt (openCV doesn't). I settled on the obvious choice of NumPy and used imageio for loading the image data instead of PIL. Maybe all the Python wizards are laughing now and could have done it during lunch break, but believe me when I tell you it took me multiple days (sure I'm not working on this full-time). Besides that setup issue, it also took me some time to prepare the data (slice the image to the individual overlays, encode them as monochrome bitmaps, transfer only entries with actual content...) so it can be understood by the keyboard and its HID protocol.
In case you want to take a look at it: https://github.com/thpoll83/PolyKybdHost The most recent firmware will gladly accept the overlay, but not transfer it to the other side, that is still something I have to do.
Be warned that I just tested it on Linux and it is not intended for a real user.
And Here Is Some Other News!
I will talk about the PolyKybd at Hackaday Europe 2024 on the 13th of April, 3pm!! The lineup is not yet announced, but I will add a link as soon as possible. Let me know if you will be there as well!
Best, Thomas
-
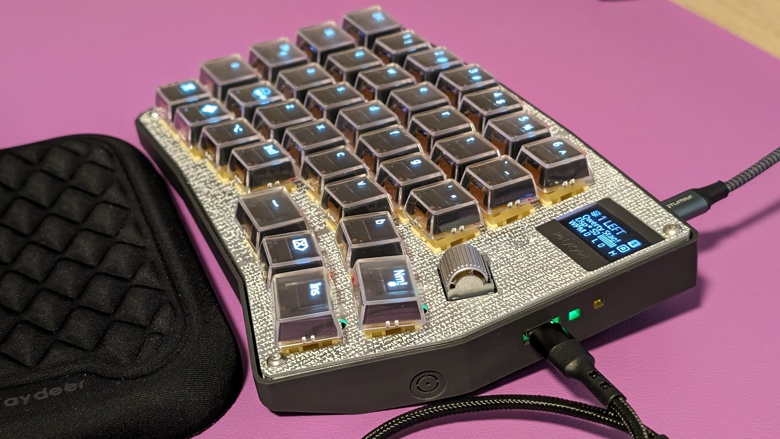
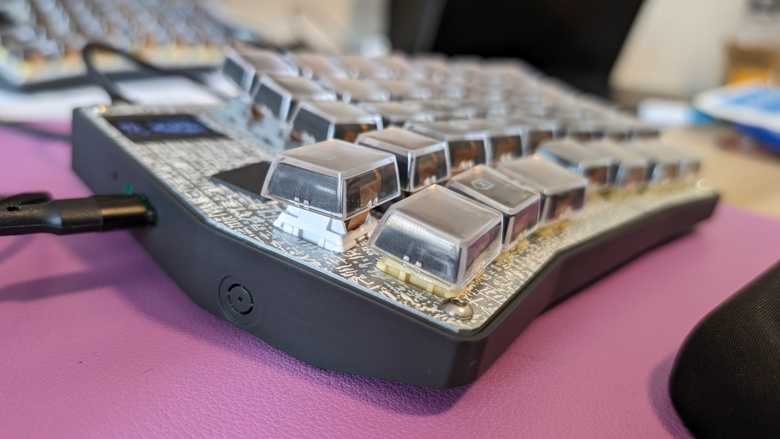
Prototypes are out for Testing!
03/15/2024 at 19:22 • 0 comments![]()
Right, so there are 4 prototypes in the wild! The first one will stay at Crowd Supply for pictures etc, so actually not so much for testing, but more as a reference and display. The second one just arrived today at my most loyal supporter Chad. Hope you enjoy putting your kit together! Of course, I am very curious to get some feedback from you :) The third PolyKybd is currently in Germany. I handed it over to 0x17, who organized CCH Con this year in Reutlingen. Hopefully, he can pass it on to some other testers soon. All these boards are hardware revision 2.2.
The last one is a ...ahm... a "Frankenboard" with one side having revision 2.2 and the other side is a revision 3.1 board. It stays with my good old friend cbirklbauer as my most and highly trusted software engineer of choice.
I hope your comments and observations will improve the software quality which is still a bit rough, but we will get there :)
So what is different with revision 3.1? Not that much! I exchanged the RGB LEDs as the WS2812B-Mini-V3 a lot of times had manufacturing issues. With the new XL-3030RGBC-WS2812B, I haven't had any issues and they appear to be a bit brighter. Another component, I exchanged, is the socket for the 14pin ribbon cable of the displays as the original part has a production delay of about half a year.
The only real functional change is a fix for the USB-Sense. With that, the keyboard can tell, which side is connected to the host (and then handle the logic and communication). In revision 2.2 the software does that by detecting a USB connection. That works in most cases, but maybe not for some older BIOSes or in case you power up the keyboard via an active USB-Hub without a PC connected to it. This should be fixed in 3.1 as I can assume that the side with the power, will be the host side.
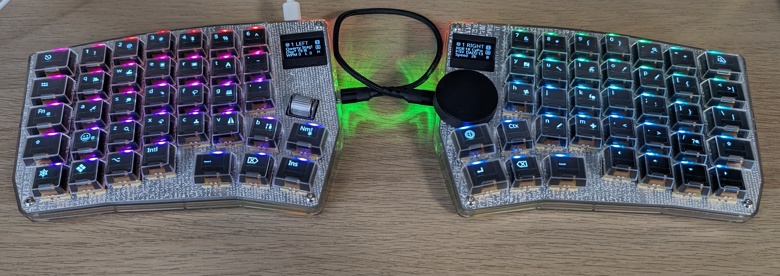
Just a few days ago, I assembled the first two PolyKybds with both sides on revision 3.1:
![]()
A low-profile version with Tecsee Medium switches.
![]()
And here is an experiment where only R1 has low-profile switches. Let's see how comfy that is...
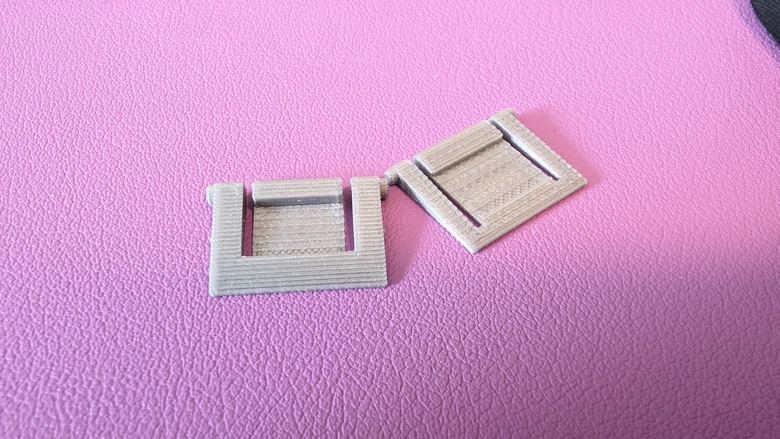
Other than that, I had to do some number-crunching to make sure, that the Crowd Supply campaign will be financially sound. There is nothing I can show you, but these tasks also have to be addressed. The only productive side-task I had, was the construction of the legs:
![]()
Looks like a fit:
![]()
![]()
If these legs are not enough, I encourage you to come up with a custom tenting solution.
For that, there are a couple of holes on the back and some pre-perforated holes on the side, which you could drill or break out. Either glue in some threaded inserts or just a 3D-printed stand/leg of your choice!
Best, Thomas
-
OLED burn in?
01/28/2024 at 16:03 • 0 comments![]()
Of course, we all heard about that, there are plenty of articles and videos out there.
Maybe the more important question is: Will this be a problem for the PolyKybd?
To find out let's take a look at my current Prototype, which I now use for 3/4 of a year - I even bring it to the office, so it is used all day long at least 5 days a week.
Before looking at the first picture let me mention that you will see some lines flickering (some lines appear lighter on the pics) here and there because of the refresh rate of the display not being synced with the camera sensor.
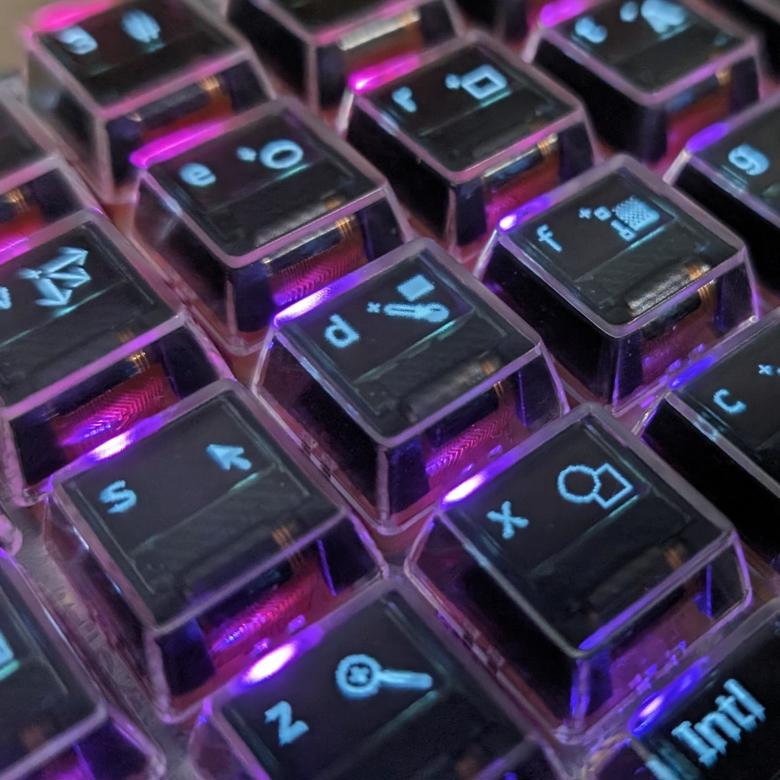
Here, we see the left side when not pressing any key:
![]()
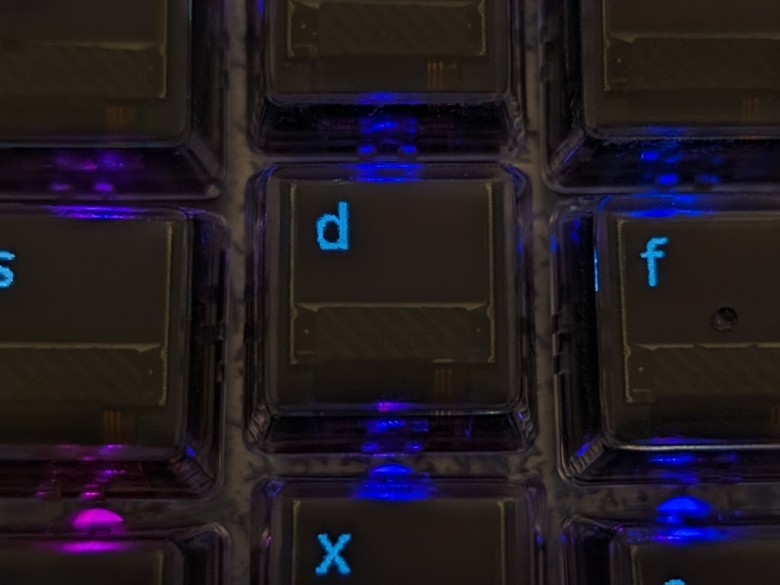
Let's focus on the 'd':
![]()
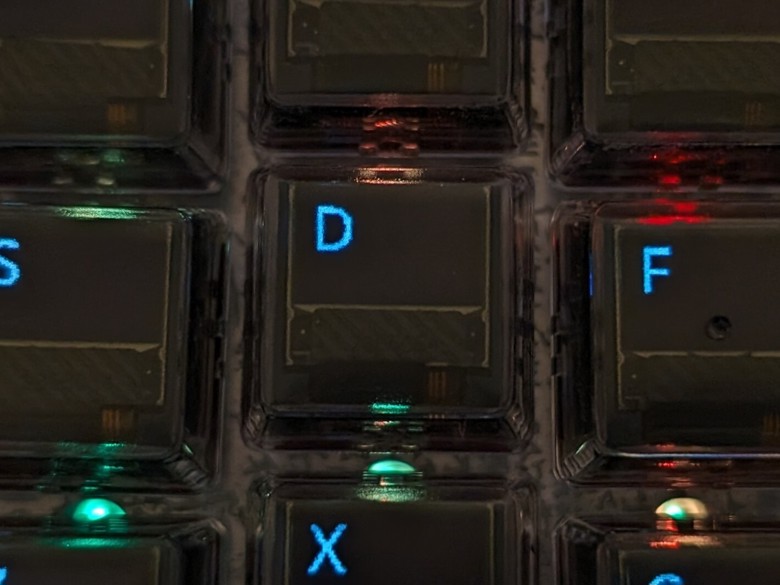
And now let's compare to the upper case 'D':
![]()
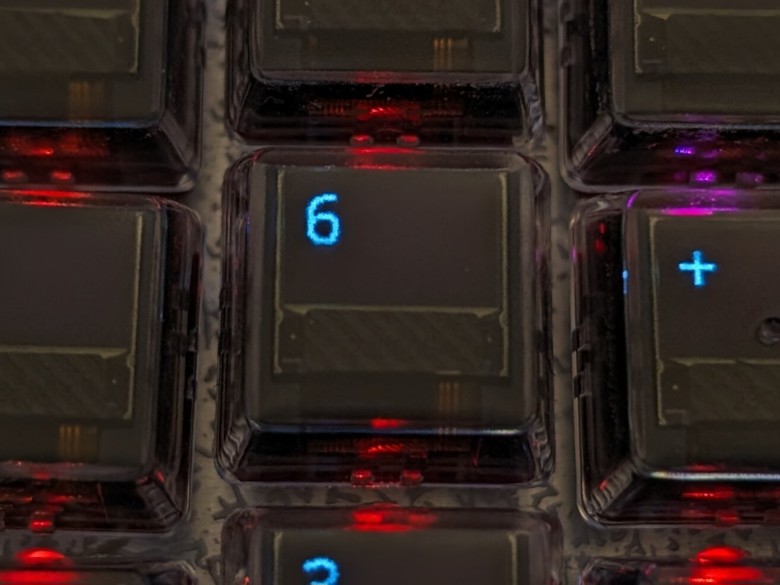
Notice any difference in the brightness apart from the flickering lines? No? How about here:
![]()
Same key, also here:
![]()
As you can see, you won't recognize little brightness differences on specific pixels of the glyph.
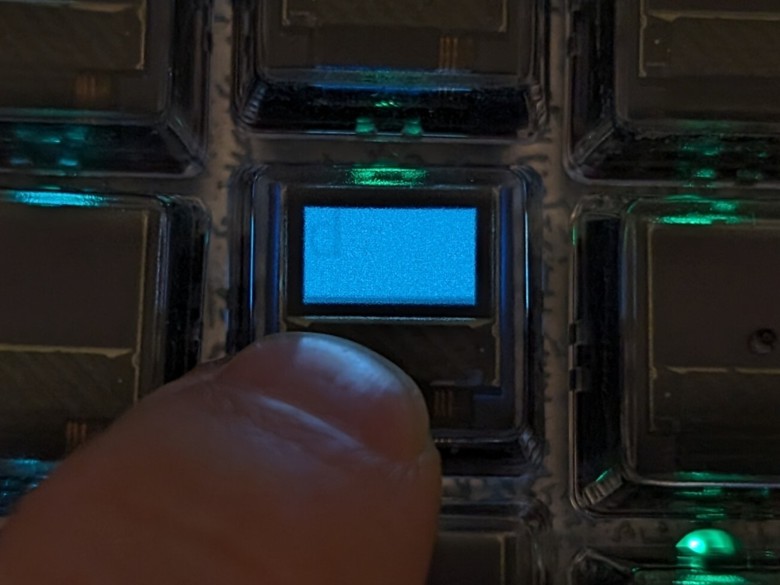
But where is the burn in effect now? Alright, of course, I can forcefully make it visible. For instance, if I invert the whole screen, like that and adjust the brightness and contrast of my camera:
![]()
Now you can see the lowercase 'd' which is displayed most of the time (+ some flickering at the bottom).
So there it is! Yes...
Will it affect your daily work? See the next pictures taken from 15cm (~6 inches) away from the keys (so multiple times closer than your eyes - at least I hope that's the case):
![]()
![]()
![]()
So at this point, I would say: Maybe not.
This is great news. Additionally, let me post similar pictures in a while again to get some more empirical data!
Nevertheless, I'm doing my best to protect the screens:
1) After a minute of inactivity I switch to the idle mode, or as other people call it: "The screen saver mode": In that mode, the displays turn on and off randomly with very low contrast and usually just a few of them at a time. It should give you enough clues to find the right key while avoiding permanently turning on all displays.
2) After another 5 min (or whatever you set) all displays turn off and wait for the next key stroke. You can configure whether that first key stroke should be accepted and forwarded to the PC.
I tried one more measure: To randomly offset the displayed characters by 1 or 2 pixels in x and y. However, that didn't look satisfactory as you can notice little offsets very well.
What do you think? What's your impression? Have you ever had to deal with OLED burn in?


 There is still work left for all the actions, like layer change etc. But I have a good feeling about it.
 This is my in-progress keyboard layout editor that is now needed, and I would say it will be in a working state rather soon. I'm very pleased that this worked out smoothly, and I can soon update my layout without VIA. Great!


 After some trial and error, I came up with a slow and steady moving contraption (the Lego locomotive is too fast), and thanks to the stabilization feature of my smartphone, I got a stable video when the camera moved. The close-ups are still not as sharp and dust-free as I wanted them to be (oh my god, I really cleaned it and got rid of grains with the compressed air spray, but..). In the end, I decided that it was good enough and I'm quite happy with the result. It is even available in 4k :)
Here is another picture of the tower for the static takes:
After some trial and error, I came up with a slow and steady moving contraption (the Lego locomotive is too fast), and thanks to the stabilization feature of my smartphone, I got a stable video when the camera moved. The close-ups are still not as sharp and dust-free as I wanted them to be (oh my god, I really cleaned it and got rid of grains with the compressed air spray, but..). In the end, I decided that it was good enough and I'm quite happy with the result. It is even available in 4k :)
Here is another picture of the tower for the static takes: