Close
0%
0%

Inductive_Dice

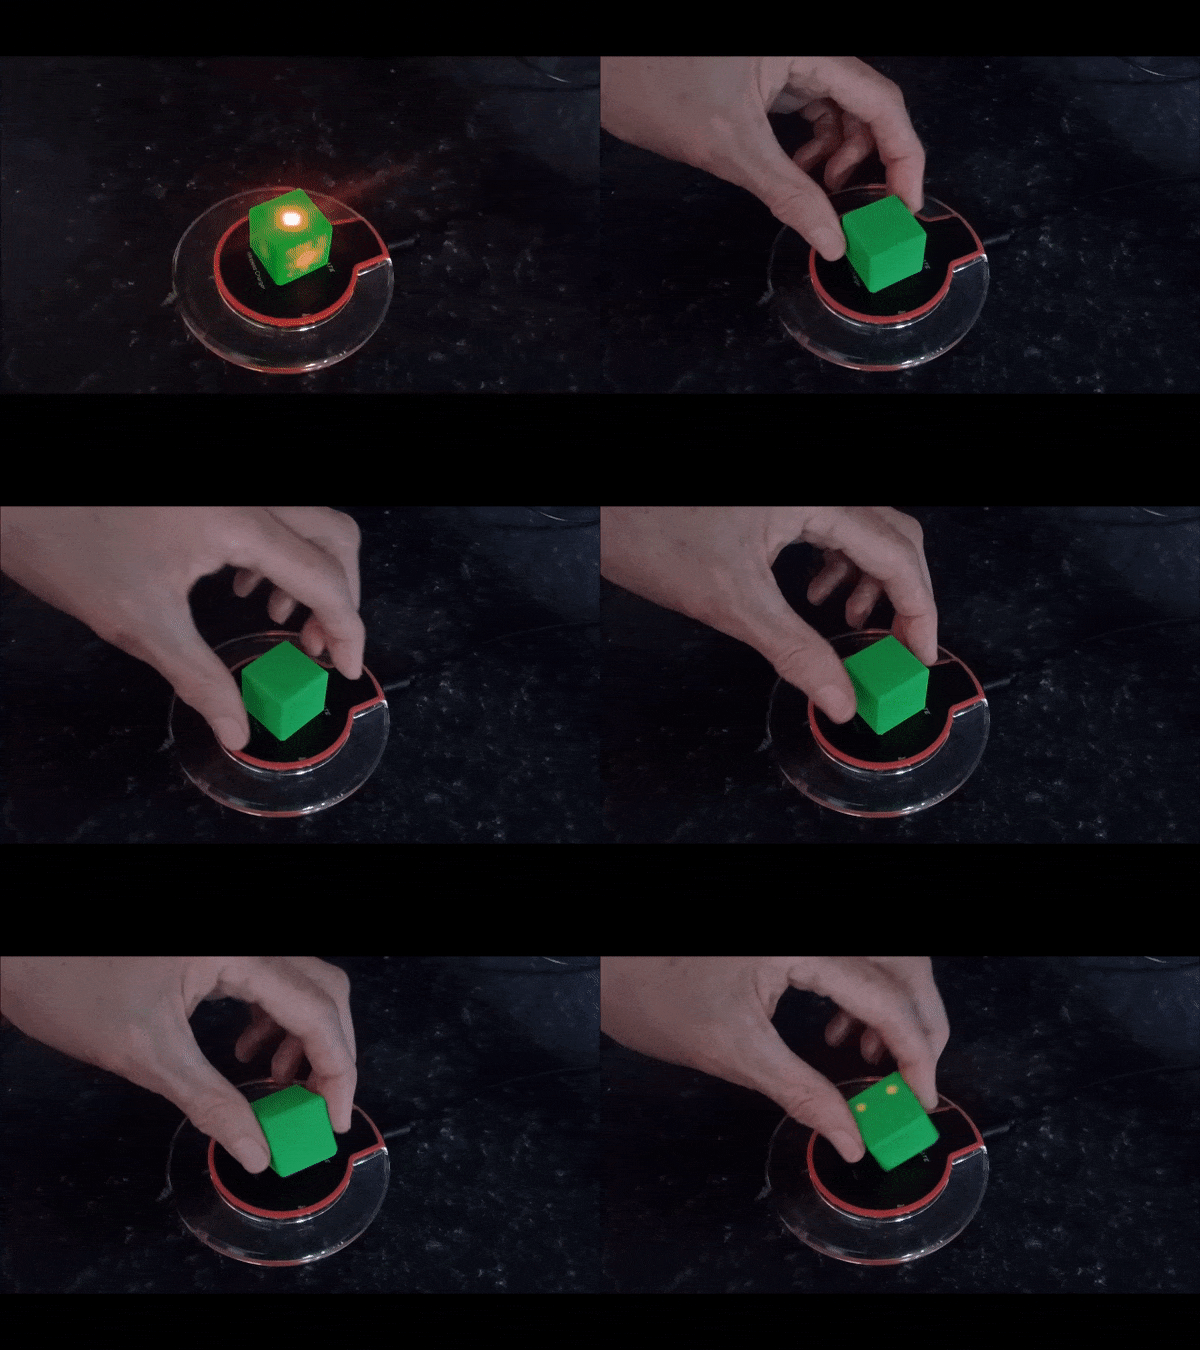
An electronic dice that contains no microcontroller, accelerometers, gyroscopes, compass or batteries. Activation by induction.

Similar projects worth following
A practical application in the form of a dice housed in a 3D printed cube.
Requiring only coils, LED's and a wireless charging pad.
The size of the housed die is 26 x 26 x 26 mm and weights 16g.


CAD Design

The physical structure for the dice is 3D printed.

It will be made up of six identical sides, each containing seven holes to allow the LED's to be positioned to form the dots in the dice and a cylindrical section to support the coil and mount the side on a central support cube.

The central support is a hollow cube with holes passing through each face to accomodate the sides of the dice.

Once the sides have been assembled on the central support the completed elements are housed in a cube consisting of two parts, a main body and lid. No markings are made on the cube surface to identify the numbered sides as this is indicated by the illuminated LED's.

The purpose of the hollow cube is to help support and strengthen the elements of the die, diffuse the light from the LED's and enhance the randomisation.

Circuit

The basic circuit design is the same for each side, an air core coil and parallel wired LED's the quantity depending on the side associated with the die pattern required for the represented number.

The red LED's are surface mount 2mm x 0.775 mm.

The sides are arranged in pairs such that the sum of the LED's on each side adds up to seven.

Coils are connected in such a way that they drive the LED's on the opposite side of the cube.

E.g The coil on the six side lights the LED on the one side and the coil on the one side lights the LED's on the six side.

The coil (~270uH), is made up of ~200 turns of 0.15mm (dia), ECW wrapped on the central form on the back of each side element.

Usage

The inductive dice is thrown in the same way as a standard dice. However, it must land on a wireless charger within the central area encompassing a radius of ~26mm for effective iilumination.

This may be difficult to achieve without an enclosure to contain the dice or simply placing the dice on the charger.

Simply rolling the dice picking it up and placing it on the pad will work unless the sides are marked allowing the numbers to be known removing the random element.

However, an enclosure designed to contain the dice within the central area of the wireless charging pad has been created but that is the subject of another project.
indu_die.png

Layout and connection diagram for dice

Portable Network Graphics (PNG) - 78.28 kB - 05/01/2023 at 23:42

Preview

  • 21 × LED OSRAM1.8 V Red LED SMD, PointLED LS P47F-U1AA-1-1
  • 1 × Enamelled copper wire 0.15mm diameter Copper Wire
  • 1 × Tinned Copper wire 0.51mm diameter Copper Wire

  • 1
    ​Circuit Assembly

    Coil Winding

    The basic assembly process is the same for each side.

    Create a free end of ~60mm of wire and wrap 200 turns of wire around the central former of the side element, trying to ensure that the windings are tight and evenly spaces. Due to hand wiring there will be some variation in the coil due to turns, wire spacing and overlapping but not enough to significantly effect operation.

    Slide a 6mm tube wrapped with tape into the centre of the former wedging it in place makes it easier to hold and wind the coil.

    Once complete secure the free end and cut the wire leaving 60mm and tape to the back of the side element.

    The free end lengths of 60mm are to allow easy manipulation during assembly and test and can be trimmed as required as the side pairs are fitted. Better at this stage for wires to be too long rather than too short.

    Apply clear lacquer or varnish to the coil to hold the winding in place.

    LED Wiring

    The LED's are held together on a wire frame made up of 2 U shaped sections formed from tinned copper wire.

    Using one of the sides as a template and using pliers to form the wires.

    One section follows the outer perimeter of the side aligned to the holes. Try to keep this as close to the holes as possible, to reduce the likelyhood of contact with neighbouring sides when fully assembled.

    The other section aligns to the perimeter of the side but on the opposite location of the holes closest to the coil former.

    In order not to damage the 3D printed side whilst soldering a template was created by tracing around the edge of the side element and the holes on card.

    Decide on the polarity orientation of the LED's and maintain this for all the LED's on all of the sides for consistency and to aid troubleshooting in the event of issues.

    Numbers 2, 4 and 6 are the simplest configurations as they do not use the central hole.

    Position and tape one of the U shaped wires on the card aligned with the hole positions and sit the LED's to be soldered in the hole positions and solder in place.

    Position and tape the other U shaped wire on the card aligned with the LED's and solder to complete the attachment.

    Cut the excess wire leaving two parallel 5mm stubs, these will be used to connect the flexible wire from the appropriate coil.

    Test with a meter in diode/continuity mode, the LED's should illuminate (verify correct lead orienation from the meter). If they all do not light check for shorts and/or opens with a meter.

    Separately or inaddition to testing with a meter verify operation with a coil.

    Test the LED's on the frame work by clipping the ends to the coil and place the coil in the centre of the wireless charger all the LED's should flash. If they all do not flash check for shorts and/or opens with a meter.

    A dry assembly of side elements prior to finally connecting the coils can be tested with a meter to check for shorts with neighbouring sides as it is easier to make adjustment before the coils are wired.

    The same process applies for the numbers 3 and 5 with the exception of the centre LED which is attached by flexible wires which are looped via the channel under the coil.

    For number one the LED is soldered directly to the associated coil wires.

    If everything is fine at this stage apply clear lacquer or varnish to the framework to insulate the wiring.

    Assembly

    The side elements are attached to holes in a central cube by the top rim of the coil formers.

    Assembly is conducted in pairs.

    Attach the number 6 side to the central cube and directly opposite to this attach the number 1 side.

    Trim the free ends of the coil wires to reduce the wire length to minimise stray coupling.

    Strip and tin the free ends with solder.

    Solder the number 6 side coil to the number 1 side LED.

    Solder the number 1 side coil to the number 6 side LED frame work.

    Test the two sides operate independently by placing each side in turn on the wireless charger.

    When the number 6 side is placed on the charger, the number 1 side LED should flash.

    When the number 1 side is placed on the charger, the number 6 side LED's should flash.

    If there are no issues secure the sides in place with glue, ensuring these are square and parallel so as to prevent issues when fitting in the hollow cube to protect the assembly.

    Test fit with the hollow cube to ensure a smooth fit and file any rough or high areas.

    Next select another number pair 5 and 2 and repeat the assembly and test process.

    As more sides are added ensure that the proximity of the frame work outer wire does not short with neighbouring sides.

    This will be evident during the testing process if sides not horizontally aligned and in contact with the charger are illuminated during testing.

    If necessary reapply the lacquer/varnish and/or insulate the frame work with a strip of clear tape.

    Repeat the process for number pair 4 and 3.

    Once all the sides are in place and the cube is complete, test to ensure all the sides behave independently and remedy any issues if found.

    The size of this assembled is: 20(L) x 20(W) x 20(H) mm

    Hollow Cube Fitting

    The purpose of the hollow cube is to protect, support and strengthen the elements of the die, diffuse the light from the LED's and enhance the randomisation as no pips are visible on the exterior.

    It just remains to finally put it in place in the hollow cube and fit the lid. The lid is a push fit and should stay in place.

    But for added security, subject to use apply a little glue around the rim if required. The downside is that this will prevent easy removal should this be required.

View all instructions

Enjoy this project?

Share

Discussions

Similar Projects

Does this project spark your interest?

Become a member to follow this project and never miss any updates