Peter Walsh
-
Marking metal with a laser cutter
12/01/2022 at 19:52 • 0 commentsSummary:
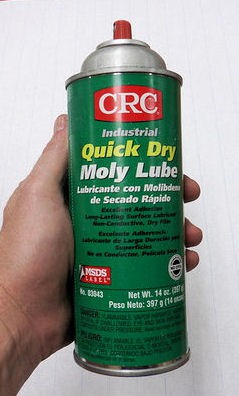
Dry Moly lubricant can be used with a laser cutter to mark metal. This is widely available at auto parts stores, and much cheaper than Cermark.
You can use this process to, for example, put your logo or printed text on metal enclosures or milled pieces. The markings are permanent, and won't come off short of scratching the metal.
Overview
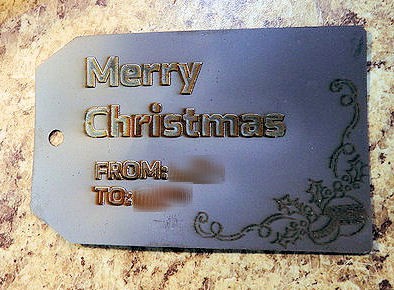
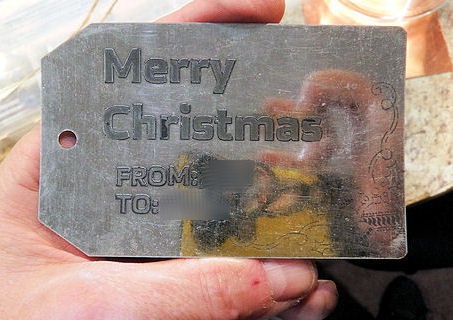
I wanted a metal Christmas gift tag, and decided to mark it using the laser cutter at the local makerspace.
(The metal tag is an in-joke, having to do with preventing woodpeckers from damaging my house. No, really: woodpeckers. The recipient will get the joke.)It's well known that Cermark can be used with a laser cutter to mark metal.
What's less well-known is that dry moly lubricant can be used for the same purpose. When marked by a laser cutter, the laser sinters the molybdenum into the metal (so I'm told), making a permanent mark on the metal.
The mark is fairly robust, and won't come off short of scratching the metal.
Dry moly lubricant is available at most auto parts stores, and is much cheaper than Cermark.
![]()
Step 1: Clean the metal
Clean the metal piece using alcohol and let dry.
![]()
Step 2: Spray coat the piece with Dry Moly
Moly sprays on like paint, but it's not liquid or sticky so it doesn't get everywhere.
![]()
Step 3: Allow the lubricant to dry
Despite appearances, it takes some 20 minutes for the lubricant to dry. It's ready when the coating doesn't smear (like paint) when handled.
![]()
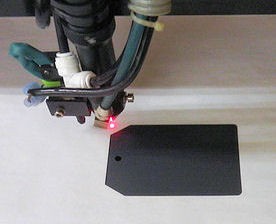
Step 4: Etch the pattern, using a laser
You want the metal to heat up at the focus point of the laser, so use high power and slow speeds.
For our 80 watt laser, I used 100% power and 10 mm/s for the bitmap (etch), and 100% power and 1 mm/s for the line etching. The lines probably came out too heavy for this application, next time I'll back off on the power or increase the speed.
![]()
![]()
The border decoration (ornaments and curly lines in the corner) looks really nice on the final tag, but doesn't photograph too well due to the tag's mirror finish.
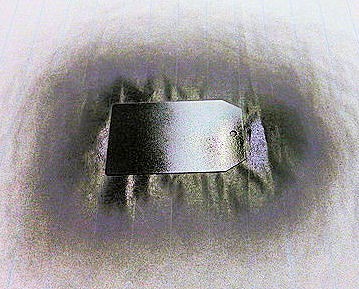
Step 5: Clean off the unsintered moly
The dry moly comes off easily with alcohol and a paper towel.
The shiny tag doesn't photograph well, but the intricate ornament work in the corner looks really nice.
![]()
Notes for future jobs:
The excess heat from the laser caused 2 bits of the anodized surface to come off, notably in the "r" character of "Christmas" below.
I don't care about that for this project, and it's only a problem with anodized surfaces anyway... but if I had to do it over, I'd reduce the line power and maybe split the job into segments to give the metal a chance to cool down in between.
-
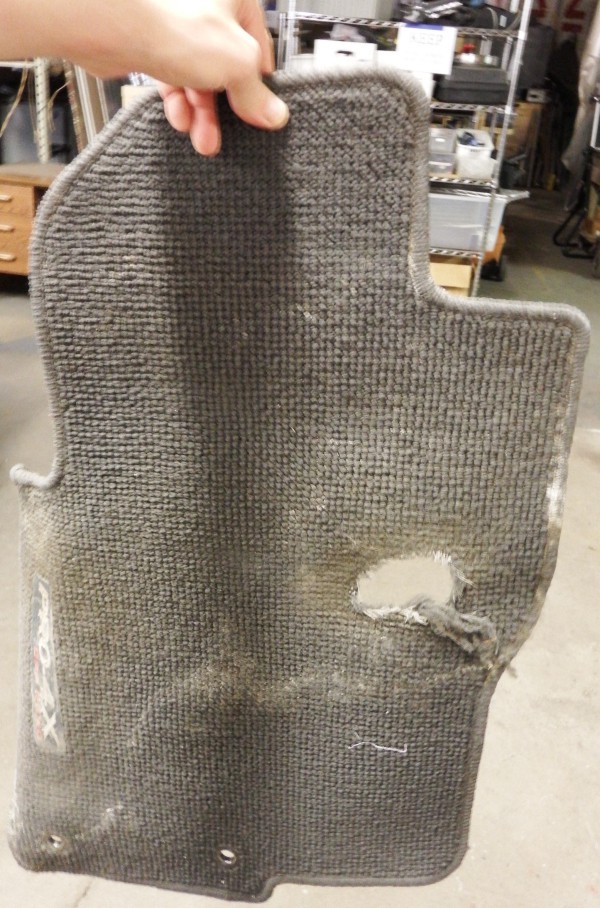
Fixing a vehicle floor mat, redux
12/01/2022 at 18:33 • 0 commentsSummary
Fix the hole in your car floor mat.
This is not really a hack, just an odd use for a laser cutter.
This is the 2nd time I've had to fix this mat. The first time was seven years ago, and since then the repaired section has itself worn out and needs replacing.
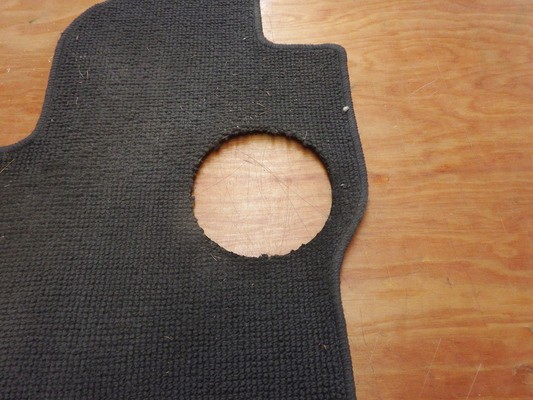
The problem
The floor mat in my truck has a hole, right under the gas pedal.
![]()
The solution
I noticed someone on Craigslist had brand new toyota floor mats on the "free" list. Apparently the new mats came with a used vehicle they purchased, and they didn't need the mats. So for the price of driving 10 miles I got some "new carpet" stock for repairing my own vehicle carpets.
The new hole in my mat was on the edge of the original hole (the newly worn section was on the border of the original mat and the repair carpet), so in retrospect the original repair was off center a little.
To compensate, the new repair will use a larger cutout.
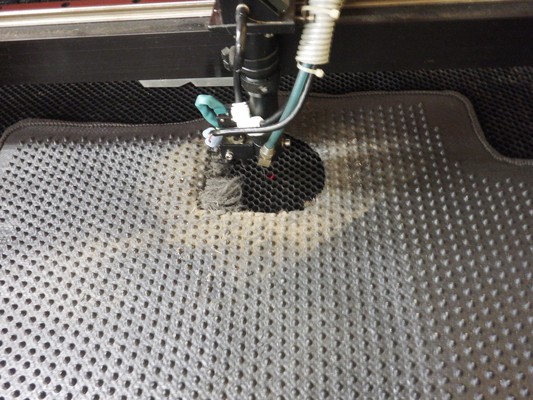
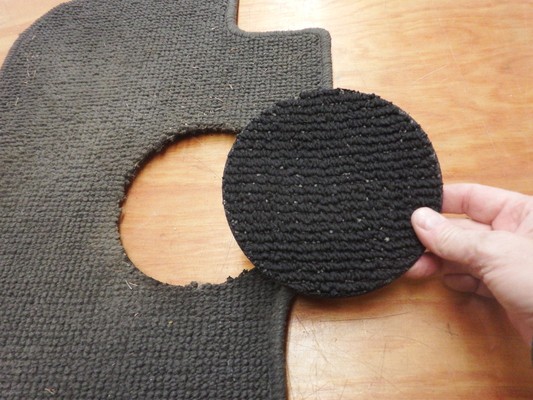
Step 1: Debriding
Center the laser on the carpet pad, and cut out a 150mm circle.
![]()
![]()
Step 2: Make a replacement
Cut a similar hole in fresh carpet
![]()
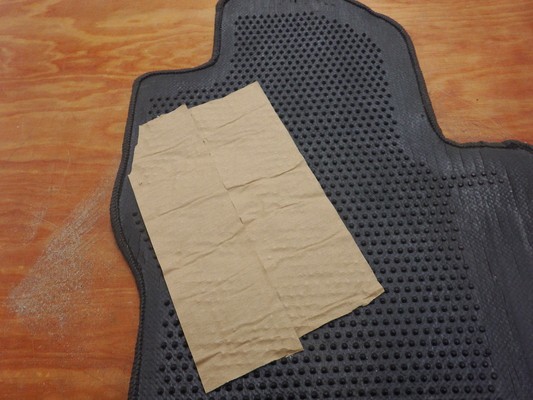
Step 3: Apply carpet tape
Using carpet tape, fix the newly cut replacement to the original pad.
![]()
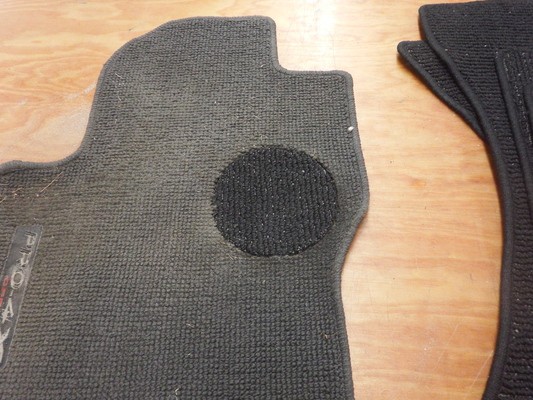
Step 4: Final results
I don't really care that the color doesn't match my original pads exactly, it's just nice to have a fresh piece of carpet under my foot. Seven more years of use on that carpet!![]()
-
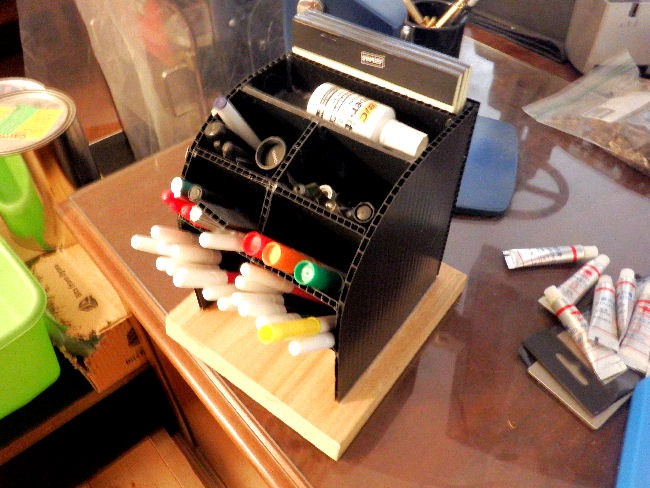
Free stock for your laser!
11/01/2020 at 16:23 • 2 comments![]()
Political signs make great cutting stock for CO2 lasers, and starting Wednesday you can get a boatload of them for free!
The official term for the stiff material is "corrogated plastic"(*), and it's basically corrugated cardbord using polypropylene instead of paper. It's light, stiff, strong, and waterproof.
Here's a desk organizer made from it. The pieces were lasercut and then hot-glued together. (Then glued to a wooden base.)
![]()
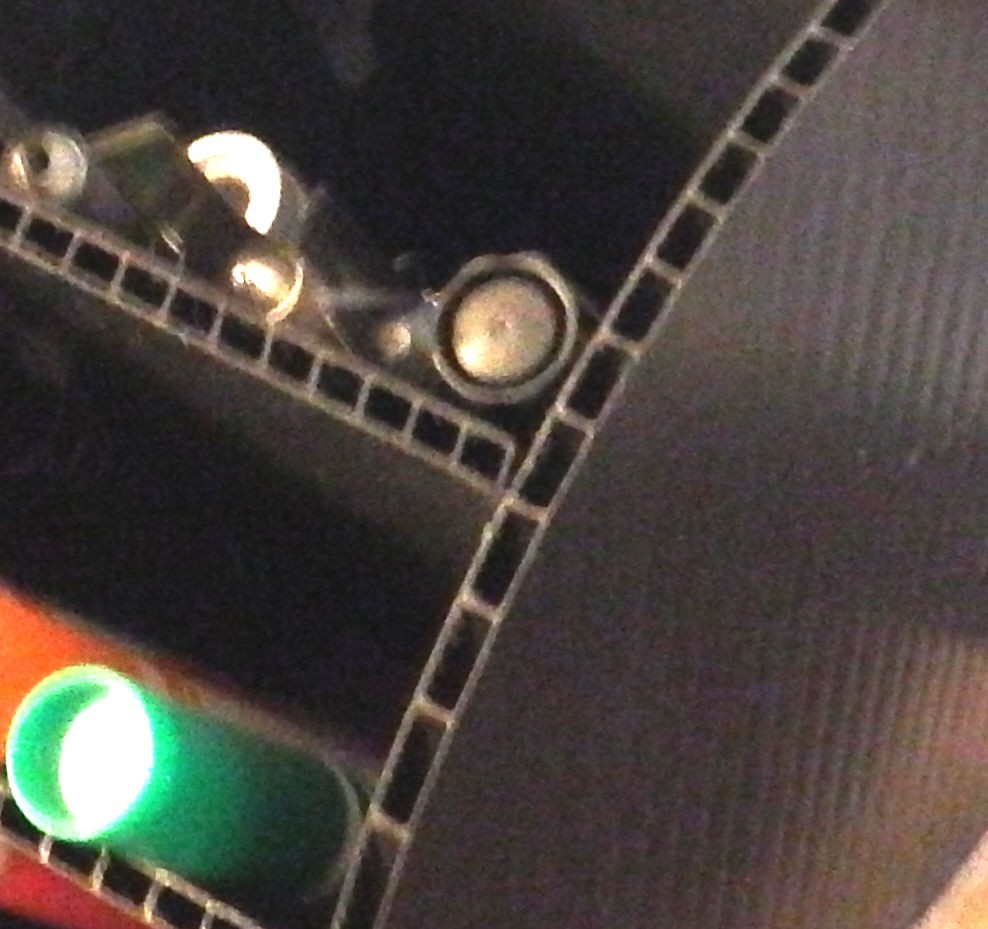
Here's a closeup showing the corrugation style of the board.![]()
Some older types might be PVC, and you shouldn't cut these on the laser, so be sure to perform a flame test on anything you find before you start cutting. Modern signs should be polypropylene, which is fine to cut.(*) Some trade names: Cartonplast®, Polyflute, Coroplast, FlutePlast, IntePro, Proplex, Correx, Twinplast, Corriflute or Corflute
-
Connecting USB lasers to linux
10/16/2020 at 16:01 • 0 commentsOverview
This post explains how to troubleshoot and fix USB laser cutter connection problems on linux.
More specifically, if:
- You have a laser cutter
- Your cutter communicates via USB
- You are trying to communicate with linux
- Your software cannot talk to the laser
...this post will take you through the steps needed to troubleshoot the problem.
Step 1: The Quick Fix
If you are reading this post for the first time, see if this fixes your problem.
In a command window, type:
> sudo usermod -a -G dialout $USEREnter your password when prompted, and if no error is shown reboot your system.
If your software now works with your laser, you're done: It was a permissions problem, you fixed it, you can stop reading.
(Note: enter the command literally as shown, including the $USER field. $USER is a variable set by the command prompt containing your login name.)
If this does not fix the problem, the next steps will help you identify where the problem is, and give some suggestions on how to fix it.
Step 2: Hardware/Electrical
The first step is to check the physical USB connection to your laser.
With the laser disconnected from your computer, in a terminal window enter "lsusb" to list the USB devices. (Note: "lsusb" is one word, no spaces.)
Without rebooting, connect the laser to your computer and enter "lsusb" a second time.
Look for an extra device in the USB listing, one that appears after you connect your laser.
For example, on my system I see the following:
Before: > lsusb Bus 002 Device 001: ID 1d6b:0002 Linux Foundation 2.0 root hubBus 006 Device 001: ID 1d6b:0001 Linux Foundation 1.1 root hub Bus 005 Device 001: ID 1d6b:0001 Linux Foundation 1.1 root hub Bus 001 Device 001: ID 1d6b:0002 Linux Foundation 2.0 root hub Bus 004 Device 001: ID 1d6b:0001 Linux Foundation 1.1 root hub Bus 003 Device 001: ID 1d6b:0001 Linux Foundation 1.1 root hub
After: > lsusb Bus 002 Device 001: ID 1d6b:0002 Linux Foundation 2.0 root hubBus 006 Device 001: ID 1d6b:0001 Linux Foundation 1.1 root hub Bus 005 Device 002: ID 0403:6001 Future Technology Devices International, Ltd FT232 USB-Serial (UART) IC Bus 005 Device 001: ID 1d6b:0001 Linux Foundation 1.1 root hub Bus 001 Device 001: ID 1d6b:0002 Linux Foundation 2.0 root hub Bus 004 Device 001: ID 1d6b:0001 Linux Foundation 1.1 root hub Bus 003 Device 001: ID 1d6b:0001 Linux Foundation 1.1 root hub
When I connect my laser to my linux system, a new device of type "Future Technologies USB-Serial" is seen by the system, and all is good.
If you do *not* see a new device line (of any type) when connecting your laser, you have an electrical or physical problem with the USB connection.
Some things to try:
- Check that your laser is turned on (doh!)
- Verify the USB cable is seated properly: jiggle the connectiors, swap the cable end-for-end
- Be sure the USB connector at the laser is connected to the USB port and not the UDisk port
- Try a different USB port on your computer (sometimes they burn out)
- Try a different USB cable
- Try a different computer/laptop
- Be sure your laser is configured to communicate by USB and not, for example, by network with USB communications turned off
- Be sure your computer and laser are plugged into the same outlet, or same outlet strip (grounding issues)
- Ask your laser vendor for help
Step 3: Device drivers
If your laser is shown on the USB listing, the next step is to see if the system is using the correct device driver.
With the laser disconnected from your computer, in a terminal window enter "ls /dev" to list the available system devices. (Note: "ls /dev" is two words, with space between.)
Without rebooting, connect the laser to your computer and enter "ls /dev" a second time.
Look for an extra file that appears when you connect the laser.
For example, on my system I see the following:
Before:

> ls /dev
bsg dvdrw i2c-4 loop6 ppp snapshot ttyS14 ttyS26 uhid vcs5 vhci

After:

> ls /dev
bsg dvdrw i2c-4 loop6 ppp snapshot ttyS14 ttyS26 ttyUSB0 uhid vcs5 vhci
(The /dev listing is long, only the line with my laser device is shown.)
If you see a ttyUSB device appear when you plug in your laser, then your system has correctly identified your laser as a serial port device and you can move on to the next step. Most likely the file will be "ttyUSB0", but it might have a different digit on the end (ttyUSB1, ttyUSB5, or similar).
If not, then you have a device driver issue.
NOTE: All modern linux systems (less than 5 years old) are natively compatible with FT232 devices used by many lasers. Linux does not need to install extra drivers to interface to these devices.
Search online for the device by VID and PID
All USB devices are identified by a "Vendor ID" (vid) and "Product ID" (pid). The "lsusb" listing shows these numbers, so one thing you can try is to google "laser" with those numbers and see if someone else had a similar problem, and what they did to fix it.
So for example, the FT232 serial port on my laser is USB ID 0403:6001. Googling "laser 0403:6001" returns a long list of people having trouble with the FT232 driver. Adding linux ("linux laser 0403:6001") returns the linux users having problems with that device.
Look in the system logs
Linux records major actions in the file /var/log/syslog, so to see how it handles the device driver we can print out the lines appended to this file when you connect to your laser.
The command "tail -f /var/log/syslog" will print the last few lines of this file, and the "follow" argument (-f) keeps the command running and printing new lines as they arrive.
I execute that command, and then when I connect my laser I see the following:
> tail -f /var/log/syslog

Oct 16 16:24:31 Vulcan kernel: [ 3854.500618] usb 5-3: new full-speed USB device number 5 using ohci-pci
Oct 16 16:24:32 Vulcan kernel: [ 3854.710880] usb 5-3: New USB device found, idVendor=0403, idProduct=6001
Oct 16 16:24:32 Vulcan kernel: [ 3854.710888] usb 5-3: New USB device strings: Mfr=1, Product=2, SerialNumber=3
Oct 16 16:24:32 Vulcan kernel: [ 3854.710893] usb 5-3: Product: FT245R USB FIFO
Oct 16 16:24:32 Vulcan kernel: [ 3854.710896] usb 5-3: Manufacturer: FTDI
Oct 16 16:24:32 Vulcan kernel: [ 3854.710900] usb 5-3: SerialNumber: A5054ANB
Oct 16 16:24:32 Vulcan kernel: [ 3854.718919] ftdi_sio 5-3:1.0: FTDI USB Serial Device converter detected
Oct 16 16:24:32 Vulcan kernel: [ 3854.718978] usb 5-3: Detected FT232RL
Oct 16 16:24:32 Vulcan kernel: [ 3854.723026] usb 5-3: FTDI USB Serial Device converter now attached to ttyUSB0
My workshop computer is "Vulcan", and the lines show a correct sequence of steps resulting in the device /dev/ttyUSB0 added to my system.
If there is a problem with the device driver, an error message will be entered, and that might indicate what the problem is and perhaps how to fix it.
Ask for help online
You can also ask for help in one of the linux laser forums online or on your vendor's help section. If you paste the added syslog lines when you ask for help, someone can probably advise you.
Change the Udev default actions
The "Udev" system manages device creation on linux. When a new USB device is connected, Udev gets a notification: it reads the VID and PID from the device, decides which driver to use, and creates the associated device file in /dev.
If you are having trouble with your system at this point, you may need to force Udev to use a specific driver, or make some specific fix.
How to do this is beyond the scope of this document, but briefly you can create a text file in /etc/udev/rules.d that tells Udev what to do when it sees your laser device.
As an example, here is a Udev script that matches the FTDI device of my laser and sets the associated group on the device file to be "laserusers". Copy this file into /etc/udev/rules.d (using any name, with extension ".rules"), then whenever my laser is connected the device will be accessible to those users in the "laserusers" group.
I don't actually do this, it's just an example of how you might get around a Udev problem in linux.
SUBSYSTEM=="usb", ATTR{idProduct}=="0403", ATTR{idVendor}=="6001", MODE:="0660", GROUP="laserusers"Step 4: File permissions
With the correct file in /dev, the next step is to examine the permissions.
With the laser connected, from a command prompt enter "ls -l /dev/ttyUSB*". This will give you the "long" listing of the file, which includes ownership and permissions. (Note: Command is three words, with spaces between).
> ls -l /dev/ttyUSB*
crw-rw---- 1 root dialout 188, 1 Oct 16 17:34 /dev/ttyUSB0

>
The fields of interest here (highlighted) are the file permissions, the owner, and the group:
- The owner is "root"
- The group is "dialout"
- The permissions are "crw-rw----"
The permissions field contains three fields of 3 characters each (9 characters total), plus an extra "filetype" char on the front.
The first char "c" indicates that the file represents a character-oriented device, which is correct for a serial port. ("b" is a block-oriented device such as a disk, "d" is directory, and "-" is a normal file.)
The next three chars "rw-" give the owner ("root") read and write access to the file.
The three chars after that "rw-" give members of the group ("dialout") read and write access.
The final three characters "---" give all other users no access to the file.
By default, linux puts all serial ports in the "dialout" group, and also by default linux users are not members of this group. So by default, users are are in the "all other" category and have permissions given by the last three chars: "---" indicates no access.
On linux, this is the most likely reason your software can't access your laser. In the vast majority of cases, simply adding the user to the "dialout" group will allow file access, and the software will work normally.
To see which groups you belong to, from a command window enter "groups".
For example, when I type "groups" I see:
> groups
pwalsh adm dialout cdrom sudo dip plugdev lpadmin sambashare

>
This shows that I belong to the "dialout" group (among others). As a member of that group, I have "rw-" access to the device file.
To add yourself to the "dialout" group, from a command prompt enter:
> sudo usermod -a -G dialout $USER
Enter your password when prompted, and if no error is shown reboot your system.
Linux only checks the groups you belong to when you first log in to the system (at the GUI level), so to update these changes you have to log all the way out and back in again, or reboot the system. Rebooting is simpler.
If you have reached this point and your system is *still* not communicating correctly with your laser, it's time to contact your vendor and ask for help.
But here's some things you can try:
Temporarily force permission
You can temporarily force the permissions to allow anyone access to the device and see if this helps. From a command prompt, enter:
> sudo chmod 666 /dev/ttyUSB0
Enter your password when prompted, then without rebooting see if your software can now connect to your laser. Be sure to type the device file for your laser, if it's isn't ttyUSB0 as shown.
This change is temporary, it will revert to the original permissions on the next reboot so once you change it you don't have to worry about undoing it later.
Forcing permission on reboot
You can place the previous command ("chmod 666 /dev/ttyUSB0") in /etc/rc.local to force permissions at system boot, but this is not recommended: it will only work if your laser is powered on and connected when the linux system boots. Disconnect or power cycle the laser without rebooting linux and the permissions will revert to the original settings.
Changing Udev rules
If you need to set a specific group or permissions, the right way is to tell Udev (the linux device manager) exactly what you want to see. For example, the following Udev script will match a particular USB vid and pid to set permissions and group access:
SUBSYSTEM=="usb", ATTR{idProduct}=="0403", ATTR{idVendor}=="6001", MODE:="0660", GROUP="laserusers"You will need to modify this script to match your specific laser (by VID and PID), and also set the permissions and group ownership you want.
So for example, if a file containing that line is saved as "/etc/udev/rules.d/Laser.rules" it will be executed whenever the laser connects to the linux system and set the permissions appropriately. The filename "Laser" is arbitrary and can be just about anything.
-
Etching anodized aluminum
12/24/2016 at 02:38 • 0 comments![]() Laser etching anodized aluminum
Laser etching anodized aluminumOne thing we teach in the laser authorization course at my hackerspace is that the laser will remove the anodization from aluminum.
The laser won't touch the aluminum metal, or any metal in general(*), but etching away the anodization is sometimes useful when you want to put your logo on a finished project, or for front panel markings.
The process does not remove *all* of the anodized layer, so the end result is a slightly tinted aluminum against the anodized background. In other words, the process does not result in perfect contrast of the image against the anodized background.
Still, it's something you can do with the laser that will give your project a professional, polished look.
You can purchase anodized aluminum plate (and many other forms) on eBay.
(*) This is not strictly true, but it's against house rules to try, so we tell people that the laser won't do it.
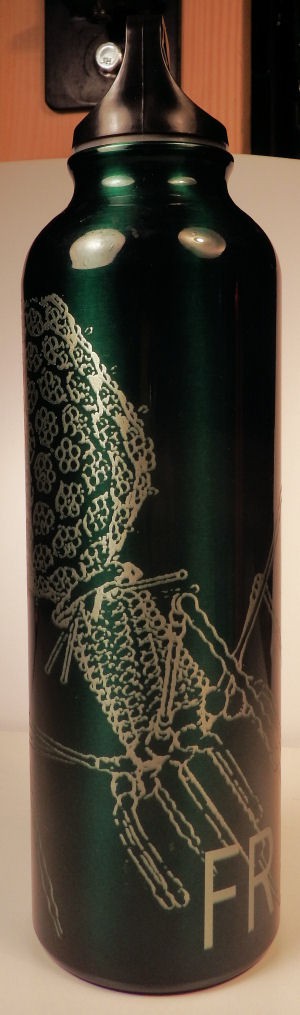
Christmas for Frankie
![]()
So when my grand-niece had her water bottle stolen and her mom suggested I get her a new one for Christmas, I made personalized versions. The results are shown up top.
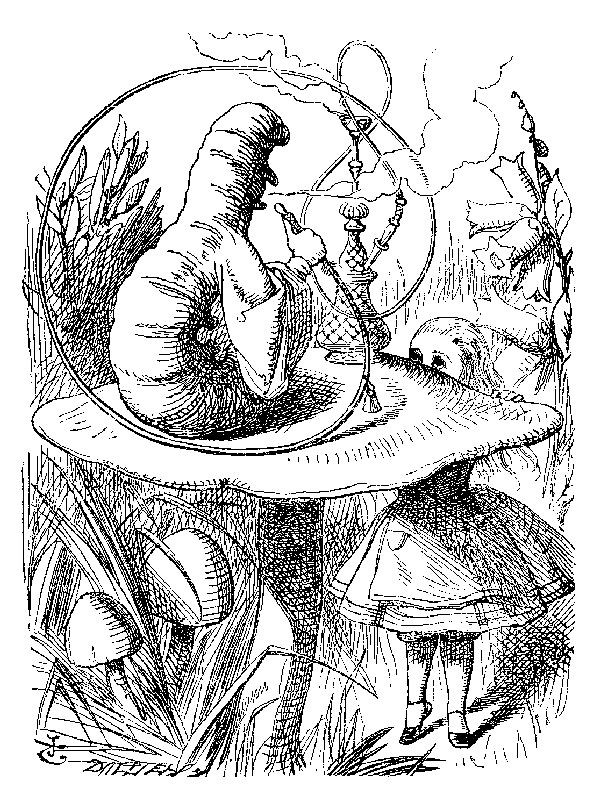
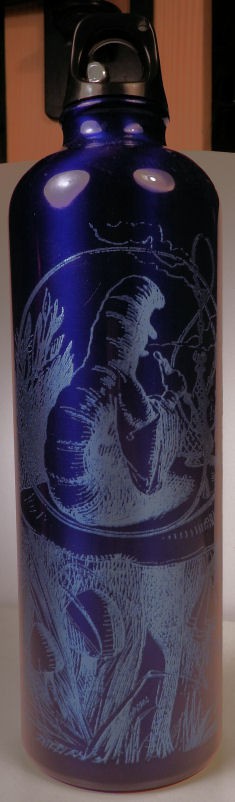
She's studying genetics doing research on viruses and fruit flies, so one bottle has a virus capsid, one bottle has fruit flies (which doesn't photograph very well), and one bottle has Alice and the caterpillar.
Each has her name engraved along the bottom, so they're less likely to be stolen.
[HA! I just now figured out how to make Hackaday.io break paragraphs at the image boundary. Take *that*, Hackaday!]
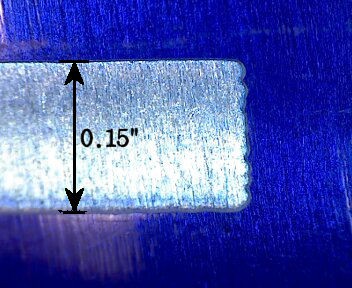
Speed and Power
Scan speed is 350mm/s, scangap is 0.15mm which is about 3 scans per line with our laser's 0.5mm line width.
Remember to turn OFF bi-directional scanning to avoid any backlash in scan positioning. Turn ON bi-directional, and the left scans will be offset from the right scans by backlash in the mechanical system, making edges look like saw teeth. Probably not what you want.
The power reading of 50% for our aging 80-watt laser probably translates to about 25 watts(*), convert as needed for your system.
(*) Our unit mins out at about 25% due to the age of the tube.
![]()
Positive and Negative
Be careful with the positive- and negative-ness of the image. The "Alice in Wonderland" image is originally black on a white background, but the etching removes the darker anodization to reveal the brighter aluminum.
The Alice scene thus became a sort of "X-ray" version - I should probably invert the image and make another one, but I ran out of bottles.
![]()
![]()
Engraved Closups
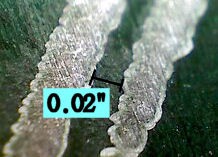
The accuracy of engraving is pretty good, considering the spot size of our laser is .02" to begin with. The line on the right is freehand from the image; ie - it's not a computer-drawn straight line.
![]()
![]()
The aluminum metal has a slight bluish (left) or greenish (right) tinge from leftover anodization, because the engrave process doesn't remove everything.
It would be interesting to see how the anodized/etched sections respond to chemical etching. Chemical etching might be an interesting hobbyist way to make complex thin aluminum pieces using a laser cutter.


 Laser etching anodized aluminum