Zapp
Zapp-
DC25 Badge Post Mortem
09/07/2017 at 05:03 • 5 comments![]()
The Start
Our DC25 project started immediately after DC24. On the car ride home we started brainstorming bigger and better ideas for the badge. Many were rejected but after the response we got with our first badge, we were motivated to do the next time. We added two new members, @bitstr3m and @hyr0n1 to the team as well bringing our member count up to five.
After some discussion and false starts we determined our high level goals were to ditch Arduino, pay for assembly, produce a lot more badges, and improve badge to badge comms. Our first decision was on an MCU. After some encouragement from @rushan of DC801, we selected the BMD-300. This became the core of the badge and would be our development environment for the next 9 months.
The Hardware
BMD-300
We can’t say enough about how great this little module is. Based on the Nordic NRF52, it gave us plenty of head room flash-wise (an issue in our DC24 badge) and in ram to do everything we needed. DMA was simple and once we had it tuned properly the bling animations on the display looked silky smooth.
TFT Display
Without a flashy screen what good is bling? We did a group buy with DC801 on the Crystalfontz CFAF128128B. This is a 24-bit 128x128 TFT display with single backlight that can operate in 4-wire SPI mode. The BMD-300 is limited to an 8mhz SPI bus but through the blast processing magic of DMA our custom driver and graphics library netted us about 24 FPS.
LEDs
Let’s just put this out there, we hate WS2812B A.K.A. Neopixels. Never again. Sadly we had to fall back to these during prototyping due to our original choice, APA102 being unable to handle lead-free solder profiles. Next year we will work on something completely new for LEDs. On a high note, our custom WS2812B driver uses a SPI bus with DMA to communicate with the LEDs. Hackers gonna hack.
Voltage Regulator
Early in design we selected the PAM2301 from Diodes Inc. Very simple design, fixed voltage, and very reliable during prototyping. But this little part caused a lot of drama. Just as we placed the order for the first 396 badges, Mouser and Digikey got low on stock. We immediately bought all 450 we could find on Octopart and consigned them to Macrofab. Crisis averted. Then we decided to add another 100 badges and PAM2301 is now out of stock with a 6 week lead time 5 weeks before DEF CON. After plenty of datasheet reading we found the MCP1603LT from Microchip which only differed in the current rating, we directed Macrofab to utilize these on the white badges.
The Firmware
With the Nordic Softdevice S132 as our base, we continued by rolling our remaining OS and features. Nearly 11k lines of code. Here are the features we threw together.
Activation
We wanted to keep features secret until DEF CON, even more so we couldn't let the Kickstarter backers gain too much of an unfair advantage weeks ahead of time. To curb this, our badge leveraged a code system for unlocks and with that we implemented an activation code "RHAC6+7X” The instructions were simple: Scroll down the main menu to the “A” icon.
Bling
Blinky LEDs and animations galore. Just so there’s no confusion our definition of bling includes an animation displayed on the screen alongside an LED blink mode. With their powers combined...it is Bling. The main bling menu has modes devoted to our f1l7hy 400lb h4ck3r ph1l4n7hr0p157 Kickstarter backers, credits thanking everyone who supported us in this endeavor, as well as dozens of hand crafted blinkies to make u the center of attention. In addition, custom mode comes with 94 animations : 30 LED patterns, for 2,820 different bling modes. If that isn’t enough, import your own via Bring Your Own Bling (BYOB) by reading the log on our hackaday page.
Games
Our single player games included a clone of Ski Free, clone of Flappy, and a CHIP8/SCHIP Emulator supporting 64+ public domain ROMS (included)! Be sure to read the instructions before launching the game. We have no speaker, so instead of beeps we blink LEDs matching the foreground of the game color!
Nearby
Lists all nearby badges as well as IoT enabled Medea vodka bottles...Hack all the b00z3 drink all the things! (Yes it does hack bottles of booze)
TCL-ish
A scripting language we created (30+ commands) so you can control the hardware on the badge without recompiling. A full API is available on our hackaday page. Just throw together your own script and drop on the SD card.
Botnet
![]()
Our major feature that we held in secret until the week of DEF CON. The botnet game turned out to be extremely popular. This is from the insert card, in how we described it:
Congratulations you are the new grey hat sys admin of your very own badge! You must protect it from all the l337 hax0rs out there. To do this, it will cost you points.
*You earn points based on how many services you have accessible.
*You do NOT earn points for a service if it is blocked or disabled.
*You can spend points on enabling, disabling, and patching services.
*You can spend points on modifying firewall rules (allow/deny).
*You can spend points on research and upgrade of exploits.
*You earn experience (XP) when you successfully attack another badge. To attack another badge you must use an exploit payload on a service they have running, which isn’t blocked by the firewall.
*If you earn enough XP you will level up and perhaps unlock things…
There was an Android Smartphone App as well to provide console access to the badge, for lulz and to partake in BOTNET.
Perhaps you don’t like graphical user interfaces. Some of the botnet can be managed via terminal over bluetooth. Head to the Google Play store, search for “AND!XOR” and use the companion app. If you use iOS, the Nordic nRF Toolbox is “compatible” with its BLE UART applet. However it is verbose and buggy, you may have to force close. We recommend making friends with an Android user, find one and buy them a beer…
The terminal can be used for many lulz, utility functions on the badge, and modification of botnet services and firewall rules.
However, the badges were pushed out early before they could be fully secured... (CVE-AND!XOR-1337) All badges have a default root password. Sys-admins are advised to determine what that password is and change it ASAP! Otherwise malicious unauthorized users may log into your badge and modify services or firewall settings for the benefit of exploitation ;)
Oh yeah, we said it was a botnet. The hackers at AND!XOR have full command and control over all badges in our ad-hoc BLE mesh badge-net. We may send lulz, gifts, or unleash havoc. Depends on our level of drunkenness...Sales
DEF CON sales were a circus. Going into DEF CON we decided to do guerilla sales around Caesars to give people and experience of being at the right place and right time. Sometimes solo, sometimes teaming up with @MrRobotBadge who also enjoys the trolling of peoples. This encouraged social engineering, got us a free glass of scotch, and a lot surprised buyers - “Oh you’re the AND!XOR guys! Got any badges?”. It also resulted in six hackers going into the pool...for 5 badges...in their clothes... and getting their daily shower – you’re welcome DEF CON. Just doing our part to assist with enforcement of the 3-2-1 mantra. @FTAlligator and Dennis Leeroye deserve a round just for their amazing swim race.
![]()
While we thought this would be a pinnacle of fun and lulz, sadly this tactic seemed to encourage stalkers when they couldn’t get badges. We were followed on several occasions, had knocks at the door of our room while trying to have some down time, and some other issues. We will handle things a bit differently next year to discourage this behavior. That being said, having so many guerrilla sales took away from our DEF CON experience.
Special thanks to Car Hacking Village and the goons for hosting us on Friday for our large sale. Crowd control was organized and we were able to avoid a total mob scene. Also big thank you to Hacker Warehouse for hosting us twice to troubleshoot and talk to badge holders.
Sponsors and Backers
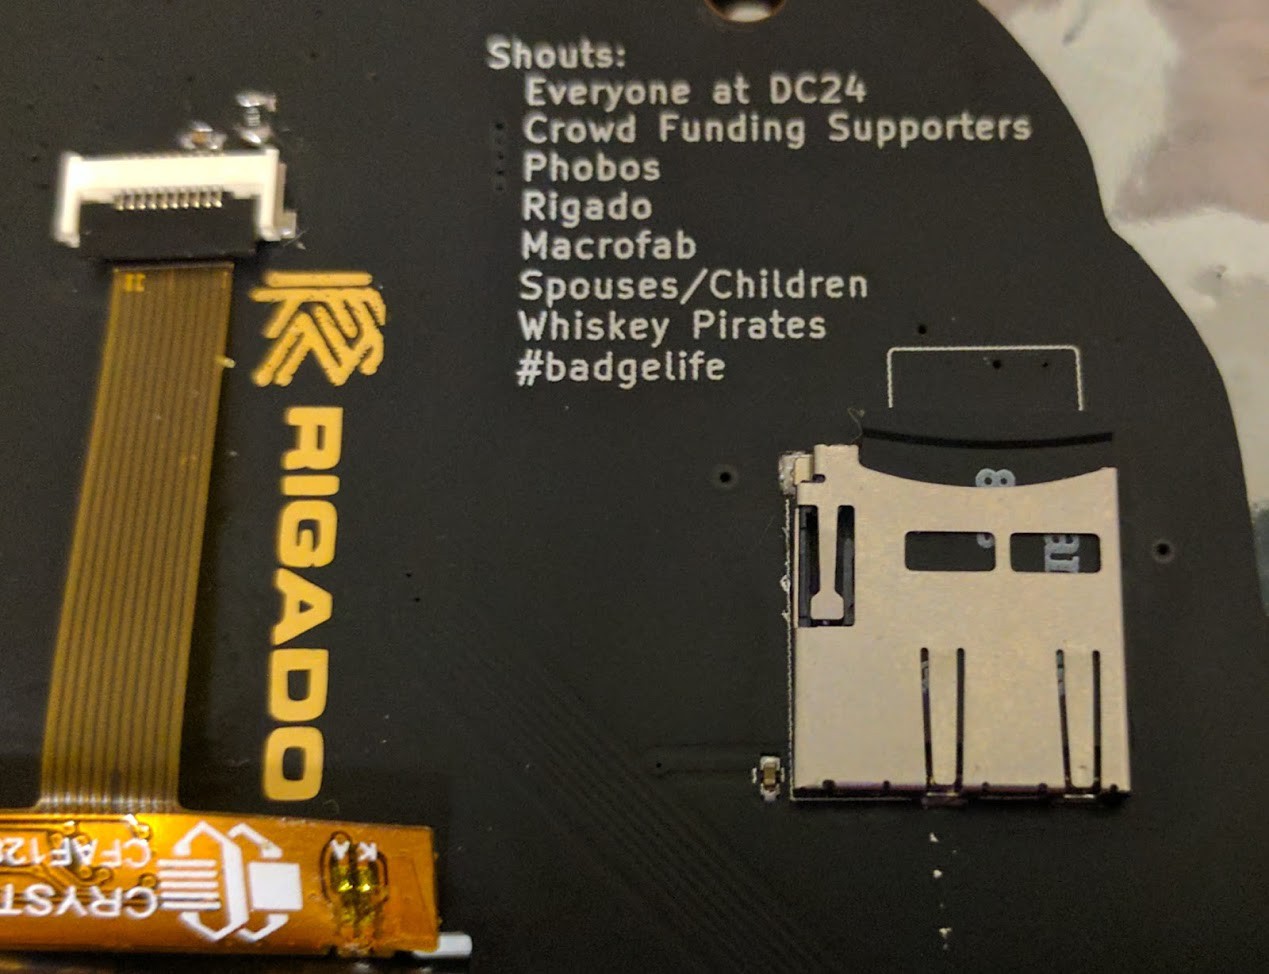
A major change from our DC24 badge was financial help. This let us go so much bigger than before. Not only did our quantity nearly triple from 175 to 503 but the BOM more than tripled and prototyping costs grew as well. Big thank you to Phobos Group, Rigado, Boosters, Kickstarters, and two anonymous sponsors. We wouldn’t have been able to afford the project this year without your help.
Failures
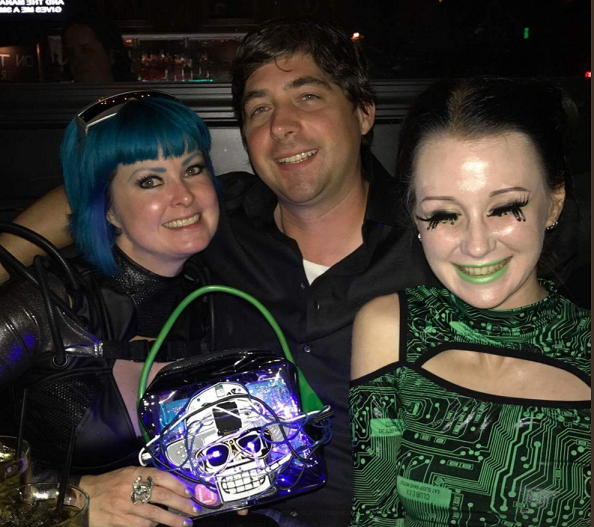
What’s a DEF CON electronic badge without failures? In total we ordered 503 badges. 488 of those past our testing and were packaged up for sale, trade, or gifts. We were able to fix a good number of badges at the Hacker Warehouse booth and return them to action, but also swapped roughly 20 bad badges for good badges. At the end of the day we lost another 9 at DEF CON that could not be repaired bringing our total up to 24 failures or 4.8%. Our DC24 badge failure rate was roughly 20%, so a vast improvement. Good news though regarding some of the failed hardware, XenoGirl (Lisa Weeks) is working a project to upcycle some of them in to blinged out hand bags! Fashion Tech PCB Bling FTW!!!
![]()
BMD-300
The most common failure during production can be traced back to the BMD-300. We were unable to fix any but the best we can tell is solder did not reflow properly and caused a short somewhere under the module. Upon further inspection, the tolerances between traces and the pads underneath could have been better.
TFT
Given that the TFT ribbon bulges out slightly from the rear of the badge, we assumed the ribbons would catch and tear. We also assumed the displays would be damaged or cracked by bouncing around on peoples’ chests. For this reason we bought a lot of extra displays. In the end we didn’t have a single failure.
Buttons
At DEF CON buttons were the highest failure. Turns out giving hackers a badge with surface mount buttons is not a great idea. A good number sheered off but easy to replace with a steady hand. Only issue here is Macrofab’s buttons are white and we ended up with black. So there’s a slight mismatch.
MicroSD
Another common failure, but we anticipated this. We lost about a dozen SD cards during packaging and DEF CON just due to corruption. From personal experience we expected this and bought 600 MicroSD cards in anticipation. Additionally, we posted the SD Image to github early so badge owners could replace the card themselves.
Voltage Regulator
This one surprised us. The Microchip replacement voltage regulators on the white badges turned out to be a high failure item. As best we can tell a short causes them to let out magic smoke. Zapp spent most of his mornings replacing with spare PAM2301s. Saturday he replaced all white badges still on hand with PAM2301s to avoid future failures. We only saw one PAM2301 fail at DEF CON which is closer to what we expected.
Badge to Badge Comms
A little advertised feature between badge makers is a badge to badge comms spec that each group implemented. The spec based on BLE GAP Advertisements. While simple, it allows our badges to recognize each other amongst all the 2.4ghz traffic at DEF CON. In the AND!XOR badge, we had code to recognize Queercon, Crypto Privacy Village, DC801, and DC503. When a badge is detected a special hello animation is played for that group. During DEF CON we observed DC801 and our badge saying hello but did not get a chance to test with the other groups. We plan to build on the spec next year.
Botnet
The botnet game turned out to be extremely popular. It had several bugs when attacking other players but overall we received positive feedback from badge owners.
Command & Control (C2)
The C2 feature was intended to give the master (orange) badges command and control over all human badges by sending worms through the BLE network. At BsidesLV this feature worked perfectly. Command sequence numbers based on common time reference allowed us to run various bling and unlock avatars as planned. By the time we got to DEF CON the common time reference overflowed the 16-bit integer we were using to store it, oops. In the final firmware we fixed the overflow and randomized the C2 special bytes and regained control.
Then DC801 came along. We aren’t sure exactly how this happened, but it appears DC801 found our special bytes or were replaying advertisements with some fuzzing or overflow fix was still buggy. @miketweaver (DC801) may have even been exploiting our time sync somehow... Either way we struggled the rest of DEF CON to maintain C2 of the badges. Props to DC801 if they pulled this off. It was fun to talk about how we made a botnet out of conference badges, and oddly more fun to admit we lost control of it.
In conclusion…
This year we wanted to go big. We spent nearly a full year planning for the four days of DEF CON and managed to deliver on our original goals. Failure rates overall were much lower, we left Arduino in the dust with 11k SLOC of our own C code, and RF worked. More importantly, we reached out to the other badge makers and we worked together to get BLE interactivity between the projects, puzzles which spanned hardware, software, crypto, IoT, and wireless, even tie-ins with Coindroids. We hope in some way this badge helped in sparking conversations and getting people to visit villages they maybe hadn’t before, learn something new, or just have fun playing the BOTNET game with others. Meet people and make new friends. We were also able to auction a badge off and raise $2100, $1100 was given to the EFF and the rest we used to donate b00z3 across various DC parties. We missed you @lo57 , there's a drink waiting for ya at DC26! Big thank you to everyone at DEF CON this year, this made all the hours worth it and can’t wait to do the next badge.
![]()
Next Year
There’s still plenty to learn so we’re doing this again. We are in the idea gathering phase and starting with a blank sheet. We know LEDs will get a lot of attention this year as well as our manufacturing process to reduce failures and give us more time to enjoy DEF CON. In the next month or so we will start ordering evaluation kits, kick off artwork, and reach out to potential sponsors. #badgelife never ends, but we wouldn’t have it any other way.
DC25 Badge Spoilers: Easter Eggs, and Unlocks
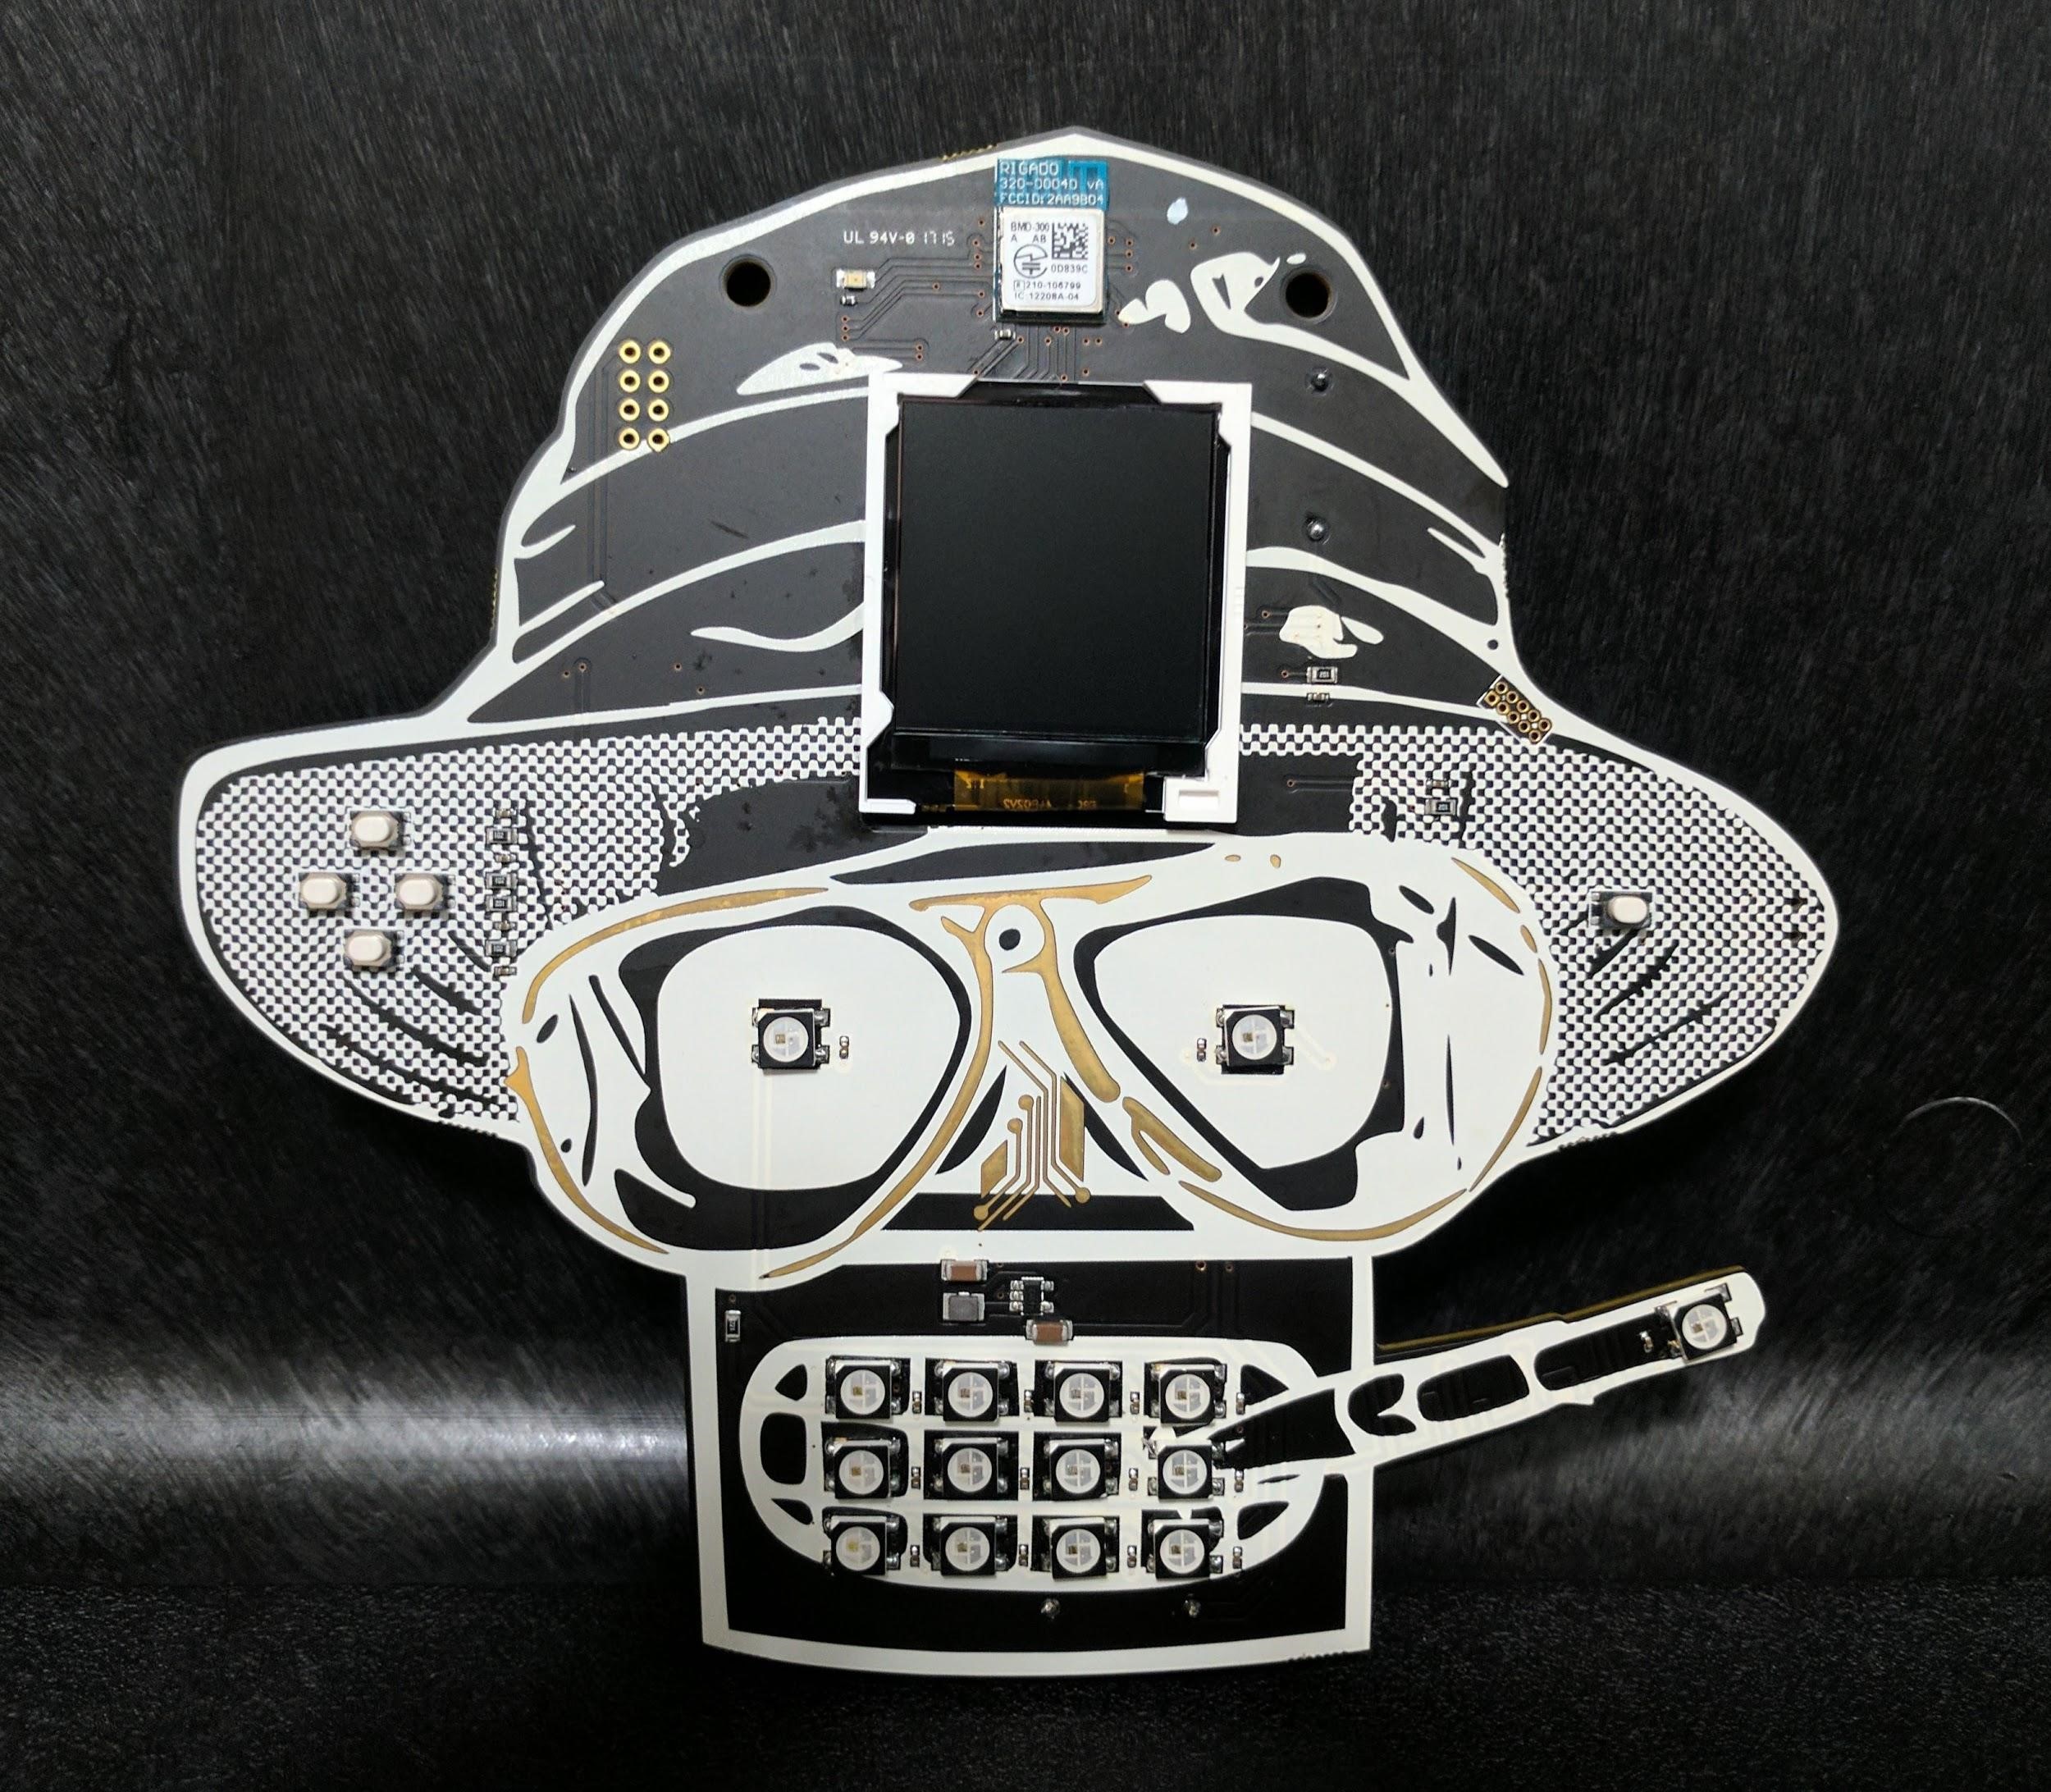
Yeah, don’t read this section if you haven’t finished the puzzles on the badge. You could just dig through the source code and gerbers, but we do realize that many of you are lazy. If you are curious about your unlock status, just hit back from the main menu. The screen will display a schematic of the badge and each LED will light up for every unlock achieved, 15 in total. Some of the unlocks required physical proximity within some of the BLE Beacons, use an ubertooth or Nordic nRF Toolbox to broadcast ;)
Primary Unlocks
#
Mask
Name
Description
Unlock Method
Feature(s) unlocked
0
0x0001
Master
Master badge Unlock
Master badge connects to human to grant
Rager Mode
1
0x0002
Whiskey Pirates
Decrypt a code using WP VHS Badge
EPYPFMSK
Zero Wing Avatar
2
0x0004
CPV Unlock
Unlocked when near beacon A placed at CPV
Unlocked when near beacon placed at CPV.
CORRECTION: It was left in Whintey's pocket during the con...so this is also known as the Whitney unlock. lulz
Major Lazer Bling
3
0x0008
Terminal HeMan
Unlocks HeMan Whats Up Bling
From BLE Terminal, type “Hey.” Complete the terminal chat of
USER: Hey
BADGE: Hey STUD! LOL j/k
USER: Hey
BADGE: What's going on?? ;)
USER: Not much. Brb.HeMan
WhatsUp Bling
4
0x0010
Terminal Datetime
You hack too much time
From BLE Terminal, type “datetime”
Change date < 1/1/1970
Hackerman Bling
5
0x0020
Terminal Defrag
Maintenance Bling
From BLE Terminal,
Escalate privleges and login as Scruffy
Type “defrag”
Defrag Bling
6
0x0040
C2 Mass Unlock
Use botnet and C2 to mass unlock badges
Master badge enables mode, worm takes it from there
Zapp Avatar
7
0x0080
TCL unlock
Fix a TCL script to reveal a code
Mount that SD card and edit the file.
Y_AN:LRN
Owl bling
8
0x0100
Twitter
Base64 on back of badge leads to Twitter
https://twitter.com/mnccoenaqakbe
has a pastepin link. Contains a file with:
3TNXFBBN
Illusion Bling
9
0x0200
Seekrit Resistor
Set mask to 1 if GPIO is held low on start
Seekrit footprint on back with solder bridge or R
Trololol Bling
10
0x0400
Matt Damon
Simple unlock
DAMON
Matt Damon Bling
11
0x0800
CHIP8 #2
Find random CHIP8 ROM that displays code
It’s one of the Pong Roms
7CA3FF1D
(Yes Hyr0n coded up roms in an archaic ch8 language for your hacking pleasure)
Fry Avatar
12
0x1000
Scroll
Scroll beyond bottom of shouts
VN2D85FF
New Party Modes
13
0x2000
@securethisnow
Find Mr Bill (@securethisnow) whos beacon will unlock
Beacon UUID
5 levels and 1000 points. Mario animation?
14
0x4000
Business Card
Business card contains Base64
YJ9XZHFA
More bender modes
SD Card Unlock
There was an AES256 encrypted zip file on the SD Card, funstuff.7z. No you wont find a Weezer video on there, but there's just as good of stuff.
If you wanted to crack an ecrypted 7z file...
$ sudo apt-get install rarcrack
$ rarcrack --type 7z --threads 12 funstuff.7z
// IT TAKES A WHILE TO CRACK UNLESS YOU USE YOUR GPU
// PASSWORD = 4Q$$
Lulz & Easter Eggs
Escalation of Privilege
Some of the unlocks required that you hack the badge through the terminal, to escalate privileges. This involved gaining access to the badge maintenance account (Scruffy), then digging through his shadow.backup file, to reveal the md5 of the root password. Scruffy is a horrible sys admin keeping his passwords in backup text files. We thought most people would have guessed the maintenance account password for scruffy (April did on day 0), but it appeared to be a puzzle the likes of which the world has never seen... so we released a hint:
![]()
Once you su to scruffy, one can finally “less shadow.backup”
#Backup for scruffy - root:ff24fefce7040369fd4fda33fd2d036d
Then you can finally escalate to root, which provided the ability to control the botnet from the console. Or more importantly, now that one knew the root password, they could backdoor into any badge which had not yet changed it and remotely modify their services and firewall settings <8
Coindroids
You know the skill-based blockchain game where droids run around attacking each other on-chain? That’s Coindroids. Their crypto game is rad. When we started talking about a way to get our two communities to to interact with one another, it came down to hiding a QR code on our badge while, in game Coindroids features, and Twitter to try and get them all to work together for the unlock. To find the QR code, go to our bling menu and play the Kickstarter Backer thank you credits. If you wait long enough until the credits have finished scrolling you will be flashed a QR code for about 300ms.
![]()
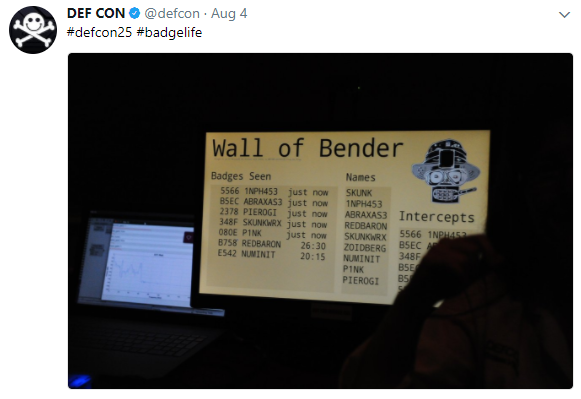
Wireless Village
So @abraxas3d & @MustBeArt created the Wall of Bender in the Wireless Village. It was a logger and display board for the badges. Three windows are displayed. A smaller window displays just the names and unique IDs of each and every badge advertisement received, in real time, even if they go by too fast to read. A bigger window displays the same information plus a time-since-last-heard indication, and smooth scrolls the entire stored list, after removing duplicates based on the BLE advertising address transmitted. In between, another smooth-scrolled window shows just the names received, regardless of which badge sent them. Very cool. They also brought some electronic RF wizardry device that spoofed badges at our backer meetup, tip of the hat you hackers!
![]()
-
The AND!XOR Conference Badges Are Part Of An IoT Botnet
06/25/2017 at 17:34 • 0 comments![]()
Botnet
The hackers at AND!XOR have full command and control over all badges in our ad-hoc wireless badge-net. We may dictate the badges send lulz, gifts, ransom-booze-ware, or unleash DDOS havoc on all of our badge holders if they are jerks. Depends on our level of drunkenness...
But oh, you're telling yourself, "There's no way they could do that, those AND!XOR dudes are somewhere in the casino getting hamski'd." Well those badges are acting as badge-net layer 2/3 repeaters. Once you're infected, you're contagious, and a mobile mesh network node executing instructions we have commanded for a duration of time. Given the density of badges in the population and expected foot traffic, we have high confidence we can reach most participating in the game unless they are hiding under a faraday blanket. That's all we are willing to say about the implementation so folks don't figure out how to abuse the system with an SDR or crack our encryption with a ChipWhisperer. Challenge poker chips and beer if you do, unless you're part of some uber fantasy hacking team composed of Mike Ossman, Joe Grand, Colin O'Flynn, and Joe Fitz (which is no fair).
By activating the badge (WE WILL PIN A TWEET WITH A CODE @ANDnXOR) you enable connectivity and consent to participate in the badge Botnet game. If not, please go to settings and enable Airplane mode once the badge has been activated if you did it by accident (or just don’t activate it, your loss)
For those who have concerns, don't forget we rolled our own custom firmware, executables, and packet structure for the badges. These badges cant be used to harm any *real* systems, since the payloads can only be interpreted by the AND!XOR badges (its absolute garbage to any other OS). This is a safe hax0r friendly environment for you to play in. Hope you have fun, we know we will!
So why would we do this? Control complex for one, but more importantly, to inject chaos while our badge holders play a little game...
Game
BOTNET: The AND!XOR feature multiplayer badge game for the security minded. Congratulations you are the new grey hat sys admin of your very own badge! Take the time to assess your badge, find its vulnerabilities, secure it, and exploit those vulnerabilities on other badge holders before they lock it down. All the while a massive botnet attack is keeping you occupied.
Basic Rules
- You must protect the badge from all the l337 hax0rs out there. To do this, it will cost you points.
- You earn points based on how many services you have accessible.
- You do NOT earn points for a service if it is disabled or blocked by a firewall rule.
- You can spend points on enabling, disabling, and patching services.
- You can spend points on modifying firewall rules (allow/deny).
- You can spend points on security research and upgrade of exploits.
- You earn experience (XP) when you successfully attack another badge.
- Service's attack surface increases over time unless patched.
- Exploits strength decreases over time unless upgraded.
- To attack another badge you must use an exploit payload on a service your victim has running, which isn’t blocked by your firewall or theirs.
- If you earn enough XP you will level up and perhaps unlock more features on the badge…
Details
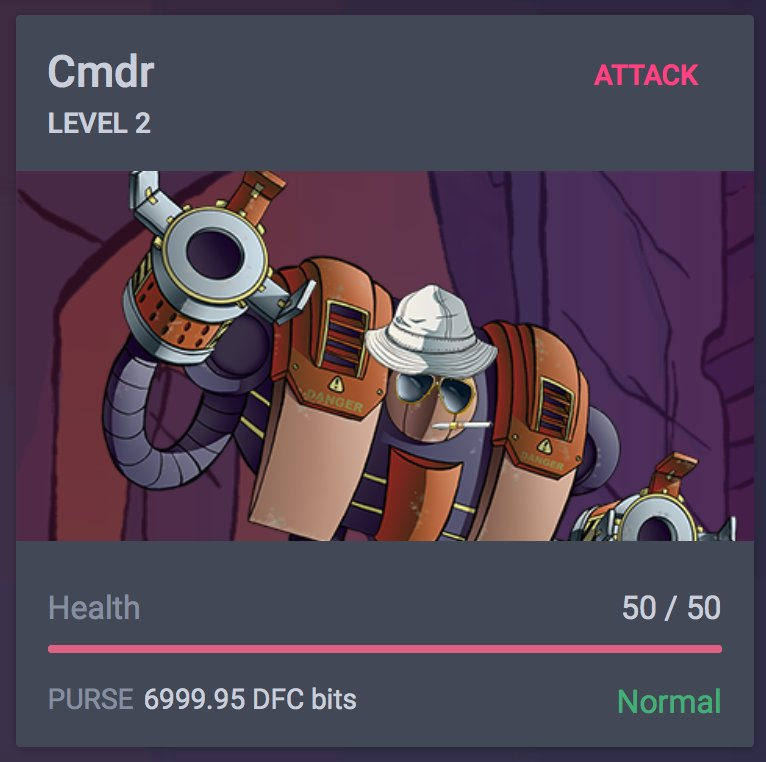
![]()
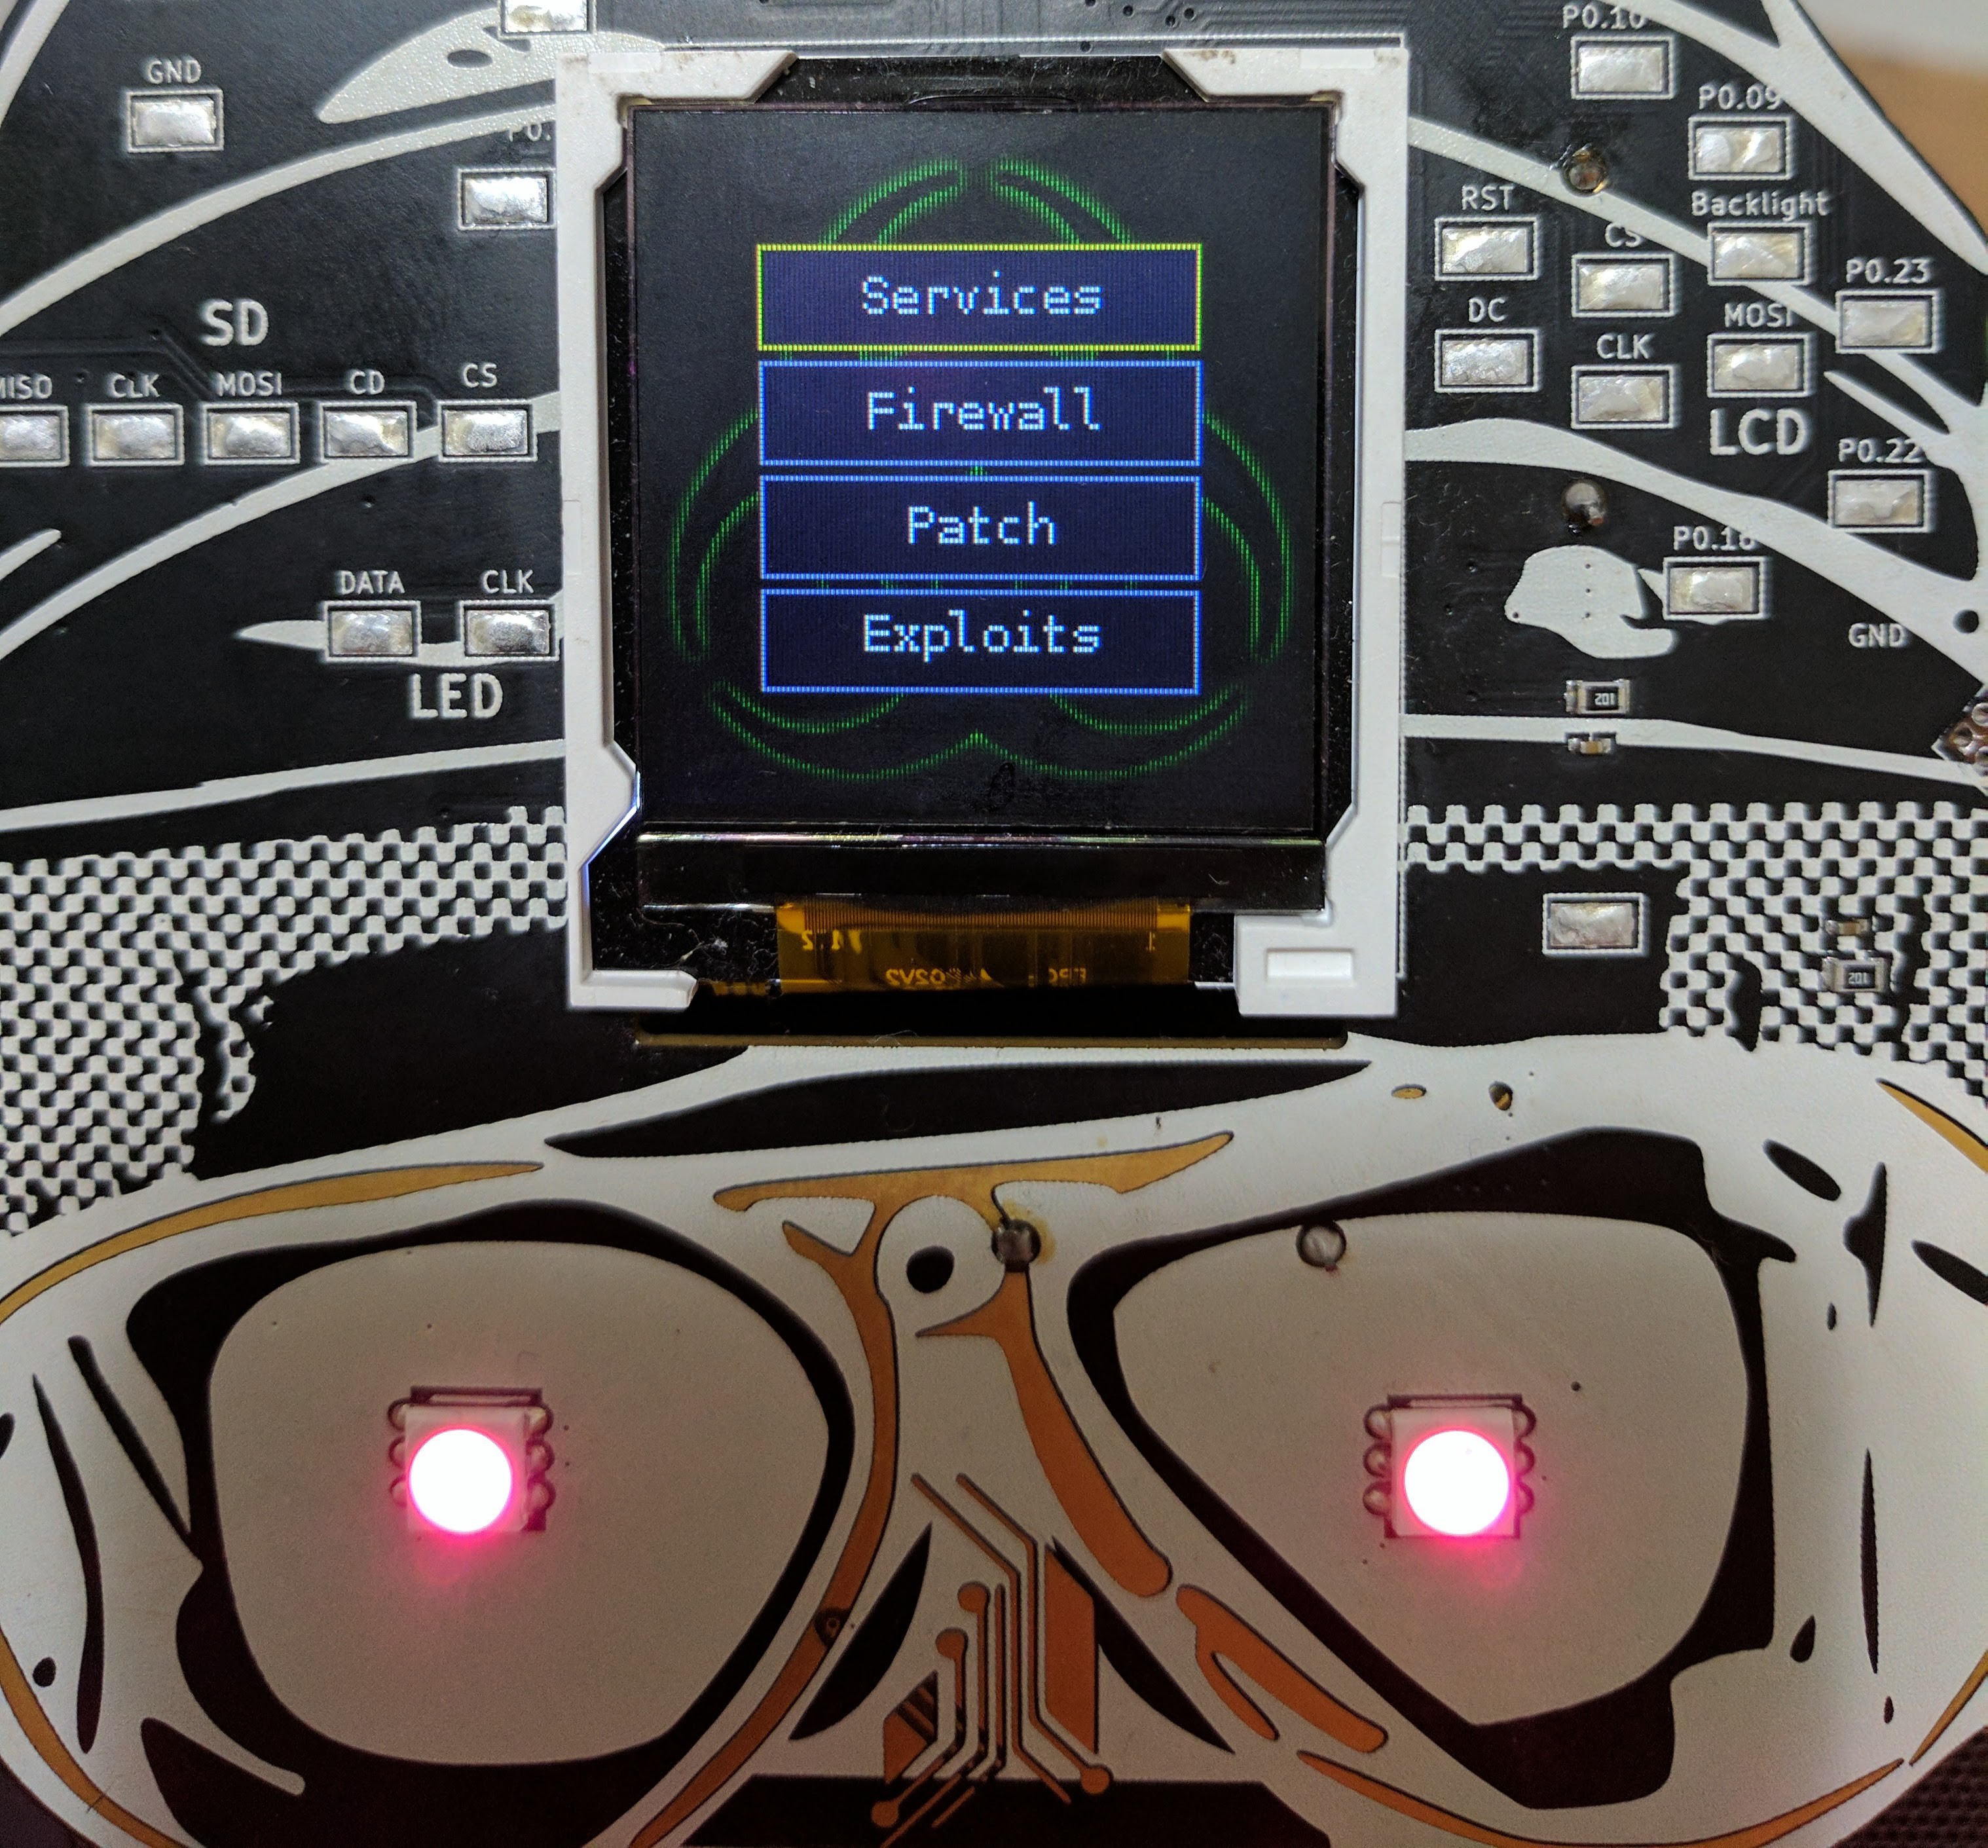
This is the main screen the sys admin will see at botnet. Here's an explanation of the various fields...
- Name
- The name you set to your badge is also your player name. Other badge holders will see this when you attack and when they attack you.
- Level
- Your overall level, it increases as you gain XP
- Points
- The total point pool used for modifying services, firewall rules, patching, or performing security research of exploits.
- XP Bar
- The total experience gained thus far per level. When it fills up you will level up.
- Exploits
- The total number of exploits in your payload cache.
- Avatar
- The avatar people will see when they try to attack you. This can be changed in settings.
- Nearby
- Shows how many AND!XOR badges are nearby for you to attack.
- Service Status
- The inner vertical bar represents whether each service is running (GREEN) or stopped (RED). Keep an eye on these, the backup admin (Scruffy) is really bad at his job and they may randomly change every 15 minutes...
- Firewall Status
- The outer vertical bar represents whether the firewall rule for each service is set to allow (GREEN) or deny (RED). Keep an eye on these, the backup admin (Scruffy) is really bad at his job and they may randomly change every 15 minutes...
- Services
- From top to bottom, the services for your badge are: SSH, HTTPS, SMTP, POP3, FTP, TELNET, VNC, NETCAT
Duh...(More Options) && Further Rules Explained
Allows you to modify (start/stop) Services, change (allow/deny) Firewall rules, Patch all services, View and upgrade your current exploit cache.
![]()
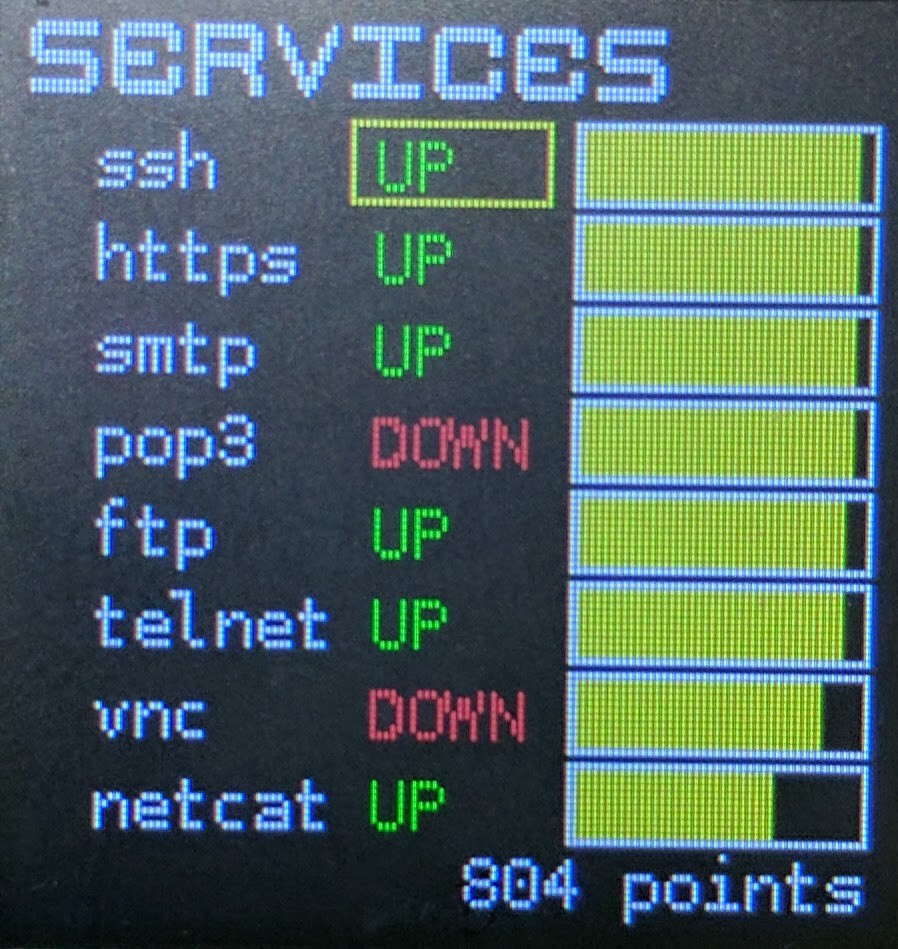
- Services
- Shows a detailed status of all services: whether they are up or down and the yellow bar is how secure they are (over time they become more exploitable and the yellow bar drains, SO DON'T NEGLECT YOUR DAMN PATCH CYCLE!). You may also modify a service by selecting it with the UP or DOWN keys and hitting the Action button (far right button on the badge). Don't forget you need services running to earn points. But then you increase your attack surface...choices...
![]()
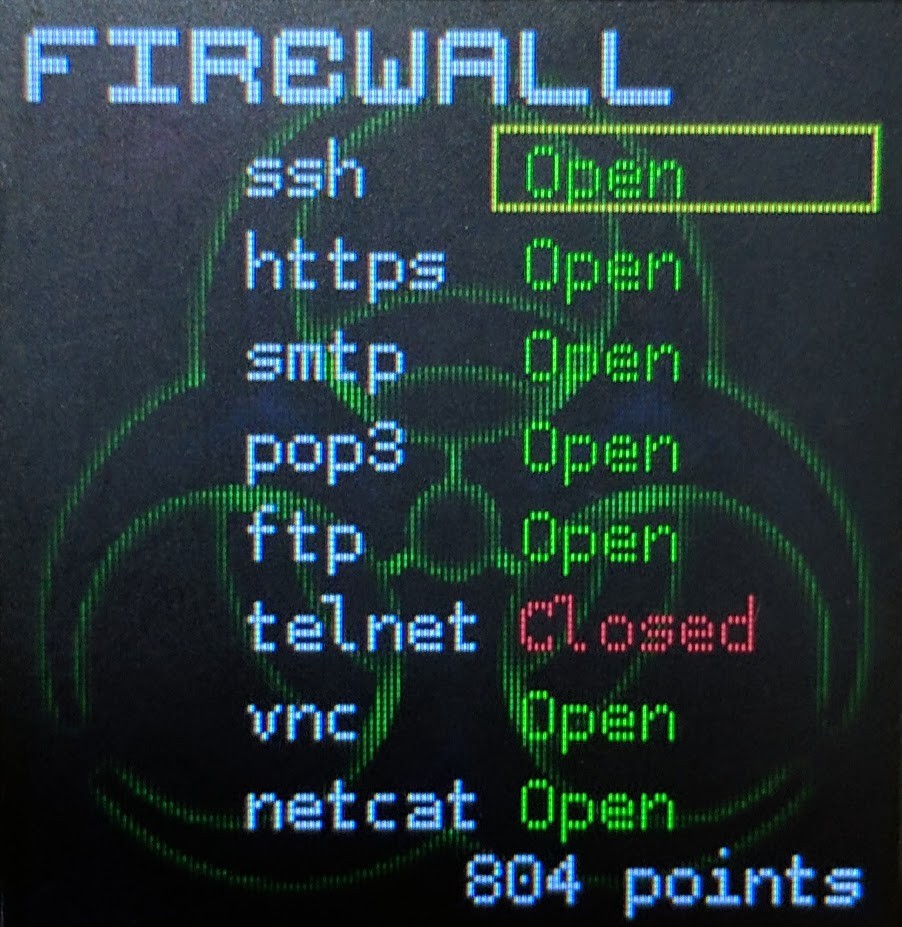
- Firewall
- Shows a detailed status of your firewall rules. If you aren't familiar with this concept...we have problems. But seriously, if the traffic is allowed (green) then the ports/protocols for your particular service are allowed to leave the badge (and traffic for that service may come in to your badge). This is EXTREMELY important to understand. You cant, for example, use an SSH exploit on another badge if your own firewall is blocking SSH. If you attempt something this stupid, we will penalize your points. More importantly, this is a double edged sword: you must open up your firewall to attack others and by doing so you make yourself vulnerable. Every time you modify a firewall rule it will cost you points.
![]()
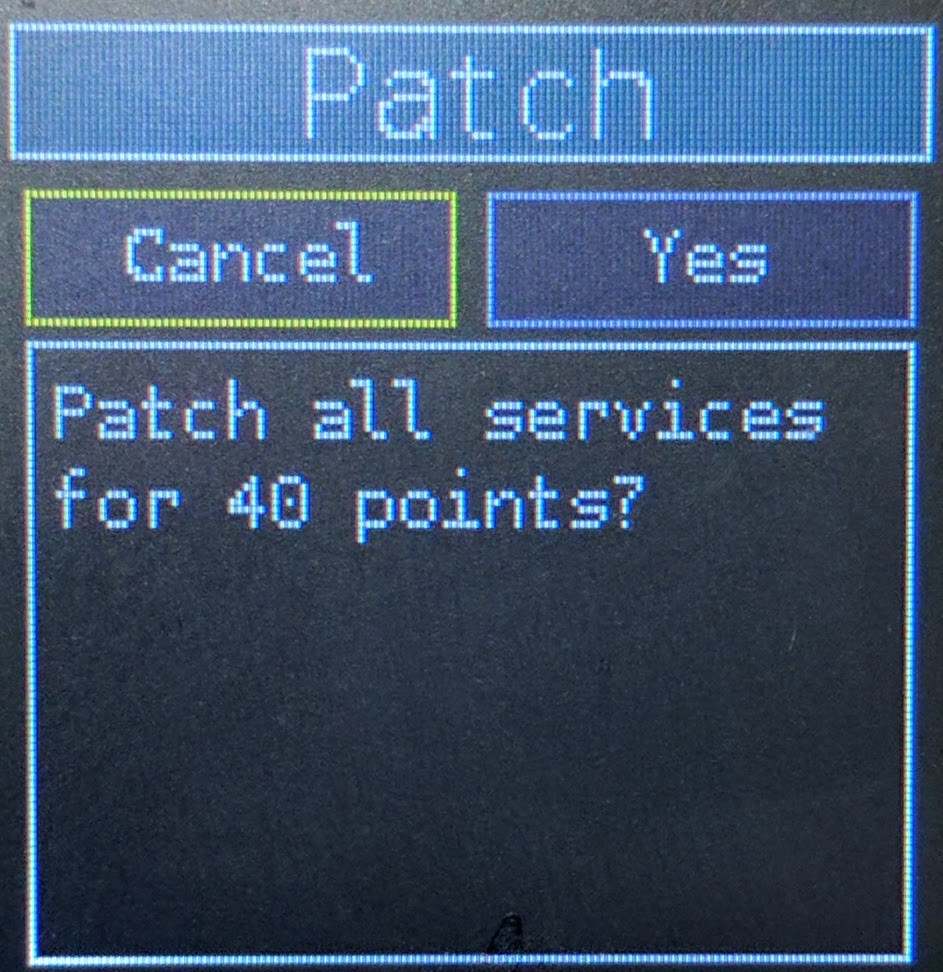
- Patch
- This is how you patch your services to keep them secure. The patch level of a service is critical in determining whether or not exploits will compromise your system. When you see the yellow status bars getting low on the Services detail screen, you should patch.
![]()
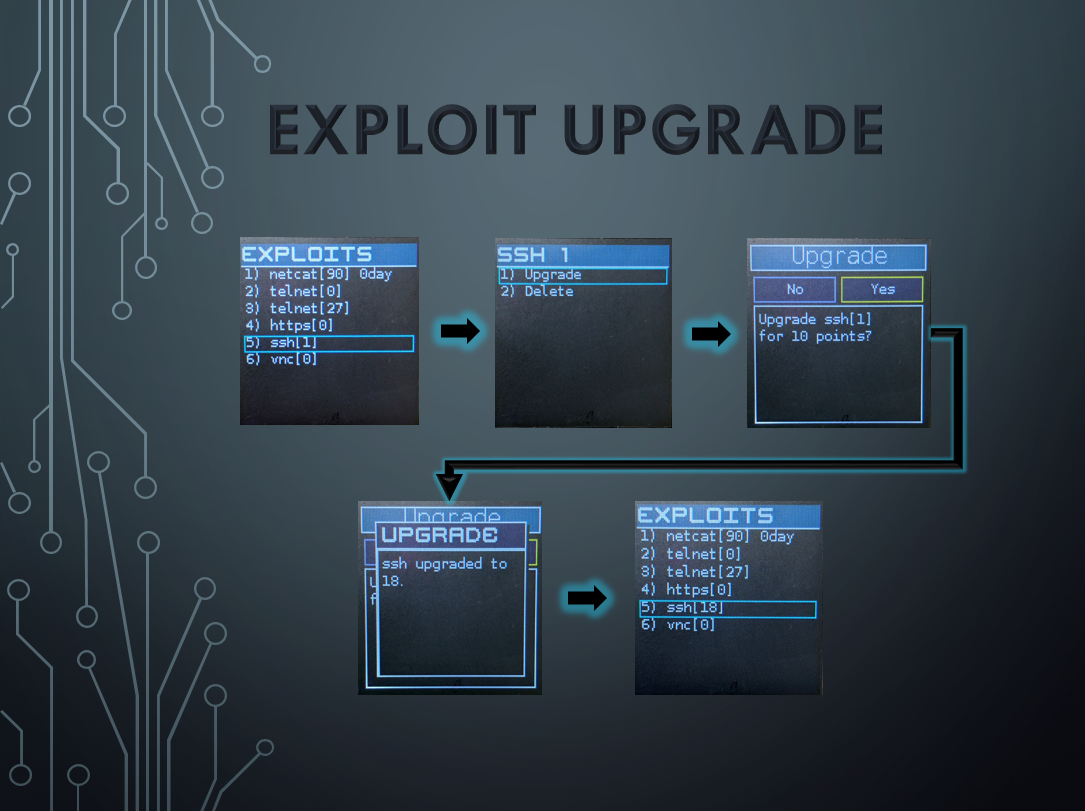
- Exploits
- Shows a detailed list of all payloads in your exploit cache. The number next to the service exploit indicates how strong the exploit is; e.g. telnet[9] means you have a payload which can be used against telnet with a strength of 9/100. When an attack occurs, the strength of your exploit is compared to the strength of the potential p0wnage target's service patch level (which you cant see). If your exploit strength >= service patch level, your exploit is successful.
- You can upgrade your exploits by selecting them with Action and choosing upgrade (it will cost you points). Most exploits are weak once initially researched, so you should spend time upgrading them before launching an attack. You can only upgrade an exploit 4x.
- If you are lucky, you may research upgrades to the point of a Zero Day[100]; denoted with "0day" at the end of the exploit. This attack has the greatest chance of success. Use it ASAP since even zero days lose their effectiveness over time...
- Exploits effectiveness degrade over time due to patch cycles. So if you hold on to it for too long, it wont be as strong as when it was initially discovered. For example, over time your exploit could degrade all the way to [0], this will NOT be successful.
![]()
Smartphone Terminal
Remeber the <REDACTED> parts of the Smartphone Terminal update?.. .We'll now you may get it. Read that log for details pertaining to our companion app. The links to download it are in that post.
The terminal can be used for many lulz, utility functions on the badge, discovery of unlocks, and modification of botnet services and firewall rules. We've also included a script kiddie toolbox so you can quickly execute commands at the tap of a button (but you have to program it yourself).
Reminder: While you are logged into the maintenance terminal, the badge is in "MAINTENANCE MODE" (e.g. the badge is offline)
![]()
CAUTION
The badges were pushed out early before they could be fully secured... (CVE-AND!XOR-1337) All badges have a default root password enabled. Sys-admins are advised to determine what that password is and change it ASAP! Otherwise malicious unauthorized users may remotely log into your badge via terminal and modify services or firewall settings for the benefit of exploitation ;)
Here's an example of some strategery...
- Attempt to hack someone's badge with your most badass exploit
- Notice they don't have the service enabled or firewall open so you can't use it on them
- Log in to THEIR badge via remote terminal (puts the badge into maintenance mode)
- Escalate privileges* (this is a puzzle all in itself)
- Turn the service on that maps to your badass exploit
- Change the firewall rule so your exploit cant make it through (allow)
- Type exit to de-escalate your privilege (or dont...whahahahah)
- Disconnect from their badge by hitting DISCONNECT on the app (ending maintenance mode)
- Use your badge to successfully p0wn theirs
- (Optional) Leave a message on their wall using the "wall" command, before disconnecting
- (Optional) Open up their entire firewall for the lulz, before disconnecting
- (NEVER OPTIONAL) Have a b33r
Command Line Interface
So there were some commands that we also had <REDACTED> in the previous update as well as some commands that didn't make much sense. Now they do. In addition, you may understand why we provided the script kiddies out there with a quick way to execute commands, perhaps to quickly escalate privileges, modify services, and firewall rules...
- fw
- Allows the display and modification of all firewall rules
- Usage: "fw x allow|deny" where x is the service rule you want to modify
![]()
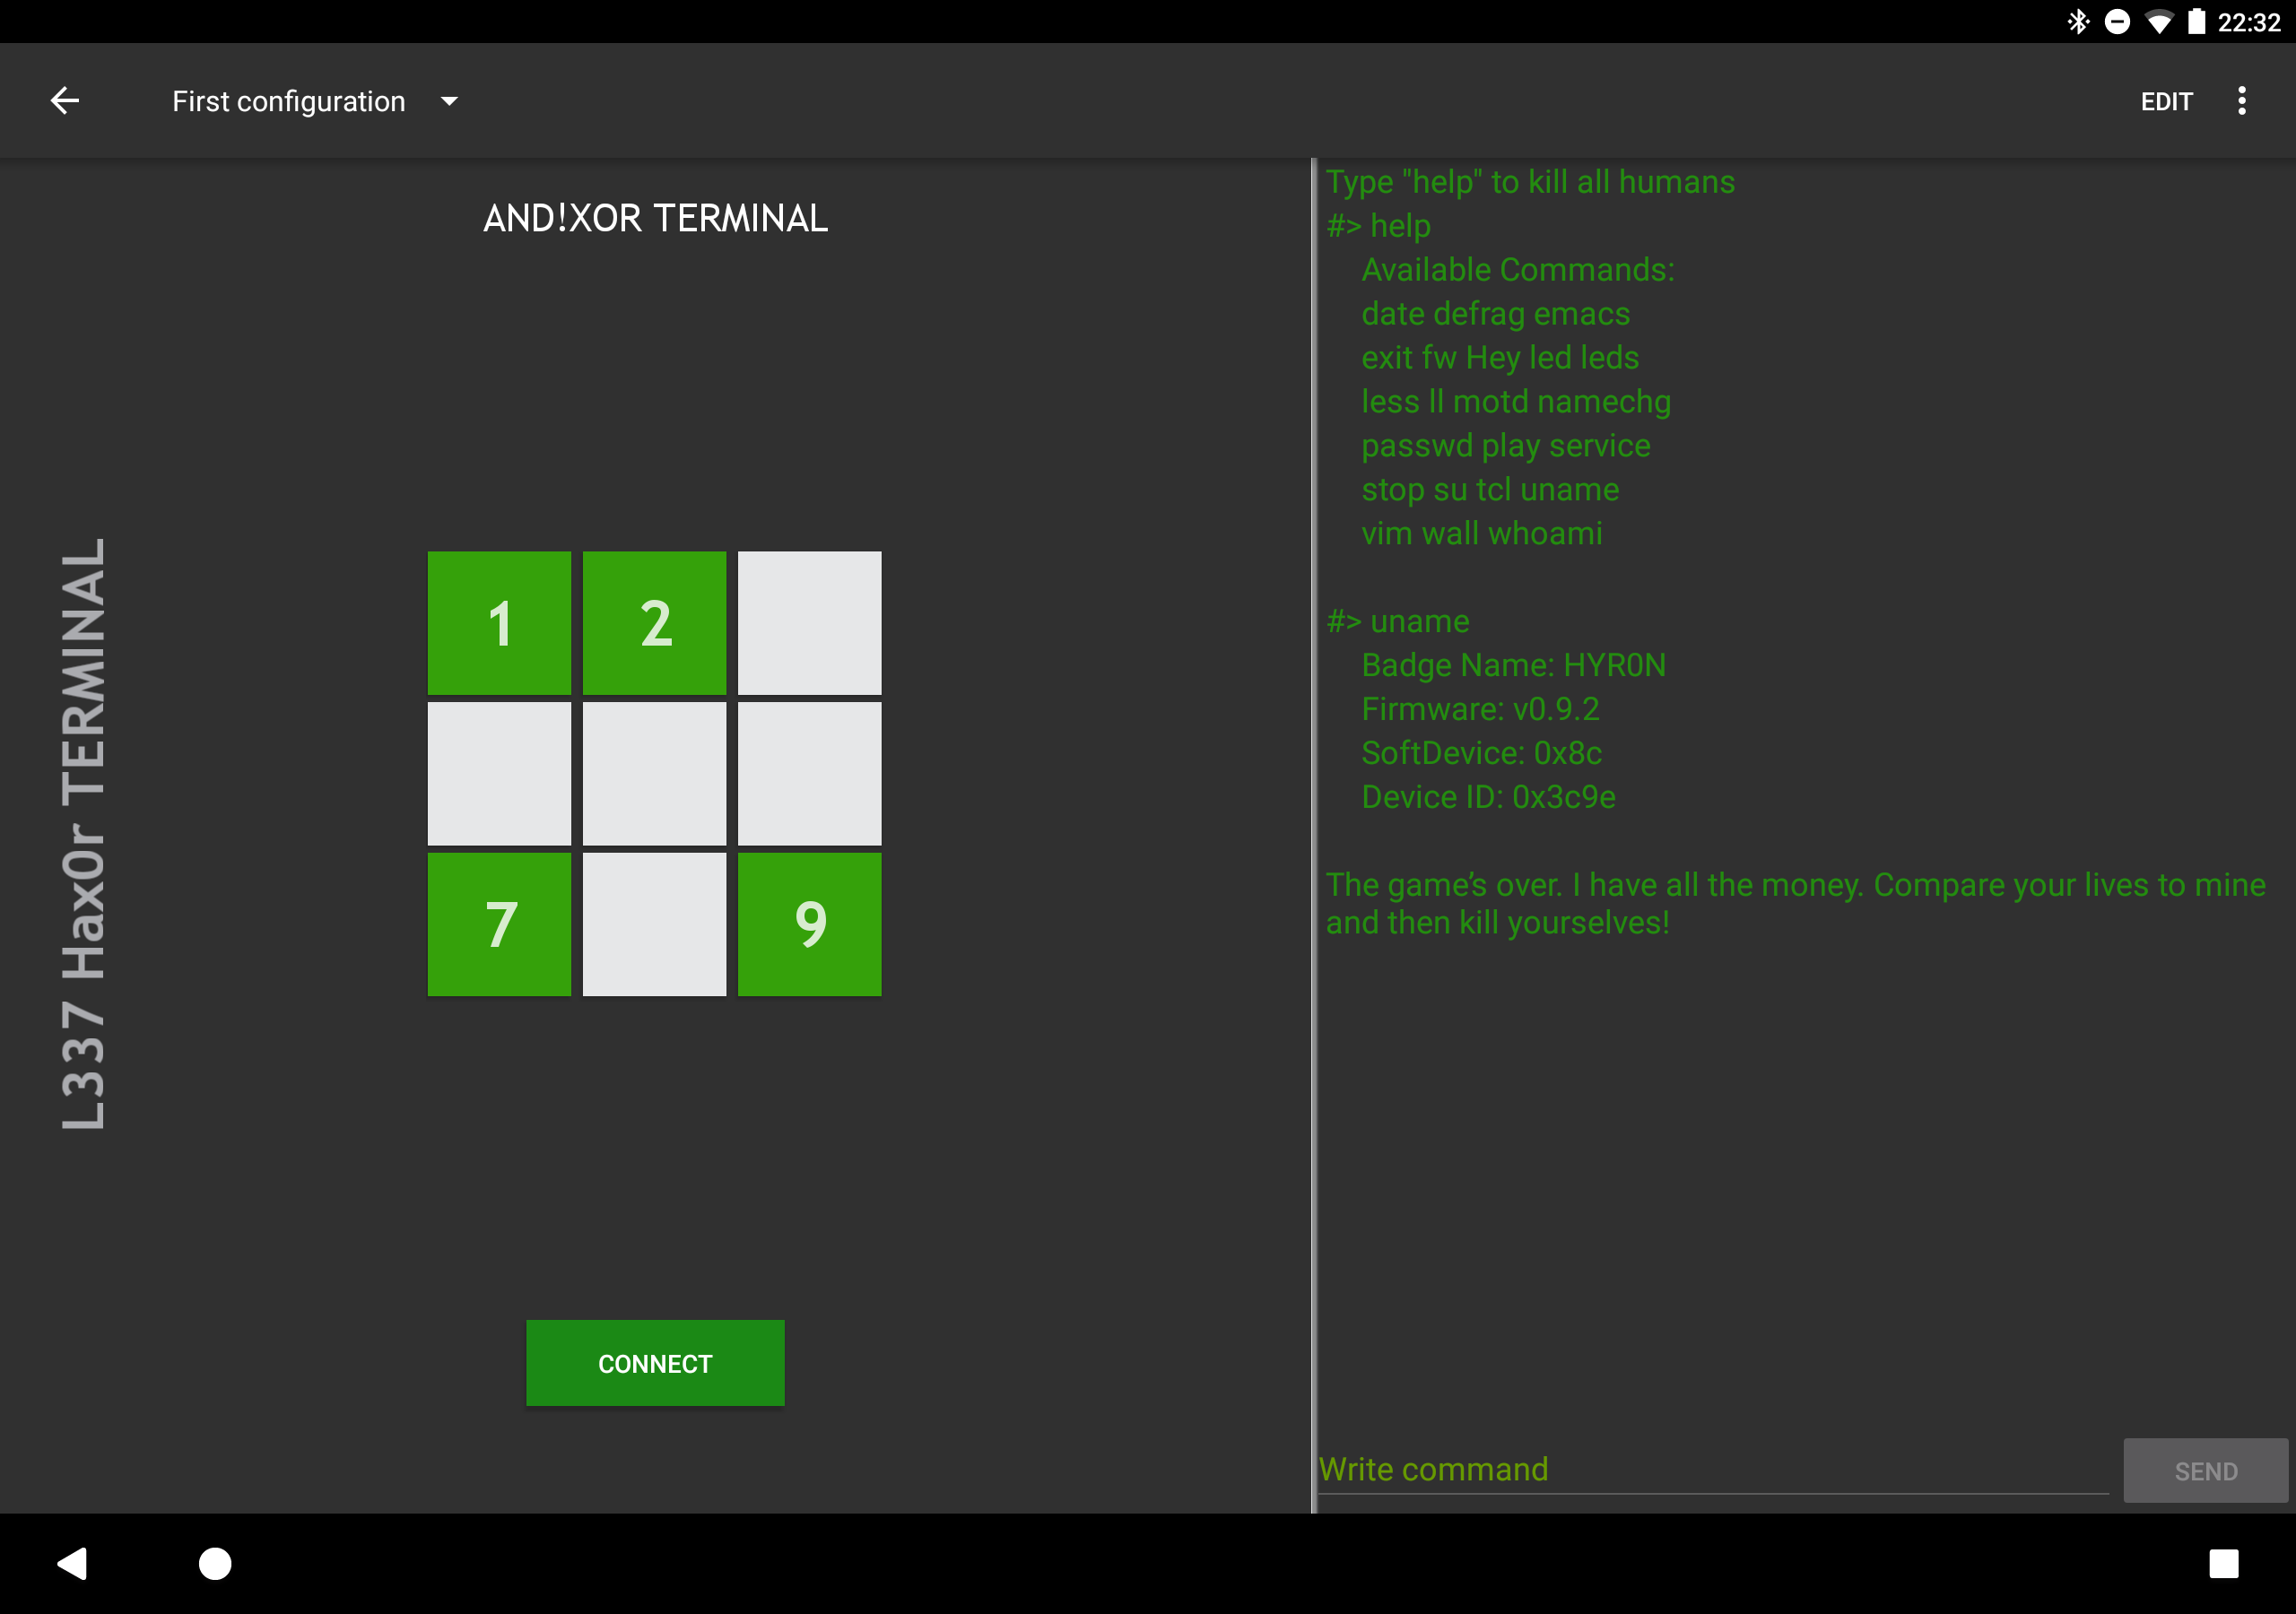
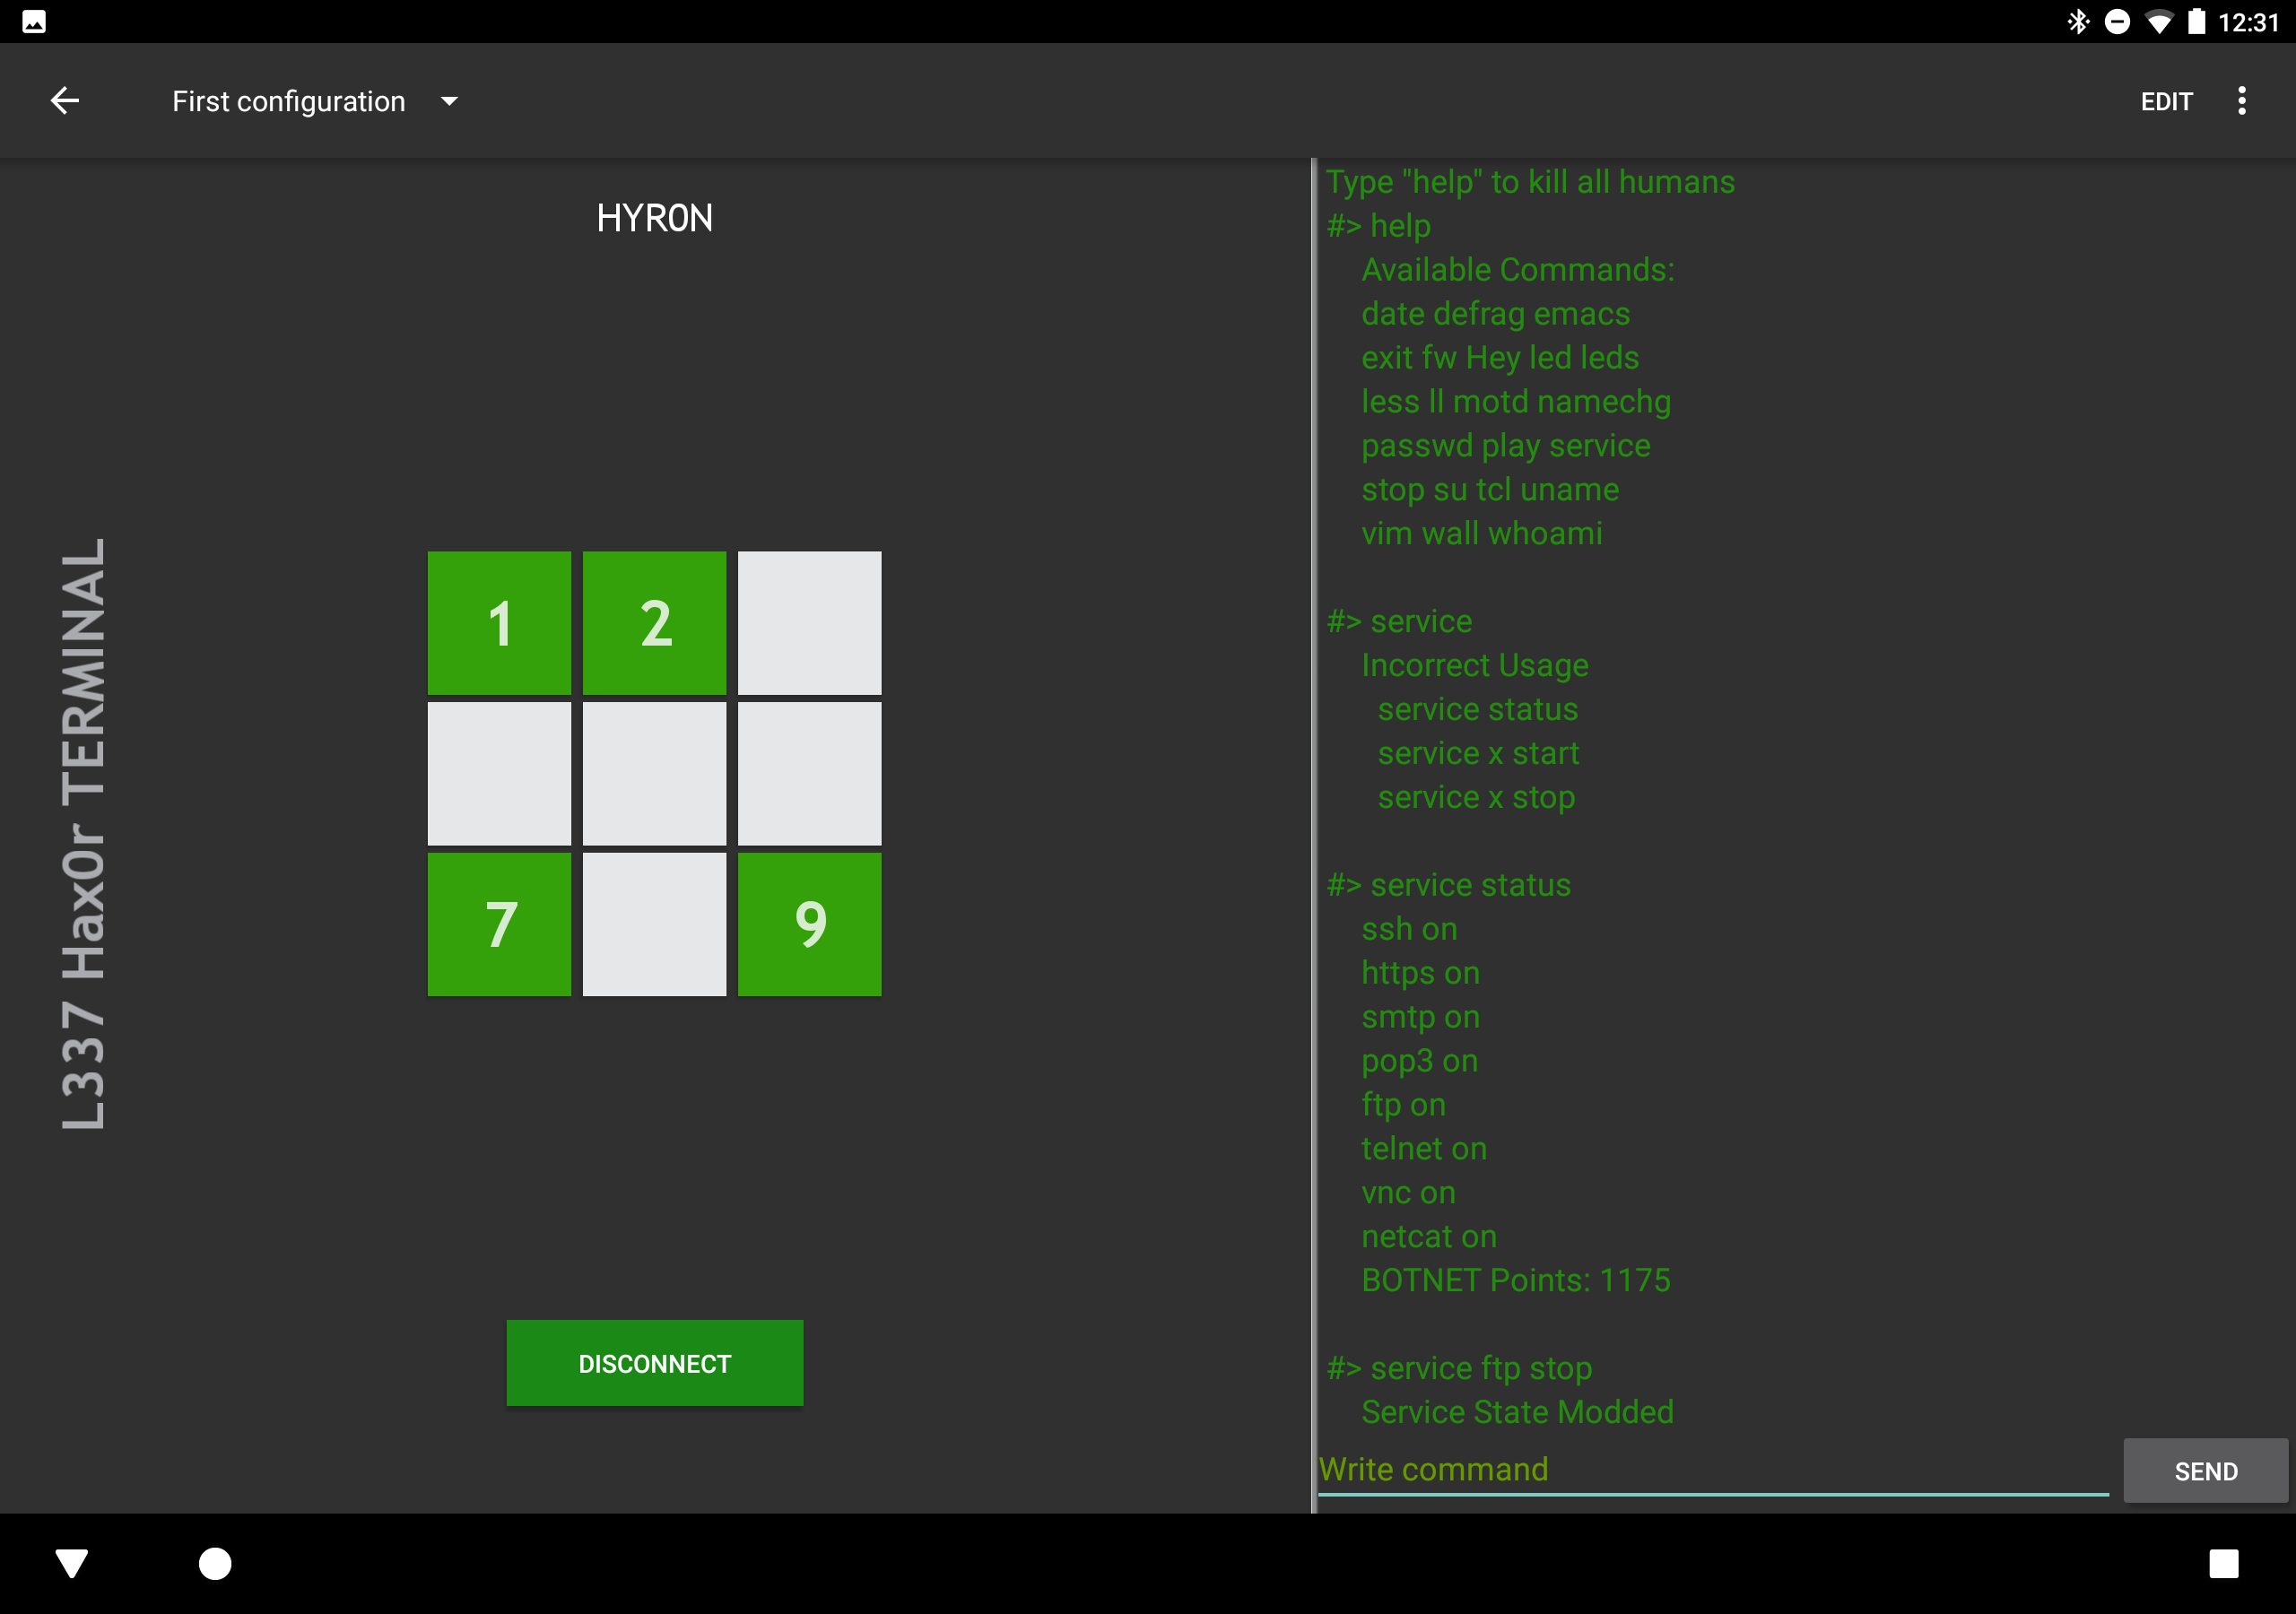
- service
- Allows the display and modification of all services
- Usage: "service x start|stop" where x is the service you want to start or stop
![]()
- su
- Allows you to switch to a different user account. Possibly one which has the permission to execute fw and service. HINT HINT you have to figure out the other user account(s) AND their passwords before you can become a command line ninja.
- exit
- Logs out the current user session. Our badge is stateful :) Meaning if you forget to type "exit" once you're in maintenance or root user mode, that's as stupid as walking away from an actual terminal with a privileged user logged in. Don't say we didn't warn you...
- passwd
- Once you figure out what the root password is, you should probably change it. This also means if you take too long to figure this out someone else (actually anyone with a smartphone) may log into your badge, change your root password, and lock you out. Time is of the essence. If your system is compromised, you only have two options (just like in real life):
- 1 - Go to your badge settings and reset it, start from scratch. You'll have to re-unlock features and your BOTNET points will be at ZERO.
- 2 - Hire some l337 BADGE Cyber Incident Response Team (BADGE-CIRT) like AND!XOR to recover your system. We work for beer, however we can't guarantee our availability.
- Once you figure out what the root password is, you should probably change it. This also means if you take too long to figure this out someone else (actually anyone with a smartphone) may log into your badge, change your root password, and lock you out. Time is of the essence. If your system is compromised, you only have two options (just like in real life):
Summary
So you have AND!XOR perturbing the system and injecting chaos via a botnet, all badge holders squaring off with one another via their sys admin interface for some badge like Capture The Flag, and anyone with a smartphone has the ability to gain access through a backdoor remote terminal and p0wn your badge. ENJOY!
-
Smartphone Integration
06/25/2017 at 17:34 • 2 comments![]()
Perhaps you don’t like graphical user interfaces and the soothing green monochrome glow of the command line just gives you warm fuzzies. Some of the badge can be managed via terminal over Bluetooth. Head to the Google Play store, search for “AND!XOR” and use the companion app. If you use iOS, the Nordic nRF Toolbox is “compatible” with its BLE UART applet. However it is more verbose than we like and sometimes buggy, you may have to force close. We recommend making friends with an Android user, find one and buy them a beer…or get yourself an Android burner phone for DEF CON (Per @Viss a real burner phone is one you can fit in your butt). Note that this smartphone integration feature isn't available until the badge has been activated...DO NOT EMAIL US ASKING WHY IT DOES NOT WORK IF YOU HAVE NOT ACTIVATED YOUR BADGE.
- Organic AND!XOR Android Application
- Nordic nRF ToolBox (iOS)
- Nordic nRF ToolBox (Windows Mobile)
The terminal can be used for many lulz, utility functions on the badge, discovery of unlocks, and modification of <REDACTED> to support <REDACTED>. We've also included a script kiddie toolbox so you can quickly execute commands at the tap of a button (but you have to program it yourself). A note to those who are wary of application permissions, the app will ask for the ability to access location services. We are NOT tracking you, the Android environment bundles Bluetooth with location services. If you don't enable it, the app can't use BLE to communicate with the badge.
Reminder: While you are logged into the maintenance terminal, the badge is in "MAINTENANCE MODE" (e.g. you are offline and other Bluetooth services are disabled)
Organic AND!XOR Android Application Quick Start Guide
- Launch App
- Tap Terminal
- Tap Connect
- Select a badge from the list to connect to (we only show AND!XOR badges)
- Swipe Right (giggity...)
- Type "help" at the terminal for a list of available commands
- Swipe Left and disconnect when done (or it will timeout with 2 minutes of inactivity).
Mo@R Info and Pretty Pictures
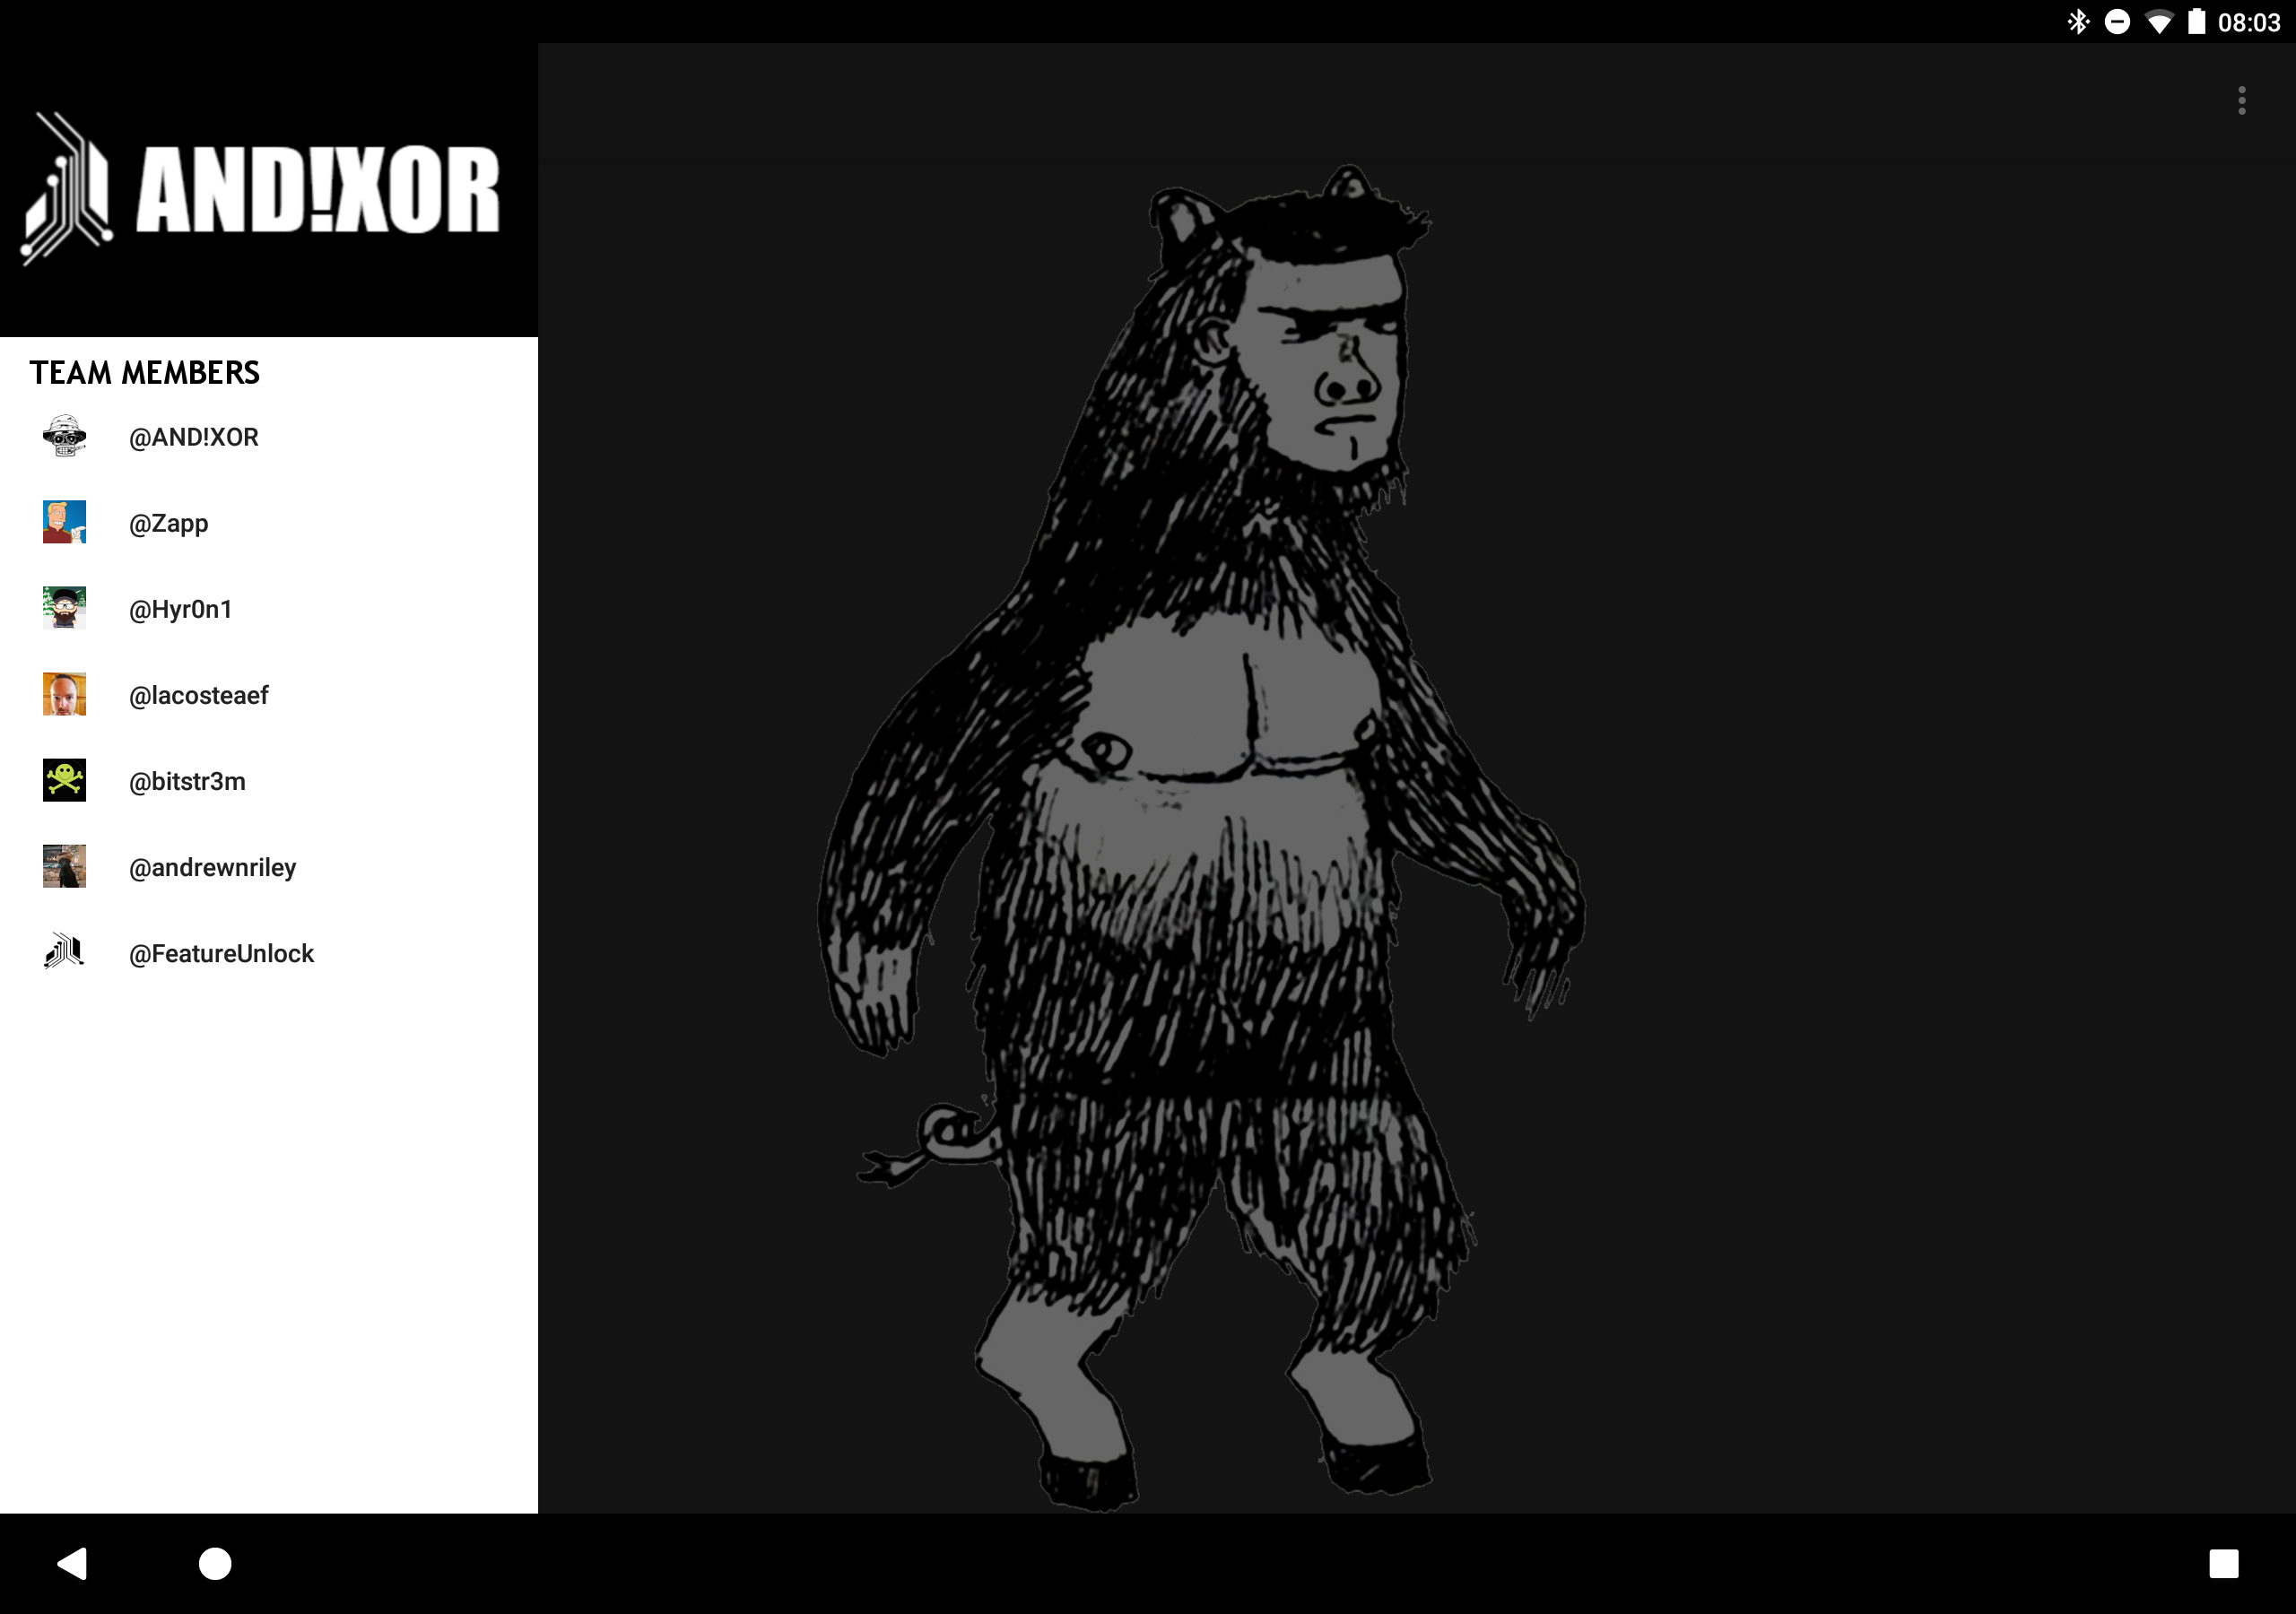
- Main Application
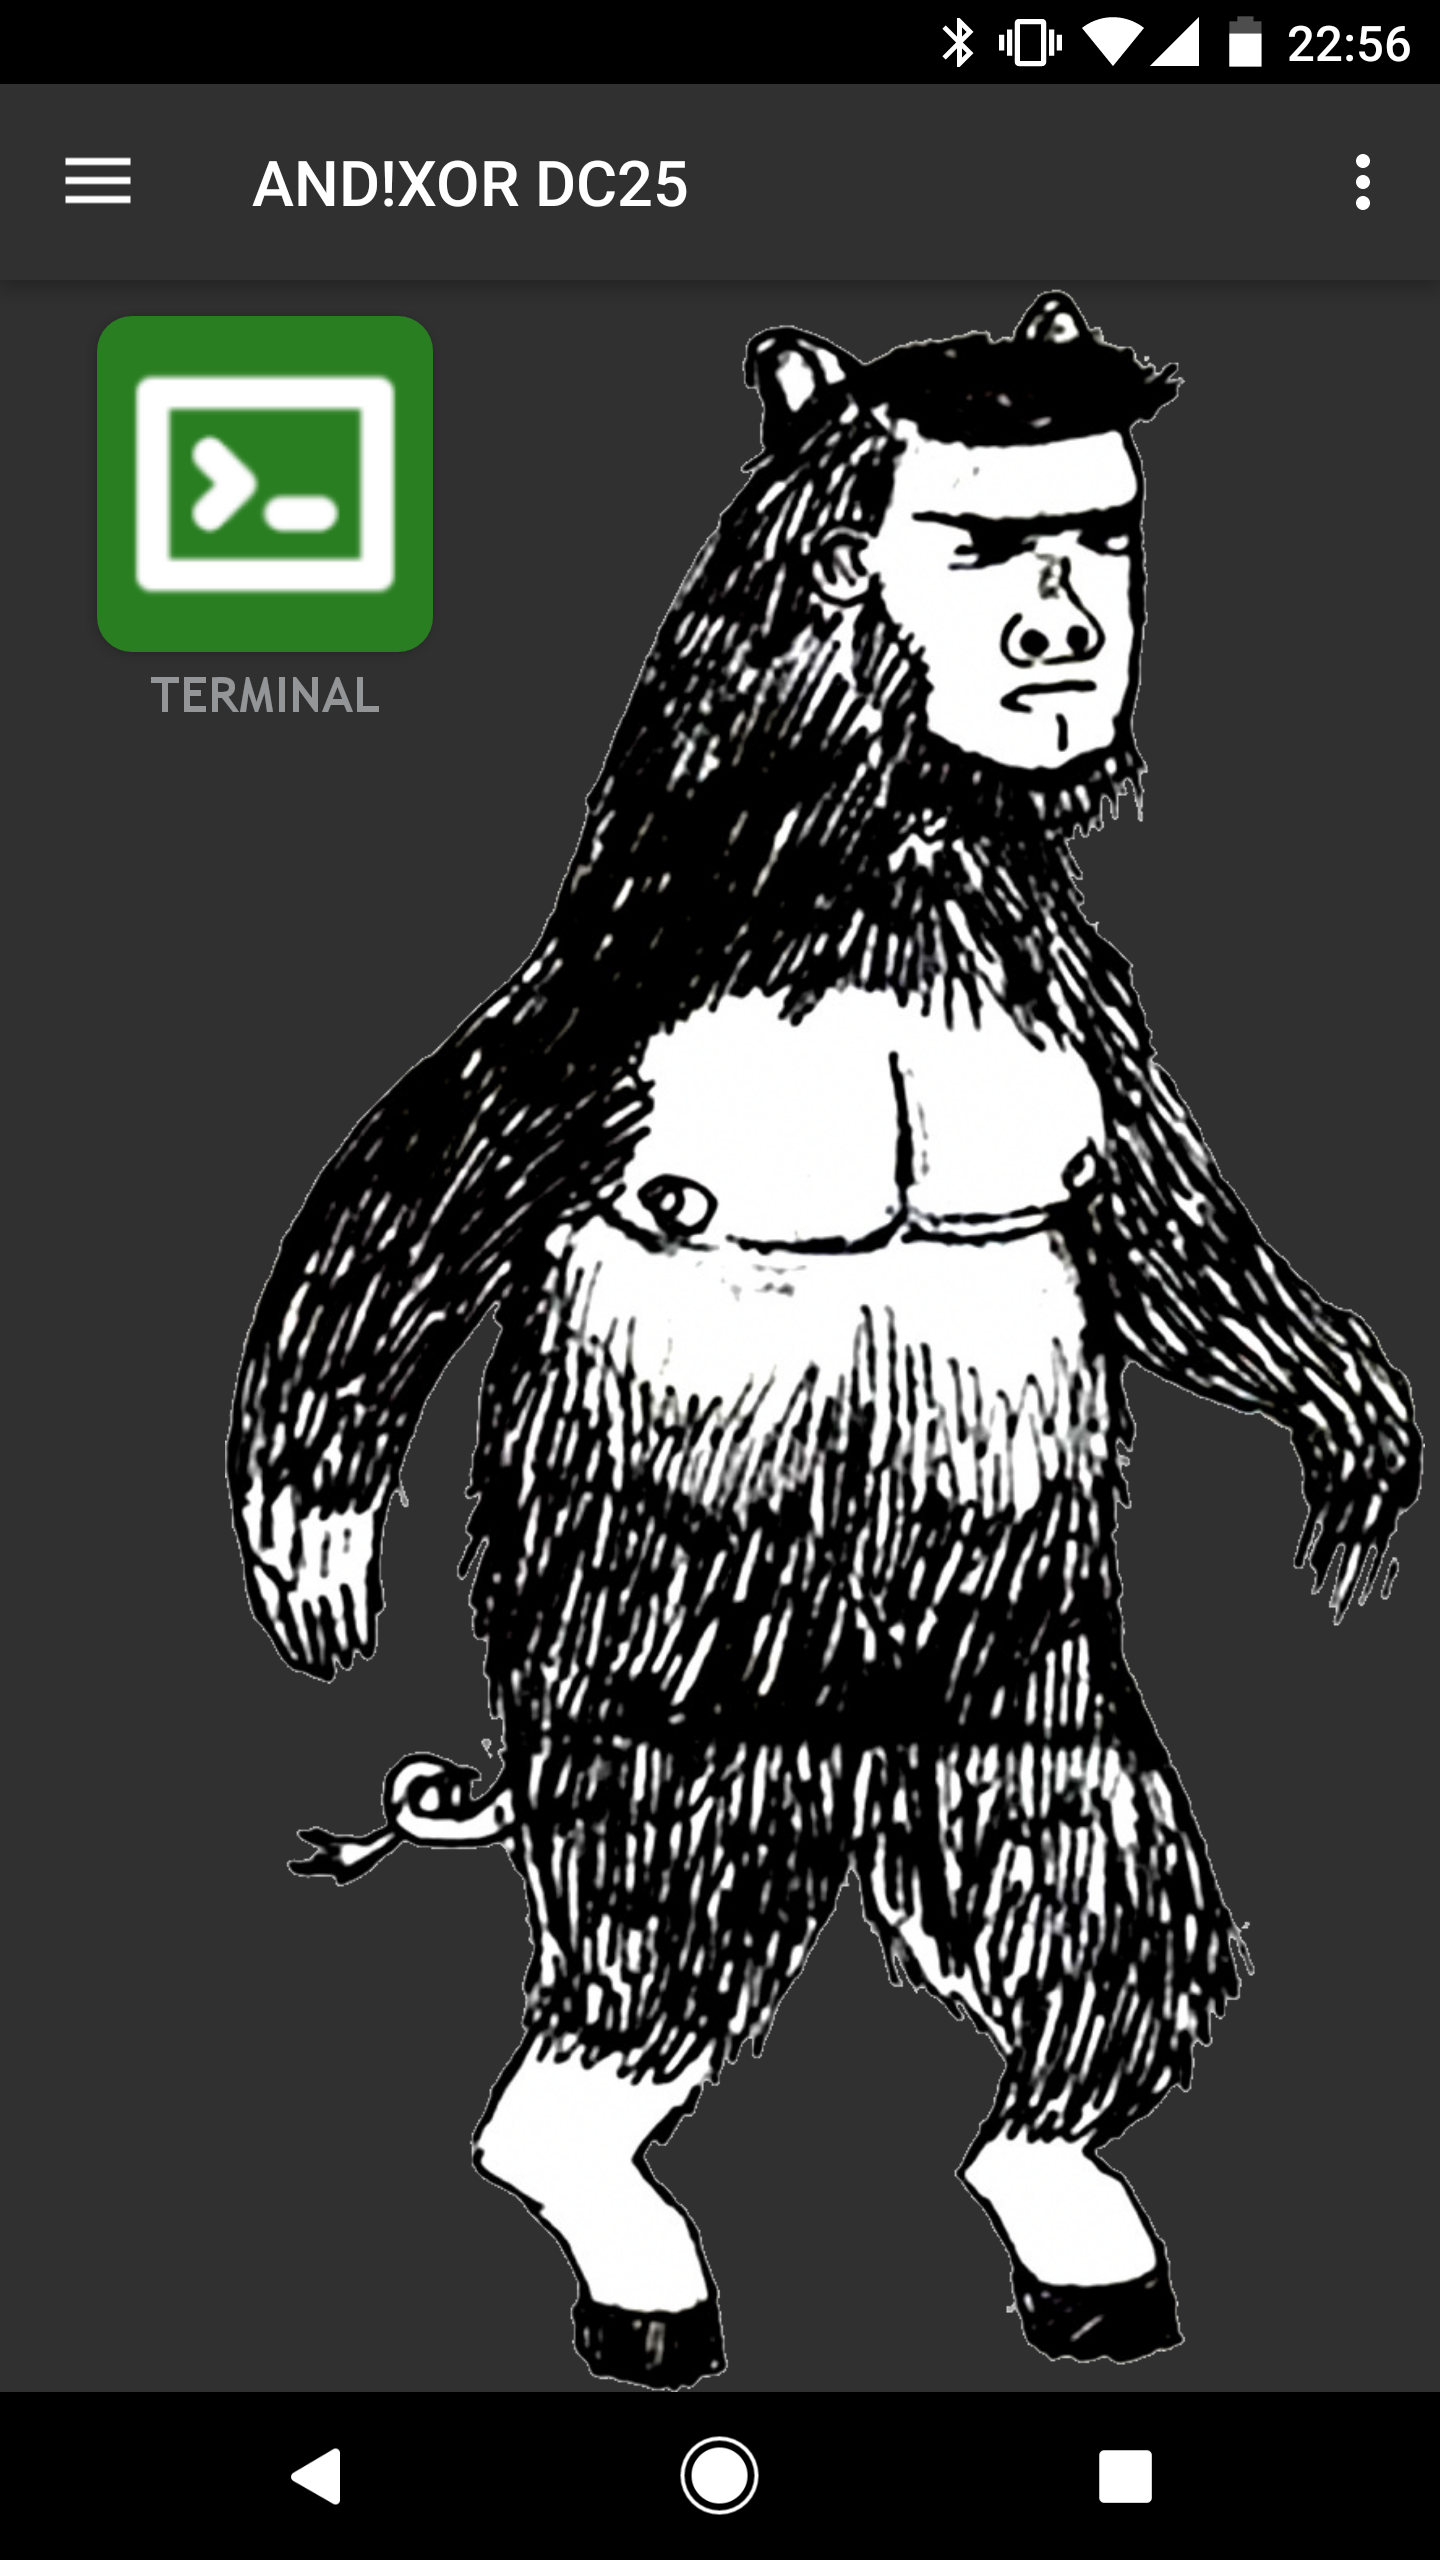
- This is the view of the main application. Tapping the top left menu brings down links to our individual Twitter accounts. We HIGHLY RECOMMEND YOU FOLLOW US AND LOOK AT ALL ACCOUNTS FREQUENTLY because we will be releasing hints to easter eggs throughout the con. Top right menu contains information regarding open source software licenses as well as a help link to this page for reference. To launch the Terminal and get hacking, tap the green Terminal Applet in the corner.
![]()
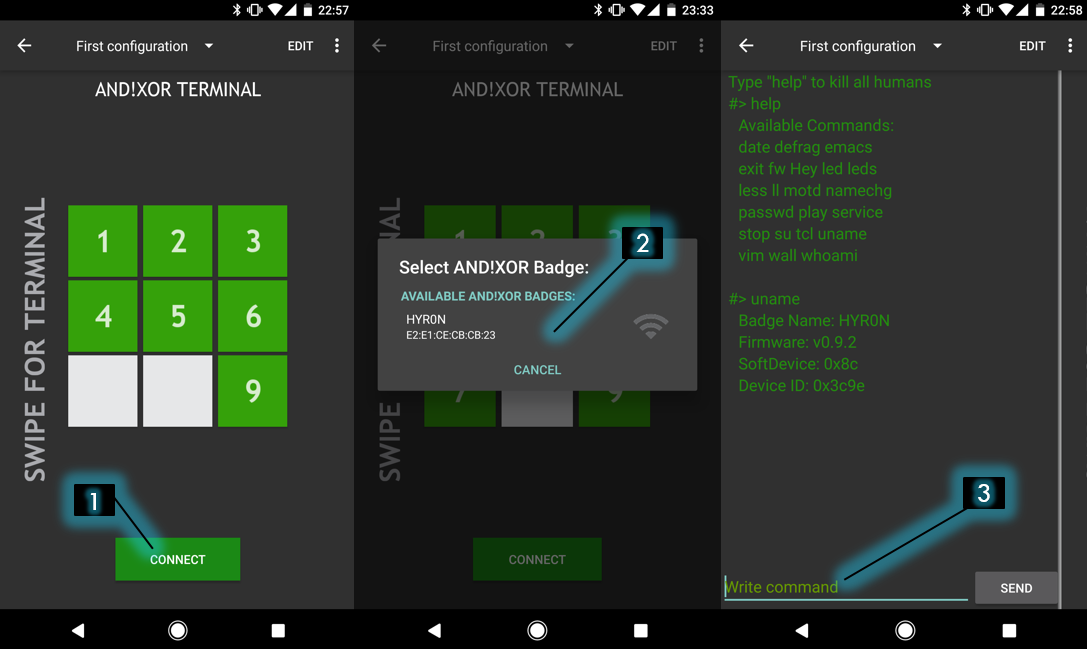
- Terminal App
- Terminal Screen
- Once you launch the Terminal applet, you'll be presented with the Script Kiddie Toolbox (see next section) and a Connect button, tap that button (1). It will launch a scanning pop up showing all available AND!XOR badges within proximity advertising the name used during badge setup (or the one you changed it to through settings). Select the badge of choice (2). Once it connects, swipe right (giggity...giggity...). You'll now be at the command line of the badge. Type 'help' for a list of commands in the input field (3). You are limited to 20 characters. Begin exploring.
- Terminal Screen
![]()
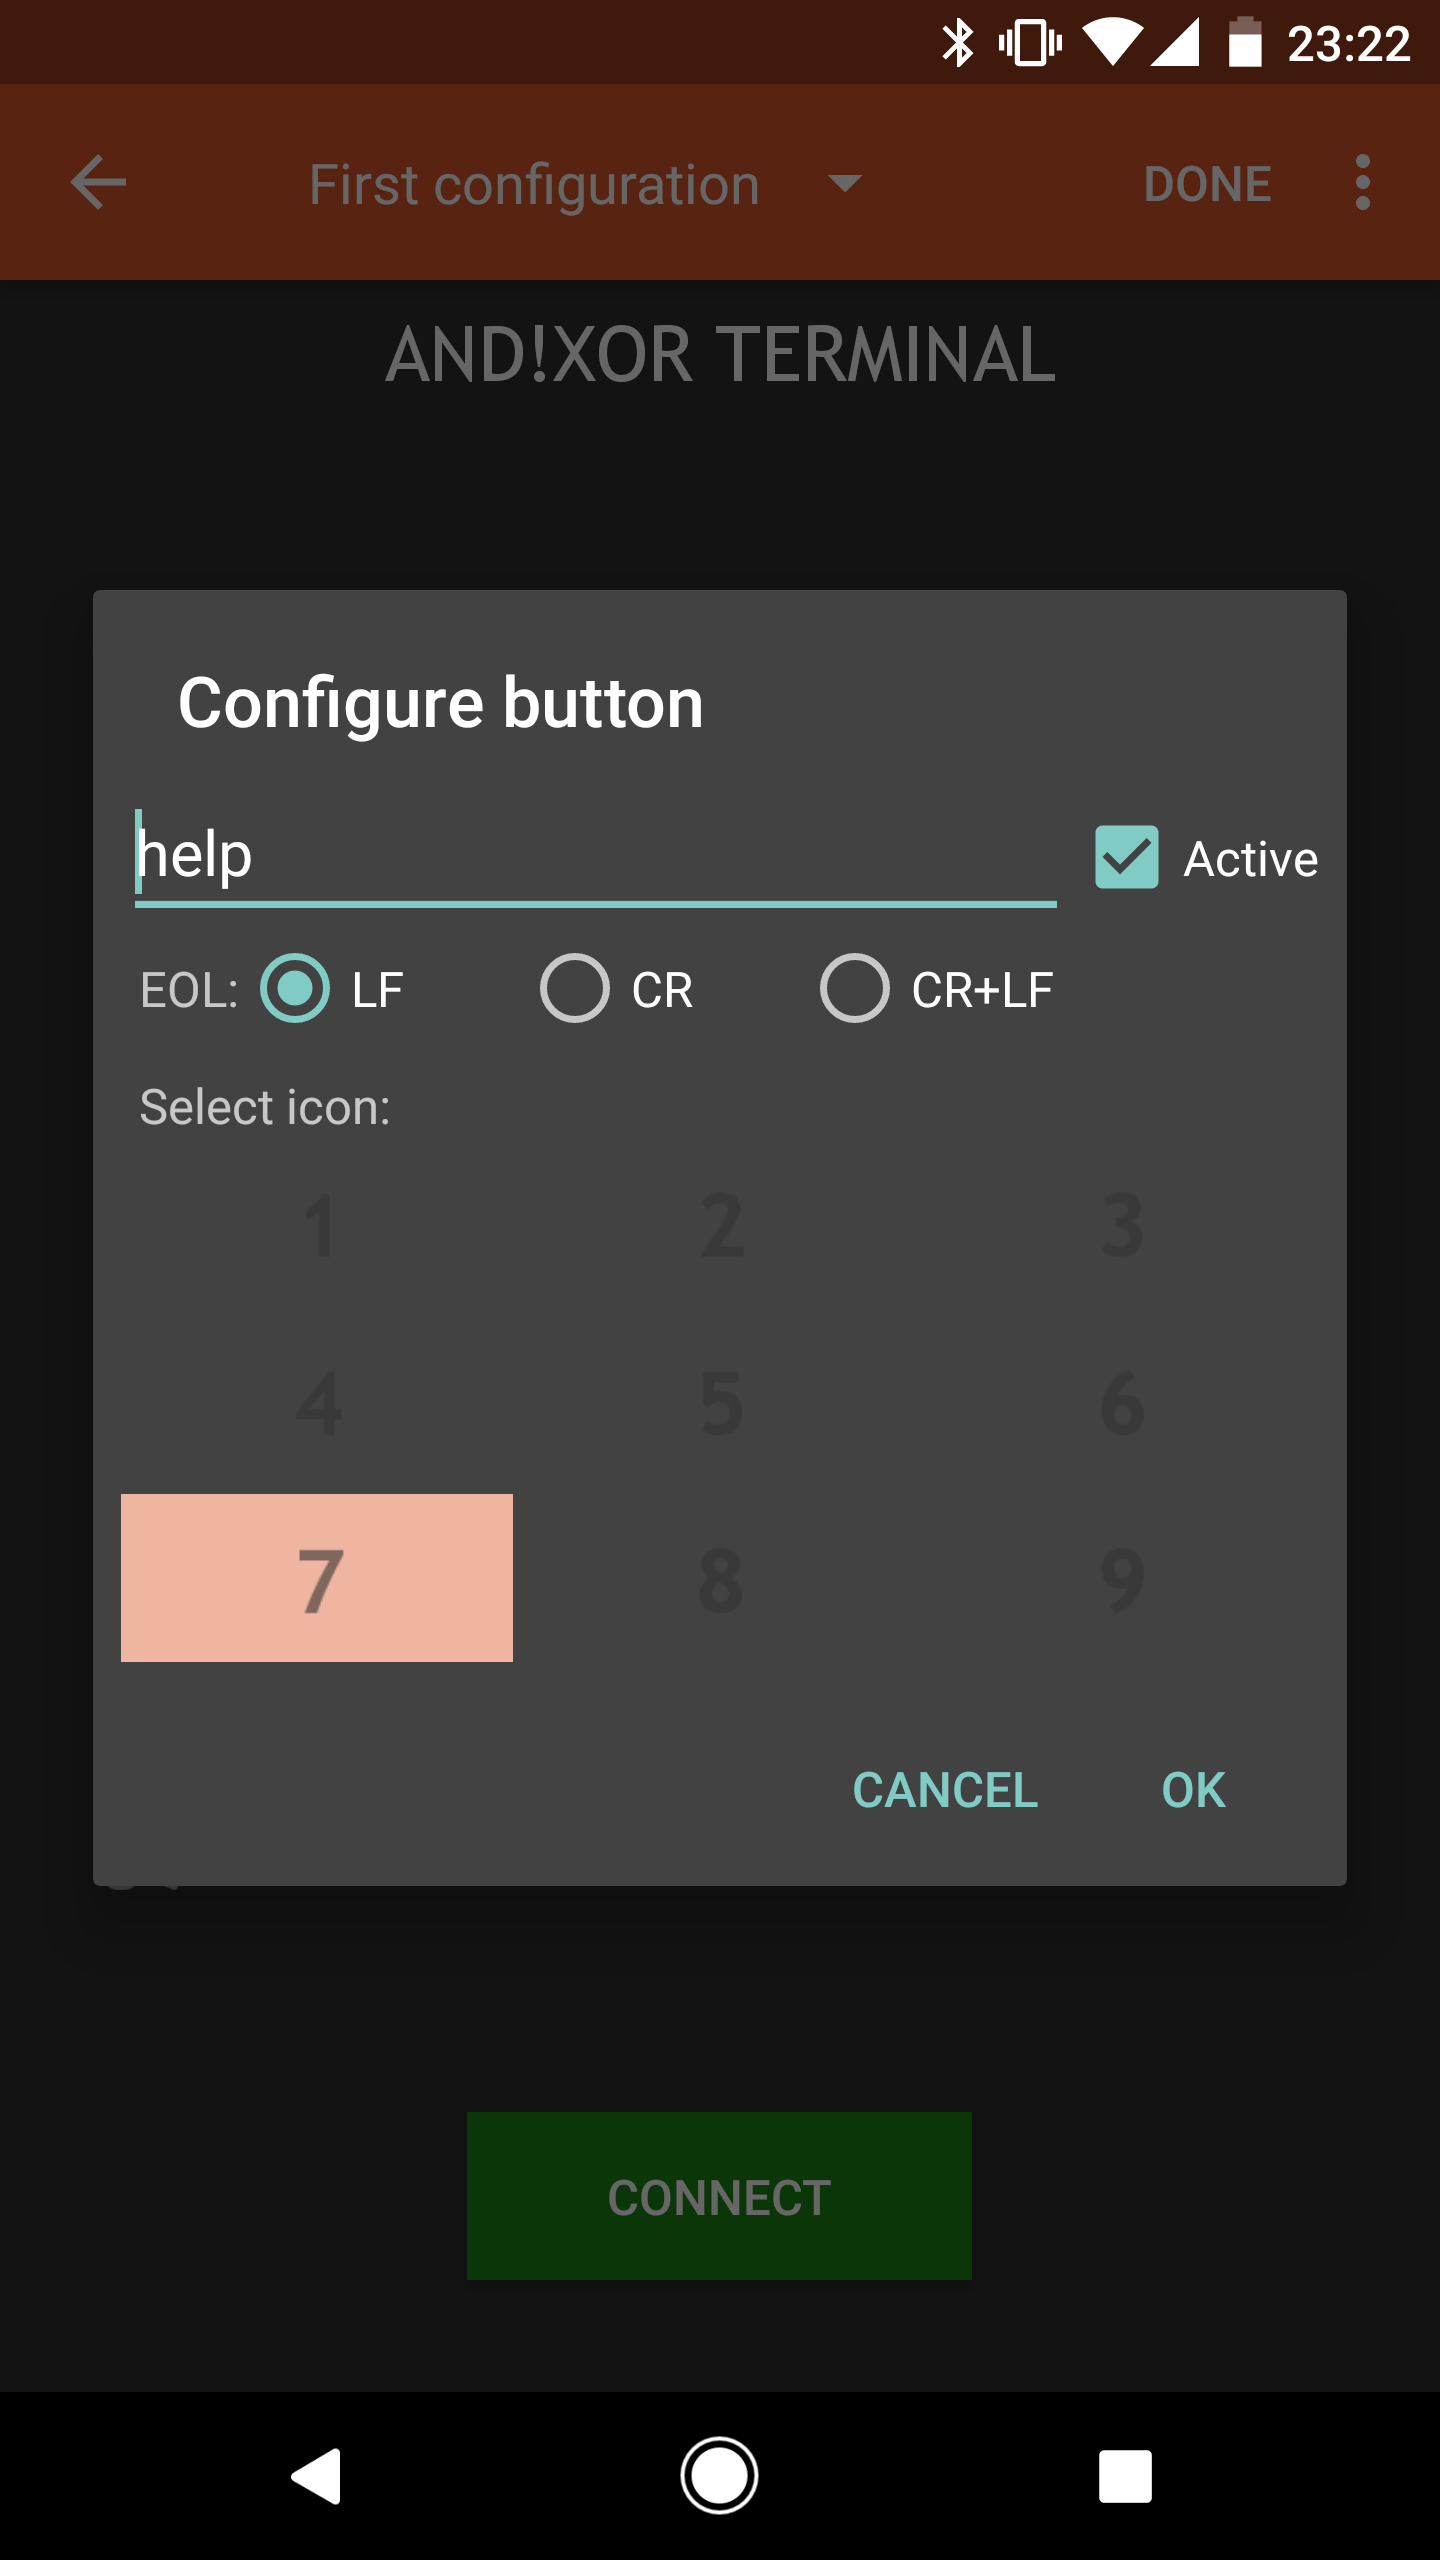
- Script Kiddie Toolbox
- After a while you may find yourself typing the same command over...and over...and over... and think to yourself, "I need to script this." That's what the Script Kiddie toolbox is for on the main Terminal Applet screen. Tap EDIT in the top right and then one of the nine buttons you want to map your script to. Type whatever command you want scripted in the input field (20 character limit). Leave Active checked (this keeps the script button active). Leave EOL selected as Line Feed (LF). Pick a number to represent a reference icon for your script, we recommend using the number corresponding to the cell in the 3x3 matrix. Hit Okay. Then hit DONE in the top right. Now your script is ready. Whenever you are connected, just tap the button and it will type and send the command automatically for you. We wonder what kind of evil you will come up with....
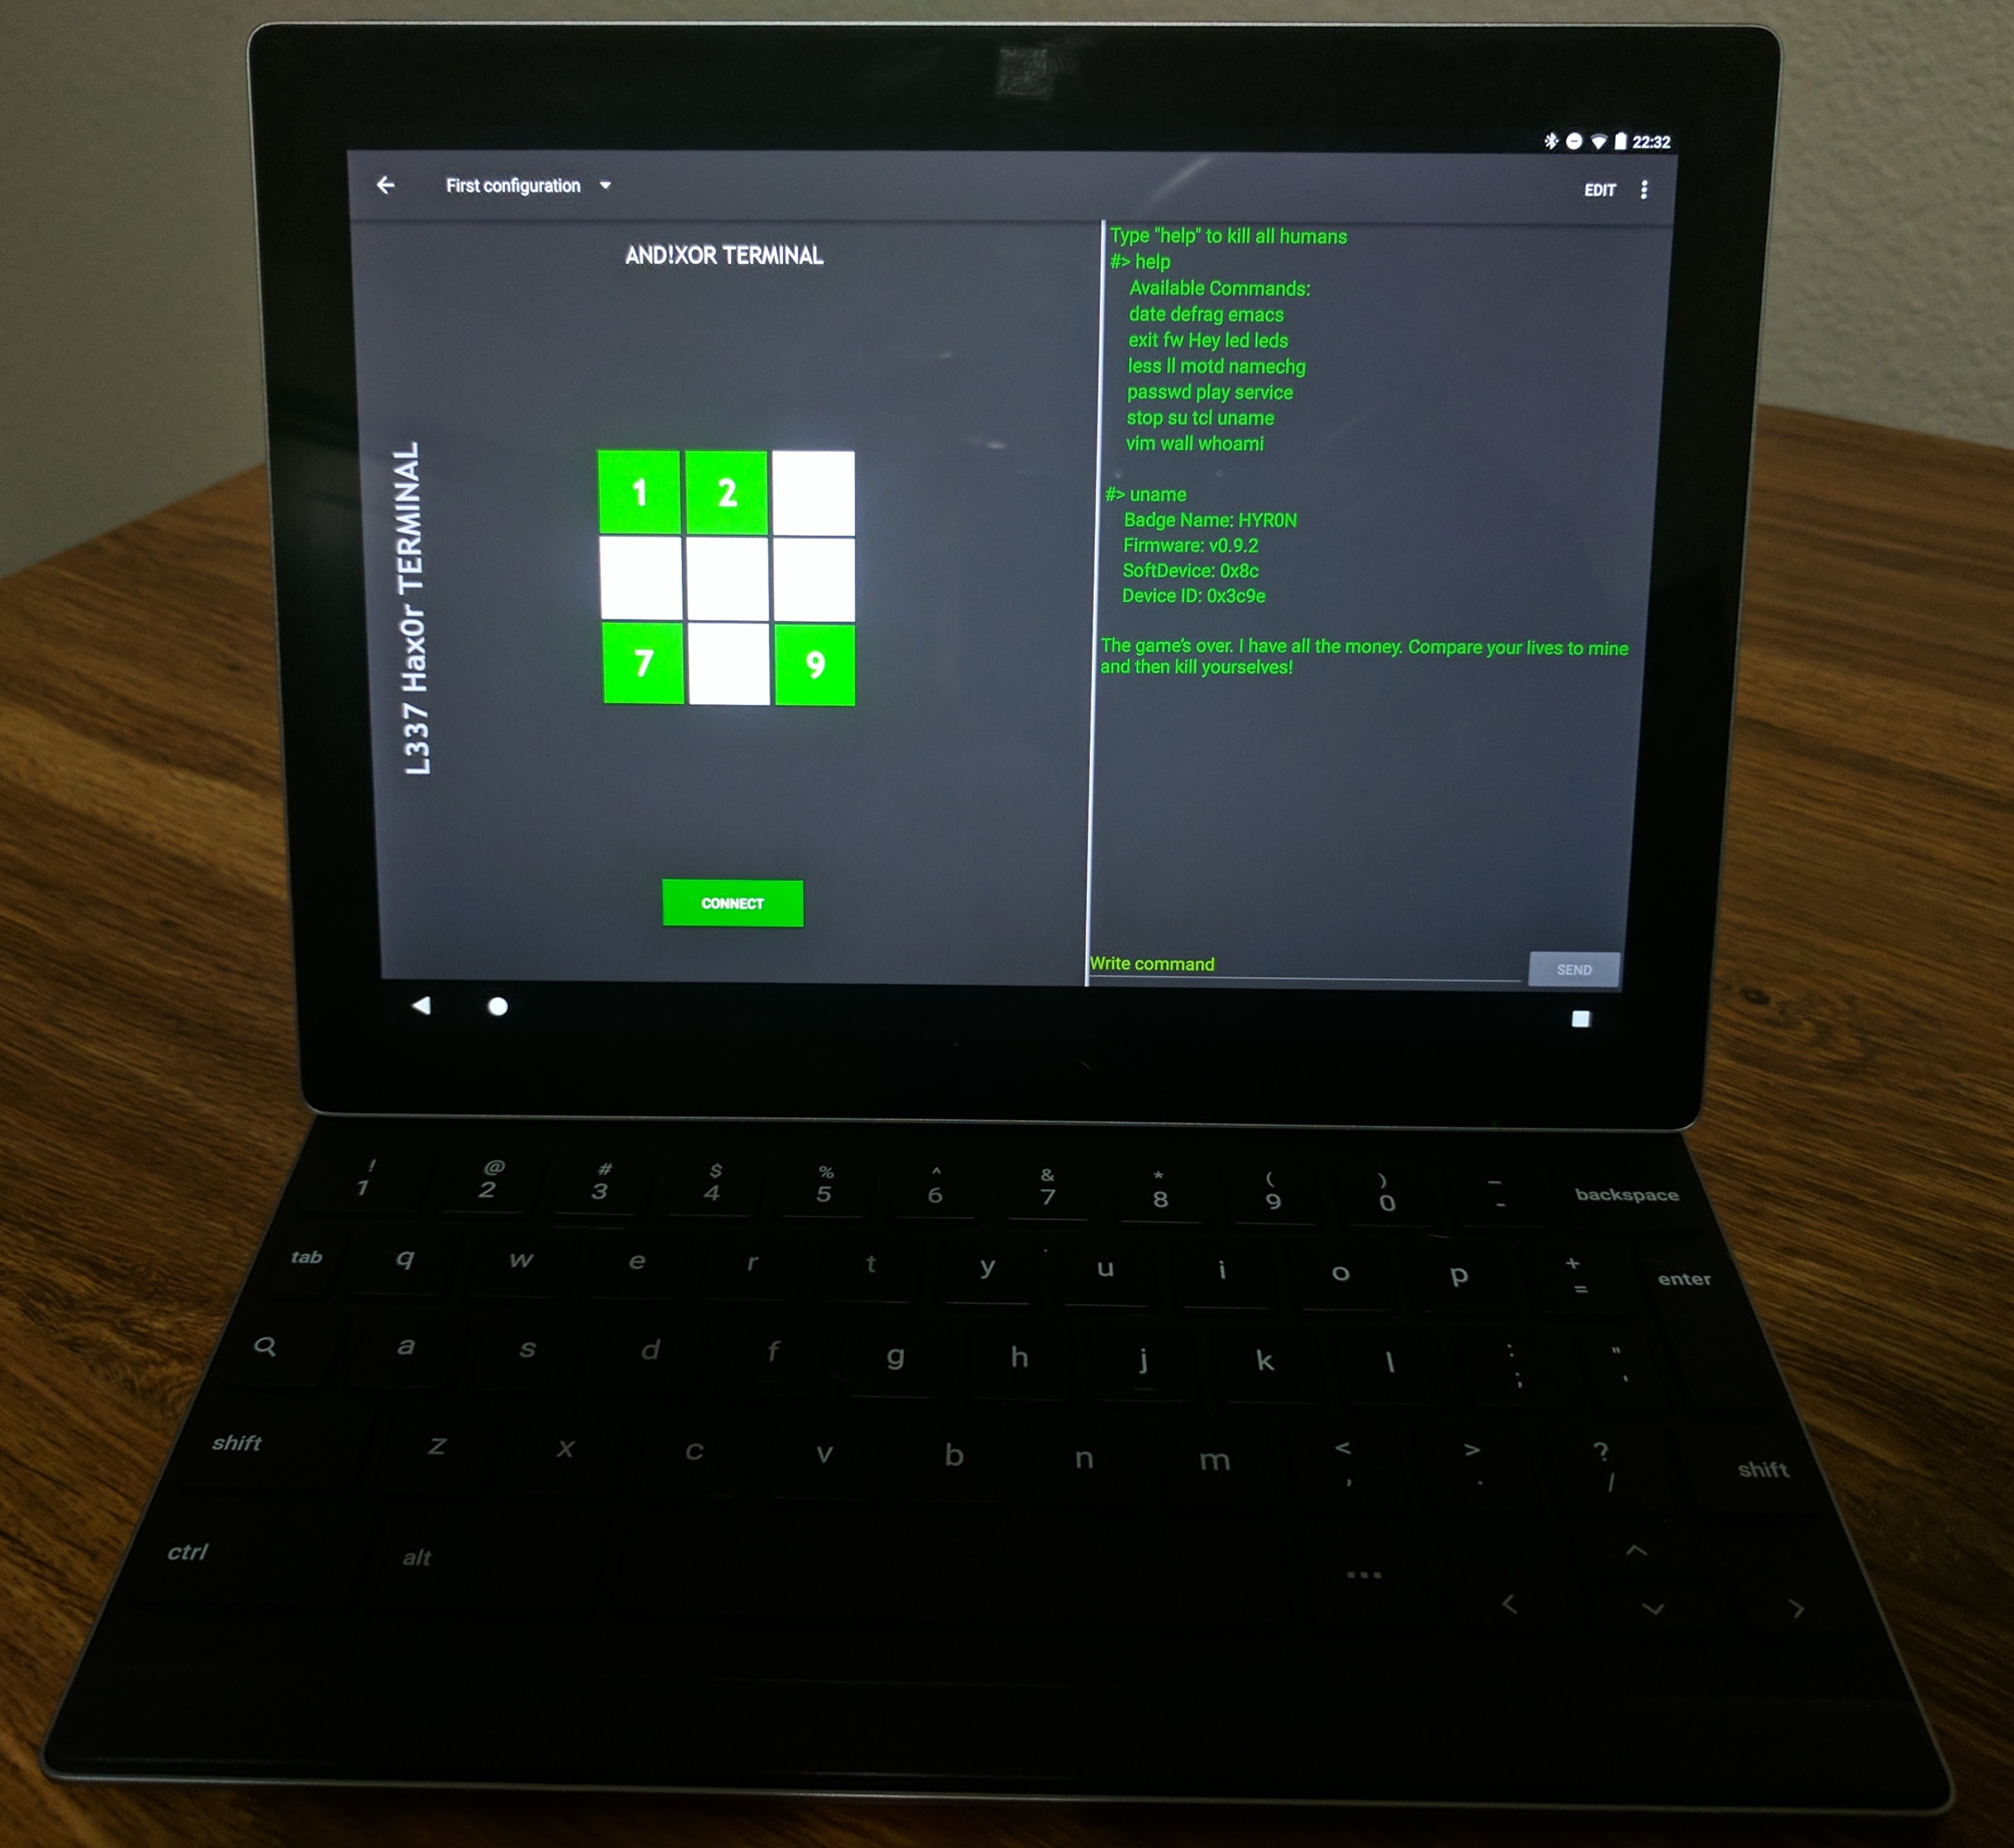
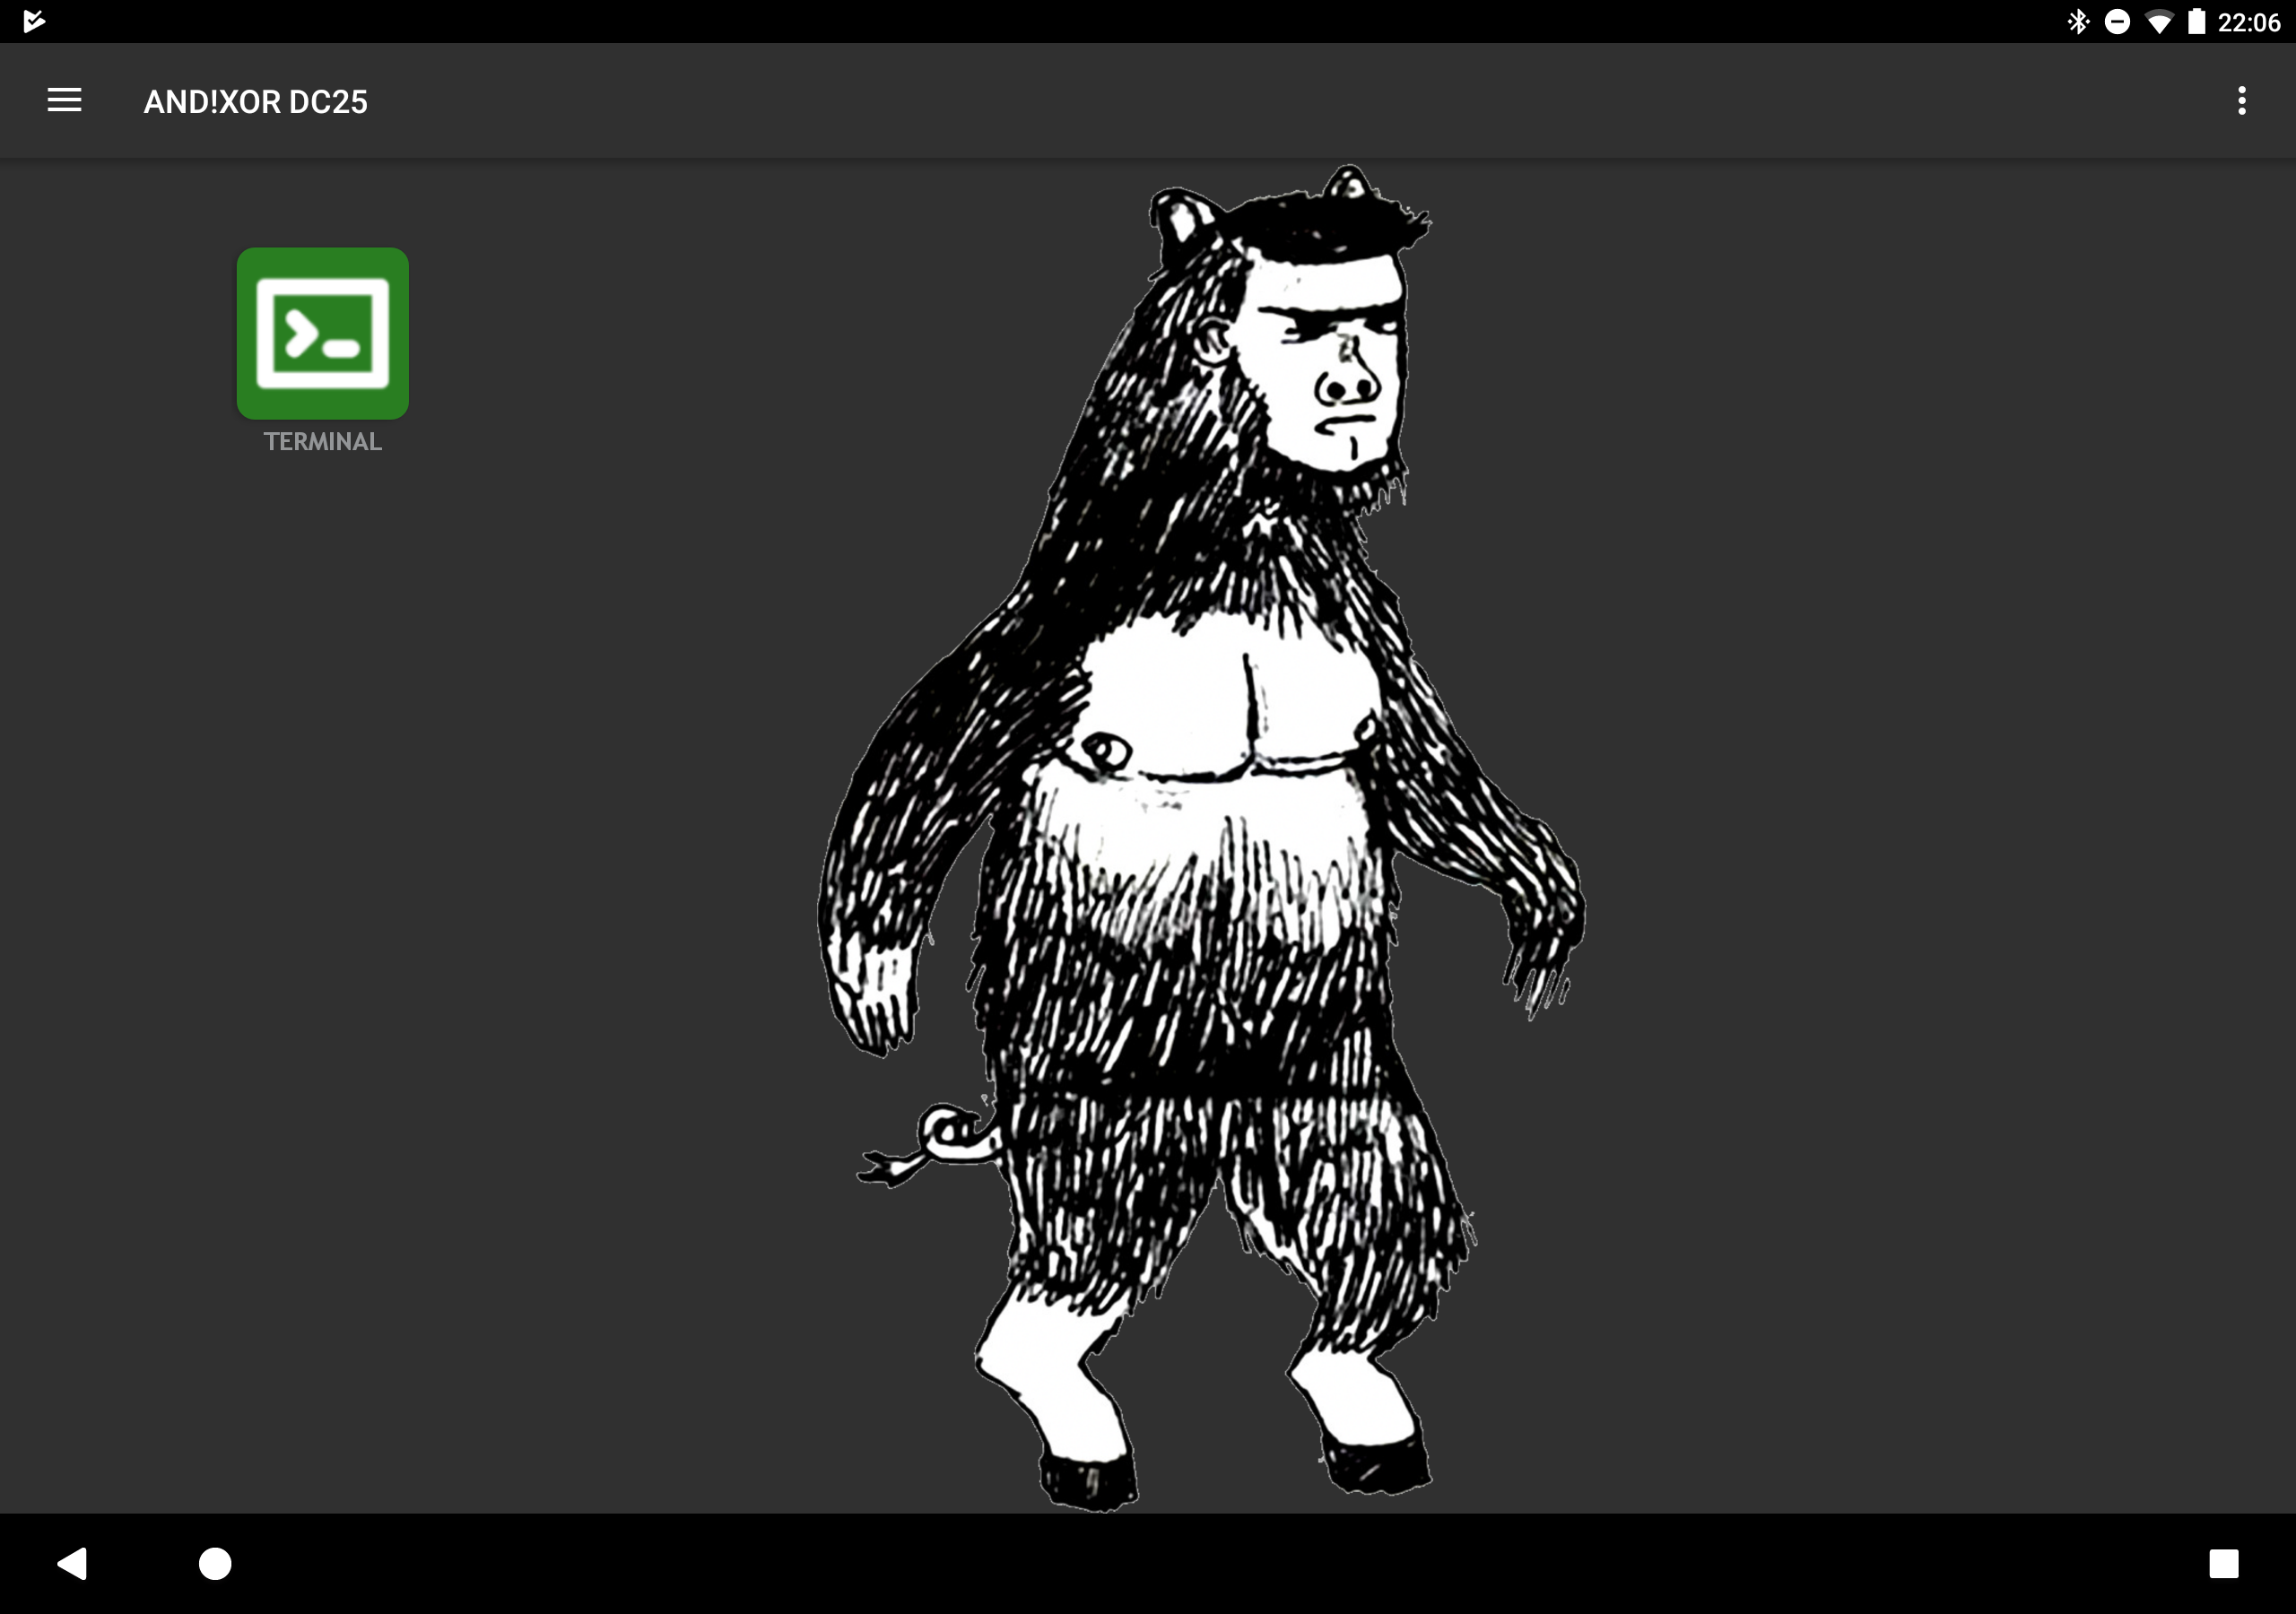
![]() Alternate Screen Layouts
Alternate Screen LayoutsDon't fancy yourself with the standard smartphone portrait layout? Use a tablet? We got you covered.
![]()
![]()
![]()
Command List
For command usage details, simply type the command in the terminal and it will automatically display the recommended usage with parameters, flags, etc (if necessary).
- date
- Display or change the current date
- defrag
- We use a FAT16 file system structure for throwback purposes, defragging the disk is highly recommended to increase performance
- emacs
- A file editor
- exit
- <REDACTED>
- fw
- <REDACTED>
- Hey
- It's for correct horse battery staples and cows like you
- led
- Light up a specific LED with a specific color
- leds
- Light up all of the LEDs with a specific color
- less
- Display the contents of a file to the terminal
- ll
- Long listing of the file directory
- motd
- Display message of the day
- namechg
- Change the displayed name on the badge
- passwd
- <REDACTED>
- play
- Play a bling mode
- service
- <REDACTED>
- stop
- Stop the current bling being played
- su
- <REDACTED>
- tcl
- Run a TCL script thats on the SD card
- uname
- Prints system name, details, and version numbers
- vim
- A file editor
- wall
- A wall to leave messages on
- whoami
- Assists the user with the philosophical question
-
TCL-ish Scripting
06/25/2017 at 17:32 • 1 comment`. ___ __,' __`. _..----....____ __...--.'``;. ,. ;``--..__ .' ,-._ _.-' _..-''-------' `' `' `' O ``-''._ (,;') _,' ,'________________ \`-._`-',' `._ ```````````------...___ '-.._'-: ```--.._ ,. ````--...__\-. `.--. `-` AND!XOR ____ | |` `. `. ,'`````. ; ;` `._`. __________ `. \'__/` `-:._____/______/___/____`. \ ` | `._ `. \ `._________`-. `. `.___ `------'`We wanted to build upon what we did at DC24 with an even more hackable badge. But we’re taking a different route from last year. No POS Arduino IDE, no specialized STM32 framework, no USB, or special drivers. This year the badge is scriptable. We didn’t want hackers spending their con configuring an arcane build environment. We want you to hack the badge on day 1, share you hacks during the con, and show us all the great things you can do. So what have we done? We’ve embedded a scripting engine. Not only that but we’ve created basic, easy-to-understand APIs for almost everything in the badge. As much as we could come up with. We looked at Python but was not impressed with anything out there. We even had a Javascript engine running on the badge at one point, but it used 25% of the flash space, we needed that for bling. We ended up adopting a very limited TCL engine. Your favorite TCL scripts won’t run on the badge, that’s not the point.
Badge TCL Language Support
- Badge supports command grouping with double quotes “ ”, braces { }, and brackets [ ].
- Badge also supports variable substitution with $.
- Badge does not support regular expressions.
- Note that some commands are executed in RPN (Reverse Polish Notation)
The following commands are supported:
- set
- subst
- puts
- proc
- if
- for
- while
- return
- break
- continue
- Mathematical expressions
- + , - , * , / , > , >= , < , <= , == , !=
Special Commands
- cls
- Clears the screen
- delay <ms>
- Pauses execution for specified milliseconds
- incr <variable>
- Increments the given variable by 1
- io_read <pin>
- Returns 1 for high or 0 for low
- io_write <pin> <HIGH|LOW>
- Sets the given pin to high or low
- led_set <index> <red> <green> <blue>
- Sets RGB value of the given led
- led_set_hsv <index> <hue> <saturation> <value>
- Sets HSV value of the given led. Where hue, saturation, and value are 0-100.
- play <path/to/raw/file>
- Plays the given raw file once.
- print <x> <y> <message>
- Prints the message coordinates x,y
- rand <max>
- Returns a value between 0 and max.
- set_color <color>
- Sets current color for printing text
- circle <x> <y> <radius> <color>
- Draws a circle with radius at x,y and given color
- image <x> <y> <width> <height> <path/to/raw/file>
- Draws raw file at x,y with given width and height
- line <x1> <y1> <x2> <y2> <color>
- Draws a line x1,y1 to x2,y2 and given color.
- rect <x> <y> <width> <height> <color>
- Draws an empty rectangle with given width and height at x,y
- fill_rect <x> <y> <width> <height> <color>
- Draws a filled rectangle with given width and height at x
- pixel <x> <y> <color>
- Draws a single pixel at x,y and given color.
- scroll <message>
- Scroll the message once
- triangle <x1> <y1> <x2> <y2> <x3> <y3> <color>
- Draws empty triangle at x1, y1, to x2, y2, to x3, y3 with given color
- up
- Returns 1 if up button is currently pressed
- down
- Returns 1 if down button is currently pressed
- left
- Returns 1 if left button is currently pressed
- right
- Returns 1 if right button is currently pressed
- action
- Returns 1 if action button is currently pressed
- button_clear
- Clears current button state, useful for preventing button holding
- button_state
- Returns state of all buttons as a 8-bit mask
- button_wait
- Blocks execution until any button is pressed
Color support
Graphics and fonts support 8 bit color. Format is RRRGGGBB. See:
https://en.wikipedia.org/wiki/8-bit_color
Some examples:
0: Black
3: Blue
28: Green
252: Yellow
224: Red
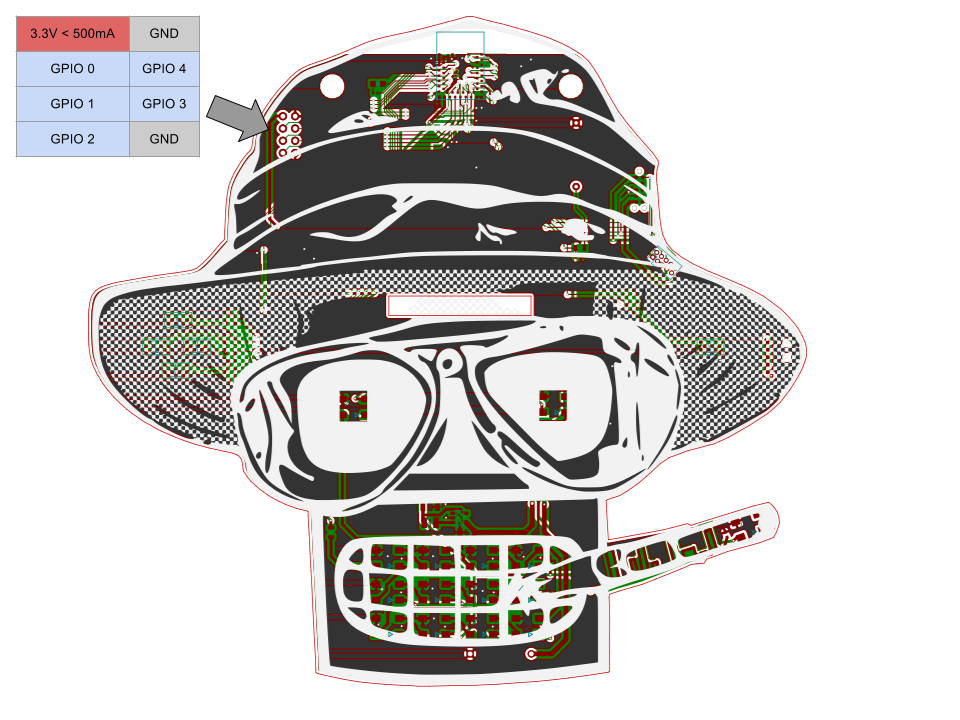
GPIO
![]() Basic GPIO io_read and io_write commands have been implemented. The PCB has a total of five IO exposed. This was all that was left after all the bling was done. Each IO is referred to as 0 through 4 in the TCL code. Note 3.3v power is also provided for addons if you desire.
Basic GPIO io_read and io_write commands have been implemented. The PCB has a total of five IO exposed. This was all that was left after all the bling was done. Each IO is referred to as 0 through 4 in the TCL code. Note 3.3v power is also provided for addons if you desire.Examples
There are examples included on the badge, here is their source code.
They are located in: /SD Image/TCL/
Drop any TCLish scripts you create in this directory.
EXAMPLE1.TCL: Prints blue and green text to the screen just like your first BASIC program.
cls;

print 10 10 "Hello World!";
delay 500;

set_color 3;
print 30 30 "Blue";
delay 1000;

set_color 28;
print 30 60 "Green";
delay 5000;
EXAMPLE2.TCL: Scrolls a message on the screen.
scroll "Hello World! This is MAN BEAR PIG TCL!";EXAMPLE3.TCL: Plays Rick Roll until user holds a button
cls;
print 0 0 "Hold any button to quit rick roll";
delay 2000;

while {== [button_state] 0} {
	play "/BLING/AND!XOR/RICKROLL.RAW";
};
EXAMPLE4.TCL: Cycles the eye color hues.
cls;
print 0, 60 "The Eyes!";

for {set h 0} {< $h 100} {incr h} {
	led_set_hsv 12 $h 100 100;
	led_set_hsv 13 $h 100 100;
	delay 100;
};
EXAMPLE5.TCL: Prints text in the middle of the screen using ascii conversions
cls;

set base 42;
set w 4;
set x 0;
set y 60;
print [* $w $x] $y [chr [+ $base 79]];
incr x;
print [* $w $x] $y [chr [+ $base 53]];
incr x;
print [* $w $x] $y [chr [+ $base 23]];
incr x;
print [* $w $x] $y [chr [+ $base 36]];
incr x;
print [* $w $x] $y [chr [- 100 $base]];
incr x;
print [* $w $x] $y [chr [+ 66 $base]];
incr x;
print [* $w $x] $y [chr [+ 72 $base]];
incr x;
print [* $w $x] $y [chr [+ 36 $base]];
incr x;

delay 5000;
EXAMPLE6.TCL: Demonstrates drawing graphics to the display
cls;

for {set c 0} {< $c 256} {incr c} {
	fill_rect 0 0 128 128 $c;
	print 0 0 $c;
	delay 100;
}

image 0 0 128 128 "TCL/BENDER4.RAW";

line 128 0 0 128 252;
line 0 0 128 128 224;
line 0 62 128 62 3;

circle 96 32 8 224;

triangle 12 12 48 48 0 50 255;

rect 80 80 40 20 150;

fill_rect 10 80 10 40 100;

delay 5000;
EXAMPLE7.TCL: Toggles IO 0 on and off
cls;
print 0 0 "Toggling IO 0 Low/High 100 times"

for {set i 0} {< $i 100} {incr i} {
	fill_rect 0 64 128 20 0
	print 0 64 $i
	io_write 0 HIGH;
	delay 400;
	io_write 0 LOW;
	delay 400;
}
EXAMPLE8.TCL: Prints random numbers to the screen
print 0, 0 "Random numbers" print 0, 10 "< 100" print 64, 10 [rand 100]; print 0, 20 "< 20" print 64, 20 [rand 20]; print 0, 30 "< 100000" print 64, 30 [rand 100000]; print 0, 64 "Press any button to continue" button_wait; -
Accessorize! 3D Model FTW
06/25/2017 at 17:32 • 0 commentsEver wanted to dress up your DEF CON badge with some sunglasses or a beard? Or maybe even an LED top hat similar to Marc Newlin's. Maybe you want to encase your badge in plexi-glass case of emotion.
![]()
Or nothing at all. Your choice.
But we know hackers are creative and we want to enable that. Today we're releasing various 3d models of the badge to the world. These aren't the gerbers so don't plan on making your own badge but you can print your own PLA or paper badge now.
Scoot on over to the files section of this project and download away.
Here is what's inside:
- VRML model of the badge with some models for components
- SVG model with layers for copper, soldermask, and silkscreen
- Simple DXF model of edge cuts
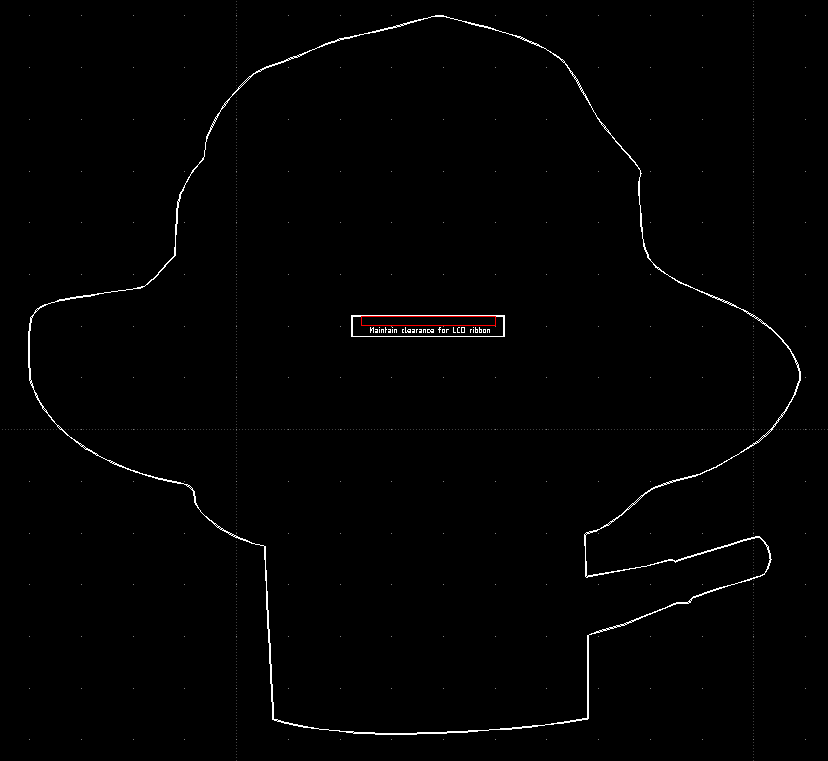
Caution
Do not rely on the cutout above his eyes. This used as a pass through for the LCD ribbon cable. We will likely cover the cutout by the LCD, however, the LCD can be shifted vertically to clear space.
Stop talking and show me some pictures!
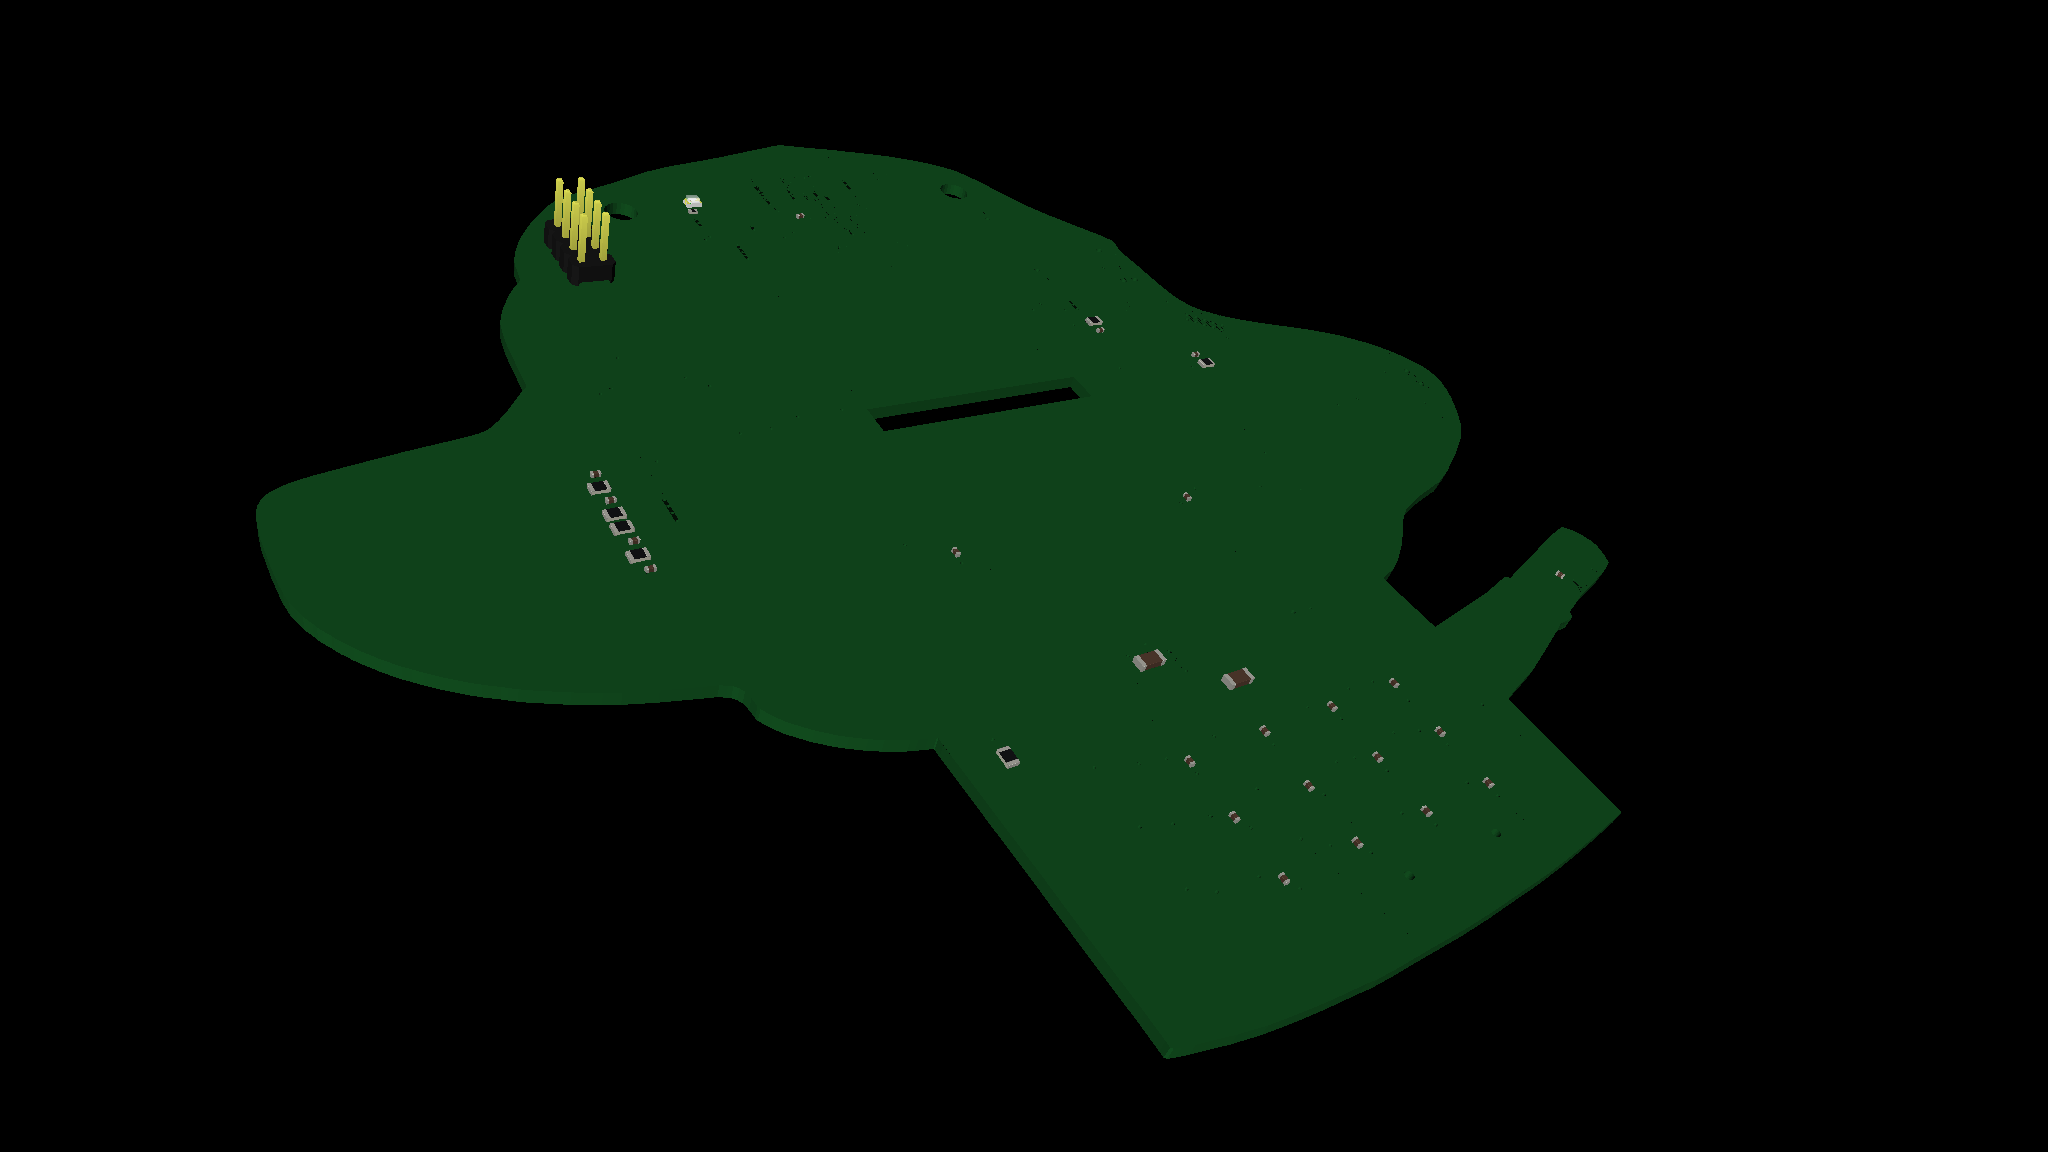
VRML
![]()
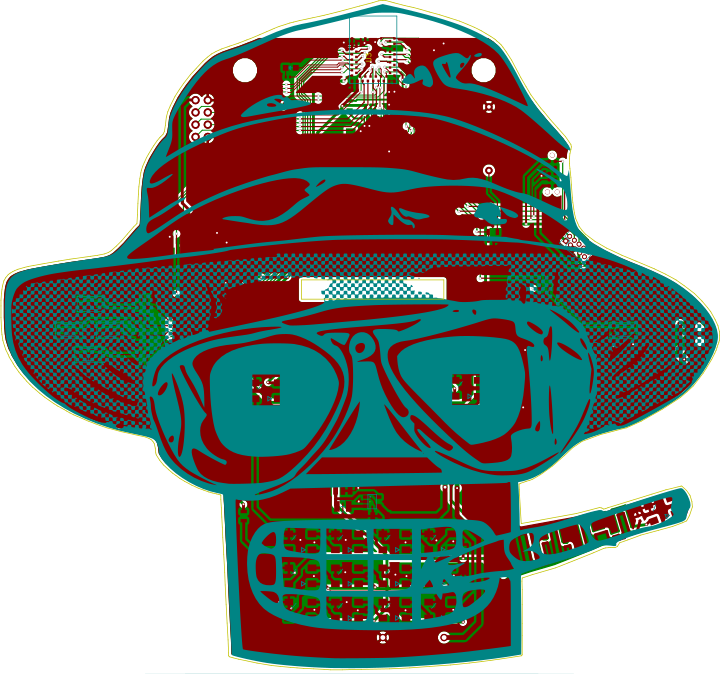
SVG
![]()
DXF
![]()
One more thing...
Just like last year, we've exposed some pins. Five GPIO pins usable by TCLish scripting (more on that later), 3.3V, and GND. Make your own blinky hat or power another badge. Have fun with it.
![]()
-
Hack All The B00z3, Drink All The Things
06/11/2017 at 06:38 • 0 commentsSo when the world presents you with an internet of useless things...you hack them. I mean, we bring burner phones to DC anyway, so why put apps on those phones when your badge can do the work for you? Actually, this IoT booze is pretty damn cool. Medea Vodka has a bottle which is decorated with circuitry and an IoT Bluetooth controlled flexible PCB LED Matrix. You typically download their app and it allows you to scroll messages on the bottle. The Medea phone app allows you to connect to anyone's bottle, but you are only supposed to connect to and scroll messages to bottles you own. Great party item. In fact, you should buy one and bring it with you to Vegas. ;)
We got some by just calling our local BevMo and special ordered it for just $32 (free shipping). Medea has a store locator too, but again, we've been successful going through BevMo and even seeing it at CostCo. The vodka isn't bad either, make some hacker mules or screwdrivers. We attribute our sudden lack of progress at times to having bottles of vodka all around the workshop.
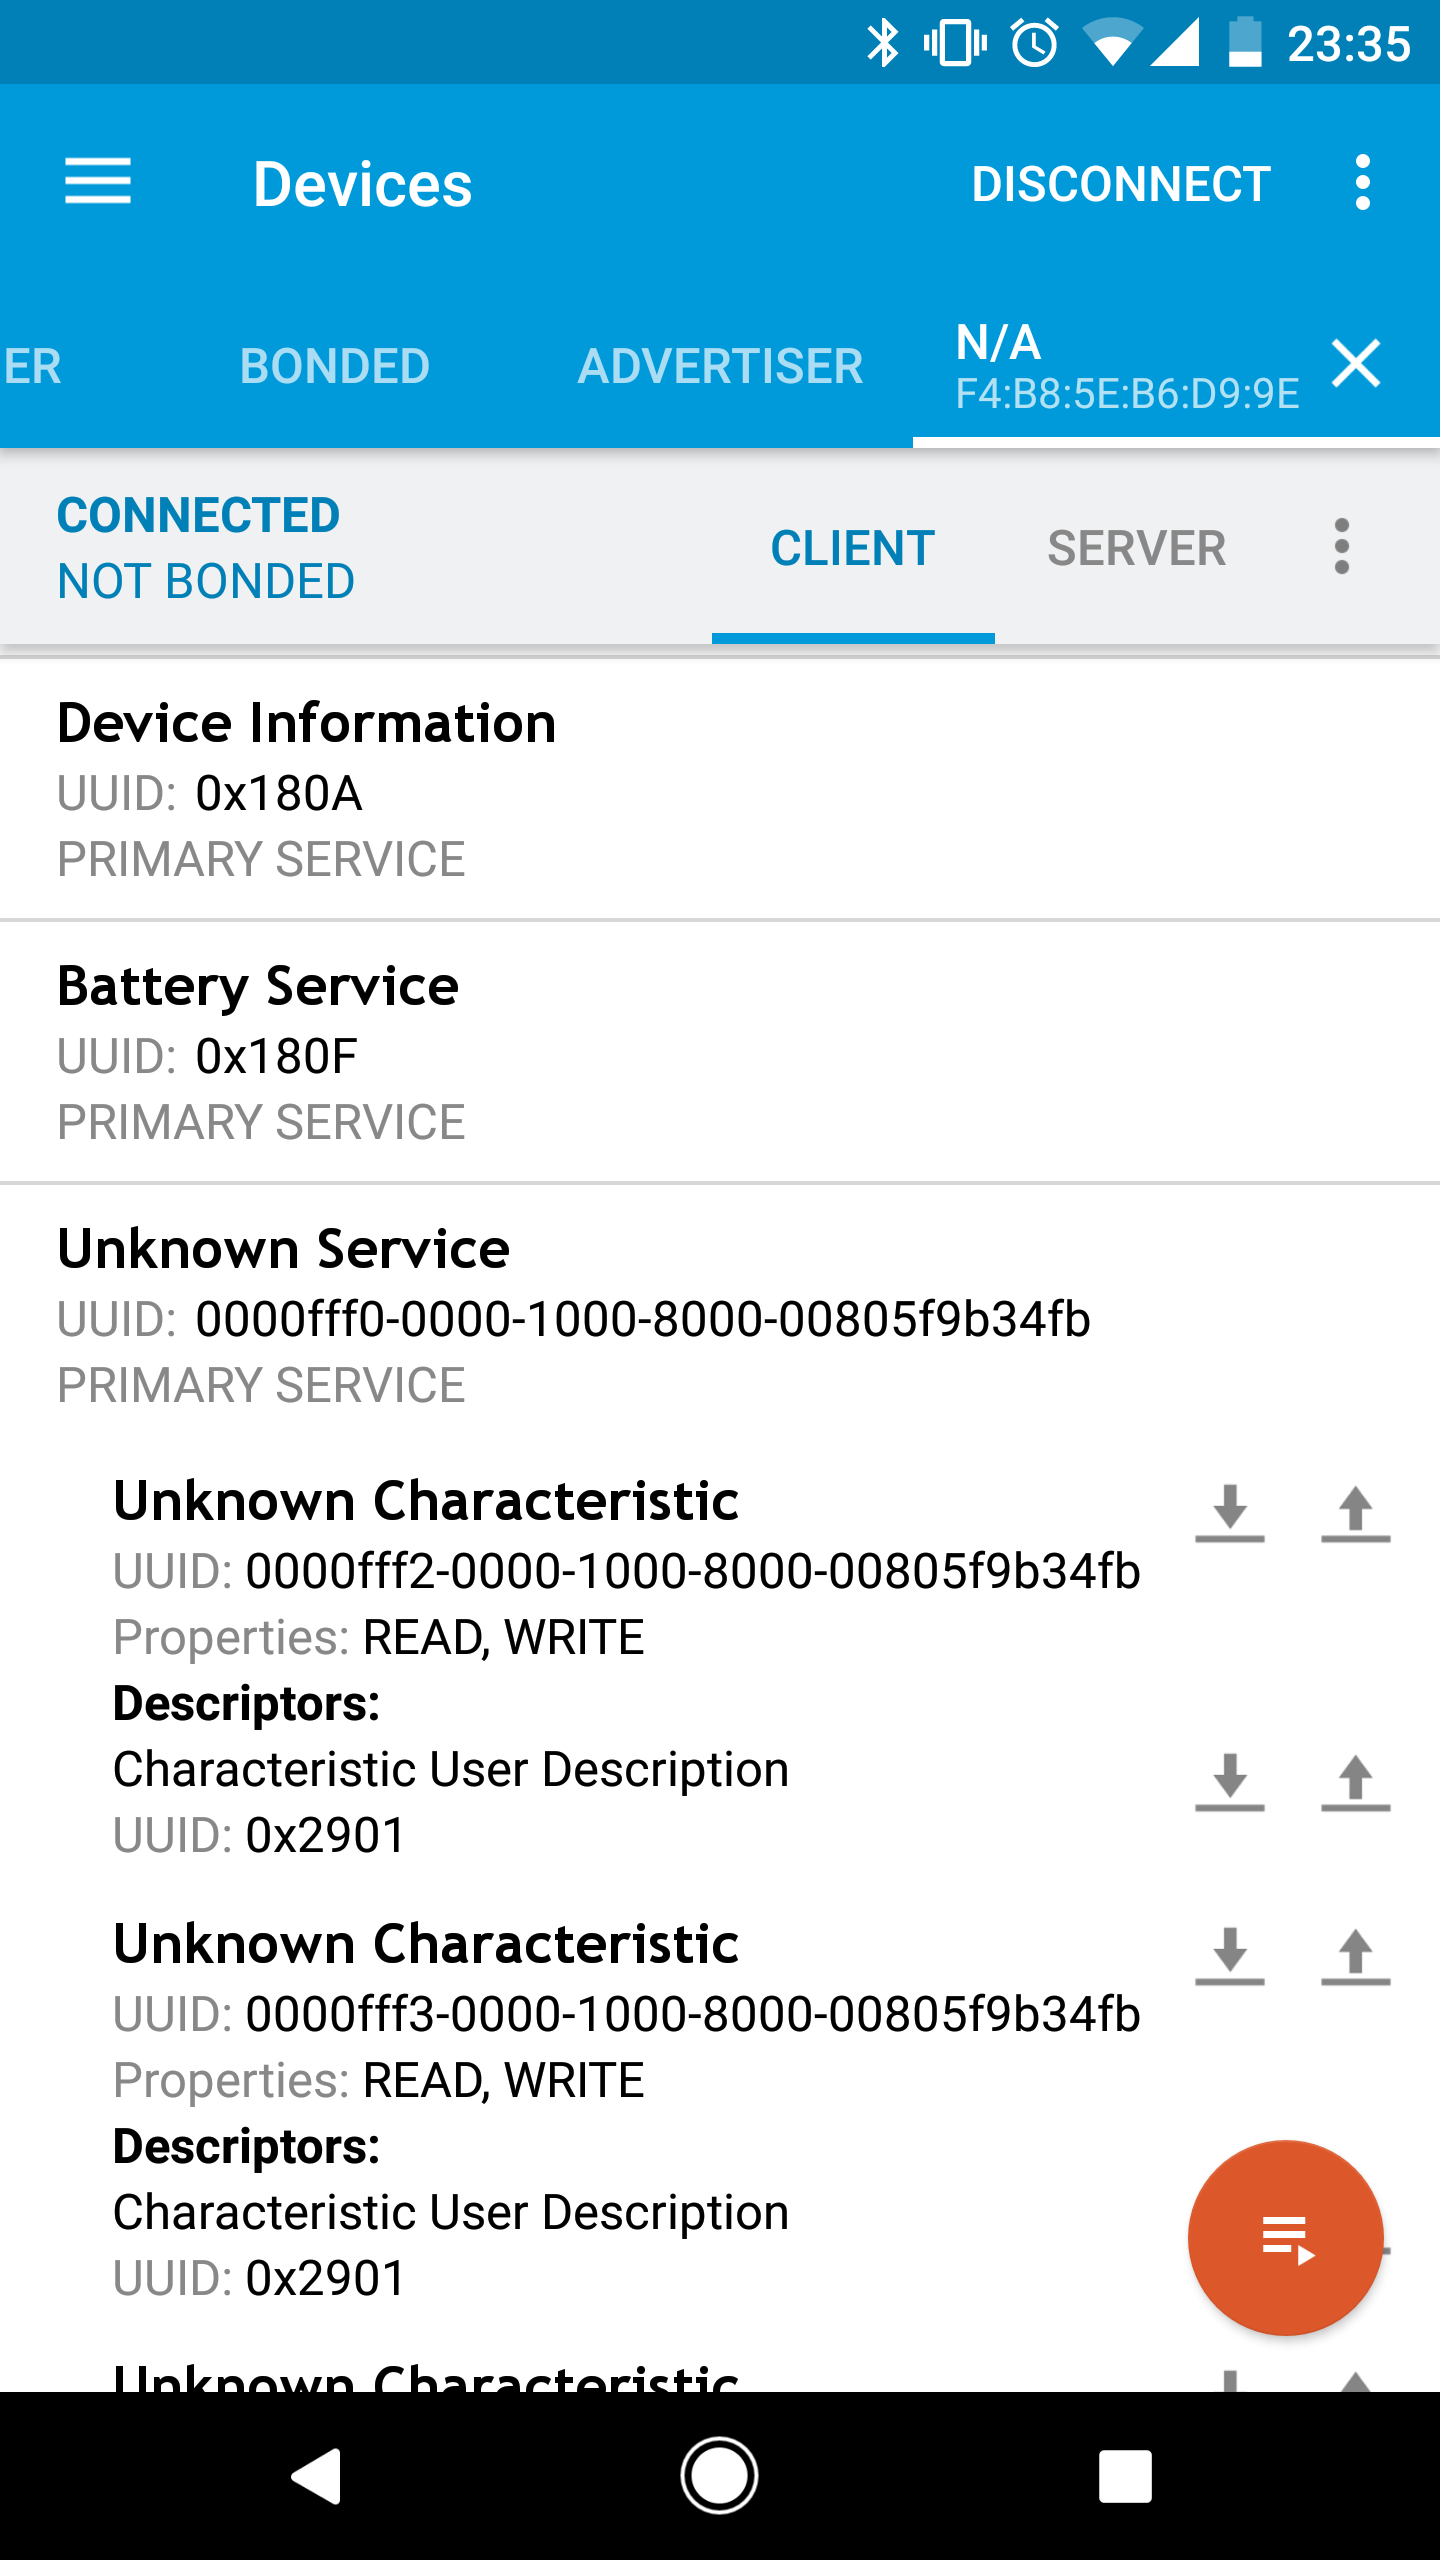
Integrating with these bottles was actually quite easy. At first we were capturing traffic with an Ubertooth and a Bluefruit BLE Sniffer, combing through the PCAPs in Wireshark to see how the thing talks. As it turns out, it didn't even require that. It uses an unencrypted iBeacon. Simply load up the hand dandy nRF Connect App and you can view all of the bluetooth characteristics and attributes.
![]()
Turns out it has super sophisticated 4 factor authentication built in (the secret 4th factor of authentication, something you drink)....okay you just tell it you have a MEDEA Service UUID and you're in. So we authenticated with the device as the interface was designed.
MEDEA_SERVICE_UUID{0xfb,0x34,0x9b,0x5f,0x80,0x00,0x00,0x80,0x00,0x10,0x00,0x00,0x00,0x00,0x00,0x00} /** Little endian **/
Our code will have the details in it, but in general, if you ever find yourself developing an IoT device, authenticating purely based on the value of service UUID is a little like this:
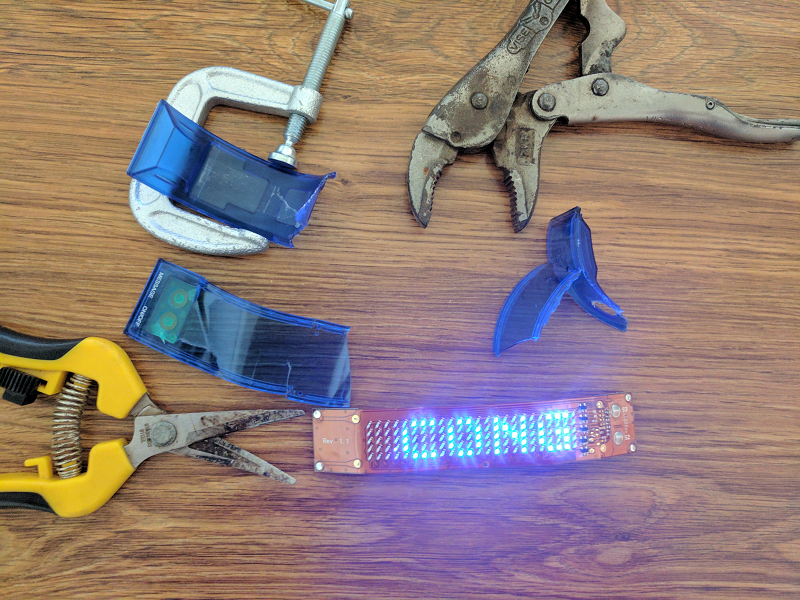
In fairness, this is transmitted in the clear and anyone can see it. And we only use it for bottles of Medea Vodka we own, which is why our function on the badge clearly lists which device you are connecting to and you dont make the mistake of connecting to someone else's bottle...(write down your MAC) More importantly, we are telling you to GO OUT AND BUY MEDEA VODKA CUZ THE BOTTLE IS F#*ING COOL AND THE BOOZ3 ACTUALLY TASTES GOOD. Now if you dont want to lug a bottle of booze around with you at a the CON (not sure why), here's a side project for the mechanical engineer in you: First get some elbow grease, a butter knife, garden pruners, and some clamps...![]()
![]()
- WE TAKE NO RESPONSIBILITY IF YOU BREAK THIS OR HURT YOURSELF. ITS ALL ON YOU. AND AT THIS POINT, IF YOU WANT TO HACK HARDWARE YOU SHOULD BE COMFORTABLE WITH THE FACT OF HAVING A LOT OF DEAD BROKEN ELECTRONICS AND SCARS ON YOUR HANDS DUE TO EXPLORATORY LEARNING FAILS. ITS HOW WE PROCEED IN LIFE. IF YOU FAIL, THEN HOPEFULLY YOU LEARN FROM YOUR MISTAKE AND IN ADDITION YOU NOW HAVE AN EXCUSE TO BUY MORE VODKA!
- Pry off the scrolling plastic enclosure from the bottle with the butter knife (It's barely attached and should pop right off).
- Next tighten the clamps on the top and bottom of the scroller, very VERY slowly until the plastic cracks. If you cant make it work this way, apply some elbow grease bending it in the middle if you are so brave. It should crack the plastic open.
- Finally take some garden pruners and snip along where the front and back of the plastic enclosure meet. Its just glued together. Eventually you'll make it around the perimeter and then you are finally #winning.
![]()
![]()
![]()
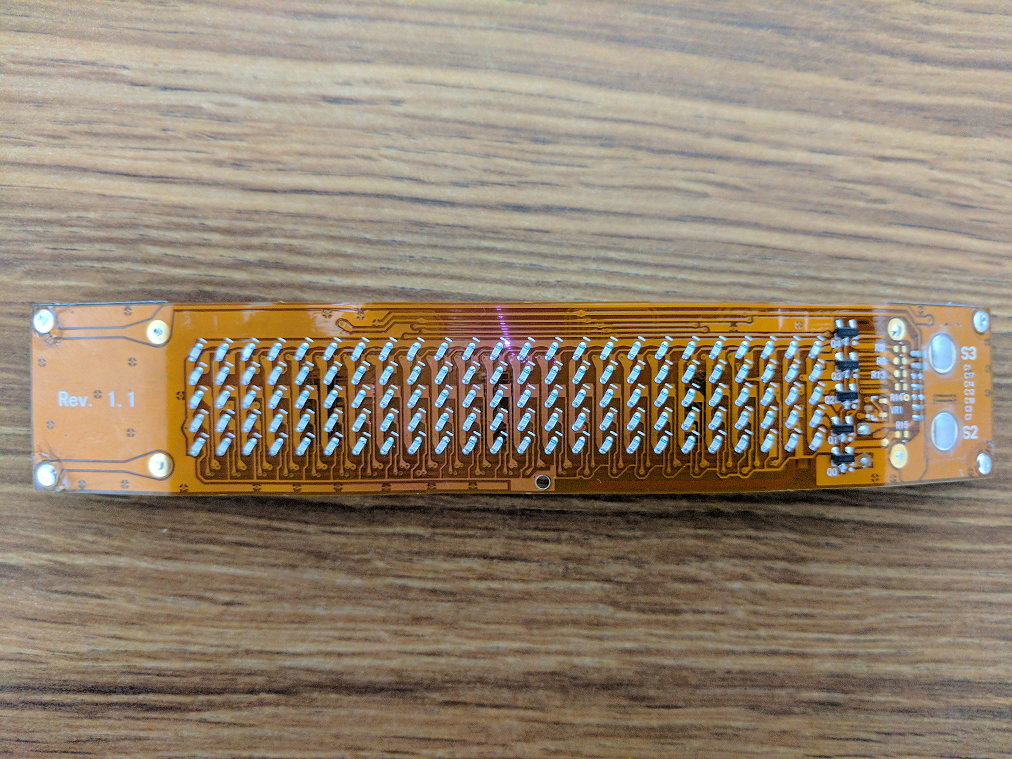
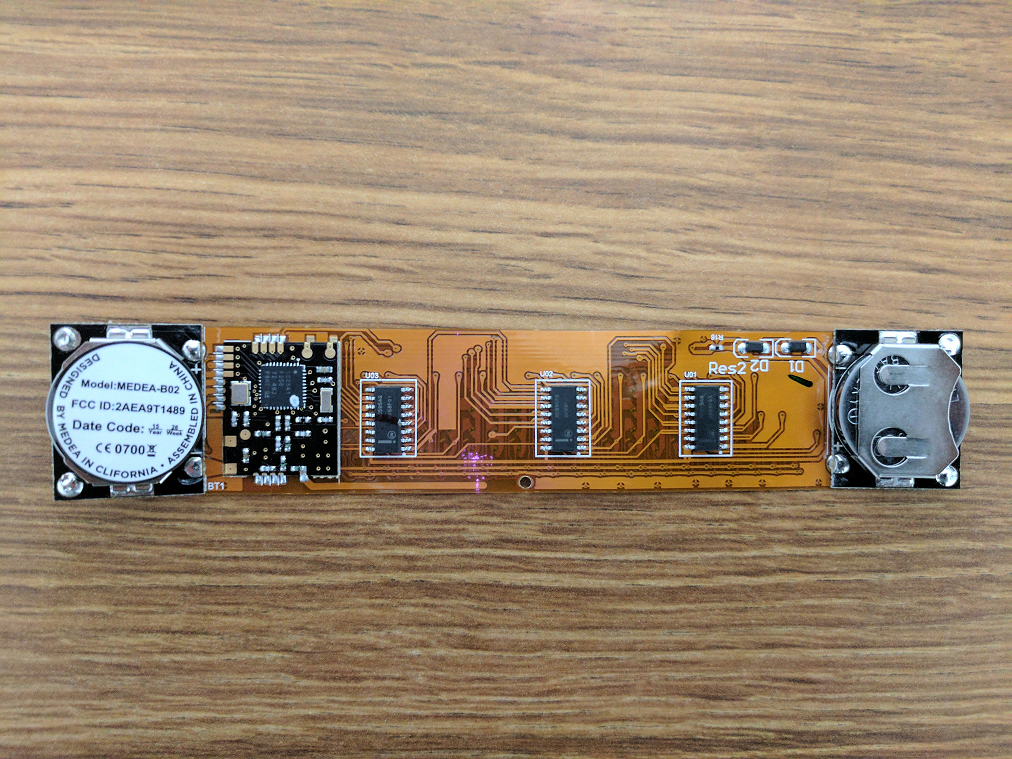
Now you have a nice flexible LED matrix. Get some velcro and attach it to yourself, your backpack, maybe you want some weird blinged out choker necklace. Who knows? You can never have enough bling. Makes a nice companion to the badge in addition to 750ml of booze.
-
An update on SW
05/05/2017 at 15:09 • 0 commentsSoftware development is in full swing with as much of our free time as possible going to coding. Last week we wrapped up v0.6 software which was focused on new features. In v0.6 we closed 105 issues, far more than any previous build on this badge. Starting May 1st we migrated our git and issue tracker, it worked surprisingly well.
Focus now is on v0.7 which is intended to polish existing features and fix bugs. We have 92 issues as of today in the tracker and that will grow. This is the build that we will demo at Layer One in Los Angeles May 27th and 28th. Come to our talk, see a demo, and drink a beer with us.
-
Secret Component & Feature: SD Card & BYOB
04/27/2017 at 04:29 • 2 commentsSo our first technical detail update in a while, but here it is: Micro SD-Card and Bring Your Own Bling (BYOB).
![]()
We're starting off a bit EZ on the feature release and a lot of it stems from this one component. So for todays update, lets focus on why SD card and the whimsical magic that is BYOB.
Chalk it up as lessons learned from DC24 to start with. Last year we leveraged NAND which is really easy to work with from a programming perspective, but a complete PITA when it comes to updating resources (configuration, images, etc) because you have to recompile the firmware and flashing in a really annoying way (Just ask Yaakov). Plus we had so many neckbeards ask us at DC24 how they could put their own images on the badge right then, and we had no "easy" answer without custom rolling a dev environment. So to be good software engineers as well as hacker friendly (not typically a good thing, but this is for DC hacking goodness) we made much of our software purely functional, reads specific resources, and parses it via an interpreter function. If you read our CHIP8 update, you would have noticed that each game comes with a config file, thats so when it loads, metadata is appropriately parsed and the menus get filled out.
Security Side Bar: This is for making a "hackable" badge. Keep in mind with real life projects, parsers are the absolute devil for code injection.
BLING works in a similar way. We have a specific folder in which we store the bling files and we added a "custom" bling mode where you can select any raw file on the Micro SD Card, pair it with a pre-made blinky light pattern, and there you go! So if you are just unsatisfied with the 100 preloaded bling modes we will provide, BYOB! Now you cant just drop an animated GIF (pronounced "jiff" or GTFO) because we use RAW format. Without getting super technical (you can f-ing google it there are well written programming articles on this topic), RAW is easier to work with than GIF in terms of overhead, which is great for embedded programming. If we just loaded plain GIFs we would have to put the entire image in memory to play it (which we are extremely limited on). Rather, using RAW format (RAW 16-bit 565 Big Endian uncompressed), we can stream the bits over SPI and straight to the screen. End result: more efficient, better FPS, less overhead, m0@r l337. @Zapp gets IPA tokens for this win. If you have criticisms, make your own embedded system con badge that has a full color screen and can display animations with only 64k of memory where each frame requires 33k of RAM...yeah we're THAT kind of efficient.
So that means to BYOB, you need to convert your files ahead of time. Here's how...
1) Find an animated GIF
![]()
2) Crop the GIF to a 1:1 Ratio
Our screen is a square and will convert the final animation to 128x128. Just make sure your crop is relatively "square" or the image will look skewed. There are many websites that will do this, we just use one at GIFGIFs
![]()
3) Convert the file to RAW
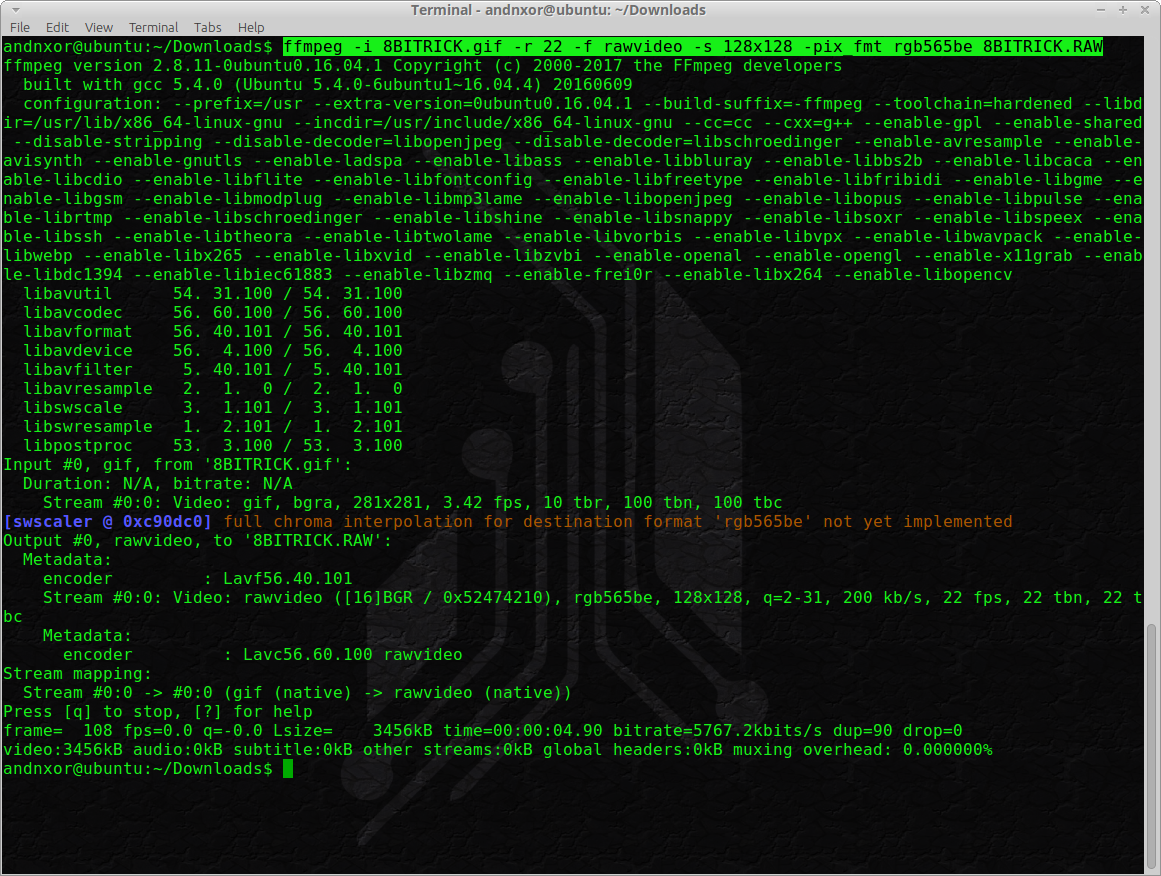
FFMpeg is your friend. Use it. Because we are going to give you the command line instructions to get this job done. There are GUI programs which do this as well, but...we are hackers. We use Linux. Deal with it. The INPUT.gif is the name of your file, the OUTPUT.RAW is what ffmpeg will save the conversion as. Make sure the filname is 8.3 length (e.g. no more than 8 charachters . RAW)
ffmpeg -i INPUT.gif -r 22 -f rawvideo -s 128x128 -pix_fmt rgb565be OUTPUT.RAWBelow is an example output. You'll see a lot of info from FFMPEG, dont worry thats normal.
4) Mount the SD Card in to your computer and copy the newly created RAW file in to /SDCard/BLING/![]()
.
5) Safely unmount the SD Card, put back in the badge, turn on the badge and go to...
Bling Menu -> Custom Bling
You will find the RAW file you just added alphabetically. Choose it and dance the night away! (forgive the video quality)
That's about it. We have some other features we'll release as the 'con gets closer. Enjoy!


 Basic GPIO io_read and io_write commands have been implemented. The PCB has a total of five IO exposed. This was all that was left after all the bling was done. Each IO is referred to as 0 through 4 in the TCL code. Note 3.3v power is also provided for addons if you desire.