WJCarpenter
-
Washer and Dryer restore state
04/03/2024 at 23:06 • 0 commentsI originally defined the dropdown helpers for the washer and dryer states to have the state "Unknown" at Home Assistant start-up. I rarely restart Home Assistant because of things like power failures or hardware maintenance, but I frequently restart it for software updates. In those scenarios, it's more useful to remember the state instead of resetting it to "Unknown". Making that change was just a matter of deleting the "initial:" configuration from those input_select definitions. There's no UI for that, so the edit has to happen manually in config/.storage/input_select.
-
A bug in the dryer state transitions
08/30/2023 at 21:16 • 0 commentsA logic error quickly revealed itself in the state transitions I described earlier. I had said, for both the washer and the dryer, that the power turning off must lead to the STOPPED state no matter what. For the dryer, I used a measure of 8 watts above or below for a little while. That's to account for the interior light that comes on when the door is opened. The trigger for power off was "power less than 8 watts for 1 minute".
The problem with that trigger is that opening the door, unloading the dryer, and then closing the door triggers "power off" and the dryer goes back into the STOPPED state.
I kept the same power on and off triggers for the dryer, but I modified the condition guarding the action resulting from the dryer power off trigger. It is now "triggered by dryer power off, and current dryer state is RUNNING". I don't really need that extra logic for the washer, which has no interior light, but I'm adding it just for consistency.
The YAML for that looks like this:
condition: and conditions: - condition: trigger id: power_off_dryer - condition: template value_template: "{{ dryer_before|lower == 'running' }}" -
Laundry in the wall panel
08/28/2023 at 01:56 • 0 commentsI have a Home Assistant wall panel in my kitchen. It's a 10 inch tablet mounted in landscape orientation. As the first step in my notification plan, I wanted to put some kind of visual notification on that wall panel. I'm starting off simple and might do something more elaborate later. For now, I want some kind of notification that either the washer or dryer is in the stopped state, and I want the notification to go away when someone gives them attention. In my scheme, anyone opening either door will cause that machine to move on from the stopped state.
I defined a binary sensor in a triggered template. It's triggered by any state or attribute change in the washer or dryer. The state of the template sensor is on if either the washer or dryer is stopped; otherwise, the template sensor is off.
- trigger:
    - platform: state
      entity_id:
        - input_select.washer_state
        - input_select.dryer_state
  binary_sensor:
    - name: Laundry needs attention
      state: >-
        {% if states('input_select.washer_state')|lower == 'stopped' or states('input_select.dryer_state')|lower == 'stopped' %}
          on
        {% else %}
          off
        {% endif %}
In the wall panel main screen, I use a custom button-card with a tap action that displays the laundry machine states. I directly followed the example from the documentation of blinking the card based on an entity state. Here, the entity is the triggered template sensor defined just above.
type: custom:button-card
name: Laundry
entity: binary_sensor.laundry_needs_attention
color_type: label-card
color: rgba(7, 103, 215, 0.5)
icon: mdi:tumble-dryer
styles:
  card:
    - width: 80px
    - height: 72px
state:
  - value: 'on'
    color: yellow
    styles:
      card:
        - animation: blink 2s ease infinite
  - operator: default
    color: rgba(7, 103, 215, 0.5)
tap_action:
  action: navigate
  navigation_path: /wjc-subpanels/laundry?wp_enabled=true
The button is normally a steady blue, but it slowly pulses yellow if either of the machines is stopped. When either machine changes state, the triggered template sensor will change state, and the button will go back to steady blue.
![]()
![]()
I had some difficulty creating the triggered template sensor. Even though Home Assistant developer tools has a button for reloading template entities, I found that they didn't completely pick up changes until I restarted Home Assistant. Most of the time, it worked as expected, so it's either some edge case or I was doing something wrong.
-
Before and after
08/19/2023 at 18:01 • 0 commentsI set up an action to send a notice to the Home Assistant app on my phone when the laundry automation runs. The message reports the washer and dryer states. I noticed right away that I was getting some notifications when neither of those states changed. I'm not completely sure, but I think that happens because the contact sensors on the washer and dryer doors periodically wake up and send their states, and I theorize that that's so they can report their battery levels occasionally even if they haven't been triggered by opening or closing.
To get rid of these spurious notifications, I wanted to define some variables in the automation: washer_before, washer_after, dryer_before, and dryer_after. I could then use a condition to only do notifications if either of the pairs showed a state change. I had a dickens of a time figuring out the right syntax for this. An ambitious person would deeply study the Home Assistant documentation, along with callouts to various YAML and Jinja template documents. Instead, I used the tried and true method of googling around and trial and error. The Home Assistant automation trace UI is very helpful for that kind of experimental approach.
Recall that the state changes are done in a massive "choose" action. I set the "before" variables just before that and the "after" variables just after that. Here's the before action; the after action is similar in the obvious way. I also do a logbook entry for diagnostic purposes.
- variables:
    washer_before: "{{ states('input_select.washer_state') }}"
    dryer_before: "{{ states('input_select.dryer_state') }}"
- service: logbook.log
  data:
    name: Laundry
    message: BEFORE washer {{ washer_before }}; dryer {{ dryer_before }}
The condition and notification actions then looks like this:
- condition: template
  value_template: "{{ washer_before != washer_after or dryer_before != dryer_after }}"
- service: notify.mobile_app_sm_g981u
  data:
    title: Laundry status
    message: >-
      washer {{ washer_before }} --> {{ washer_after }}; dryer {{ dryer_before
      }} --> {{ dryer_after }}
In an automation, a condition evaluating to false stops the sequence of action, in which case the notification action that follows is not executed. If I needed more elaborate logic, I'd use a "choose" action instead of a condition.
-
Revisiting state transitions
07/14/2023 at 03:13 • 0 commentsThis is another look at the states and event transitions that I described in an earlier project log. I'm now ready to implement it in a Home Assistant automation definition. It will actually be two automations, but the automation for the dryer is just a clone of the automation for the washer with the names of devices and entities adjusted.
As a reminder, there are 4 event inputs for each machine: door open, door closed, power on, and power off. Those are events, not states, so "power on" means "power is turned on". I'm configuring the automations as "queued", so the events can never happen simultaneously, no matter how it happens in real life. There are some impossible or nonsense transitions, and there are also some fairly simple considerations.
- If the power turns on, the machine must be transitioned to the RUNNING state, no matter what we thought its previous state was.
- If the power turns off, the machine must be transitioned to the STOPPED state, no matter what we thought its previous state was.
- If the door becomes open, the machine cannot be in the RUNNING state.
- The door cannot become open without being closed, and vice versa.
Current
stateDoor
openDoor
closedPower
onPower
offUnloaded Loading - Running Stopped Loading - Loaded Running Stopped Loaded Loading - Running Stopped Running - - Running Stopped Stopped Unloading - Running Stopped Unloading - Unloaded Running Stopped Unknown - - Running Stopped This leads to fairly simple logic. Power events don't need to consider anything else. Door events only need to consider the current state to decide what the next state should be. There are some cases where things are not perfect, but we can tolerate them. For example, when in the STOPPED state and the door is opened, we transition to the unloading state. It will be very common for the machine to be re-loaded without the door being closed in the meantime. When the door is closed, we will think we are in the UNLOADED state when we are actually in the LOADED state. In the normal case, the power will soon turn on and transition us to the RUNNING state. We don't care that we missed the LOADING and LOADED states, except that we don't necessarily have the opportunity to alert if the machine is loaded but not powered on for some amount of time. That's not much different from someone opening the door, not loading the machine, and then closing the door. We would need some additional sensors of some kind to distinguish those cases, and it's not worth it (to me).
For the automation, I am using just one automation per machine, and the trigger can be any of the four event types. Even though it might seem simpler to have separate automations for each of the possible triggers, or at least for the possible trigger types, I'm combining them all into a single automation so that I can configure it as "queued" and not have to worry about concurrency edge cases.
I mentioned in an earlier project log that I am using templated sensors for the door contact sensors. That avoids having to deal with unavailable or unknown values. I'm using the templated forms for the automation triggers. Incidentally, I had to be careful to use entity state changes as the triggers. I originally used the contact sensor device, but that triggers on any attribute change. The devices phone home every few hours even if the door does not open or close. I think that's to report their battery level as an attribute.
For the power triggers, I used a numeric value comparison. Power above a threshold value for a certain period of time is considered on. Power below that threshold for a certain period of time is considered off. At the moment, I'm using 8 watts for the threshold and 1.5 minutes for the time period. I may have to tweak those things later, depending on what I observe in real life.
The action in the automation is just changing the state of the applicable dropdown helper entity. It consists of a nested choose action that implements the transition table. The default action is to do nothing, so we only have to deal with the table cells that have entries. The outer choose action is based on which trigger invoked the automation. The action for the power triggers is constant. For the door triggers, each has an inner choose action the distinguishes the current state.
(Update: I later added a 1 minute delay to the contact sensors to avoid some noise. If someone opens the dryer door to see if it's got something in it, it can move the state from STOPPED to UNLOADING and then UNLOADED. This can matter for the case of automatically cancelling a notification if we get fooled into thinking the dryer was unloaded when it wasn't.)
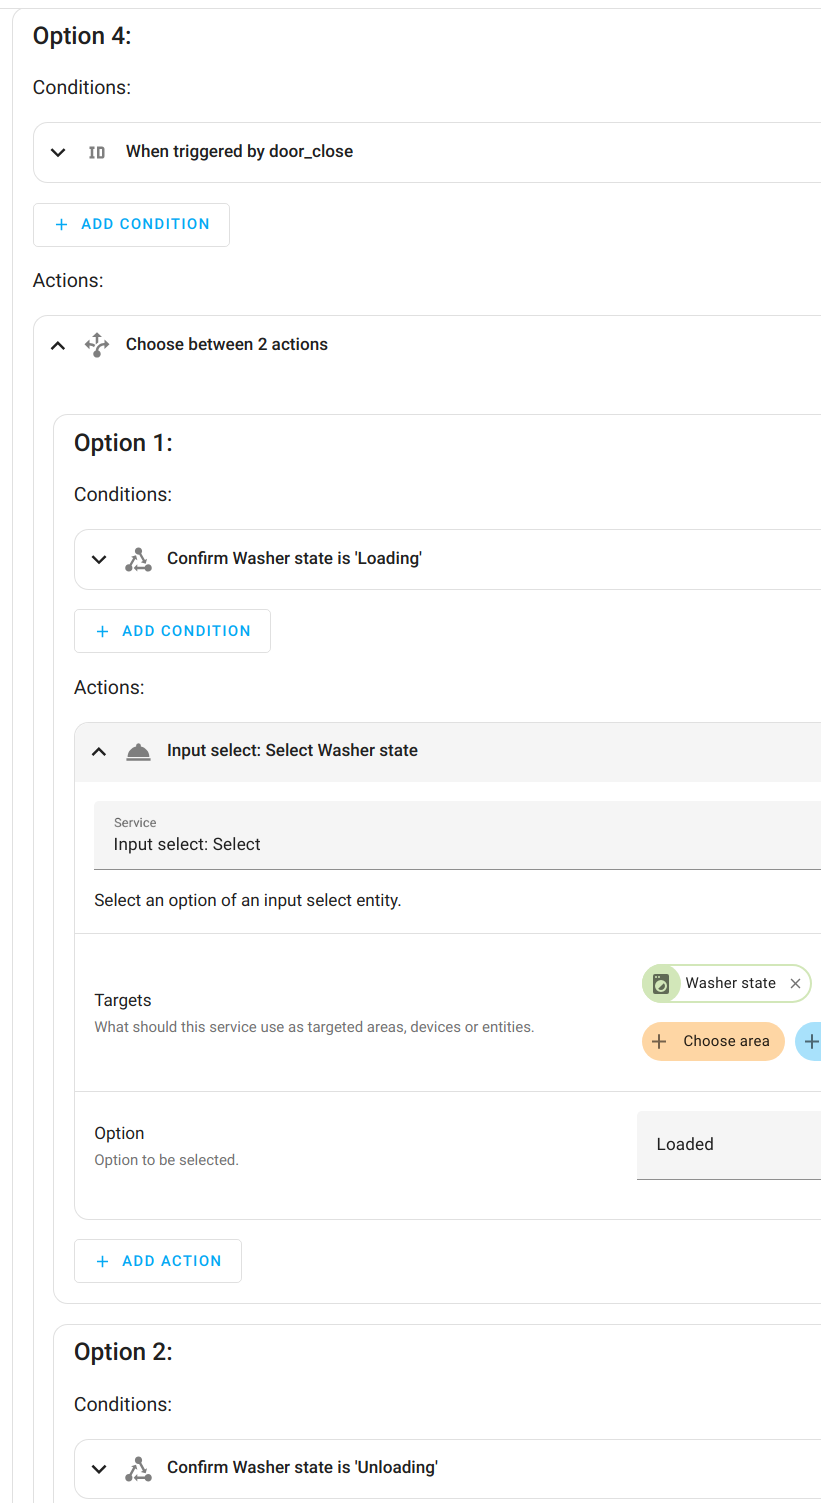
That all look pretty complicated in YAML. Here's a partial look at the GUI version to give a flavor of it.
![]()
And here is (most of) the actions for the door closed trigger:
![]()
Here's the complete YAML form:
alias: State transitions Washer description: "" trigger: - platform: numeric_state id: power_on entity_id: sensor.washer_power above: 8 for: hours: 0 minutes: 1 seconds: 30 - platform: numeric_state id: power_off entity_id: sensor.washer_power below: 8 for: hours: 0 minutes: 1 seconds: 30 - platform: state entity_id: - binary_sensor.contact_sensor_washer_triggered to: "on" id: door_open - platform: state entity_id: - binary_sensor.contact_sensor_washer_triggered to: "off" id: door_closed condition: [] action: - choose: - conditions: - condition: trigger id: power_on sequence: - service: input_select.select_option data: option: Running target: entity_id: input_select.washer_state - conditions: - condition: trigger id: power_off sequence: - service: input_select.select_option data: option: Stopped target: entity_id: input_select.washer_state - conditions: - condition: trigger id: door_open sequence: - choose: - conditions: - condition: state entity_id: input_select.washer_state state: Unloaded sequence: - service: input_select.select_option data: option: Loading target: entity_id: input_select.washer_state - conditions: - condition: state entity_id: input_select.washer_state state: Loaded sequence: - service: input_select.select_option data: option: Loading target: entity_id: input_select.washer_state - conditions: - condition: state entity_id: input_select.washer_state state: Stopped sequence: - service: input_select.select_option data: option: Unloading target: entity_id: input_select.washer_state - conditions: - condition: trigger id: door_close sequence: - choose: - conditions: - condition: state entity_id: input_select.washer_state state: Loading sequence: - service: input_select.select_option data: option: Loaded target: entity_id: input_select.washer_state - conditions: - condition: state entity_id: input_select.washer_state state: Unloading sequence: - service: input_select.select_option data: option: Loaded target: entity_id: input_select.washer_state mode: queued max: 10 -
Power consumption graphs
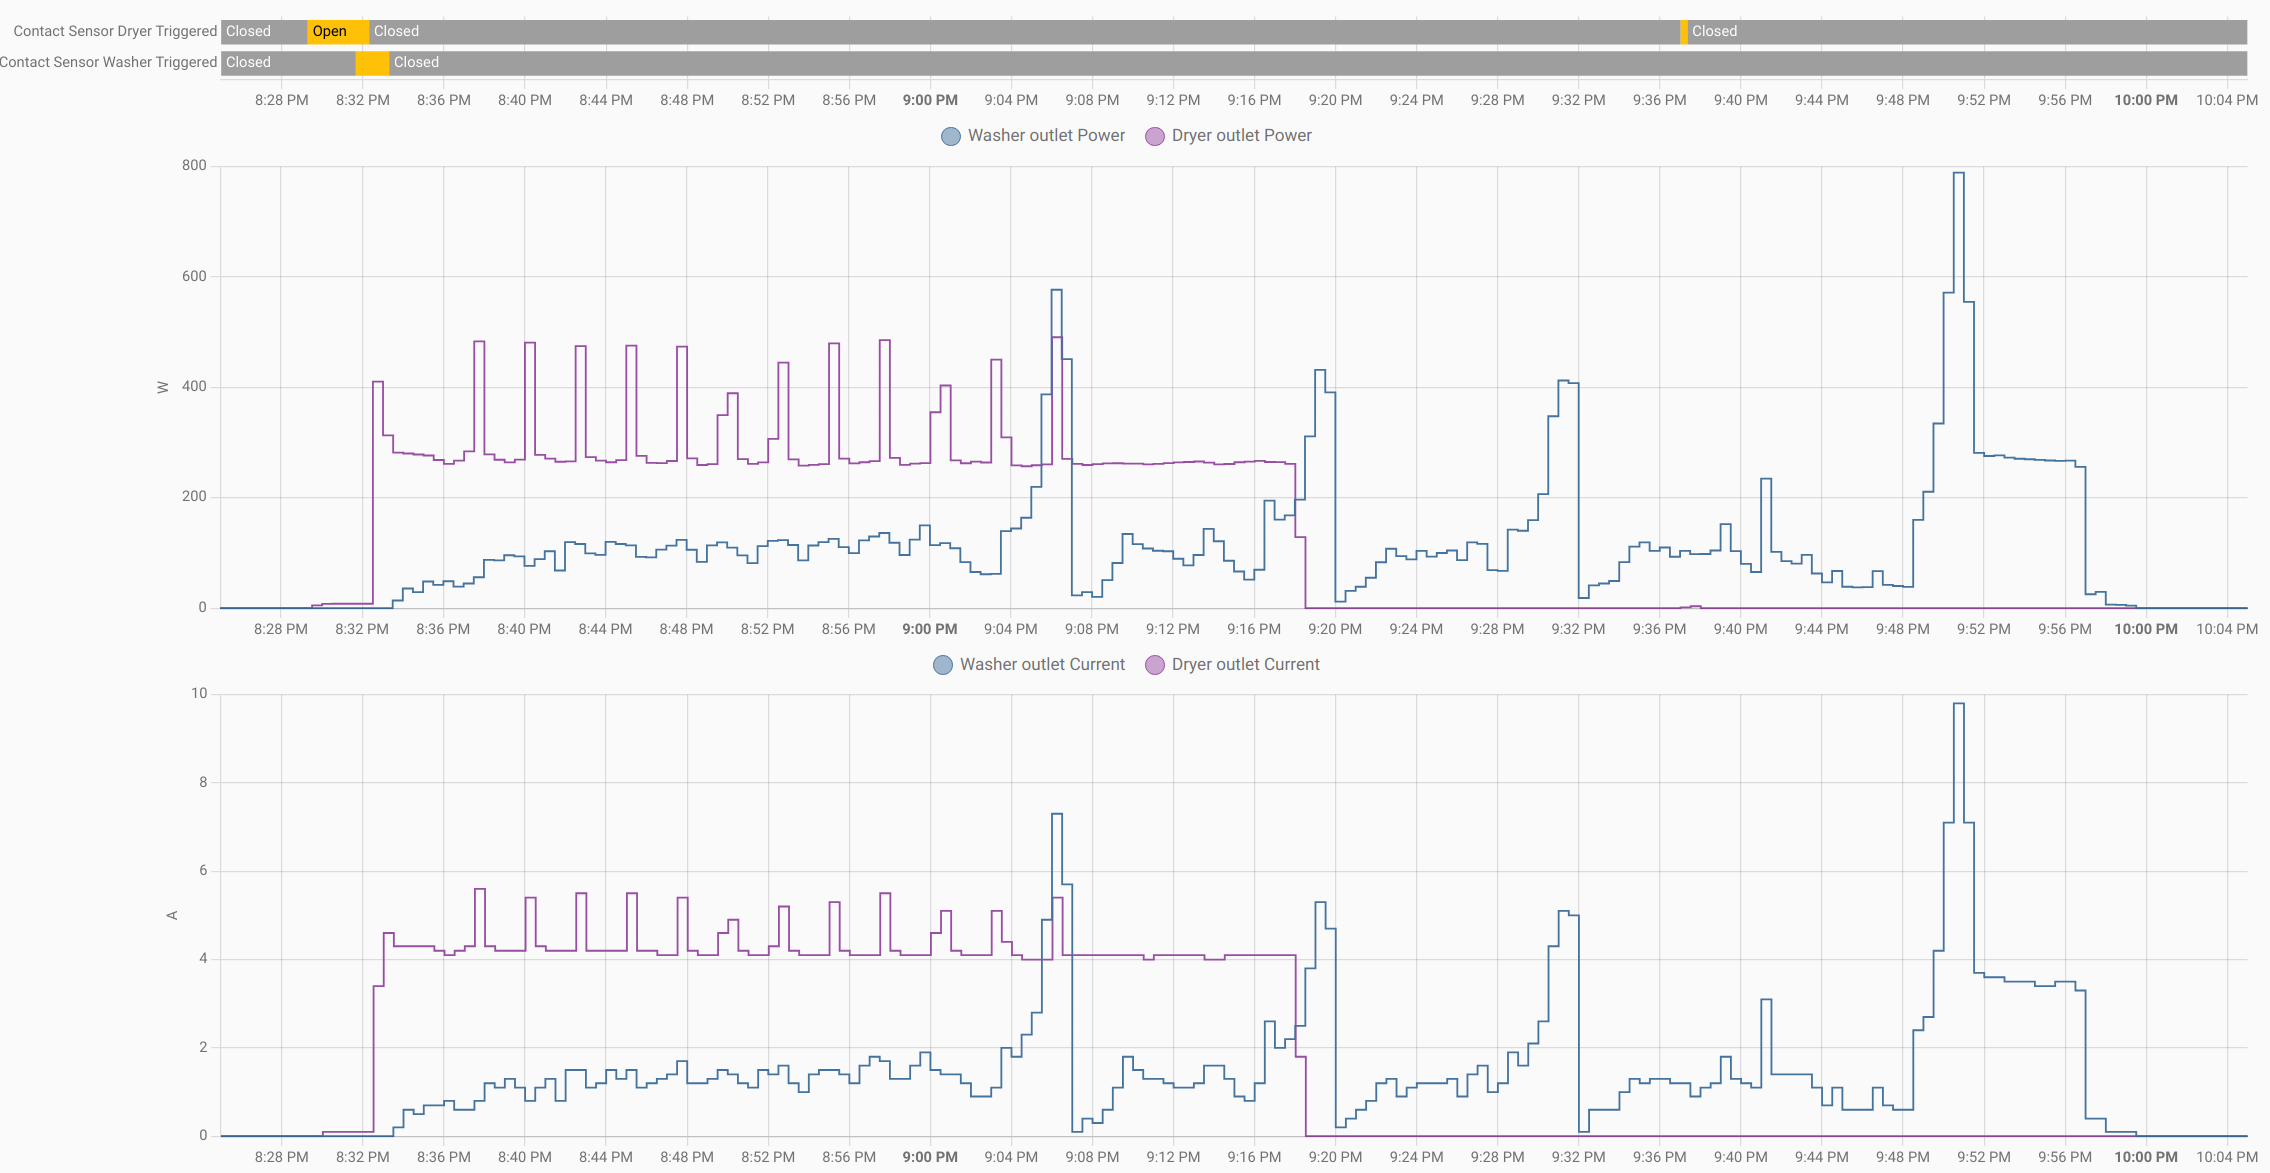
07/13/2023 at 16:32 • 0 commentsThese graphs show the power (in watts) and current (in amps) drawn by the washer (blue) and dryer (purple) that happened to be both running at roughly the same time. The bars at the top of the screenshot show the state of the door sensors for the machines. Click the image to get a larger view of it.
![]()
Observations....
- When the washer is off, it is completely off with zero energy consumption. That can't be literally true because it has to be able to sense the soft switch to be able to be turned on. It's zero within the precision of the smart socket measuring it.
- The same is true of the dryer, with one important extra factor. There is a light in the dryer that comes on when the door is open. If you look closely, you can see a small blip in the top graph for the dryer between 9:36 and 9:40. It's directly under the yellow "open" patch for the door sensor. I opened the door for a little while specifically to see what the energy consumption would be. It's 3.7 watts. The current graph does not show a similar draw. It stays at zero, which I think is probably due to a difference in the measuring sensors in the smart outlet.
- The very end of the cycle for the washer shows a small power draw (4-6 watts) that lasts about a minute. I don't know what the machine is thinking about during that time, but it always does it before it finally switches completely off.
- There are other low spots in the washer's cycle when it is switching between phases. The durations are all exactly 30 seconds, but that is probably the granularity of how often the smart socket is reporting things. The lowest of those dips is 11.9 watts for this particular cycle. There are other types of cycles that could be different in that respect.
- Since I want to use the power consumption to know when the machines start or stop running, I think I can reliably do that for the washer by saying "zero watts for at least some time period", which is an easy thing to do in Home Assistant triggers. For the dryer, I can't use zero watts because of the light. I will have to use a small value of perhaps 5 watts. But in both cases, I can reasonably assume that the machines are not running if their door is open. I'll have to tinker with this a little, but I'm pretty sure I will be able to work out triggers and conditions that can be the same for both machines. (Using the same triggers and conditions is not a hard requirement for me. It's just for simplicity.)
-
Somebody did the homework
07/05/2023 at 01:06 • 0 commentsThis person already worked out quite a bit of the mechanics of integrating all this with Home Assistant, so I will probably copy a lot of their work. I haven't yet analyze all the machine state stuff yet, so I don't know if I agree or disagree with what they decided.
(some time passes)
I'm definitely going to take advantage of that person's mechanics in how they set this up. My notion about the machine states is a little different. It's more detailed, but it will probably turn out that I don't need most of the states, but I'm going to start with all of them and see how it goes. I also expect to organize my automations differently, but that is mostly a style matter rather than a fundamental difference.
First up, the dropdown helper. I had to consult Home Assistant documentation to find it in the UI because it has moved since that write-up. It's now at Settings > Devices & Services > Helpers. I originally planned to use the same states for both the washer and dryer, but it seems the helper is really an individual entity rather than something that can be associated with some other kind of object.
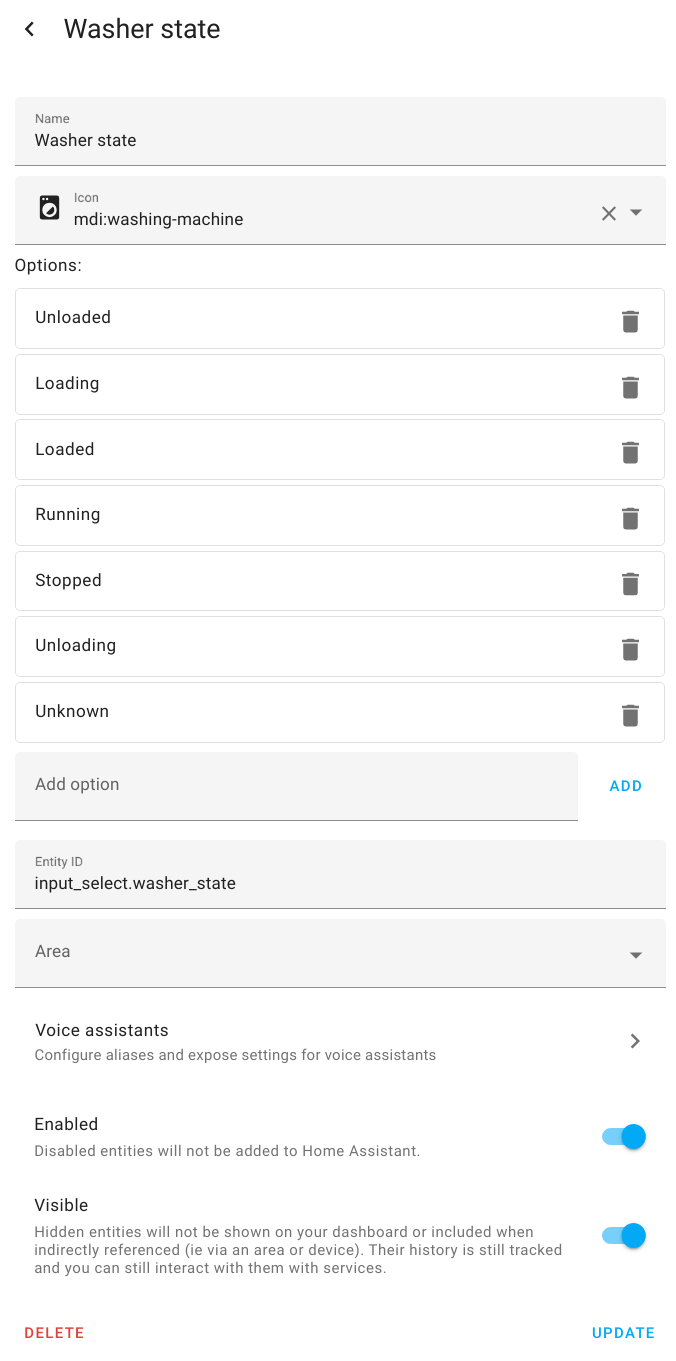
Here's the helper for the washer. I have an essentially identical one for the dryer. There is probably a smarter way to do this that does allow sharing, but the duplication is OK for this simple project.
![]()
In addition to the states mentioned in a previous project log, I also defined an "Unknown" state. That will be used when Home Assistant starts up since any number of events may have been missed. It will also incidentally be used the first time I start all these things going.
The UI doesn't have the usual option to view or edit the YAML. I found it afterwards in file config/.storage/input_select, which is referenced from config/.storage/core.entity_registry.
{ "version": 1, "minor_version": 2, "key": "input_select", "data": { "items": [ { "id": "washer_state", "name": "Washer state", "icon": "mdi:washing-machine", "options": [ "Unloaded", "Loading", "Loaded", "Running", "Stopped", "Unloading", "Unknown" ] }, { "id": "dryer_state", "name": "Dryer state", "icon": "mdi:tumble-dryer", "options": [ "Unloaded", "Loading", "Loaded", "Running", "Stopped", "Unloading", "Unknown" ] } ] } } -
The state of machine state machines
07/02/2023 at 01:24 • 0 commentsBoth the washer and the dryer have these possible states:
- UNLOADED (ub). The machine is not running and has no laundry in it.
- LOADING (la). Laundry is being loaded into the machine.
- LOADED (lb). There is laundry in the machine, but it is not yet running.
- RUNNING (r). The machine is running.
- STOPPED (s). The machine is stopped at the end of its cycle.
- UNLOADING (ua). Laundry is being unloaded from the machine.
We'll only have two sensors for each machine: the power monitor, as a simple binary sensor (on or off) and the door sensor (open or closed).
With 6 states for each machine, there are 36 possible state combinations. With two sensors per machine there are 8 possible sensor inputs and 1 or more "some time has passed" inputs. We make the simplifying assumption that sensor inputs never occur at exactly the same time, so they can be treated independently. The states for separate machines can obviously overlap.
For a while, I thought about making a big state transition matrix, with 36 states and 8 or 9 types of event transitions. That would be a very sparse matrix, with most of the transitions being either impossible or no-ops. Instead, let's look at the states for an individual machine.
- The machine starts in a default state of UNLOADED.
- When the door in open for more than some period of time, we assume it's LOADING.
- When the door closes, the we assume the machine is LOADED.
- When the power monitor shows non-zero, the machine is RUNNING.
- When the power monitor returns to zero, the machine is STOPPED.
- When the door in open for more than some period of time, we assume it's UNLOADING.
- When the door closes, the machine is UNLOADED.
The above stages are the normal progression of things for each machine. Only a couple of combinations are interesting for human attention:
- Dryer is STOPPED, washer is in any state.
- Washer is STOPPED, dryer is UNLOADED (or STOPPED, from the previous rule). We also include UNLOADING in case someone left the door open after unloading.
Assuming we have some kind of notification out for attention, we can automatically cancel the notification for any of these events happening:
- Someone explicitly acknowledges the notification.
- Either door opens or closes.
- Either machine moves to the RUNNING state.
For the doors and power monitor, we can considering having separate notifications and cancellations . We can also consider having some kind of reminder loop if someone acknowledges the notification but we don't see the expected attention to the laundry.
There are a lot of things that could go wrong with this cold algorithmic plan. For example, someone could open a machine door and not actually unload the machine. Best effort here is probably good enough for now.
-
Blink service
07/02/2023 at 00:06 • 0 commentsI haven't decided yet what kind of notifications I'm going to do when the laundry needs attention, but among the possibilities is blinking the LED on or both of the Sonoff S31 switches.
Doing the classic perpetual LED blink in ESPHome is simplicity itself. You just set up actions on the state changes to delay and toggle back and forth. This example uses explicit turning on and off, but it could also have use toggle actions.
switch:
  - platform: gpio
    id: me
    pin:
      number: 15
    on_turn_on:
    - delay: 100ms
    - switch.turn_off: me
    on_turn_off:
    - delay: 1000ms
    - switch.turn_on: me
For this project, I want to be able to turn blinking on and off as a service call from Home Assistant. Further, I want Home Assistant to decide what the on and off periods are so it can do slow blinking, fast blinking, or some kind of asymmetric on/off cadence. So, the start_blinking service takes two parameters for those durations. The stop_blinking service has one additional job, besides just stopping the blinking. It has to restore the LED to the state it was in (on or off) before the blinking was started. Of course, that status was recorded when the start_blinking service was called. If start_blinking is called multiple times without an intervening stop_blinking call, the new cadence is set but the pre-blinking status of the LED is unaffected.
Here's the code (in two files) as it stands today. It has several other small changes since the previous project log.
substitutions:
  name: s31yellow
  friendly_name: Unknown Yellow Spirit
  alias_icon: mdi:cloud-question
  power_on_boot: 'true'
  use_address: ${name}.carpenter.org

<<: !include { file: s31.yaml.inc}
and
# This is an adaptation of the ESPHome configuration for Sonoff S31 # smart plug described here: https://www.esphome-devices.com/devices/Sonoff-S31/ # Pin Function # GPIO0 Push Button (HIGH = off, LOW = on) # GPIO12 Relay and its status LED # GPIO13 Blue LED (HIGH = off, LOW = on) # GPIO1 RX pin (for external sensors) # GPIO3 TX pin (for external sensors) # This file is intended to be included from another file that defines # some configuration choices via substitution variables: # name: the name of this device, appears various places # alias_icon: front-end icon for the alias sensor # power_on_boot: boolean, whether to turn on the relay at boot time esphome: name: ${name} friendly_name: ${friendly_name} platform: ESP8266 board: esp01_1m on_boot: then: - text_sensor.template.publish: id: i_alias state: ${name} - if: condition: lambda: "return ${power_on_boot};" then: - switch.turn_on: relay else: - switch.turn_off: relay - switch.turn_off: i_blue_status_led globals: - id: IS_BLINKING type: "bool" initial_value: "false" - id: BLINK_OFF_PERIOD type: int - id: BLINK_ON_PERIOD type: int - id: PREBLINK_STATE type: "bool" wifi: ssid: !secret wifi_ssid password: !secret wifi_password use_address: ${use_address} logger: level: DEBUG baud_rate: 0 # (UART logging interferes with cse7766) ota: password: !secret ota_password api: services: - service: start_blinking variables: {on_period: int, off_period: int} then: - globals.set: id: BLINK_ON_PERIOD value: !lambda "return on_period;" - globals.set: id: BLINK_OFF_PERIOD value: !lambda "return off_period;" - if: condition: lambda: "return !id(IS_BLINKING);" then: - globals.set: id: PREBLINK_STATE value: !lambda "return id(i_blue_status_led).state;" - globals.set: id: IS_BLINKING value: !lambda "return true;" - switch.toggle: i_blue_status_led - service: stop_blinking then: - if: condition: lambda: "return id(IS_BLINKING);" then: - globals.set: id: IS_BLINKING value: !lambda "return false;" # The blinking doesn't actually stop until one or the other of these delays expires # so wait it out (plus a little slop) before setting the LED on or off. - delay: !lambda "return 20 + max(id(BLINK_ON_PERIOD), id(BLINK_OFF_PERIOD));" - if: condition: lambda: "return id(PREBLINK_STATE);" then: - switch.turn_on: i_blue_status_led else: - switch.turn_off: i_blue_status_led # The value never changes except on a firmware update, # so the update interval is never, and the value is # published at boot time. text_sensor: - platform: template name: "${friendly_name} alias" id: i_alias icon: ${alias_icon} update_interval: never uart: rx_pin: RX baud_rate: 4800 binary_sensor: - platform: gpio pin: number: GPIO0 mode: INPUT_PULLUP inverted: True name: "Button" on_press: - switch.toggle: relay - platform: status name: "Status" sensor: - platform: wifi_signal name: "WiFi Signal" update_interval: 120s - platform: cse7766 update_interval: 30s current: name: "Current" accuracy_decimals: 1 voltage: name: "Voltage" accuracy_decimals: 1 power: name: "Power" accuracy_decimals: 1 energy: name: "Energy" accuracy_decimals: 1 switch: - platform: gpio name: "Relay" pin: GPIO12 id: relay # I changed this from a status_led component to a switch component # so that I could control it independently of the boring status. # "inverted" so that it's normally off. - platform: gpio id: i_blue_status_led name: "Blue LED" pin: number: GPIO13 inverted: true on_turn_on: then: - if: condition: lambda: "return id(IS_BLINKING);" then: - delay: !lambda "return (id(BLINK_ON_PERIOD));" - switch.turn_off: i_blue_status_led on_turn_off: then: - if: condition: lambda: "return id(IS_BLINKING);" then: - delay: !lambda "return (id(BLINK_OFF_PERIOD));" - switch.turn_on: i_blue_status_led -
Machine door sensors
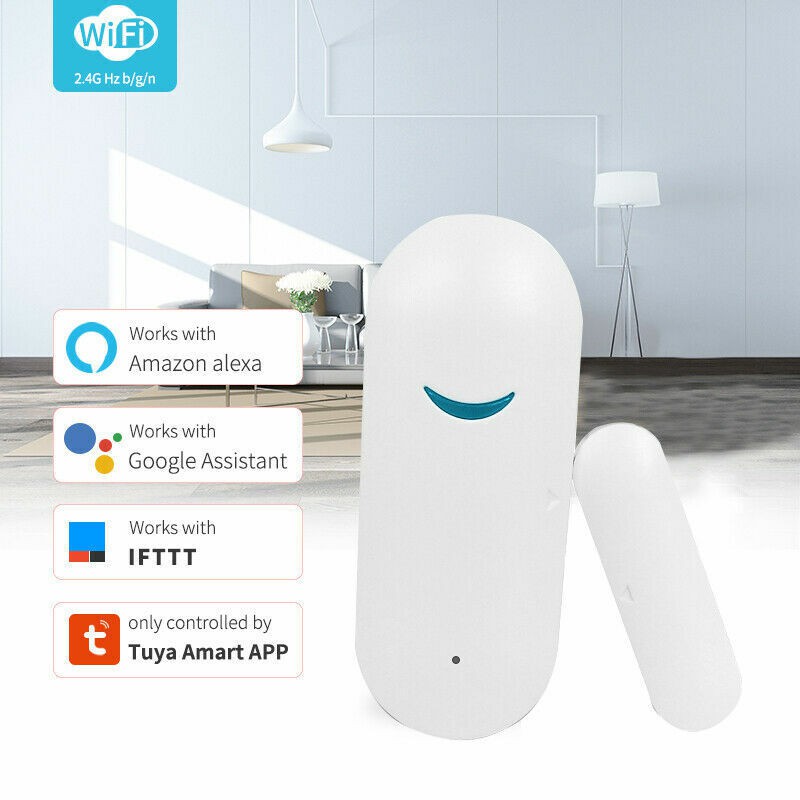
07/01/2023 at 18:08 • 0 commentsTo keep track of when the laundry is moved around by someone, I put contact sensors on the door of the washer and dryer. I know the smart money thinks you should use Zigbee sensors for battery-powered devices like this, but I have not had a good experience with Zigbee sensors in the past. Maybe I just need to work harder at it and understand more things. For now, I am using these battery-powered wifi devices.
![]()
These are widely available with no-name branding for US$10-12 each. They are powered by 2 AAA batteries. Certainly there is a few seconds lag in getting updates from them, but that's not important in this application. Places that sell them claim half a year battery life under some unknown conditions. We shall see about that.
I integrated these with Home Assistant using localtuya. I've already got several other devices integrated that way, so I'm comfortable in getting it to work. The only tricky part is more of an annoyance than a trick. To conserve power, the devices are only connected to the wifi for a few seconds after an open or close event. So, to set them up via the localtuya integration, you have to keep triggering them by moving the magnet near and away. It's not too bad once you know what's going on and get used to what you need to do. The localtuya integration does not make the battery level available, but the cloud-based Tuya integration does. I disabled the entity for the open/close sensor in the Tuya integration but left the battery level sensor available.
The other quirk that you have to deal with in this kind of sensor is that it shows "unavailable" most of the time in Home Assistant. Of course, that's also due to dropping off of wifi as soon as it can. The answer to that is a somewhat advanced feature of Home Assistant called templating. It's advanced in the sense that you have to directly edit templates in files; there's no simple GUI for it. The idea of templates for these sensors is to define a new sensor that remembers the value of the last real sensor. Home Assistant's templating mechanism will let you trigger the update of the templated sensor based on a state change of the real sensor. So, when the real washer door sensor signals "open", it triggers an update of the templated sensor to that value. Likewise when it signals "closed". For this purpose, the template explicitly ignore state changes to "unavailable".
Here's what the resulting triggered templates look like:
  - trigger:
      - platform: state
        entity_id:
          - binary_sensor.lt_contact_sensor_washer
    binary_sensor:
      - name: Contact Sensor Washer Triggered
        device_class: door
        state: >-
          {% if states('binary_sensor.lt_contact_sensor_washer') != 'unavailable' %}
            {{ states('binary_sensor.lt_contact_sensor_washer') }}
          {% else %}
            {{ states('binary_sensor.contact_sensor_washer_triggered') }}
          {% endif %}

  - trigger:
      - platform: state
        entity_id:
          - binary_sensor.lt_contact_sensor_dryer
    binary_sensor:
      - name: Contact Sensor Dryer Triggered
        device_class: door
        state: >-
          {% if states('binary_sensor.lt_contact_sensor_dryer') != 'unavailable' %}
            {{ states('binary_sensor.lt_contact_sensor_dryer') }}
          {% else %}
            {{ states('binary_sensor.contact_sensor_dryer_triggered') }}
          {% endif %}
(I first learned about this template sensor trick from another Home Assistant user for a different sensor.)
Laundry monitoring
A collection of notes and pointers for the usual laundry monitoring project.