Close
0%
0%

TOPS

3D Printed Quadrupedal Robot

Similar projects worth following
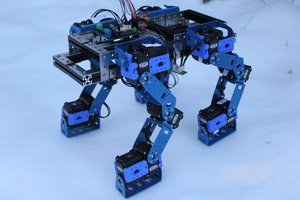
TOPS (Traverser of Planar Surfaces) or SPOT backward is a 12DOF quadrupedal robot. I have attempted robot dogs in the past, but nothing has come close to having the natural gait of an actual dog. In this project, the goal is to make a more dynamic quadrupedal robot.

Website (Project Overview and Interactive Models): http://aaedmusa.com/projects/tops
GitHub (CAD, Code, BOM, etc...): https://github.com/aaedmusa/TOPS

This project was heavily inspired by James Bruton's openDog V3 robot.
openDogV3: https://www.youtube.com/watch?v=eKZIJwJBjEs

  • 4 Month Build
  • Total Cost: $3,300
  • Total Weight: 29.6lbs (13.43kg) 
  • Weight of 3D Printed Parts: 9.98lbs (4.53kg) 
  • 12x Custom QDD actuators 
    • 3D printed 9: 1 planetary gearbox 
    • 90KV brushless motor
    • ODrive S1 FOC Controller Carbon Fiber Frame 
  • 30A Silicone Feet 
  • 6S 5200mah Lipo Battery
  • Teensy 4.1 Microcontroller

Part 0: QDD Actuators

Part 1: Leg Design V1

Part 2: Leg Design V2

Part 3: Full Robot Build

Libraries.zip

Arduino Libraries

x-zip-compressed - 129.76 kB - 10/06/2023 at 17:12

Download

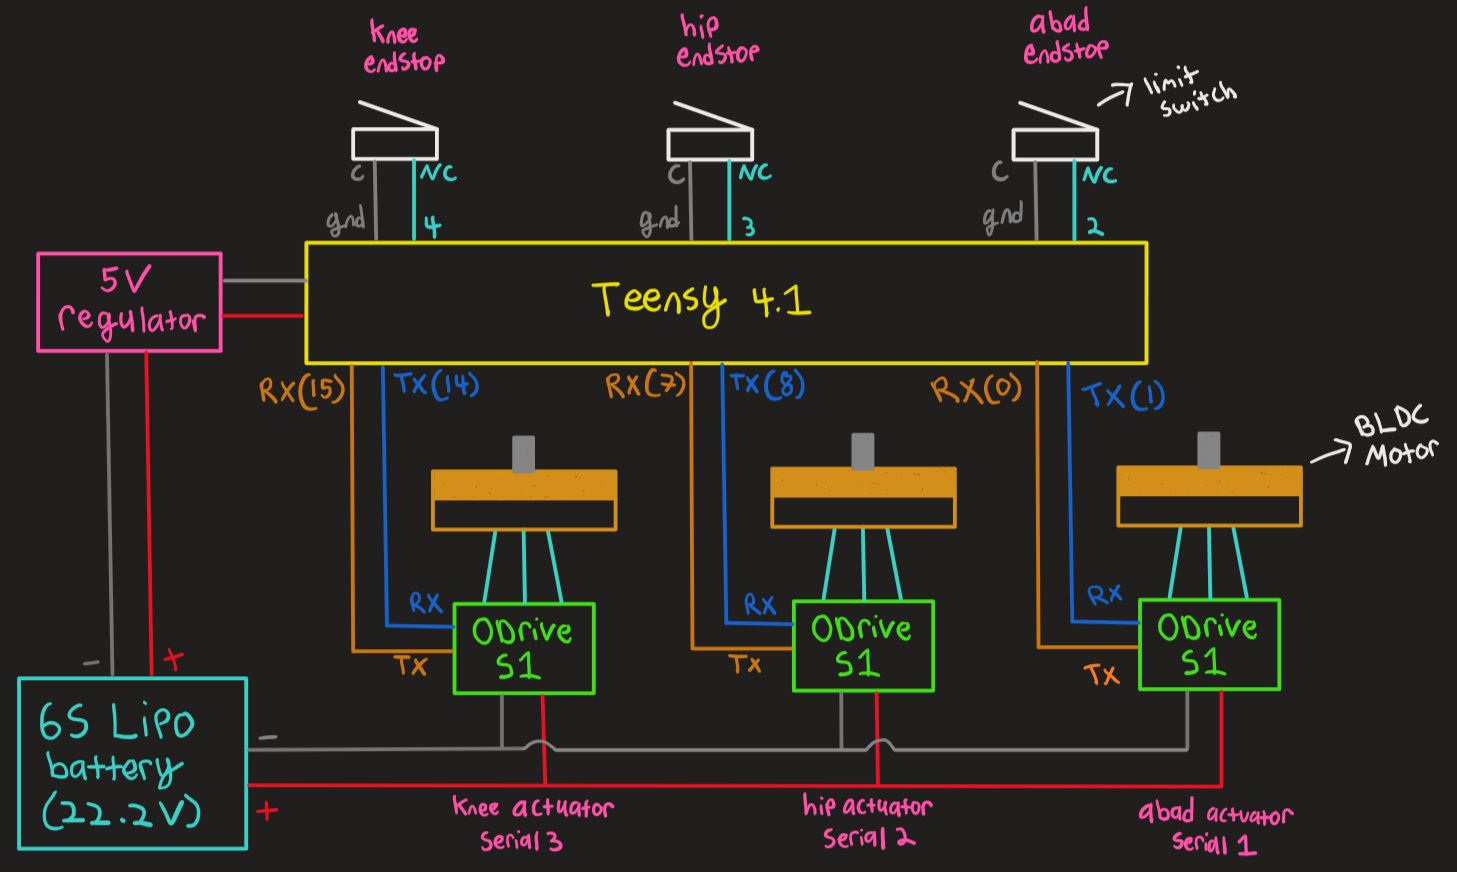
Full Robot Schematic.png

electronics schematic

Portable Network Graphics (PNG) - 151.40 kB - 10/06/2023 at 17:11

Preview

TOPS BOM.xlsx

Bill of Material

sheet - 22.92 kB - 10/06/2023 at 17:11

Download

TOPS CAD Assembly.stp

STEP file Assembly

stp - 38.01 MB - 10/06/2023 at 17:11

Download

TOPS_Workout.ino

Arduino Code

ino - 24.90 kB - 10/06/2023 at 17:10

Download

View all 6 files

  • Full Robot Build

    Aaed Musa10/06/2023 at 14:16 0 comments

    Design

    The single-leg design hasn't changed much. I cut off a bit more weight and removed the homing block. This homing block will now be a separate part incorporated into the actual robot design rather than on each leg itself. 

    The approach that I took to designing the test legs was to have the actuators connect together and make up the main body of the leg. This worked well for a single leg, so I'm applying that same design strategy to the full robot assembly.

    The frame of the robot is made up of 4 carbon fiber tubes. Each of the legs slides onto two of the carbon fiber tubes. The front, back, and middle of the robot have panels to hold the 4 tubes in place,

    One of my main design considerations was making all of the parts small enough to fit on a 200 x 200 x 200mm print bed.

    Previously I had just 3D printed the feet on the test legs, but 3D-printed feet have little to no traction. For the full robot, the feet were cast in 30 A silicone which, according to online scales, is somewhere between the squishiness of a rubber band and an eraser. The base of the foot is 3D printed, so the silicone is just applied to the outside of this base. I did this by suspending the part in between two 3D-printed molds and pouring silicone inside. 

    Printing

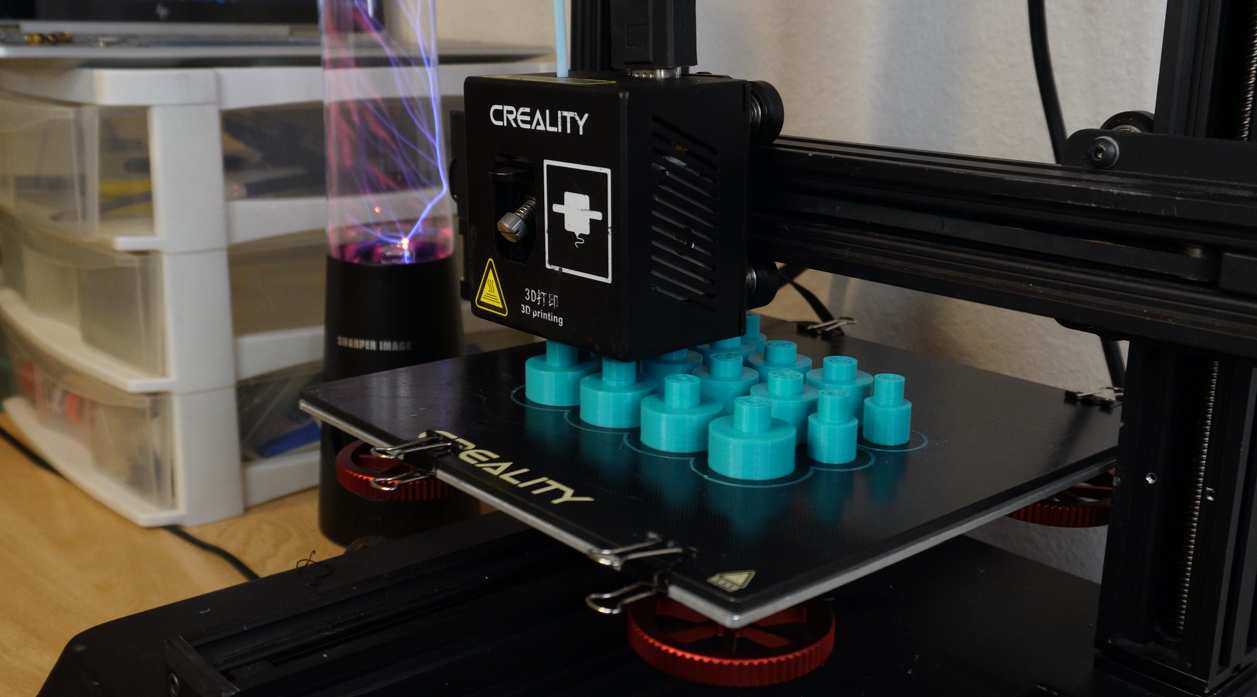
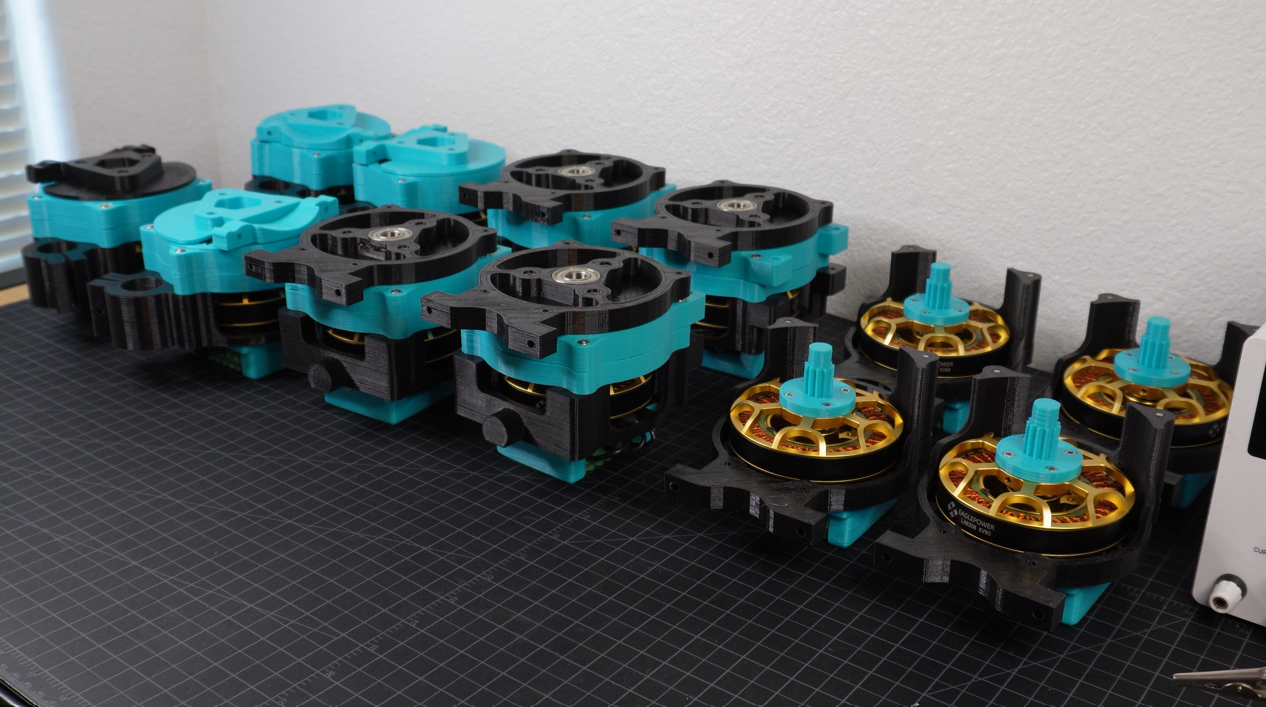
    It took about 3 weeks to print all of the parts on my reality CP-01 printer. Overall the 3D printed parts account for 9.98lbs (4.53kg) which is about 1/3 of the robot's weight. I printed all of the parts in black and Bahama blue PLA.

    Build

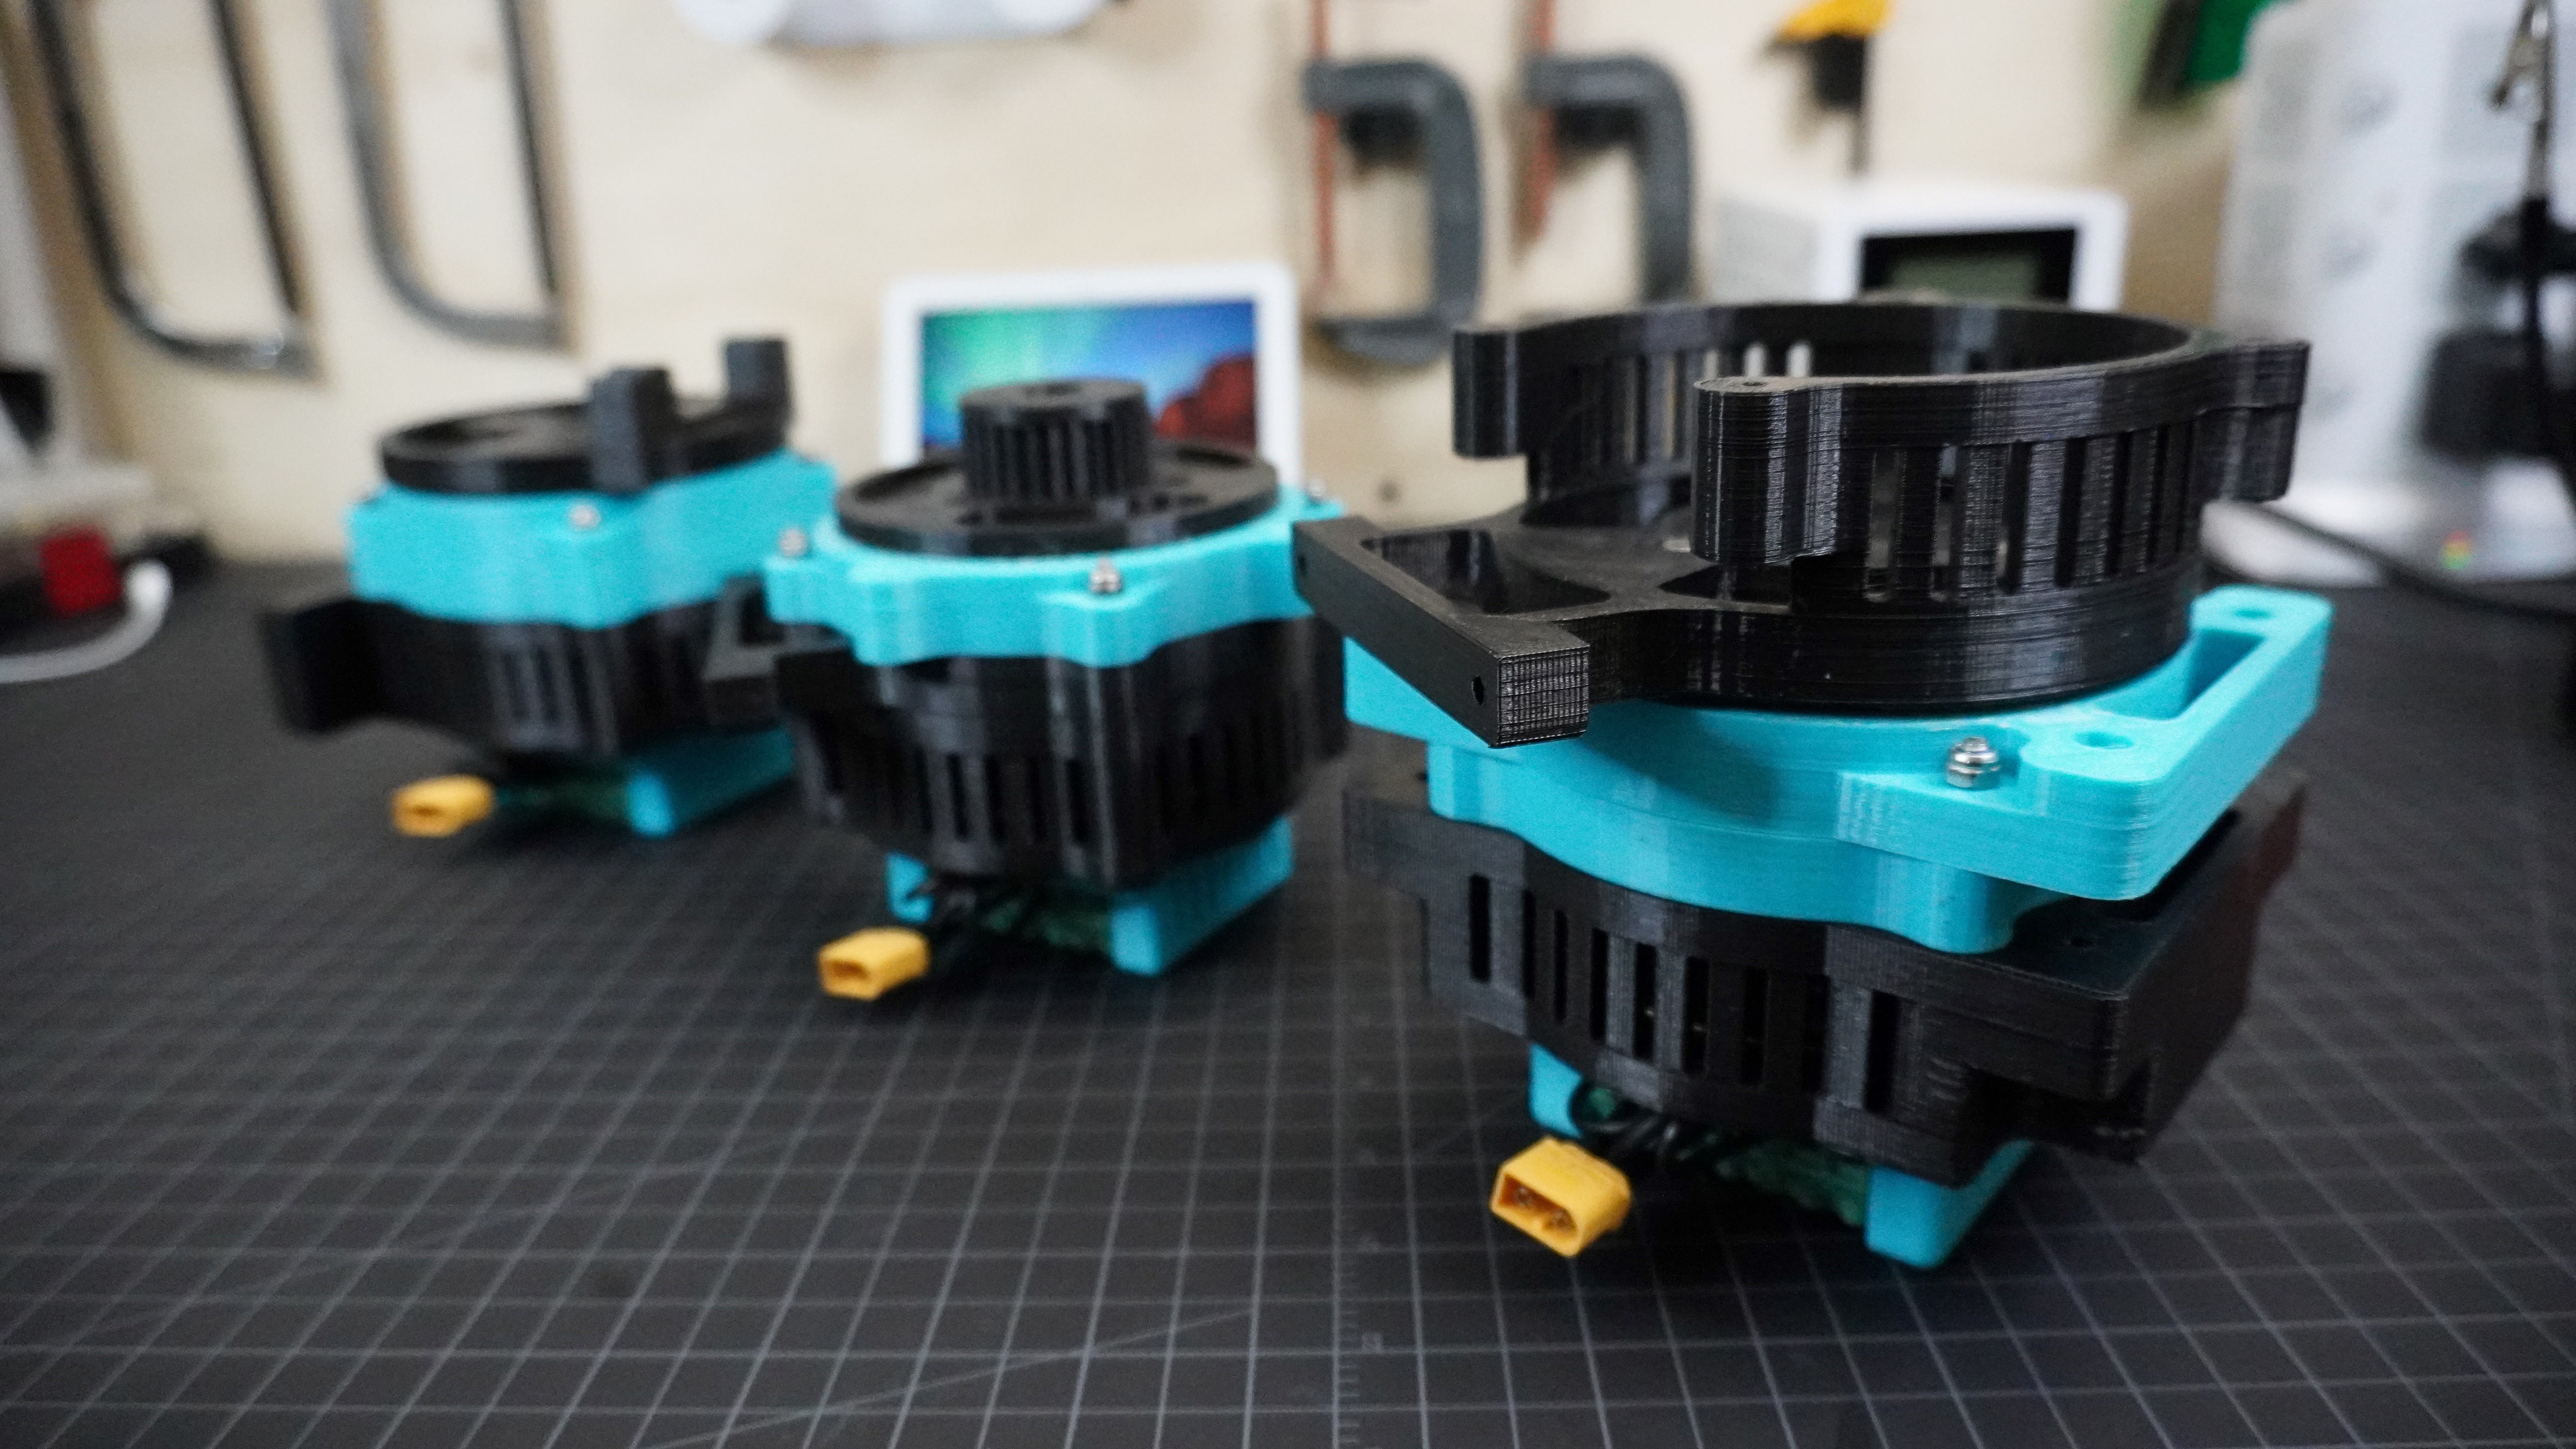
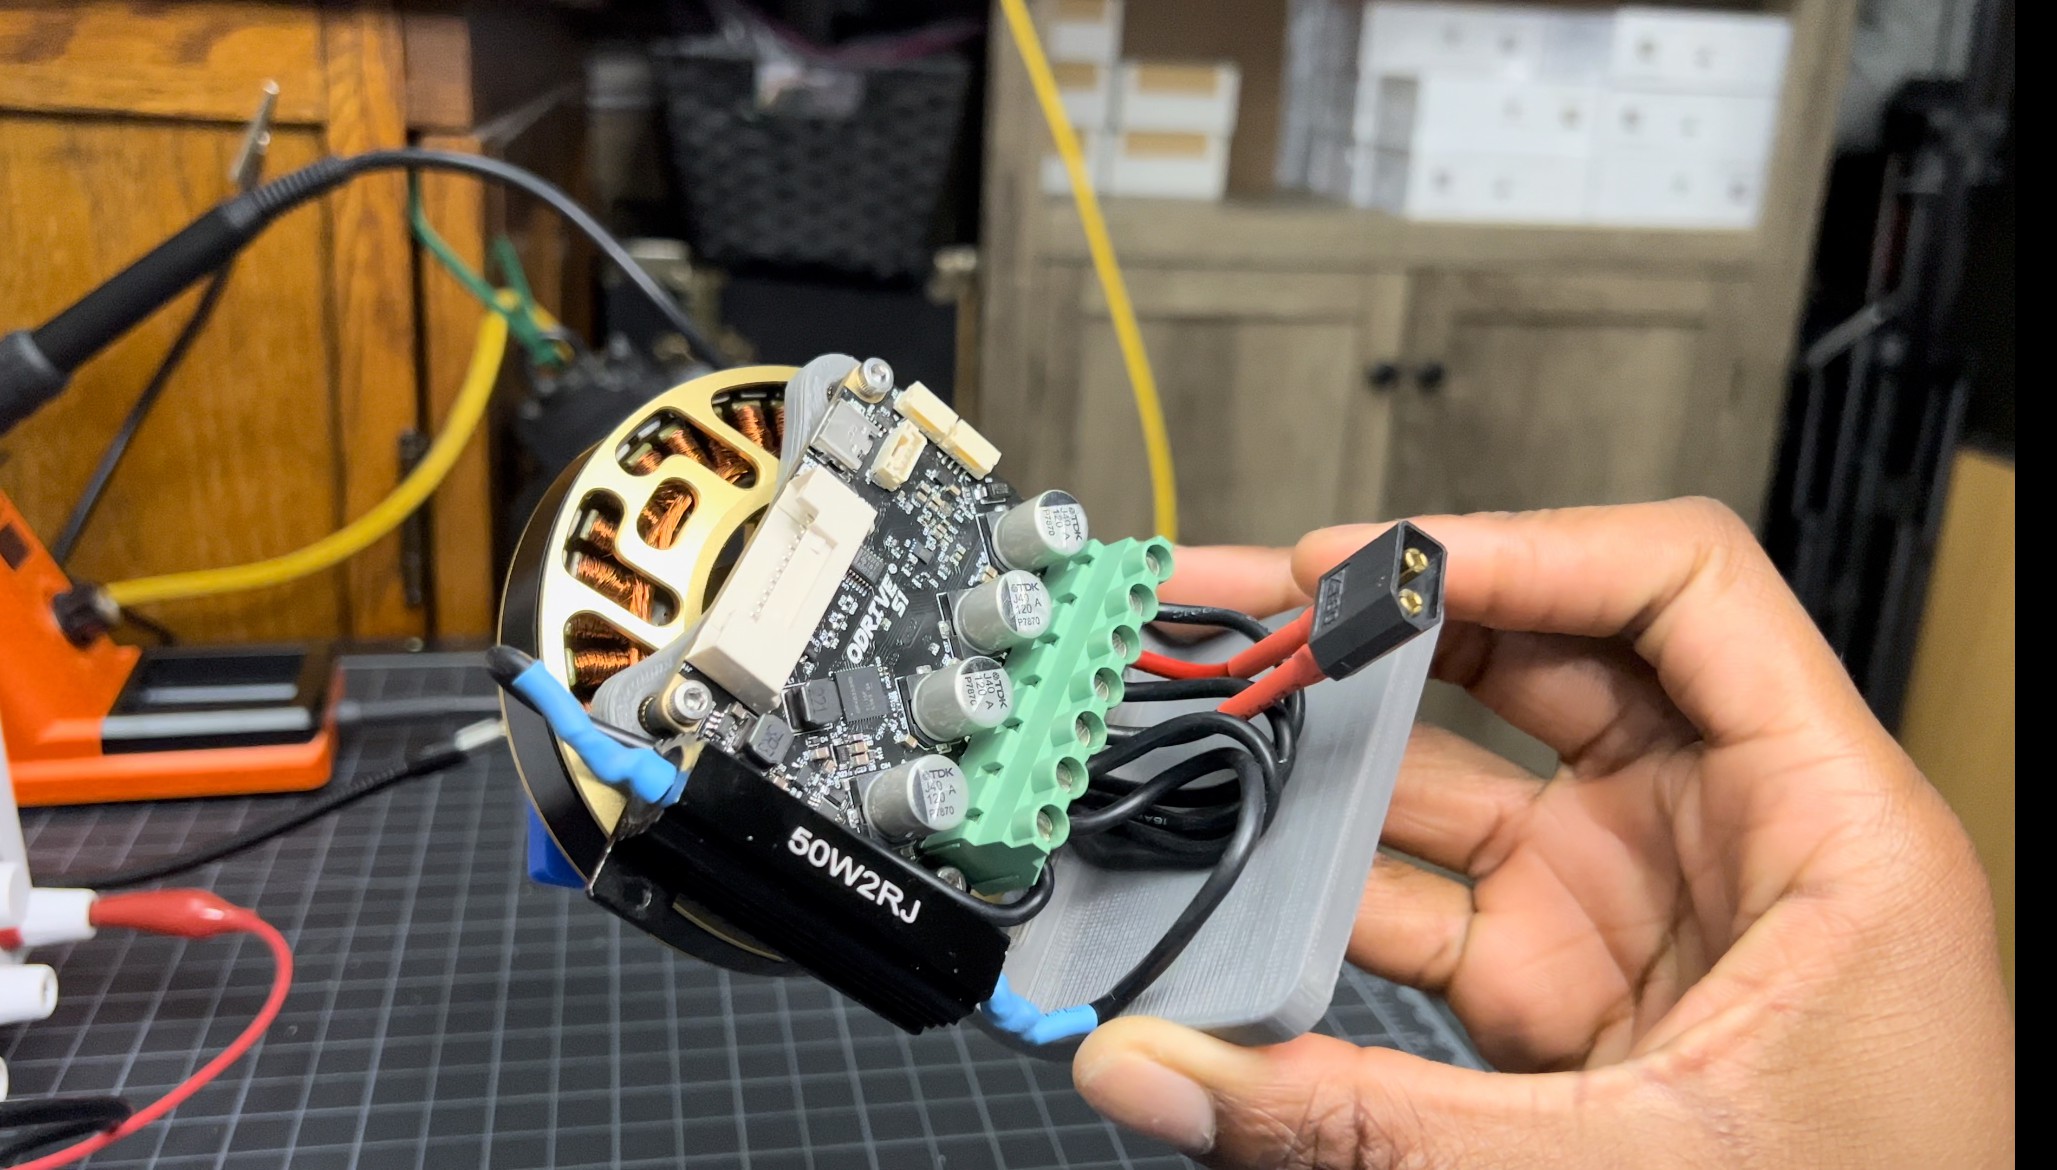
    The first step in assembling the robot was to build all 12 actuators using 12x high-torque 90KV brushless motors and 12x ODrive S1 brushless motor controllers with position, velocity, and torque closed-loop control. 

    To get the actuators up and running, I used the ODrive GUI to change settings, calibrate the motors, and define each actuator's CAN bus node ID.

    There are 3 different types of actuators since each leg has 3 types of joints: adduction, hip, and knee. These each fit together to form the body of a single-leg assembly and 4 of these leg assemblies form one 12 DOF robot. 

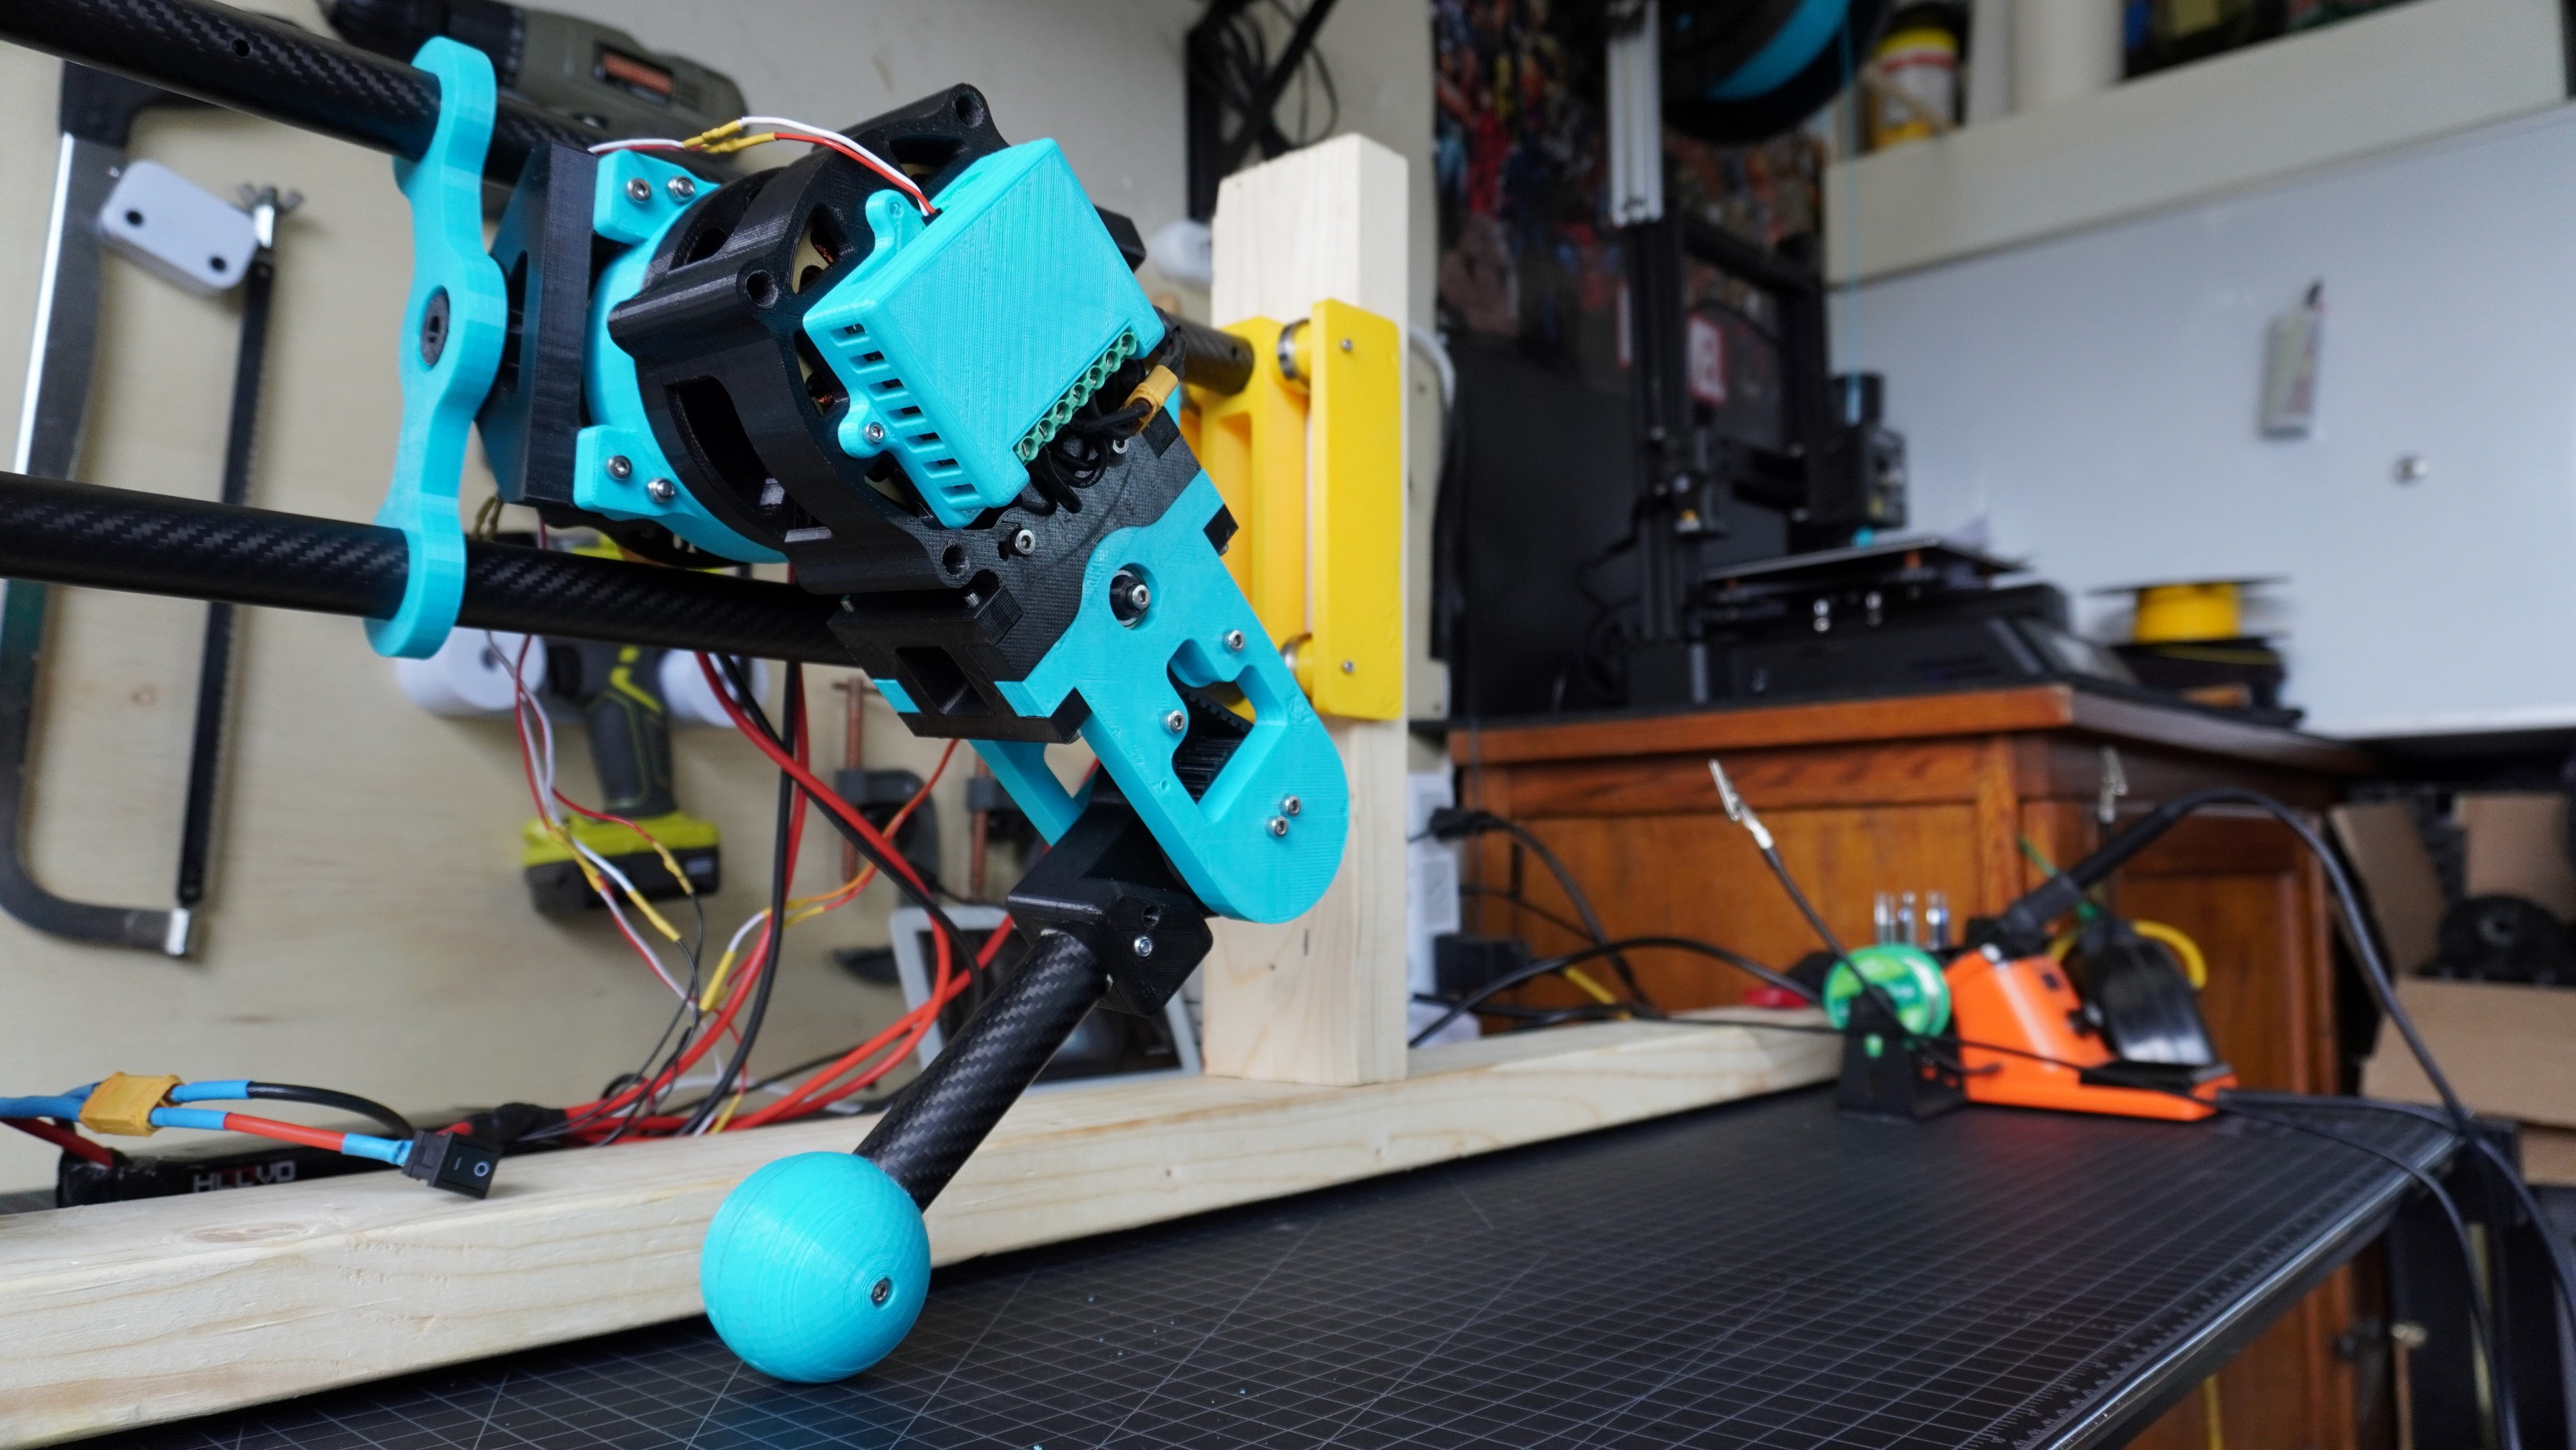
    In my single-leg testing, I found that using screws with carbon fiber tubes ended up just making wide and unusable holes. To fix this, I integrated clamps into the design of each adduction actuator’s housing so that I could use a screw to clasp the actuator onto the carbon fiber tube.

    Electronics

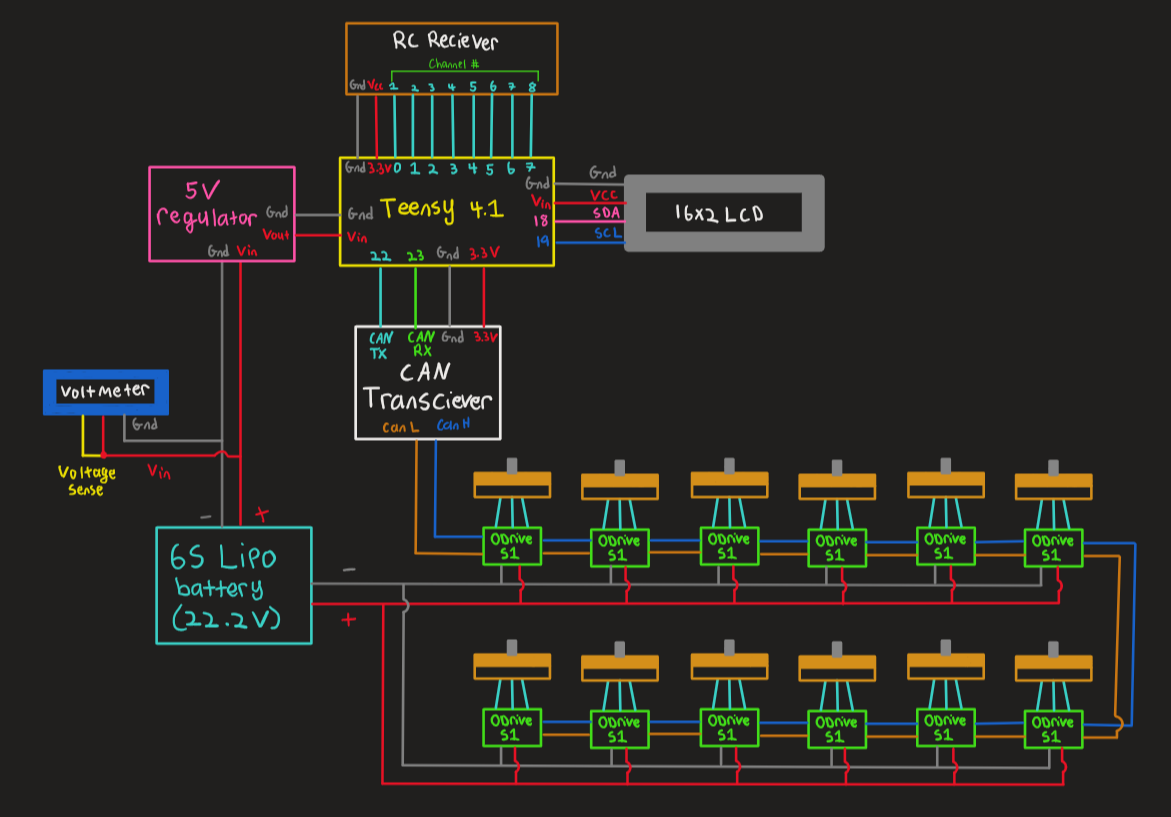
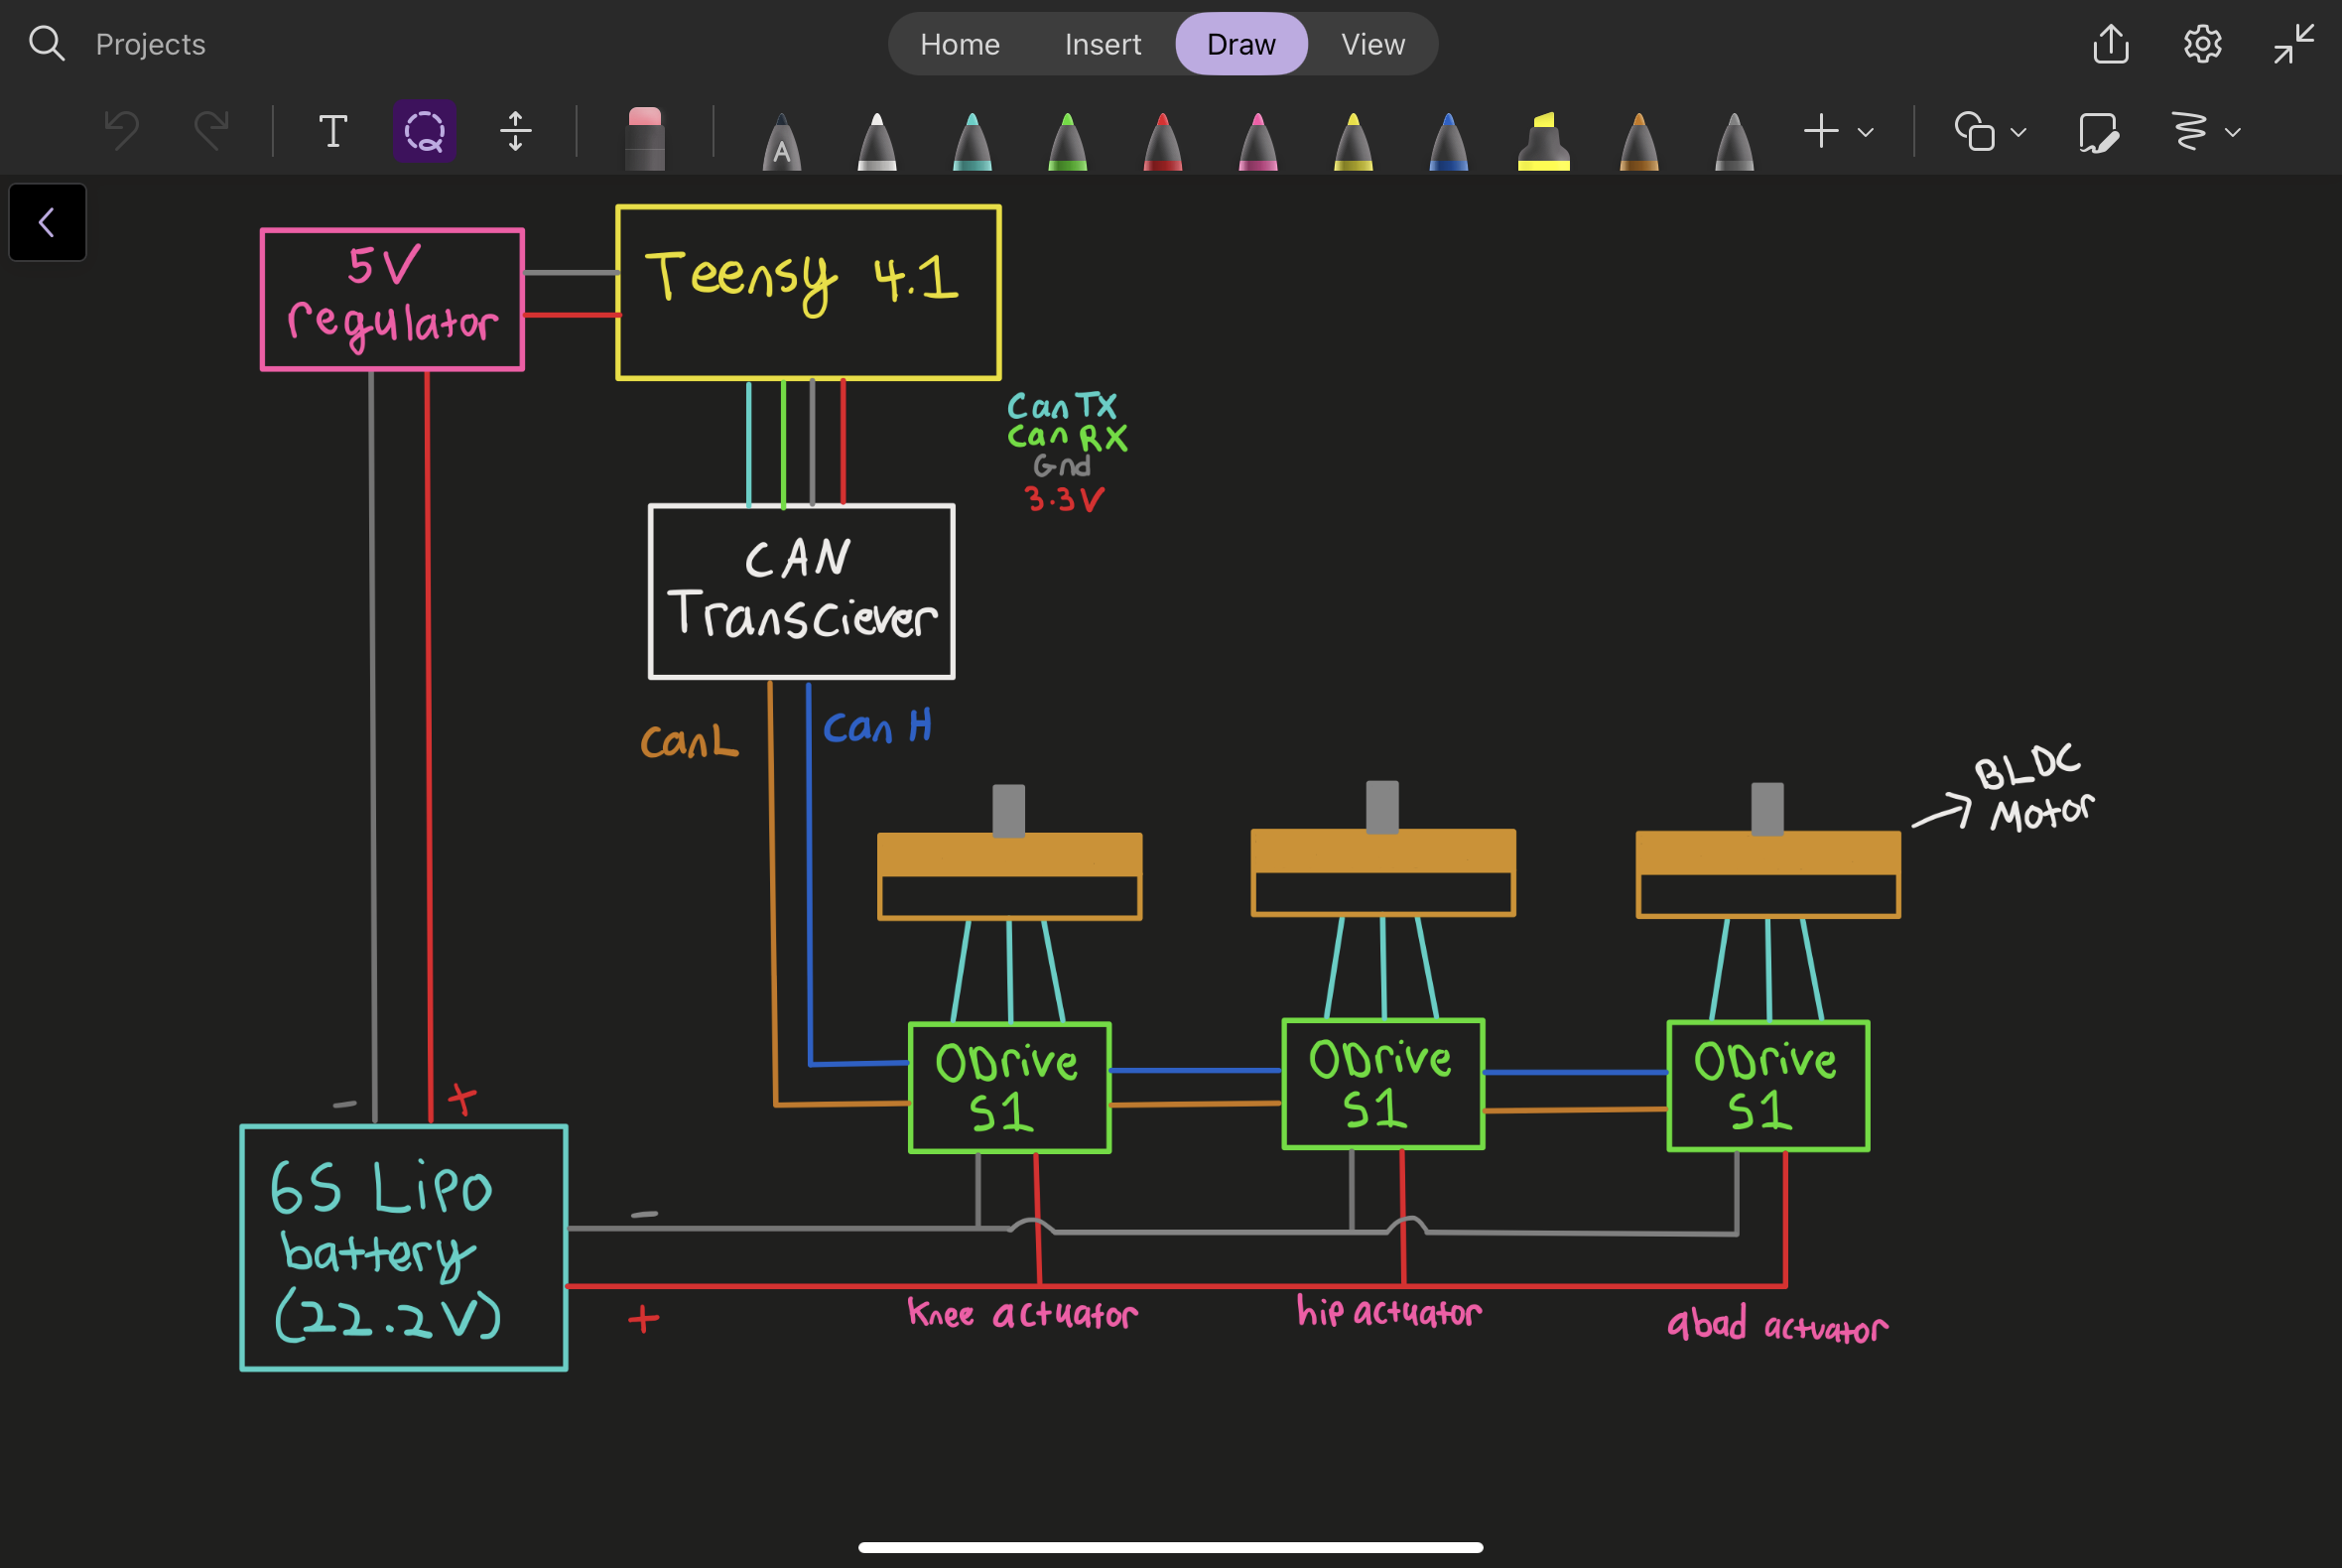
    All 12 of the actuators are powered by a 6S 5200 mAh Lipo battery. The actuators are also Daisy chained together via the CAN LOW and CAN HIGH lines which connect to the CAN bus transceiver which connects to the Tensy 4.1 microcontroller. 

    I'm using an RC remote and receiver to control the robot as well as a small 16x2 LCD to act as a menu for different control modes. Both of these also connect to the Teensy. The Teensy is powered by a 5V regulator which steps down the battery voltage. On the left side of the robot, I've attached a voltage display to monitor the battery life. 

    Programming

    Programming this robot was the hardest part of the build. There are so many different variables to consider like the amount of time each leg is off the ground, how far the legs lift off the ground, how big each step is, the step trajectory etc.... These factors not only determine if the robot can walk in the first place, but how dynamic that walking motion is.  

    The main principle in getting a quadruped to walk is to always have a pair of 2 diagonal feet in contact with the ground at any given moment, this is otherwise known as trotting, and it's what allows TOPS to maintain balance.

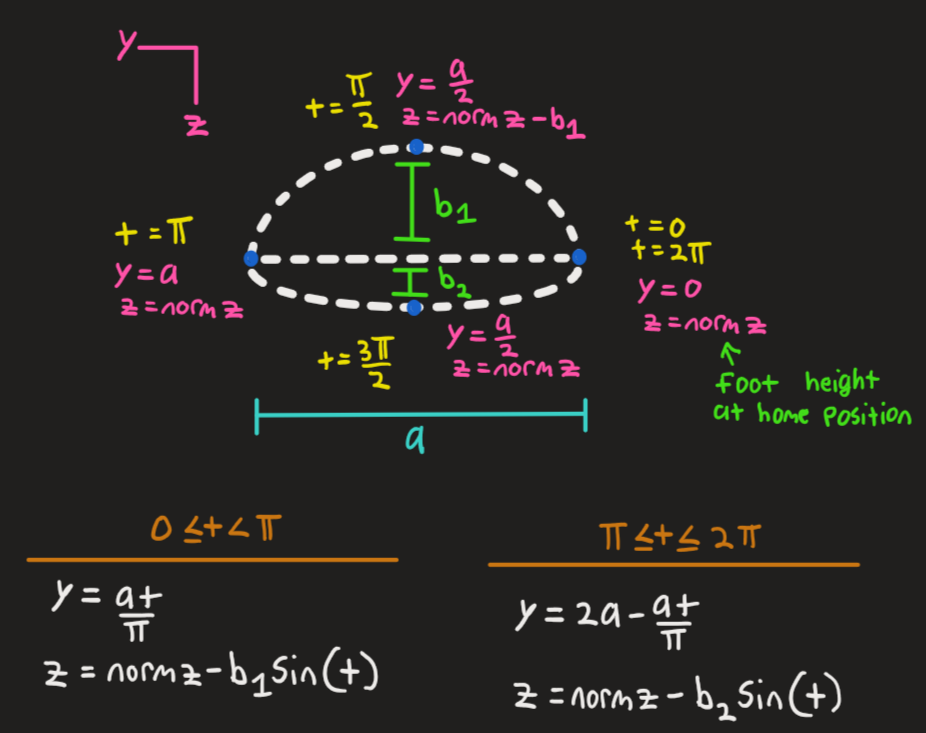
    I had originally planned for a sinusoidal step trajectory, but it just didn’t work out so I reverted to a more crude but reliable square-step trajectory. Here the foot moves up, forward, down, and back.

    Now getting the robot to trot forward is essentially a 2-step sequence. You first need to have...

    Read more »

  • Leg Design V2

    Aaed Musa08/25/2023 at 20:09 0 comments

    I’ve decided to redesign the leg before designing the full robot in order to address some issues that arose when testing out the V1 leg.

    Physical Design Changes

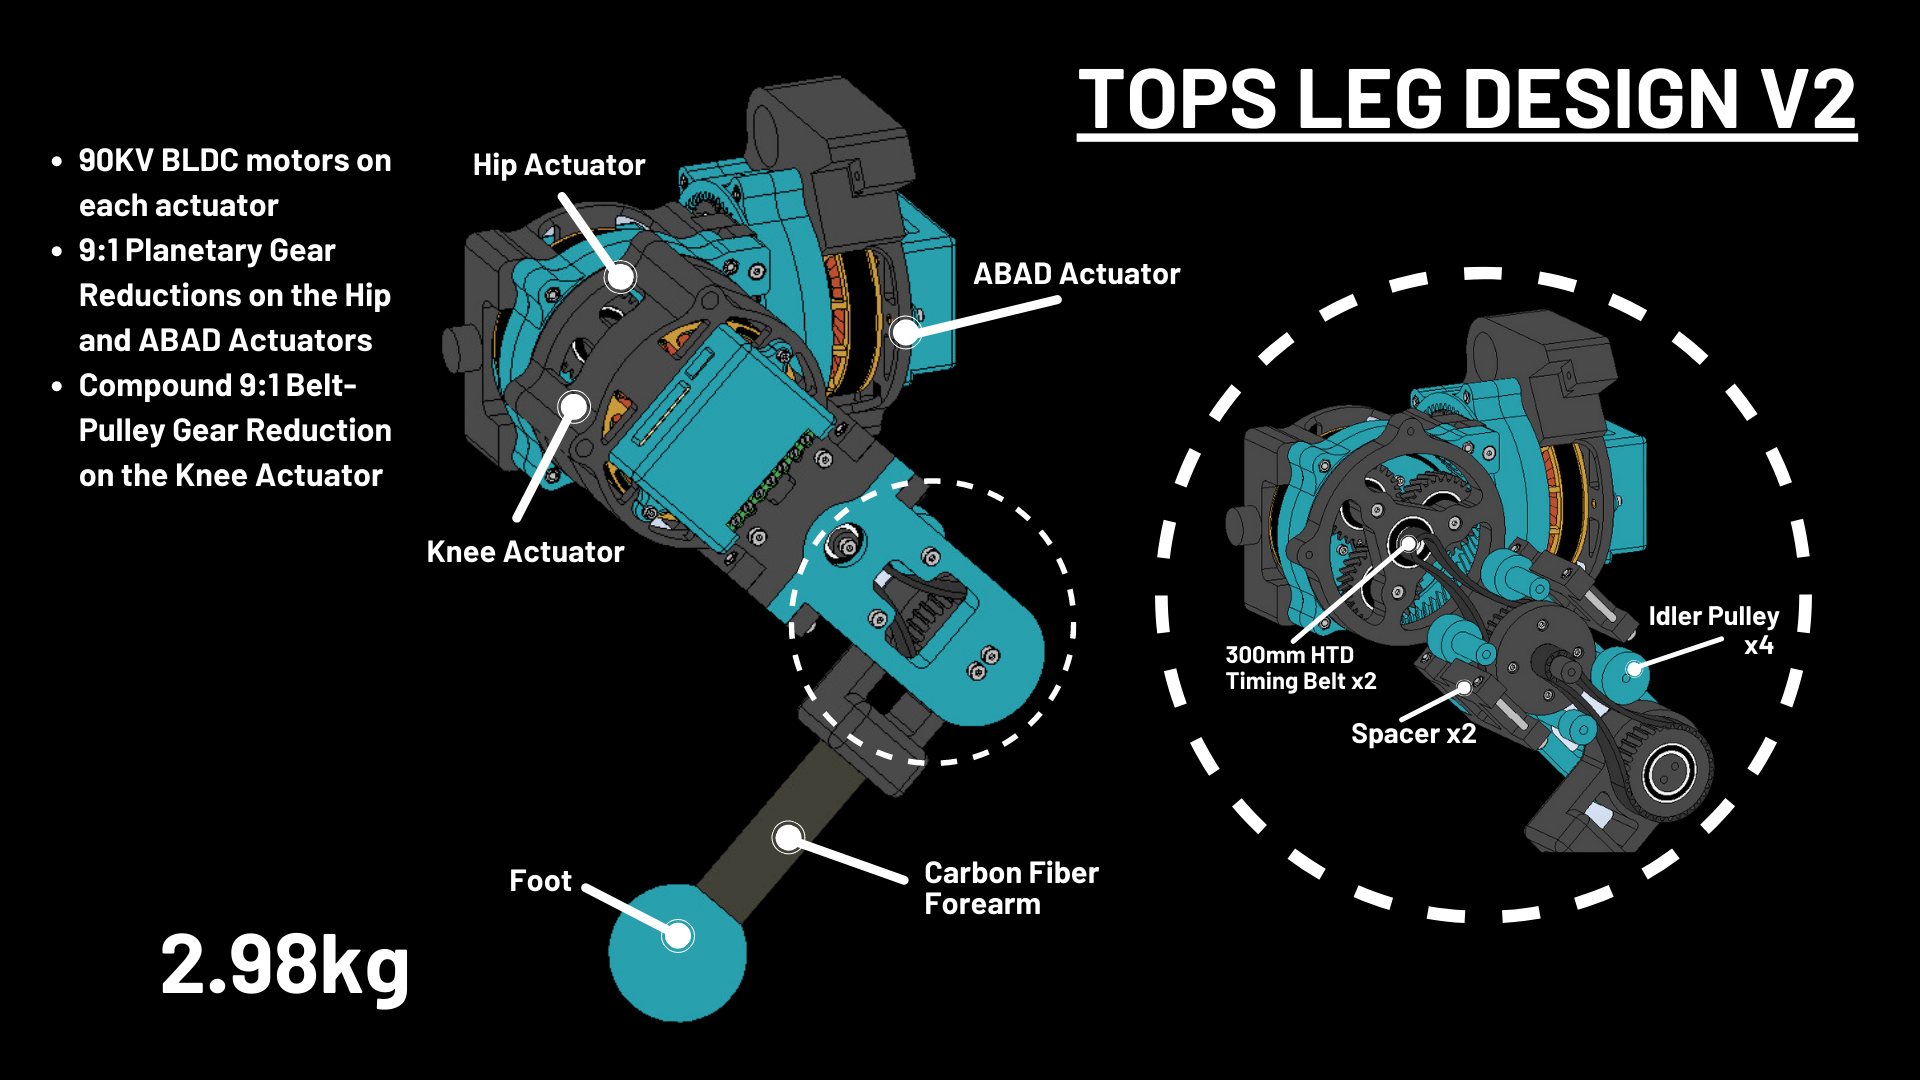
    • Got rid of using limit switches for homing.
    • Reduced total screw count and made it so that most of the leg can be assembled with just M4 x 40mm rather than assorted screw lengths.
    • Took off about 1lb from the original design (V1: 3.42kg, V2: 2.98kg, 0.44kg or 0.97lb difference). Considering a full robot, I’ve now made it 4lb lighter which is quite significant. I’m estimating the total weight of the robot to be about 13-15kg. For reference, Spot from Boston Dynamics weighs 31.7kg.
    • Made the leg design much lower profile by reducing how much the it sticks out.
    • Reduced the complexity/print time of each actuator design. The BLDC motors are now visible which allows me to feel the motors when they get hot. It also just looks a lot cooler! The knee actuator had the most change. The knee actuator in V1 used 9:1 planetary gear set in addition to a 1:1 gear reduction for the belt pulley system to actuate the lower leg. Now, in V2, the knee actuator has no planetary gear set and a 9:1 reduction for the belt pulley system. This change was the biggest weight and size reduction.


    Motor Control Changes

    • Switched from UART to CAN BUS since the microcontroller that I’m using (Teensy 4.1) only has 8 out of the 12 serial ports that I would need to control 12 motors with UART on a full robot. With CAN BUS, in theory, I would only need 1 serial port to control 12 motors although it would be best to use 2 (6 per port).
    • With CAN bus all motors are interconnected through two wires (CAN H, and CAN L) which significantly reduces wiring. For reference, with UART, each motor was connected to four wires for serial communication rather than two.
    • The only limitation of using CAN bus is that the ODrive motor controllers that I’m using don’t yet have an official Arduino library for CAN bus so I’m not able to read the absolute position from the onboard encoders. This means that homing the actuators requires me to move the leg manually to a common position which I've integrated physical limits into the design.


    Gait

    • In V1 I created a stepping sequence called sine step which moves the leg forward by following the path of a sine wave and then moves the leg back to the original position by following the path of a straight line. This time, the leg moves back to the original position by following the path of another sine wave (of small amplitude) rather than the path of a straight line. This is the same gait trajectory used by the Stanford Doggo and I’m hoping that this further smooths out the gait.

    Jump Testing

    • Shaving off so much weight got me thinking about making the leg jump. 
    • I’ve got the leg to jump a little less than 3.5”. With four legs the robot should definitely be able to jump.
    • One issue I ran into while doing jump tests was belt tensioning of the knee actuator. The knee actuator carries the most load, so its belts have to be extremely tensioned to so that they don't slip during a high-impact landing. Although I haven’t tested this, reducing the position gains, which increases actuator compliance, should increase impulse and help reduce impact upon landing.

    Weight Testing

    • I've got the leg to lift 10 lbs meaning that the robot should be able to lift 40lb, which shouldn’t be confused with how much weight it will be able to walk with (most likely less than 40lb). I did further testing with a scale and the leg should be able to lift up to about 13lb. 

  • Leg Design V1

    Aaed Musa07/28/2023 at 11:18 1 comment

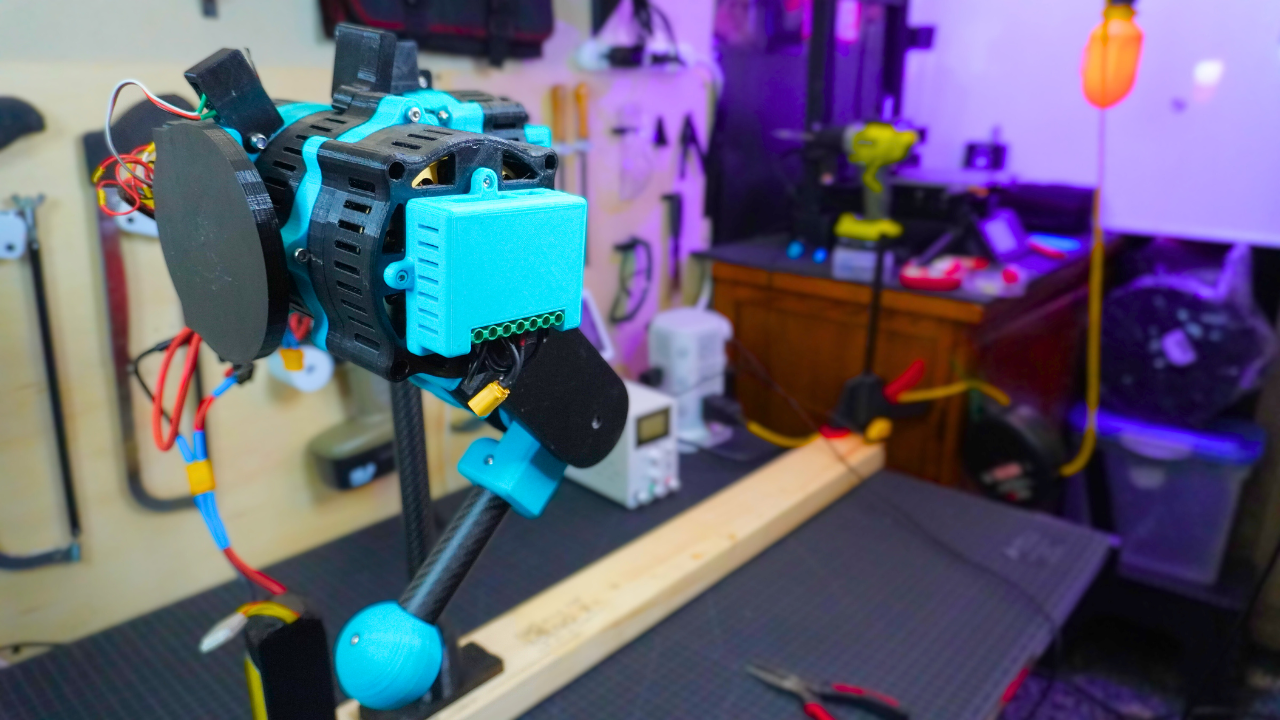
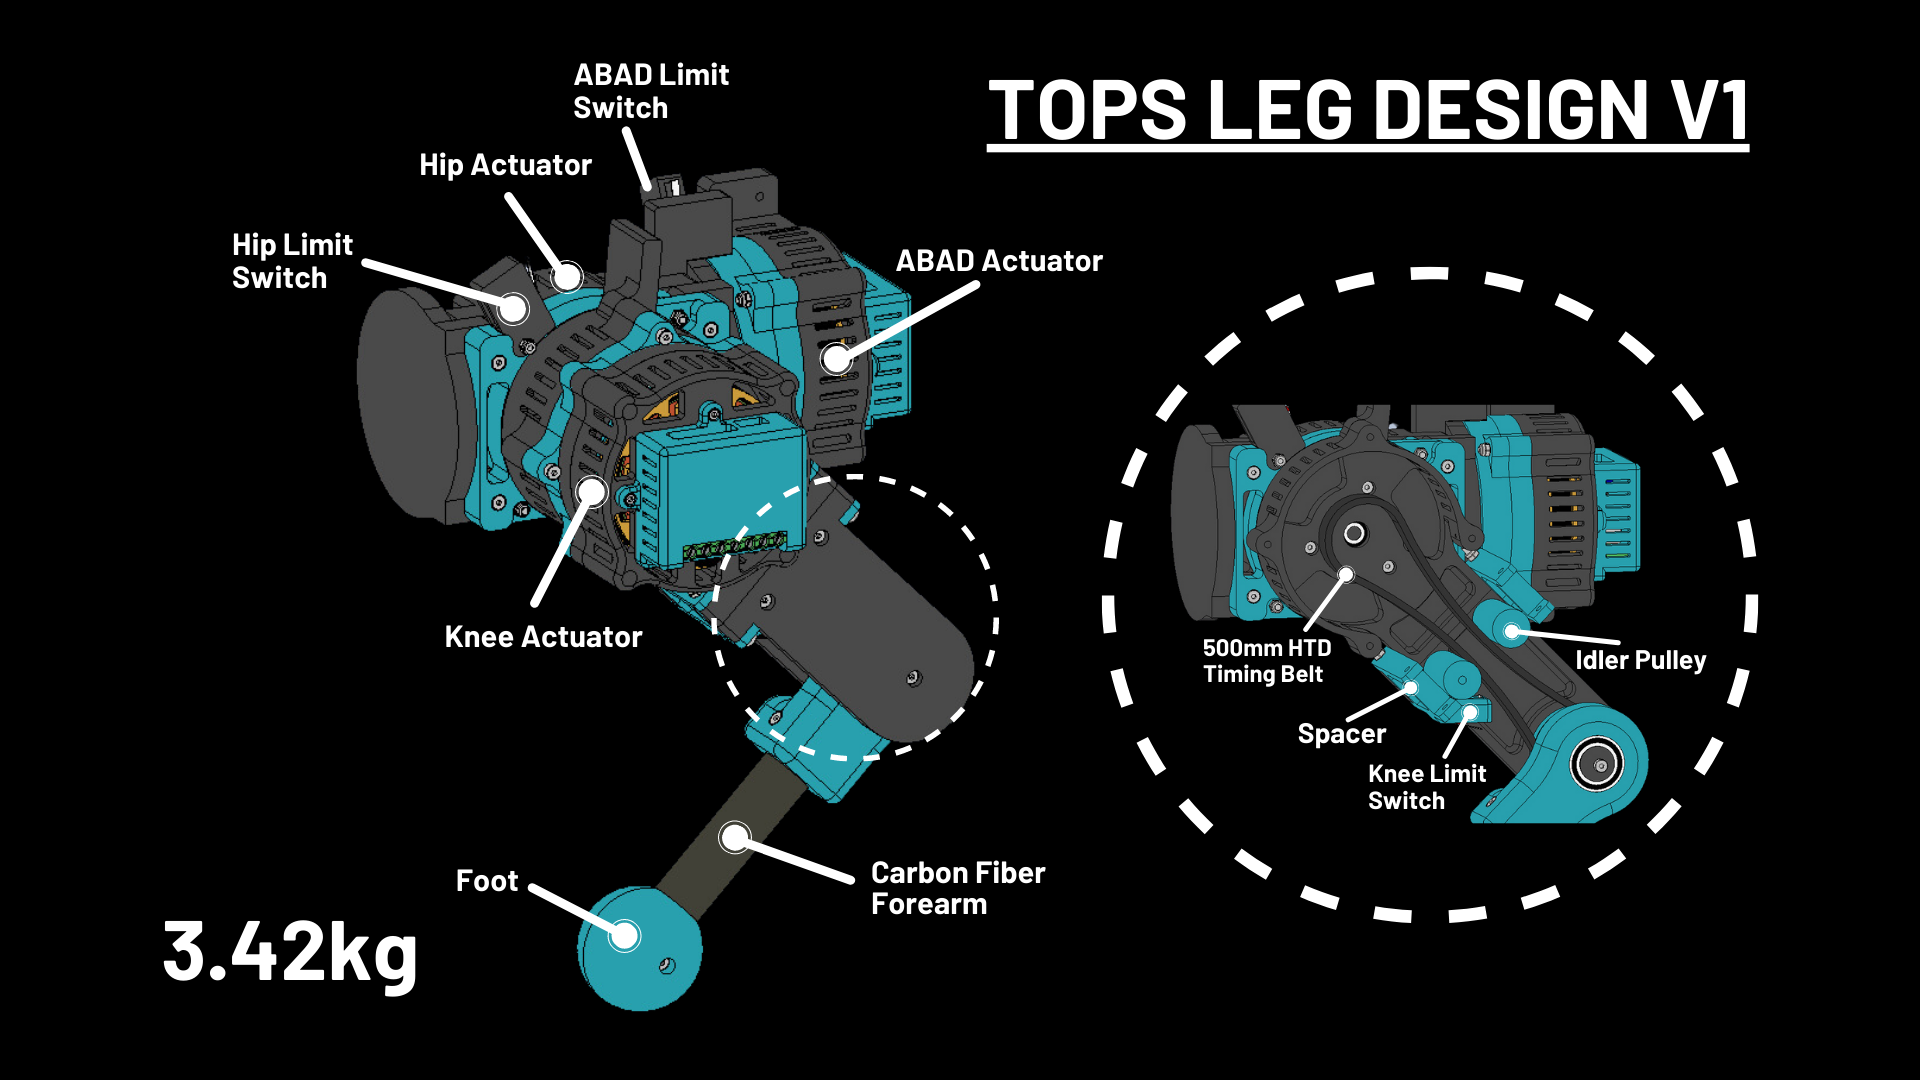
    • 3-DOF/ 3 Joints/ 3 Actuators (abad, hip, and knee)
    • Each actuator has a 9:1 planetary gear set reduction
    • Each actuator is a modified version of my OpenQDD Actuator.
    • The leg design is integrated into the design of each actuator.
    • The knee actuator uses a belt-pulley system with a  1:1 gear reduction 
    • Derived my own inverse kinematic equations called QIK (Quadruped Inverse Kinematics) to calculate the joint angular positions when placing the foot at a specific point in space.
    • Made an Arduino Library for the QIK equations.
    • Sinusoidal gate trajectory 
    • Weight: 3.42kg

  • QDD Actuators

    Aaed Musa07/28/2023 at 04:07 0 comments

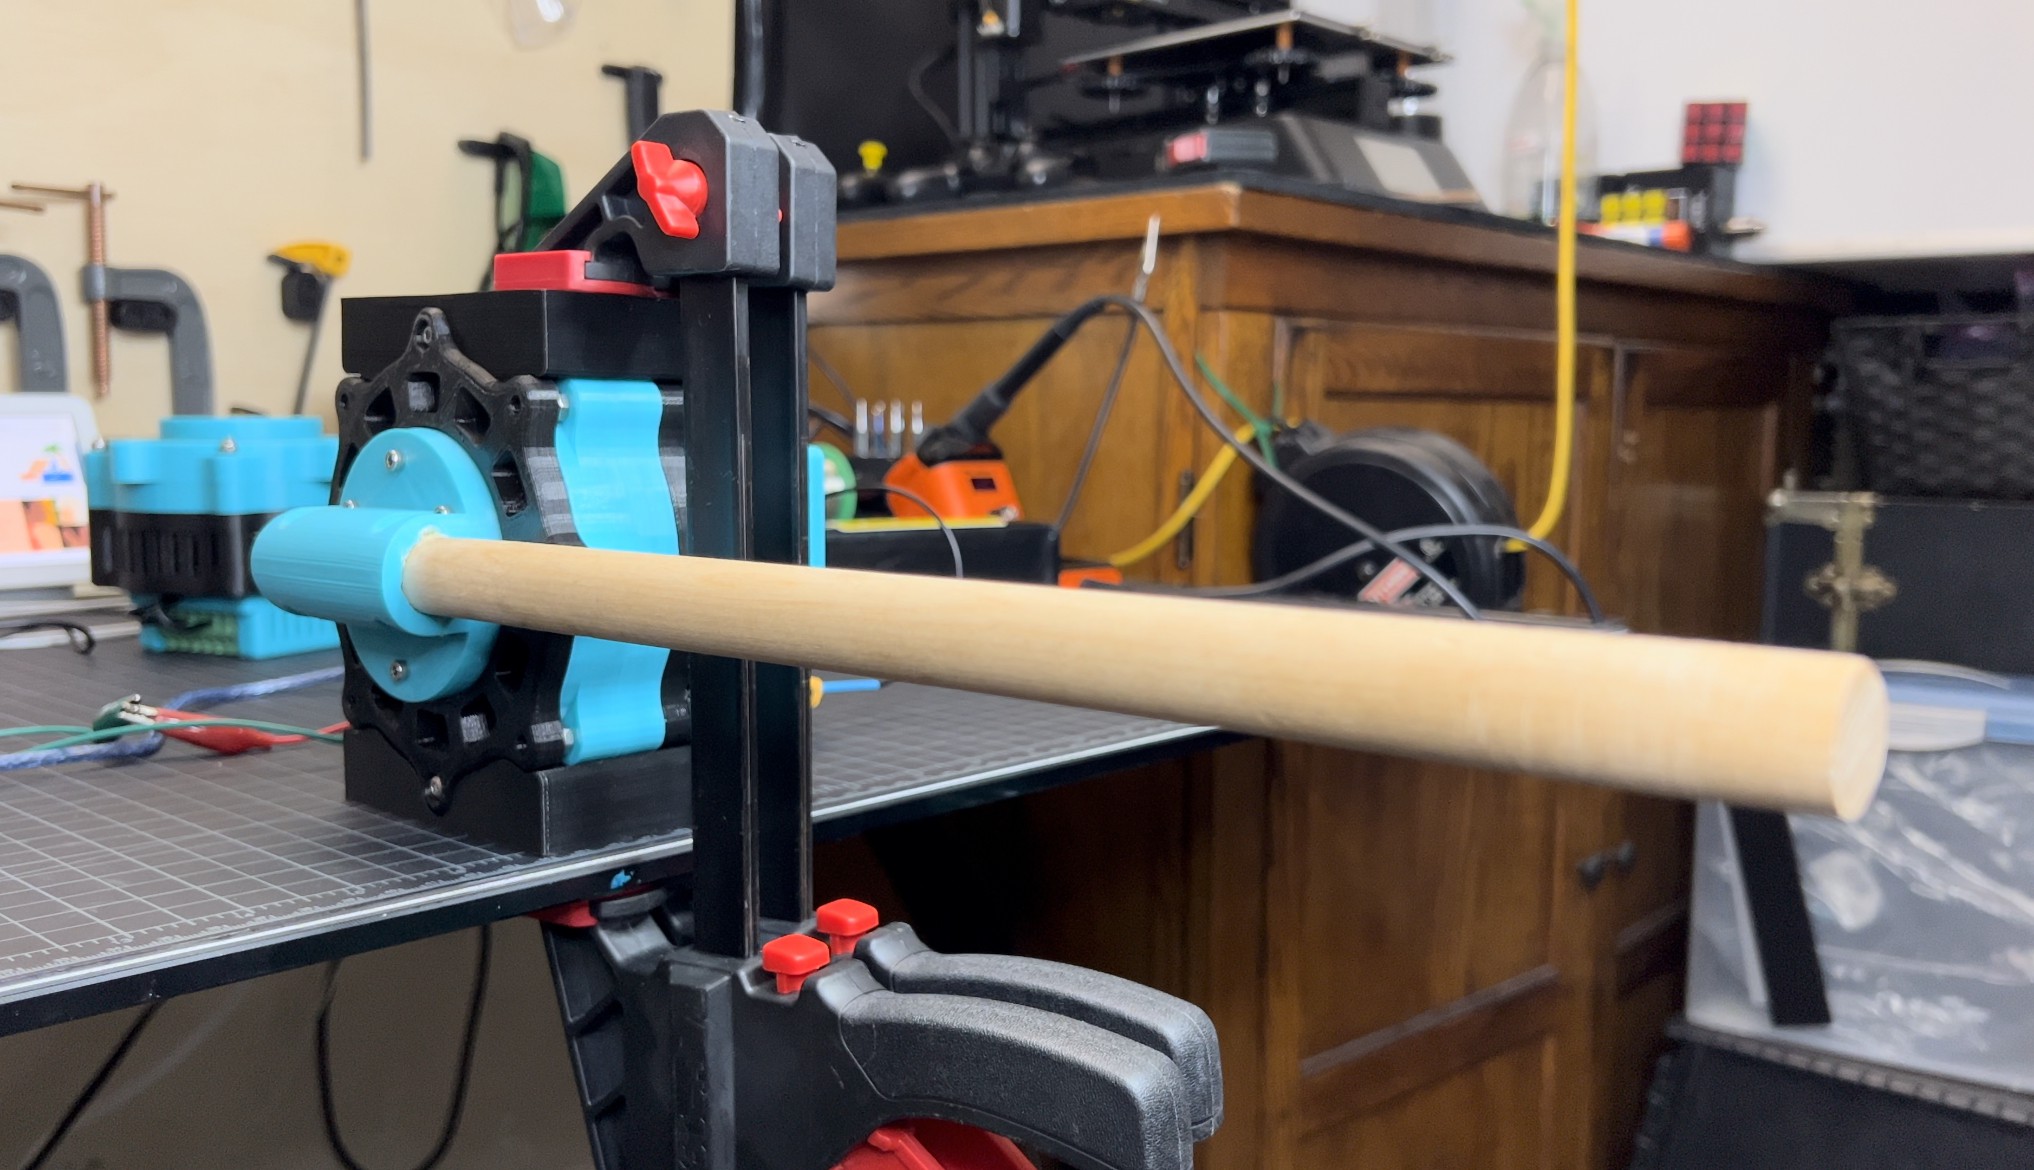
    QDD (Quasi Direct Drive) actuators use brushless motors and have low gear reductions, high torque, and high speed. These characteristics make them ideal for developing walking robots. For this project, I’ll be using the QDD actuators that I developed called OpenQDD.

    Specifications

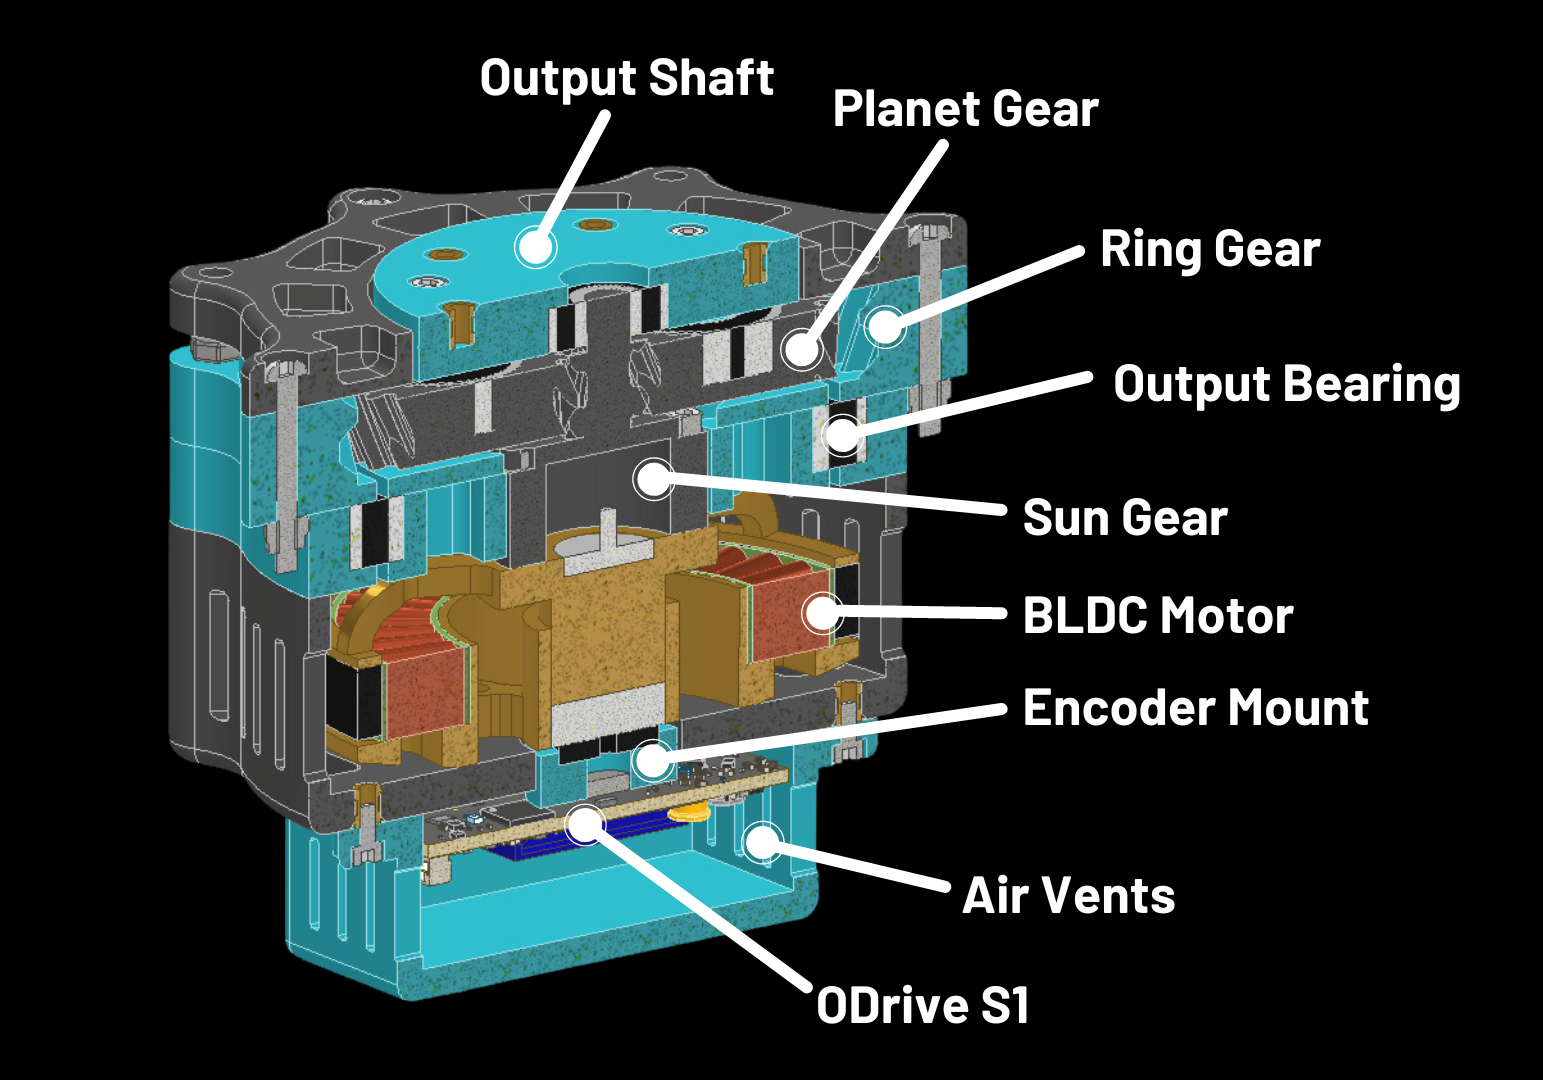
    • 9:1 Planetary Gear Set with Helical Gears
    • ODrive S1 FOC Controller with an Onboard Encoder
    • 13x 3D Printed Parts
    • Air Vents for Passive Cooling
    • Peak Holding Torque: 16.36 Nm
    • Total Mass: 935g
    • Total Cost: $247

View all 4 project logs

Enjoy this project?

Share

Discussions

Joe Montano wrote 03/25/2024 at 17:53 point

Also I believe I found an issue with "Plane_Carrier_Top(1)" for ab-ad, it overlaps with 2 different models from what I can tell.
I'm very excited to have my first leg built and thanks for this great project!

  Are you sure? yes | no

Joe Montano wrote 03/22/2024 at 22:59 point

Love this project! Working on my own build of it, have you shared your ODrive configuration anywhere by chance?

  Are you sure? yes | no

Tristan Branch Saints wrote 10/09/2023 at 06:01 point

i want to sponsor you email me at 7mbratri@stithian.com

  Are you sure? yes | no

SLAVKINGRED wrote 10/07/2023 at 17:21 point

this may very well be the best 3d printed robot dog project.

  Are you sure? yes | no

Similar Projects

Does this project spark your interest?

Become a member to follow this project and never miss any updates