 doctek
Update 9/3/25; This revision adds capability to use the Arduino Debugger with either the STLink or the DapLink.

The Arduino debugging capability requires use of OpenOCD. As the menu shows, both STLink and DapLink can be used. Selecting either one as the Upload method will automatically make them available for use in debugging. Many thanks to my friend Doug LaRue for figuring out how to make DapLink work and for making sure the menu selections worked properly! The only thing lacking is a good tutorial on actually using the Arduino Debugger.
To install this capability, just follow the instructions given below, but use WeActDuino_R2.zip from the Files area.
Update 8/24/25: This revision will add Generic Serial support. In addition to using HardwareSerial to enable the UARTs, you can now just use Serial without any other definitions just like on any other Arduino. This is especially important when using libraries that assume Serial is available for debug, etc. Sketches using these libraries now compile without error.
To install this new capability, close Arduino (if it is open) and simply go to the hardware directory, as described a few paragraphs down, and delete the WeActDuino directory. Then download WeActDuino_R1.zip from the Files area for this project. Unzip the zip and move WeActDuino into the hardware directory. Now reopen Arduino and press Reload Board Data on the Tools menu. Serial should now be available and sketches using it will compile. Serial will use pin A9 for TX and A10 for RX as shown on the WeAct_Pin_Map_R1.png (in the Files area).
I am now using Arduino 2.3.6, and STM32 MCU Boards version 2.11.0. Earlier versions should work as well, but these are what I've tested.
Complete update on how to get going. (3/25/25) You can read all about the project after this, but this is important!
As a preliminary, install Arduino 2.0 or later for your system.
First you must install STM32 support to Arduino. Follow the instructions here . Start with "Installing STM32 Cores" and proceed through "Extra step" to install the STM32CubeProgrammer.
Install the STM32CubeProgrammer following the instructions here. Download the software by scrolling down to Get Software and choose the correct version for your operating system. More information can be found here. To program the WeAct Duino, you will need an St-Link. The one from WeAct works well. You may need to install the ST-Link Driver. If using an ST-Link on a Nucleo board, you may need to update the software. Google should get you to the right areas.
The final step is to install the files to support the WeAct Duino variant. That process is described in the below, but is included here for simplicity. Find your Arduino Sketchbook location from the Arduino IDE using File > Preferences. The Sketchbook location is the first entry in the window. In that location, create a new directory named "hardware" (without the quotes). Then download WeActDuino.zip from the Files area of this project. Unzip it into the hardware directory you just created. once the files are in place, select the tools menu in Arduino and click Reload Board Data. You should see an entry in the Tools -> Board menu named "WeActDuino Boads (in sketchbook)" with a single entry "weActDuinoG431". The old way to force new Board Data to be read was : "Once the files are in place in the hardware directory, you must close Arduino if it's open, delete ~/.config/arduino-ide, and restart Arduino. Do this anytime the files in the WeActDuino directory are changed. (It's a bug in Arduino.)" This is no longer necessary as of 4/15/25. I leave these old details just in case things don't work as expected, you can try the old method.
OK, now you can read about how we got here. Please note that all the items in tArmDuino that were indicated as "broken" have been fixed and are working well. Further, I'm now running Ubuntu 24.04 and using Arduino 2.3.4.
My first serious work with STM processors as...
Read more »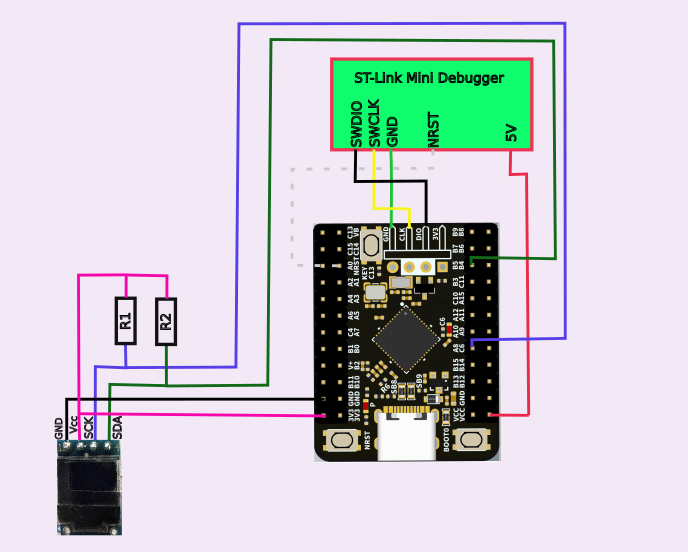


 Hulk
Hulk
 Gregor
 DIY GUY Chris
 Sander van de Bor
I followed the clear instructions and got my WeAct STM32G431 board running Blink pretty quick. I am now trying to figure out how to use the 4 UART interfaces in ways that I am used to using the single UART of the other Arduino capable boards! Thanks Doktek