 simeononsecurity
-
1Instructions
DIY Onocoy Reference Station Setup Guide
In this guide, we’ll walk you through the process of setting up your own GPS Onocoy server using cost-effective hardware options and reliable GPS receivers. Whether you’re interested in enhancing the accuracy of your location-based applications, conducting precision surveys, or simply exploring the world of DIY technology, this guide provides step-by-step instructions to help you get started with creating your DIY Onocoy reference station.
What is Onocoy?: Advancing GNSS Correction Data
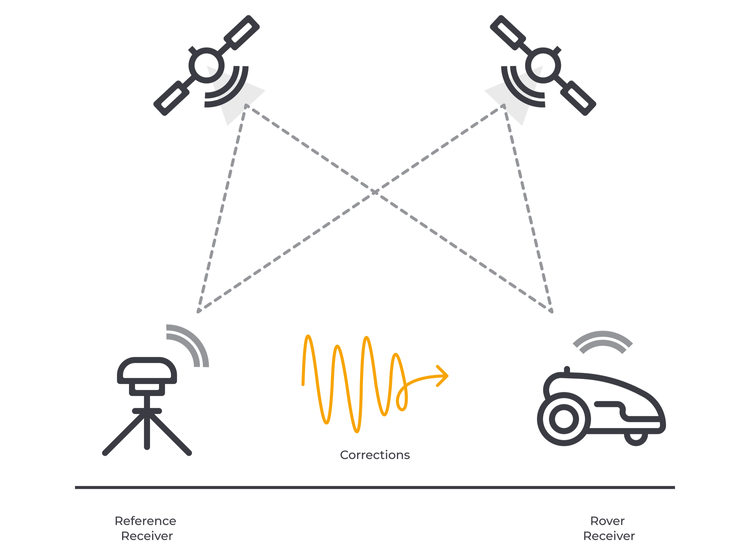
Onocoy is an innovative platform that harnesses GNSS devices and correction data to create a decentralized network for precise positioning and navigation. It offers users the opportunity to contribute to this network while earning rewards based on their data contributions.
Enhancing Your GNSS and RTK Setup
Onocoy offers a fresh perspective on GNSS stations. Beyond pinpoint accuracy, it’s about becoming part of a global network that benefits users worldwide. Discover the key considerations for setting up your station: from selecting the right equipment to optimizing antenna placement and ensuring reliable internet connectivity.
![Onocoy RTK]()
Contribution and Rewards
At its heart, Onocoy not only improves accuracy but also recognizes your contributions. Uncover how your role in enabling specific NTRIP messages and maintaining low latency translates into tangible rewards. Onocoy’s approach ensures a fair distribution of rewards through blockchain technology, providing transparency in recognition.
![Onocoy Reward calculation]()
Understanding Onocoy’s GNSS Capabilities and Requirements.
Exploring the GNSS capabilities of Onocoy sheds light on the diverse channels and bands it supports. As a rule of thumb, a broader range of bands and constellations translates to enhanced rewards within the network. For an in-depth understanding, refer to the insights shared in section 4.2.1 of the whitepaper, which is accessible on LinkedIn here and soon on the official website.
Update rates, a crucial factor, cater differently to miners and RTK Rovers, who are the data consumers utilizing the Onocoy service. Miners find stability with a rate of 1Hz, ensuring steady data contribution. In contrast, higher update rates like 10Hz, 20Hz, or even 100Hz predominantly serve RTK Rovers’ needs for real-time precision.
Addressing the notion of minimum required position accuracy, Onocoy adopts a pragmatic approach. Straying from stringent demands, the system’s meticulous processing accurately determines device positions during validation steps, ensuring reliability without undue accuracy expectations.
Signal-to-Noise Ratio (SNR) and signal levels emerge as pivotal factors. SNR above 40 dBHz, preferably reaching around 45 dBHz, signifies optimal performance. Lower SNR values, stemming from factors like extended cables or antenna quality, can elevate code/carrier noise, potentially affecting measurement quality. Two fundamental principles guide this aspect:
- Ensuring an unobstructed 360-degree sky view for the antenna, ensuring unhindered signal access.
- Aiming for a secure and stable antenna mount to counteract vibrations and instability.
This comprehensive approach forms the bedrock of reliable and robust data contribution to the Onocoy network.
Why DIY a Onocoy Reference Station?
Creating your own DIY Onocoy reference station offers several compelling advantages. Firstly, it provides a cost-effective solution, enabling you to save on setup expenses while achieving high precision in location-based applications. Secondly, the customization options allow you to tailor the hardware and software to your specific needs, enhancing flexibility and adaptability. Moreover, DIY setup empowers you with a deeper understanding of the technology, enabling you to troubleshoot and innovate. Lastly, contributing to the Onocoy network not only improves your own accuracy but also lets you play a vital role in advancing global navigation systems while earning rewards for your data contributions.
Hardware Requirements:
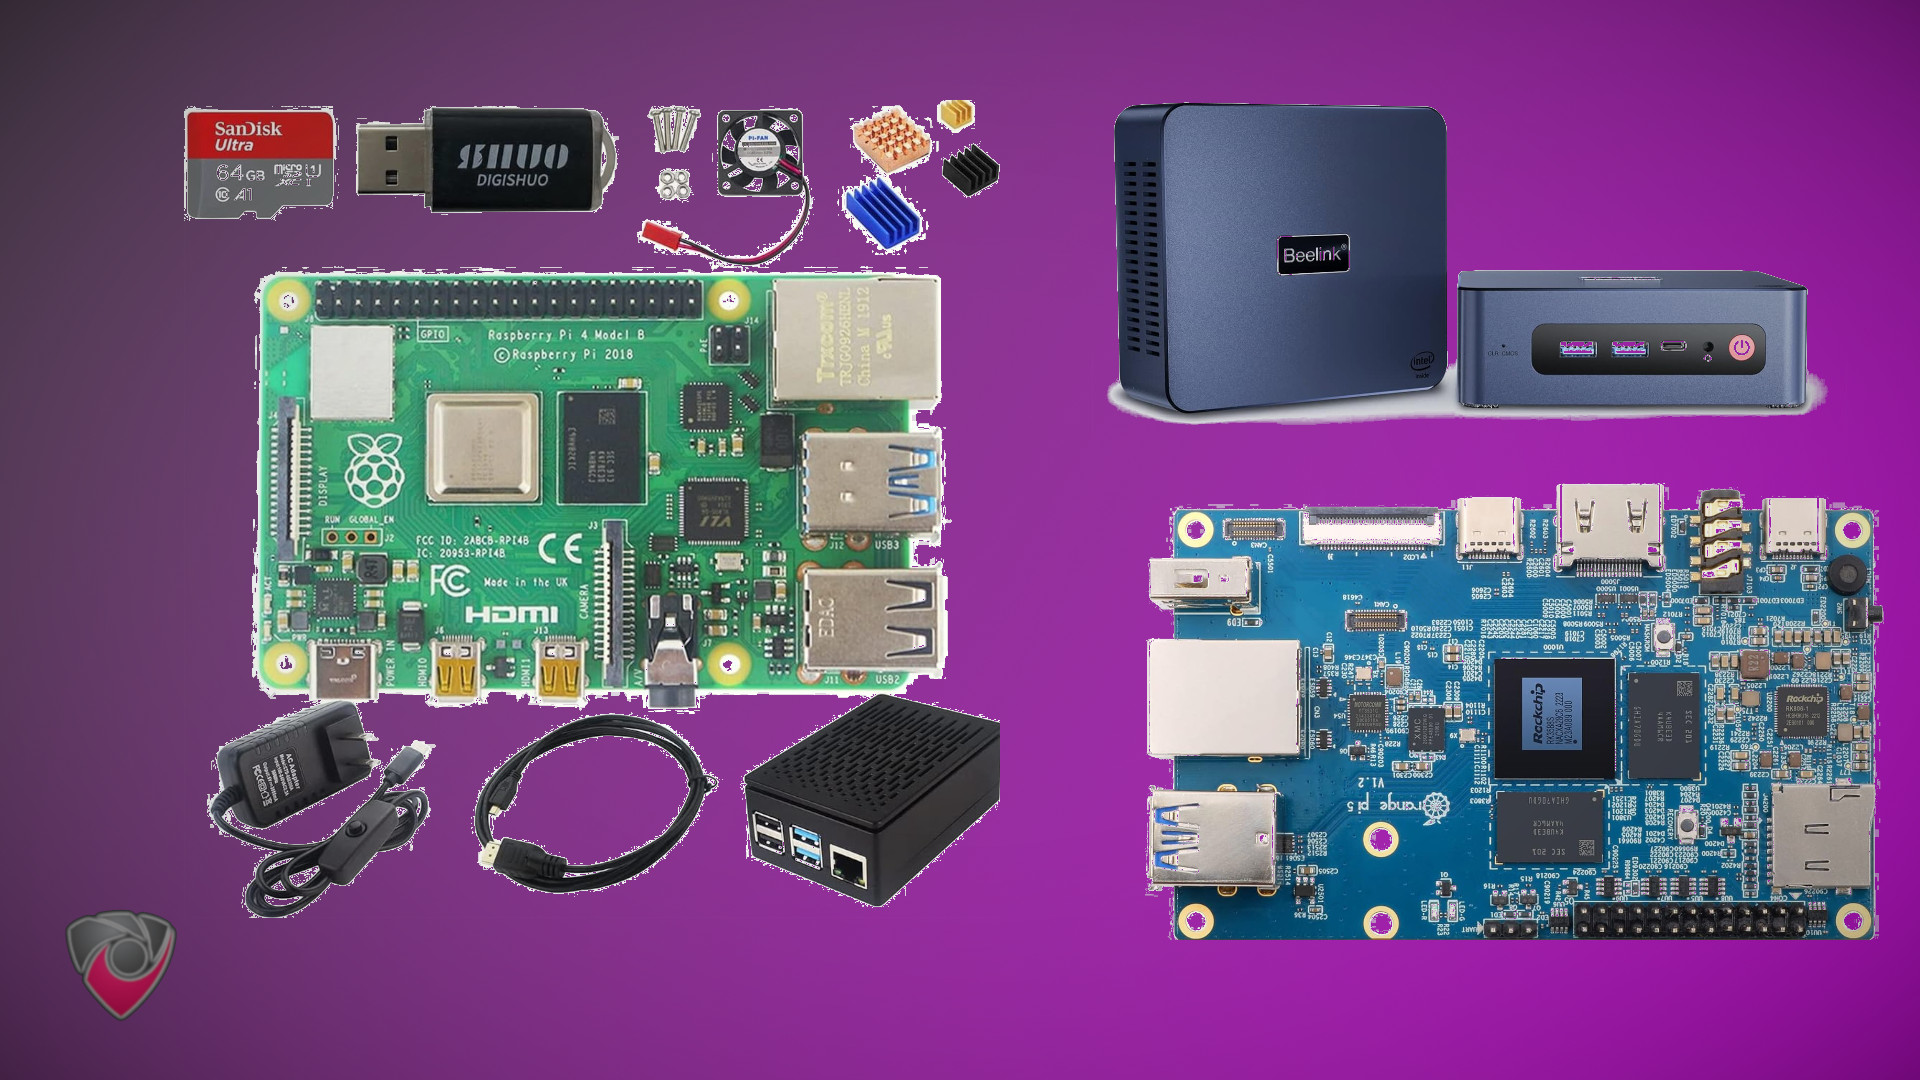
One of the following is required. We basically just need any efficient and low powered computer we can get our hands on that also runs Linux. Any Raspberry PI, Intel NUC, or similar will do. They don’t have to be all that powerful. However, we will recommend you have at least 32g-64g of flash-based storage (for longevity of the SSD). For this, we will be targeting a budget of around $50-$200 for compute hardware, but feel free to go higher if it suits your needs. Our power target is approximately 10w average.
![Onocoy DIY Compute for Receivers]()
Raspberry Pi and Pi Clones:
Hard to get ahold of these days but they are super low power and are quite customizable. For info on how to install raspian on your Raspberry PI
- Orange Pi 5 4GB
- Raspberry Pi 4B Model B DIY Kit
- GeeekPi Raspberry Pi 4 4GB Starter Kit
- GeeekPi Raspberry Pi 4 8GB Starter Kit
Any USFF/Tiny/Mini/Micro PC:
Any Mini PC with Intel N5100 or similar
For super low power Raspberry Pi equivalent but on x64 platform.
Ultra Low Power / Low Budget
Compute Notable Mentions
Older Raspberry Pi models (1, 2, 3) should be sufficient. But newer models should be significantly more efficient and allow you do run multiple low powered mining setups on a single device. This is why we recommend newer compute hardware.
Recommended GPS Receivers for DIY Onocoy Deployments
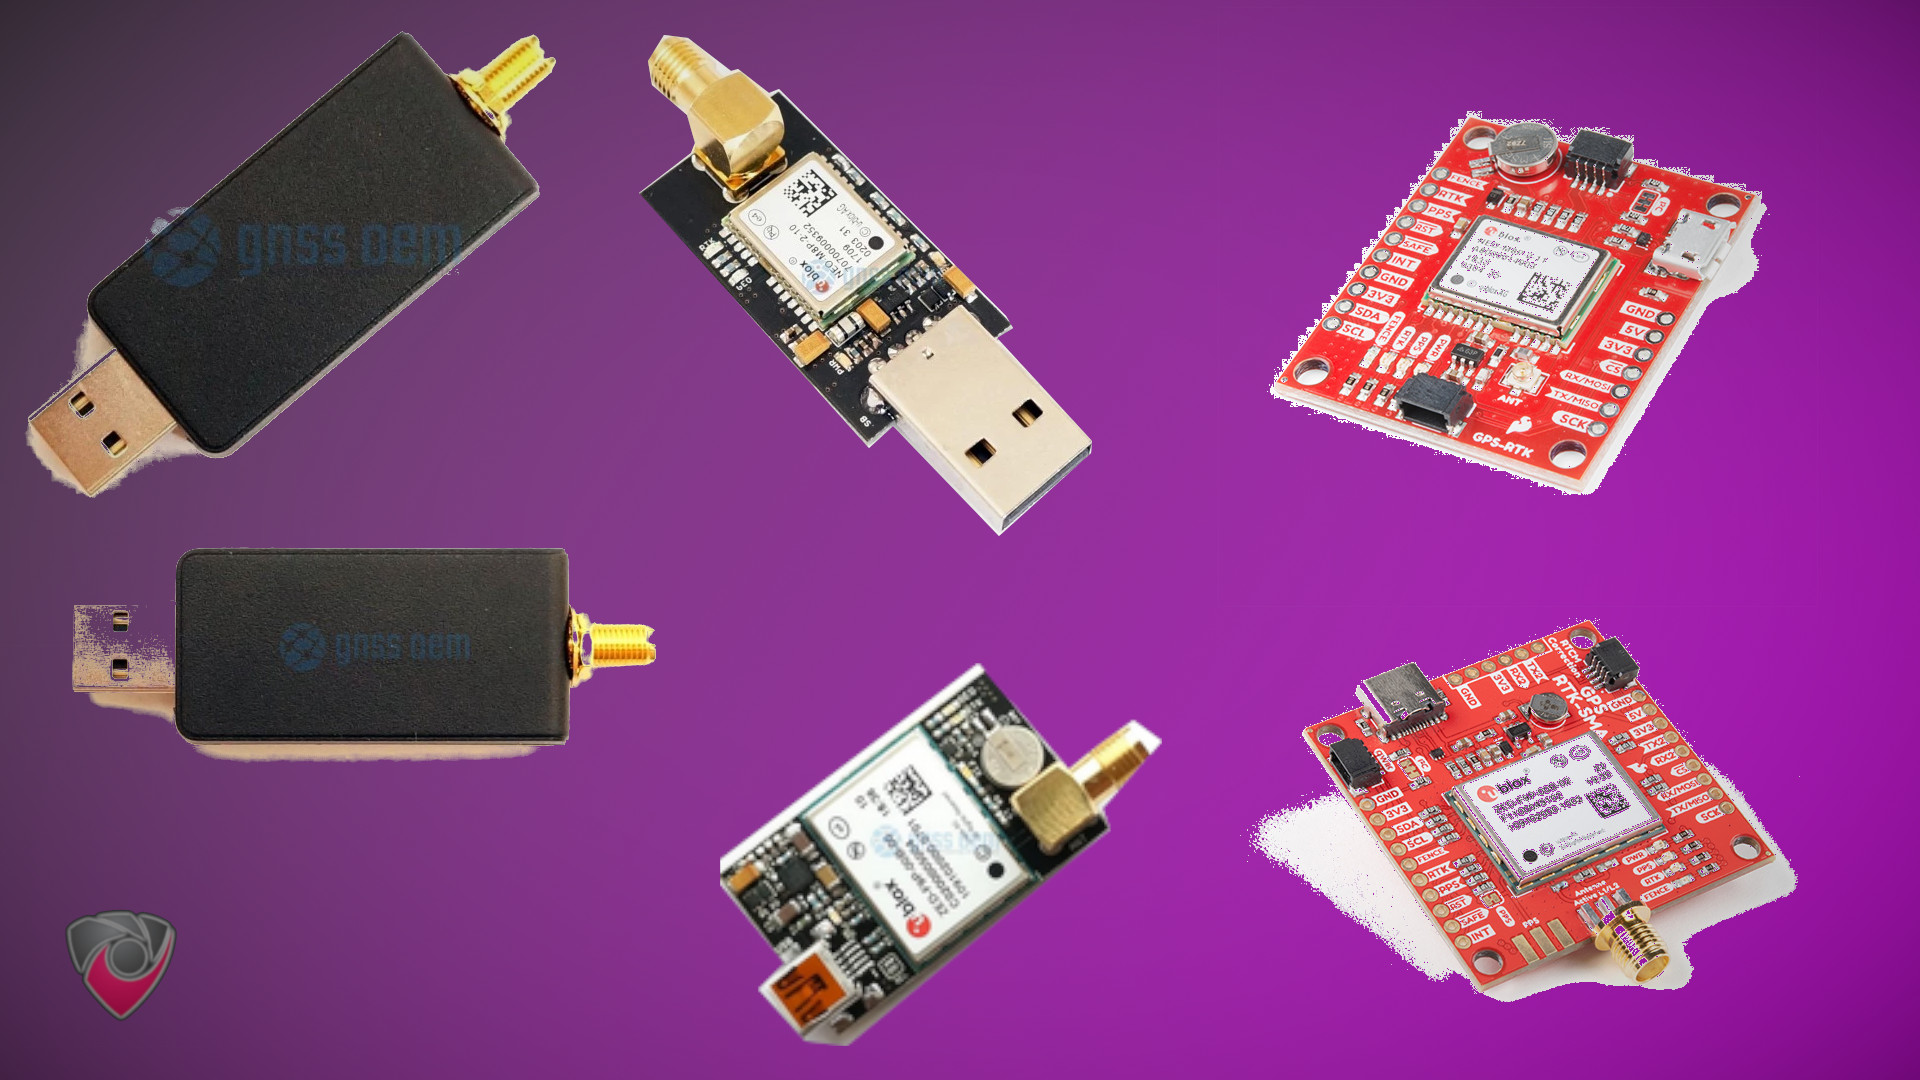
There are many receivers on the market but at a bare minimum it must support RTCM (Radio Technical Commission for Maritime Services) and ideally have the ability to be hooked up to an antenna outside of the install location with 360 degree unobstructed view of the sky.
![Basic GPS Receivers for Onocoy]()
- U-Blox Based Receivers
- NEO-M8P RTK GPS GNSS receiver board with SMA and mini USB for UAV, Robots
- $150
- Single-Band (L1 only), 72 Channels, supports USB; I2C; and UART, Accurate within 6 feet, 10hz pull rate. Rewards will be limited, 8-10% only.
- Shows up as
/dev/ttyACM0instead of/dev/ttyUSB0in the instructions below. Same goes for all U-BLOX based devices.
- NEO-F9P-15B Multi-band
- $220
- Dual-Band L1+L2 (or L1+L5), 184 Channels, supports USB only, Accurate within 6 feet, 20hz pull rate. Rewards will be limited, 30% of possibly maximum rewards.
- SparkFun GPS-RTK Board - NEO-M8P-2 (Qwiic)
- $180
- NEO-M8P-2 Based, Single-Band (L1 only), 6 Foot Accuracy. Rewards will be limited, 8-10% only.
- SparkFun GPS-RTK-SMA Breakout - ZED-F9P (Qwiic)
- $275
- ZED-F9P Based, Dual-Band L1+L2 (or L1+L5), 184 Channels, 20hz pull rate, USB or GPIO Breakout. Rewards are limited, 30% of possibly maximum rewards.
- ZED-F9P RTK GNSS receiver board with SMA Base or Rover
- $210
- ZED-F9P Based, Dual-Band L1+L2 (or L1+L5), 184 Channels, 20hz pull rate, USB Only. Rewards are limited, 30% of possibly maximum rewards.
- NEO-M8P RTK GPS GNSS receiver board with SMA and mini USB for UAV, Robots
- $150
- Unicorecomm UM980/UM982 Based USB Receivers
The preferred option overall and by far for almost every setup.
Requires
FTDI Drivers
.
- (Preferred)
UM980 RTK GNSS USB Dongle
- $225
- Unicorecomm UM980 Based, Triple Band L1, L2 and L5, All-Constellation, High Precision, 1408 Channels, 20hz pull rate, 80% Rewards.
- Use discount code
SIMEONSECURITY_GNSSfor an additional 5% discount.
- (Preferred)
UM982 Dual Channel RTK GNSS USB Dongle
- $235
- Unicorecomm UM982 Based, Triple Band L1, L2 and L5, All-Constellation, High Precision, 1408 Channels, 20hz pull rate, 80% Rewards.
- Use discount code
SIMEONSECURITY_GNSSfor an additional 5% discount.
- (Preferred)
UM980 RTK GNSS USB Dongle
- $225
Advanced Receivers for DIY Onocoy Deployments
These are all going to be devices that are Triple-Band, High Pull Rate, Extreme Position Receivers. They likely won’t support USB. They will require PCI-E, UART, I2C, or Serial Connections. If you don’t know what that is or you aren’t experienced, please use the options above. However these will allow you to be capable of at most 80% of Onocoy Rewards in the case of the Unicorecomm UM980 and Unicorecomm UM982 based boards and 100% of rewards in the Septentrio Mosaic X5 based boards. While you’ll be able to use the same software we mention below, the instructions we’ve provided won’t exactly line up. Be advised.
![Basic GPS Receivers for Onocoy]()
Unicorecomm UM980 Capable of up to 80% of the Onocoy rewards. 100% is possible after planned future firmware update.
- UM980 module
+
DSD TECH SH-U05A USB to I2C
+
GH1.25 to Dupont2.54 Pre-Crimped Cables
- $180 - $220
- Unicorecomm UM980 Based, Triple Band L1, L2 and L5.
- For more details on how to install this, we recommend you read this article on how to set up the I2C connection on the UM980
- UM980 M.2
- Unicorecomm UM980 Based, Triple Band L1, L2 and L5.
- May not be recognized by all systems, it uses USB protocols over M.2
- Use discount code
SIMEONSECURITY_GNSSfor an additional 5% discount.
- UM980 mPCIe
- Unicorecomm UM980 Based, Triple Band L1, L2 and L5.
- May not be recognized by all systems, it uses USB protocols over mPCIe
- Use discount code
SIMEONSECURITY_GNSSfor an additional 5% discount.
- UM980 module
+
DSD TECH SH-U05A USB to I2C
+
GH1.25 to Dupont2.54 Pre-Crimped Cables
- $180 - $220
Unicorecomm UM982 Capable of up to 80% of the Onocoy rewards. 100% is possible after planned future firmware update.
- UM982 M.2
- Unicorecomm UM982 Based, Triple Band L1, L2 and L5.
- May not be recognized by all systems, it uses USB protocols over M.2
- Use discount code
SIMEONSECURITY_GNSSfor an additional 5% discount.
- UM982 mPICe
- Unicorecomm UM982 Based, Triple Band L1, L2 and L5.
- May not be recognized by all systems, it uses USB protocols over mPCIe
- Use discount code
SIMEONSECURITY_GNSSfor an additional 5% discount.
- UM982 M.2
Septentrio Mosaic X5 Capable of up to 100% of the Onocoy rewards. Requires already available firmware update .
- mosaic-go GNSS module receiver evaluation kit
- $645
- Septentrio Mosaic X5 Based, 50-100hz Pull Rate, Anti-Interference, Anti-Jamming, Anti-Spoofing.
- (Preferred)
simpleRTK3B mPCIe
- Septentrio Mosaic X5 Based, 50-100hz Pull Rate, Anti-Interference, Anti-Jamming, Anti-Spoofing.
- mosaic-go GNSS module receiver evaluation kit
- $645
Recommended Antennas for Onocoy
We’ve covered this in a more in depth guide about the Best GPS Base Station Antennas .
Basic Antennas for Onocoy
![Beitian BT-800D High Gain High Precision GPS/GNSS Antenna]()
We can only recommend using these on the basic U-Blox based receivers we recommended earlier.
- Bingfu GPS Navigation Antenna
- $9
- Basic, simple, not the best, but it works.
- (Preferred)
Bingfu GPS Navigation External Antenna
- $24
- Outdoor Rated, Cheap, Allows view of the Sky.
- SparkFun GNSS-RTK Accessory Kit
- $85
- This is only recommended for those who can not properly install the antennas below. It will underperform against the others.
Advanced Antennas for Onocoy
![Ardusimple and GNSS.STORE Surveying Antennas]()
For all other recommended Receivers above we recommend the antennas below.
- (Preferred)
Beitian High Gain High Precision GPS/GNSS Antenna
- $86
- High Antenna Gain, High Precision, Builtin Anti-interference, IP67 Rated, High and Low Temp Ratings, UV Resistant Housing, Supports Most Bands..
- (Preferred)
Calibrated Survey GNSS Tripleband + L-band antenna (IP67)
- $230
- Calibrated Quad-Band, Extremely High Precision, Anti-interference, Supports All Bands
- Multi-frequency High Precision Survey Antenna
- $95
- Strong Antenna Signal, High Precision, Builtin Anti-interference.
- GNSS Surveying Antenna and Precise Navigation Antenna
- $180
- High Antenna Gain, Extremely High Precision, IP67 Rated.
- HARXON CSX627A
- $135
- Calibrated Triple Band RTK Antenna, IP67, Supports All Bands
- L1/L2/L5 GPS, G1/G2/G3 GLONASS, B1/B2/B3 BDS, Galileo E1/E5/E6 38dB Antenna
- $205
- Supports Most Bands, IP67 Rated
OS Installation:
We won’t go into the technical details of how to install an operating system here. However here are some great resources to get you started.
Raspbian:
Ubuntu:
- Install Ubuntu desktop
- Ubuntu Server - Basic installation
- Ubuntu Complete Beginner’s Guide: Download & Installing Ubuntu
Proper Onocoy Base Station Antenna Placement
![An Installed Tri-Band GPS Antenna]()
Installed Antenna - doc.onocoy.com
Onocoy has published antenna placement requirements , but to summarize you should understand the following:
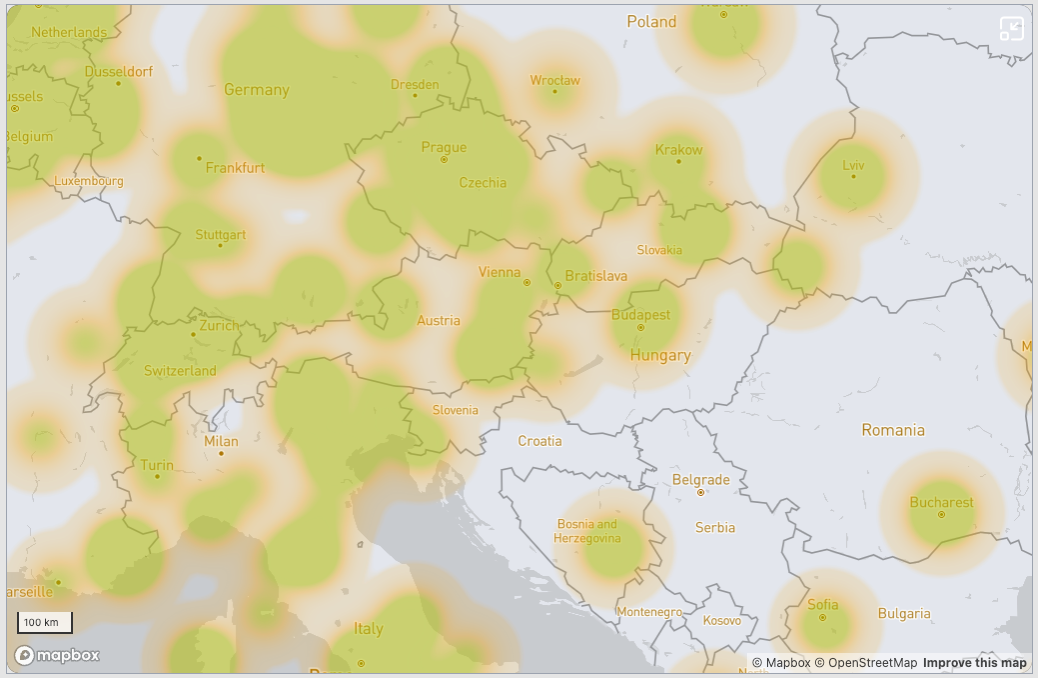
Optimal Location Selection: To optimize station placement,** choose a location at least 20 kilometers away from the nearest Onocoy station**. Stations located close to three or more others will receive reduced rewards. Utilize the Onocoy Explore function to easily check the distance to the nearest Onocoy station for any location.
![onocoy Explorer]()
Onocoy Explorer - doc.onocoy.com
Ideal Surroundings: Ensure that the antenna has an unobstructed 360-degree view of the sky, with no obstructions such as buildings, trees, or mountains above 10 degrees elevation. Limited sky visibility or signal multipath can result in scaled-down rewards. The antenna must be rigidly mounted to prevent movement exceeding 1-2 millimeters, as excessive vibrations or movement can lead to reward pausing.
Stable Internet Connection: Maintain a stable and permanent internet connection for the station. The required bandwidth is relatively low, typically around 1 kB/s, and no inbound traffic is necessary. There is no need to open ports on typical firewalls, as connections are established from inside-out.
Setting up the Onocoy Base Station and NTRIP Software
Once you’ve set up your device and properly placed your antenna , you can start configuring the required software.
For this section we assume some basic technical experience and that you have installed your operating system already as well as know how to get into the terminal.
- We need to create an account and get our credentials from the onocoy website . You will need to grab the server address, username, password, and port number from this step. Once it is completed, go to the reference station tab and grab the mount point, which we also need.
- Refer to the Onocoy documentation if you need help.
Install some base dependencies.
sudo apt install -y gpsd gpsd-dbg gpsd-clients gpsbabel minicom socat git make build-essentialFollow one of the Options Below. Either NTRIP Server or RTKLIB
Wait and Verify Your Station on the Onocoy Dashboard
- Visit the Onocoy Console Dashboard and check to see your device has finished it’s validation period. If it hasn’t check back later, it can take up to 3 days.
Profit?
- You can view the following Onocoy documentation to learn more.
Option 1: NTRIP Server
On your linux device download the ntripserver software.
git clone https://github.com/simeononsecurity/ntripserver.git
cd ./ntripserver
make
Identify the USB Source
lsusbEx.
Bus 00x Device 00x: ID xxxx:xxxx Prolific Technology, Inc. PL2303 Serial Port / Mobile Action MA-8910PorBus xxx Device xxx: ID xxxx:xxxx U-Blox AG [u-blox 8]Note: Some devices may show up as
ttyUSB0,ttyACM0, etc. You’ll have to look this up per your device. `ls /dev/ttyUSB*sudo minicom -D /dev/ttyUSB0Now we get to configure the software
Test the configuration.
~/ntripserver/ntripserver -M 1 -i /dev/ttyUSB0 -b 19200 -O 1 -a servers.onocoy.com -p 2101 -m {{mountpointhere}} -n {{usernamehere}} -c {{passwordhere}}Now that you confirmed it works. We need to create a service to have it restart on boot.
- Create a Service File:
sudo nano /etc/systemd/system/ntripserver.serviceRemember to replace
/path/to/ntripserverwith the actual path to your ntripserver executable.[Unit] Description=NTRIP Server Service After=network.target Wants=network-online.target After=network-online.target [Service] ExecStart=/path/to/ntripserver -M 1 -i /dev/ttyUSB0 -b 19200 -O 1 -a servers.onocoy.com -p 2101 -m {{mountpointhere}} -n {{usernamehere}} -c {{passwordhere}} Restart=always RestartSec=120 # 2 minutes (in seconds) TimeoutStartSec=300 # Set a 5-minute timeout (adjust as needed) User=root [Install] WantedBy=default.target- Enable and Start the Service:
sudo systemctl enable ntripserver.service sudo systemctl start ntripserver.service- Check the Service Status:
sudo systemctl status ntripserver.serviceex.
ntripserver[815]: serial input: device = /dev/ttyUSB0, speed = 19200
systemd[1]: Started NTRIP Server Service.
ntripserver[815]: caster output: host = xxx.xxx.xxx.xxx, port = 2101, mountpoint = Mount1, mode = http
ntripserver[815]: transfering data ...
Option 2: RTKLIB
On your linux device install the rtklib software.
sudo apt-get update
sudo apt-get -y install rtklib
Identify the USB Source
lsusbEx.
Bus 00x Device 00x: ID xxxx:xxxx Prolific Technology, Inc. PL2303 Serial Port / Mobile Action MA-8910PorBus xxx Device xxx: ID xxxx:xxxx U-Blox AG [u-blox 8]Note: Some devices may show up as
ttyUSB0,ttyACM0, etc. You’ll have to look this up per your device.ls /dev/ttyUSB*sudo minicom -D /dev/ttyUSB0Create a Rtkrcv.conf RTKLIB Configuration File
- Create the paths and conf file
sudo mkdir ~/rtklib/ sudo nano ~/rtklib/rtkrcv.conf- Conf File Contents
[serial] port = /dev/ttyUSB0 bitrate = 19200 [ntrip] caster = servers.onocoy.com port = 2101 mountpoint = {{mountpointhere}} user = {{usernamehere}} passwd = {{passwordhere}} [output] format = rtcm3 path = /path/to/output/file.rtcm- Test the RTKLIB config
rtkrcv -s -o ~/rtklib/rtkrcv.confCreate the RTKLIB Service
Create the Service Unit File
bash sudo nano /etc/systemd/system/rtklib.serviceAdd the Service Configuration ```toml [Unit] Description=RTKLIB Service After=network.target Wants=network-online.target After=network-online.target
[Service] ExecStart=/path/to/rtkrcv -s -o /path/to/rtkrcv.conf Restart=always RestartSec=120 # 2 minutes (in seconds) TimeoutStartSec=300 # Set a 5-minute timeout (adjust as needed) User=root [Install] WantedBy=default.target ```- Enable and Start The Service
bash sudo systemctl daemon-reload sudo systemctl enable rtklib.service sudo systemctl start rtklib.service - Verify the Service
bash sudo systemctl status rtklib.service
Option 3: Docker Container
1. Install Docker
Consult the following guides for more information on how to install docker
- https://www.digitalocean.com/community/tutorial-collections/how-to-install-and-use-docker
- https://docs.docker.com/engine/install/
- https://docs.docker.com/engine/install/ubuntu/
2. Run the Docker Container
Run our Docker container , ensuring that you provide the necessary environment variables and parameters:
docker run \
  -td \
  --restart unless-stopped \
  --name sosrtk \
  --device=/dev/<YOUR_USB_PORT> \
  -e USB_PORT=<YOUR_USB_PORT> \
  -e BAUD_RATE=<YOUR_SERIAL_BAUD_RATE> \
  -e DATA_BITS=<YOUR_SERIAL_DATA_BITS> \
  -e PARITY=<YOUR_SERIAL_PARITY> \
  -e STOP_BITS=<YOUR_SERIAL_STOP_BITS> \
  -e ONOCOY_USERNAME=<YOUR_ONOCOY_MOUNTPOINT_USERNAME> \
  -e PASSWORD=<YOUR_ONOCOY_MOUNTPOINT_PASSWORD> \
  -e LAT=<OPTIONAL_YOUR_LATITUDE> \
  -e LONG=<OPTIONAL_YOUR_LONGITUDE> \
  -e ELEVATION=<OPTIONAL_YOUR_ELEVATION_FROM_SEA_LEVEL_IN_METERS> \
  -e INSTRUMENT=<OPTIONAL_YOUR_GPS_RECEIVER_DESCRIPTION> \
  -e ANTENNA=<OPTIONAL_YOUR_ANTENNA_DESCRIPTION> \
  simeononsecurity/docker-rtklib-onocoy-rtkdirect:latest
Ensure you replace the placeholder values (
<...>) with your specific configuration.Ex.
docker run \
 -td \
 --restart unless-stopped \
 --name sosrtk \
 --device=/dev/ttyUSB0 \
 -e USB_PORT=ttyUSB0 \
 -e BAUD_RATE=921600 \
 -e DATA_BITS=8 \
 -e PARITY=n \
 -e STOP_BITS=1 \
 -e ONOCOY_USERNAME=your_onocoy_mountpoint_username \
 -e PASSWORD=your_onocoy_mountpoint_password \
 -e LAT=37.7749 \
 -e LONG=-122.4194 \
 -e ELEVATION=50 \
 -e INSTRUMENT="Your GPS Receiver" \
 -e ANTENNA="Your Antenna" \
 simeononsecurity/docker-rtklib-onocoy-rtkdirect:latest
Windows Option 1: STRSVR
On windows, one of our best options and arguably our best free option is STRSVR , which is based on RTKLIB.
Download and save
STRSVR.exefrom the github releases page . Be sure to save it to a good location that you can easily find again later.Execute
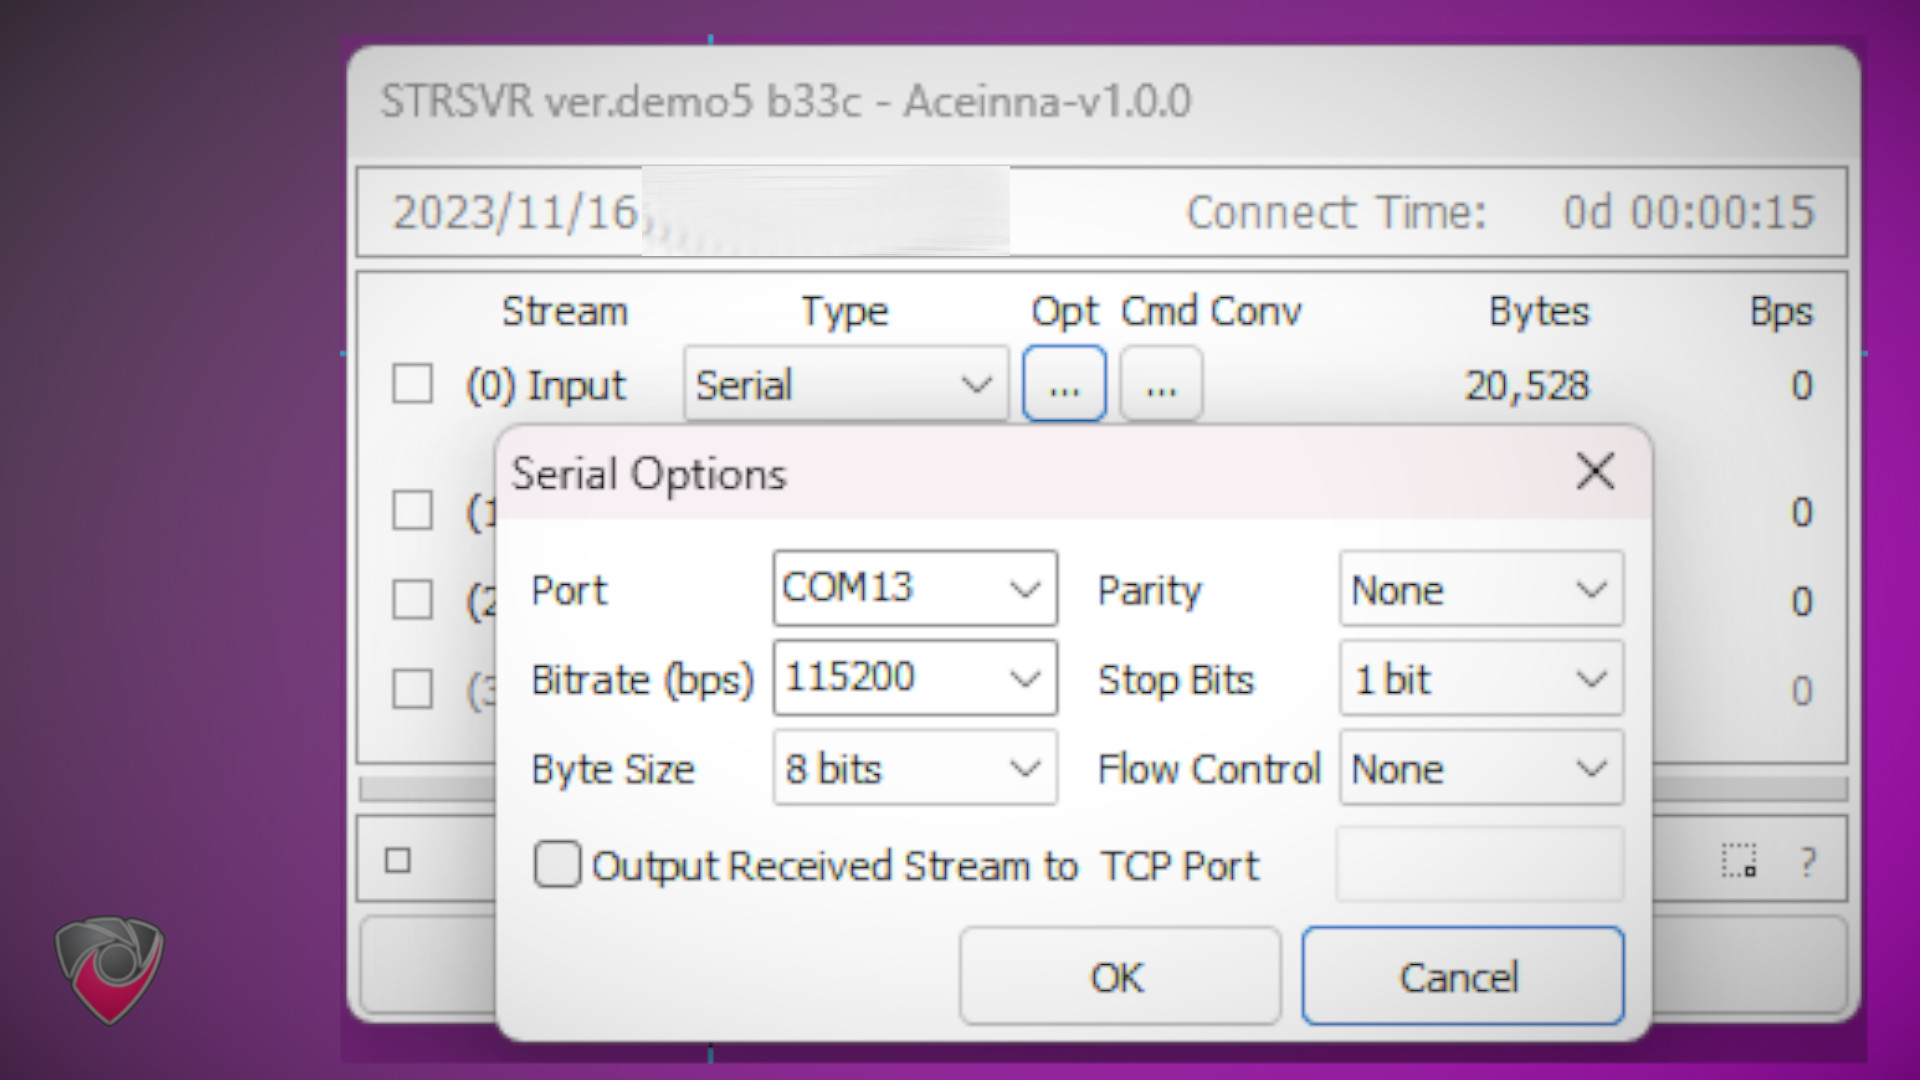
STRSVR.exe, selectSerialas your input device, and configure the correct COM Port for your serial reciever.
![STRSVR Serial Configuration]()
STRSVR Serial Configuration
Note: Your com port will be different on your device. Consult your manufactures documentation and the Windows Device Manager on to identify the correct com port
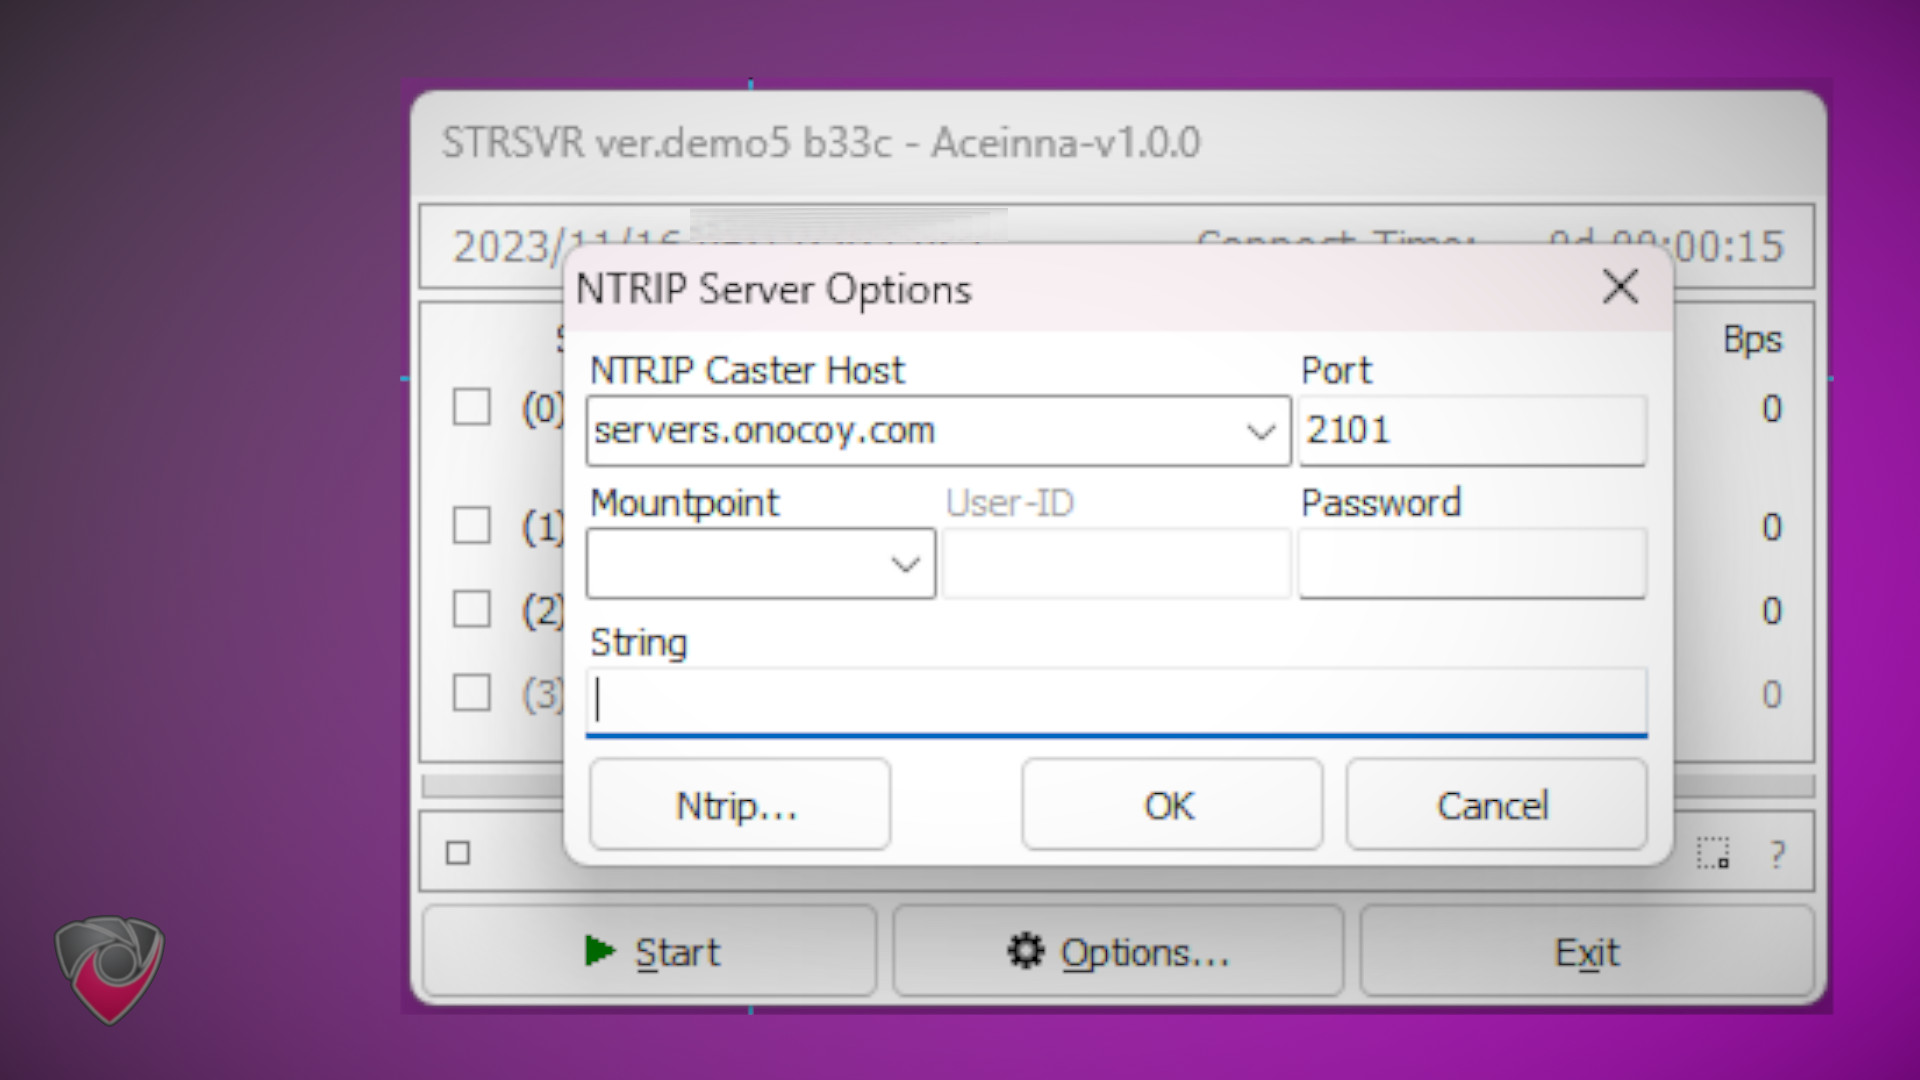
- Select
NTRIP Serveras one of your output devices and configure it using the credentials and settings you got from the onocoy console .
![STRSVR NTRIP Server Configuration]()
STRSVR NTRIP Server Configuration
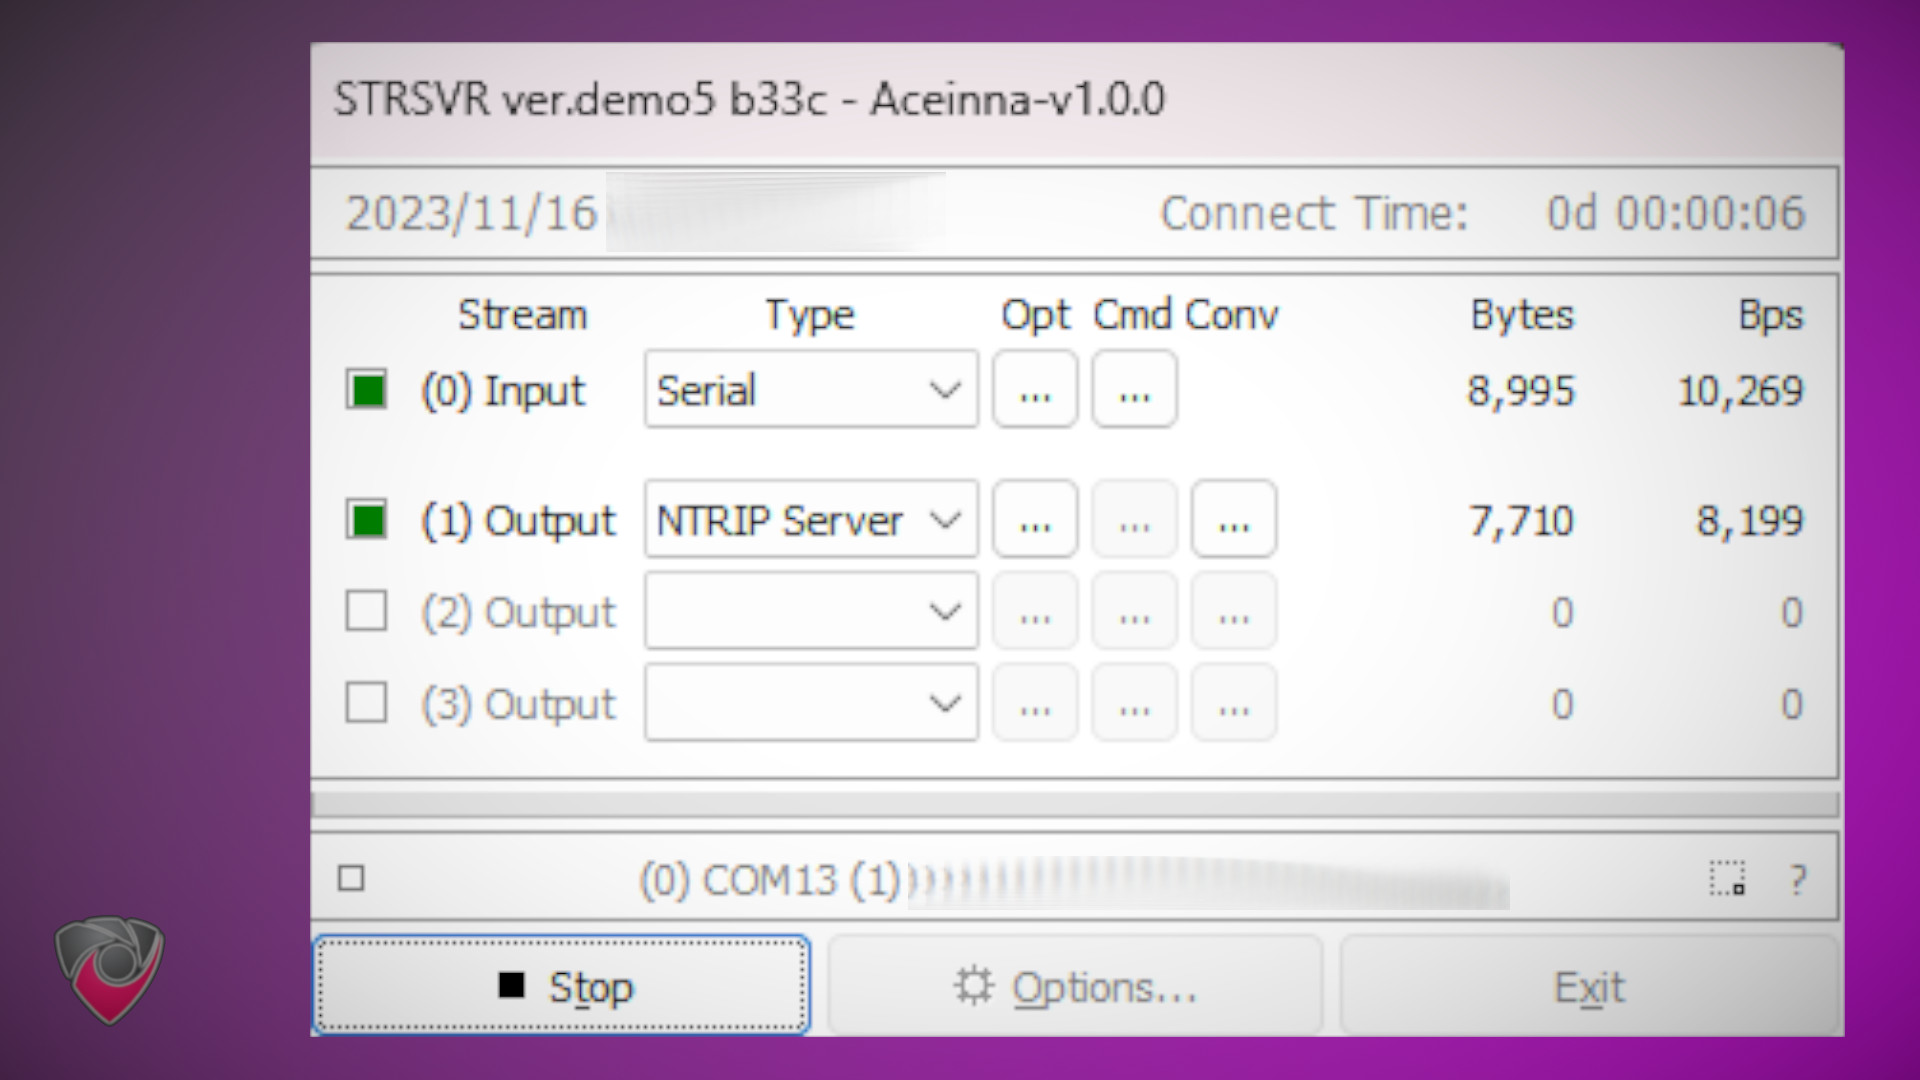
- Hit the
Start Button
![STRSVR DEMO]()
STRSVR DEMO
Windows Option 2: SNIP
On windows, our options are limited. One of the NTRIP communities favorite options for Windows is Snip . While there is a trial available, you’ll need to purchase the software long term if you plan on ever using it for more than an hour at any given time.
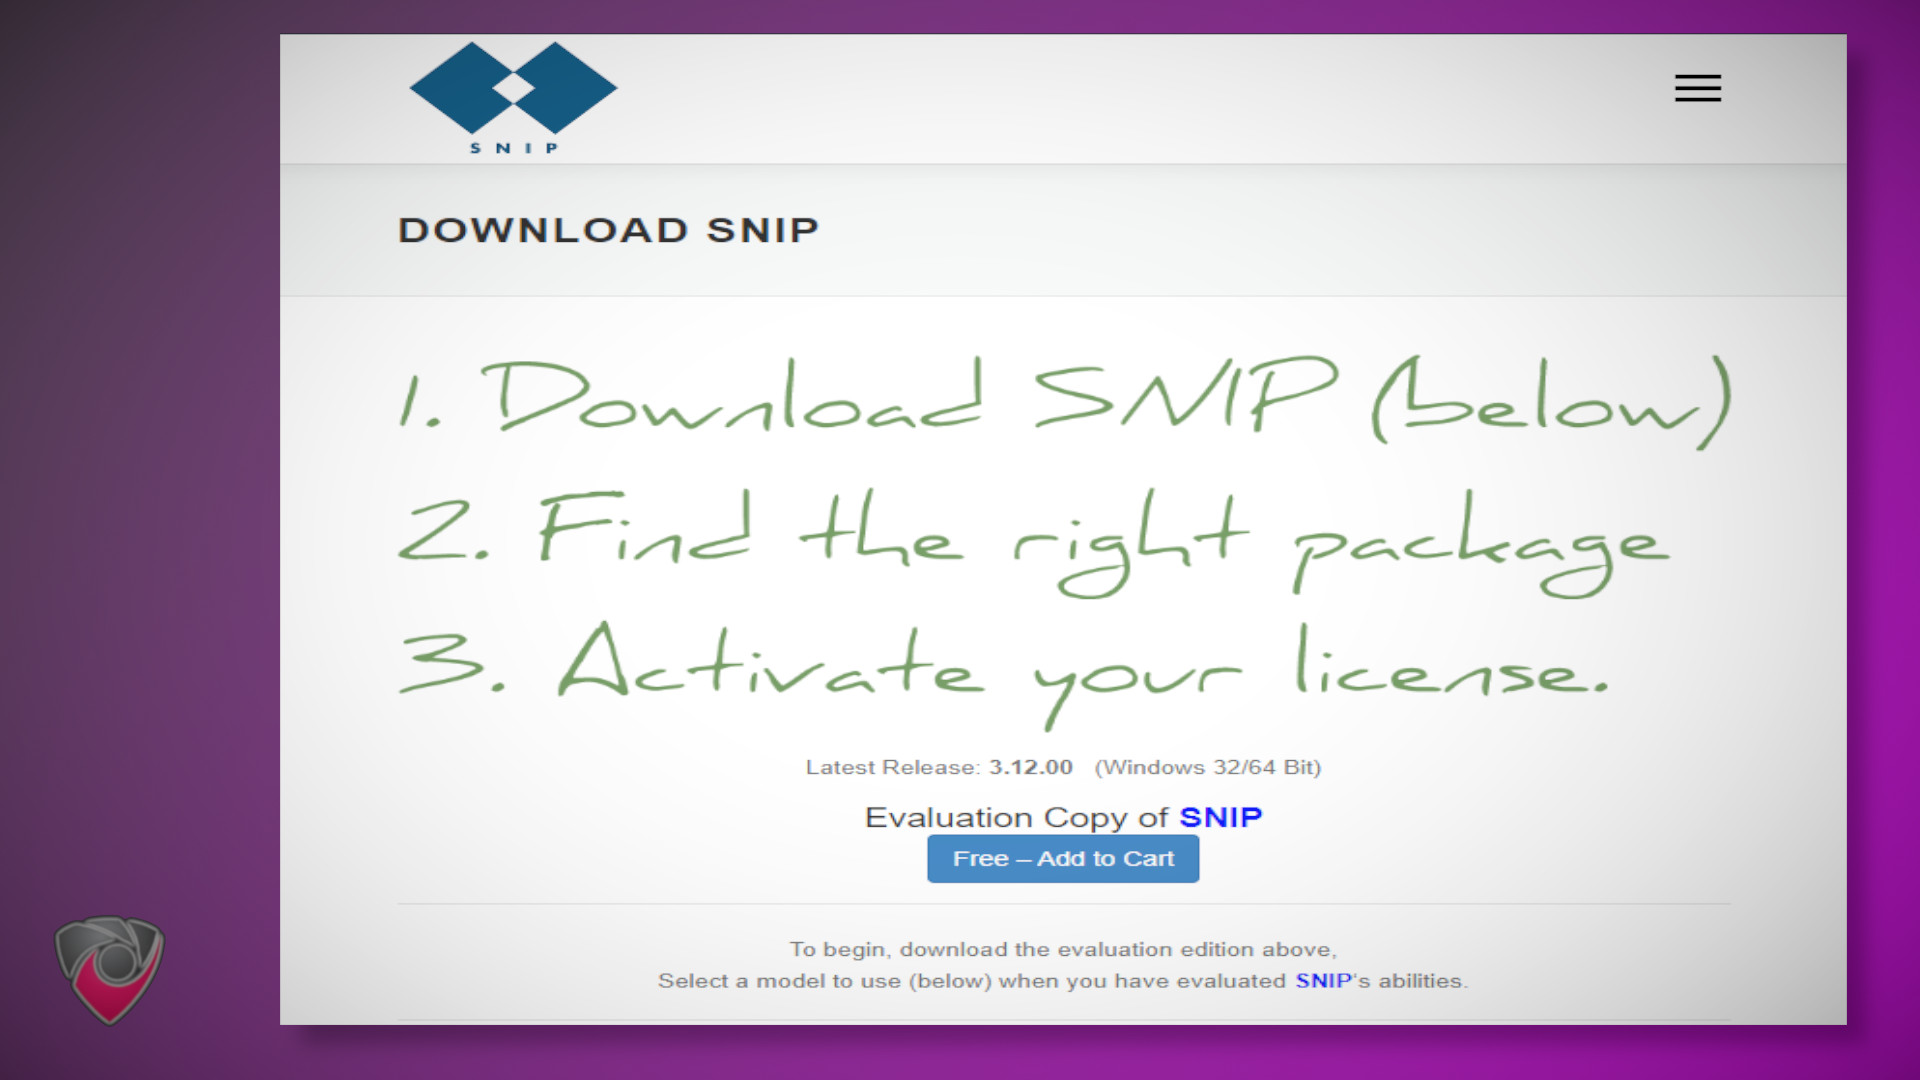
- Download and install Snip from the download page .
![Snip Download Page]()
Snip Download Page
You’ll have to give them an email and get the download link in your email. Use a service like 10minutemail to avoid getting spam in your email.
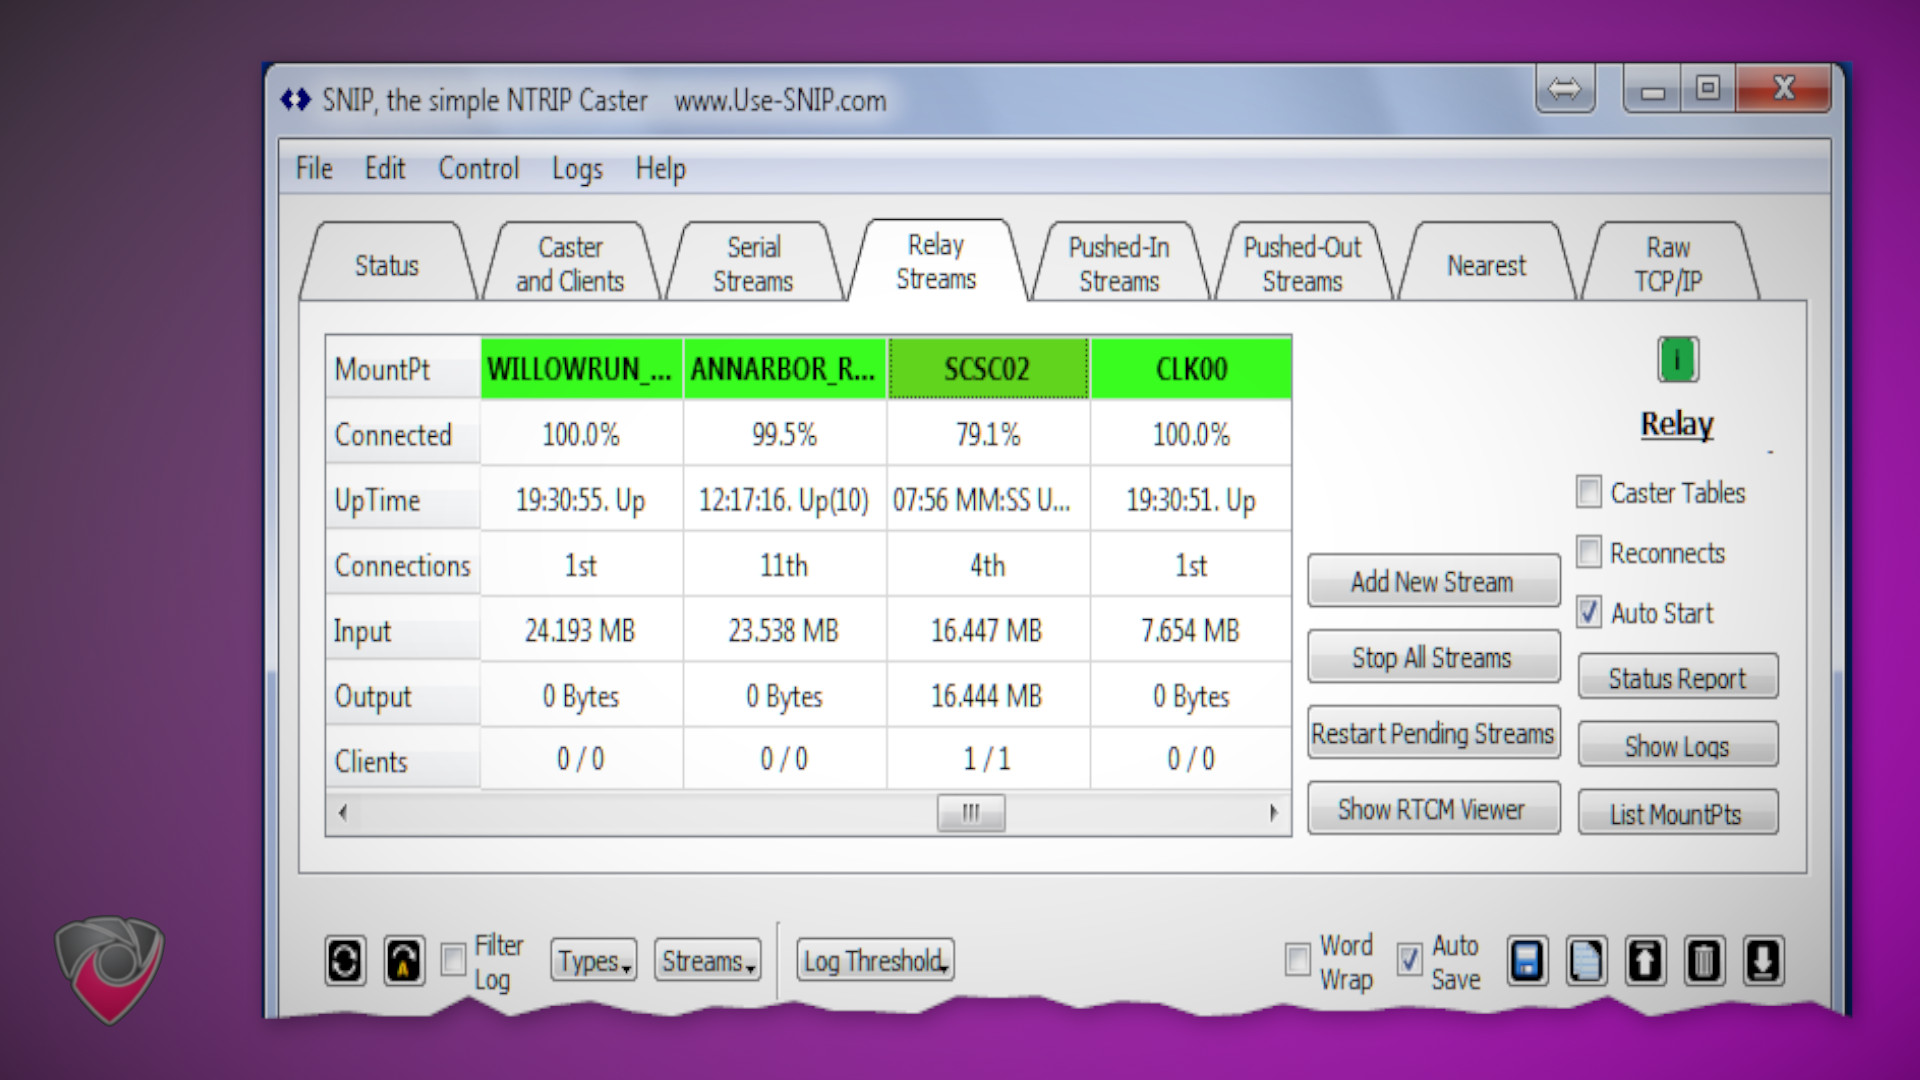
- Once installed, go to the relay streams tab tab and delete all options from that page.
![Snip Relay Streams Menu]()
Snip Relay Streams Menu - use-snip.com
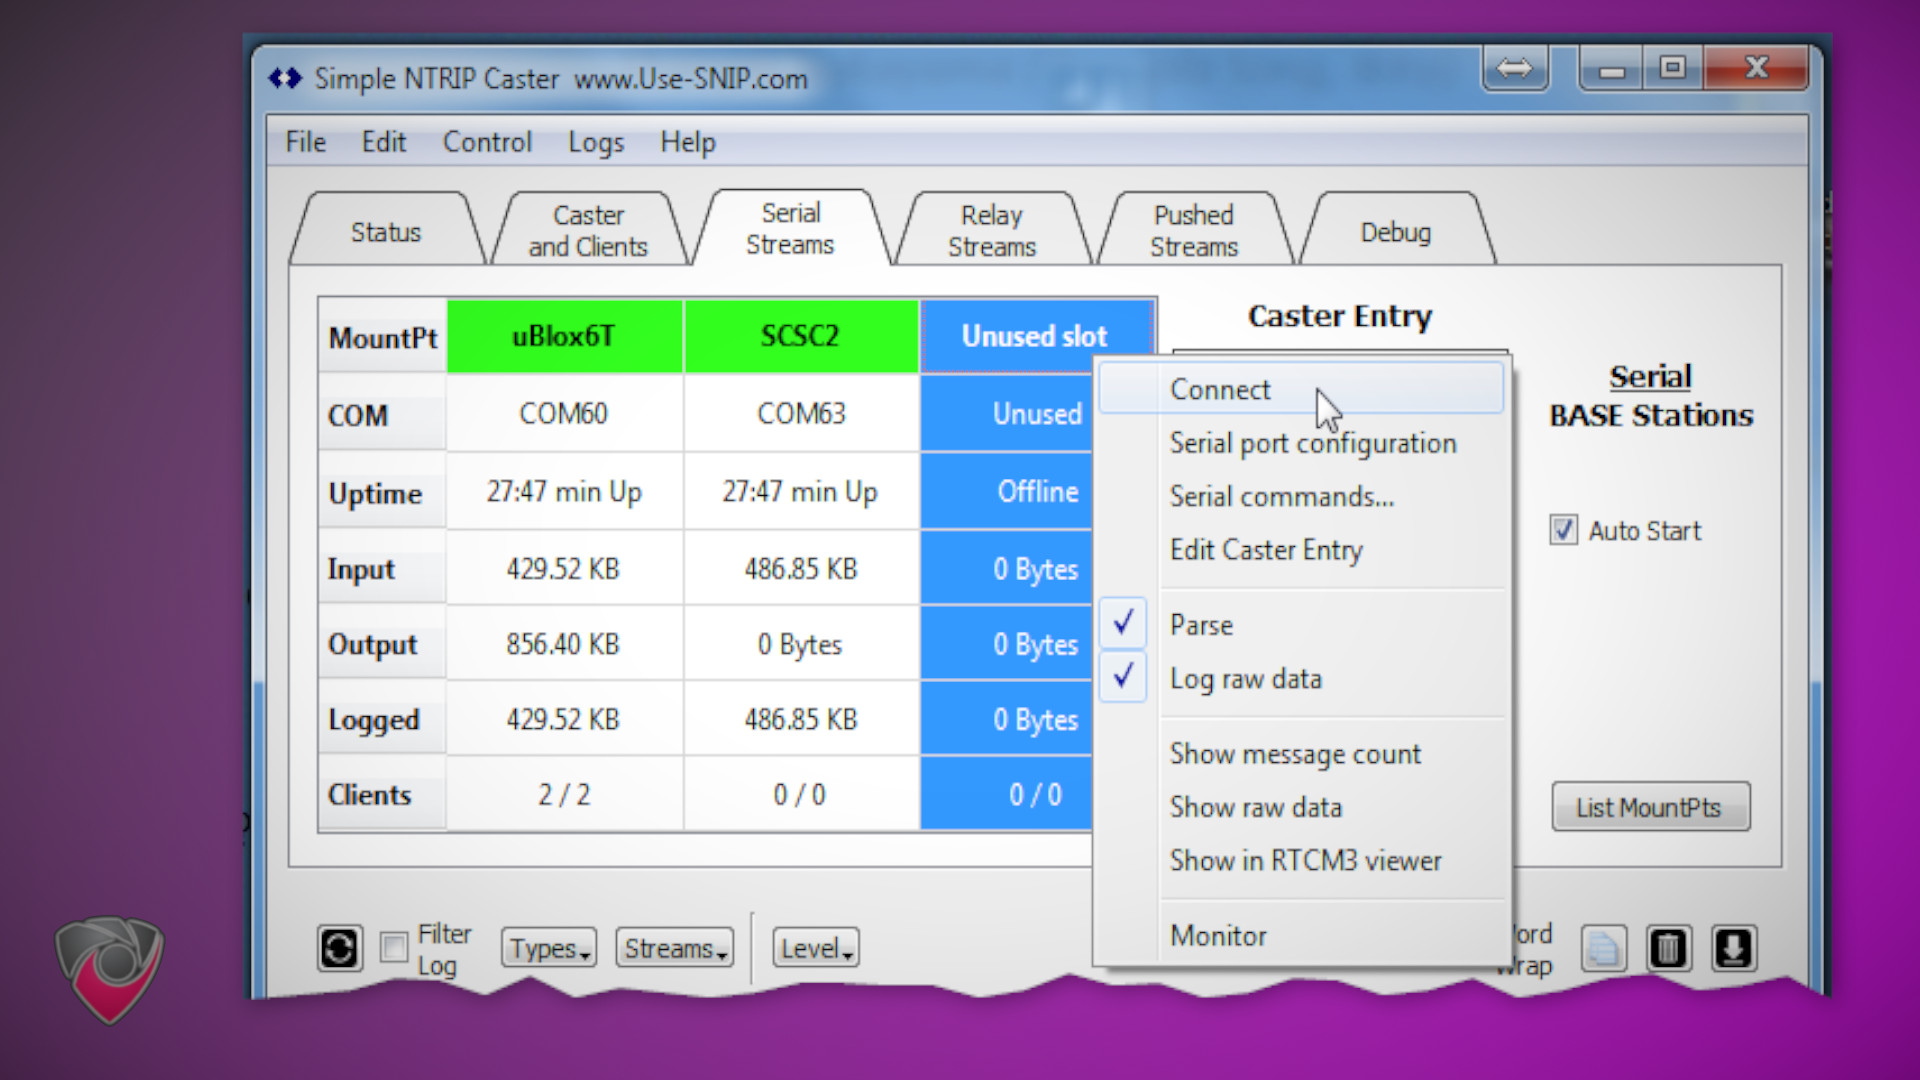
- Under the Serial Streams Tab add your COM device and create a serial stream device.
![Snip Serial Streams Menu]()
Snip Serial Streams Menu - use-snip.com
Learn more about how to add a serial stream source device on Snip
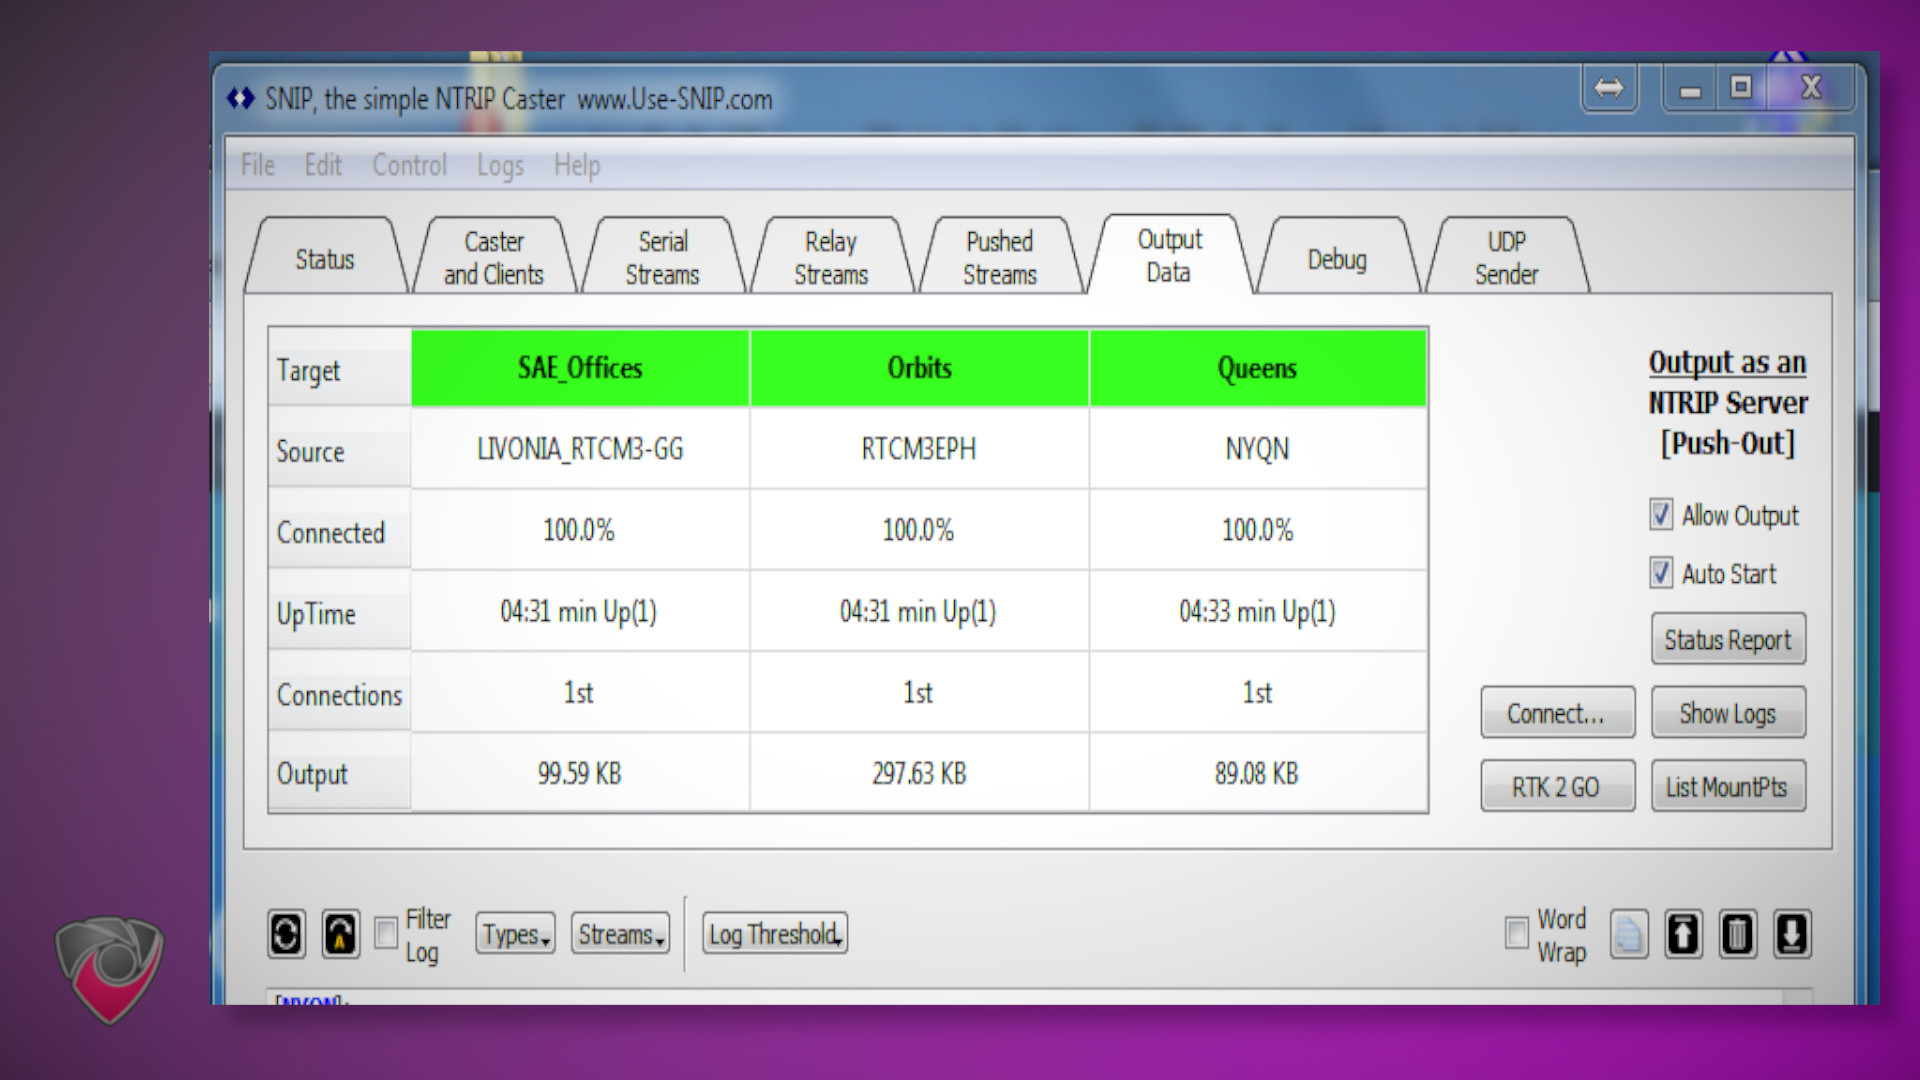
- On the Pushed-Out Data Tab manually add the Ntrip server information from the onocoy console .
![Snip Pushed-Out Data Menu]()
Snip Pushed-Out Data Menu - use-snip.com
Troubleshooting and Verifying GPS Connectivity on Linux
- Stop the ntripserver service
sudo systemctl stop ntripserver.service- Use a GPS tool to verify connectivity
- First, make sure you have gpsd installed:
sudo apt-get install gpsd - Then start gpsd to connect to your GPS device:
sudo gpsd /dev/ttyACM0 -F /var/run/gpsd.sock
gpsmon
- First, make sure you have gpsd installed:
- When finished either reboot your device or run
sudo systemctl start ntripserver.serviceNotible Mentions for Alternative Ntrip Server Software.
While reviewing this topic and discussing with the Onocoy team on their discord, I came across the following. These may work better for you but we didn’t cover them here. We may review them another time.
- Ntrip Server
- Seems to be a newer version of the software we used above. However it’s more difficult to access. It is created and maintained by the German Federal Agency for Cartography and Geodesy (BKG)
- RTKLIB
- A more widely used Ntrip server. However it can be significantly more technically involved.
- esp32-xbee
- Exclusive to the ESP32, this software enables you to build even cheaper base stations. Or more expensive…
Additional Configuration For Unicorecomm UM980 and UM982 Devices
To enable all the bands and base station mode on the Unicorecomm devices you’ll need to serial into them using baud rate of
115200and run the following commands. This can be done within terminal, putty, or the Unicorecomm UPrecise software.The provided configuration adjustments are made to ensure the proper functionality of the reference station receiver, specifically tailored for the Onocoy system .
mode base time 60 2 2.5: This line configures the reference station’s operation mode, which is set to “base”. In this configuration the base station will figure out it’s actual location after receiving traffic for 60 seconds.CONFIG SIGNALGROUP 2: This command appears to configure the signal group for the UM980/UM982 devices. This enables all bands and frequencies on the device.rtcm1005 30 and rtcm1006 30: These commands set the rate at which RTCM messages 1005 and 1006 are sent out from the reference station, respectively. The values “30” suggest a 30-second interval, which is optimized for Onocoy system’s requirements .rtcm1033 1, rtcm1074 1, rtcm1077 1, rtcm1084 1, rtcm1087 1, rtcm1094 1, rtcm1097 1, and rtcm1117 1, rtcm1124 1 and rtcm1127 1: These commands enable RTCM messages per Onocoy system’s requirements , ensuring that the reference station transmits these specific messages. The value “1” enables these messages to happen every second..saveconfig: This command saves the configured settings, ensuring that they persist and are applied whenever the reference station is operational.
Unicorecomm UM980 and UM982 Configuration Script
# Set up automatic base configuration with automatic gps location
mode base time 60 2 2.5

# Enable the Largest Signal Group
config signalgroup 2
config RTCMB1CB2a enable

# ONLY IF MODULE IS UM982
# CONFIG SIGNALGROUP 3 6

# Enable All GPS Messages
unlog
gngga 1
gpgll 1
gpgsa 1
gpgsv 1
gnrmc 1
gpvtg 1
gpzda 1
gpgst 1
saveconfig

#enable all bands
UNMASK GPS
UNMASK BDS
UNMASK GLO
UNMASK GAL
UNMASK B1
UNMASK E5A
saveconfig

#ONOCOY RTCM CONFIGURATION
rtcm1006 30
rtcm1033 30
rtcm1077 1
rtcm1087 1
rtcm1097 1
rtcm1117 1
rtcm1127 1
saveconfig

# ONLY CHANGE IF YOU WANT TO IMPROVE THE BAUDRATE
# config com1 921600
# saveconfig
It should be noted that the Unicorecomm device does not have the ability to transmit the
RTCM 1230message type as required per Onocoy system’s requirements . And some other messages may require a firmware update. Contact your manufacture to get the tools and firmware to update.Unicorecomm UM980 and UM982 Commands Reference Manuals
For additional configuration guidance, consult the following documentation:
DIY Ntrip Server and Reference Station Setup
This guide provides step-by-step instructions to help you get started with creating your DIY Onocoy reference station


Discussions
Become a Hackaday.io Member
Create an account to leave a comment. Already have an account? Log In.