Close
0%
0%

Ctrl+Fight!

An alternative controller designed for fighting games. It takes the form of protections on which people can hit to play the game.

Similar projects worth following
207 views
0 followers

The goal ? 

Playing fighting games as realistically as possible ! This altervative controller allows you to simulate the fact of typing with boxing gloves, and allows you to move like a real boxing game.
This altervative controller would work for any type of fighting game.
Don't hesitate to try it guys !

Code 2.4.png

The Arduino Code for the laser, part 4.

Portable Network Graphics (PNG) - 88.08 kB - 01/09/2024 at 15:13

Preview

Code 2.3.png

The Arduino Code for the laser, part 3.

Portable Network Graphics (PNG) - 81.80 kB - 01/09/2024 at 15:13

Preview

Code 2.2.png

The Arduino Code for the laser, part 2.

Portable Network Graphics (PNG) - 97.42 kB - 01/09/2024 at 15:13

Preview

Code 2.1.png

The Arduino Code for the laser, part 1.

Portable Network Graphics (PNG) - 88.37 kB - 01/09/2024 at 15:13

Preview

Code Arduino 1.2.png

The Arduino Code for the sensors, part 2.

Portable Network Graphics (PNG) - 107.92 kB - 01/09/2024 at 15:13

Preview

View all 13 files

  • 25 × Cables for Arduino card 1 x 11.8" Dupont female-male cables
  • 4 × Magnets Néodyme 6170796 (Ø x H) 16 mm x 7 mm silver
  • 4 × Sensor ILS contact module - to use with a magnet
  • 4 × Laser transmitter Laser transmitter module KY-008 650nm
  • 4 × Laser receiver Laser receiver module

View all 9 components

  • January 9th

    ranafawaz01/09/2024 at 14:29 0 comments

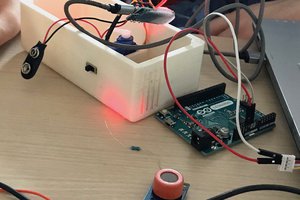
    We set up our project and tried our code for the Arduino card. In the past week, we also made wooden boxes for our laser modules out of planks we salvaged. Unfortunately, the code was wrong and made our computer crash, basically making the Arduino card unusable. On the bright side, we could complete the hardware part of the project and successfully made one vest work.

  • January 5th

    ranafawaz01/07/2024 at 16:11 0 comments

    After a week, we went back to school to get our boxes, since they take a long time to print. They were as we had imagined, except for one detail : the 3D printer had a large margin of error : we had not paid attention to this detail...

    This clearly shows the limits of 3D printing : printing even a small box takes a considerable amount of time.
    Using the laser cutter could have been another solution, however, the boxes wouldn't have been as resistant since the thickness of the wood is very thin.
    The advantage of using the 3D printer was the possibility of adding layers to make it thicker.
    The boxes are therefore not very thick, but strong enough to handle repeated punches.

  • December 29th

    ranafawaz01/07/2024 at 16:04 0 comments

    We went back to school during holidays to print our boxes. After carefully rechecking the dimensions, and changing the thickness of the boxes, we launched 3D printing. We had smaller and larger boxes. 
    Printing a small box took at least 4 hours (because we added layers of thickness)
    Printing a large box took at least 8 hours.
    The lids of the small and large boxes took 30 minutes and 1 hour respectively.
    Of course, these values are approximate...

  • December 11th - December 18th

    ranafawaz01/07/2024 at 15:16 0 comments

    We thought about how we were going to model our boxes.

    We thought about several possibilities, and the one we chose was 3D modeling. We used a software named OneShape. We had to learn how to use this software, which was, at the beginning, really difficult. After a lots of tests and many hours, we managed to model our boxes, paying attention to the dimensions and thickness. Since we have to hit the boxes, we had to add layers of thickness to make them more resistant. Now we just have to print them by using a 3D printer at the LAB. 

  • 5 december 2023

    Eponine Renard12/12/2023 at 13:55 0 comments

    On 5 December, we carried out a number of tasks. Firstly, we made cardboard prototypes of the boxes that will contain the sensors. These boxes will be sewn onto the bullet-proof vest. We took the necessary measurements to ensure that the boxes would fit the vest and the size of the sensors perfectly. The boxes at the front of the vest will be 4.2 cm wide and 6 cm long. They will be 2cm high and 0.5cm thick.
    Similarly, the box containing the arduino board, located at the back of the jacket, will be 3 cm high and 0.5 cm thick. The length will be 12cm and the width 8.5cm.
    We've chosen to include a hole on each box so that the wires can come out and link the boxes together.
    Finally, we made a prototype of the box.

    We also ordered the last sensors we needed, such as the lasers.

  • Prototyping

    ranafawaz11/28/2023 at 16:36 0 comments

    24/10/23 – Creation of the prototype of the suit for the upper part of the body (see "Prototype_upper_circuit_back" and "Prototype_upper_circuit_front") out of cardboard. We defined the positions of the Arduino card and the sensors. The prototype is satisfying, but only tailored to one of our team members. We need to have unisized suits (possibly buying an already existing one and fixate the card and sensors on it). We also need to make a prototype with the card and sensors on it. 

    21/11/23 - Creation of a more complete prototype of the suit for the upper part of the body (see "Ctrl+Fight! prototype back" and "Ctrl+Fight! prototype front"). We connected the hall effect sensors with the Arduino card and to the computer. The system is working, the hall effect sensors seem like a better option than the ILS modules. The gloves will need to be equipped with magnets to make it work. However, the cables were too short and barely holding, we need a sheathing for them. The cable connecting the card to the computer might also be too short, it doesn’t allow much movement. We need to make a prototype for the boxes that will contain the sensors. 

    We also started looking for a way to track the players position on the ground to make movements inputs in the game. Laser emitters and receivers seem like a good way to do that. 

    28/11/23 - Creation of a prototype for the arena in which the players will fight (see "Arena" and "Diagram_of_the_arena") and for the boxes that will contain the sensors (see "sensor_box"). The arena was made to scale, but still seems rather small (1,2 x 1 m) and doesn’t allow much movement. The lasers are placed on the lateral sides of the arena, two lasers for each player that will make them go right or left in game. For the suit, we started looking for second-hand offers online and have found some not too expensive.  

View all 6 project logs

  • 1
    Equipments

    You will need : an Arduino card, a breadboard, hall effect sensors (x3), magnets (x2), lasers modules (x2), light sensors (x2), a safety vest and a good amount of cables.

  • 2
    Connecting the hall effect sensors

    Connect the hall effect sensors to the Arduino card and the breadboard, then put the sensors into small boxes (that may be 3D printed or made out of wood), then attach them to the vest. Put one box on each shoulder and one on the belly.

  • 3
    Setting up the laser

    Connect the laser modules and light sensors to the Arduino card. Put said lasers and sensors into wooden boxes as they are very fragile (one in each), and dispose them on the ground to form an arena (as depicted in the "arena" file). 

View all 5 instructions

Enjoy this project?

Share

Discussions

Similar Projects

Does this project spark your interest?

Become a member to follow this project and never miss any updates