-
New Location for the PiTrac Github Repository
09/29/2025 at 16:09 • 0 comments# PiTrac repo is getting a new home
-# The code is moving soon from `jamespilgrim/PiTrac` → `PiTracLM/PiTrac`.
**TL;DR:** We're transferring the repo to the new **@PiTracLM** organization. Old links will keep working for now, but after the change below is completed, please update your local `origin` (or `upstream` if you forked) to the new URL. We will let folks know when it's done.
**New repo:** https://github.com/PiTracLM/PiTrac
**Old repo:** https://github.com/jamespilgrim/PiTrac
**Packages (DEB):** https://pitraclm.github.io/packages/## Why the change?
- Moving to a github **organization** gives us better, more granular permission control for maintainers and contributors.
- It lets us grow with multiple repos under the **PiTrac** name (docs, tooling, packages, etc.).
- We’ve also launched our new **DEB package hosting**: https://pitraclm.github.io/packages/> Heads up: GitHub will redirect `git clone/fetch/push` from the old path to the new one, but it’s best practice to update your remote so your tooling and scripts point to the right place.
## Update your Git remote
### 1) See which protocol you use
Run:
```bash
git remote -v
```
Look at the `origin` URL:
- If it starts with `git@github.com:` → you’re using **SSH**
- If it starts with `https://github.com/` → you’re using **HTTPS****Which should I pick?**
- Stick with what you’re already using.
- Choosing fresh? **SSH** is great for regular contributors (no passwords/PAT prompts once your SSH key is set up). **HTTPS** can be simpler behind strict networks or for occasional contributions.### 2) Update `origin` to the new repo
**SSH**
```bash
git remote set-url origin git@github.com:PiTracLM/PiTrac.git
```**HTTPS**
```bash
git remote set-url origin https://github.com/PiTracLM/PiTrac.git
```### 3) Verify
```bash
git remote -v
``` -
Left-Handed Play Processing Works
07/22/2025 at 17:23 • 0 commentsThe latest version of the PiTrac software automatically recognizes (for each shot) whether the shot is left- or right-handed and processes that shot accordingly. We have not had a chance to get a fast-hitting left-handed player in the golf sim yet, but hope to do so (and shoot a video) soon. (https://imgur.com/a/QzIo6F6)
-
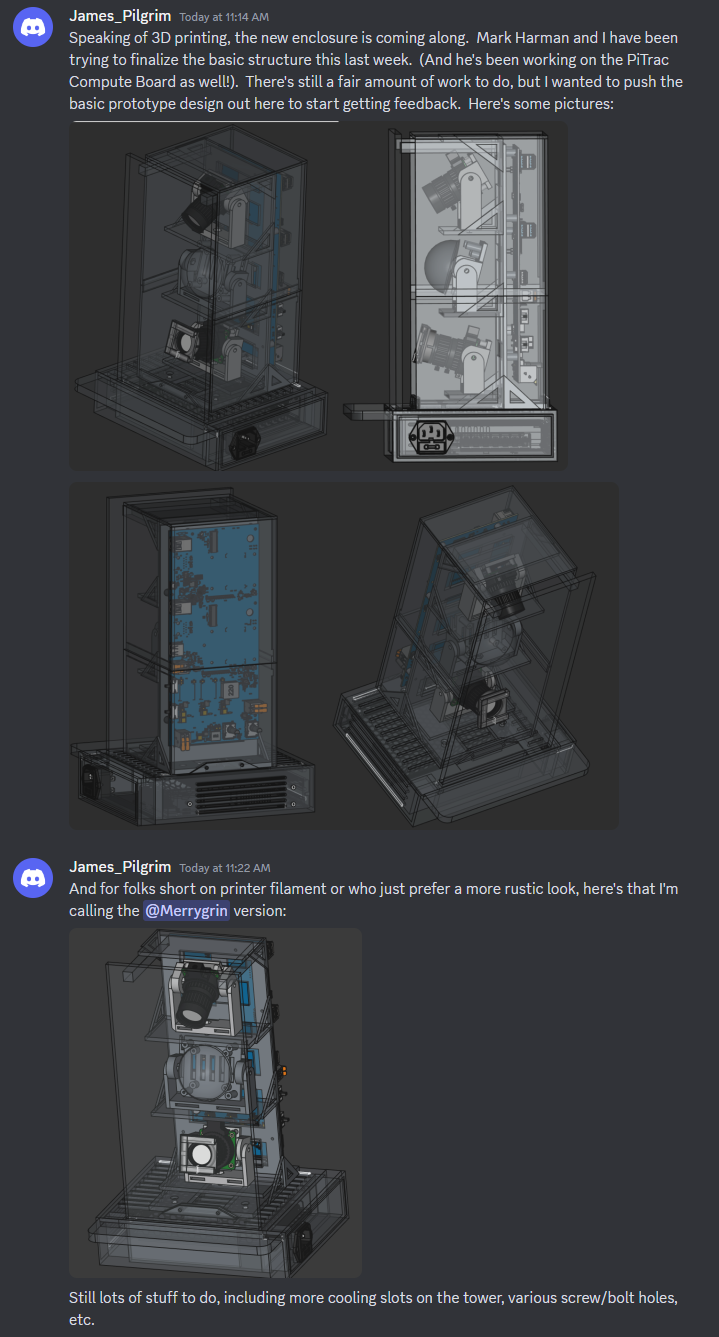
New PiTrac Enclosure Model Starting To Take Shape
03/02/2025 at 18:31 • 0 comments![]()
-
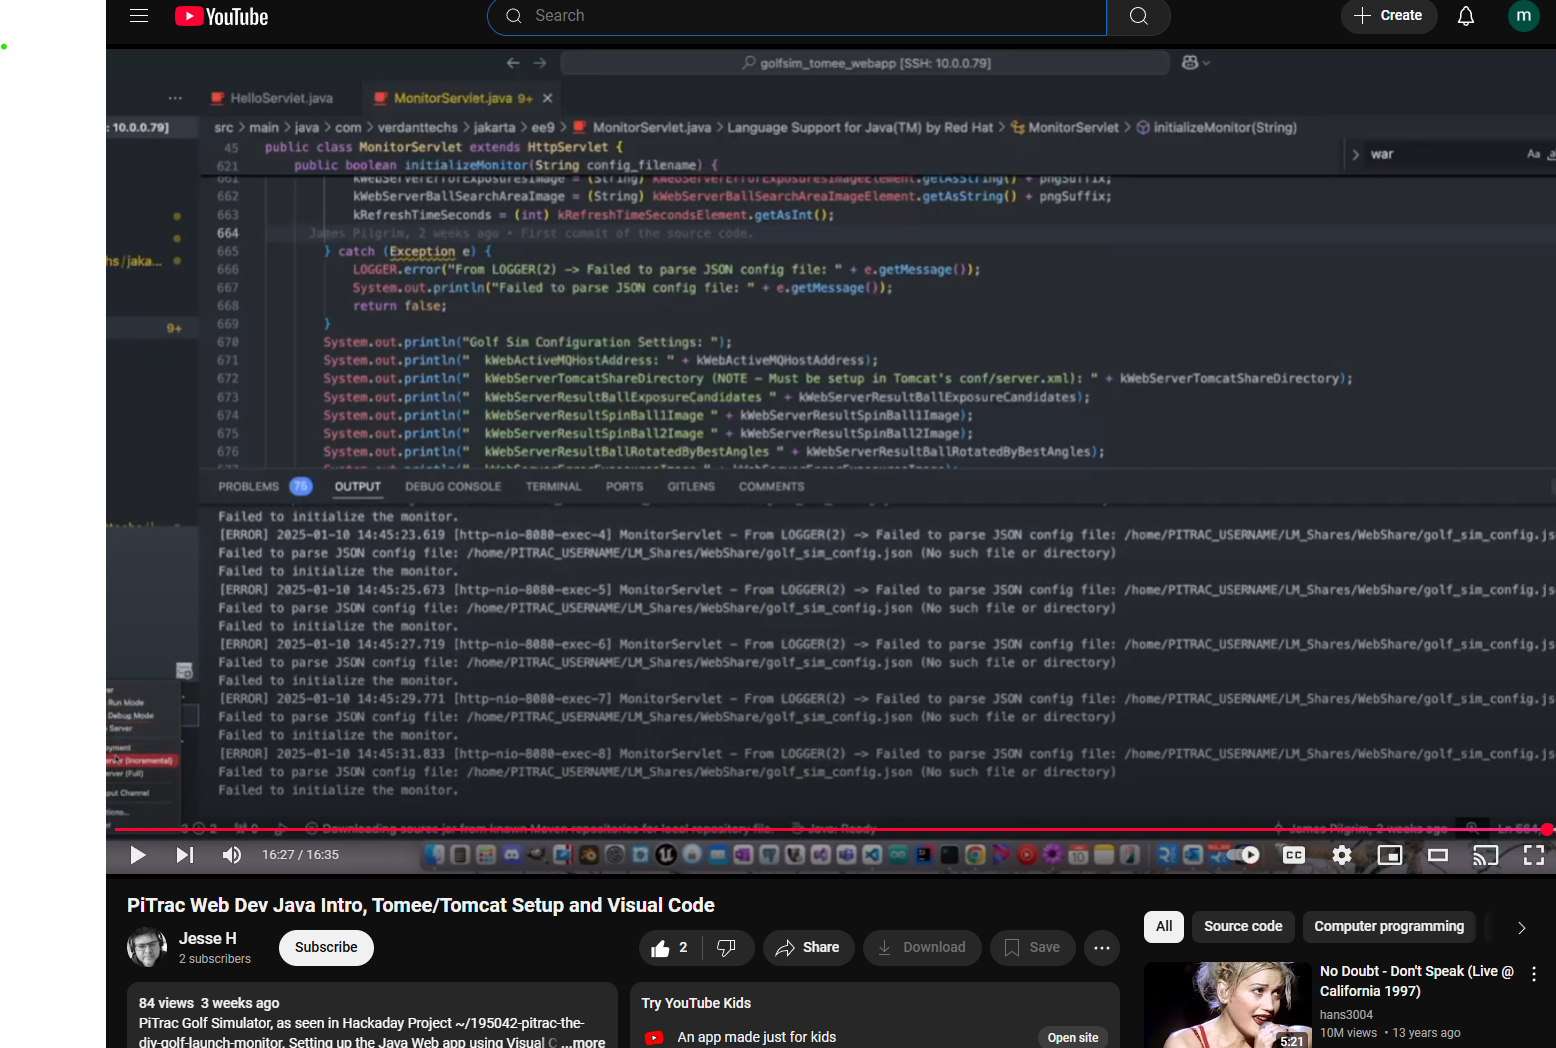
PiTrac Web Development and Java Introduction with Tomee/Tomcat Setup and Visual Code
02/02/2025 at 15:46 • 0 commentsContributor Jesse H has created a great video tutorial on how to develop and test web apps in the PiTrac project.
![]()
Jesse's been instrumental in starting to refactor the PiTrac web-based GUI code as well as many other contributions, and the video goes through the setup and use of Visual Code to work in the PiTrac java-based GUI. He's also been considering ideas like the use of micro-services to implement the GUI.
Prior to his work, we'd been developing the PiTrac GUI in a pretty rudimentary way, and it was not a very efficient workflow. The new workflow is a LOT better. Even if you're not planning to touch the PiTrac GUI, the video is great if you're just interested generally in developing web apps.
Please check out Jesse's extensive video here:
-
Over 100 Folks Now On PiTrac Discord
01/30/2025 at 15:50 • 0 commentsOver 100 people are now on the PiTrac Discord server! Kind of a cool milestone.
On a related note, the ever-expiring Discord link is: https://discord.gg/Ju4E7Prd
-
The most disliked line of code in PiTrac (and a call for help to any computer vision folks)
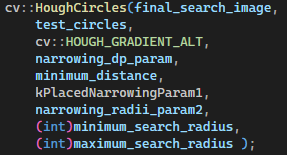
01/17/2025 at 21:18 • 0 commentsThere is one line of code that has been a problem from the first day of the PiTrac project. And although the processing associated with that line of code has improved over time, it’s still a single point of failure that limits the system’s reliability and accuracy. The line of code is (currently) line 797 in ball_image_proc.cpp:
![]()
PiTrac uses this method to find circles in an image and specifically to produce a result set of x,y centers and radii. HoughCircles() is part of the OpenCV computer vision toolkit. The method is used in many places in PiTrac. It is used to identify where the teed-up ball is positioned or to realize that PiTrac needs to wait for a ball to show up. It is used to identify the strobed ball-in-flight images from Camera 2. It is used to find the centers and radii of the ball images that will be chosen for spin analysis. It’s really a workhorse.
Under ideal situations, calling HoughCircles() works pretty well. And to be clear – there’s nothing wrong with OpenCV’s implementation of the underlying algorithm. But especially with the overlapping ball images and relatively low resolution of the PiTrac cameras, we’ve struggled to make HoughCircles() work as well it can. Small distortions of the ball images, such as around the edges of an image, can also create problems. Even with the calibrated anti-distortion matrices that work to keep the image looking its best, some of the balls end up a little elliptical, and when we relax the circle detection, that can lead to mis-identification and/or errors identifying the exact centers and radii of the circles. In addition, visual background noise can confuse the algorithm.
There is also a lot of wonky, brittle, hard-to-follow code all around this call. And there are several currently-disabled remnants of earlier coding attempts that we’ve retained in the code in the hopes of someday getting those earlier ideas to work better. Which makes the code even more confusing. There’s also pre-processing such as performing Guassian (or other) blurring of the image (which at first seems like it would make things worse), image erosion, dilation, and so forth. And there’s literally dozens of super-fussy parameters that help drive all of this. Small changes in those parameters can break the circle detection process in weird and unpredictable ways. In addition, some of the adaptive algorithms we've created to help HoughCircles cope with different lighting scenarios can slow the system down as the algorithm repeatedly calls HoughCircles to try to refine the best parameters.
An example of a currently-disabled approach is using HoughCircles to iteratively find the best searched-for-circle-radii (which can be enabled in the golf_sim_config.json file (the kUseBestCircleRefinement parameter, among others). First, PiTrac calls HoughCircles in a rough manner with a wide range of possible ball radii to figure out what the real range is for the sizes of balls in an image. And then PiTrac calls the method a second time with that hopefully-much-smaller range of radii to look for.
Problems have cropped up in this area so frequently, we even developed a separate “playground” app that allows the user to tweak the touchy parameters that go into HoughCircles in real time and see the results immediately. That sometimes leads to finding better settings for the system.
We’ve also tried a few alternative circle detection strategies, such as elliptical detectors, arc extraction, and some other recent academic approaches. But it still kinda sucks.
Anyway, if there’s anyone out there who wanted to take on a pretty complicated improvement assignment, working in the circle detection area of the code would be a great place to dig in. We’re hoping someone out there could look at the types of images we’re dealing with (we’ve got lots of test images) and figure out a better (and hopefully simpler) way to do this.
-
Great Question on Camera Angles and Positioning (from Discord)
01/16/2025 at 16:50 • 0 commentsSo a great question on the Discord server was:
- “Could [the PiTrac cameras] be changed by having the #1 camera point forwards and the #2 camera [which is strobed] straight out? At least more than now so that the LM can be moved back (quite a bit). As it is now it doesn't take much of a miss to hit the LM.”
The following picture from the camera calibration instructions shows why it is relatively easy to hit PiTrac with the golf ball in the default camera configuration – because the Camera 1 looks “back” at the ball, which means PiTrac is further ahead of the ball. And sometimes in harm’s way…
(Oh – and yes – I’ve hit the prototype PiTrac with the ball lots of times. The poor thing has long suffered from my poor golf skills).
Summary Answer:
The really short answer is YES – we should be able to change the camera angles so that Camera 1 looks straight out (and down), and then Camera 2 looks to the left (in the picture above), basically down-range. The angles and relative positions of the cameras in the system are presented as configuration values in the golf_sim_config.json file. PiTrac is designed to be flexible (especially since it’s experimental). If you switched the cameras around and calibrated them correctly and pushed the resulting position/angle information into the .json file, the system should still work. And in this case, you would move the PiTrac back to be more or less even with where the teed-up ball is. Although I’m sure I could hit some wild shot that will still nail the PiTrac right in the…ball-watching camera.
Even better would be if both cameras could look straight out, as we’ll discuss in a moment. But we’re not quite there yet in terms of processing speed.
More Detailed Answer:
Let’s look at the current camera setup first. With the Camera 2 (the strobed camera) facing straight out from the monitor as it is now, the camera is looking at the ball in flight basically perpendicularly (from the side). In that case, we get images that look like:
In this configuration, the size of the ball is mostly constant, and should be affected only by the Z-axis position of the ball. And the Z-Axis movement is going to determine the horizontal (side-to-side) launch angle, HLA. By Z-axis, I mean straight out from the monitor, as suggested by the first picture, above.
But if Camera 2 is facing more down-range, closer to the angle of ball flight, the perspective changes, of course. In that case, the same shot shown above will look more like this:
Here, the X-axis (left-right as the camera sees it) is more compressed, and the imaged size of the ball decreases with distance, because the ball is getting further from Camera 2 as it flies. This alternate camera positioning (especially if taken to the extreme) creates a few challenges:
- Especially at shallow VLA (vertical launch angles), there is more ball overlap because the camera is sort of looking at the ball from behind. In an extreme case, the strobed ball imprints might all overlap and look like concentric circles as the ball flies downrange.
- The increased overlap may make it more difficult to find two good, clear, images to use in the spin-analysis, so spin accuracy could decrease.
- Because of the compressed X-axis, HLA accuracy may decrease, because there are not as many pixels through which to measure HLA. And at the (current) low resolution of the Pi GS camera, a single pixel error could mean mis-locating the ball by several millimeters or more.
- The compressed X-axis also means that calculating the distance the ball moved between strobe pulses will likely be less accurate. And that will affect the ball speed measurement, and that, of course, is an important metric for a launch monitor.
Positioning the Camera 2 so that it is looking straight out at the ball in flight was an attempt to maximize the accuracy of speed and VLA measurement, as well as the number of good, non-overlapped images for spin analysis. Although it does so at the expensive of HLA accuracy, because the perceived radius of the ball (which is determined by the Z-axis position) is pretty touchy, and small errors in circle-detection can create larger errors in HLA determination.
However, it’s certainly possible that moving the cameras a little bit in the way @Merrygrin suggests won’t affect accuracy that much, but would still allow the system to be moved a little more from harm’s way. We’ll have to experiment with that once we get things stable in the builder community, and hopefully some of our contributors will do the same.
A related question is why not just have both cameras point straight out? This would make it really simple to switch between left- and right-handed golfers as well as allowing the safer positioning of the monitor. There are a couple current problems with this:
- Even with 500 FPS (2ms between images), the golf ball could (in a worst case, when it moves right after the last image is taken by the camera) move 20 centimeters downrange. And with additional processing latency, it could be even further downrange by the time the Pi 1 system calculates the pixel differences between the most-recent frame and the prior frame and opens the Pi 2 camera shutter and starts sending strobe pulses. By that time, the ball may have already moved out of the field of view.
- By positioning Camera 2 right where the ball is, it effectively cuts the field of view in half. The area to the left of the ball (from the camera’s perspective, for right-handed golfers) is wasted, because the ball only goes from the middle of the image to the right.
- For the same reason as for #2, above, this configuration effectively reduces the resolution of the camera in half for the pixels that can “see” the ball in flight.
That said, I’m optimistic we’ll get to a point where the cameras can be straight out some day. And I’ve noticed that even now, if you set the ball too far back (to the right, looking at the PiTrac), the processing is fast enough on the Pi 5 that we’re actually sometimes getting errors at low ball speeds because many of the strobe flashes occur before the ball even gets within sight of the Camera 2. For example:
With all that said, we’d love to hear about people’s thoughts, ideas, musings, etc. on this subject!
-
Discord Server Is Online
01/02/2025 at 14:51 • 4 commentsQuite a few folks expressed an interest in hosting the (hopefully-growing) PiTrac community on Discord. We'd started a GitHub Discussion forum, but have learned that Discord seems to be the preference.
So... without further ado -- and without any experience or knowledge on how to run or moderate a Discord server -- here's an invite to use to get into the PiTrac server. Please don't post anywhere super-public (is that really an issue?) so that we don't have to cull out a ton of bots. But please join!
https://discord.gg/xMwkWaJD (updated Feb. 7)
-
Compile, run, and debug PiTrac on Visual Studio
01/01/2025 at 23:16 • 0 commentsNow you can compile, run, debug and generally experiment with the majority of the PiTrac source code on a Windows or Mac using Visual Studio. The Pi-specific (mostly camera-oriented) code automatically #define's itself out of the compile process when working on a non-unix operating system such as Windows.
This allows folks who would like to work on the code (or just walk through parts of it) to do so without making the investment in building a physical Pi-based PiTrac system. Static images are used to simulate the images that the Pi cameras would otherwise take on the real Pi system We've found this Visual Studio capability to be invaluable when debugging complicated image-processing problems. Of course VS will run on the Pi operating system as well, but we haven't found that development environment to be as productive.
The instructions are here.
-
Over 140k Views on Reddit
12/30/2024 at 16:21 • 0 commentsWow - we never expected anywhere near the number of clicks, views, shares and up-votes on Reddit! Between r/golfsimulator an r/golf, the PiTrac project has received more than 140k views!
PiTrac - The DIY Golf Launch Monitor
Launch monitor using low-cost Raspberry pi and camera hardware to determine ball launch speed, angles and spin
 James Pilgrim


