Roger
Roger-
Focus is now on Mark II
09/08/2017 at 16:58 • 0 commentsThis project, retroactively named Mark I, was built out of salvaged & retired computer parts. The concept worked well enough for me to embark on Mark II, which uses components I purchased for the purpose. After two major revisions I'm pretty confident the idea will pan out... eventually. Several more iterations are still needed before it meets all of my objectives.
The major differences are:
Mark I Mark II Screen Salvaged 17" laptop LCD panel Larger 24" monitor Motherboard Full sized ATX board Smaller mini-ITX board Power Supply Full sized ATX power supply unit. Smaller SFX PSU At this point I do not expect to put any more effort into Mark I, though if anybody wants to take the files I've shared here as a basis for their project I'd love to hear about it.
For the foreseeable future I'll be refining Mark II. The full verbose build blog is here, the "Cliff Notes" version of progress summaries will be posted on the Mark II Hackaday.io project page here.
-
Four Month Report
08/16/2017 at 17:24 • 0 commentsWhat else has happened since project completion 4 months ago:
- Promoted to Primary: Four months ago I completed this project, filling the chassis with retired PC components I had sitting in the closet. After using it for about a month, I decided I really liked it. The components were re-retired into the closet, and the heart of my primary desktop PC tower were installed. My primary computer has been living in the Luggable PC chassis ever since.
- Network Storage: In my desktop tower PC I had 3.5" spinning platter hard drives for bulk storage. The move to the luggable chassis meant I had to give them up. For alternative bulk storage, I set up a network attached storage (NAS) server on my home network. The FreeNAS Box project is shared to everyone on Hackaday.io on this page, with the overly verbose full build log here.
- Portable Second Monitor: At home I could attach a large 28" monitor, but when on the go I only had the 17" screen built into the luggable chassis and sometimes that feels cramped. In order to expand screen real estate while on the go, a second salvaged laptop LCD was turned into a portable external monitor. Hackaday.io project page here, verbose full build log here.
- Luggable PC Mark II: The earlier "Luggable Frame" project built around the 28" QHD Yamakasi Catleap monitor was halted, but the idea of building PC chassis around a retail monitor lives on. When Best Buy put a promising lightweight Lenovo 24" QHD monitor on sale, it marked the official start of the Luggable PC Mark II project. Hackaday.io project page here, verbose full build log here.
- SGVLUG talk: After seeing Luggable PC show up at local tech meets, I was invited to present at a monthly meet of the San Gabriel Valley Linux User's Group. The presentation covered all of the above projects and I also brought all the iterations (not just the final product) so the audience can get up close and personal looks at the evolution of each design. The presentation slide deck is available here.
-
Luggable Frame Experiment #2
06/04/2017 at 19:14 • 0 commentsThe experiment to build a luggable frame to carry a Yamakazi Catleap (28" QHD) monitor with a HP Z220 small form factor case is moving to the back burner. After building two prototype frames, it became clear the size and weight is a bit high for what we can consider "luggable".
The changes for experimental prototype #2 are documented here.
But the underlying concept of building a luggable PC out of a commercially available computer monitor (versus a salvaged laptop panel driven by a questionable eBay circuit board from China) is still compelling and will continue to evolve with smaller and lighter components.
-
Luggable Frame Experiment #1
05/31/2017 at 20:34 • 0 commentsI built the Luggable PC for me, but I recognize the trade-offs would not work for everybody. [Tux Lab] proposed something easier to build and modify, with the trade-off of increased size and weight. The discussion resulted in this: a luggable frame that integrates a VESA monitor mount and a tray to hold a small form factor chassis.
Construction of the initial prototype is documented at this link.
If this project gains traction, I'll create a separate Hackaday.io project page.
![]()
-
Acer Predator 21X
05/24/2017 at 20:36 • 0 commentsGizmodo published a hilarious article for the insane Acer Predator 21X "Gaming Laptop"
Random points of comparison with my project:
Luggable PC Acer Predator 21X Weight 17.5 lb.
(excludes weight of keyboard and mouse)19 lb.
(excludes weight of its dual power supplies)Battery run time Not Applicable About an hour Carrying handle Yes No. (But its customized Pelican carrying case does.) -
1+ Week Report
04/11/2017 at 23:08 • 0 commentsI've been using the Luggable PC as my portable computing solution for a little over a week and I'm happy with it. By recycling the parts I retired from my main desktop PC, it cost me a small fraction of the cost of a new laptop with similar specs. It's certainly no lightweight! (17.5 pounds, to be exact.) But it's portable enough if I'm driving somewhere. I'll still use my Macbook Air when I'm flying for a trip, or otherwise need something small and light that easily fits in a backpack.
Given its satisfactory performance to date I don't plan any more ground-up redesigns of the chassis. There will obviously be additional minor tweaks since I'm the tinkerer type. But if anything major comes up, I'm more likely to document it as a separate/spin-off/sequel project. (See below.)
I've updated the project status page to "Completed Project."
As stated earlier, I've documented the whole thing. The Fusion 360 CAD file is shared, the parts list filled out in detail, and step-by-step instructions posted. You are welcome (and encouraged!) to take what I've done and customize it to suit your needs.
And when you are done... let me know! Show it off! I'd love to see other takes on this concept.
Some possibilities for future development, by myself or by others:
- Laser-cut: My individual components were constrained by the 200mm x 200mm bed of my 3D printer. Most laser cutters have significantly larger working area which opens up the possibility of a redesign to take advantage of laser cutter strengths.
- Sheet metal: Similar to the above, industrial sheet metal tooling would allow tremendous reduction in part count and cost. If some enterprising entrepreneur wants to turn this basic idea into a product, it will definitely need to be redesigned for sheet metal mass production.
- AIO: If portability is not a goal, and the desire is simply for a compact chassis for full-sized components, the screen assembly and associated hinge can be deleted. In its place, an aluminum extrusion to bolt on a monitor that doesn't move (no hinge).
- Screen hinge for VESA compatible screens: A more ambitious version of the above that preserves portability. In this version, the screen and hinge mechanism is redesigned so it works with any VESA compatible screen instead of customized to a specific screen like I did. It'd be very impressive if this can be done!
-
Newegg Case Mod Event
04/07/2017 at 18:18 • 1 commentI think I'll take the Luggable PC out to the Newegg case mod event. See how that audience would react to a 3D printed PC chassis. Maybe it will be appreciated, or maybe it will only sit in the shadows of LED light show from the bling-tastic modded boxes present, who knows?
-
Components & Instructions for Extrusion Box V1
04/04/2017 at 00:12 • 0 comments![]()
All the information has been uploaded for anybody to build their own Extrusion Box Luggable PC.
- The Autodesk Fusion 360 CAD file is shared via link to the Autodesk 360 sharing hub.
- The component list on this project page has been updated with all parts required.
- The instruction list on this project page has been updated with step-by-step detail.
If the 90-step instruction list is too long for you, here's a handy TL;DR animated GIF version courtesy of http://gifcreator.me
-
Extrusion Box V1.0
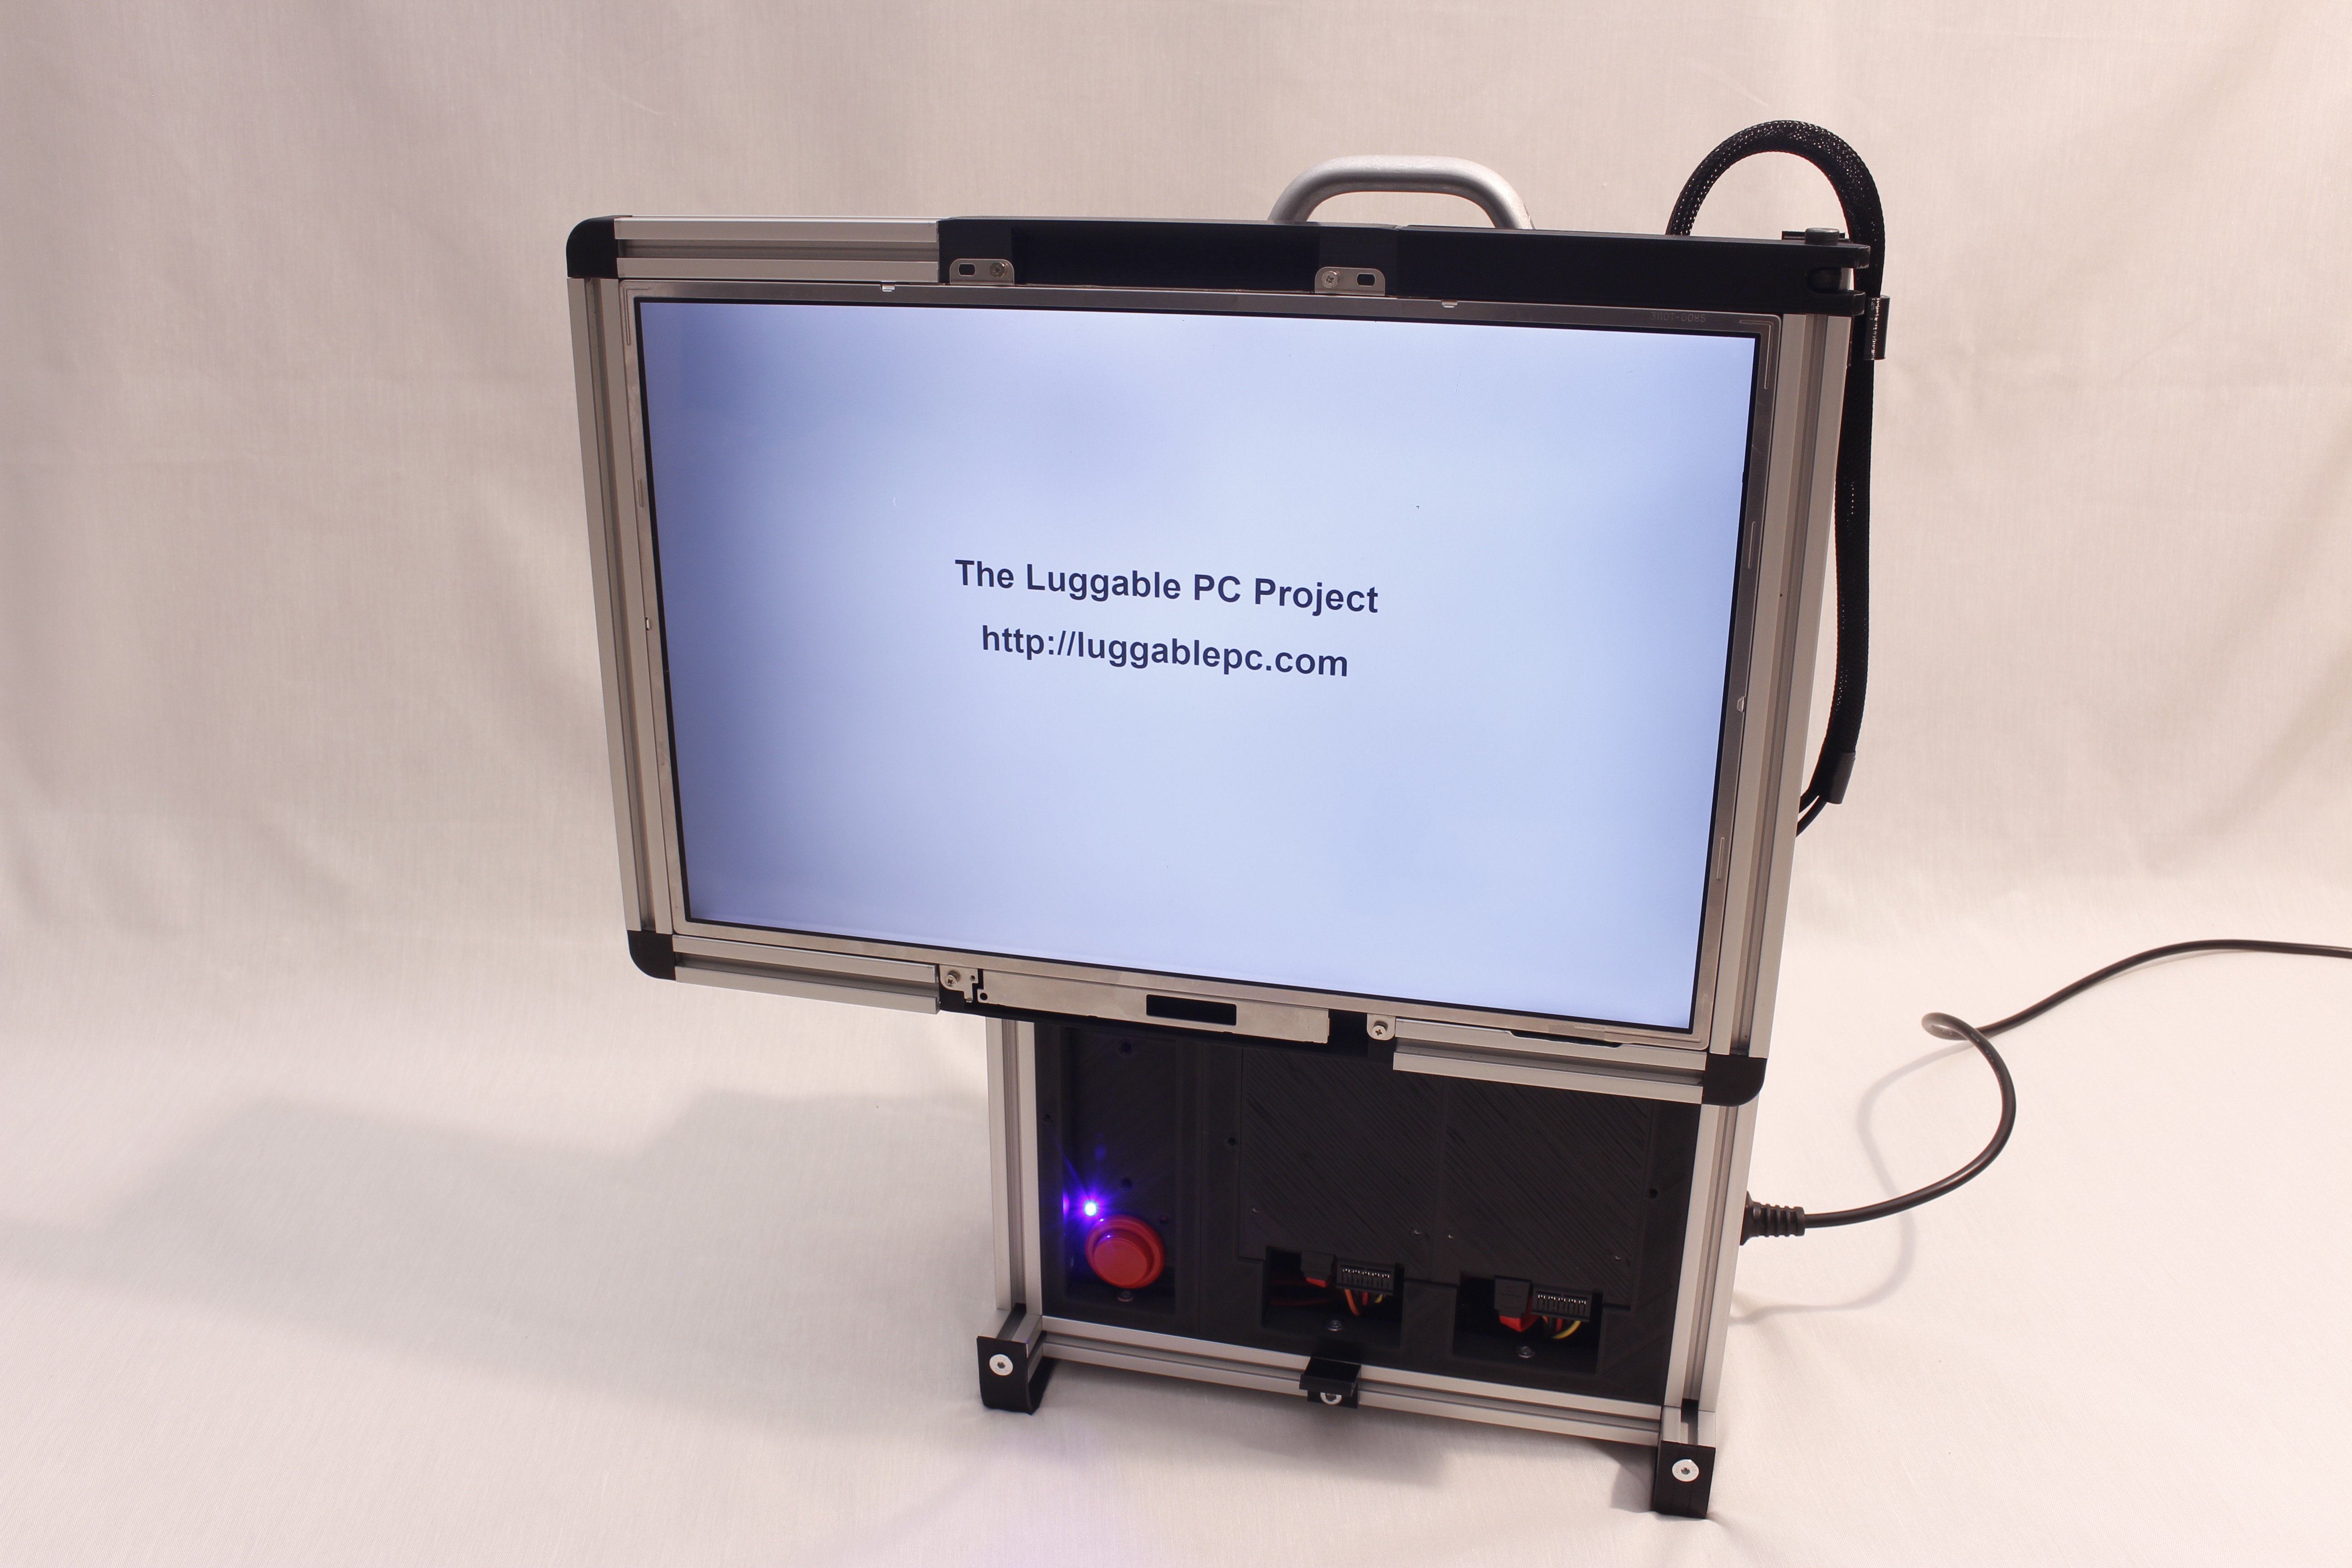
04/02/2017 at 19:26 • 0 commentsThe Extrusion Box 1.0 is complete! I've taken all the lessons learned from previous prototypes and rebuilt the structure using aluminum extrusions. Relative to the threaded rods I had used earlier, aluminum extrusions provide a stronger framework with far more consistency in dimension for building.
With the completion of this prototype I now have something I can lug around when I need more computing power than available from an Apple MacBook Air.
Over the next several days I'll flesh out this project page, update the components list and provide a full list of instructions for building your own Luggable PC.
In the meantime, here is a list to posts explaining specific design elements that went into the project.
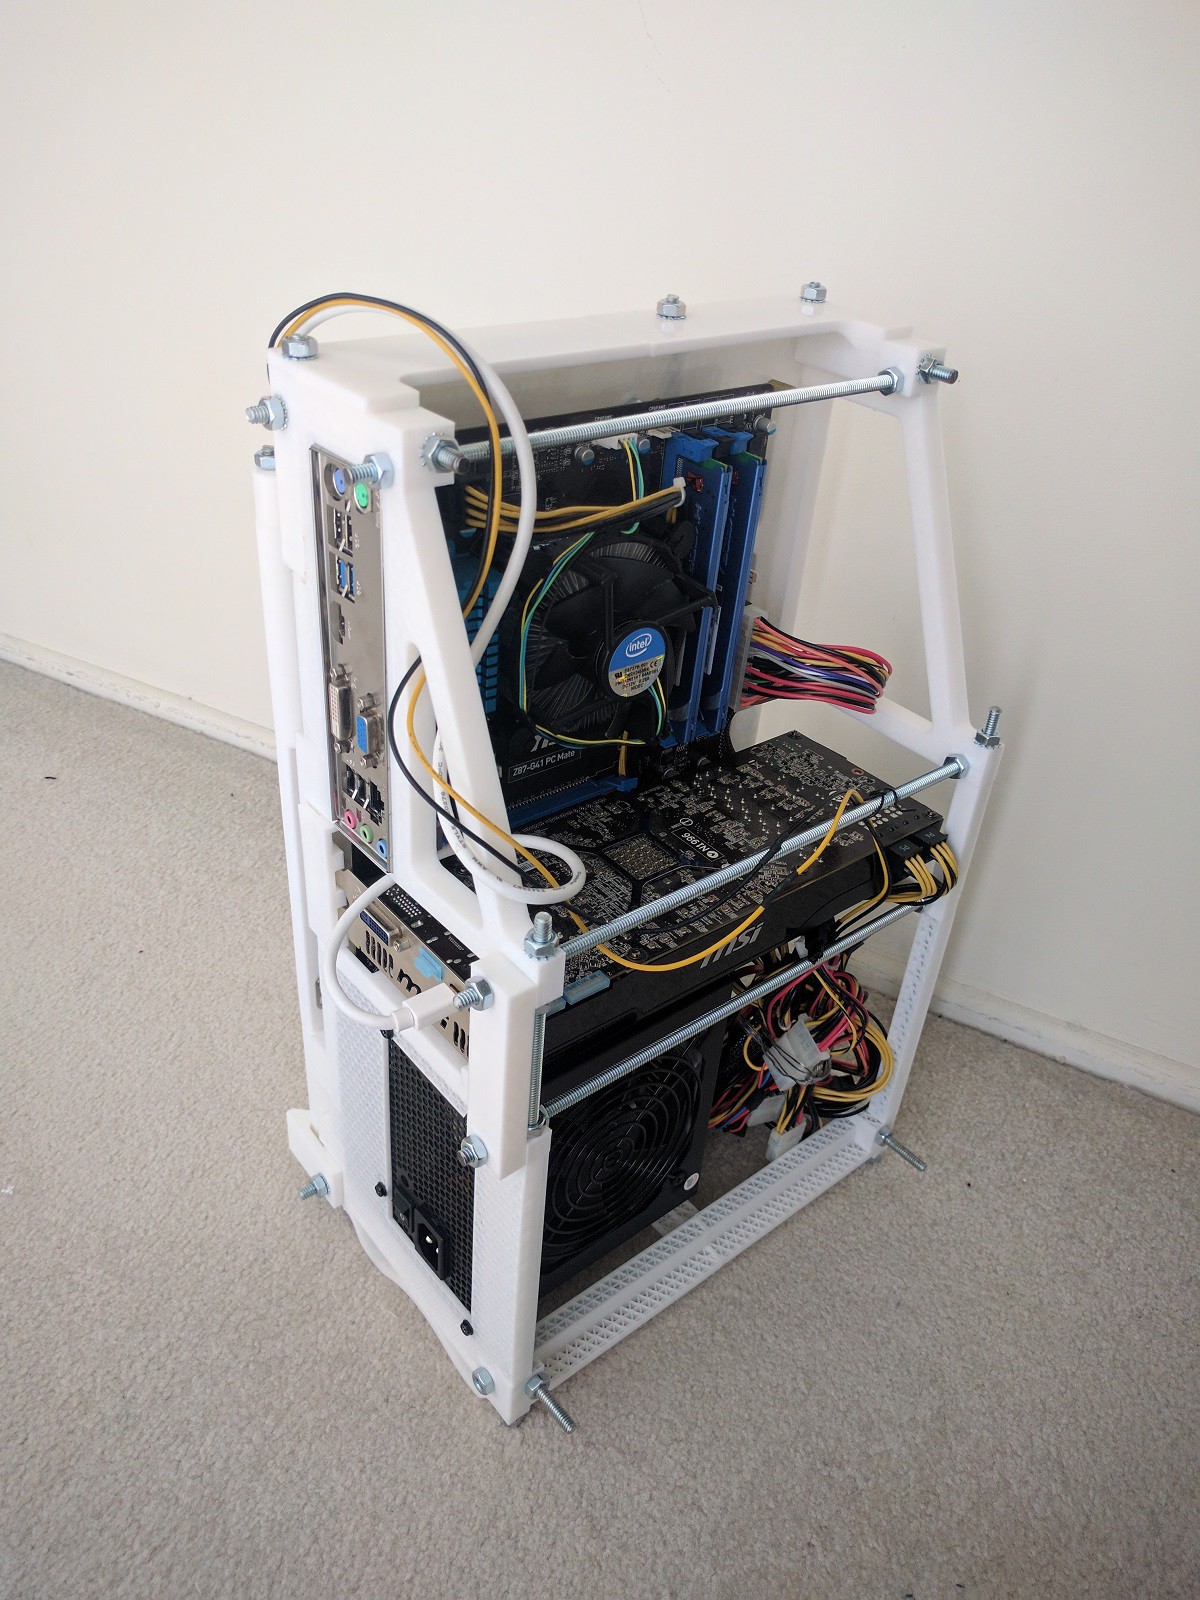
- PSU Layout: The heavy power supply unit anchors the chassis.
- Motherboard Layout: Trying to pack components tightly around a (very) not compact full-size ATX motherboard.
- Screen Layout Challenges: The wishlist for my perfect screen layout and why it is hard to satisfy all the requirements.
- Screen Hinge: The final design that satisfied (almost) all of the wishlist.
- A Tale of Three Corners: Learning how to build better 3D printed structures with threaded rods. (Made irrelevant by the switch to aluminum extrusions.)
- Angled Feet: A minor design element with major ergonomics impact.
- Drive Bay: Finding the best way to package 2 x 2.5" storage drives.
![]()
-
Threaded Rod Box v2
02/27/2017 at 23:58 • 0 commentsPresenting the second version of the threaded-rod box design!
It advanced on the previous version in several significant ways. The most obvious new feature is the screen hinge mechanism. I've already posted an animated GIF showing it in action at the Feb. Hackaday LA meet, here are higher-resolution stills in the open and closed positions:
![]()
![]()
The screen hinge design offers the following benefits:
- When closed for traveling:
- Screen glass is facing inward and protected.
- Screen edge is not sticking out so less vulnerable to damage.
- Vertical orientation minimizes width and depth to increase portability.
- When open for use:
- Screen is at a high ergonomic position. This addresses a peeve of mine against laptops, whose screen (at table height) are too low.
- Horizontal orientation as is typical for computers. (Versus phone/tablet)
- Exposes an area for things like a Big Red Button power switch, which is something I've always wanted in a PC case.
It has the following issues I want to resolve in future iterations:
- The screen wiring is awkward and exposed. Right now it is easy for them to get tangled up and pinched by the metal hinge hardware.
- The hinge needs to move through two axis of movement ("flip" and "rotate") to switch between configurations. This is poor design: It's not obvious to an user if the flip should happen before the rotate, or the opposite, or some combination in between. I want to evolve this design so it has one continuous unambiguous movement between the open and closed positions.
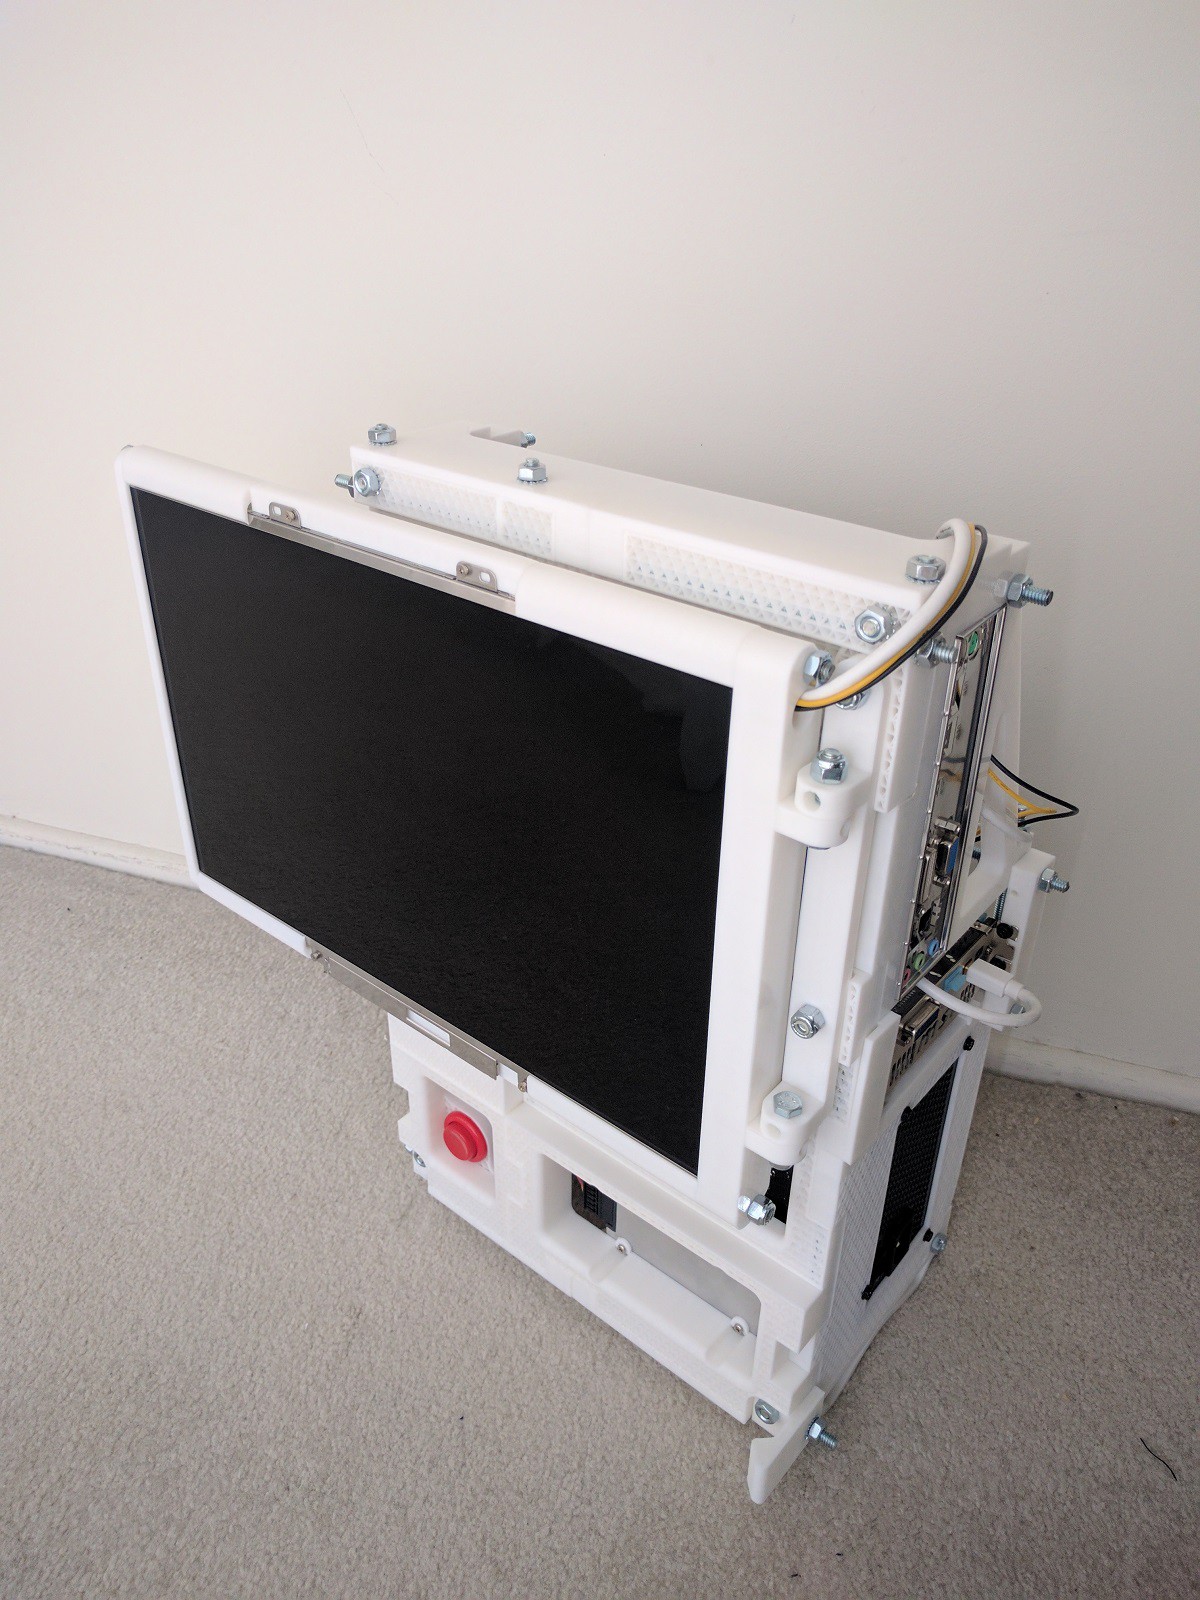
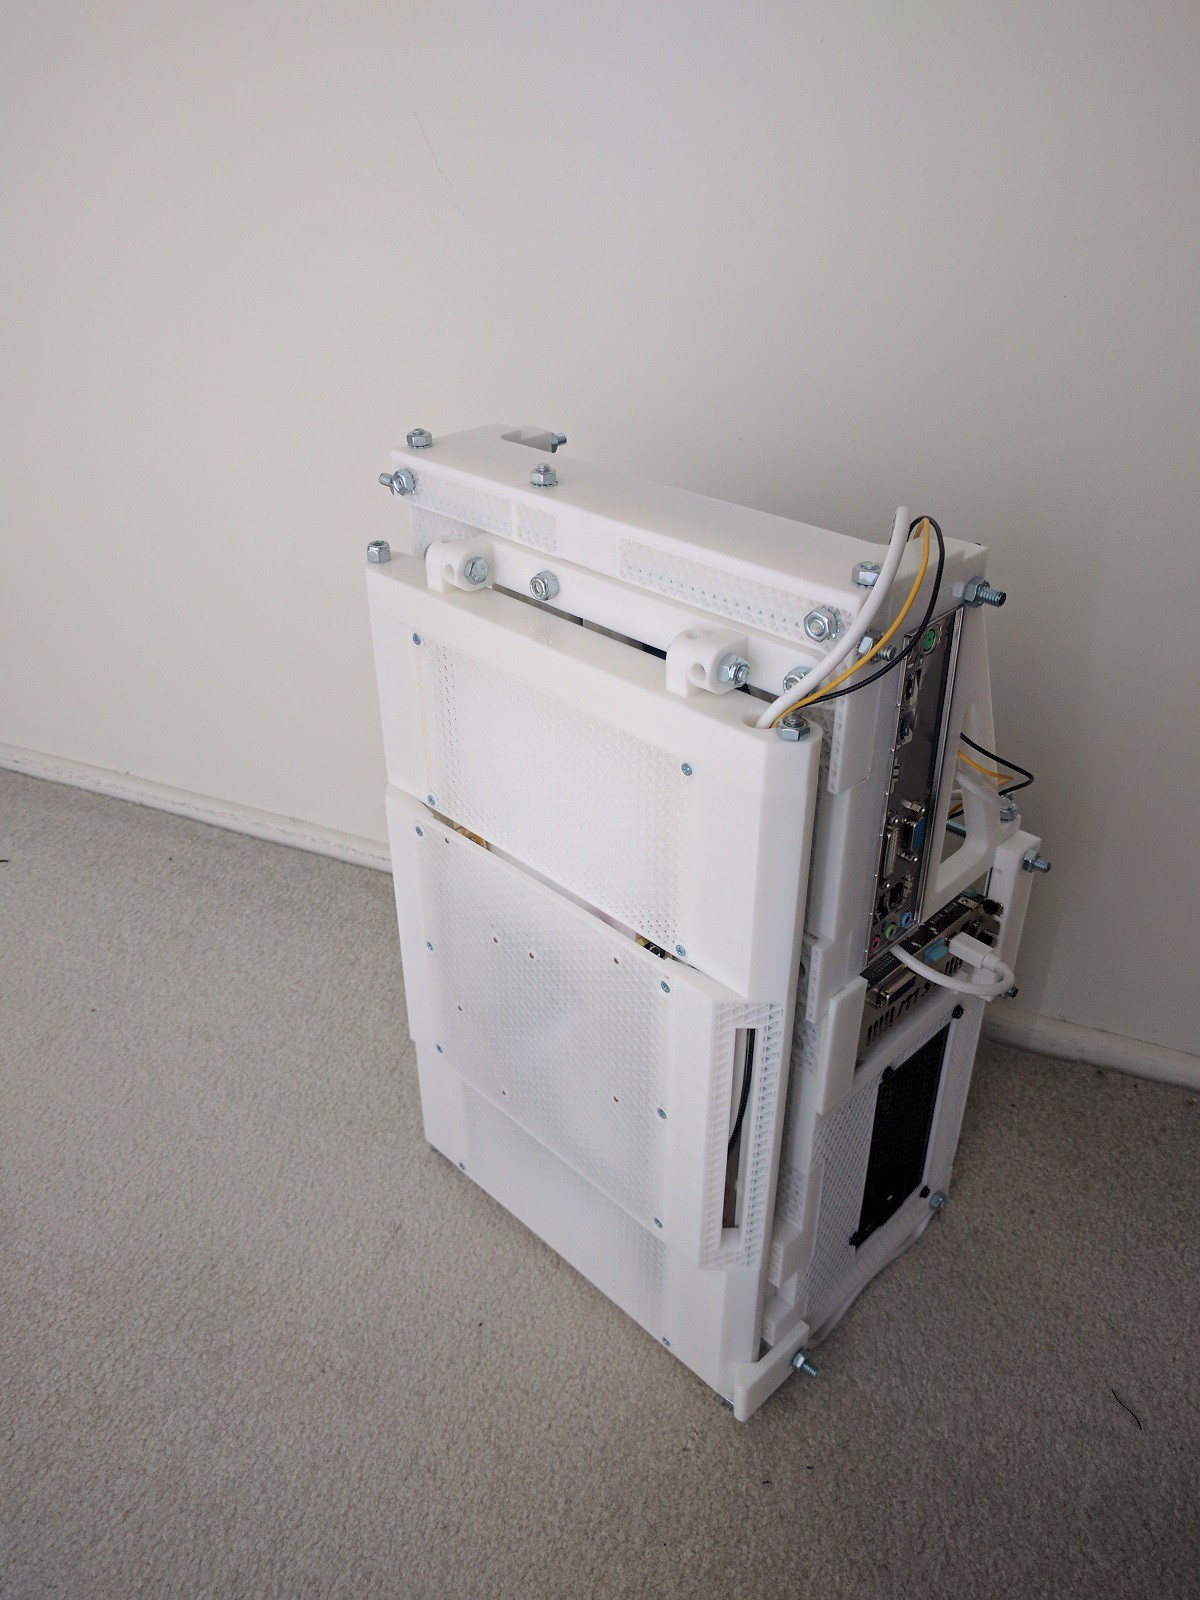
Inside the box, the component layout is identical to Threaded Rod Box V1 but for one significant difference: the motherboard has been flipped around so the backside of the board faces the screen. The space that was previously enclosed and wasted in the box v1 volume is now opened up to a sloped back.
![]()
I focused mostly on the front of the box this time around, leaving the back pretty bare and open. I think much of the volume can be reclaimed for productive purposes. Ideas for future iterations include:
- A few hooks that will be useful to coil power and network cables.
- A home for a mouse, probably in the form of a small cubby.
- A way to attach a keyboard, probably in the form of a clip or a tray.
Lastly, I also made a significant change in construction technique. In the previous versions, plastic printed pieces are asked to hold together metal pieces several centimeters apart. Given that distance and plastic's flexible nature, the earlier editions would noticeably bend and flex as I moved them around.
The latest design keeps the metal pieces much closer together. This means less plastic to flex in the corners. The resulting box is far more rigid and confidence inspiring to carry around.
- When closed for traveling:
Luggable PC
A nominally portable ("luggable") computer chassis for commodity desktop PC components.