 kutluhan_aktar
-
21Step 10.3: Evaluating the model accuracy and deploying the model
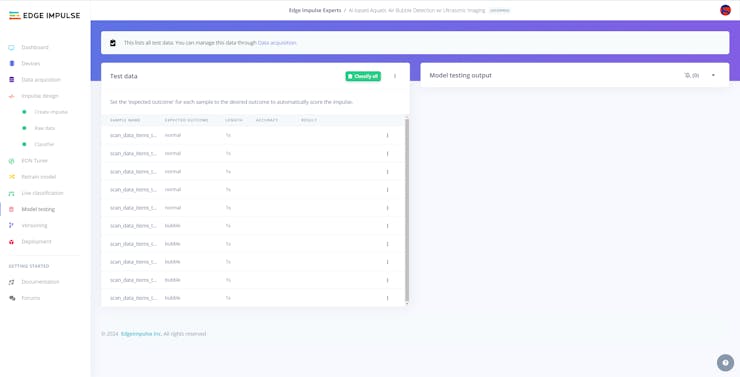
After building and training my neural network model with the Ridge classifier, I tested its accuracy and validity by utilizing testing samples.
The evaluated accuracy of the model is 100%.
#️⃣ To validate the trained model, go to the Model testing page and click Classify all.
![]()
![]()
![]()
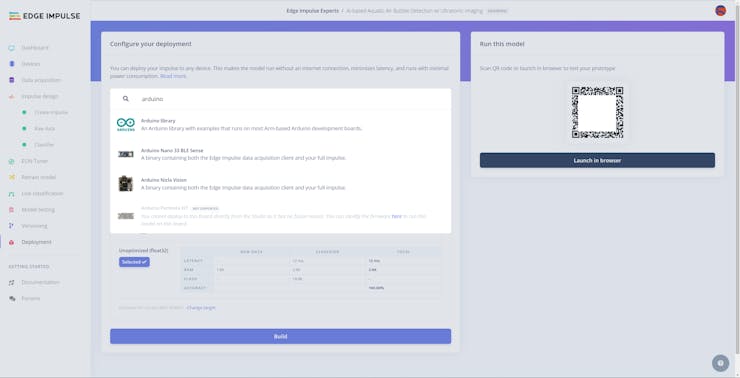
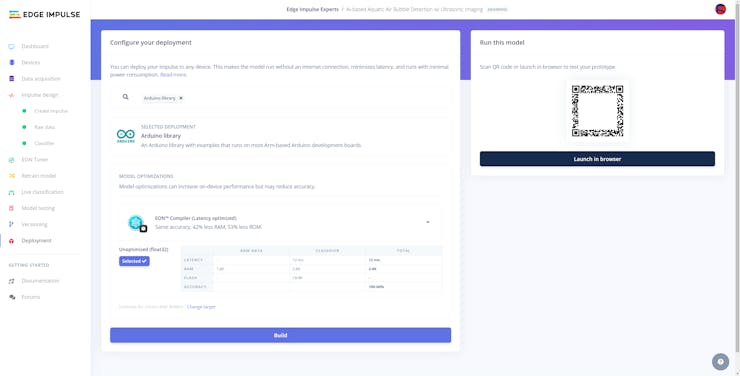
After validating my neural network model, I deployed it as a fully optimized and customizable Arduino library.
#️⃣ To deploy the validated model as an Arduino library, navigate to the Deployment page and search for Arduino library.
#️⃣ Then, choose the default Unoptimized (float32) option since the Quantized (int8) optimization option is not available for the Ridge classifier.
#️⃣ Finally, click Build to download the model as an Arduino library.
![]()
![]()
![]()
-
22Step 11: Building an object detection (NVIDIA TAO RetinaNet) model w/ Edge Impulse Enterprise
When I completed capturing images of chemical water quality test results (color-coded) representing the most common indicators of water contamination in a retail fish farm and storing the captured samples on UNIHIKER, I started to work on my object detection (RetinaNet) model to assess water pollution levels.
Since Edge Impulse provides developer-friendly tools for advanced edge AI applications and supports almost every development board due to its model deployment options, I decided to utilize Edge Impulse Enterprise to build my object detection model. Also, Edge Impulse Enterprise incorporates elaborate model architectures for advanced computer vision applications and optimizes the state-of-the-art vision models for edge devices such as UNIHIKER.
Since assessing water pollution levels based on the applied chemical water quality tests (color-coded) is a complex computer vision task, I decided to employ an enhanced vision model architecture. After conducting experiments with the advanced algorithms supported by Edge Impulse Enterprise, I decided to utilize RetinaNet from the NVIDIA TAO Toolkit.
NVIDIA TAO Toolkit is a low-code AI toolkit built on TensorFlow and PyTorch, which simplifies the model training process and lets developers select one of 100+ pre-trained vision AI models with customization options. TAO provides an extensive selection of pre-trained models, either trained on public datasets or proprietary datasets for task-specific use cases. Since Edge Impulse Enterprise incorporates production-tested NVIDIA TAO vision models and provides configurable backbones (MobileNetV2, GoogLeNet, ResNet, etc.), fine-tuning RetinaNet to unique data sets and deploying optimized models for edge devices are efficient and user-friendly on Edge Impulse.
Even though Edge Impulse supports JPG or PNG files to upload as samples directly, each target object in a training or testing sample needs to be labeled manually. Therefore, I needed to follow the steps below to format my data set so as to train my object detection model accurately:
- Data Scaling (Resizing)
- Data Labeling
As explained earlier, I managed to group water pollution levels into three categories empirically while observing the water quality levels after applying chemical color-coded tests.
Since I added the mentioned pollution categories and the collection date to the file names while capturing images of water quality test results (color-coded), I preprocessed my data set effortlessly to label each target object on an image sample on Edge Impulse by utilizing the assigned pollution category:
- sterile
- dangerous
- polluted
Plausibly, Edge Impulse Enterprise allows building advanced computer vision models optimized in size and accuracy efficiently and deploying the trained model as a supported firmware (Linux AARCH64) for UNIHIKER. Therefore, after scaling (resizing) and processing my image data set to label target objects, I was able to build a valid object detection model to assess water pollution based on the applied water quality tests, which runs on UNIHIKER without any additional requirements.
You can inspect my object detection (RetinaNet) model on Edge Impulse as a public project.
-
23Step 11.1: Uploading images (samples) and labeling objects
After collecting training and testing image samples, I uploaded them to my project on Edge Impulse. Then, I labeled each target object on the image samples.
#️⃣ First of all, to utilize the incorporated tools for advanced AI applications, sign up for Edge Impulse Enterprise.
#️⃣ Then, create a new project under your organization.
![]()
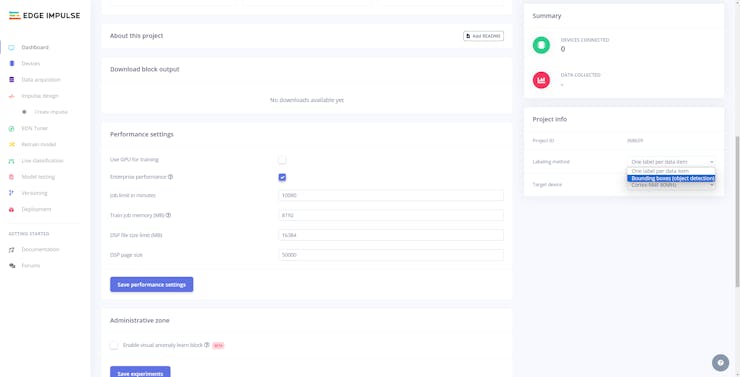
#️⃣ To be able to label image samples manually on Edge Impulse for object detection models, go to Dashboard ➡ Project info ➡ Labeling method and select Bounding boxes (object detection).
![]()
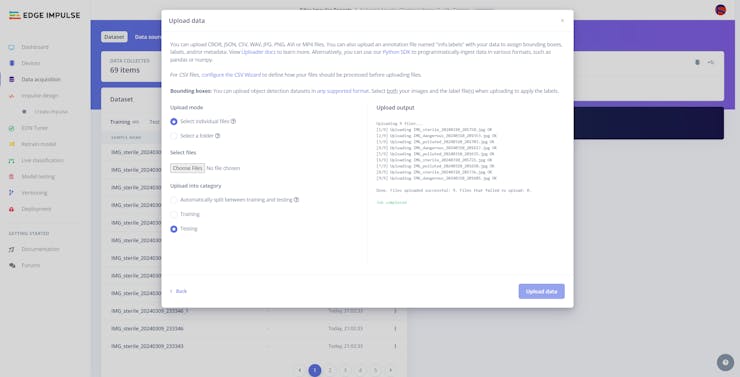
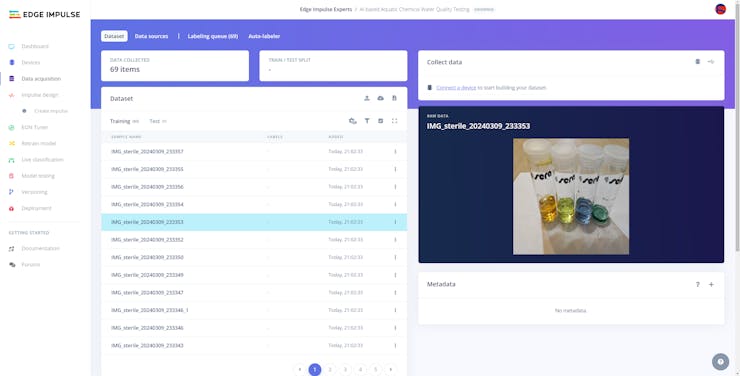
#️⃣ Navigate to the Data acquisition page and click the Upload data icon.
![]()
#️⃣ Then, choose the data category (training or testing), select image files, and click the Upload data button.
![]()
![]()
![]()
![]()
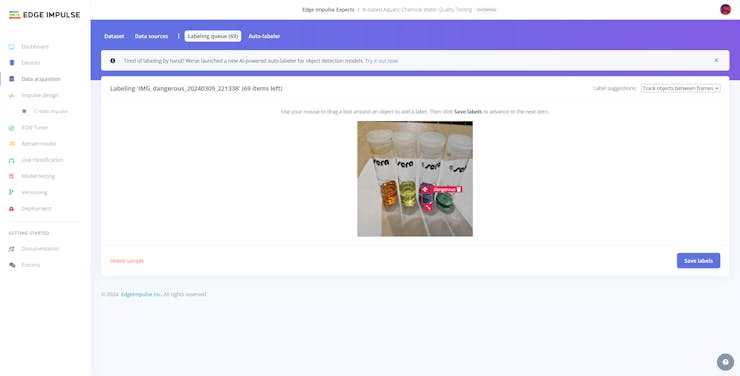
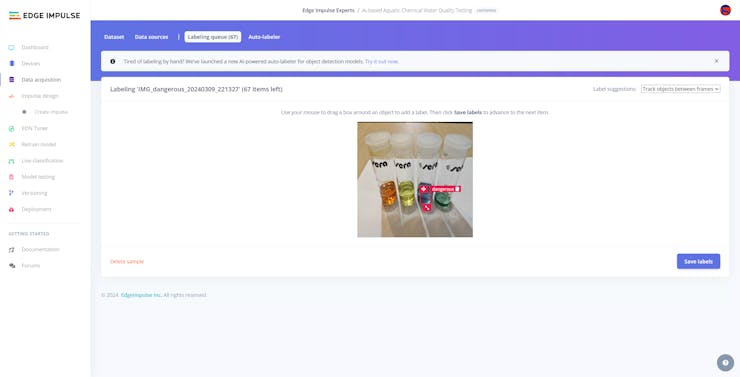
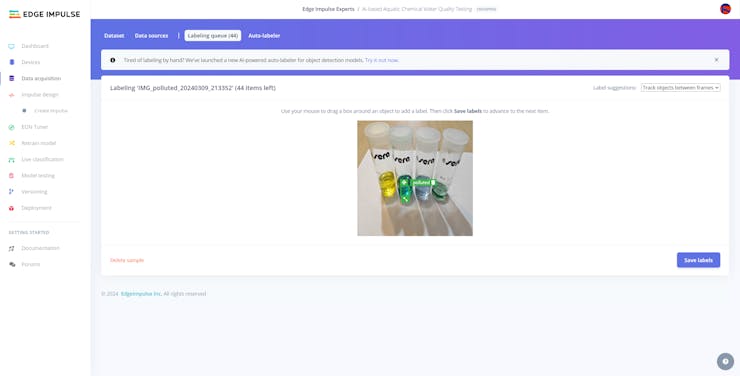
After uploading my image data set successfully, I labeled each target object on the image samples by utilizing the assigned water pollution categories (classes). In Edge Impulse, labeling an object is as easy as dragging a box around it and entering a class. Also, Edge Impulse runs a tracking algorithm in the background while labeling objects, so it moves the bounding boxes automatically for the same target objects in subsequent images.
#️⃣ Go to Data acquisition ➡ Labeling queue. It shows all unlabeled items (training and testing) remaining in the given data set.
#️⃣ Finally, select an unlabeled item, drag bounding boxes around target objects, click the Save labels button, and repeat this process until all samples have at least one labeled target object.
![]()
![]()
![]()
![]()
![]()
![]()
![]()
![]()
![]()
![]()
![]()
![]()
-
24Step 11.2: Training the RetinaNet model on the water quality test images
After labeling target objects on my training and testing samples successfully, I designed an impulse and trained the model on detecting water pollution levels based on the applied chemical water quality tests.
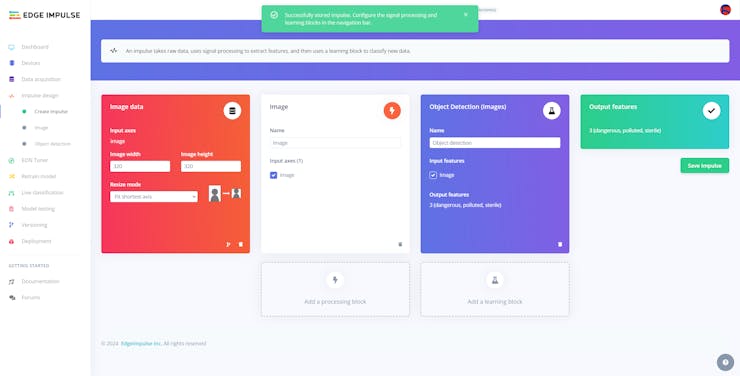
An impulse is a custom neural network model in Edge Impulse. I created my impulse by employing the Image preprocessing block and the Object Detection (Images) learning block.
The Image preprocessing block optionally turns the input image format to grayscale or RGB and generates a features array from the raw image.
The Object Detection (Images) learning block represents a machine learning algorithm that detects objects on the given image, distinguished between model labels.
In this case, I configured the input image format as RGB since the applied chemical water quality tests highly rely on color codes to distinguish quality levels.
Due to the NVIDIA TAO vision model requirements, the image width and height must be multiples of 32 while configuring the impulse.
#️⃣ Go to the Create impulse page and set image width and height parameters to 320. Then, select the resize mode parameter as Fit shortest axis so as to scale (resize) given training and testing image samples.
#️⃣ Select the Image preprocessing block and the Object Detection (Images) learning block. Finally, click Save Impulse.
![]()
#️⃣ Before generating features for the object detection model, go to the Image page and set the Color depth parameter as RGB. Then, click Save parameters.
![]()
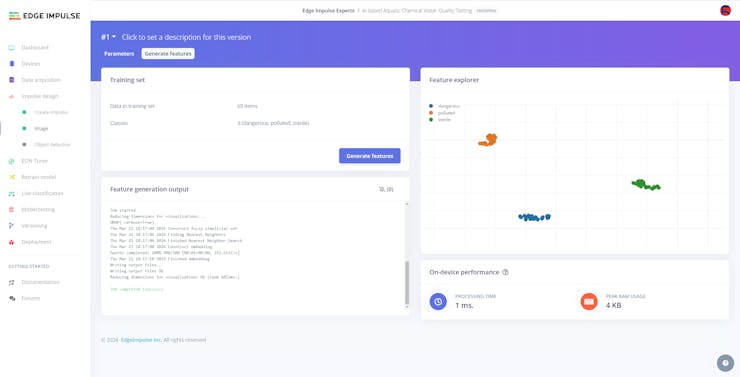
#️⃣ After saving parameters, click Generate features to apply the Image preprocessing block to training image samples.
![]()
![]()
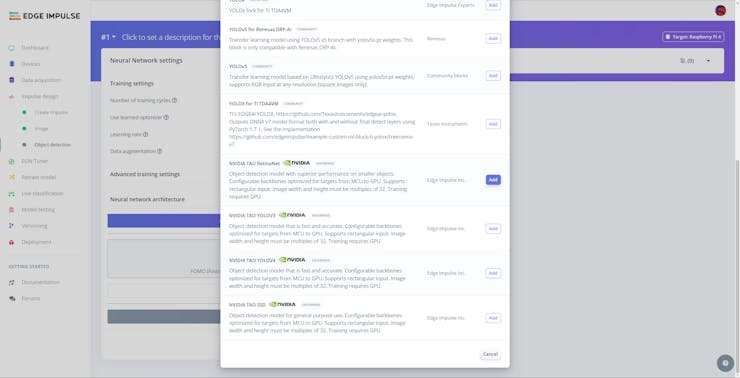
#️⃣ After generating features successfully, navigate to the Object detection page.
![]()
To change the default computer vision model (algorithm), click the Choose a different model button and select the NVIDIA TAO RetinaNet model, providing superior performance on smaller objects.
![]()
Then, switch to GPU training since NVIDIA TAO models are GPU-optimized computer vision algorithms.
![]()
![]()
#️⃣ After configuring the model settings, click Start training.
![]()
![]()
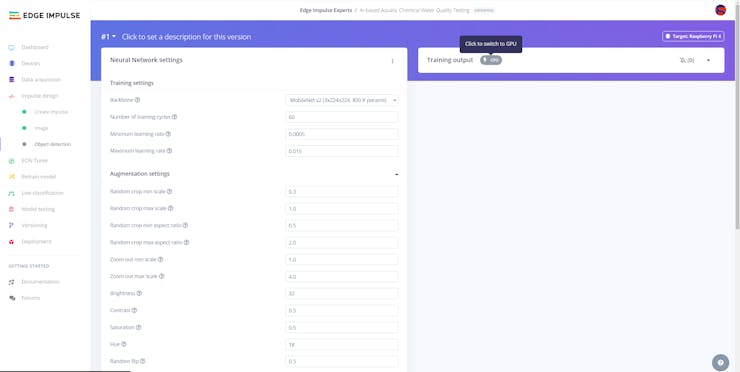
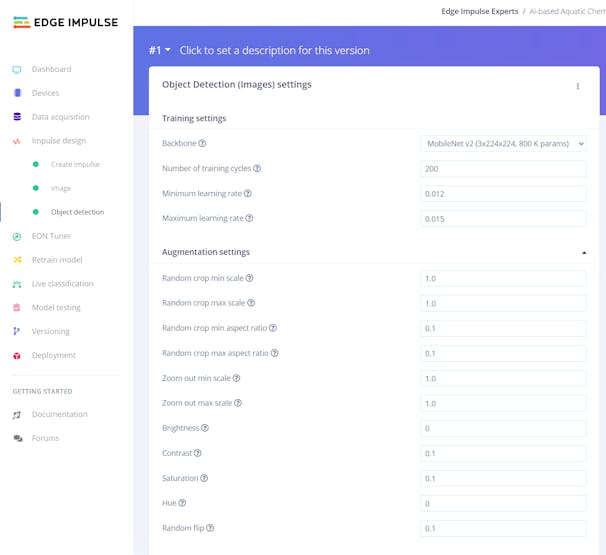
According to my rigorous experiments with my RetinaNet object detection model, I modified the model and augmentation settings to fine-tune the MobileNet v2 backbone so as to build an optimized object detection model with high accuracy and validity:
📌 Object Detection (Images) settings:
- Backbone ➡ MobileNet v2 (3x224x224, 800 K params)
- Number of training cycles ➡ 200
- Minimum learning rate ➡ 0.012
- Maximum learning rate ➡ 0.015
- Random crop min scale ➡ 1.0
- Random crop max scale ➡ 1.0
- Random crop min aspect ratio ➡ 0.1
- Random crop max aspect ratio ➡ 0.1
- Zoom out min scale ➡ 1.0
- Zoom out max scale ➡ 1.0
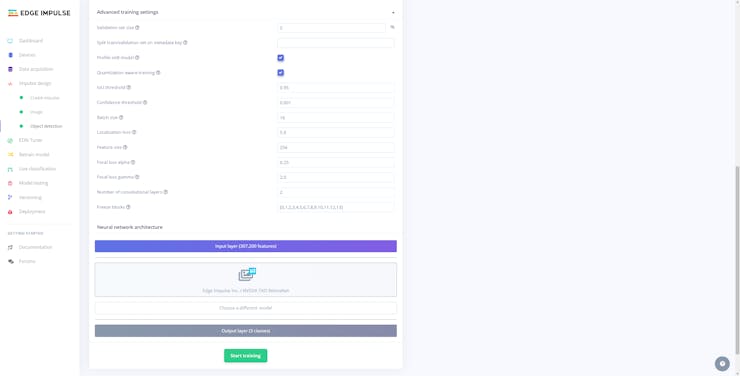
- Validation set size ➡ 5
- IoU threshold ➡ 0.95
- Confidence threshold ➡ 0.001
- Batch size ➡ 16
📌 Neural network architecture:
- NVIDIA TAO RetinaNet (ENTERPRISE)
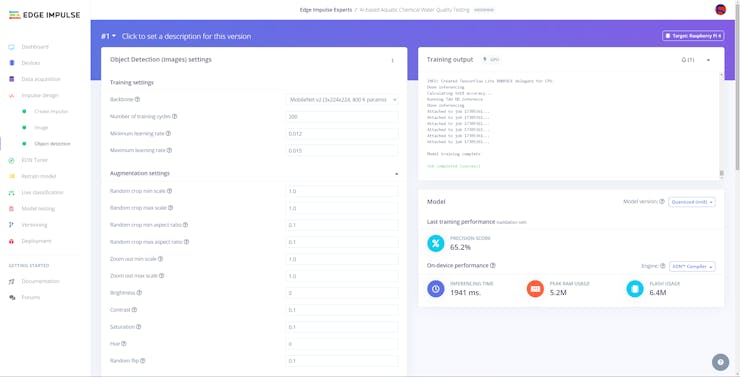
After generating features and training my RetinaNet model with training samples, Edge Impulse evaluated the precision score (accuracy) as 65.2%.
The precision score (accuracy) is approximately 66% due to the small volume of validation image samples of color-coded chemical water quality test results. Since the validation set only consists of two water pollution categories, the model attempts to validate only the passed categories (classes) instead of three while training. Therefore, I highly recommend retraining the model with the image samples of the water quality tests applied to the targeted retail fish farm before running inferences.
![]()
![]()
-
25Step 11.3: Evaluating the model accuracy and deploying the optimized model
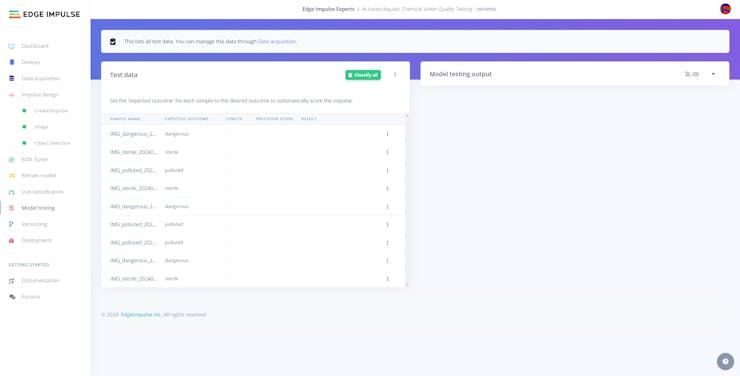
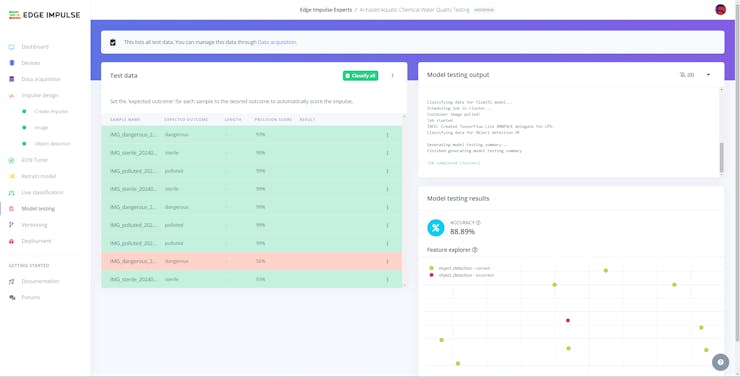
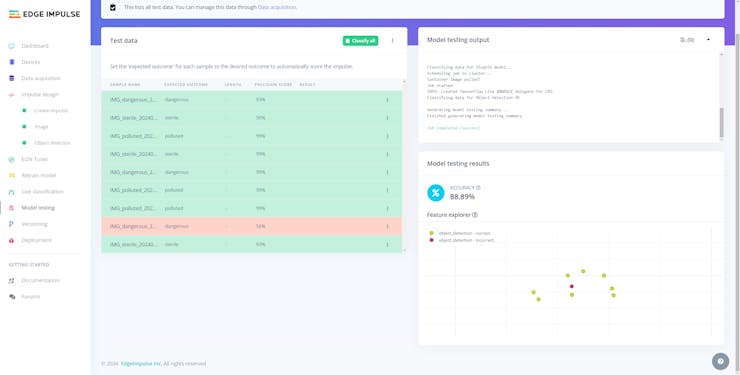
After building and training my RetinaNet object detection model, I tested its accuracy and validity by utilizing testing image samples.
The evaluated accuracy of the model is 88.89%.
#️⃣ To validate the trained model, go to the Model testing page and click Classify all.
![]()
![]()
![]()
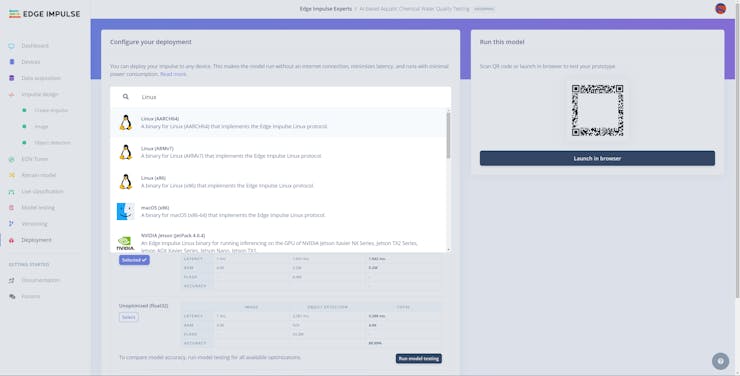
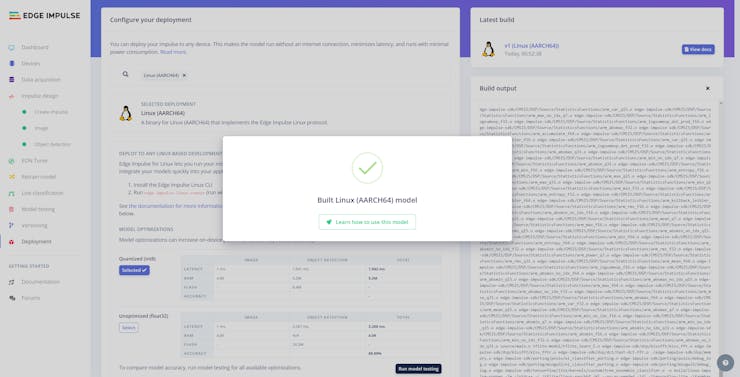
After validating my object detection model, I deployed it as a fully optimized and customizable Linux (AARCH64) application (.eim).
#️⃣ To deploy the validated model as a Linux (AARCH64) application, navigate to the Deployment page and search for Linux (AARCH64).
#️⃣ Then, choose the Quantized (int8) optimization option to get the best performance possible while running the deployed model.
#️⃣ Finally, click Build to download the model as a Linux (AARCH64) application (.eim).
![]()
![]()
![]()
-
26Step 12: Setting up the neural network model on Nano ESP32
After building, training, and deploying my neural network model with the Ridge classifier as an Arduino library on Edge Impulse, I needed to upload the generated Arduino library on Nano ESP32 to run the optimized model directly so as to identify toxic underwater air bubbles with minimal latency, memory usage, and power consumption.
Since Edge Impulse optimizes and formats signal processing, configuration, and learning blocks into a single package while deploying models as Arduino libraries, even for complex machine learning algorithms, I was able to import my advanced model effortlessly to run inferences.
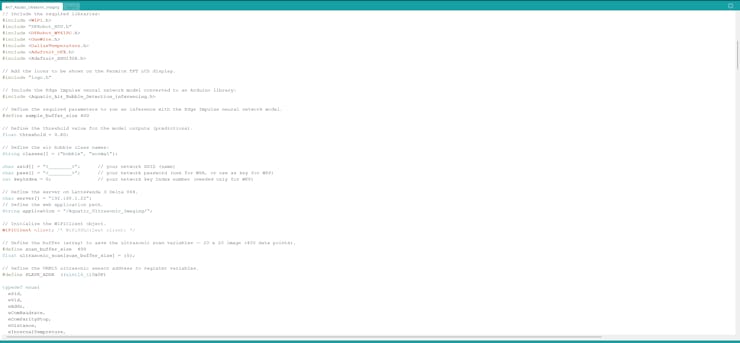
#️⃣ After downloading the model as an Arduino library in the ZIP file format, go to Sketch ➡ Include Library ➡ Add.ZIP Library...
#️⃣ Then, include the Aquatic_Air_Bubble_Detection_inferencing.h file to import the Edge Impulse neural network model with the Ridge classifier.
#include <Aquatic_Air_Bubble_Detection_inferencing.h>
After importing my model successfully to the Arduino IDE, I programmed Nano ESP32 to run inferences to identify noxious underwater air bubbles via aquatic ultrasonic scans.
Then, I employed Nano ESP32 to transfer the model detection results (buffer passed to the model and the detected air bubble class) to the web application via an HTTP POST request after running an inference successfully.
As mentioned earlier, the web application can also communicate with UNIHIKER to allow the user to access the stored model detection results in order to provide interconnected features.
Since the interconnected features for data collection and running advanced AI models are performed by two separate development boards (Nano ESP32 and UNIHIKER), the described code snippets show the different aspects of the same code file. Please refer to the code files below to inspect all interconnected functions in detail.
📁 AIoT_Aquatic_Ultrasonic_Imaging.ino
⭐ Define the required parameters to run an inference with the Edge Impulse neural network model with the Ridge classifier.
#define sample_buffer_size 400
⭐ Define the threshold value (0.60) for the model outputs (predictions).
⭐ Define the air bubble class names.
float threshold = 0.60;// Define the air bubble class names:String classes[] = {"bubble", "normal"};⭐ In the run_inference_to_make_predictions function:
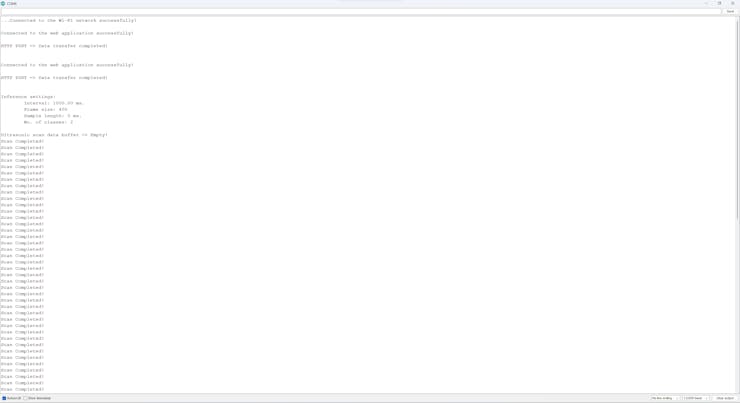
⭐ Summarize the Edge Impulse neural network model inference settings and print them on the serial monitor.
⭐ If the URM15 ultrasonic sensor produces an ultrasonic scan data buffer (20 x 20 image — 400 points) successfully:
⭐ Create a signal object from the resized (scaled) raw data buffer — ultrasonic scan buffer.
⭐ Run an inference with the Ridge classifier.
⭐ Print the inference timings on the serial monitor.
⭐ Obtain the prediction results for each label (class).
⭐ Print the model classification results on the serial monitor.
⭐ Get the imperative predicted label (class).
⭐ Print inference anomalies on the serial monitor, if any.
⭐ Release the previously generated ultrasonic scan buffer if requested.
void run_inference_to_make_predictions(bool _r){ // Summarize the Edge Impulse neural network model inference settings (from model_metadata.h): Serial.print("\nInference settings:\n"); Serial.print("\tInterval: "); Serial.print((float)EI_CLASSIFIER_INTERVAL_MS); Serial.print(" ms.\n"); Serial.printf("\tFrame size: %d\n", EI_CLASSIFIER_DSP_INPUT_FRAME_SIZE); Serial.printf("\tSample length: %d ms.\n", EI_CLASSIFIER_RAW_SAMPLE_COUNT / 16); Serial.printf("\tNo. of classes: %d\n", sizeof(ei_classifier_inferencing_categories) / sizeof(ei_classifier_inferencing_categories[0])); // If the URM15 ultrasonic sensor generates an ultrasonic scan buffer (20 x 20 — 400 points) successfully: if(ultrasonic_scan[scan_buffer_size-1] > 0){ // Run inference: ei::signal_t signal; // Create a signal object from the resized (scaled) raw data buffer — ultrasonic scan buffer. numpy::signal_from_buffer(ultrasonic_scan, EI_CLASSIFIER_DSP_INPUT_FRAME_SIZE, &signal); // Run the classifier: ei_impulse_result_t result = { 0 }; EI_IMPULSE_ERROR _err = run_classifier(&signal, &result, false); if(_err != EI_IMPULSE_OK){ Serial.printf("ERR: Failed to run classifier (%d)\n", _err); return; } // Print the inference timings on the serial monitor. Serial.printf("\nPredictions (DSP: %d ms., Classification: %d ms., Anomaly: %d ms.): \n", result.timing.dsp, result.timing.classification, result.timing.anomaly); // Obtain the prediction results for each label (class). for(size_t ix = 0; ix < EI_CLASSIFIER_LABEL_COUNT; ix++){ // Print the prediction results on the serial monitor. Serial.printf("\t%s:\t%.5f\n", result.classification[ix].label, result.classification[ix].value); // Get the imperative predicted label (class). if(result.classification[ix].value >= threshold) predicted_class = ix; } Serial.printf("\nPredicted Class: %d [%s]\n", predicted_class, classes[predicted_class]); // Detect anomalies, if any: #if EI_CLASSIFIER_HAS_ANOMALY == 1 Serial.printf("Anomaly: %d \n", result.anomaly); #endif // Release the ultrasonic scan buffer if requested. if(!_r){ for(int i=0; i<scan_buffer_size; i++){ ultrasonic_scan[i] = 0; } } }else{ Serial.println("\nUltrasonic scan data buffer => Empty!"); }}⭐ In the show_interface function:
⭐ Create the home screen and menu option layouts with the assigned interface icons so as to elevate the user experience with an enhanced user interface.
void show_interface(String com, int menu_option){ // Get the assigned interface logo information. int l_w = interface_widths[menu_option]; int l_h = interface_heights[menu_option]; if(com == "home"){ display.clearDisplay(); display.drawBitmap(0, (SCREEN_HEIGHT-l_h)/2, interface_logos[menu_option], l_w, l_h, SSD1306_WHITE); display.setTextSize(1); (menu_option == 1) ? display.setTextColor(SSD1306_BLACK, SSD1306_WHITE) : display.setTextColor(SSD1306_WHITE); display.setCursor(l_w+5, 5); display.println("1.Show Readings"); (menu_option == 2) ? display.setTextColor(SSD1306_BLACK, SSD1306_WHITE) : display.setTextColor(SSD1306_WHITE); display.setCursor(l_w+5, 20); display.println("2.Ultrasonic+++"); (menu_option == 3) ? display.setTextColor(SSD1306_BLACK, SSD1306_WHITE) : display.setTextColor(SSD1306_WHITE); display.setCursor(l_w+5, 35); display.println("3.Save Samples"); (menu_option == 4) ? display.setTextColor(SSD1306_BLACK, SSD1306_WHITE) : display.setTextColor(SSD1306_WHITE); display.setCursor(l_w+5, 50); display.println("4.Run Inference"); display.display(); delay(500); } else if(com == "sensor"){ display.clearDisplay(); display.drawBitmap(SCREEN_WIDTH-l_w, SCREEN_HEIGHT-l_h, interface_logos[menu_option], l_w, l_h, SSD1306_WHITE); display.setTextSize(1); display.setCursor(0, 0); display.print("Distance: "); display.print(distance); display.println("cm"); display.setCursor(0, 20); display.print("X: "); display.print(_acc.acc_x); display.print(" / "); display.print(_acc.gyro_x); display.setCursor(0, 30); display.print("Y: "); display.print(_acc.acc_y); display.print(" / "); display.print(_acc.gyro_y); display.setCursor(0, 40); display.print("Z: "); display.print(_acc.acc_z); display.print(" / "); display.print(_acc.gyro_z); display.display(); } else if(com == "scan"){ display.clearDisplay(); display.drawBitmap(SCREEN_WIDTH-l_w, SCREEN_HEIGHT-l_h, interface_logos[menu_option], l_w, l_h, SSD1306_WHITE); display.setTextSize(2); display.setCursor(0, 0); display.print(scanned_points+1); display.println(" / 400"); display.setTextSize(1); display.setCursor(0, 25); (scanned_points < 399) ? display.print("Scanning...") : display.print("Scan Completed!"); display.display(); } else if(com == "save"){ display.clearDisplay(); display.drawBitmap((SCREEN_WIDTH-l_w)/2, 0, interface_logos[menu_option], l_w, l_h, SSD1306_WHITE); display.setTextSize(1); display.setCursor(0, l_h+10); display.print("A) Class => normal"); display.setCursor(0, l_h+25); display.print("C) Class => bubble"); display.display(); } else if(com == "run"){ display.clearDisplay(); display.setTextSize(1); display.setTextColor(SSD1306_WHITE); display.setCursor(0, l_h+5); display.print("A) Run Inference"); display.setCursor(0, l_h+20); // Show the latest model detection result and the assigned class icon if the model yields a label successfully. String r = (predicted_class > -1) ? classes[predicted_class] : "Pending"; display.print("C) Send: "+ r); (predicted_class > -1) ? display.drawBitmap((SCREEN_WIDTH-class_widths[predicted_class])/2, 0, class_logos[predicted_class], class_widths[predicted_class], class_heights[predicted_class], SSD1306_WHITE) : display.drawBitmap((SCREEN_WIDTH-l_w)/2, 0, interface_logos[menu_option], l_w, l_h, SSD1306_WHITE); display.display(); }}⭐ If the fourth menu option (Run Inference) is activated:
⭐ Display the model inference options on the SSD1306 screen.
⭐ If the control button A is pressed, run an inference with the Edge Impulse neural network model with the Ridge classifier.
⭐ If the neural network model detects an air bubble class successfully, notify the user by showing the associated class icon on the SSD1306 screen.
⭐ After showing the detected class, if the control button C is pressed, transfer the model detection results (ultrasonic scan buffer passed to the model and the detected label) to the web application via an HTTP POST request.
⭐ According to the data transmission success, notify the user by showing the associated connection icon on the screen.
⭐ If the control button D is pressed, redirect the user to the home screen.
if(!digitalRead(control_button_B) && menu_option == 4){ selected_interface[menu_option-1] = true; adjustColor(255,255,255); while(selected_interface[menu_option-1]){ // Display the running inference progress on the SSD1306 screen. show_interface("run", menu_option); // If the control button A is pressed, run the Edge Impulse neural network model to detect aquatic air bubbles by applying the ultrasonic scan data points collected via the URM15 ultrasonic sensor. if(!digitalRead(control_button_A)){ // Run inference. run_inference_to_make_predictions(true); delay(2000); } // After running the neural network model successfully, if the control button C is pressed, transfer the applied data record (ultrasonic scan buffer) and the detected air bubble class to the web application via an HTTP POST request. if(!digitalRead(control_button_C) && predicted_class > -1){ if(make_a_post_request("?scan=OK&type=detection&class=" + classes[predicted_class])){ // If successful: display.clearDisplay(); display.drawBitmap((SCREEN_WIDTH-connected_width)/2, (SCREEN_HEIGHT-connected_height)/2, connected_bits, connected_width, connected_height, SSD1306_WHITE); display.display(); adjustColor(0,255,0); delay(2000); adjustColor(255,255,255); }else{ display.clearDisplay(); display.drawBitmap((SCREEN_WIDTH-error_width)/2, (SCREEN_HEIGHT-error_height)/2, error_bits, error_width, error_height, SSD1306_WHITE); display.display(); adjustColor(255,0,0); delay(2000); adjustColor(255,255,255); } } // If the control button D is pressed, redirect the user to the home screen. if(!digitalRead(control_button_D)){ selected_interface[menu_option-1] = false; adjustColor(0,0,0); // Clear the predicted class (label). predicted_class = -1; } } }![]()
![]()
![]()
-
27Step 13: Running the neural network model to identify noxious air bubbles
My Edge Impulse neural network model with the Ridge classifier predicts possibilities of labels (air bubble classes) for the passed ultrasonic scan data buffer as an array of 2 numbers. They represent the model's "confidence" that the given features buffer corresponds to each of the two different air bubble classes [0 - 1], as shown in Step 10:
- 0 — bubble
- 1 — normal
You can inspect overlapping user interface features, such as generating an ultrasonic scan buffer in the previous steps.
After setting up and running the optimized neural network model on Nano ESP32:
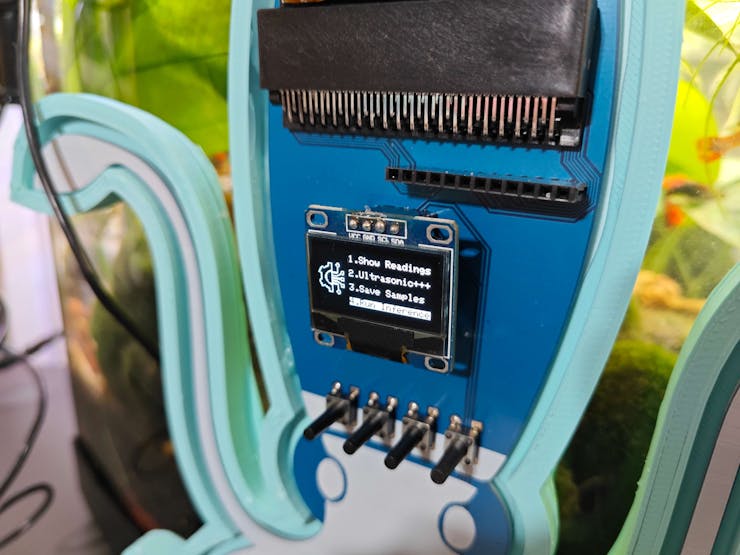
🐠📡💧📊 As explained in the previous steps, after initiating the ultrasonic image scanning procedure, the device allows the user to generate an ultrasonic scan data buffer — 20 x 20 (400 points).
![]()
![]()
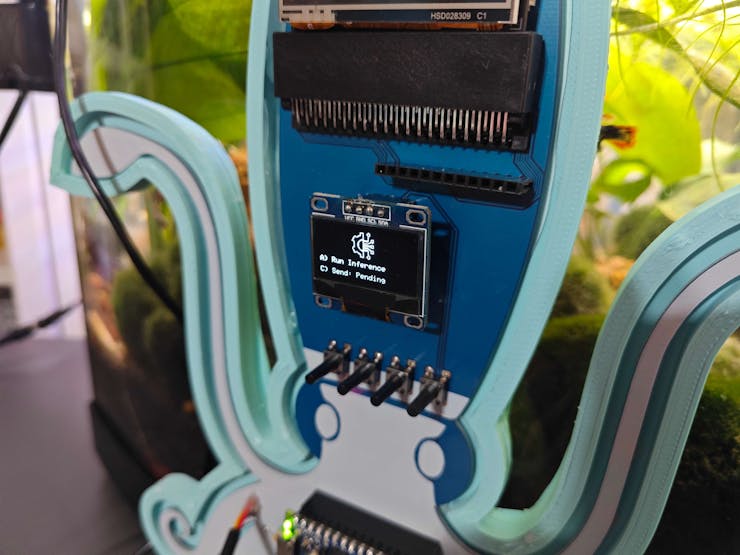
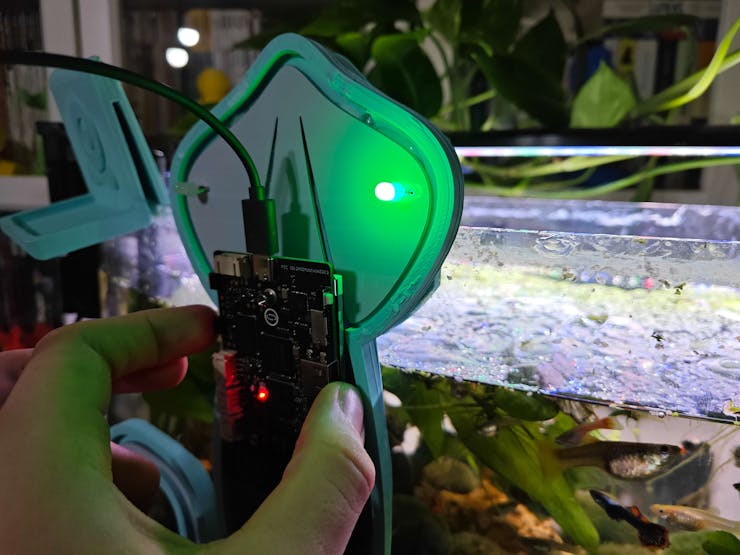
🐠📡💧📊 If the user activates the fourth menu option — (Run Inference):
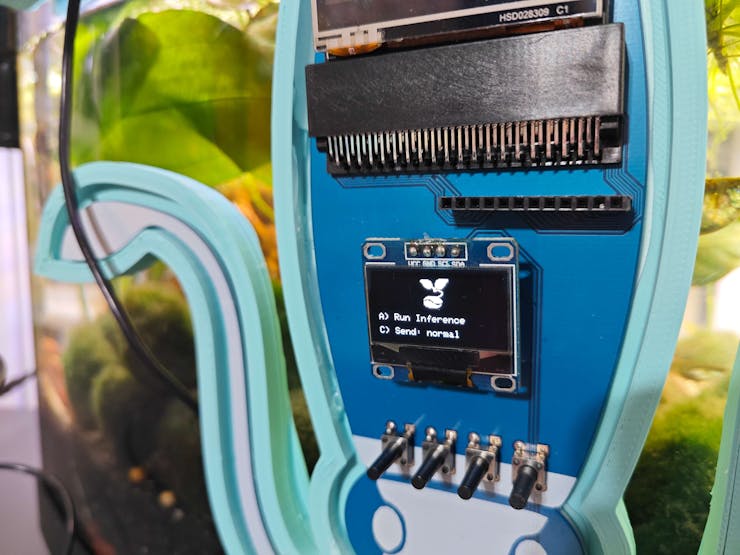
🐠📡💧📊 The device turns the RGB LED to white and displays the selectable inference options with their associated buttons.
- A) Run Inference
- C) Send: Pending
![]()
![]()
![]()
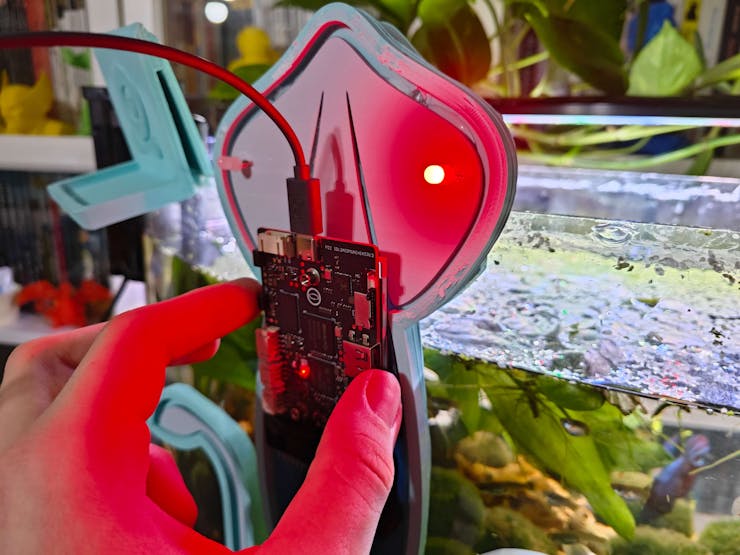
🐠📡💧📊 If the control button A is pressed, the device runs an inference with the neural network model to identify noxious underwater air bubbles by utilizing the produced aquatic ultrasonic scan buffer.
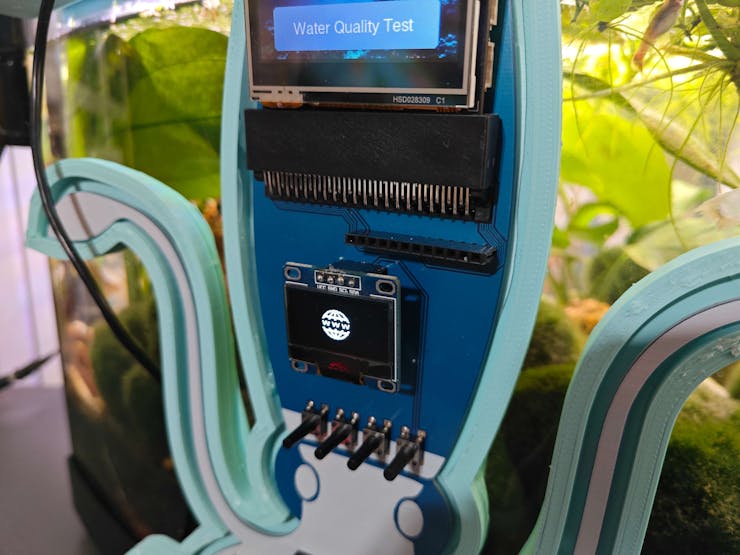
🐠📡💧📊 If the neural network model detects an air bubble class successfully, the device notifies the user by showing the associated class icon on the SSD1306 screen.
![]()
![]()
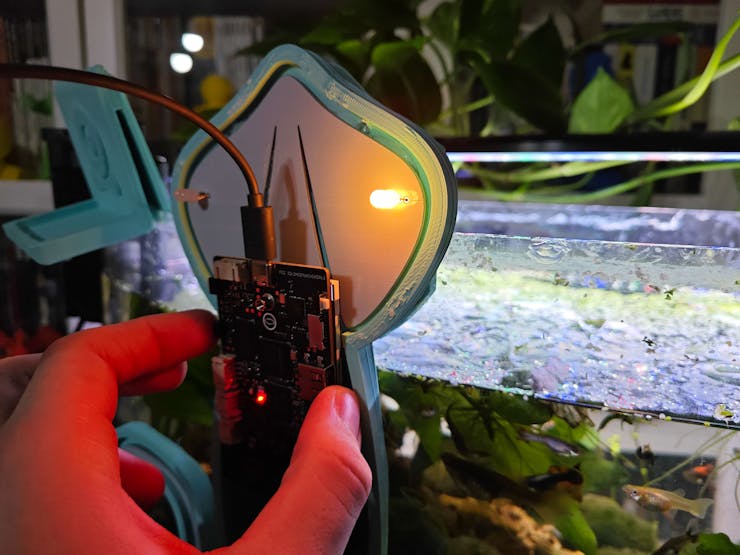
🐠📡💧📊 After displaying the detected class, if the control button C is pressed, the device transfers the model detection results (ultrasonic scan buffer passed to the model and the detected label) to the web application via an HTTP POST request.
🐠📡💧📊 If Nano ESP32 transfers the given data packet successfully to the web application, the device notifies the user by showing the assigned connection icon on the screen and turning the RGB LED to green.
![]()
![]()
🐠📡💧📊 Also, Nano ESP32 prints progression notifications on the serial monitor for debugging.
![]()
![]()
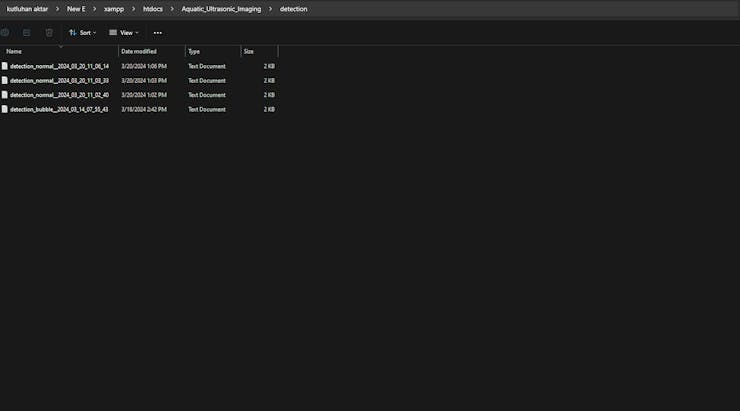
🐠📡💧📊 After receiving the ultrasonic scan data buffer passed to the model, the web application saves the received buffer as a text (TXT) file to the detection folder by adding the detected label and the prediction date to the file name.
- detection_normal__2024_04_03_10_15_35.txt
- detection_bubble__2024_04_03_10_20_52.txt
![]()
![]()
-
28Step 14: Setting up the object detection model on UNIHIKER
After building, training, and deploying my RetinaNet object detection model as a Linux (AARCH64) application on Edge Impulse, I needed to upload the generated Linux application to UNIHIKER to run the optimized model directly via the Linux Python SDK so as to create an accessible AI-powered water pollution detection device operating with minimal latency, memory usage, and power consumption.
Since Edge Impulse optimizes and formats signal processing, configuration, and learning blocks into a single EIM file while deploying models as a Linux (AARCH64) application, even for complex computer vision models from NVIDIA TAO, I was able to import my advanced model effortlessly to run inferences in Python.
#️⃣ After downloading the generated Linux (AARCH64) application to the model folder and installing the required modules via SSH, make sure to change the file permissions via the terminal on MobaXterm to be able to execute the model file.
sudo chmod 777 /root/aquarium/model/ai-based-aquatic-chemical-water-quality-testing-linux-aarch64.eim
![]()
#️⃣ After switching the SSH connection to the Thonny IDE for programming in Python, create the required folder tree in the root directory of this detection device on UNIHIKER:
- /assets
- /detections
- /model
- /samples
- /scans
- main.py
- _class.py
![]()
![]()
After uploading the generated Linux application successfully, I programmed UNIHIKER to run inferences via the user interface (GUI) to assess water pollution levels based on the applied chemical water quality tests.
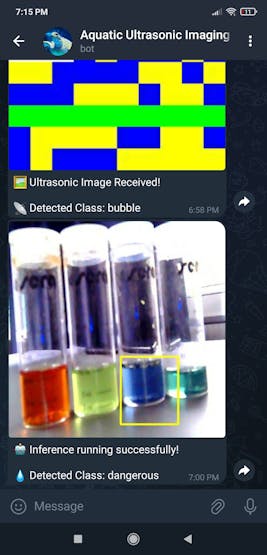
Then, I employed UNIHIKER to transfer the resulting image modified with the produced bounding boxes to a given Telegram bot via the HTTP-based Telegram Bot API.
As mentioned earlier, Nano ESP32 cannot convert the generated ultrasonic scan buffers to ultrasonic images after running the neural network model. Therefore, I employed UNIHIKER to communicate with the web application in order to obtain the latest model detection result (ultrasonic scan buffer passed to the neural network model and the detected air bubble class) and convert the received buffer to an ultrasonic image via the built-in OpenCV functions.
Also, similar to the modified resulting image, UNIHIKER can transfer the produced ultrasonic image to the given Telegram bot so as to inform the user of the latest aquatic ultrasonic scan and the presence of toxic underwater air bubbles.
Since the interconnected features for data collection and running advanced AI models are performed by two separate development boards (UNIHIKER and Nano ESP32), the described code snippets show the different aspects of the same code file. Please refer to the code files below to inspect all interconnected functions in detail.
📁 _class.py
Please refer to the _class.py file to inspect all interconnected functions.
⭐ Include the required modules.
import cv2import numpyfrom edge_impulse_linux.image import ImageImpulseRunnerfrom unihiker import GUIfrom pinpong.board import *from pinpong.extension.unihiker import *import osimport requestsimport datetimefrom time import sleep
⭐ In the __init__ function:
⭐ Initialize the USB high-quality camera feed.
⭐ Define the required variables to establish the connection with the web application — Aquatic_Ultrasonic_Imaging.
⭐ Define the required frame settings.
⭐ Define the required configurations to run the Edge Impulse RetinaNet (NVIDIA TAO) object detection model.
⭐ Determine the required parameters to produce an ultrasonic image (20 x 20) from the received ultrasonic scan buffer.
⭐ Define the required parameters to transfer information to the given Telegram bot — @aquatic_ultrasonic_bot — via the HTTP-based Telegram Bot API.
⭐ Initiate the user interface (Tkinter-based GUI) and the GPIO interface of the microcontroller coprocessor via the integrated Python modules.
def __init__(self, model_file): # Initialize the USB high-quality camera feed. self.camera = cv2.VideoCapture(0) sleep(2) # Define the required variables to establish the connection with the web application — Aquatic_Ultrasonic_Imaging. self.web_app = "http://192.168.1.22/Aquatic_Ultrasonic_Imaging/" # Define the required variables to configure camera settings. self.frame_size_m = (320,320) self.frame_size_s = (120,120) # Define the required configurations to run the Edge Impulse RetinaNet (NVIDIA TAO) object detection model. dir_path = os.path.dirname(os.path.realpath(__file__)) self.model_file = os.path.join(dir_path, model_file) self.class_names = ["sterile", "dangerous", "polluted"] self.class_colors = ["green", "yellow", "red"] self.bb_colors = {"sterile": (0,255,0), "dangerous": (0,255,255), "polluted": (0,0,255)} self.selected_class = -1 self.detected_class = "Pending" # Define the required variables to generate an ultrasonic (radar) image. self.u_im = {"w": 20, "h": 20, "offset": 20, "temp_path": "./assets/ultrasonic_temp.jpg"} # Define the required parameters to transfer information to the given Telegram bot — @aquatic_ultrasonic_bot. telegram_bot_token = "<____________>" # e.g., 123456:ABC-DEF1234ghIkl-zyx57W2v1u123ew11 self.telegram_webhook = "https://api.telegram.org/bot{}".format(telegram_bot_token) self.latest_air_label = "..." # Initiate the user interface (GUI) on UNIHIKER. self.interface = GUI() # Initiate the built-in sensor features on UNIHIKER. Board().begin() # Define the RGB LED pins. self.rgb = {"r": Pin(Pin.P4, Pin.OUT), "g": Pin(Pin.P5, Pin.OUT), "b": Pin(Pin.P6, Pin.OUT)}⭐ In the run_inference function:
⭐ Summarize the Edge Impulse RetinaNet model inference settings and print them on the shell.
⭐ Get the currently captured and modified image frame via the high-quality USB webcam.
⭐ After obtaining the modified frame, resize it (if necessary) and generate features from the obtained frame depending on the provided model settings.
⭐ Run an inference.
⭐ Obtain labels (classes) and bounding box measurements for each detected target object on the passed frame.
⭐ If the Edge Impulse model predicts a class successfully, get the imperative predicted label (class).
⭐ Modify the generated model resulting image with the produced bounding boxes (if any) and save the modified resulting image with the prediction date to the detections folder.
⭐ Then, notify the user of the model detection results on the interactive user interface.
⭐ Also, if configured, transfer the modified resulting image and the detected water pollution level (class) to the given Telegram bot as a push notification.
⭐ Finally, stop the running inference.
def run_inference(self, notify="Telegram", bb_offset=40): # Run inference to detect water quality levels based on chemical water tests via object detection. with ImageImpulseRunner(self.model_file) as runner: try: resulting_image = "" # Print the information of the Edge Impulse model converted to a Linux (AARCH64) application (.eim). model_info = runner.init() print('\nLoaded runner for "' + model_info['project']['owner'] + ' / ' + model_info['project']['name'] + '"') labels = model_info['model_parameters']['labels'] # Get the currently captured and modified image via the high-quality USB webcam. test_img = self.modified_image # After obtaining the test frame, resize (if necessary) and generate features from the retrieved frame depending on the provided model so as to run an inference. features, cropped = runner.get_features_from_image(test_img) res = runner.classify(features) # Obtain the prediction (detection) results for each label (class). if "bounding_boxes" in res["result"].keys(): print('Found %d bounding boxes (%d ms.)' % (len(res["result"]["bounding_boxes"]), res['timing']['dsp'] + res['timing']['classification'])) # If the Edge Impulse model predicts a class successfully: if(len(res["result"]["bounding_boxes"]) == 0): self.detected_class = "empty" else: for bb in res["result"]["bounding_boxes"]: # Get the latest detected labels: self.detected_class = bb['label'] print('\t%s (%.2f): x=%d y=%d w=%d h=%d' % (bb['label'], bb['value'], bb['x'], bb['y'], bb['width'], bb['height'])) cv2.rectangle(cropped, (bb['x']-bb_offset, bb['y']-bb_offset), (bb['x']+bb['width']+bb_offset, bb['y']+bb['height']+bb_offset), self.bb_colors[self.detected_class], 2) # Save the generated model resulting image with the passed bounding boxes (if any) to the detections folder. if self.detected_class != "empty": date = datetime.datetime.now().strftime("%Y%m%d_%H%M%S") resulting_image = "/detections/detection_{}_{}.jpg".format(self.detected_class, date) cv2.imwrite("."+resulting_image, cropped) # Notify the user of the model detection results on UNIHIKER. self.cam_info_text.config(text="Detection: " + self.detected_class) print("\n\nLatest Detected Label => " + self.detected_class) if(self.detected_class == "sterile"): self.adjust_color([0,1,0]) if(self.detected_class == "dangerous"): self.adjust_color([1,1,0]) if(self.detected_class == "polluted"): self.adjust_color([1,0,0]) sleep(2) self.adjust_color([0,1,1]) # If requested, also inform the user via Telegram by transferring the modified model resulting image and the latest detected water quality class. if(notify == "Telegram" and self.detected_class != "empty"): self.telegram_send_data("water_test", "6465514194", resulting_image) # Stop the running inference. finally: if(runner): runner.stop()⭐ In the make_a_get_request function:
⭐ Depending on the passed command, make an HTTP GET request to the web application in order to perform these tasks:
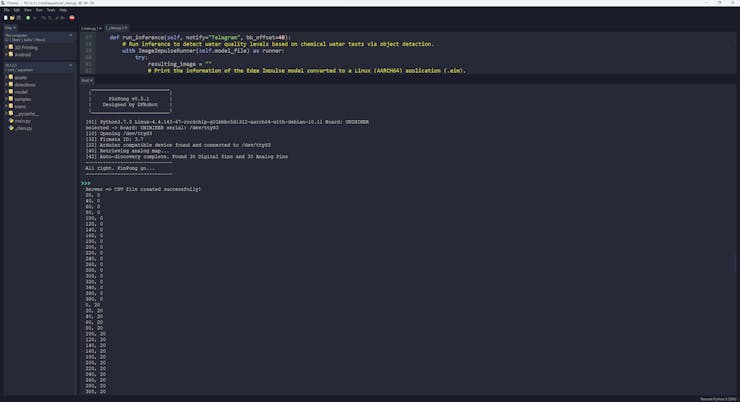
⭐ Make the web application to generate a CSV file from the stored ultrasonic scan buffer samples (text files).
⭐ Obtain the latest neural network model detection result (ultrasonic scan buffer passed to the neural network model and the detected air bubble class) and convert the retrieved buffer (400 points) to an ultrasonic image (20 x 20).
⭐ Then, display the produced ultrasonic image with the detected air bubble class (label) for further inspection.
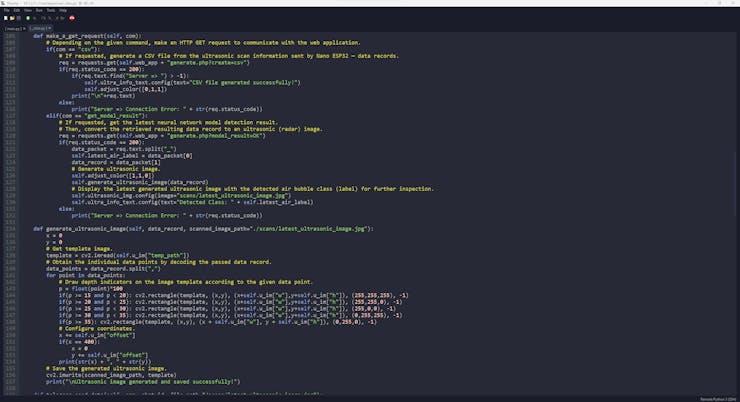
def make_a_get_request(self, com): # Depending on the given command, make an HTTP GET request to communicate with the web application. if(com == "csv"): # If requested, generate a CSV file from the ultrasonic scan information sent by Nano ESP32 — data records. req = requests.get(self.web_app + "generate.php?create=csv") if(req.status_code == 200): if(req.text.find("Server => ") > -1): self.ultra_info_text.config(text="CSV file generated successfully!") self.adjust_color([0,1,1]) print("\n"+req.text) else: print("Server => Connection Error: " + str(req.status_code)) elif(com == "get_model_result"): # If requested, get the latest neural network model detection result. # Then, convert the retrieved resulting data record to an ultrasonic (radar) image. req = requests.get(self.web_app + "generate.php?model_result=OK") if(req.status_code == 200): data_packet = req.text.split("_") self.latest_air_label = data_packet[0] data_record = data_packet[1] # Generate ultrasonic image. self.adjust_color([1,1,0]) self.generate_ultrasonic_image(data_record) # Display the latest generated ultrasonic image with the detected air bubble class (label) for further inspection. self.ultrasonic_img.config(image="scans/latest_ultrasonic_image.jpg") self.ultra_info_text.config(text="Detected Class: " + self.latest_air_label) else: print("Server => Connection Error: " + str(req.status_code))⭐ In the generate_ultrasonic_image function:
⭐ Obtain the template image — black square.
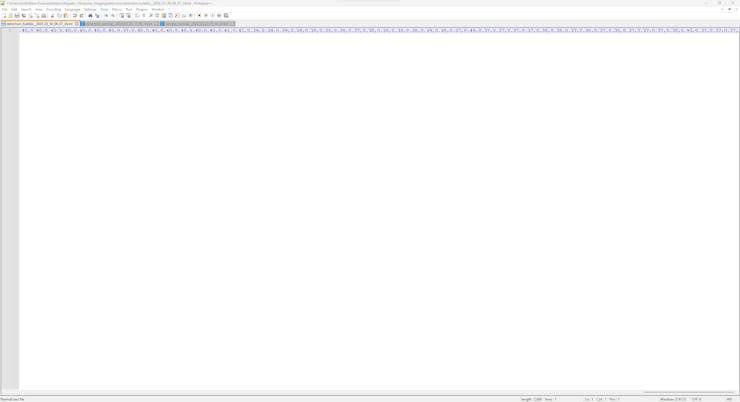
⭐ Split the received ultrasonic scan data buffer to obtain each data point individually.
⭐ For each data point, draw depth indicators, color-coded according to the given depth ranges, on the template image via the built-in OpenCV functions.
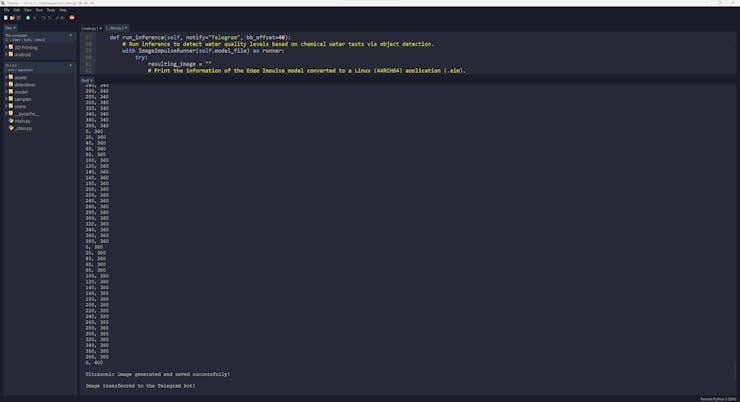
⭐ After concluding drawing color-coded indicators (20 x 20) on the template, save the modified image as the latest ultrasonic image to the scans folder — latest_ultrasonic_image.jpg.
def generate_ultrasonic_image(self, data_record, scanned_image_path="./scans/latest_ultrasonic_image.jpg"): x = 0 y = 0 # Get template image. template = cv2.imread(self.u_im["temp_path"]) # Obtain the individual data points by decoding the passed data record. data_points = data_record.split(",") for point in data_points: # Draw depth indicators on the image template according to the given data point. p = float(point)*100 if(p >= 15 and p < 20): cv2.rectangle(template, (x,y), (x+self.u_im["w"],y+self.u_im["h"]), (255,255,255), -1) if(p >= 20 and p < 25): cv2.rectangle(template, (x,y), (x+self.u_im["w"],y+self.u_im["h"]), (255,255,0), -1) if(p >= 25 and p < 30): cv2.rectangle(template, (x,y), (x+self.u_im["w"],y+self.u_im["h"]), (255,0,0), -1) if(p >= 30 and p < 35): cv2.rectangle(template, (x,y), (x+self.u_im["w"],y+self.u_im["h"]), (0,255,255), -1) if(p >= 35): cv2.rectangle(template, (x,y), (x + self.u_im["w"], y + self.u_im["h"]), (0,255,0), -1) # Configure coordinates. x += self.u_im["offset"] if(x == 400): x = 0 y += self.u_im["offset"] print(str(x) + ", " + str(y)) # Save the generated ultrasonic image. cv2.imwrite(scanned_image_path, template) print("\nUltrasonic image generated and saved successfully!")⭐ In the telegram_send_data function:
⭐ Get the directory path of the root folder of this application (aquarium) on UNIHIKER.
⭐ Depending on the passed command (ultrasonic or water_test):
⭐ Make an HTTP POST request to the HTTP-based Telegram Bot API so as to transfer the produced ultrasonic image and the detected air bubble class to the given Telegram bot.
⭐ Make an HTTP POST request to the HTTP-based Telegram Bot API so as to transfer the resulting image modified with the produced bounding boxes and the detected water pollution level to the given Telegram bot.
⭐ After sending an image from the local storage successfully, notify the user via the interactive user interface.
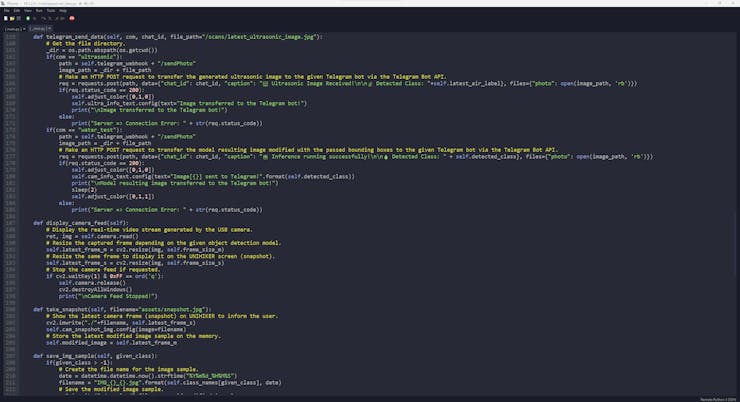
def telegram_send_data(self, com, chat_id, file_path="/scans/latest_ultrasonic_image.jpg"): # Get the file directory. _dir = os.path.abspath(os.getcwd()) if(com == "ultrasonic"): path = self.telegram_webhook + "/sendPhoto" image_path = _dir + file_path # Make an HTTP POST request to transfer the generated ultrasonic image to the given Telegram bot via the Telegram Bot API. req = requests.post(path, data={"chat_id": chat_id, "caption": "🖼 Ultrasonic Image Received!\n\n📡 Detected Class: "+self.latest_air_label}, files={"photo": open(image_path, 'rb')}) if(req.status_code == 200): self.adjust_color([0,1,0]) self.ultra_info_text.config(text="Image transferred to the Telegram bot!") print("\nImage transferred to the Telegram bot!") else: print("Server => Connection Error: " + str(req.status_code)) if(com == "water_test"): path = self.telegram_webhook + "/sendPhoto" image_path = _dir + file_path # Make an HTTP POST request to transfer the model resulting image modified with the passed bounding boxes to the given Telegram bot via the Telegram Bot API. req = requests.post(path, data={"chat_id": chat_id, "caption": "🤖 Inference running successfully!\n\n💧 Detected Class: " + self.detected_class}, files={"photo": open(image_path, 'rb')}) if(req.status_code == 200): self.adjust_color([0,1,0]) self.cam_info_text.config(text="Image[{}] sent to Telegram!".format(self.detected_class)) print("\nModel resulting image transferred to the Telegram bot!") sleep(2) self.adjust_color([0,1,1]) else: print("Server => Connection Error: " + str(req.status_code))![]()
![]()
![]()
![]()
📁 main.py
I employed the main.py file to initialize the user interface (GUI), the GPIO interface of the microcontroller coprocessor, and the camera feed simultaneously.
⭐ Define the aquarium object of the aquarium_func class.
⭐ Define and initialize separate Python threads to start the camera feed and the GPIO interface.
⭐ Enable the interactive user interface (GUI) designed with the built-in UNIHIKER modules consecutively.
# Define the aquarium object.aquarium = aquarium_func("model/ai-based-aquatic-chemical-water-quality-testing-linux-aarch64.eim")# Define and initialize threads.Thread(target=aquarium.camera_feed).start()Thread(target=aquarium.board_configuration).start()# Show the user interface (GUI) designed with the built-in UNIHIKER modules.aquarium.create_user_interface()![]()
-
29Step 15: Running the RetinaNet model to assess water pollution levels and inform the user via Telegram
My Edge Impulse object detection (NVIDIA TAO RetinaNet) model scans a captured image frame and predicts the possibilities of trained labels to recognize a target object on the given picture. The prediction result (score) represents the model's "confidence" that the detected target object corresponds to each of the three different labels (classes) [0 - 2], as shown in Step 11:
- 0 — dangerous
- 1 — polluted
- 2 — sterile
After setting up and running the optimized Edge Impulse object detection (RetinaNet) model on UNIHIKER:
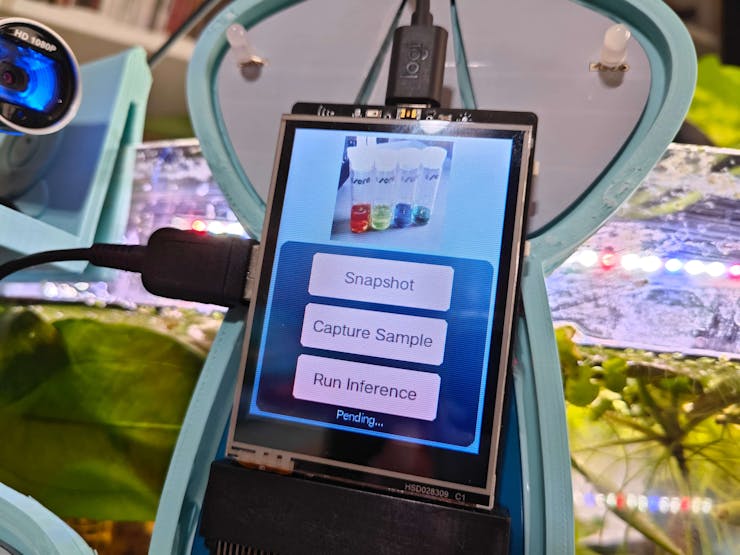
🐠📡💧📊 As mentioned earlier, on the Water Quality Test section, the device lets the user generate a snapshot image to inspect the latest stored camera frame.
🐠📡💧📊 Then, the device waits for the user to decide on the resized camera frame to pass to the object detection model while generating and inspecting multiple snapshot images.
![]()
🐠📡💧📊 When the user clicks the Run Inference button, the device runs an inference with the object detection model to detect the water pollution level based on the applied chemical water quality tests.
![]()
![]()
![]()
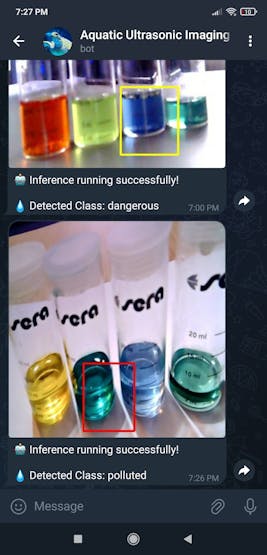
🐠📡💧📊 After detecting a water pollution level (class) successfully, the device modifies the resulting image with the produced bounding boxes and saves the modified resulting image with the prediction date to the detections folder.
🐠📡💧📊 Then, if configured, the device transfers the latest saved resulting image and the detected class to the given Telegram bot by making an HTTP POST request to the HTTP-based Telegram Bot API.
#️⃣ Since the HTTP-based Telegram Bot API accepts local files, I was able to send images from UNIHIKER local storage to the given Telegram bot without establishing an SSL connection to set a webhook.
🐠📡💧📊 After sending the push notification to the Telegram bot successfully, the device notifies the user via the onboard touchscreen.
![]()
![]()
![]()
![]()
![]()
🐠📡💧📊 Also, UNIHIKER prints progression notifications on the shell for debugging.
![]()
![]()
![]()
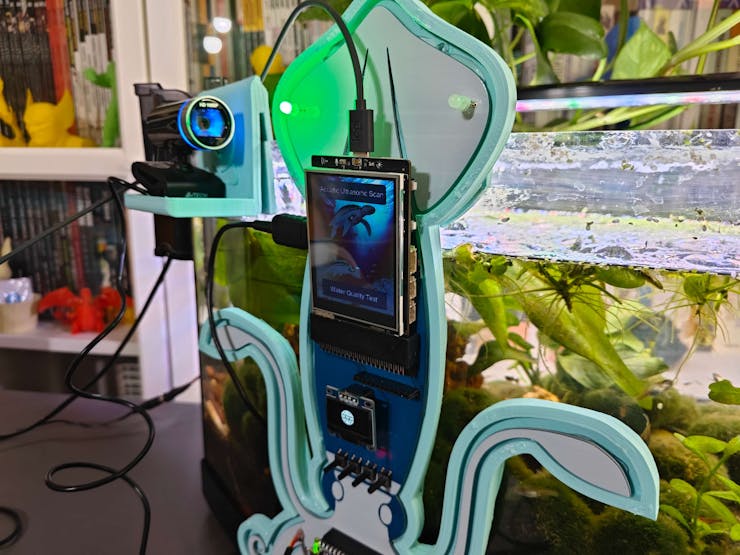
🐠📡💧📊 As mentioned earlier, the device employs the secondary RGB LED to inform the user of the device status while performing operations related to UNIHIKER. Since I was planning to place UNIHIKER on the back of the Squid PCB initially, I configured the micro:bit-compatible edge connector (Kitronik) pin connections reversed. Due to my aquarium's shape, I subsequently decided to position UNIHIKER to the front. Thus, solder the edge connector backward or flip UNIHIKER to enable the secondary RGB LED.
![]()
![]()
![]()
![]()
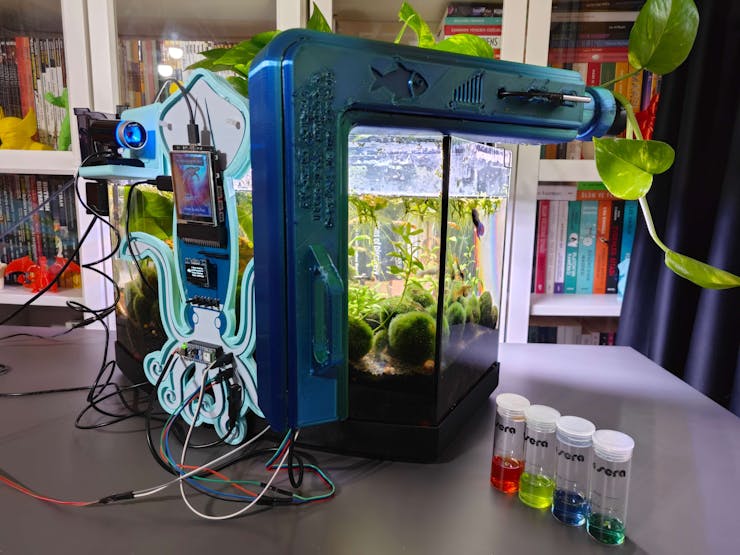
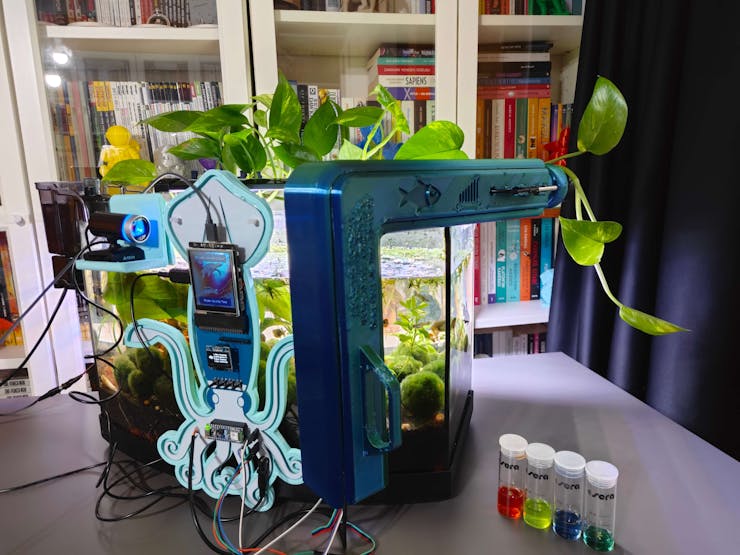
After applying four color-coded water quality tests and conducting diverse experiments, I obtained accurate and consistent prediction results for each water pollution level (class).
-
30Step 15.1: Producing aquatic ultrasonic images from buffers to visualize harmful air bubbles
As mentioned repeatedly, Nano ESP32 cannot convert the produced ultrasonic scan buffers to ultrasonic images after running the neural network model. Thus, I provided additional features via the UNIHIKER user interface (GUI) so as to enable UNIHIKER to access the neural network model results via the web application.
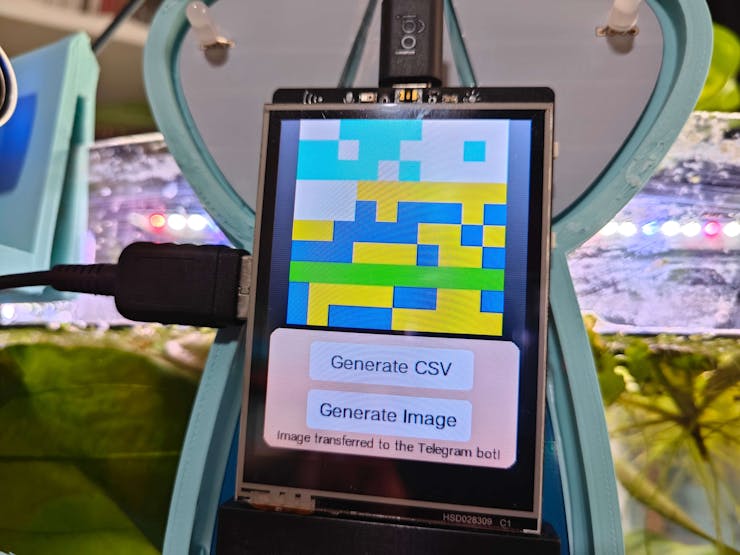
🐠📡💧📊 If the user clicks the Aquatic Ultrasonic Scan button, the device opens the Aquatic Ultrasonic Scan section.
![]()
🐠📡💧📊 If the user clicks the Generate CSV button, the device makes an HTTP GET request to the web application, forcing the application to generate a pre-formatted CSV file (scan_data_items.csv) from all of the stored ultrasonic scan buffer samples (text files).
![]()
![]()
🐠📡💧📊 If the user clicks the Generate Image button:
🐠📡💧📊 The device makes an HTTP GET request to the web application so as to obtain the latest neural network model detection results, including the ultrasonic scan buffer passed to the neural network model and the detected air bubble class (label).
🐠📡💧📊 Then, the device splits the retrieved ultrasonic scan data buffer to obtain each data point individually.
🐠📡💧📊 The device draws depth indicators (20 x 20) on the passed template image (black square) via the built-in OpenCV functions.
🐠📡💧📊 While generating the aquatic ultrasonic image (20 x 20) from 400 data points, the device assigns colors to depth indicators according to the predefined depth ranges so as to visualize the given aquatic ultrasonic scan with thoroughly encoded pixels.
🐠📡💧📊 Since OpenCV functions are optimized for the BGR format, the color tuples should be passed accordingly.
- 15 <= p < 20 ➡ (255, 255, 255)
- 20 <= p < 25 ➡ (255, 255, 0)
- 5 <= p < 30 ➡ (255, 0, 0)
- 30 <= p < 35 ➡ (0, 255, 255)
- p >= 35 ➡ (0, 255, 0)
![]()
![]()
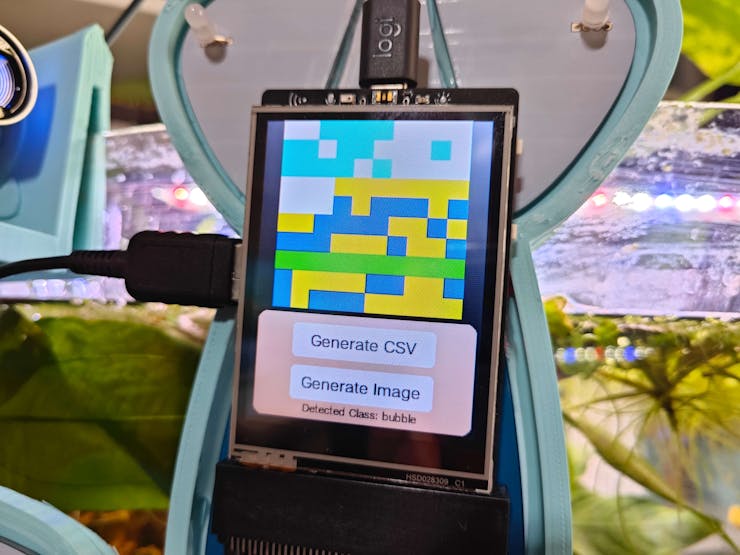
🐠📡💧📊 After producing the aquatic ultrasonic image, the device saves the generated image to the scans folder — latest_ultrasonic_image.jpg.
🐠📡💧📊 Then, the device shows the latest aquatic ultrasonic image with the detected air bubble class (label) on the user interface (GUI) for further inspection.
![]()
![]()
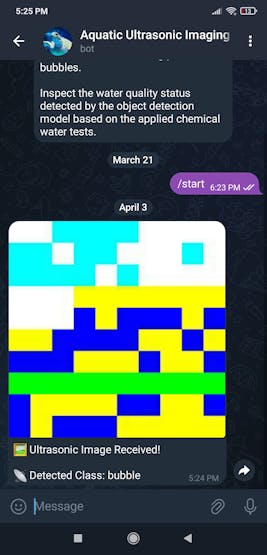
🐠📡💧📊 If the user clicks the displayed aquatic ultrasonic image on the onboard touchscreen, the device transfers the aquatic ultrasonic image and the detected air bubble class to the given Telegram bot by making an HTTP POST request to the HTTP-based Telegram Bot API.
🐠📡💧📊 After sending the push notification to the Telegram bot successfully, the device notifies the user via the onboard touchscreen.
![]()
![]()
![]()
![]()
After conducting numerous experiments, UNIHIKER kept producing precise aquatic ultrasonic images to visualize aquatic ultrasonic scans manifesting noxious underwater air bubbles and inform the user via Telegram push notifications.
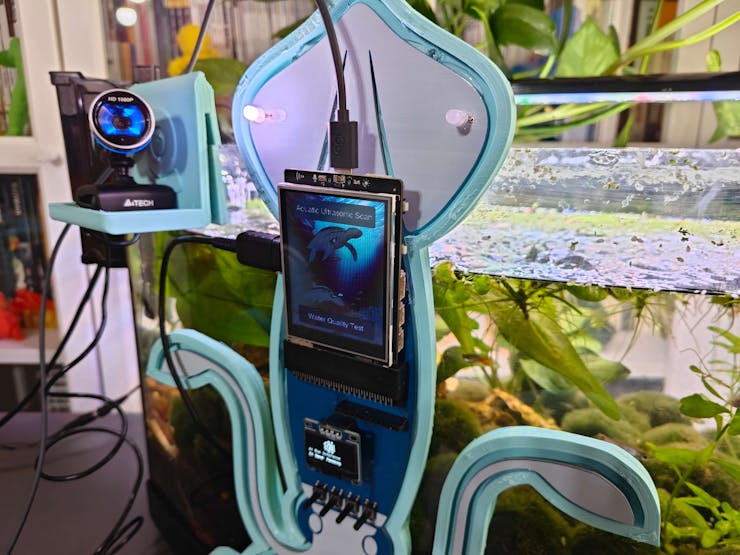
AI-based Aquatic Ultrasonic Imaging & Water Test
Identify noxious air bubbles lurking in the substrate w/ ultrasonic scans and assess water pollution based on chemical tests simultaneously.


Discussions
Become a Hackaday.io Member
Create an account to leave a comment. Already have an account? Log In.
Wow pretty amazing work and description of it. Thanks so much for sharing. Pretty interesting work with the ultrasonic sensor - still grokking your direction. Wow.!!
I wonder did you post/release the ESP32 software anywhere , gitxxx?
Are you sure? yes | no
Thanks for your kind words :)
I only posted my code files here:
https://www.hackster.io/kutluhan-aktar/ai-based-aquatic-ultrasonic-imaging-chemical-water-testing-f6b233#code
Are you sure? yes | no