WJCarpenter
-
Some capture measurements [UPDATED]
08/10/2024 at 20:50 • 0 commentsI finally got around to doing some video captures with the dongles on a couple of Raspberry Pi boards. For these experiments, the OS was Raspberry Pi OS Lite (64 bit), aka Debian Bookworm, running from an SD card. The "lite" OS does not include a graphical desktop. I chose to avoid that overhead since my experiments would be command line driven anyhow. I also tested on HP EliteDesk 800 G3 i7-6700T 2.80GHz (8gb RAM, 8 threads).
The dongle I used is the one with the MS2130 chip. The one I have has a USB-C connector, and I used a simple mechanical USB-C to USB-A adapter. The RPi 3 has only USB 2.0 ports, but I used a USB 3.0 port on the RPi 4. For the HDMI input, I used a Google Chromecast dongle (the HD version, not the 4K version). It was just repeatedly displaying various setup animations. I don't think there was any audio. In any case, I didn't try to capture any audio because I knew the video would dominate the performance challenge. CPU figures below are by eyeballing htop and averaging across all 4 cores for the RPi boards and 8 cores for the x86_64.
Test 1:
This first test tries to capture what I ultimately need: an MPEG-TS stream at FHD resolution. The capture dongle outputs 50 fps at that resolution for MJPEG. The command transcodes that into MPEG2
ffmpeg -f v4l2 -video_size 1920x1080 -input_format mjpeg -i /dev/video0 -f mpegts out.mkv
RPi 3: Transcode 11 fps. CPU about 50%.
RPi 4: Transcode 25 fps. CPU about 50%.
x86_64: Transcode 50 fps. CPU about 13%.
Test 2:
This is the same experiment, but with YUYV input instead of MJPEG. The dongle's advertised rate is only 10 fps.
ffmpeg -f v4l2 -video_size 1920x1080 -input_format yuyv422 -i /dev/video0 -f mpegts out.mkv
RPi 3: Transcode 8+ fps. CPU about 35%.
RPi 4: Transcode 10 fps. CPU about 20%.
x86_64: Transcode 10 fps. CPU about 4%.
Test 3:
This is a repeat of Test 1, but with the "ultrafast" preset for H.264.
ffmpeg -f v4l2 -video_size 1920x1080 -input_format mjpeg -i /dev/video0 -preset ultrafast -f mpegts out.mkv
RPi 3: Transcode 11 fps. CPU about 50%.
RPi 4: Transcode 25 fps. CPU about 40%.
x86_64: Transcode 50 fps. CPU about 14%, with one thread outlier of 35%.
Test 4:
The same as Test 3, but with YUYV input.
ffmpeg -f v4l2 -video_size 1920x1080 -input_format yuyv422 -i /dev/video0 -preset ultrafast -f mpegts out.mkv
RPi 3: Transcode 8+ fps. CPU about 35%.
RPi 4: Transcode 10 fps. CPU about 20%.
x86_64: Transcode 10 fps. CPU about 4%.
Test 5:
This test captures the incoming video without transcoding. For some scenarios (not mine), this allows for later transcoding as a separate step.
ffmpeg -f v4l2 -video_size 1920x1080 -input_format mjpeg -i /dev/video0 -c copy out.mkv
RPi 3: Transcode 50 fps. CPU less than 5%.
RPi 4: Transcode 50 fps. CPU less than 5%.
x86_64: Transcode 50 fps. CPU less than 1% with some threads completely idle.
Test 6:
ffmpeg -f v4l2 -video_size 1920x1080 -input_format yuyv422 -i /dev/video0 -c copy out.mkv
RPi 3: Transcode 4+ fps. CPU less than 5%.
RPi 4: Transcode 8+ fps. CPU less than 5%.
x86_64: Transcode 50 fps. CPU less than 5% with some threads completely idle.
Observations:
It's no surprise that the RPi 4 performed better than the RPi 3. For both boards, the only things that could keep up were the captures of raw encoding of MJPEG. The ultrafast transcoding of YUYV kept up, but only to match the dongle's limitation of 10 fps, which is not acceptable for entertainment video. The x86_64 box was able to keep up at the full frame rate with plenty of overhead. In a future experiment, I'll connect multiple dongles to see how it handles it. The x86_64 box also has a single USB-C port, so I gave that a quick try with Test 1. It resulted in a higher frame rate (60 fps) at the cost of slightly higher CPU. It might be possible to operate multiple dongles on a single USB-C port with the use of a true USB-C hub. The box I have has, in contrast, 6 USB-A ports.
The raw video captures, even on the RPi 3 used very little CPU resources, so it is probably feasible to use an RPi 3 or RPi 4 as a capture device for multiple HDMI dongles. I didn't try it, but I suspect that an RPi 2 would also be up to the task. All of that obviously just delays the heavy lifting of the transcoding job. For simply playing the videos (for example, in VLC), the raw videos are fine and would work as an intermediate step in some video production pipeline. For capturing livestreaming video in near real time, it's not very suitable. The files are enormous. I did an experiment of sending the raw video to ffmpeg's built-in streaming server. ffmpeg warned me that the video was being mux'd in as a private stream and my player might not recognize it. That turned out to be the case with trying to play the stream with VLC (it just kept reading but displaying a black window).
When I copied the YUYV raw video capture to another machine and viewed it in VLC, there were some obvious "jaggies" artifacts in what should have been solid lines. In contrast the raw MJPEG showed the lines smoothly. That could just be due to using a cheap HDMI capture dongle.
One could move up to an RPi 5 (which I don't have on hand) to get better performance, but that starts to approach the price point of the dedicated HDMI encoder devices. Second-hand x86_64 boxes look like a better bet for this scenario at the cost of greater power consumption.
-
An aside: adventures in desktop streaming
08/07/2024 at 19:16 • 0 commentsOne of the things I want to capture, and which sort of inspired this whole line of research, is something that can run in fullscreen mode on Linux in general and Raspberry Pi in particular. Since I am already on a Raspberry Pi, can I efficiently stream an entire desktop? I did a bunch of experiments, mostly on a Raspberry Pi but a bit on a Linux x86 machine. This is a description of some things I found out along the way. You shouldn't think of this as a monograph from an expert in this area. Rather, I am trying to describe a few specific things with enough detail for context that it is useful (including being useful for future me). If you are and expert in any of these areas, you will probably be chuckling at how much I struggled to figure out what you think is obvious.
My use case requirements simplified the general question somewhat.
- The desktop would be 1920x1080, aka "FHD".
- The target framerate was 60 FPS, but I figured 30 FPS would also be acceptable.
- I wasn't concerned too much about progressive versus interlaced.
- The stream format would be MPEG-TS.
- The stream would include audio produced by an application.
- There would only be at most a single consumer of the stream, though that single client would not always be consuming (it would come and go).
There is a heck of a lot that I don't know about MPEG, MPEG-TS, and their friends. I could write a book. No, wait, I couldn't write a book; I mean that what I don't know could fill volumes. As it is, what I do and don't know fills untold quantities of software documentation, forum postings, and wikis. Quite often advice to "just try this" is offered by someone who doesn't really know anything about anything, except that that single "try this" worked for them under some unspecified circumstances. Consequently, there is paradoxically too much information available since a lot of it is wrong or obsolete with no way to tell the difference. It's the Fog of Wikis.
The FFmpeg approach
ffmpeg -h full
Although there are billions of tools for doing things with video streams, almost all of them are built on top of FFmpeg or its constellation of libraries and their close friends. I decided to start by going right to the BMOC and see if I could use it directly. For a long time, I've put off learning a lot of things about FFmpeg simply because it can do so much. On my Linux desktop, just printing the "full help" from the ffmpeg command gives over 15,000 lines of text. The tool is ridiculously capable (and I mean that in a complimentary way).
I soon discovered that there are a couple of ways to use the Linux display as the FFmpeg input. The simplest to understand is "x11grab", which in FFmpeg parlance is a format. The input device is something that identifies the X11 display (typically ":0.0"). The other way is "kmsgrab", which does something similar but at a different architectural layer (docs). My (unverified) understanding is that "kmsgrab" uses fewer resources but can sometimes be trickier to use. (Note: Before using ffmpeg with "kmsgrab", you need to set a capability on the ffmpeg binary: "sudo setcap cap_sys_admin+ep /usr/bin/ffmpeg".) This Wikipedia article gives a good overview of DRM/KMS. This article, though with some vendor specifics, is also a pretty good read: https://wiki.st.com/stm32mpu/wiki/DRM_KMS_overview Both "x11grab" and "kmsgrab" offer options for selecting portions of the screen, size of the screen capture, and so on.
Because FFmpeg is available for so many platforms, and because there are lots of compile-time choices, either or both of those two formats might be missing from an environment. Some years ago, "x11grab" may have been deprecated in favor of "xcbgrab", but most of my copies of ffmpeg still have "x11grab". I don't really know the difference between the two or what their twisted history is all about. My suggestion would be to see which one is present and use it. I think the options are compatible. Find which one you have by running this command:
ffmpeg -formats | grep grab
You might see some other things that happen to have the string "grab" in them, but it should be clear if you have the ones you want.
I came across another way to approach this, https://github.com/umlaeute/v4l2loopback, but I haven't done any experiments with it so far.
That takes care of the input.
You can ask FFmpeg to transcode the input into an MPEG-TS stream by specifying a format of "mpegts" for the output. That's pretty simple, though it ignores audio, which I'll come back to. Where should that output go? It's easy to capture it in a file, but for streaming purposes we need to get it onto a network somehow. In ancient times, the FFmpeg project had a tool called FFserver which was a streaming server, but it's been gone for a while. You can give an HTTP URL as the FFmpeg output, but only if something is listening at that location to receive the stream. If you want the output destination to listen for streaming requests, you have to give command line option "-listen 1" (single client) or "listen 2" (multi clients) before the output URL. I haven't tracked down the precise difference between single and multi clients, though I have an idea.
I only found out about the "listen" option when I saw it mentioned in a forum response. Though it is listed in the FFMpeg full help, I haven't been able to find any official documentation for it. It's probably in there somewhere. On at least one of the environments where I was experimenting with FFmpeg, the "listen" option wasn't recognized. I thought maybe it was deprecated, so I gave up on it as a possible part of a solution. I have just checked, and it's still part of the libavformat source code, so maybe it was some build-time decision for the environment where it didn't work for me. Or maybe I just made a mistake of some kind in that particular experiment.
Putting all of that together, an example command line for streaming the full desktop to a localhost port looks like this:
ffmpeg -video_size 1920x1080 -framerate 60 -f x11grab -i :0.0 -listen 2 -f mpegts http://127.0.0.1:33444
The accepted answer in this (very old) thread has some good examples of how to combine audio and video from separate sources: https://superuser.com/questions/277642/how-to-merge-audio-and-video-file-in-ffmpeg. This article is a good tutorial on some alternative scenarios: https://json2video.com/how-to/ffmpeg-course/ffmpeg-add-audio-to-video.html
The VLC approach
vlc -H
You are probably familiar with VLC as the all-singing, all-dancing media player that can play just about anything. You might not be familiar with a couple of its other features:
- It can transcode its input in a variety of ways.
- It can take multiple inputs and send those (possibly transcoded) inputs to multiple destinations.
- One of the inputs is a pseudo-device that captures the screen.
- One of the destinations for outputs is a built-in streaming server.
- All of the things you can do from menus and wizards in the GUI can be done via the companion headless tool, cvlc. cvlc can also do some things that are probably not available via the GUI.
Until a few days ago, I either didn't know about or wasn't very familiar with most of those bullet points. For some things you do in the GUI, vlc shows you the command line equivalent, which you can modify on the fly. Theoretically, you can also copy those things and use them directly with cvlc. Also, if you turn on vlc debug logging, it will log those CLI pipelines. I say theoretically because I didn't have very good luck with those approaches. The CLI syntax is quite quirky, and I was seldom able to directly use what vlc told me in the GUI or in the logs. That might be due to my thick skull being unwilling to let the syntax waves penetrate. By trial and error, I eventually created a pipeline that worked.
The pseudo-device for screen capture is literally "screen://". There are also command line parameters for controlling some of the screen capture settings. For example, you can control the frame rate (of the capture, not the physical screen). As I mentioned earlier, capturing the screen only deals with the video images and does not include audio. On Linux, the audio is a completely separate subsystem, most commonly PulseAudio or PipeWire. A typical system will have multiple possible audio outputs (HDMI/DisplayPort, analog headset jack, and possibly others). To capture the audio along with the video, VLC refers to it as an input slave. You have to instruct VLC which audio device to use. It's easy to find out that you choose a PulseAudio device by using the literal string "pulse://", but it's a bit more mysterious how you indicate which PulseAudio device you want. In my case, I wanted to the audio being sent over the HDMI connector and I got lucky by guessing "pulse://hdmi". I have yet to find any documentation suggesting that or explaining why it should work.
For the transcoding part of the pipeline, I just used fragments of what the GUI told me it was doing. I then used the VLC embedded help (which produces a mere 6000 lines) to find additional parameters to tune that starting configuration.
For the output destination, I used the HTTP target, which acts as a built-in streaming server. You can configure a specific local IP address or name, or you can leave that out and have VLC listen on all of the interfaces. You specify a TCP port number and an optional URL path.
Putting all of the above together, here is an example of capturing the entire screen along with HDMI audio, transcoding it to MPEG-TS, and sending it to the built-in streaming server:
cvlc screen:// :input-slave=pulse://hdmi :screen-fps=60.0 :live-caching=300 --sout '#transcode{vcodec=x264,venc=x264{profile=baseline,keyint=30},acodec="mpga",ab="128",channels="2",samplerate="48000",scodec=none,threads=4}:http{dst=:33444/ts.ts}' :sout-all :sout-keepIn that example, the subtitle codec is specified as "none" because I know I don't have any in this scenario. Some of the other parameters in the pipeline might not be needed, and I am still tuning for performance. The client request for the stream would go to "http://some.server:33444/ts.ts".
This documentation section describes the overall streaming model: https://docs.videolan.me/vlc-user/desktop/3.0/en/advanced/stream_out_introduction.html This wiki page has several examples of cvlc streaming pipelines: https://wiki.videolan.org/Documentation:Streaming_HowTo/Command_Line_Examples/ Here is another useful VLC wiki page: https://wiki.videolan.org/Documentation:Streaming_HowTo_New/
The TSDuck approach
tsp --help
Along the way to looking at tooling for this, I came across the TSDuck toolkit. I originally got interested in it because it has a lot of facilities for analyzing and modifying MPEG-TS streams, and I wanted to see if I could figure out why channels DVR didn't like what my HDMI encoder box sometimes put out. I didn't actually solve that riddle, but I was able to use TSDuck to create a simple proxy that worked around whatever the issue is. I packaged it up as a Docker image. You can read about it here.
As far as I can tell, TSDuck doesn't have a direct way to captured the desktop video. It wants to start with an MPEG-TS stream or file. At the end of it's pipeline, TSDuck's tsp command can expose a rudimentary streaming server. Even though it is limited to a single client at a time and has other restrictions, it turned out to be exactly good enough for what I needed.
Audio stuff
I started using Linux back in the days getting audio output was a matter of having the write driver for one of a handful of sound cards and their clone friends. Things have gone through multiple generations of de facto standards since then. I hadn't really kept up with the details because things always just worked on my various desktop and laptops. I saw a lot of component names mentioned, but I let them fly by without impediment.
In a nutshell, here is what I think the situation is. The Linux device driver stuff eventually gave way to Open Sound System (OSS), a more modular way of providing pretty much the same thing. OSS is probably still a thing, but is generally supplanted by the Advanced Linux Sound Architecture (ALSA). Here, both OSS and ALSA refer to kernel-level interfaces for audio devices. There are also userland libraries for applications to use. For the purposes of this discussion, we can forget about OSS. The latest generation of audio architectures tends to independently running audio services. The two services that dominate these days are PulseAudio and PipeWire. PulseAudio is pretty well-established, but PipeWire seems to be picking up steam. (There is a third contender, JACK, but you are unlikely to encounter it unless you are doing high-end audio work.) If you have a reasonably modern Linux distribution, it will almost certainly have one or the other those already installed or readily available. Both use the ALSA kernel interface to talk to actual devices. By running as services, they are able to do sophisticated things like simultaneous access by multiple applications, flexible mixing, on-the-fly device switching and other things. Because of capitalism or something, all of these things have evolved emulation layers to cater to applications written to use one of the other things. That's handy for running applications but confusing for sorting out what is actually happening.
Rather than have my little gray cells overrun with details, I decided to focus on what I could do with PulseAudio. All of the Linux systems I have been working with either already had it installed or could easily have it.
For the problem at hand, we want to find out which real or virtual device is receiving audio from the application and tap it for multiplexing it into our resulting MPEG-TS stream. Unfortunately, different tools have different ways of describing things, both in notation and in terminology. The best starting point for enumerating devices is "aplayer", which is generally installed as part of some ALSA utilities package. It's a standalone CLI audio player, but it also has some useful discovery options. "aplay -l" (lowercase L) lists the hardware devices. "aplay -L" (uppercase L) lists virtual devices, each of which is some combination of encoding/conversion to a hardware device. Some of that "aplay -L" output will usually be described as "no conversion", and those listings should parallel the things listed in the "aplay -l" output.
Wait a minute.... the application is playing audio to an output device, but we want an input device to pick it up for our MPEG-TS stream. What's that about? The PulseAudio paradigm for doing this is called a loopback device or a monitor, and it's for exactly this kind of use. This article has a good general overview of how to identify PulseAudio loopback devices: https://wiki.debian.org/audio-loopback. These articles have some good hints about audio capture: https://trac.ffmpeg.org/wiki/Capture/ALSA and https://trac.ffmpeg.org/wiki/Capture/PulseAudio However, none of those helped me identify the PulseAudio loopback device for the HDMI interface. I simply guessed and got lucky for the VLC case.
-
UVC and UAC
05/27/2024 at 19:28 • 0 commentsI don't know whether to file this under "learn something new every day" or "teach an old dog new tricks", but I recently looked into a standard called USB video device class (UVC) published by the USB Implementers Forum. (There is a companion standard, UAC, for audio, but I haven't looked at that.) The dongles based on the MS2109 and MS2130 chips advertise UVC and UAC compatibility, but I didn't really know what that meant beyond "don't need to install custom drivers". The dongles also expose a USB HID device, and I had assumed that any configuration control of them would be via the USB HID. Not so.
UVC is one of those standards where any particular device is likely to only implement some subset, and that is true of these dongles. UVC provides protocol elements for querying or changing lots of different configuration items. There are multiple open source utilities that can be used to interact with UVC devices. For example, yavta and v4l-utils. Here are some examples for my MS2130 dongle:
This reports the available video modes, resolutions, and frame rates (figures for frame rates are quoted as frame intervals, so 1/60 is 60fps):
$ sudo yavta --enum-formats /dev/video2
Device /dev/video2 opened.
Device `USB3 Video: USB3 Video' on `usb-0000:00:15.0-1' (driver 'uvcvideo') supports video, capture, without mplanes.
- Available formats:
    Format 0: YUYV (56595559)
    Type: Video capture (1)
    Name: YUYV 4:2:2
    Frame size: 1920x1080 (1/60, 1/50, 1/30, 1/20, 1/10)
    Frame size: 1600x1200 (1/60, 1/50, 1/30, 1/20, 1/10)
    Frame size: 1360x768 (1/60, 1/50, 1/30, 1/20, 1/10)
    Frame size: 1280x1024 (1/60, 1/50, 1/30, 1/20, 1/10)
    Frame size: 1280x960 (1/60, 1/50, 1/30, 1/20, 1/10)
    Frame size: 1280x720 (1/60, 1/50, 1/30, 1/20, 1/10)
    Frame size: 1024x768 (1/60, 1/50, 1/30, 1/20, 1/10)
    Frame size: 800x600 (1/60, 1/50, 1/30, 1/20, 1/10)
    Frame size: 720x576 (1/60, 1/50, 1/30, 1/20, 1/10)
    Frame size: 720x480 (1/60, 1/50, 1/30, 1/20, 1/10)
    Frame size: 640x480 (1/60, 1/50, 1/30, 1/20, 1/10)

    Format 1: MJPEG (47504a4d)
    Type: Video capture (1)
    Name: Motion-JPEG
    Frame size: 1920x1080 (1/60, 1/50, 1/30, 1/20, 1/10)
    Frame size: 1600x1200 (1/60, 1/50, 1/30, 1/20, 1/10)
    Frame size: 1360x768 (1/60, 1/50, 1/30, 1/20, 1/10)
    Frame size: 1280x1024 (1/60, 1/50, 1/30, 1/20, 1/10)
    Frame size: 1280x960 (1/60, 1/50, 1/30, 1/20, 1/10)
    Frame size: 1280x720 (1/60, 1/50, 1/30, 1/20, 1/10)
    Frame size: 1024x768 (1/60, 1/50, 1/30, 1/20, 1/10)
    Frame size: 800x600 (1/60, 1/50, 1/30, 1/20, 1/10)
    Frame size: 720x576 (1/60, 1/50, 1/30, 1/20, 1/10)
    Frame size: 720x480 (1/60, 1/50, 1/30, 1/20, 1/10)
    Frame size: 640x480 (1/60, 1/50, 1/30, 1/20, 1/10)

Video format: YUYV (56595559) 1920x1080 (stride 3840) field none buffer size 4147200$ sudo v4l2-ctl -d2 --set-fmt-video "pixelformat=MJPG
This switches the video mode from YUYV to MJPG
$ sudo v4l2-ctl -d2 --get-fmt-video
Format Video Capture:
    Width/Height      : 1920/1080
    Pixel Format      : 'YUYV' (YUYV 4:2:2)
    Field             : None
    Bytes per Line    : 3840
    Size Image        : 4147200
    Colorspace        : sRGB
    Transfer Function : Rec. 709
    YCbCr/HSV Encoding: ITU-R 601
    Quantization      : Default (maps to Limited Range)
    Flags             :

$ sudo v4l2-ctl -d2 --set-fmt-video "pixelformat=MJPG"

$ sudo v4l2-ctl -d2 --get-fmt-video
Format Video Capture:
    Width/Height      : 1920/1080
    Pixel Format      : 'MJPG' (Motion-JPEG)
    Field             : None
    Bytes per Line    : 0
    Size Image        : 4147200
    Colorspace        : sRGB
    Transfer Function : Rec. 709
    YCbCr/HSV Encoding: ITU-R 601
    Quantization      : Default (maps to Full Range)
    Flags             :
These tools tend to think you already know what the various parameters mean, but they are quite handy once you get the hang of them. The settings seem to stick, at least for the specific dongle that I have. If I unplug it and replug it, it remembers what I last set. The bad news is that the video playing software that I have handy (vlc and ffplay) seem to want to tweak some of the UVC settings, probably to better suit how they handle things. That's inconvenient, but not a big deal for the overall goal.
I was able to capture some video via yavta and verify from the captured file that it had the settings expected. For example,
$ sudo yavta -f mjpeg --size 1920x1080 --capture=1000 --file=/tmp/vid.mjpeg /dev/video2
With these same utilities, I was able to configure one of my MS2109 dongles to output MJPEG FHD@30fps. Here are its possibilities:
$ sudo yavta --enum-formats /dev/video2
Device /dev/video2 opened.
Device `USB3.0 HD VIDEO: USB3.0 HD VIDE' on `usb-0000:00:15.0-2' (driver 'uvcvideo') supports video, capture, without mplanes.
- Available formats:
    Format 0: MJPEG (47504a4d)
    Type: Video capture (1)
    Name: Motion-JPEG
    Frame size: 1920x1080 (1/30, 1/25, 1/20, 1/10, 1/5)
    Frame size: 1600x1200 (1/30, 1/25, 1/20, 1/10, 1/5)
    Frame size: 1360x768 (1/30, 1/25, 1/20, 1/10, 1/5)
    Frame size: 1280x1024 (1/30, 1/25, 1/20, 1/10, 1/5)
    Frame size: 1280x960 (1/50, 1/30, 1/20, 1/10, 1/5)
    Frame size: 1280x720 (1/60, 1/50, 1/30, 1/20, 1/10)
    Frame size: 1024x768 (1/60, 1/50, 1/30, 1/20, 1/10)
    Frame size: 800x600 (1/60, 1/50, 1/30, 1/20, 1/10)
    Frame size: 720x576 (1/60, 1/50, 1/30, 1/20, 1/10)
    Frame size: 720x480 (1/60, 1/50, 1/30, 1/20, 1/10)
    Frame size: 640x480 (1/60, 1/50, 1/30, 1/20, 1/10)

    Format 1: YUYV (56595559)
    Type: Video capture (1)
    Name: YUYV 4:2:2
    Frame size: 1920x1080 (1/5)
    Frame size: 1600x1200 (1/5)
    Frame size: 1360x768 (1/8)
    Frame size: 1280x1024 (1/8)
    Frame size: 1280x960 (1/8)
    Frame size: 1280x720 (1/10)
    Frame size: 1024x768 (1/10)
    Frame size: 800x600 (1/20, 1/10, 1/5)
    Frame size: 720x576 (1/25, 1/20, 1/10, 1/5)
    Frame size: 720x480 (1/30, 1/20, 1/10, 1/5)
    Frame size: 640x480 (1/30, 1/20, 1/10, 1/5)

Video format: MJPEG (47504a4d) 1920x1080 (stride 0) field none buffer size 4147200
All in all, good news for cheap dongles. Even the cheapest of the cheap with the MS2109 chip should be able to get FHD@30fps, which is maybe good enough for under ten US bucks. Of course, MJPEG is lossy compression. That will affect quality, but I don't yet have a bead on that. For MS2130 devices, you can get FHD@60fps with (lossless) YUYV, so there is no point to switching to MJPEG. For MS2109, the lossy MJPEG at 30fps is better than YUYV at 5fps when viewing entertainment video streams.
-
syslog for MS2130 dongle
05/24/2024 at 00:20 • 0 commentsWhen plugging the MS2130-based HDMI capture dongle, /var/log/syslog says this:
2024-05-23T17:05:32.366859-07:00 yogi kernel: [14895.900908] usb 2-1: new SuperSpeed USB device number 5 using xhci_hcd
2024-05-23T17:05:32.398878-07:00 yogi kernel: [14895.933905] usb 2-1: LPM exit latency is zeroed, disabling LPM.
2024-05-23T17:05:32.422841-07:00 yogi kernel: [14895.956505] usb 2-1: New USB device found, idVendor=345f, idProduct=2130, bcdDevice=31.00
2024-05-23T17:05:32.422889-07:00 yogi kernel: [14895.956531] usb 2-1: New USB device strings: Mfr=1, Product=2, SerialNumber=3
2024-05-23T17:05:32.422895-07:00 yogi kernel: [14895.956540] usb 2-1: Product: USB3 Video
2024-05-23T17:05:32.422899-07:00 yogi kernel: [14895.956546] usb 2-1: Manufacturer: UltraSemi
2024-05-23T17:05:32.422902-07:00 yogi kernel: [14895.956552] usb 2-1: SerialNumber: 20210623
2024-05-23T17:05:32.438897-07:00 yogi kernel: [14895.973543] usb 2-1: Found UVC 1.00 device USB3 Video (345f:2130)
2024-05-23T17:05:32.498521-07:00 yogi kernel: [14896.032696] hid-generic 0003:345F:2130.000A: hiddev0,hidraw1: USB HID v1.10 Device [UltraSemi USB3 Video] on usb-0000:00:15.0-1/input4
2024-05-23T17:05:32.503063-07:00 yogi mtp-probe: checking bus 2, device 5: "/sys/devices/pci0000:00/0000:00:15.0/usb2/2-1"
2024-05-23T17:05:32.503640-07:00 yogi mtp-probe: bus: 2, device: 5 was not an MTP device
2024-05-23T17:05:32.592287-07:00 yogi (udev-worker)[16747]: controlC1: Process '/usr/sbin/alsactl -E HOME=/run/alsa -E XDG_RUNTIME_DIR=/run/alsa/runtime restore 1' failed with exit code 99.
2024-05-23T17:05:32.603188-07:00 yogi systemd[4030]: Reached target sound.target - Sound Card.
2024-05-23T17:05:32.606696-07:00 yogi mtp-probe: checking bus 2, device 5: "/sys/devices/pci0000:00/0000:00:15.0/usb2/2-1"
2024-05-23T17:05:32.606803-07:00 yogi mtp-probe: bus: 2, device: 5 was not an MTP device
2024-05-23T17:05:32.715245-07:00 yogi wireplumber[4049]:  Failed to call Lookup: GDBus.Error:org.freedesktop.portal.Error.NotFound: No entry for camera
A relevant detail is that it has both the video and audio device stuff, but it also has a HID interface. There is some reverse engineered work for doing things via that HID interface here: https://github.com/BertoldVdb/ms-tools
In contrast, when plugging the device into a USB 2.0 port, it's logged as:
2024-05-24T10:47:05.913518-07:00 yogi kernel: [42791.625745] usb 1-4.2: new high-speed USB device number 13 using xhci_hcd
2024-05-24T10:47:06.093496-07:00 yogi kernel: [42791.807407] usb 1-4.2: New USB device found, idVendor=345f, idProduct=2130, bcdDevice=21.00
2024-05-24T10:47:06.093516-07:00 yogi kernel: [42791.807417] usb 1-4.2: New USB device strings: Mfr=1, Product=5, SerialNumber=7
2024-05-24T10:47:06.093520-07:00 yogi kernel: [42791.807419] usb 1-4.2: Product: USB2 Video
2024-05-24T10:47:06.093521-07:00 yogi kernel: [42791.807421] usb 1-4.2: Manufacturer: UltraSemi
2024-05-24T10:47:06.093521-07:00 yogi kernel: [42791.807423] usb 1-4.2: SerialNumber: 20210621
2024-05-24T10:47:06.113028-07:00 yogi kernel: [42791.826992] usb 1-4.2: Found UVC 1.00 device USB2 Video (345f:2130)
2024-05-24T10:47:06.183876-07:00 yogi kernel: [42791.897291] hid-generic 0003:345F:2130.0013: hiddev0,hidraw6: USB HID v1.10 Device [UltraSemi USB2 Video] on usb-0000:00:15.0-4.2/input4
2024-05-24T10:47:06.187848-07:00 yogi mtp-probe: checking bus 1, device 13: "/sys/devices/pci0000:00/0000:00:15.0/usb1/1-4/1-4.2"
2024-05-24T10:47:06.188320-07:00 yogi mtp-probe: bus: 1, device: 13 was not an MTP device
2024-05-24T10:47:06.286059-07:00 yogi (udev-worker)[77117]: controlC1: Process '/usr/sbin/alsactl -E HOME=/run/alsa -E XDG_RUNTIME_DIR=/run/alsa/runtime restore 1' failed with exit code 99.
2024-05-24T10:47:06.315144-07:00 yogi mtp-probe: checking bus 1, device 13: "/sys/devices/pci0000:00/0000:00:15.0/usb1/1-4/1-4.2"
2024-05-24T10:47:06.315285-07:00 yogi mtp-probe: bus: 1, device: 13 was not an MTP device
To round things out, here's how the MS2109 dongle is logged (it only has a USB 2.0 interface):
2024-05-24T10:51:33.637497-07:00 yogi kernel: [43059.353221] usb 1-4: reset high-speed USB device number 3 using xhci_hcd
2024-05-24T10:51:34.929511-07:00 yogi kernel: [43060.645017] usb 1-4.3: new high-speed USB device number 14 using xhci_hcd
2024-05-24T10:51:35.077555-07:00 yogi kernel: [43060.795877] usb 1-4.3: New USB device found, idVendor=534d, idProduct=2109, bcdDevice=21.00
2024-05-24T10:51:35.077583-07:00 yogi kernel: [43060.795890] usb 1-4.3: New USB device strings: Mfr=1, Product=0, SerialNumber=0
2024-05-24T10:51:35.077585-07:00 yogi kernel: [43060.795892] usb 1-4.3: Manufacturer: MACROSILICON
2024-05-24T10:51:35.081559-07:00 yogi kernel: [43060.797220] usb 1-4.3: Found UVC 1.00 device  (534d:2109)
2024-05-24T10:51:35.085512-07:00 yogi kernel: [43060.804070] hid-generic 0003:534D:2109.0014: hiddev0,hidraw6: USB HID v1.10 Device [MACROSILICON] on usb-0000:00:15.0-4.3/input4
2024-05-24T10:51:35.104692-07:00 yogi mtp-probe: checking bus 1, device 14: "/sys/devices/pci0000:00/0000:00:15.0/usb1/1-4/1-4.3"
2024-05-24T10:51:35.105185-07:00 yogi mtp-probe: bus: 1, device: 14 was not an MTP device
2024-05-24T10:51:35.220540-07:00 yogi (udev-worker)[77200]: controlC1: Process '/usr/sbin/alsactl -E HOME=/run/alsa -E XDG_RUNTIME_DIR=/run/alsa/runtime restore 1' failed with exit code 99.
2024-05-24T10:51:35.240113-07:00 yogi mtp-probe: checking bus 1, device 14: "/sys/devices/pci0000:00/0000:00:15.0/usb1/1-4/1-4.3"
2024-05-24T10:51:35.240260-07:00 yogi mtp-probe: bus: 1, device: 14 was not an MTP device
-
The five hurts
05/22/2024 at 01:39 • 0 commentsI figured out what's up with the 5fps over the cheap dongle I have. In fact, I ordered a second, newer looking dongle, and it also gave me only 5fps.
Essentially all of these low-cost HDMI-to-USB dongles are based on the Macro Silicon MS2109 chip. It took some sleuthing, but I eventually found a datasheet for that chip. The chip has two output modes: YUV422 and MJPEG. MJPEG is what we really want, and the chip can output up to 1920x1080@30fps. In YUV422 mode, it's limited to 1920x1080@5fps. The dongles (at least the ones that I have) are configured for YUV422 mode, and that can't be changed without modifying the firmware in EEPROM. I don't know why the manufacturers selected that very limited output format.
Meanwhile, it looks like the go-to chip for the recent generation of those dongles is the Macro Silicon MS2130 (datasheet). In addition to the faster USB 3.0 interface, it supports output of 1920x1080@60fps for both YUV422 and MJPEG outputs. (The datasheet says the chip can be programmed to output 4K@15fps, but I haven't seen that mentioned in any advertisements for these things.
The older MS2109 dongles can be had for around US$10, and the newer MS2130 dongles go for around US$20. For this sort of project, that price difference doesn't matter too much. I got a dongle with an MS2130 chip:
Bus 002 Device 094: ID 345f:2130 UltraSemi USB3 Video
It does, indeed, emit video at FHD@60fps.
I could wish that it emitted MJPEG, but at least I am seeing the full resolution and frame rate.
-
Expensive-ish HDMI encoder
05/18/2024 at 22:54 • 0 commentsWhen I started thinking about this cheap encoder project, I assumed it was more likely than not that it wouldn't be good enough for household TV watching. To hedge my bets, I ordered a standalone HDMI encoder box. It's this one:
![]() I selected this one according to the Cheap and Lazy algorithm. I saw it mentioned by some other people, and it was inexpensive relative to others mentioned. It was also readily available with just a short delay. The day I bought it, there was also an instant coupon for US$20 off the price.
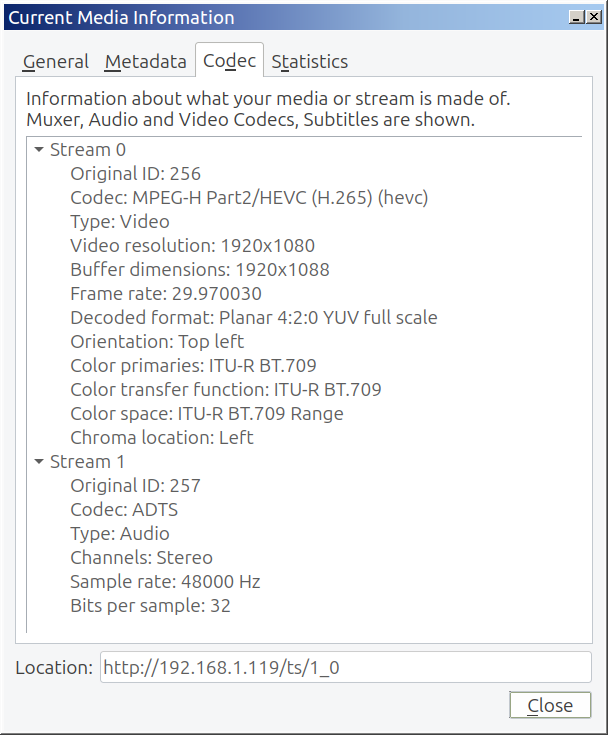
I selected this one according to the Cheap and Lazy algorithm. I saw it mentioned by some other people, and it was inexpensive relative to others mentioned. It was also readily available with just a short delay. The day I bought it, there was also an instant coupon for US$20 off the price.I ran the same sort of POC test with this device that I ran with the cheap encoder dongle earlier. Results were pretty good. Here is what vlc says about the stream:
vlc was able to consume and display a very clear image with both H.264 and H.265 codecs. Despite best efforts, I was only able to get a frame rate of 30fps. I'm not sure if that's a limitation of the device, a limitation of the Fire TV stick, or some other settings thing. The video and audio were completely smooth in vlc.
As a side note, there was some small inconvenience as a side effect of buying the least expensive device. The setup instructions are for Windows (whatever that is), and the device comes configured with a static IP address of 192.168.1.120. I already have a device with that address, so I had to temporarily turn it off while I configured this new device. Luckily, there is a simple web UI that lets you change the network configuration and various other things. There was an unexpected bonus (because I didn't pay attention to it while shopping). The device can record to an SD card for subsequent download. I don't know if I'll ever use that, but it's nice to have.Regardless of what happens with this overall project, I should be able to scratch my single-channel itch with this device after applying some software magic.
-
Proof of concept
05/17/2024 at 22:28 • 0 commentsDo those dongles actually work, and are they better than "marginally above crap"? Let's see what we can see.
When I plug the dongle into my Linux machine, it shows up as this USB device:
Bus 001 Device 038: ID 534d:2109 MacroSiliconSearching around for those ID strings leads to the MacroSilicon MS2109 chip that powers the dongle that I have. I haven't pursued the innards of this chip, but it was easy to figure out that it's supported by the Linux v4l subsystem and presents as a pair of video devices.
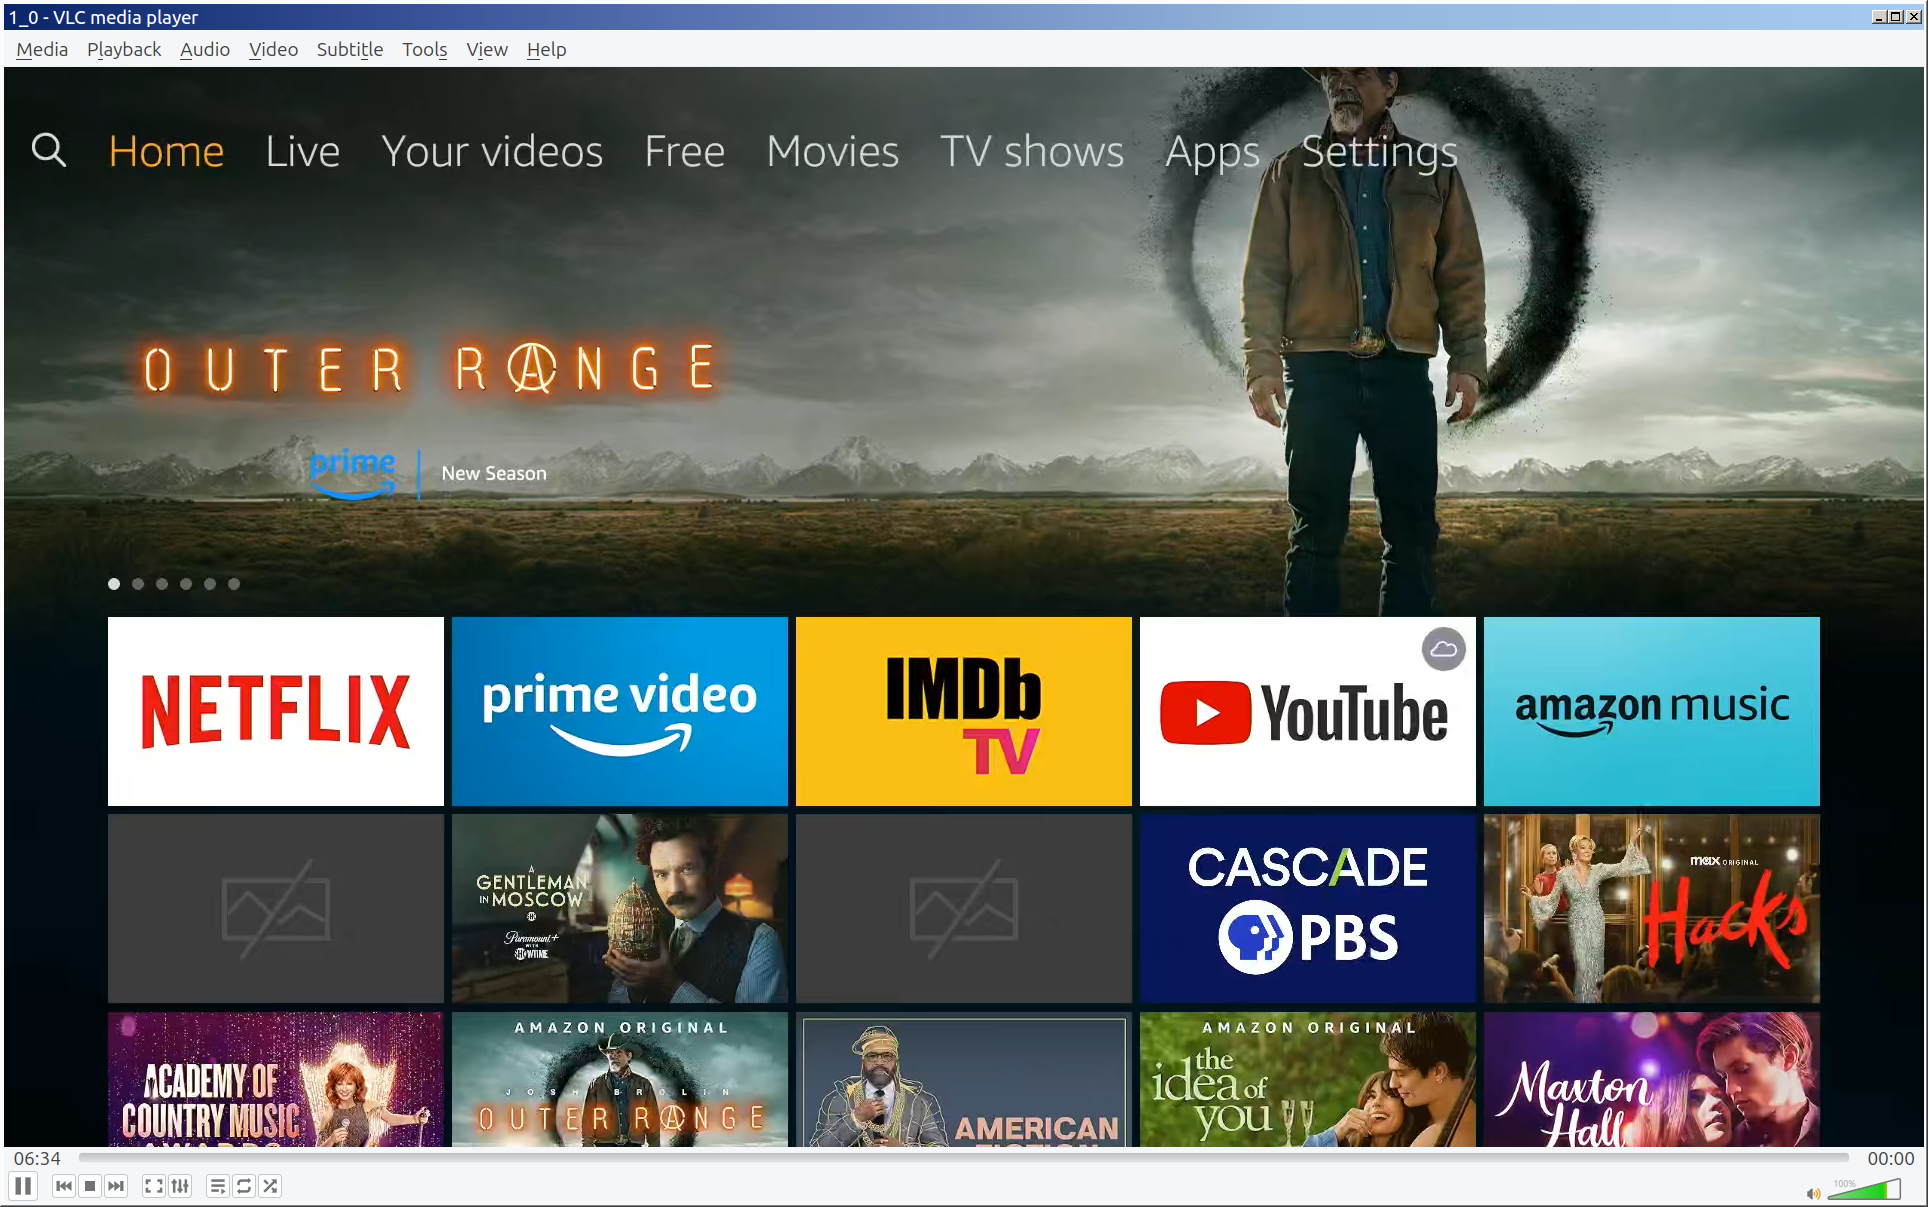
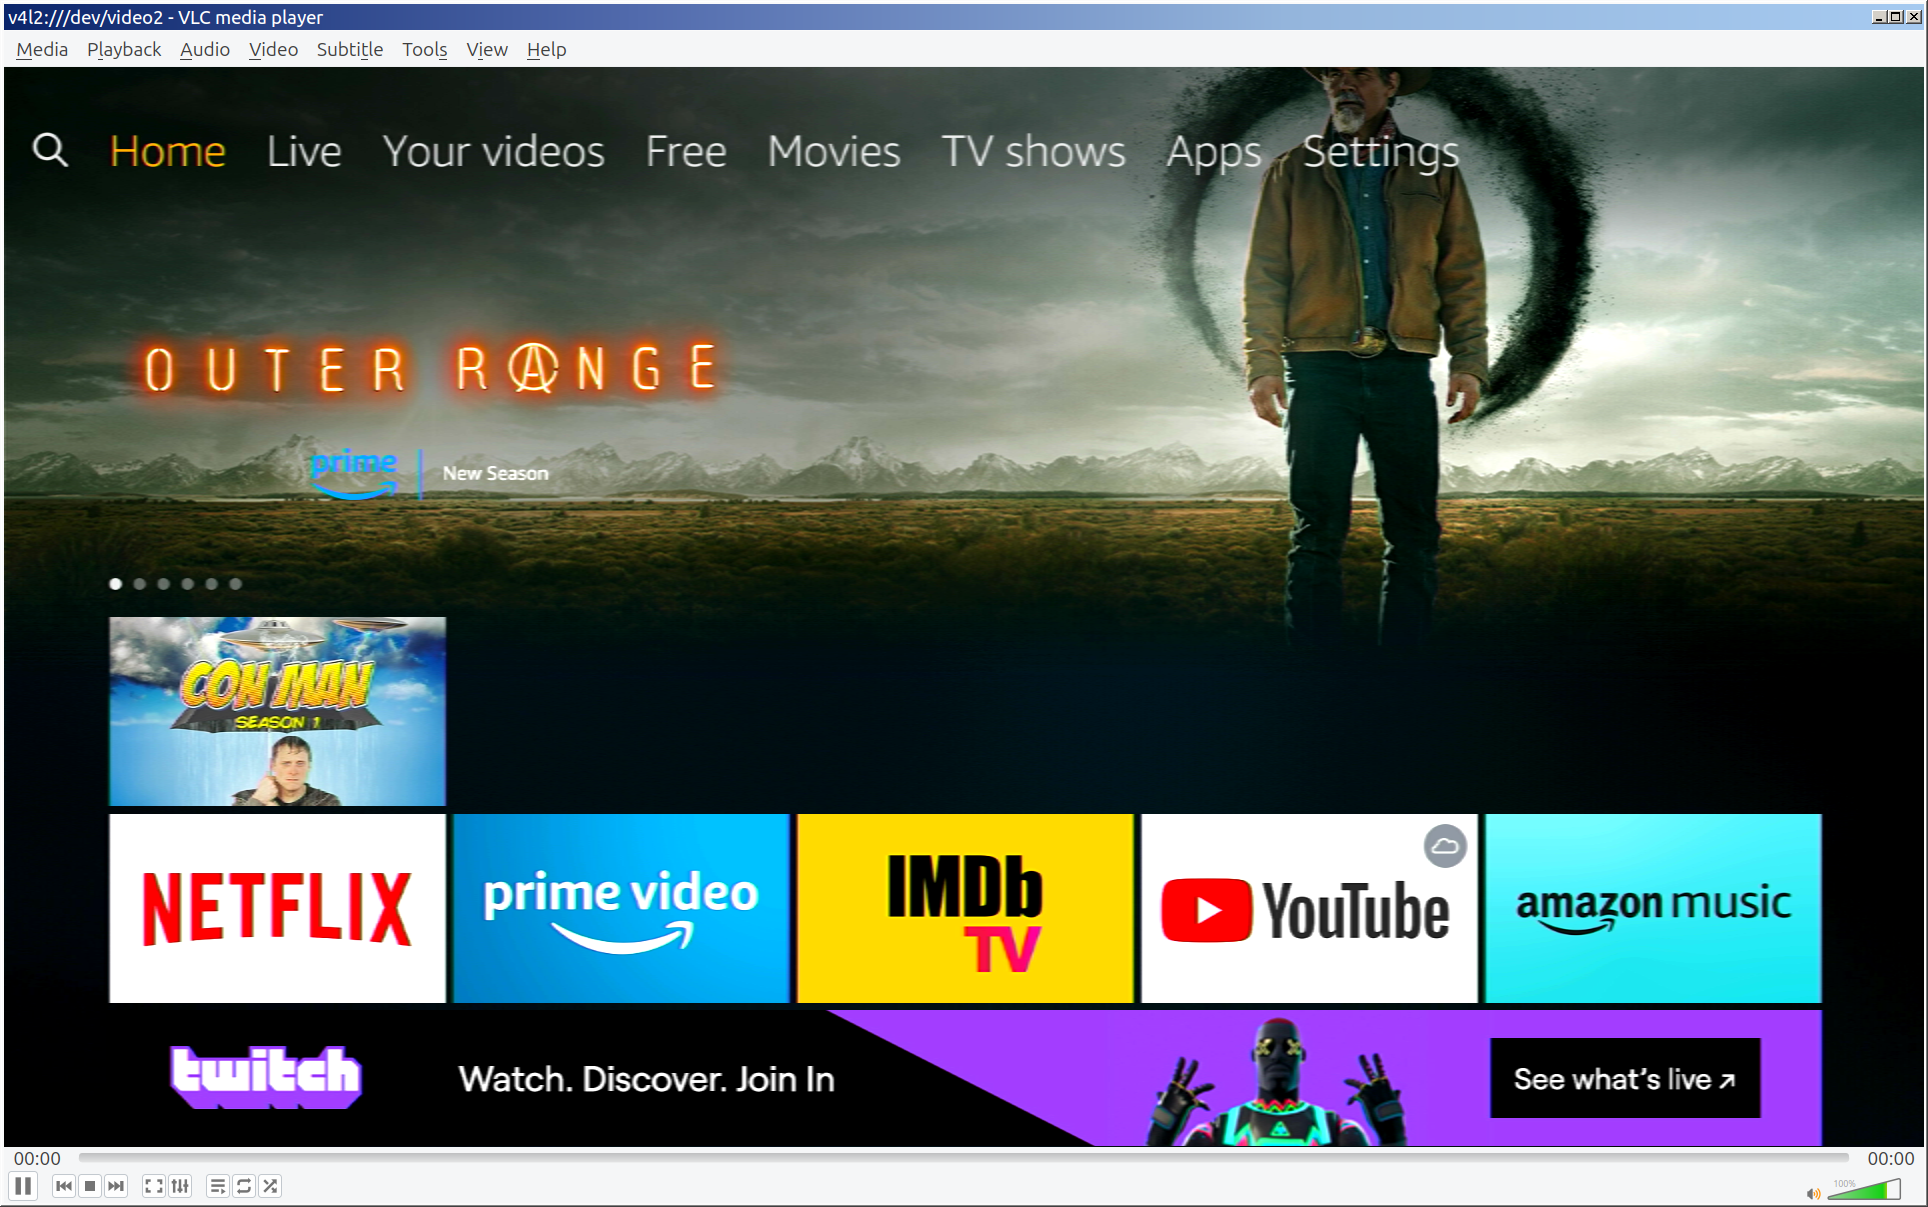
crw-rw----+ 1 root video 81, 2 May 17 11:36 /dev/video2
crw-rw----+ 1 root video 81, 3 May 17 11:36 /dev/video3
At this point, I just needed any old HDMI video signal. I plugged in an Amazon Fire TV stick that was in my "send to the thrift store" box. I used vlc to open /dev/video2 as a capture device.
![]()
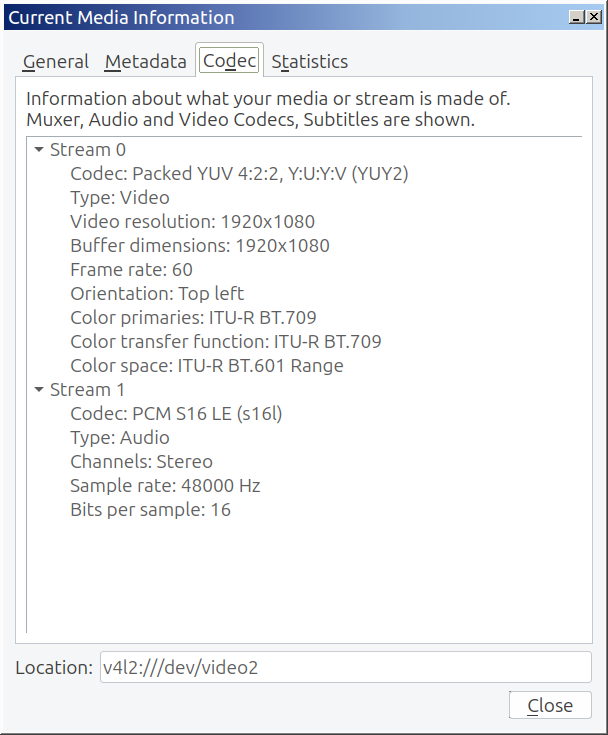
Hey, that worked! You can't see it, but the audio also played correctly. On my 4k monitor, that window with the FHD video doesn't look completely sharp, but it's good enough for the POC. Here's what vlc says about it:
The resolution is FHD (1920x1080), but it's only 5fps. The playing video has the choppy look that you'd expect from that frame rate. My quad-core low-powered Linux box reports about 30-50% on each core.
It didn't really prove anything that I didn't already know was OK, but I also streamed that video. My first attempt was to use mjpg-streamer, which I had used in an earlier project., but some python thing was giving me a hard time today. Instead, I used µStreamer, which is part of the PiKVM project. It doesn't include audio for this kind of setup, but I was able to view the playing video in a web browser.
Next steps: I've ordered a newer dongle that has a USB 3.0 interface, and I have some beefier Linux boxes to try. I am cautiously optimistic.
-
The HDMI dongles
05/17/2024 at 22:01 • 0 commentsThere are dongles that take HDMI input and plug into a USB port for output, and they are extremely cheap. They are readily available online for US$10-20. I've had one that looks like this for several years:
![]()
Until today, I'd never plugged it in. It was probably pretty cheap and I bought it for hazy future use after seeing it mentioned in some article somewhere. The future is now! The documentation that came with it claims it can accept an input of 4K@30fps and output FHD@30fps. I don't know if that claim is actually true. Even if it is, 30fps is less than desirable for watching TV. Newer iterations of similar dongles claim to output up to FHD@60fps. My TV is only FHD, not 4K, so FHD@60fps would be fine for now if it turns out to be true.
-
The DVR
05/17/2024 at 21:52 • 0 commentsDVR, I hear you ask. These days, it's relatively easy to create your own DIY DVR with inexpensive hardware. For example, a Raspberry Pi with a couple of USB hard drives is enough computer power. Digital tuners are available for receiving OTA programming. The most well-known is HDHomeRun, but there are others. Many paid programming services also make their live TV content available for streaming via a technology called TV Everywhere. For the software, I've experimented with Channels DVR, emby, and a few others. None are perfect, but several are good enough.
One of the side-effects of these various DIY DVR efforts is that the people involved, both the developers and the users, have lots of interesting ideas for how to deal with programming. It is some of those ideas that I am exploring in this project. In particular, it's aspects of these very long discussion threads in the Channels DVR community forums that set me to thinking.
BETA: Chrome Capture for Channels
ADBTuner: A “channel tuning” application for networked Google TV / Android TV devices
Streamo Encodo Cheapo
Trying to make an inexpensive HDMI encoder with off the shelf stuff
 I selected this one according to the Cheap and Lazy algorithm. I saw it mentioned by some other people, and it was inexpensive relative to others mentioned. It was also readily available with just a short delay. The day I bought it, there was also an instant coupon for US$20 off the price.