-
1Slicing the Video
This first step is to slice the video into individual images. This was done using FFmpeg. You only need to use FFmpeg to slice the video. You could also use it to make the images compatible with the screen, but we will use software by Waveshare for this E-Paper display to crop and recolor the frames.
.\ffmpeg.exe -hwaccel auto -i .\Howls_Moving_Castle.mkv -vf "fps=4,crop=1920:1040" -q:v 2 .\test\%02d.jpg
The following is a breakdown of each commands you can change.
- -i .\some_video.mkv: set the input video to be sliced.
- fps=4: Saves every 4th frame. You may want to change this to increase or decrease the amount of frames, based on how often you want to update the frame.
- crop=1920:1040: The video I used had black bars on the top and bottom. So I used crop to remove them - this can be removed if your images does not have the bars.
- -q:v 2: Changes the quality of the outputted image. 2 is the highest and 32 is the lowest. I would keep it at 2 since we will lower the resolution of the images in a following step.
- .\video_images\%04d.jpg: Sets the folder to save the images into and auto names the outputted images to #.jpg
-
2Process the Images
The next step is to process all the images to be able to be displayed on the E-Paper display. Waveshare supplies an application for the frame that will resize, recolor and apply a dithering algorithm to the images so that they work perfectly with the frame.
-PhotoPainter - Waveshare Wiki
Windows:
- Download the 7 Colors Dithering Pictures Convert Tool and unzip the folder.
- From the Windows folder copy the two files and paste then in the images folder created in the previous step.
- Double click the converterTo7color_all.cmd.
- Wait for all images to be converted - this will take a hour or so depending on the number of images.
- Once done move the converted photos to a folder named pic.
Mac:
- Download the 7 Colors Dithering Pictures Convert Tool and unzip the folder.
- In a terminal cd to the downloaded folder and then the Mac folder.
- Change the executable permission for both of the files in the folder.
- Once done move the converted photos to a folder named pic.
sudo chmod +x convert sudo chmod +x converterTo7color_all.sh - Then run the following to convert all of the images - this will take a hour or so depending on the number of images.
./converterTo7color_all.sh
Before:
![]()
After:
![]()
-
3Creating an image list
For the frame to display the images it needs a file that contains a list of all the image names.
To create the file you can use the python code or the .exe file in this GitHub repo - Honsl/PhotoPaperPrep (github.com).
- Place the .exe or .py file in the folder that contains the pic folder created in an earlier step. Then either run either of the files.
- Once it has run there will be a new file called fileList.txt. That contains a list of all of the photos in the pic folder.
Example file contents:
pic/100_image.bmp
pic/101_image.bmp
pic/102_image.bmp
pic/103_image.bmp
-
4Format SD card
For the frame to be able to read the images from the SD card, the card needs to be in FAT32 format
-
5Copy to SD Card
Next copy the pic folder and the fileList.txt onto the SD card.
DO NOT PLACE THE SD CARD IN THE FRAME YET.
-
6Preparing the Frame
The next step is is install the Lithium (Optional) and cell battery into the frame. The frame can be used without the Lithium battery and just be plugged into a wall via a USB C cable. The cell battery is required as it is used for the timing the image changes.
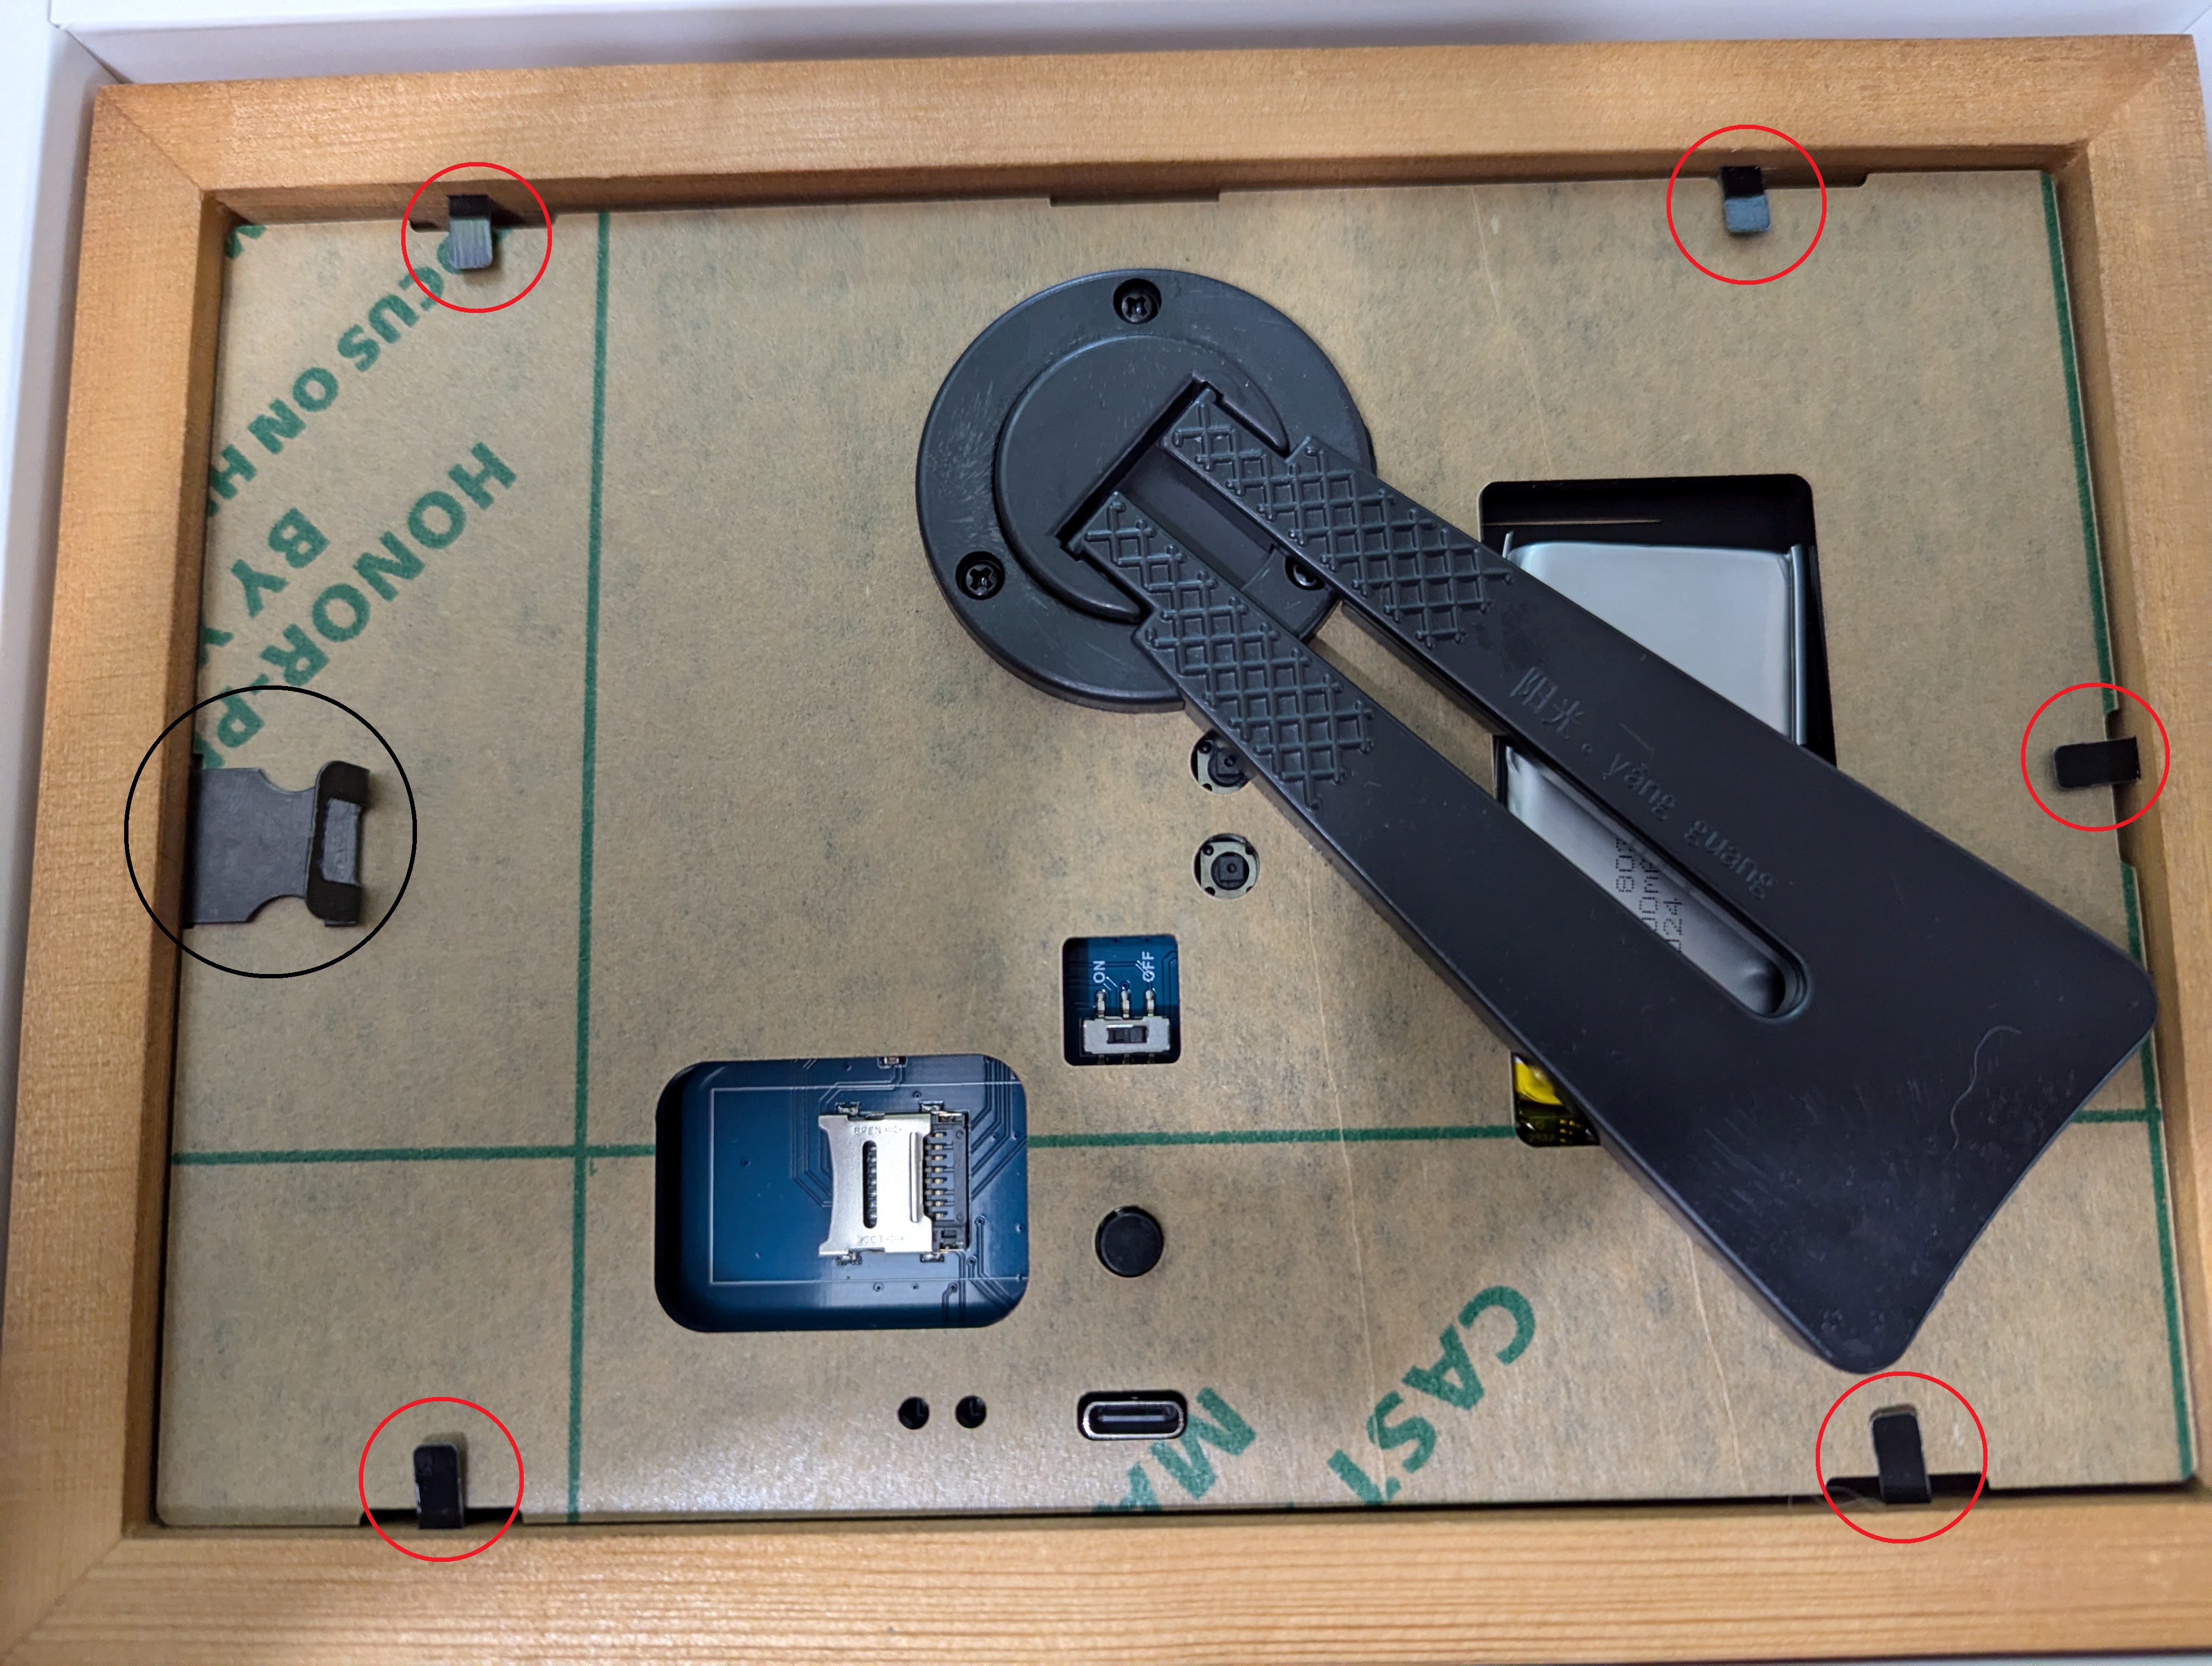
- Pull back the five black tabs (red circles) on the back of the frame and lift up the back. You will also want to move the hanging mount (black circle) - if you want to hang the frame in landscape. There is nothing else beside these tabs holding the screen to the frame - so don't pick up the frame without them pressed back down.
![]()
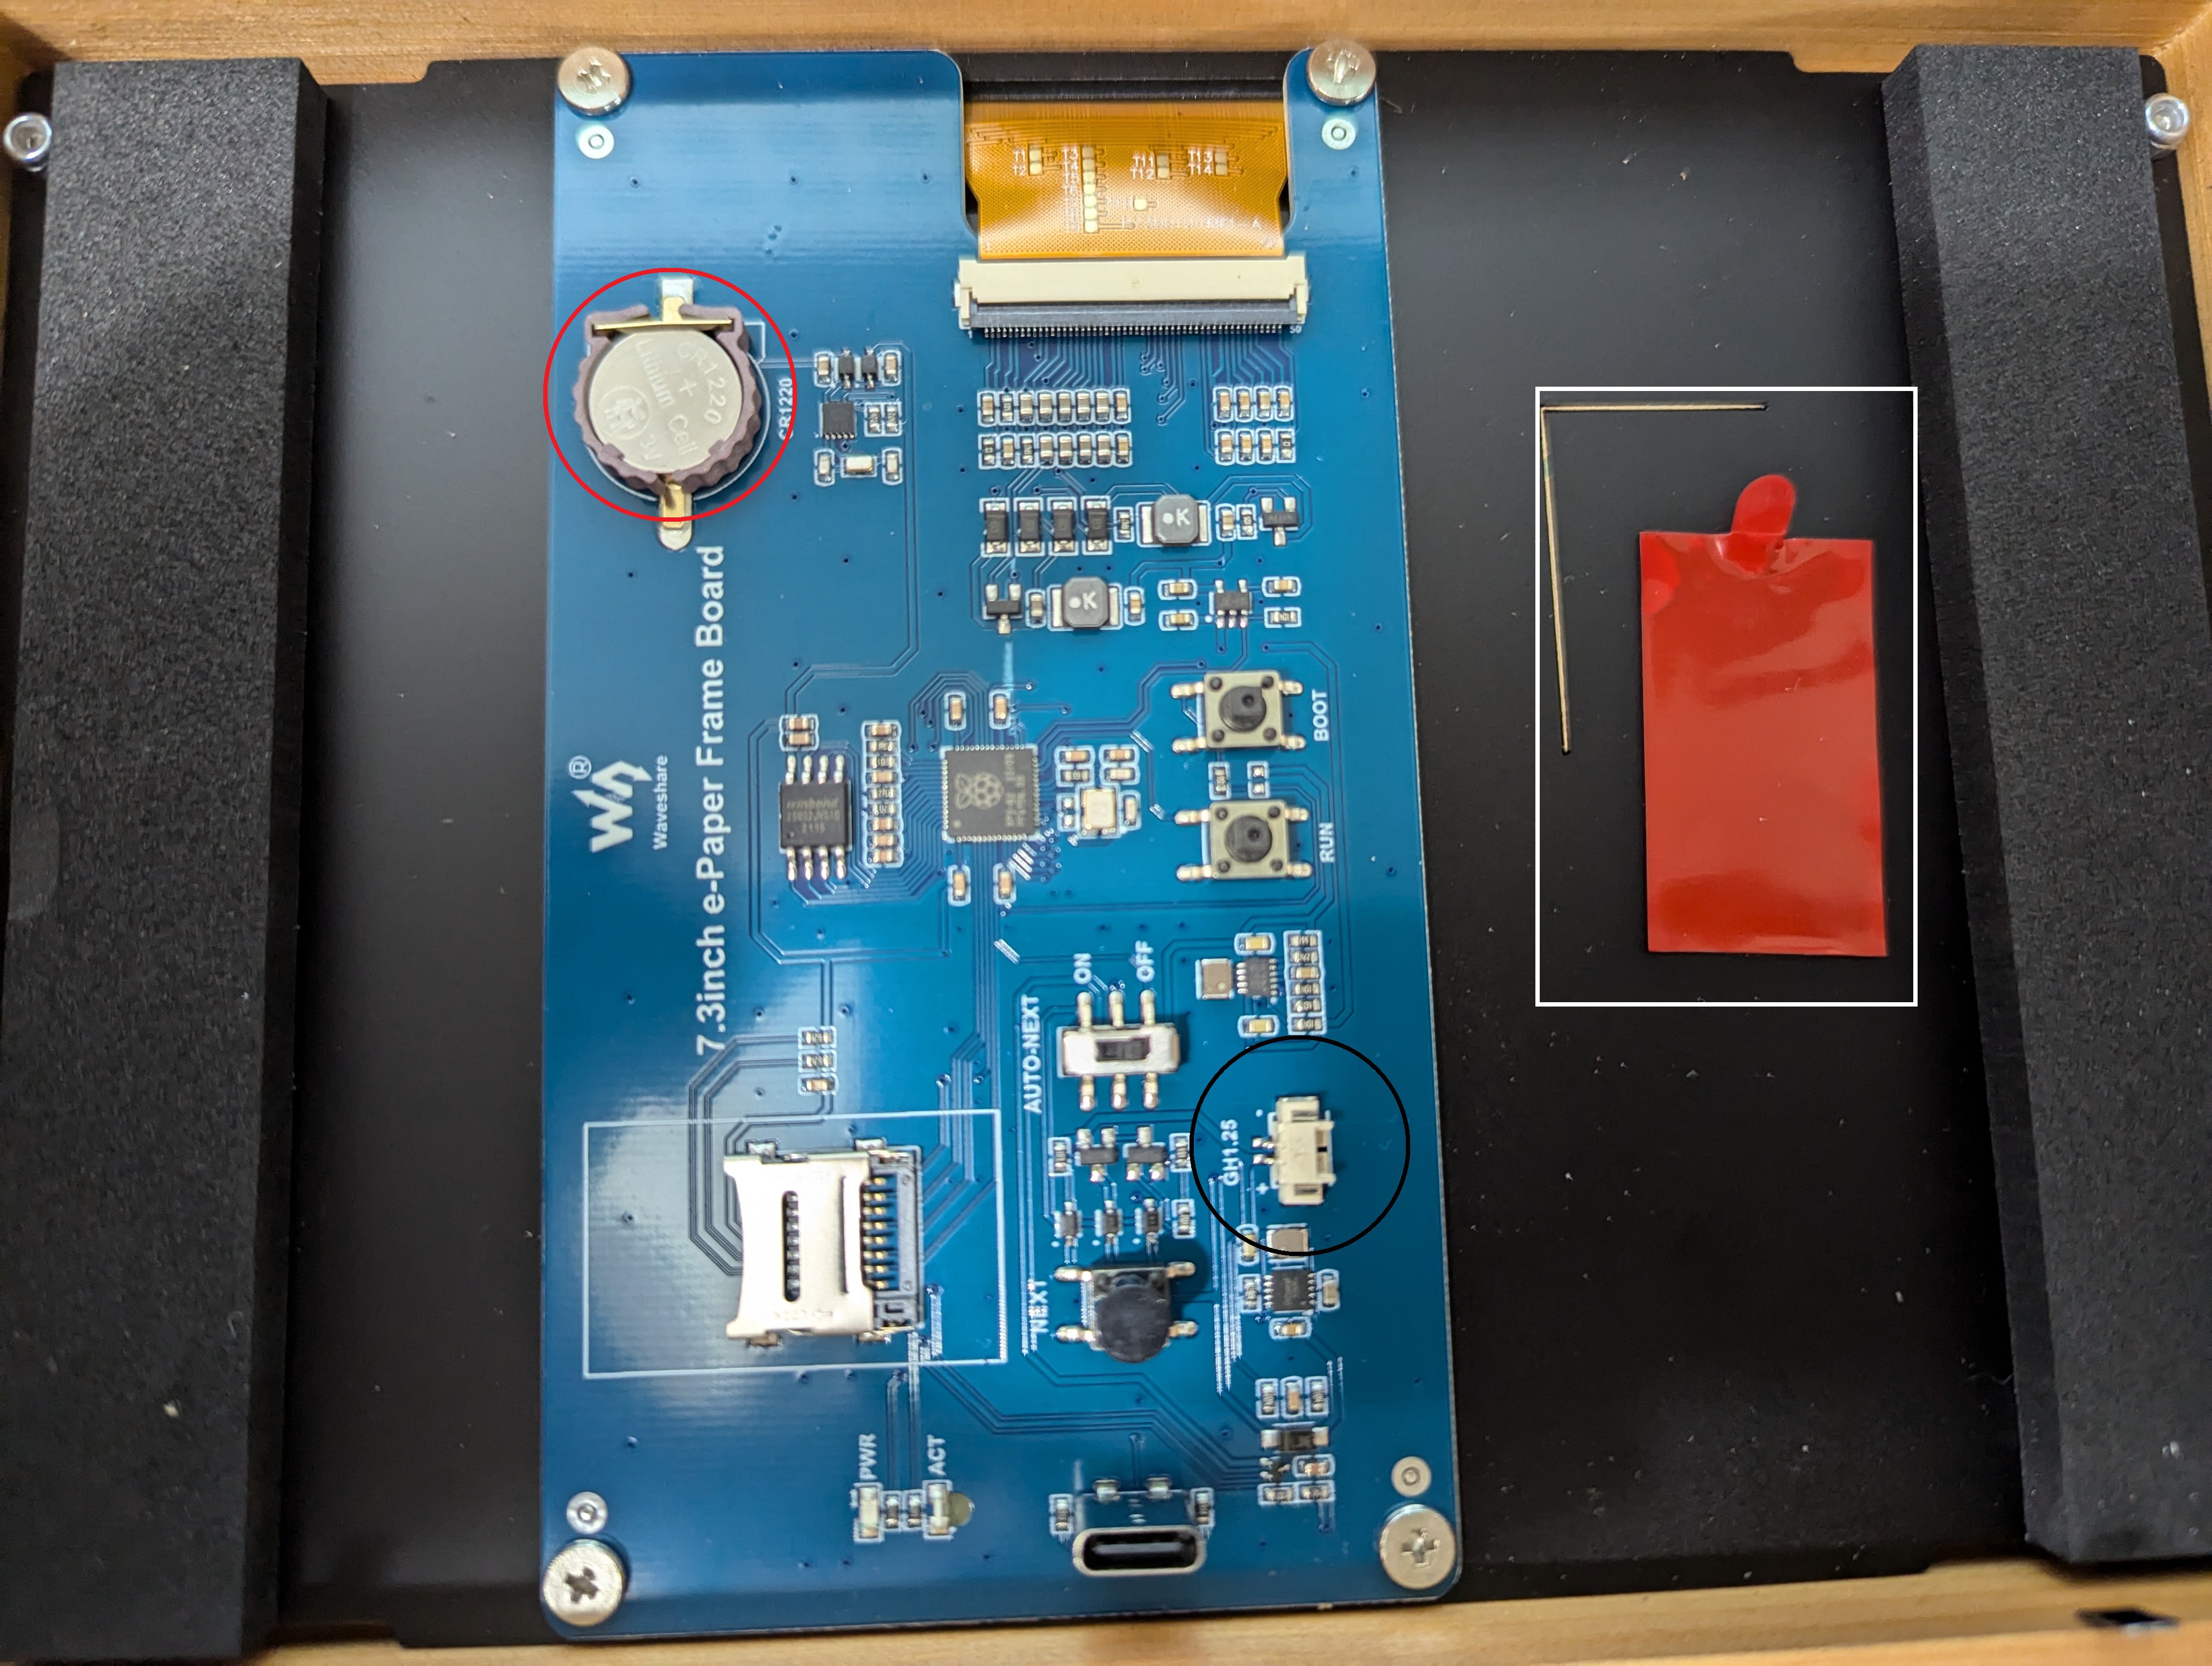
- Install the Lithium battery cable (Black Circle) and cell battery (Red circle). Place the back panel back on the frame fishing the battery back through the large rectangle. Make sure to press the black tabs back down.
![]()
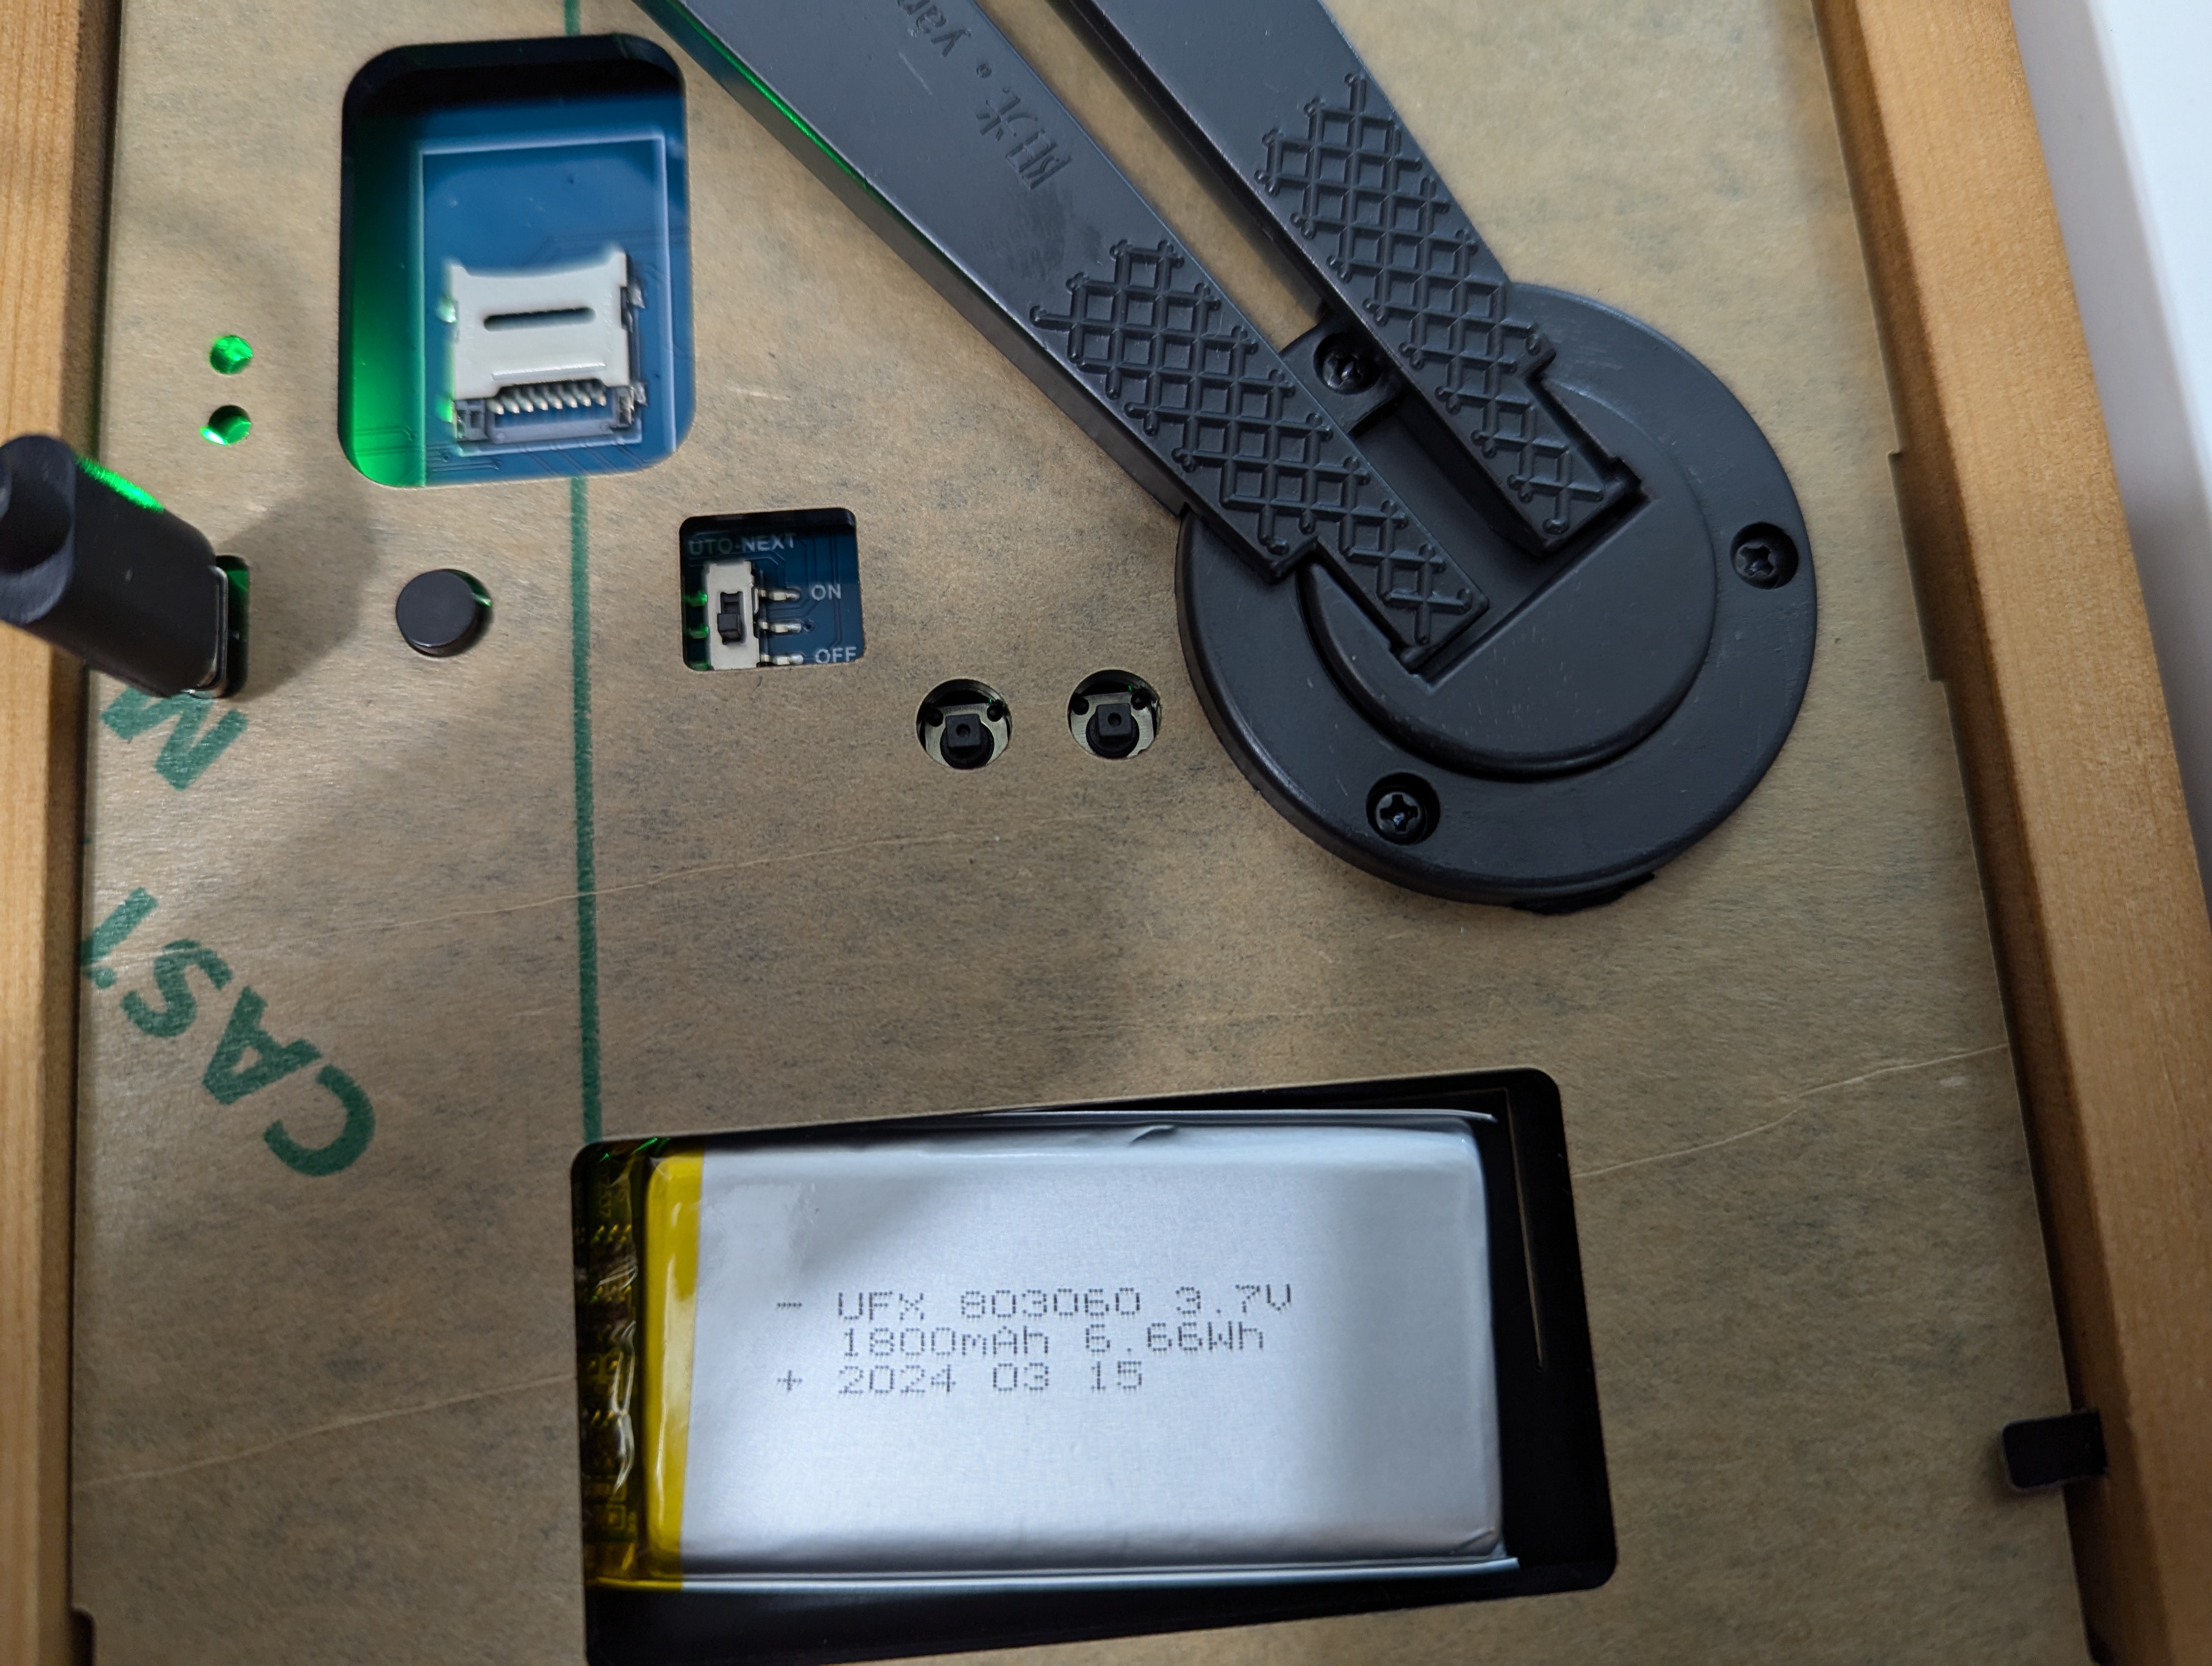
- Remove the red film (White rectangle) covering the sticky pad for the battery. Place the battery on the pad. Charge the battery with the USB C port until the light beside the port turns green.
![]()
Change the toggle switch from OFF to ON. To allow the frame to auto progress through the images.
- Pull back the five black tabs (red circles) on the back of the frame and lift up the back. You will also want to move the hanging mount (black circle) - if you want to hang the frame in landscape. There is nothing else beside these tabs holding the screen to the frame - so don't pick up the frame without them pressed back down.
-
7Update the Firmware
The original firmware for the frame only supports 100 images and updated the image every 12 hours. This does not work since from a video we will have 10's of thousands of videos. To get around this the frame has a mode that allows us to supply a .txt with a list of all the files. I have created new firmware updates that change the mode and the timing for the photo to update. You can find these in the files section. Select the .uf2 with the timing you want.
To upload the selected firmware
- Plug the frame into your computer via the USB C cable.
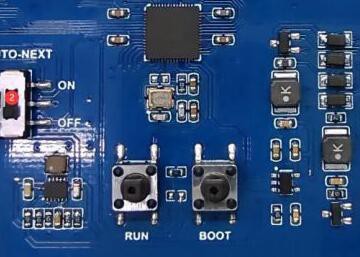
- Press RUN, then press BOOT, then release RUN, then release BOOT, a USB flash drive will pop up on the computer.
![]()
- Then drag the UF2 file into the drive.
- Once the file is transferred the frame will auto unmount from the computer.
- Unplug the frame from the computer.
-
8Insert the SD card
- insert the SD card into the frame.
- Hit the next button to have the frame load the first image.
Note: If the frame is not updating, plug the frame into a computer and click the RUN button. Wait for the red light to stop flashing and then it next.
Super Simple Slowest Video Player - 7 Colors
A simpler version of the Slowest video player


Discussions
Become a Hackaday.io Member
Create an account to leave a comment. Already have an account? Log In.