 kutluhan_aktar
-
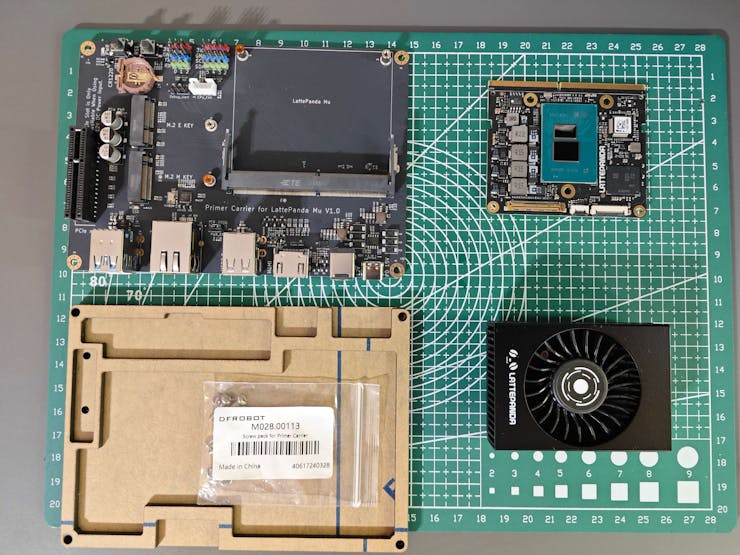
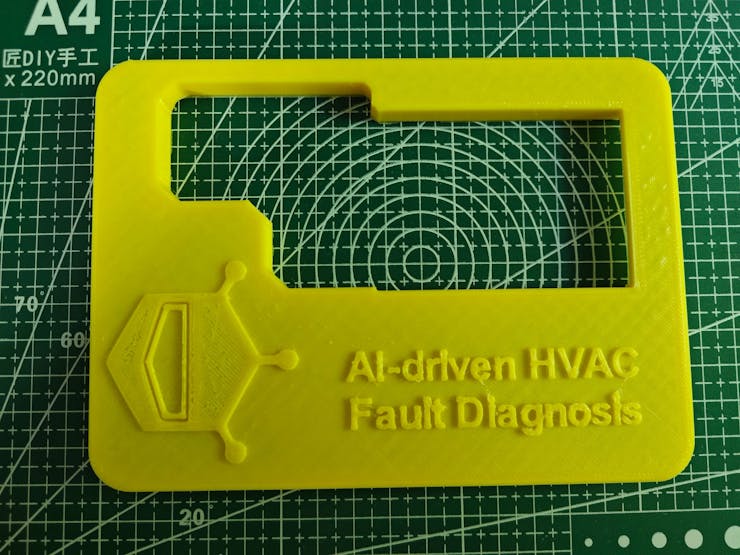
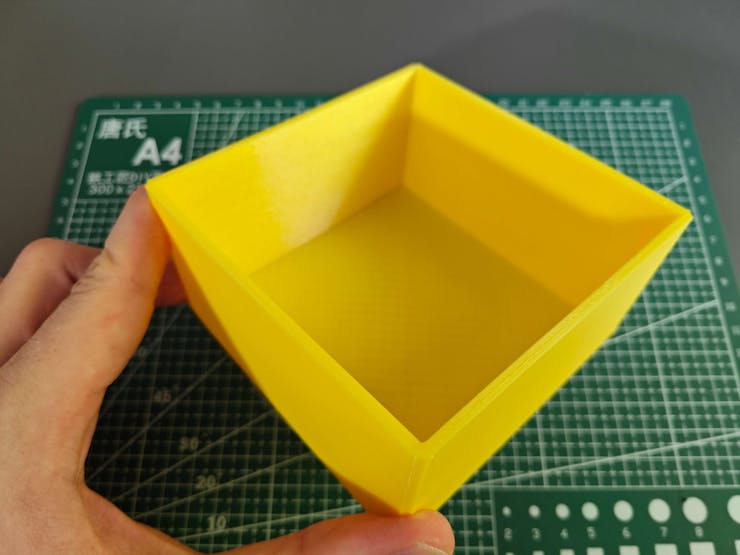
11Step 2.c.1: Assembling the 3D-printed components
After printing all 3D models related to the additional features, I started to combine the components with their associated parts.
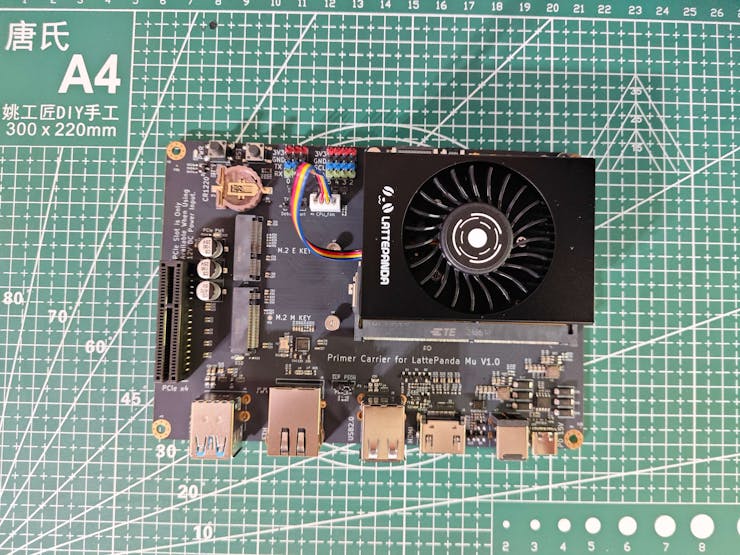
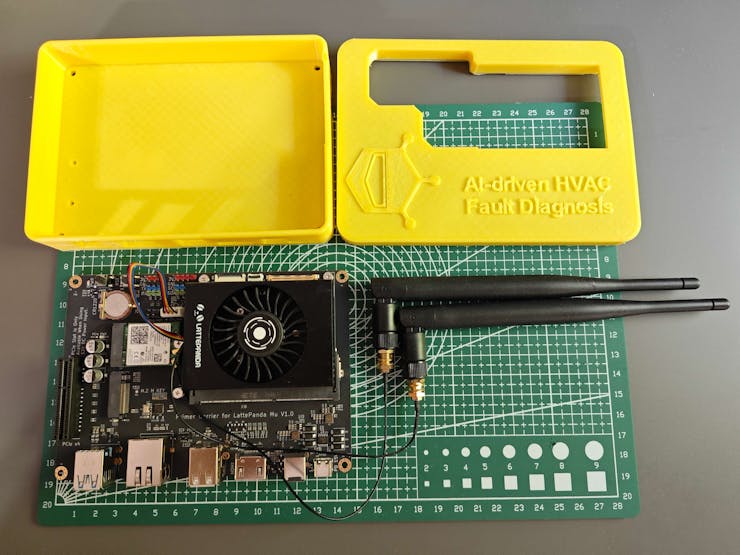
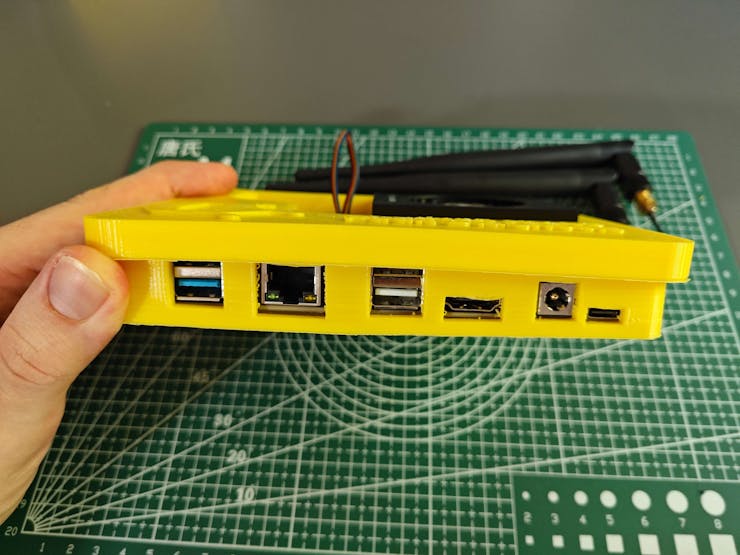
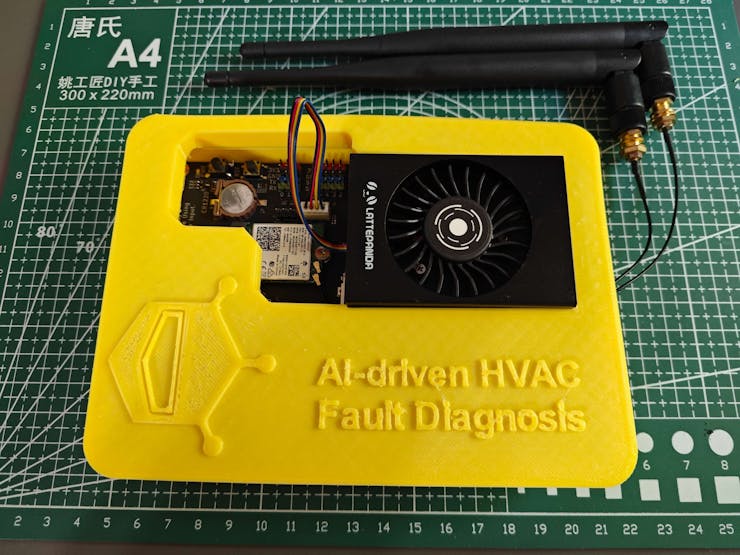
First, I installed the special heatsink, providing thermal paste, on LattePanda Mu and attached LattePanda Mu to the Lite Carrier board via the built-in connector (slot).
Since the Lite Carrier board does not support Wi-Fi connection out of the box, I connected an AC8265 wireless NIC module (WLAN expansion card) via the built-in M.2 E Key (2230).
![]()
![]()
![]()
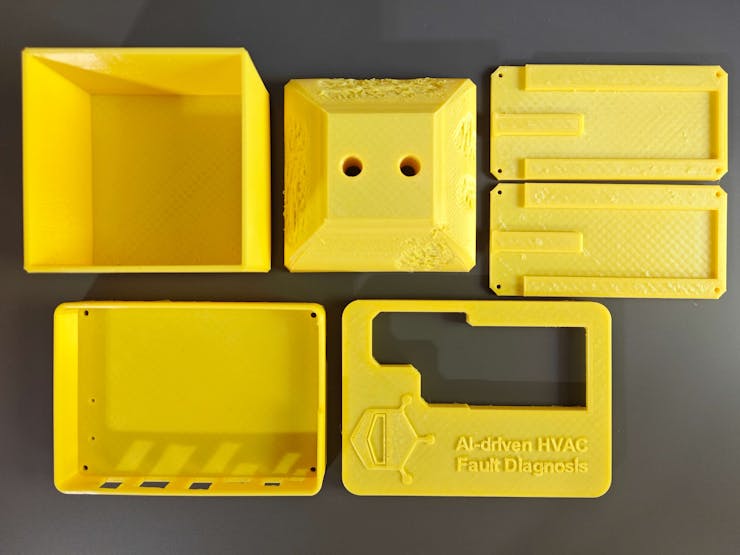
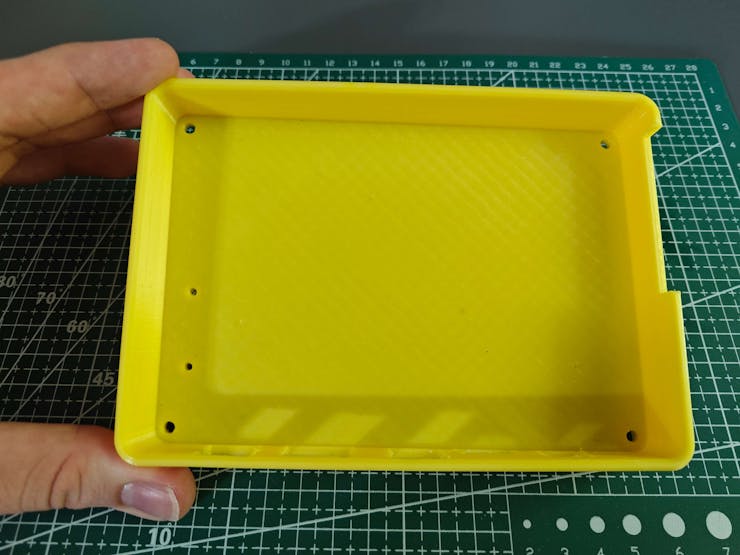
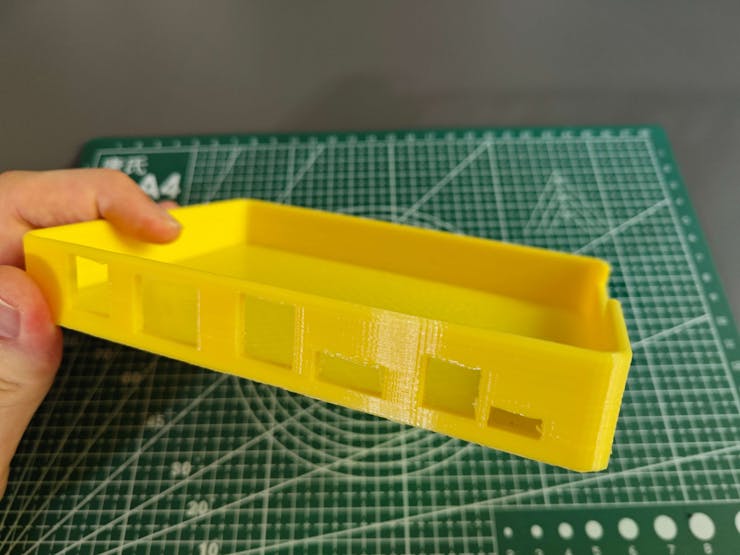
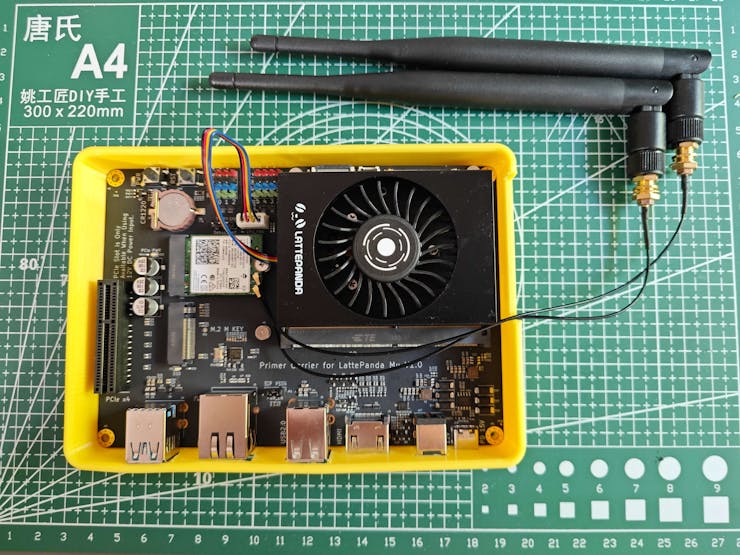
Since the water reservoir does not need assembly, I simply placed its removable top cover. Then, I fastened the aluminum cooling blocks to their holders via the hot glue gun. Since the LattePanda Mu case is printed with a flexible filament, I was able to place the Lite Carrier board into the case effortlessly.
![]()
![]()
![]()
![]()
![]()
![]()
![]()
![]()
![]()
![]()
![]()
![]()
![]()
![]()
-
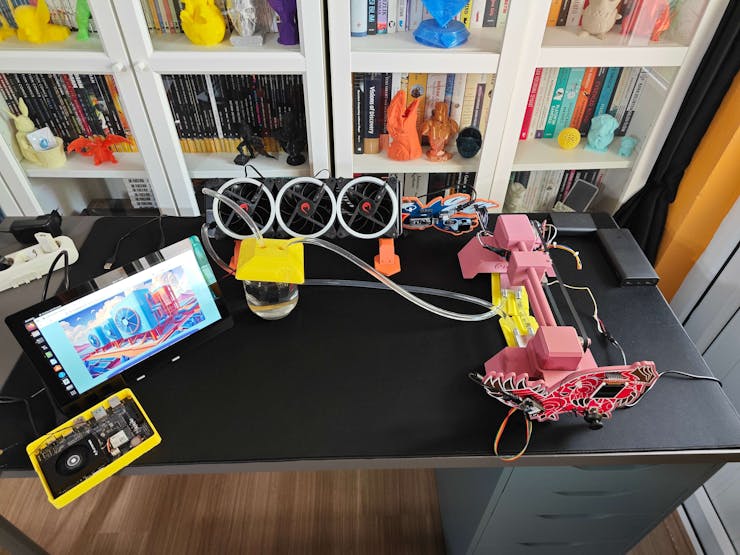
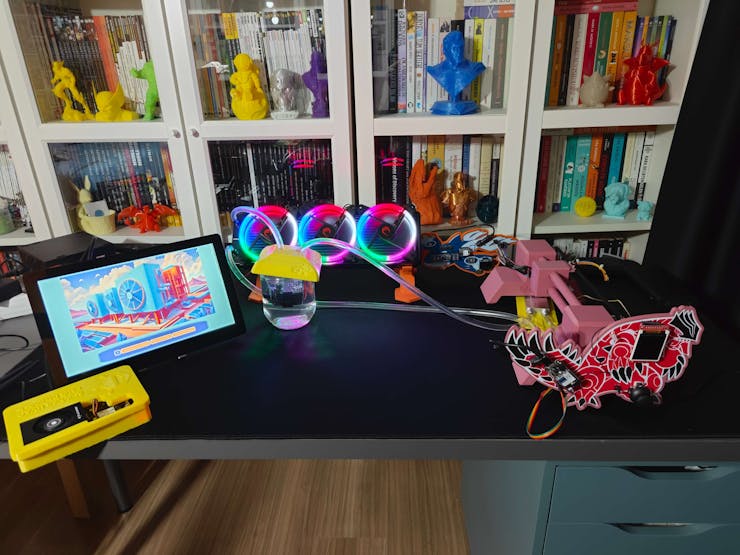
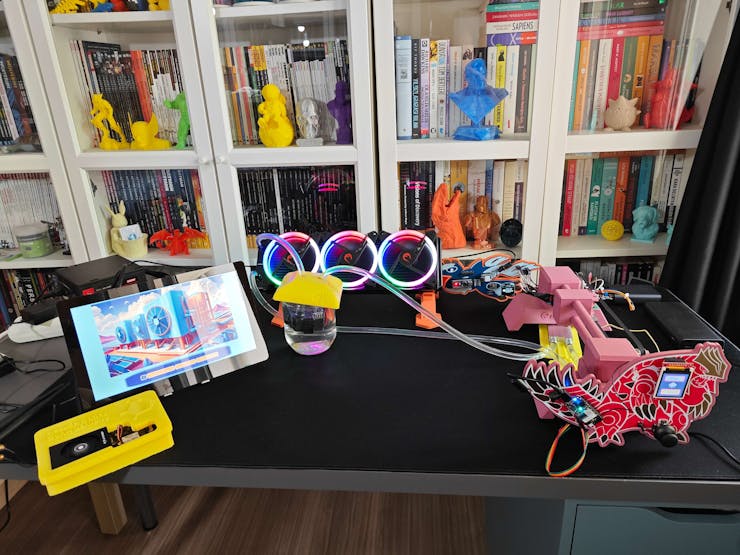
12Step 3: Setting up a simplified water-cooled HVAC system manifesting potential cooling malfunctions
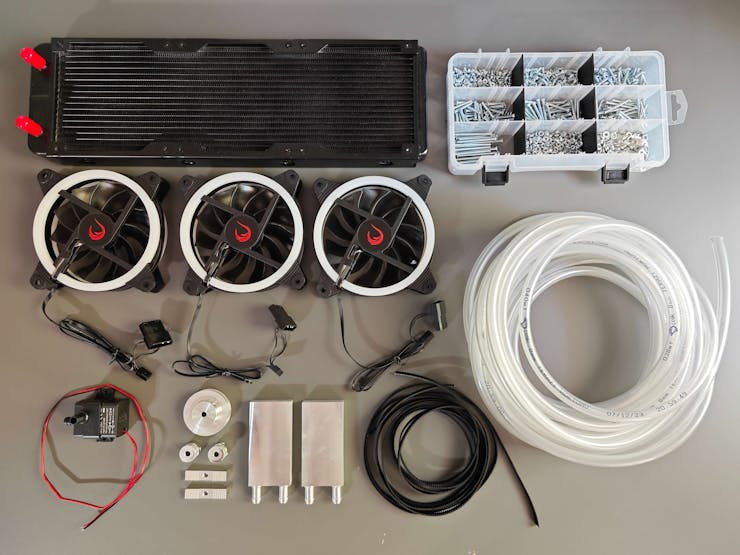
As discussed earlier, I needed to build a simplified water-based HVAC system to construct data sets fulfilling the purpose of multi-model HVAC malfunction diagnosis and to conduct in-field model testing. Since I got heavily inspired by PC (computer) water cooling systems, I built my simplified system by utilizing these water cooling components, reminiscent of a closed-loop PC water cooling design:
- an aluminum water cooling radiator,
- two aluminum water cooling blocks (40 x 80 mm),
- a water cooling pump (4.8 W - 240 L/H),
- 10 mm plastic tubing (hose),
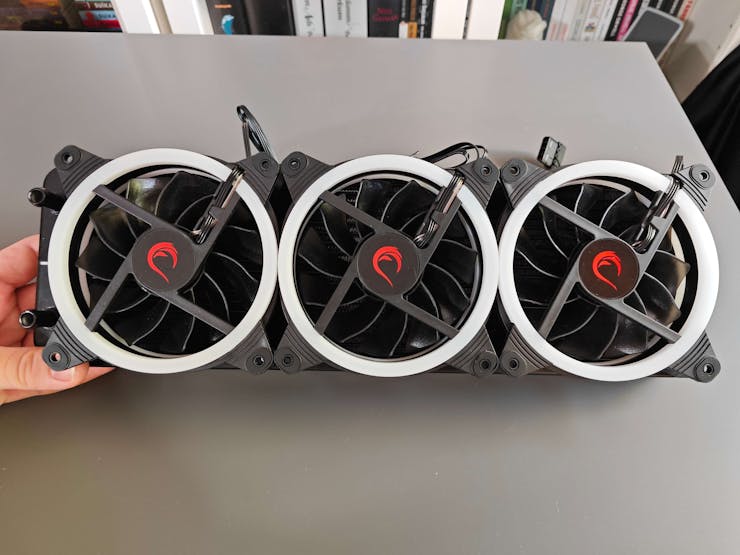
- three 120 mm case fans (RGB) compatible with the radiator.
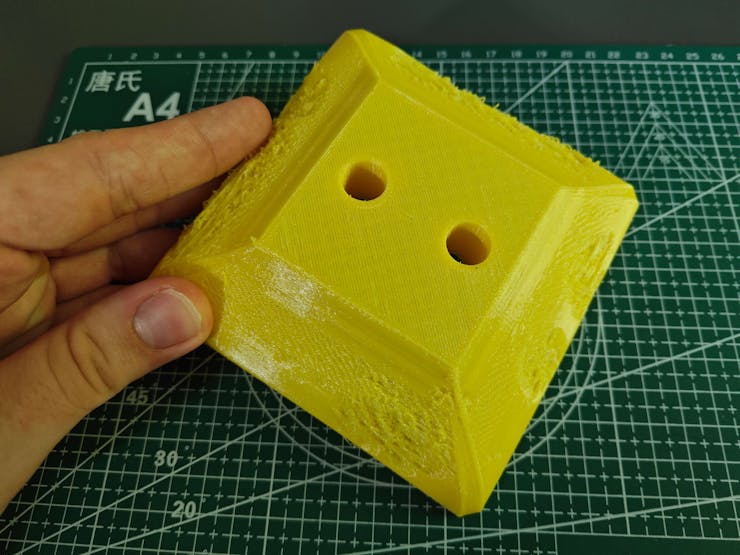
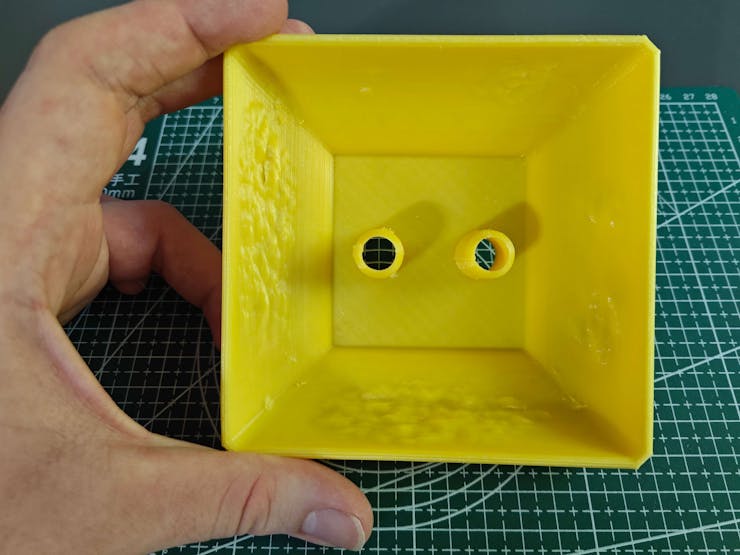
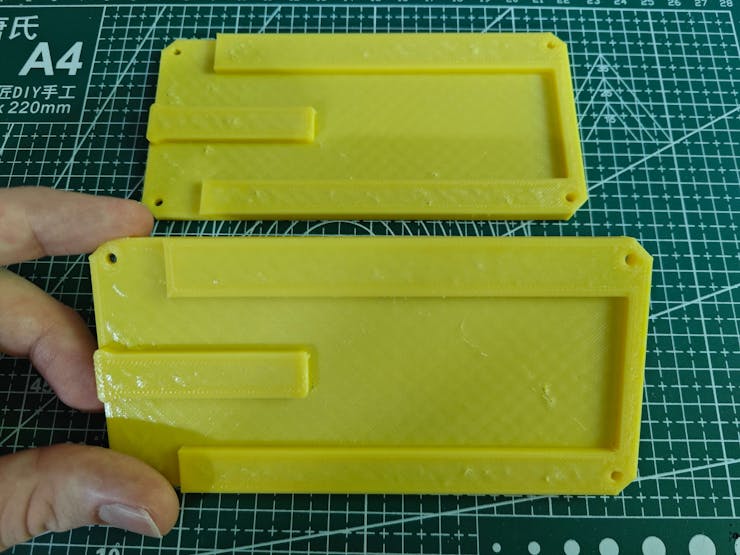
As mentioned, I decided to model a 3D-printable water reservoir, including a removable top cover with built-in plastic tubing fittings — IN and OUT.
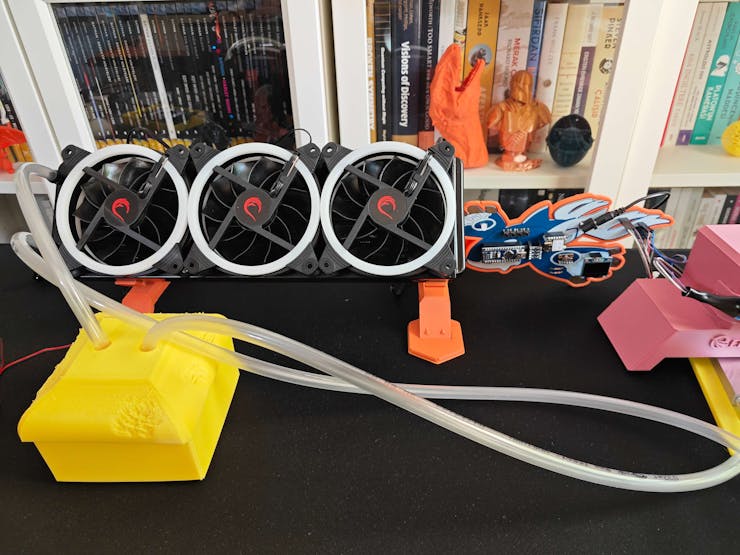
After concluding assembling all of the 3D-printed parts, I started to build the simplified water-based HVAC system.
![]()
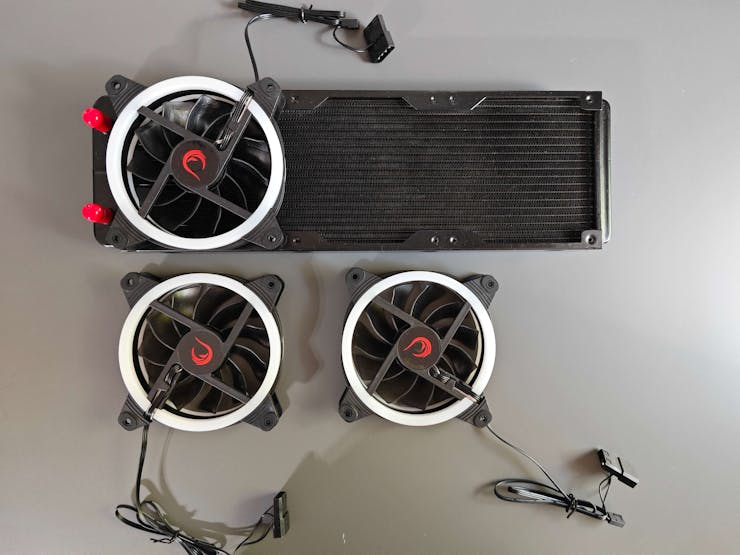
#️⃣ First, I attached 120 mm RGB case fans to the aluminum radiator via M3 screws and nuts.
![]()
![]()
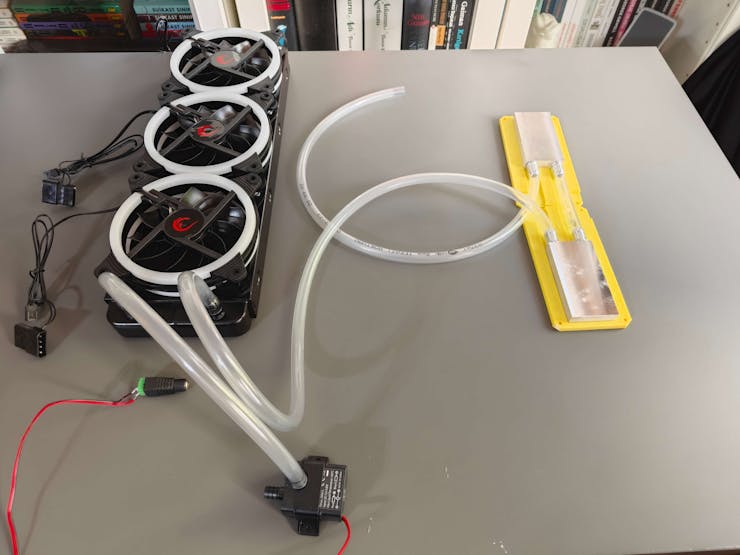
#️⃣ Then, I attached a terminal input female DC barrel jack to the water pump and connected two aluminum cooling blocks via plastic tubing.
![]()
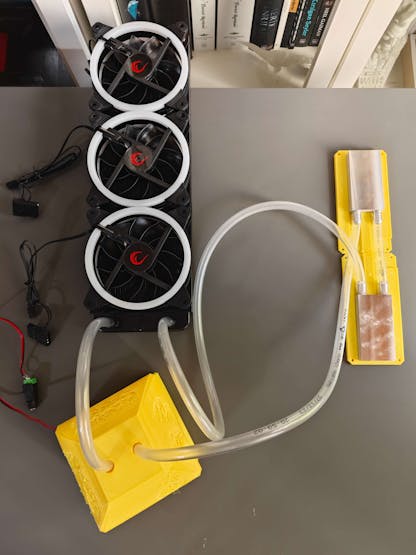
#️⃣ I created the closed-loop water cooling system by making connections via plastic tubing respectively:
Water Pump OUT ➜ Radiator IN ➜ Radiator OUT ➜ First Aluminum Block IN ➜ First Aluminum Block OUT ➜ Second Aluminum Block IN ➜ Second Aluminum Block OUT ➜ Custom Water Reservoir IN
![]()
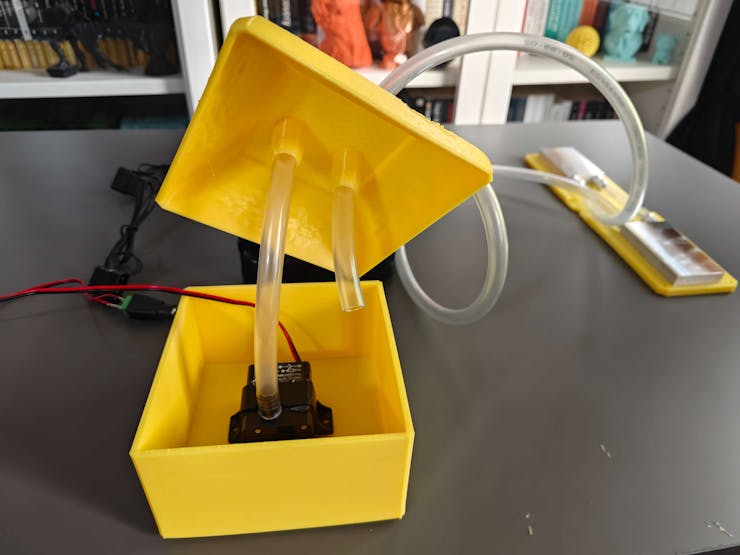
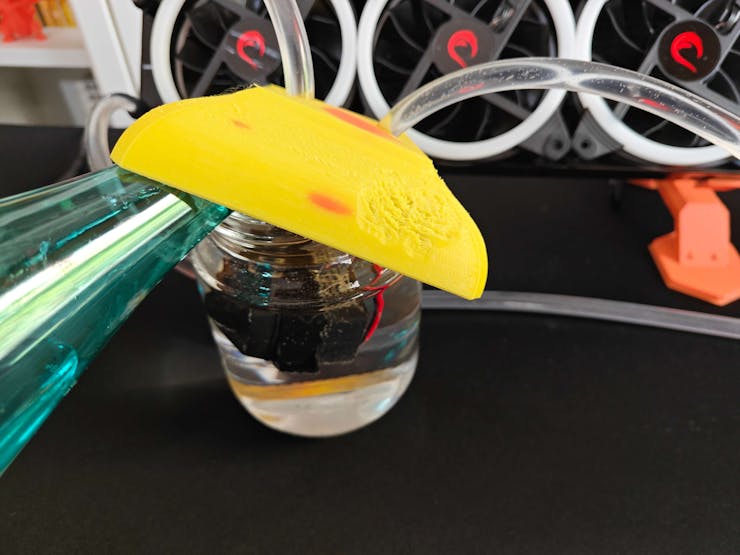
#️⃣ Finally, I fastened the water pump into the custom water reservoir and passed the cooling system IN and OUT tubings through the built-in plastic fittings on the reservoir top cover. Since I utilized TPU flexible filament to print the custom water cooling parts, I did not encounter any issues while connecting plastic tubings or circulating water through the system.
![]()
![]()
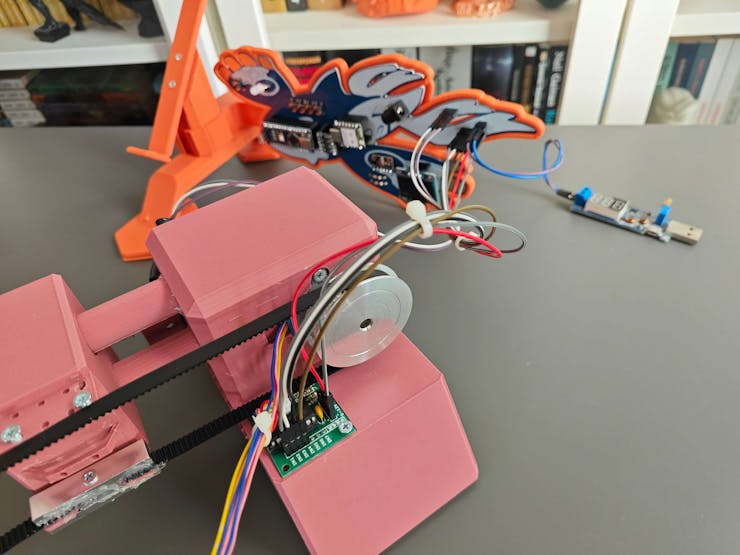
After completing the simplified closed-loop water cooling system, I started to work on combining PCBs, 3D parts, and the remaining components.
#️⃣ First, I attached the Kyogre PCB to its unique encasement affixed to the right radiator mount.
![]()
#️⃣ Then, I made the required connections between the ULN2003 driver board and the Kyogre PCB via jumper wires.
![]()
#️⃣ I fastened the micro switch (JL024-2-026) to its connector attached to the left CNC stand and made the required connections between the micro switch and the Kyogre PCB via jumper wires.
![]()
#️⃣ I attached the Groudon PCB to its unique encasement affixed to the right CNC stand.
![]()
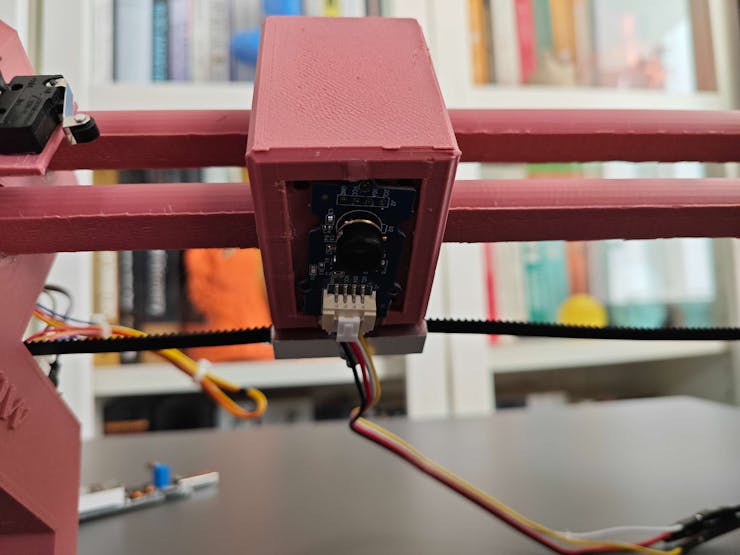
#️⃣ I fastened the MLX90641 thermal imaging camera to its slot on the thermal camera container head via the hot glue gun. Then, I made the required connections between the thermal imaging camera and the Groudon PCB by extending the Grove 4-pin connection cable via jumper wires.
![]()
![]()
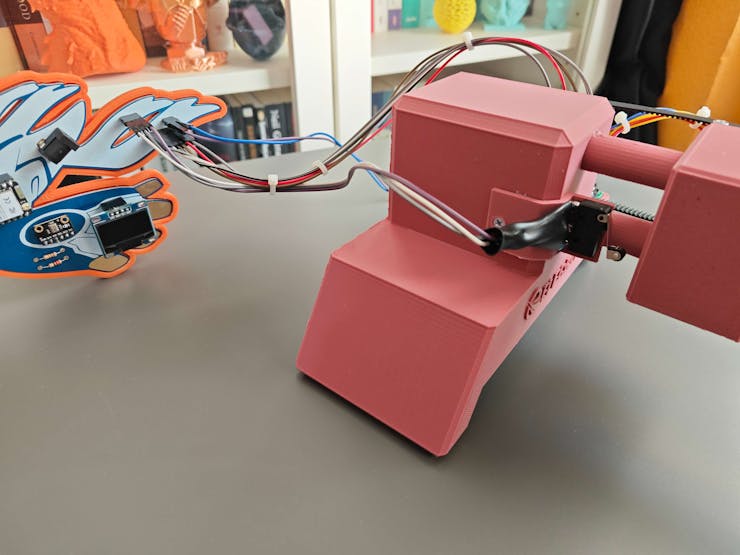
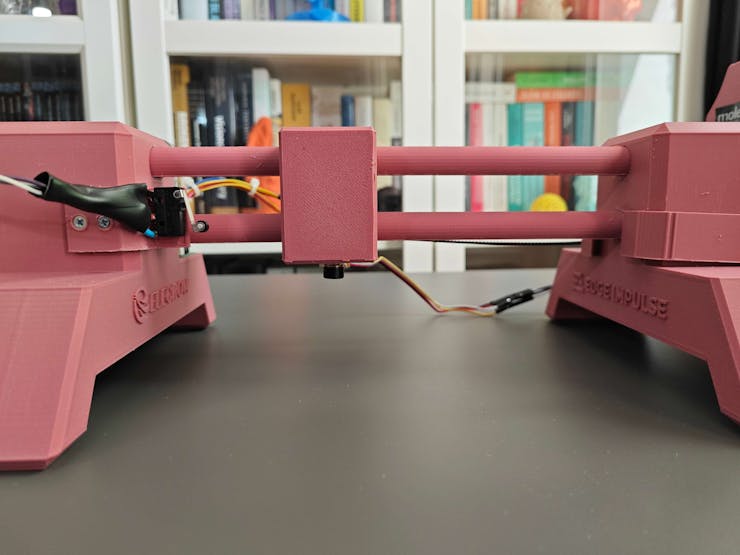
#️⃣ I attached the radiator to the radiator mounts in a tilted position and placed the aluminum cooling blocks under the custom CNC router, aligning the thermal imaging camera position.
![]()
![]()
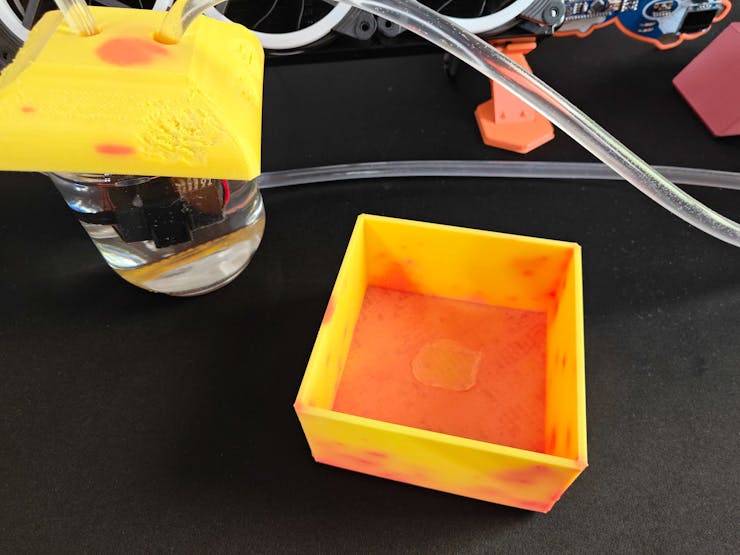
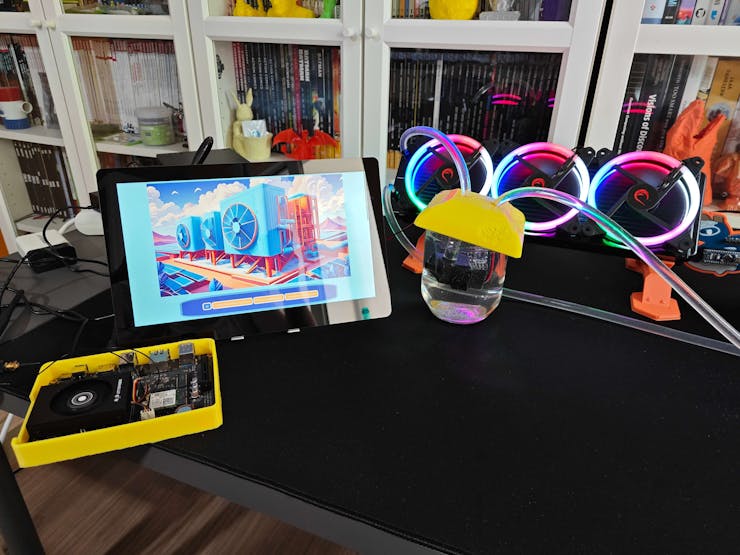
#️⃣ While conducting experiments with the completed HVAC system, I noticed the custom reservoir started leaking after changing color. I assume the reason is that the color-changing additives in the TPU filament slightly distort the infill shape of the bottom of the 3D-printed reservoir. Thus, I employed a glass jar as the reservoir to replace the leaking one.
![]()
![]()
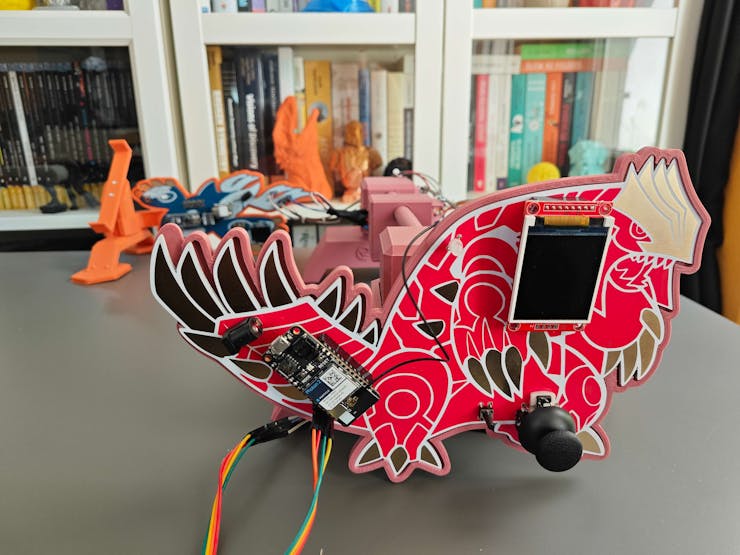
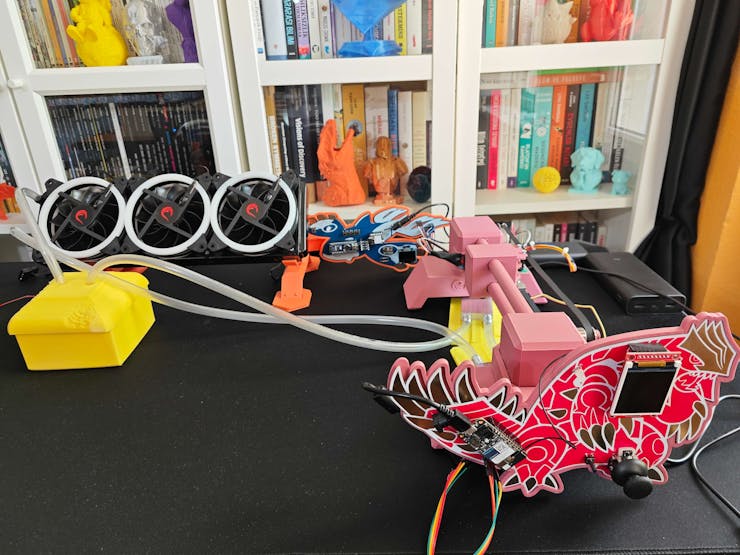
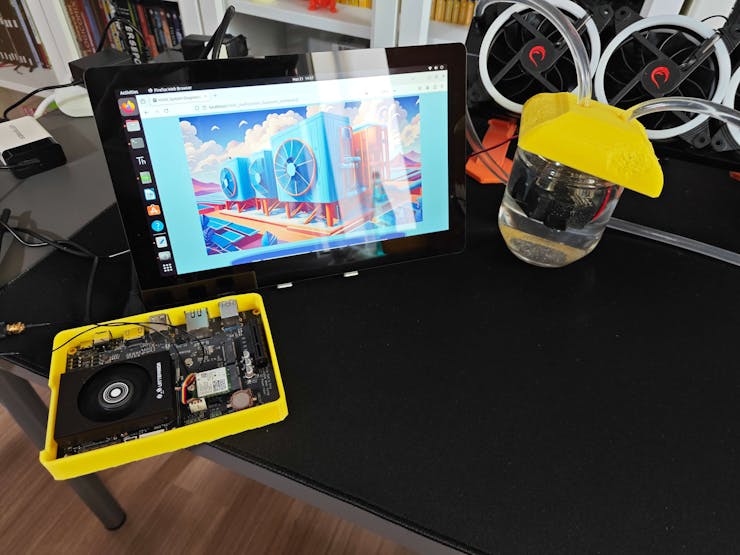
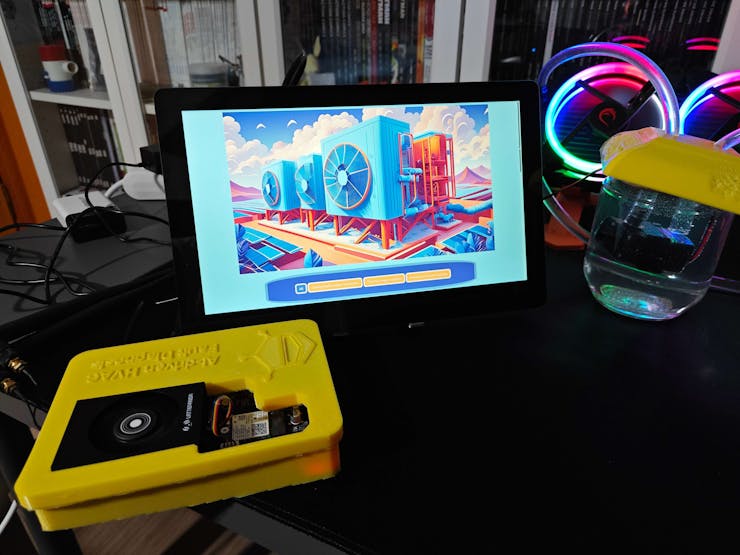
#️⃣ To showcase the web dashboard, I connected the CrowVision 11.6'' touchscreen module to LattePanda Mu via an HDMI to Mini-HDMI cable. Since I placed the Lite Carrier board into its custom flexible case, I did not encounter any issues while connecting peripherals to LattePanda Mu.
![]()
![]()
![]()
![]()
After concluding all of the mentioned assembly stages, I started to conduct experiments to simulate and detect HVAC system cooling malfunctions.
![]()
![]()
![]()
-
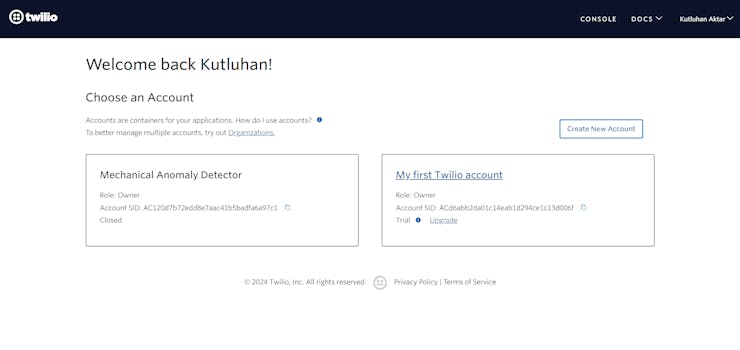
13Step 4: Creating an account to utilize Twilio's SMS API
Since I decided to inform the user of the latest diagnosed cooling malfunctions via SMS after running the Audio MFE and visual anomaly detection models consecutively, I decided to utilize Twilio's SMS API. In this regard, I was also able to transfer the prediction date and the modified resulting image name for further inspection through the web dashboard (application).
Twilio provides a trial text messaging service to transfer an SMS from a virtual phone number to a verified phone number internationally. Also, Twilio supports official helper libraries for different programming languages, including PHP, enforcing its suite of APIs.
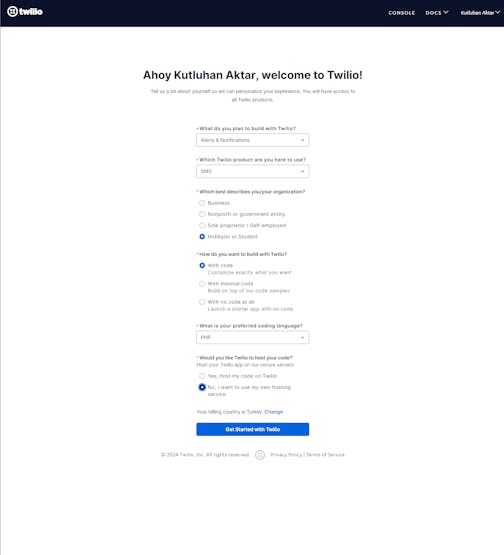
#️⃣ First of all, sign up for Twilio and navigate to the Account page to utilize the default (first) account or create a new account.
I noticed that creating free subsidiary accounts (projects) more than once may lead to the permanent suspension of a Twilio user account. So, I recommend using the default trial account or a previously created account if you have multiple iterations or did not subscribe to a paid plan.
![]()
![]()
#️⃣ After verifying a phone number for the selected account (project), set the initial account settings for SMS in PHP.
![]()
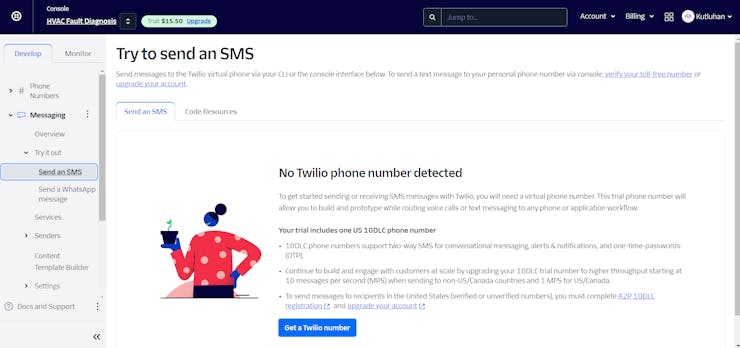
#️⃣ To configure the SMS settings, go to Messaging ➡ Send an SMS.
#️⃣ Since a virtual phone number is required to transfer an SMS via Twilio, click Get a Twilio number.
![]()
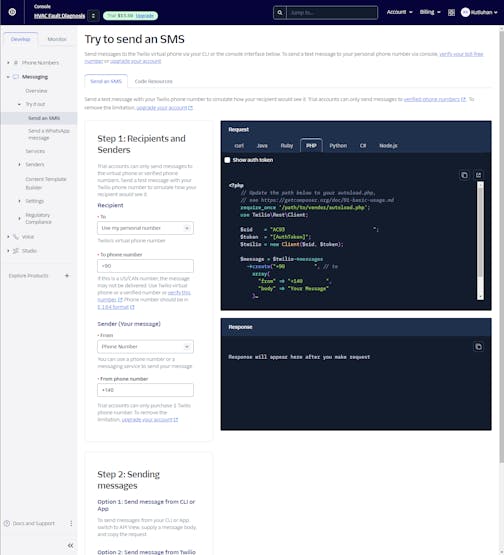
Since Twilio provides a free 10DLC virtual phone number for each trial account, Twilio allows the user to utilize the text messaging service immediately after activating the given virtual phone number.
#️⃣ After obtaining the free virtual phone number, download the Twilio PHP Helper Library to send an SMS via the web dashboard.
![]()
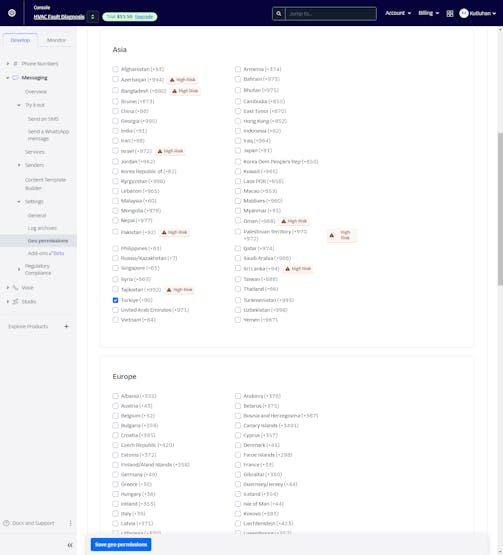
#️⃣ Finally, go to Geo permissions to adjust the allowed recipients depending on your region.
![]()
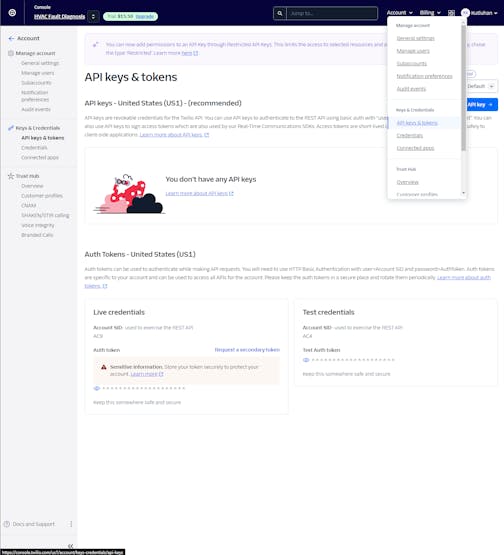
#️⃣ After configuring the required settings, go to Account ➡ API keys & tokens to get the account SID and the auth token under Live credentials to be able to employ Twilio's SMS API to send SMS.
![]()
-
14Step 5.0: Setting up the XAMPP application and the required Python modules on LattePanda Mu (Ubuntu 22.04)
Before starting to develop the web dashboard (application), I needed to configure the required software and Python modules on LattePanda Mu to be able to host the web dashboard, produce thermal images for data collection, and run the FOMO-AD visual anomaly detection model.
Since the web dashboard heavily relies on Python modules, especially for running the FOMO-AD model via the Edge Impulse Linux Python SDK, I set up Ubuntu as the operating system for LattePanda Mu. As I was working on this device, Ubuntu 22.04 was officially supported by LattePanda Mu. You can inspect the prioritized operating system versions here.
Plausibly, the XAMPP application provides an official Linux installer. So, creating a local server with a MariaDB database to host the web dashboard (application) on LattePanda Mu becomes straightforward and effortless.
#️⃣ First, download the XAMPP Linux installer.
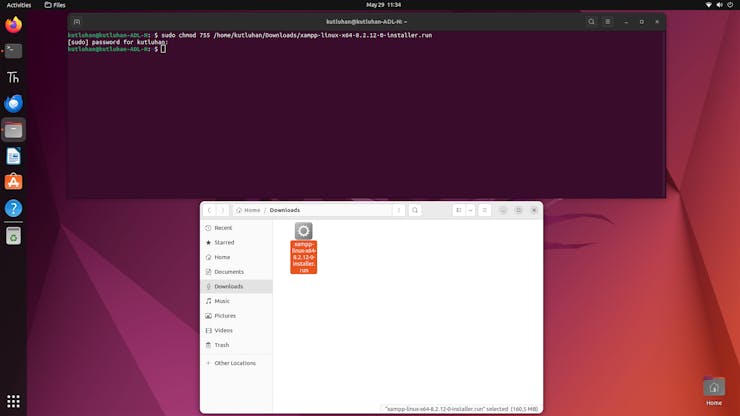
#️⃣ After downloading the XAMPP installer, change its permissions via the terminal (command line).
sudo chmod 755 /home/kutluhan/Downloads/xampp-linux-x64-8.2.12-0-installer.run
![]()
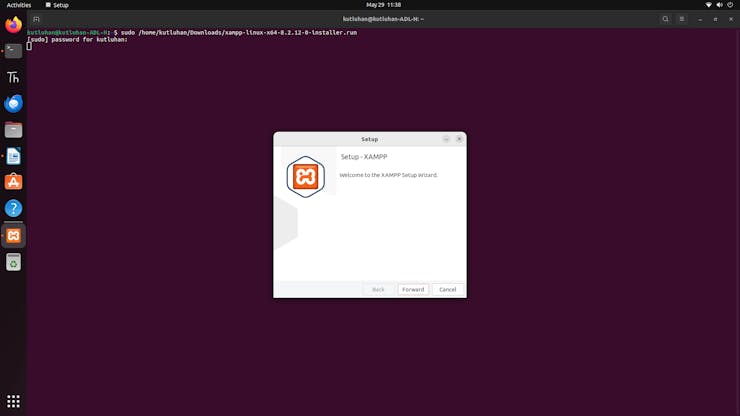
#️⃣ Then, execute the XAMPP installer via the terminal.
sudo /home/kutluhan/Downloads/xampp-linux-x64-8.2.12-0-installer.run
![]()
![]()
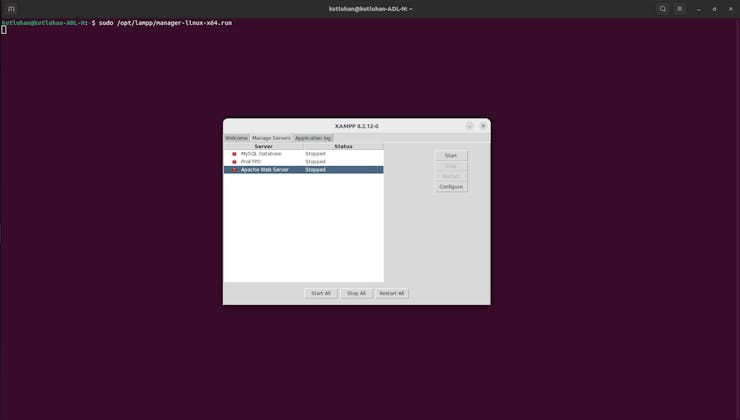
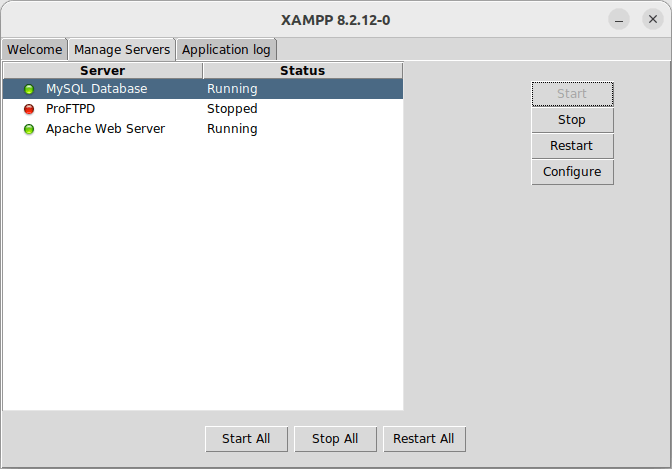
#️⃣ After configuring the required settings via the installer, run the XAMPP application (lampp) via the terminal.
sudo /opt/lampp/manager-linux-x64.run
#️⃣ Since the XAMPP development environment does not create a shortcut on Linux, you always need to use the terminal to launch XAMPP (lampp) unless you enable autostart.
![]()
![]()
After installing and setting up the XAMPP application (lampp) on LattePanda Mu, I needed to configure some settings to make the web dashboard (application) access the terminal and execute Python scripts.
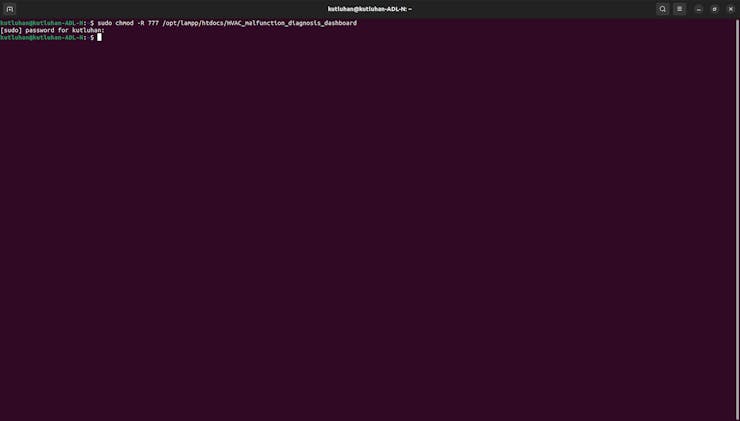
#️⃣ First, create the web application folder under the lampp folder and change its permissions via the terminal to be able to generate, open, and save files.
sudo chmod -R 777 /opt/lampp/htdocs/HVAC_malfunction_diagnosis_dashboard
![]()
However, even after changing the permissions, the web application cannot access the terminal and utilize the sudo command required to execute necessary Python scripts with the root user (super-user) privileges.
Although assigning super-user privileges to different users is a security risk, I decided to give the web application the ability to access the terminal with root user privileges. In this case, it was applicable since the XAMPP application is only operating as a local development environment.
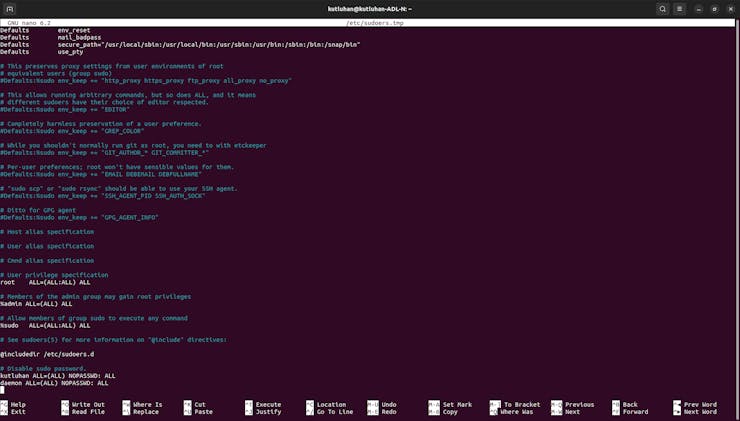
#️⃣ Since we need to edit the sudoers file to change user privileges, open the terminal and utilize the visudo command to alter the sudoers file safely.
sudo visudo
#️⃣ Since the XAMPP application (lampp) employs daemon as the user name, add these lines to the end of the sudoers file to enable the web application to run the sudo command without requiring a password.
# Disable sudo password.<_username_> ALL=(ALL) NOPASSWD: ALLdaemon ALL=(ALL) NOPASSWD: ALL
![]()
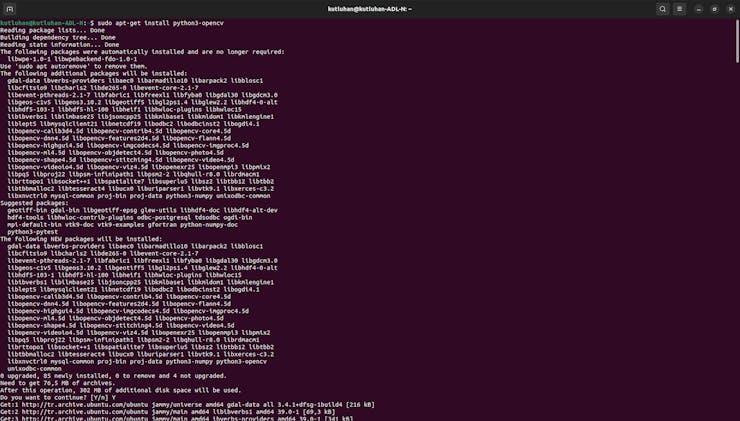
After configuring the required permissions and privileges for the web application, I needed to install the necessary Python modules.
#️⃣ First, install the OpenCV module required to generate and modify thermal images.
sudo apt-get install python3-opencv
![]()
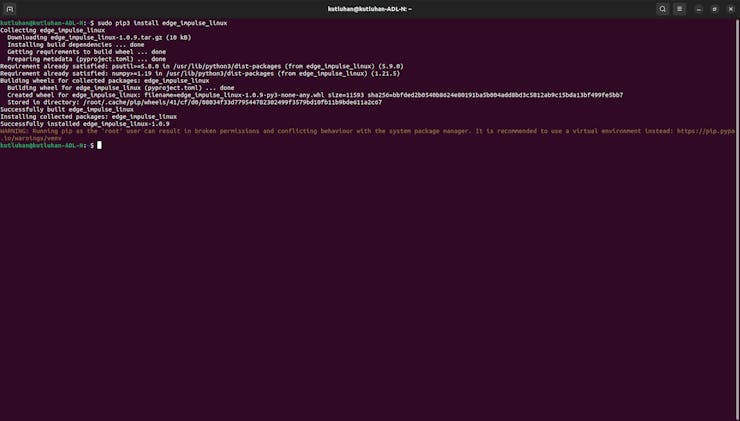
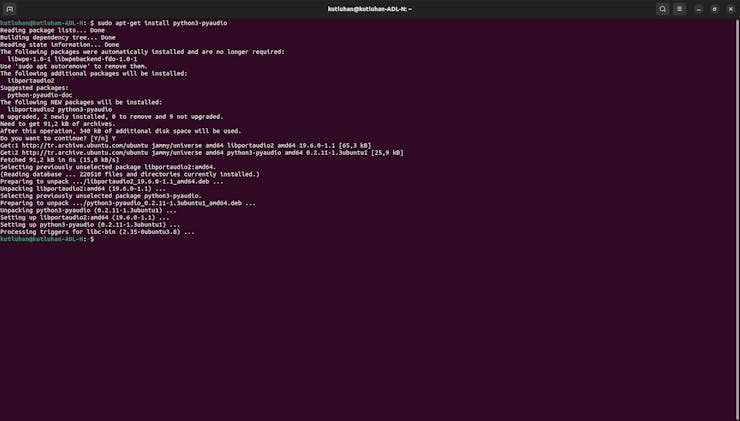
#️⃣ To run Edge Impulse machine learning models on LattePanda Mu, install the Edge Impulse Linux Python SDK via the terminal.
sudo pip3 install edge_impulse_linux
sudo apt-get install python3-pyaudio
![]()
![]()
-
15Step 5: Developing a feature-rich web application to communicate w/ the Particle Cloud and process requests from XIAO ESP32C6
As discussed earlier, I decided to develop a versatile web dashboard (application) to improve the user experience and run essential device features, including but not limited to executing Python scripts.
Since the web application features interconnect with data collection and model running procedures executed by different development boards, please refer to the web application code files or the following steps focusing on the device qualifications to review all of the web application capabilities thoroughly.
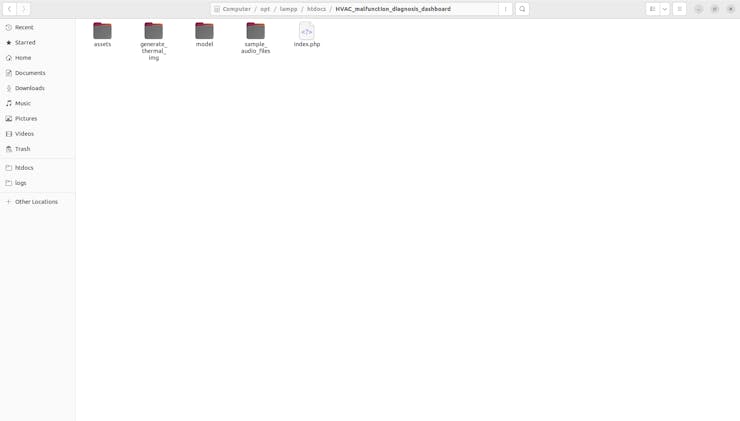
As shown below, the web application consists of seven folders and nine code files in various programming languages:
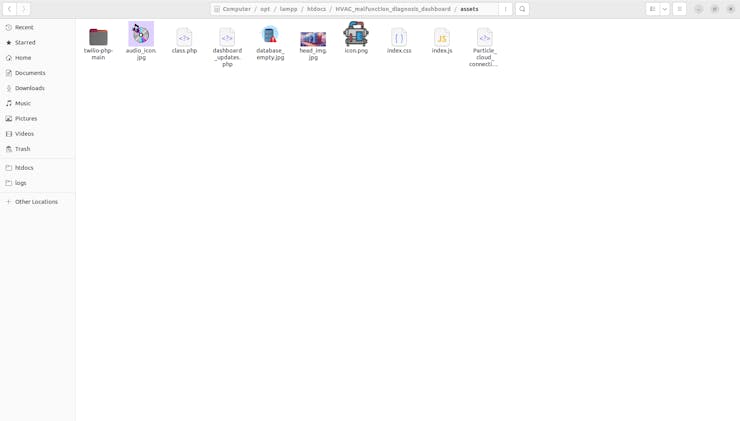
- /assets
- class.php
- dashboard_updates.php
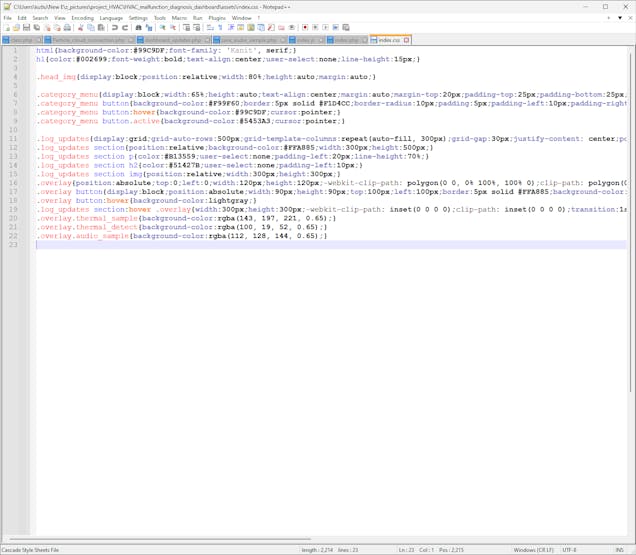
- index.css
- index.js
- Particle_cloud_connection.php
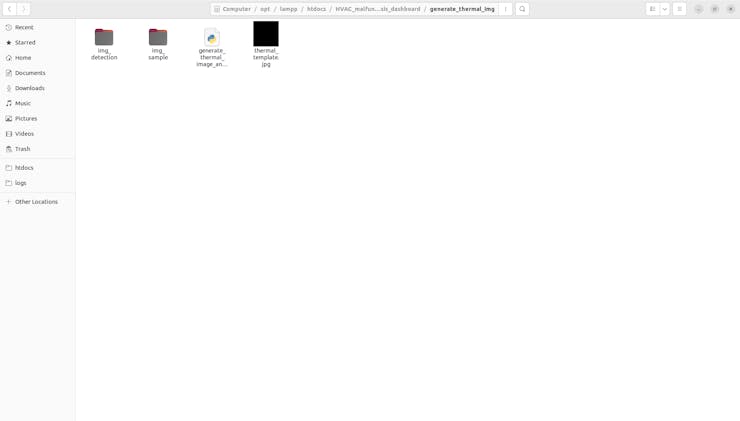
- /generate_thermal_img
- /img_detection
- /img_sample
- generate_thermal_image_and_run_model.py
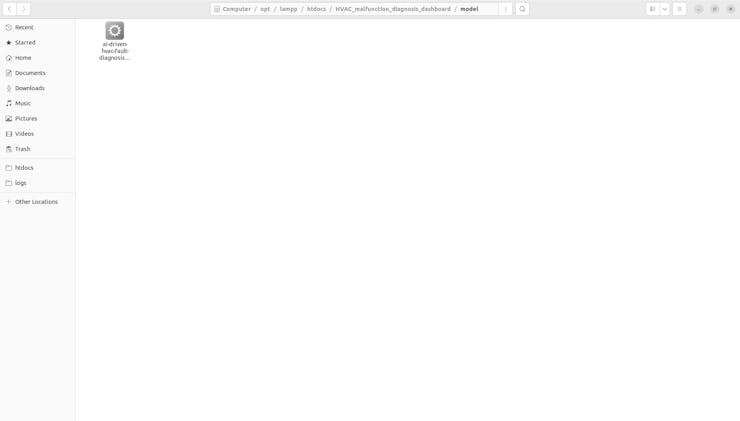
- /model
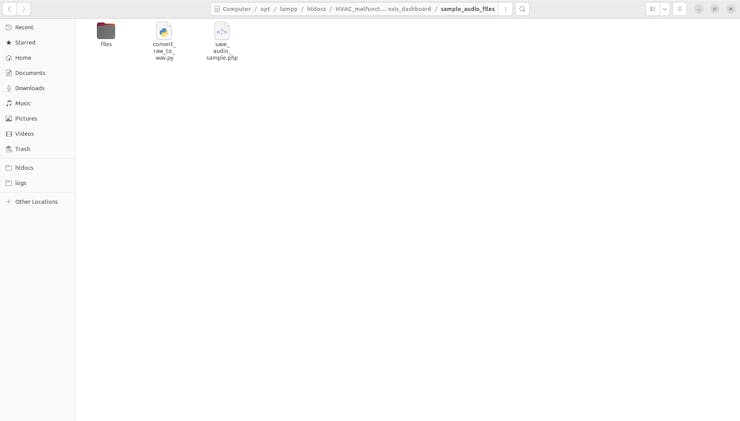
- /sample_audio_files
- /files
- convert_raw_to_wav.py
- save_audio_sample.php
- index.php
![]()
![]()
![]()
![]()
![]()
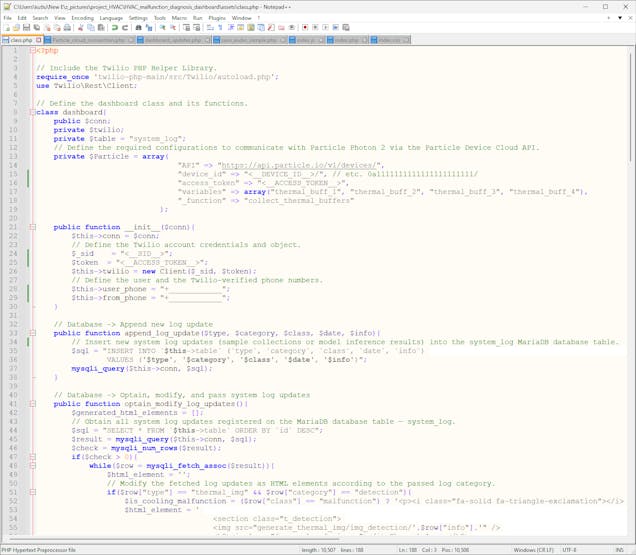
📁 class.php
To bundle all functions under a specific structure, I created a class named dashboard. Please refer to the following steps to inspect all interconnected device features.
⭐ Define the required configurations to communicate with Photon 2 via the Particle Device Cloud API.
⭐ In the __init__ function:
⭐ Define the Twilio account credentials and required settings.
public function __init__($conn){ $this->conn = $conn; // Define the Twilio account credentials and object. $_sid = "<__SID__>"; $token = "<__ACCESS_TOKEN__>"; $this->twilio = new Client($_sid, $token); // Define the user and the Twilio-verified phone numbers. $this->user_phone = "+____________"; $this->from_phone = "+____________"; }⭐ In the append_log_update function:
⭐ Insert a new system log update regarding data collection or model inference results into the system_log MariaDB database table.
public function append_log_update($type, $category, $class, $date, $info){ // Insert new system log updates (sample collections or model inference results) into the system_log MariaDB database table. $sql = "INSERT INTO `$this->table` (`type`, `category`, `class`, `date`, `info`) VALUES ('$type', '$category', '$class', '$date', '$info')"; mysqli_query($this->conn, $sql); }⭐ In the optain_modify_log_updates function:
⭐ Fetch all system log updates registered on the system_log database table.
⭐ According to the given log category, modify the obtained information to generate HTML elements for each system log update.
⭐ While generating HTML elements for the retrieved log updates, append each HTML element to an array so as to create a thorough index.
⭐ Finally, return the produced HTML element index (list).
⭐ If there is no registered system log update in the database table, return the default HTML element index.
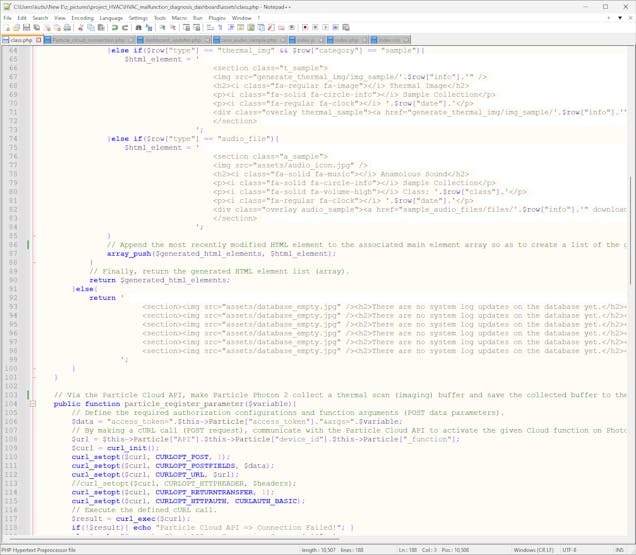
public function optain_modify_log_updates(){ $generated_html_elements = []; // Obtain all system log updates registered on the MariaDB database table — system_log. $sql = "SELECT * FROM `$this->table` ORDER BY `id` DESC"; $result = mysqli_query($this->conn, $sql); $check = mysqli_num_rows($result); if($check > 0){ while($row = mysqli_fetch_assoc($result)){ $html_element = ''; // Modify the fetched log updates as HTML elements according to the passed log category. if($row["type"] == "thermal_img" && $row["category"] == "detection"){ $is_cooling_malfunction = ($row["class"] == "malfunction") ? '<p><i class="fa-solid fa-triangle-exclamation"></i> Cooling Malfunction Detected!</p>' : '<p><i class="fa-solid fa-circle-check"></i> Cooling Status is Stable!</p>'; $html_element = ' <section class="t_detection"> <img src="generate_thermal_img/img_detection/'.$row["info"].'" /> <h2><i class="fa-regular fa-image"></i> Thermal Image</h2> <p><i class="fa-solid fa-circle-info"></i> Malfunction Diagnosis</p> <p><i class="fa-solid fa-triangle-exclamation"></i> Anamolous Sound Detected!</p> '.$is_cooling_malfunction.' <p><i class="fa-regular fa-clock"></i> '.$row["date"].'</p> <div class="overlay thermal_detect"><a href="generate_thermal_img/img_detection/'.$row["info"].'" download><button><i class="fa-solid fa-cloud-arrow-down"></i></button></a></div> </section> '; }else if($row["type"] == "thermal_img" && $row["category"] == "sample"){ $html_element = ' <section class="t_sample"> <img src="generate_thermal_img/img_sample/'.$row["info"].'" /> <h2><i class="fa-regular fa-image"></i> Thermal Image</h2> <p><i class="fa-solid fa-circle-info"></i> Sample Collection</p> <p><i class="fa-regular fa-clock"></i> '.$row["date"].'</p> <div class="overlay thermal_sample"><a href="generate_thermal_img/img_sample/'.$row["info"].'" download><button><i class="fa-solid fa-cloud-arrow-down"></i></button></a></div> </section> '; }else if($row["type"] == "audio_file"){ $html_element = ' <section class="a_sample"> <img src="assets/audio_icon.jpg" /> <h2><i class="fa-solid fa-music"></i> Anamolous Sound</h2> <p><i class="fa-solid fa-circle-info"></i> Sample Collection</p> <p><i class="fa-solid fa-volume-high"></i> Class: '.$row["class"].'</p> <p><i class="fa-regular fa-clock"></i> '.$row["date"].'</p> <div class="overlay audio_sample"><a href="sample_audio_files/files/'.$row["info"].'" download><button><i class="fa-solid fa-cloud-arrow-down"></i></button></a></div> </section> '; } // Append the most recently modified HTML element to the associated main element array so as to create a list of the generated HTML elements. array_push($generated_html_elements, $html_element); } // Finally, return the generated HTML element list (array). return $generated_html_elements; }else{ return ' <section><img src="assets/database_empty.jpg" /><h2>There are no system log updates on the database yet.</h2></section> <section><img src="assets/database_empty.jpg" /><h2>There are no system log updates on the database yet.</h2></section> <section><img src="assets/database_empty.jpg" /><h2>There are no system log updates on the database yet.</h2></section> <section><img src="assets/database_empty.jpg" /><h2>There are no system log updates on the database yet.</h2></section> <section><img src="assets/database_empty.jpg" /><h2>There are no system log updates on the database yet.</h2></section> <section><img src="assets/database_empty.jpg" /><h2>There are no system log updates on the database yet.</h2></section> '; } }⭐ In the particle_register_parameter function:
⭐ Define the authorization configurations and cloud function arguments (POST data parameters) required by the Particle Cloud API.
⭐ By making a cURL call (POST request), employ the Particle Cloud API to make Photon 2 collect a thermal scan (imaging) buffer and register the collected buffer to the Particle Cloud.
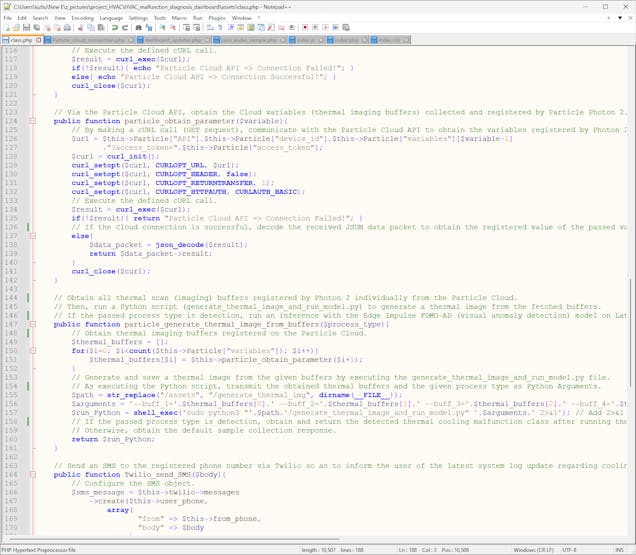
public function particle_register_parameter($variable){ // Define the required authorization configurations and function arguments (POST data parameters). $data = "access_token=".$this->Particle["access_token"]."&args=".$variable; // By making a cURL call (POST request), communicate with the Particle Cloud API to activate the given Cloud function on Photon 2. $url = $this->Particle["API"].$this->Particle["device_id"].$this->Particle["_function"]; $curl = curl_init(); curl_setopt($curl, CURLOPT_POST, 1); curl_setopt($curl, CURLOPT_POSTFIELDS, $data); curl_setopt($curl, CURLOPT_URL, $url); //curl_setopt($curl, CURLOPT_HTTPHEADER, $headers); curl_setopt($curl, CURLOPT_RETURNTRANSFER, 1); curl_setopt($curl, CURLOPT_HTTPAUTH, CURLAUTH_BASIC); // Execute the defined cURL call. $result = curl_exec($curl); if(!$result){ echo "Particle Cloud API => Connection Failed!"; } else{ echo "Particle Cloud API => Connection Successful!"; } curl_close($curl); }⭐ In the particle_obtain_parameter function:
⭐ By making a cURL call (GET request), employ the Particle Cloud API to obtain information regarding the passed Cloud variable registered by Photon 2.
⭐ If the Cloud response is successful, decode the received JSON data packet to fetch the given Cloud variable value. Then, return the obtained value.
public function particle_obtain_parameter($variable){ // By making a cURL call (GET request), communicate with the Particle Cloud API to obtain the variables registered by Photon 2. $url = $this->Particle["API"].$this->Particle["device_id"].$this->Particle["variables"][$variable-1] ."?access_token=".$this->Particle["access_token"]; $curl = curl_init(); curl_setopt($curl, CURLOPT_URL, $url); curl_setopt($curl, CURLOPT_HEADER, false); curl_setopt($curl, CURLOPT_RETURNTRANSFER, 1); curl_setopt($curl, CURLOPT_HTTPAUTH, CURLAUTH_BASIC); // Execute the defined cURL call. $result = curl_exec($curl); if(!$result){ return "Particle Cloud API => Connection Failed!"; } // If the Cloud connection is successful, decode the received JSON data packet to obtain the registered value of the passed variable. Then, return the obtained value. else{ $data_packet = json_decode($result); return $data_packet->result; } curl_close($curl); }⭐ In the particle_generate_thermal_image_from_buffers function:
⭐ Obtain all thermal scan (imaging) buffers registered by Photon 2 individually from the Particle Cloud.
⭐ Then, generate a precise thermal image from the fetched buffers by executing a Python script — generate_thermal_image_and_run_model.py.
⭐ According to the passed process type, save the produced image as a sample directly or run an inference with the Edge Impulse FOMO-AD model via the same Python script.
⭐ Finally, return the response transferred by the executed Python script.
Since the web application executes the given Python script via the shell_exec function, it is not possible to observe debugging errors like using the terminal. Thus, I appended 2>&1 to the command line in the shell_exec function to display debugging errors on the browser directly. In this regard, I was able to develop the web application way faster.
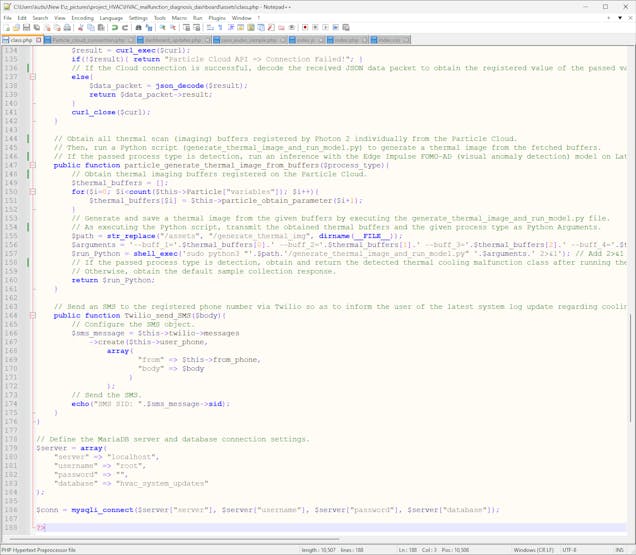
public function particle_generate_thermal_image_from_buffers($process_type){ // Obtain thermal imaging buffers registered on the Particle Cloud. $thermal_buffers = []; for($i=0; $i<count($this->Particle["variables"]); $i++){ $thermal_buffers[$i] = $this->particle_obtain_parameter($i+1); } // Generate and save a thermal image from the given buffers by executing the generate_thermal_image_and_run_model.py file. // As executing the Python script, transmit the obtained thermal buffers and the given process type as Python Arguments. $path = str_replace("/assets", "/generate_thermal_img", dirname(__FILE__)); $arguments = '--buff_1='.$thermal_buffers[0].' --buff_2='.$thermal_buffers[1].' --buff_3='.$thermal_buffers[2].' --buff_4='.$thermal_buffers[3].' --process='.$process_type; $run_Python = shell_exec('sudo python3 "'.$path.'/generate_thermal_image_and_run_model.py" '.$arguments.' 2>&1'); // Add 2>&1 for debugging errors directly on the browser. // If the passed process type is detection, obtain and return the detected thermal cooling malfunction class after running the FOMO-AD (visual anomaly detection) model via the Python script. // Otherwise, obtain the default sample collection response. return $run_Python; }⭐ In the Twilio_send_SMS function:
⭐ Via the Twilio SMS API, send an SMS from the Twilio virtual phone number to the registered (user) phone number to transfer the given text message.
public function Twilio_send_SMS($body){ // Configure the SMS object. $sms_message = $this->twilio->messages ->create($this->user_phone, array( "from" => $this->from_phone, "body" => $body ) ); // Send the SMS. echo("SMS SID: ".$sms_message->sid); }⭐ Define the required MariaDB database configurations for LattePanda Mu.
$server = array( "server" => "localhost", "username" => "root", "password" => "", "database" => "hvac_system_updates");$conn = mysqli_connect($server["server"], $server["username"], $server["password"], $server["database"]);
📁 Particle_cloud_connection.php
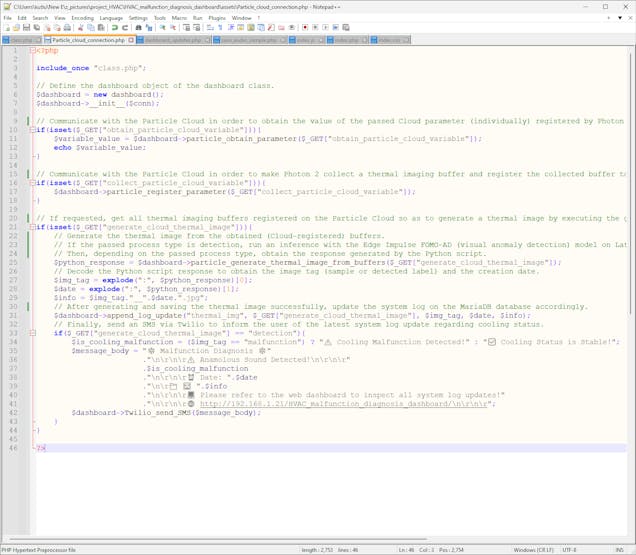
⭐ Include the class.php file and define the dashboard object of the dashboard class.
include_once "class.php";// Define the dashboard object of the dashboard class.$dashboard = new dashboard();$dashboard->__init__($conn);
⭐ If requested via HTTP GET request, communicate with the Particle Cloud to obtain the value of the passed Cloud variable (individually) registered by Photon 2 and return the fetched value.
if(isset($_GET["obtain_particle_cloud_variable"])){ $variable_value = $dashboard->particle_obtain_parameter($_GET["obtain_particle_cloud_variable"]); echo $variable_value;}⭐ If requested via HTTP GET request, communicate with the Particle Cloud in order to make Photon 2 collect a thermal imaging buffer and register the collected buffer to the passed Cloud variable.
if(isset($_GET["collect_particle_cloud_variable"])){ $dashboard->particle_register_parameter($_GET["collect_particle_cloud_variable"]);}⭐ If requested via HTTP GET request:
⭐ Communicate with the Particle Cloud to obtain all thermal imaging buffers registered by Photon 2.
⭐ Generate a thermal image from the obtained buffers by executing a Python script — generate_thermal_image_and_run_model.py.
⭐ According to the passed process type (sample or detection), save the generated image as a sample or run an inference with the Edge Impulse FOMO-AD (visual anomaly detection) model via the same Python script.
⭐ Then, decode the response generated by the Python script to obtain the image tag (default sample or detected label) and the creation date.
⭐ After producing the thermal image and conducting the given process type successfully, update the system log on the MariaDB database accordingly.
⭐ Finally, depending on the process type, send an SMS via Twilio to inform the user of the latest system log update regarding cooling status.
if(isset($_GET["generate_cloud_thermal_image"])){ // Generate the thermal image from the obtained (Cloud-registered) buffers. // If the passed process type is detection, run an inference with the Edge Impulse FOMO-AD (visual anomaly detection) model on LattePanda Mu via the same Python script. // Then, depending on the passed process type, obtain the response generated by the Python script. $python_response = $dashboard->particle_generate_thermal_image_from_buffers($_GET["generate_cloud_thermal_image"]); // Decode the Python script response to obtain the image tag (sample or detected label) and the creation date. $img_tag = explode(":", $python_response)[0]; $date = explode(":", $python_response)[1]; $info = $img_tag."__".$date.".jpg"; // After generating and saving the thermal image successfully, update the system log on the MariaDB database accordingly. $dashboard->append_log_update("thermal_img", $_GET["generate_cloud_thermal_image"], $img_tag, $date, $info); // Finally, send an SMS via Twilio to inform the user of the latest system log update regarding cooling status. if($_GET["generate_cloud_thermal_image"] == "detection"){ $is_cooling_malfunction = ($img_tag == "malfunction") ? "⚠️ Cooling Malfunction Detected!" : "✅ Cooling Status is Stable!"; $message_body = "❄️ Malfunction Diagnosis ❄️" ."\n\r\n\r⚠️ Anamolous Sound Detected!\n\r\n\r" .$is_cooling_malfunction ."\n\r\n\r⏰ Date: ".$date ."\n\r📁 🖼️ ".$info ."\n\r\n\r💻 Please refer to the web dashboard to inspect all system log updates!" ."\n\r\n\r🌐 http://192.168.1.21/HVAC_malfunction_diagnosis_dashboard/\n\r\n\r"; $dashboard->Twilio_send_SMS($message_body); }}📁 dashboard_updates.php
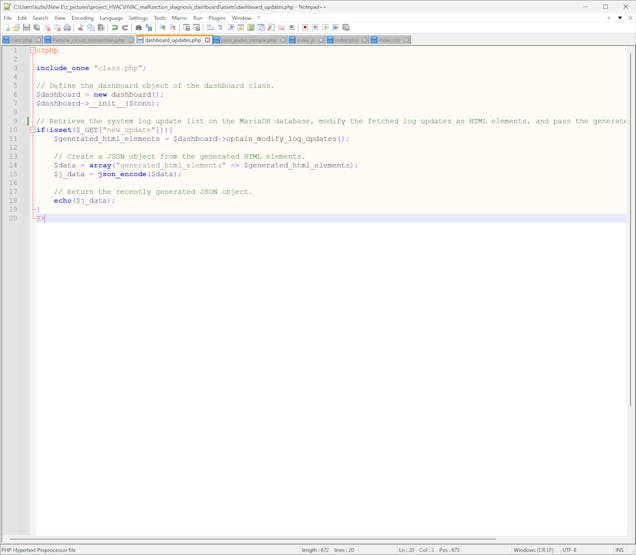
⭐ Include the class.php file and define the dashboard object of the dashboard class.
include_once "class.php";// Define the dashboard object of the dashboard class.$dashboard = new dashboard();$dashboard->__init__($conn);
⭐ If requested via HTTP GET request:
⭐ Retrieve all of the system log updates on the MariaDB database table — system_log.
⭐ According to the given log category, modify the obtained information to generate HTML elements for each system log update.
⭐ Then, create a JSON object from the produced HTML element index (list).
⭐ Finally, return the recently generated JSON object.
if(isset($_GET["new_update"])){ $generated_html_elements = $dashboard->optain_modify_log_updates(); // Create a JSON object from the generated HTML elements. $data = array("generated_html_elements" => $generated_html_elements); $j_data = json_encode($data); // Return the recently generated JSON object. echo($j_data);}📁 save_audio_sample.php
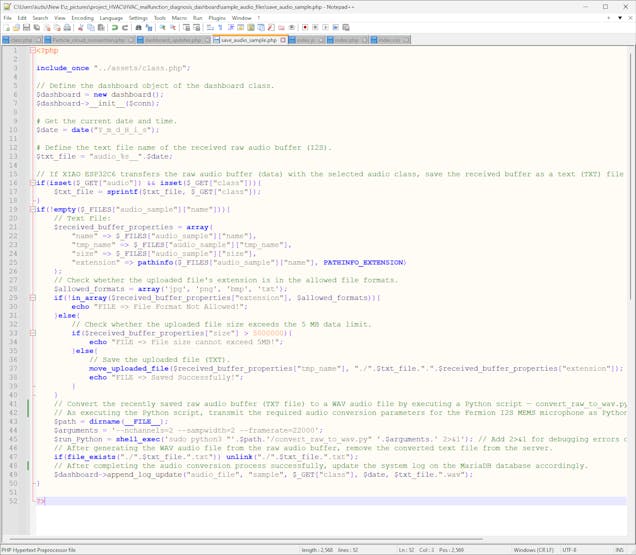
⭐ Include the class.php file and define the dashboard object of the dashboard class.
include_once "../assets/class.php";// Define the dashboard object of the dashboard class.$dashboard = new dashboard();$dashboard->__init__($conn);
⭐ Define the text file name for the received raw audio buffer (I2S).
⭐ If XIAO ESP32C6 transfers the selected audio class name via a GET (URL) parameter, modify the text file name accordingly.
# Get the current date and time.$date = date("Y_m_d_H_i_s");# Define the text file name of the received raw audio buffer (I2S).$txt_file = "audio_%s__".$date;// If XIAO ESP32C6 transfers the raw audio buffer (data) with the selected audio class, save the received buffer as a text (TXT) file and modify the file name accordingly. if(isset($_GET["audio"]) && isset($_GET["class"])){ $txt_file = sprintf($txt_file, $_GET["class"]);}⭐ If XIAO ESP32C6 transfers the collected raw audio buffer (I2S) via an HTTP POST request:
⭐ Save the received audio buffer to the defined text (TXT) file.
⭐ Then, convert the recently saved raw audio buffer (TXT file) to a WAV audio file by executing a Python script — convert_raw_to_wav.py.
⭐ As executing the Python script, transmit the required audio conversion parameters for the Fermion I2S MEMS microphone as Python Arguments.
⭐ After generating the WAV audio file from the raw audio buffer, remove the converted text file from the server.
⭐ After completing the audio conversion process successfully, update the system log on the MariaDB database accordingly.
Since the web application executes the given Python script via the shell_exec function, it is not possible to observe debugging errors like using the terminal. Thus, I appended 2>&1 to the command line in the shell_exec function to display debugging errors on the browser directly. In this regard, I was able to develop the web application way faster.
if(!empty($_FILES["audio_sample"]["name"])){ // Text File: $received_buffer_properties = array( "name" => $_FILES["audio_sample"]["name"], "tmp_name" => $_FILES["audio_sample"]["tmp_name"], "size" => $_FILES["audio_sample"]["size"], "extension" => pathinfo($_FILES["audio_sample"]["name"], PATHINFO_EXTENSION) ); // Check whether the uploaded file's extension is in the allowed file formats. $allowed_formats = array('jpg', 'png', 'bmp', 'txt'); if(!in_array($received_buffer_properties["extension"], $allowed_formats)){ echo "FILE => File Format Not Allowed!"; }else{ // Check whether the uploaded file size exceeds the 5 MB data limit. if($received_buffer_properties["size"] > 5000000){ echo "FILE => File size cannot exceed 5MB!"; }else{ // Save the uploaded file (TXT). move_uploaded_file($received_buffer_properties["tmp_name"], "./".$txt_file.".".$received_buffer_properties["extension"]); echo "FILE => Saved Successfully!"; } } // Convert the recently saved raw audio buffer (TXT file) to a WAV audio file by executing a Python script — convert_raw_to_wav.py. // As executing the Python script, transmit the required audio conversion parameters for the Fermion I2S MEMS microphone as Python Arguments. $path = dirname(__FILE__); $arguments = '--nchannels=2 --sampwidth=2 --framerate=22000'; $run_Python = shell_exec('sudo python3 "'.$path.'/convert_raw_to_wav.py" '.$arguments.' 2>&1'); // Add 2>&1 for debugging errors directly on the browser. // After generating the WAV audio file from the raw audio buffer, remove the converted text file from the server. if(file_exists("./".$txt_file.".txt")) unlink("./".$txt_file.".txt"); // After completing the audio conversion process successfully, update the system log on the MariaDB database accordingly. $dashboard->append_log_update("audio_file", "sample", $_GET["class"], $date, $txt_file.".wav");}📁 index.js
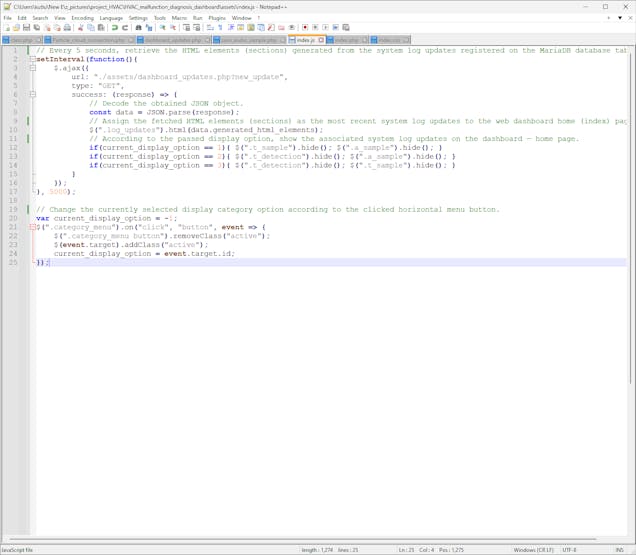
⭐ Utilizing the setInterval function, every 5 seconds, make an HTTP GET request to the dashboard_updates.php file to:
⭐ Retrieve the HTML element index (list) as a JSON object generated from the system log updates registered on the MariaDB database table.
⭐ Decode the obtained JSON object.
⭐ Pass the fetched HTML elements (sections) to the web dashboard home (index) page automatically.
⭐ According to the given display category option, show the associated elements only on the index page.
setInterval(function(){ $.ajax({ url: "./assets/dashboard_updates.php?new_update", type: "GET", success: (response) => { // Decode the obtained JSON object. const data = JSON.parse(response); // Assign the fetched HTML elements (sections) as the most recent system log updates to the web dashboard home (index) page. $(".log_updates").html(data.generated_html_elements); // According to the passed display option, show the associated system log updates on the dashboard — home page. if(current_display_option == 1){ $(".t_sample").hide(); $(".a_sample").hide(); } if(current_display_option == 2){ $(".t_detection").hide(); $(".a_sample").hide(); } if(current_display_option == 3){ $(".t_detection").hide(); $(".t_sample").hide(); } } });}, 5000);⭐ According to the clicked horizontal menu button, change the display category option and the clicked button's appearance by toggling classes.
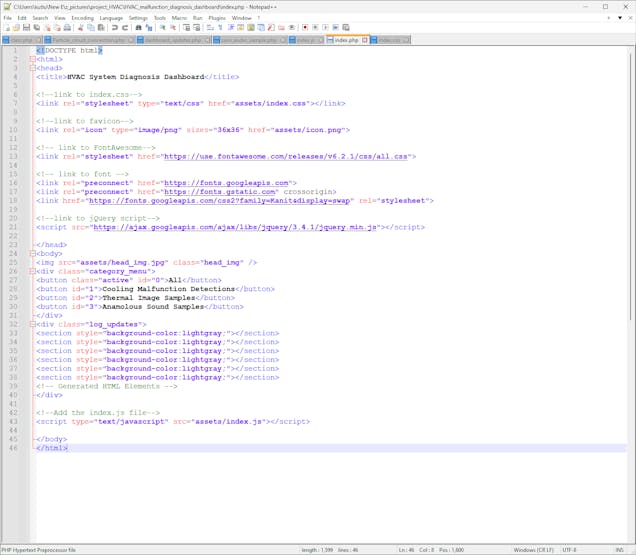
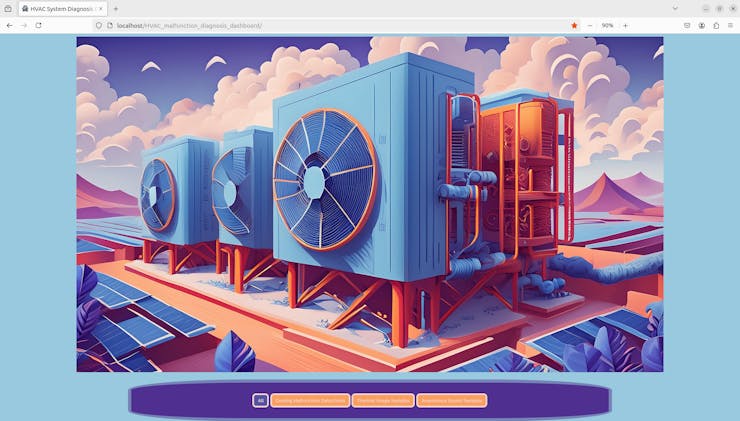
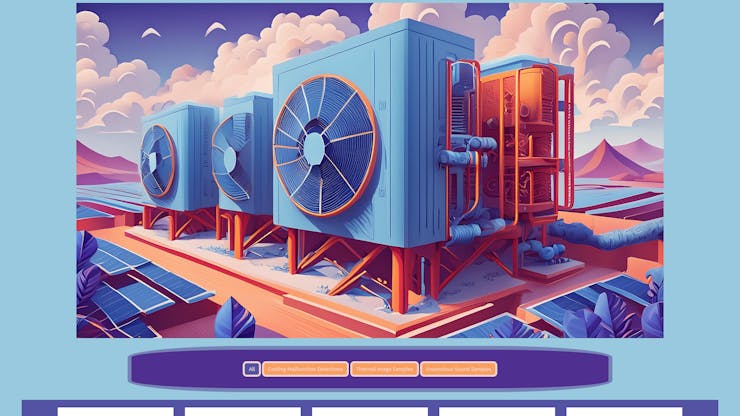
var current_display_option = -1; $(".category_menu").on("click", "button", event => { $(".category_menu button").removeClass("active"); $(event.target).addClass("active"); current_display_option = event.target.id;});📁 You can inspect index.php and index.css files below, which are for designing the web dashboard home (index) page.
![]()
![]()
![]()
![]()
![]()
![]()
![]()
![]()
![]()
![]()
-
16Step 5.1: Converting the raw audio buffers transferred by XIAO ESP32C6 via POST requests to WAV files and transmitting the required conversion parameters as Python Arguments
As explained earlier, I needed to convert the raw audio buffers transferred by XIAO ESP32C6 to WAV audio files in order to save compatible audio samples for Edge Impulse. Therefore, I programmed a simple Python script to perform the audio conversion process.
Since Python scripts can obtain parameters as Python Arguments from the terminal (shell) directly, the web dashboard (application) passes the required audio conversion variables effortlessly.
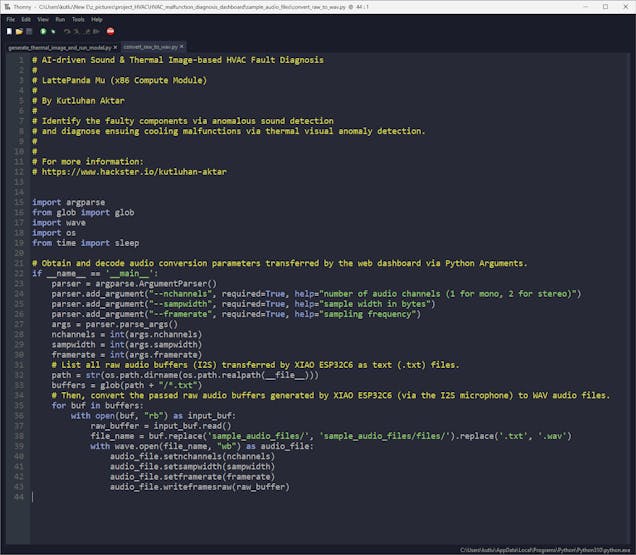
📁 convert_raw_to_wav.py
⭐ Include the required modules.
import argparsefrom glob import globimport waveimport osfrom time import sleep
⭐ Obtain and decode audio conversion parameters transferred by the web dashboard as Python Arguments.
⭐ Get all text (.txt) files consisting of raw audio buffers (I2S) transferred by XIAO ESP32C6.
⭐ Then, open each text file to convert the stored raw audio buffers to WAV audio files and save the produced WAV audio samples to the files folder.
if __name__ == '__main__': parser = argparse.ArgumentParser() parser.add_argument("--nchannels", required=True, help="number of audio channels (1 for mono, 2 for stereo)") parser.add_argument("--sampwidth", required=True, help="sample width in bytes") parser.add_argument("--framerate", required=True, help="sampling frequency") args = parser.parse_args() nchannels = int(args.nchannels) sampwidth = int(args.sampwidth) framerate = int(args.framerate) # List all raw audio buffers (I2S) transferred by XIAO ESP32C6 as text (.txt) files. path = str(os.path.dirname(os.path.realpath(__file__))) buffers = glob(path + "/*.txt") # Then, convert the passed raw audio buffers generated by XIAO ESP32C6 (via the I2S microphone) to WAV audio files. for buf in buffers: with open(buf, "rb") as input_buf: raw_buffer = input_buf.read() file_name = buf.replace('sample_audio_files/', 'sample_audio_files/files/').replace('.txt', '.wav') with wave.open(file_name, "wb") as audio_file: audio_file.setnchannels(nchannels) audio_file.setsampwidth(sampwidth) audio_file.setframerate(framerate) audio_file.writeframesraw(raw_buffer)![]()
-
17Step 5.2: Transferring the thermal scan (imaging) buffers obtained from the Particle Cloud as Python Arguments to generate a precise thermal image
As discussed earlier, Photon 2 is not suitable for generating thermal images, saving image samples, and running a demanding visual anomaly detection model simultaneously due to memory limitations. Therefore, I utilized the web dashboard to obtain the thermal scan (imaging) buffers registered on the Particle Cloud and programmed a Python script to perform the mentioned processes.
Since Python scripts can obtain parameters as Python Arguments from the terminal (shell) directly, the web dashboard (application) passes the obtained thermal imaging buffers and the given process type effortlessly.
📁 generate_thermal_image_and_run_model.py
To bundle all functions under a specific structure, I created a class named thermal_img. Please refer to the following steps to inspect all interconnected device features.
⭐ Include the required modules.
import cv2import numpyfrom edge_impulse_linux.image import ImageImpulseRunnerimport argparseimport osimport datetimefrom time import sleep
⭐ In the __init__ function:
⭐ Get the absolute folder path to avoid errors while running this script via the web dashboard (application).
⭐ Define the required configurations to run the Edge Impulse FOMO-AD visual anomaly detection model converted to a Linux (x86_64) application (.eim).
⭐ Define the required variables to generate a thermal image from the given thermal scan (imaging) buffers, including the template (blank) image.
def __init__(self, model_file): # Get the absolute folder path to avoid errors while running this script via the web dashboard (application). self.path = str(os.path.dirname(os.path.realpath(__file__))) # Define the required configurations to run the Edge Impulse FOMO-AD (visual anomaly detection) model. self.model_file = os.path.join(self.path, model_file).replace("/generate_thermal_img", "") self.threshold = 5 self.detected_class = "" self.__debug = False # Define the required variables to generate a thermal image from the given thermal scan (imaging) buffers. self.t_img = {"w": 192, "h": 192, "p_w": 6, "p_h": 8, "temp_img": self.path+"/thermal_template.jpg"} self.thermal_buff_width = 16 self.thermal_buff_height = 12⭐ In the generate_thermal_img function:
⭐ Open and read the template (blank) image (192 x 192) via the built-in OpenCV function — imread.
⭐ Since the MLX90641 thermal imaging camera produces 16x12 IR arrays (buffers), I decided to set the pixel width as six (6) and the pixel height as eight (8) to fill the template image completely with four sequential buffers.
⭐ For each passed thermal imaging buffer ((16x12) x 4):
⭐ Define the coordinates for the first pixel.
⭐ Starting with the first pixel, draw each individual data point with the color indicator on the template image to generate a precise thermal image, estimated by the specific color algorithm based on the temperature ranges defined on Photon 2.
⭐ Note: Indicators are defined in the BGR format.
⭐ After drawing a pixel successfully, update the successive data point coordinates.
⭐ After generating the thermal image from the given buffers, store the modified template frame before saving an image file.
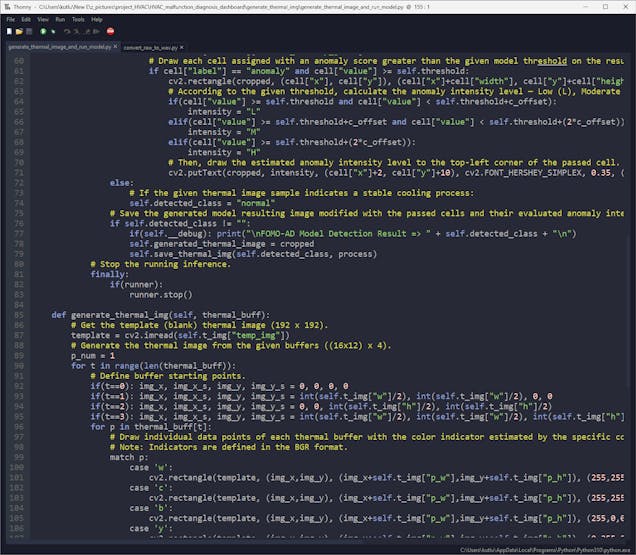
def generate_thermal_img(self, thermal_buff): # Get the template (blank) thermal image (192 x 192). template = cv2.imread(self.t_img["temp_img"]) # Generate the thermal image from the given buffers ((16x12) x 4). p_num = 1 for t in range(len(thermal_buff)): # Define buffer starting points. if(t==0): img_x, img_x_s, img_y, img_y_s = 0, 0, 0, 0 if(t==1): img_x, img_x_s, img_y, img_y_s = int(self.t_img["w"]/2), int(self.t_img["w"]/2), 0, 0 if(t==2): img_x, img_x_s, img_y, img_y_s = 0, 0, int(self.t_img["h"]/2), int(self.t_img["h"]/2) if(t==3): img_x, img_x_s, img_y, img_y_s = int(self.t_img["w"]/2), int(self.t_img["w"]/2), int(self.t_img["h"]/2), int(self.t_img["h"]/2) for p in thermal_buff[t]: # Draw individual data points of each thermal buffer with the color indicator estimated by the specific color algorithm based on the defined temperature ranges to generate a precise thermal image. # Note: Indicators are defined in the BGR format. match p: case 'w': cv2.rectangle(template, (img_x,img_y), (img_x+self.t_img["p_w"],img_y+self.t_img["p_h"]), (255,255,255), -1) case 'c': cv2.rectangle(template, (img_x,img_y), (img_x+self.t_img["p_w"],img_y+self.t_img["p_h"]), (255,255,0), -1) case 'b': cv2.rectangle(template, (img_x,img_y), (img_x+self.t_img["p_w"],img_y+self.t_img["p_h"]), (255,0,0), -1) case 'y': cv2.rectangle(template, (img_x,img_y), (img_x+self.t_img["p_w"],img_y+self.t_img["p_h"]), (0,255,255), -1) case 'o': cv2.rectangle(template, (img_x,img_y), (img_x+self.t_img["p_w"],img_y+self.t_img["p_h"]), (0,165,255), -1) case 'r': cv2.rectangle(template, (img_x,img_y), (img_x+self.t_img["p_w"],img_y+self.t_img["p_h"]), (0,0,255), -1) # Update the successive data point coordinates. img_x += self.t_img["p_w"] if(p_num==self.thermal_buff_width): img_x = img_x_s img_y += self.t_img["p_h"] p_num = 0 p_num += 1 # After generating the thermal image, register the modified frame before saving an image file. self.generated_thermal_image = template
⭐ In the save_thermal_img function:
⭐ Depending on the passed process type (sample or detection), save the stored thermal image frame as a sample to the img_sample folder directly or save the modified model resulting image (after running the FOMO-AD model) to the img_detection folder.
⭐ Print the passed image tag (sample or the detected label) with the creation (or prediction) date as the response to the web dashboard.
def save_thermal_img(self, img_tag, _type): # Depending on the passed process type (sample or detection), save the produced (registered) frame to the img_sample or img_detection folder by adding the creation date to the file name. folder = "img_sample" if _type=="sample" else "img_detection" date = datetime.datetime.now().strftime("%Y_%m_%d_%H_%M_%S") file_name = "{}/{}/{}__{}.jpg".format(self.path, folder, img_tag, date) cv2.imwrite(file_name, self.generated_thermal_image) print(img_tag+":"+date)⭐ In the run_inference function:
⭐ Print the provided information of the Edge Impulse FOMO-AD visual anomaly detection model.
⭐ Get the latest stored thermal image (frame).
⭐ After obtaining the latest thermal image, resize the retrieved frame if necessary and generate features from the cropped frame depending on the given model characteristics.
⭐ Run an inference.
⭐ Since the Edge Impulse FOMO-AD model categorizes a passed image by individual cells (grids) based on the dichotomy between two predefined classes (anomaly and no anomaly), utilize the mean visual anomaly value to detect overall (high-risk) thermal cooling malfunctions based on the confidence threshold estimated while testing the model accuracy on Edge Impulse.
⭐ If the calculated mean visual anomaly value is higher than the given threshold:
⭐ Obtain the visual anomaly grid produced by the FOMO-AD model, consisting of individual cells with coordinates, assigned labels, and anomaly scores.
⭐ If a cell's assigned label is anomaly and its anomaly score is higher than the given threshold:
⭐ Draw a rectangle on the model resulting image (cropped) with the provided cell coordinates.
⭐ Calculate the cell's anomaly intensity level — Low (L), Moderate (M), High (H) — in relation to the given threshold.
⭐ Then, draw the evaluated anomaly intensity level to the top-left corner of the cell rectangle.
⭐ Save the model resulting image modified with the cell rectangles and their evaluated anomaly intensity levels.
⭐ Finally, stop the running inference.
def run_inference(self, process): # Run inference to identify HVAC cooling malfunctions based on the generated thermal images via visual anomaly detection. with ImageImpulseRunner(self.model_file) as runner: try: resulting_image = "" # Print the information of the Edge Impulse FOMO-AD model converted to a Linux (x86_64) application (.eim). model_info = runner.init() if(self.__debug): print('\nLoaded runner for "' + model_info['project']['owner'] + ' / ' + model_info['project']['name'] + '"') labels = model_info['model_parameters']['labels'] # Get the latest registered thermal image (frame) generated from the passed thermal imaging buffers. latest_img = self.generated_thermal_image # After obtaining the latest image, resize (if necessary) and generate features from the retrieved frame depending on the provided model so as to run an inference. features, cropped = runner.get_features_from_image(latest_img) res = runner.classify(features) # Since the Edge Impulse FOMO-AD (visual anomaly detection) model categorizes given image samples by individual cells (grids) # based on the dichotomy between two predefined classes (anomaly and no anomaly), utilize the mean visual anomaly value to detect overall (high-risk) thermal cooling malfunctions. if res["result"]["visual_anomaly_mean"] >= self.threshold: # If the given thermal image sample indicates a thermal cooling malfunction: self.detected_class = "malfunction" # Obtain the cells with their assigned labels and anomaly scores evaluated by the FOMO-AD (visual anomaly detection) model. intensity = "" c_offset = 5 for cell in res["result"]["visual_anomaly_grid"]: # Draw each cell assigned with an anomaly score greater than the given model threshold on the resulting image. if cell["label"] == "anomaly" and cell["value"] >= self.threshold: cv2.rectangle(cropped, (cell["x"], cell["y"]), (cell["x"]+cell["width"], cell["y"]+cell["height"]), (0,255,0), 2) # According to the given threshold, calculate the anomaly intensity level — Low (L), Moderate (M), High (H) — for each individual cell provided by the FOMO-AD model. if(cell["value"] >= self.threshold and cell["value"] < self.threshold+c_offset): intensity = "L" elif(cell["value"] >= self.threshold+c_offset and cell["value"] < self.threshold+(2*c_offset)): intensity = "M" elif(cell["value"] >= self.threshold+(2*c_offset)): intensity = "H" # Then, draw the estimated anomaly intensity level to the top-left corner of the passed cell. cv2.putText(cropped, intensity, (cell["x"]+2, cell["y"]+10), cv2.FONT_HERSHEY_SIMPLEX, 0.35, (0,255,0), 1, cv2.LINE_AA) else: # If the given thermal image sample indicates a stable cooling process: self.detected_class = "normal" # Save the generated model resulting image modified with the passed cells and their evaluated anomaly intensity levels (if applicable) to the img_detection folder on the web dashboard. if self.detected_class != "": if(self.__debug): print("\nFOMO-AD Model Detection Result => " + self.detected_class + "\n") self.generated_thermal_image = cropped self.save_thermal_img(self.detected_class, process) # Stop the running inference. finally: if(runner): runner.stop()⭐ Define the thermal_img object of the thermal_img class and pass the path of the FOMO-AD model (Linux (x86_64) application) on the server.
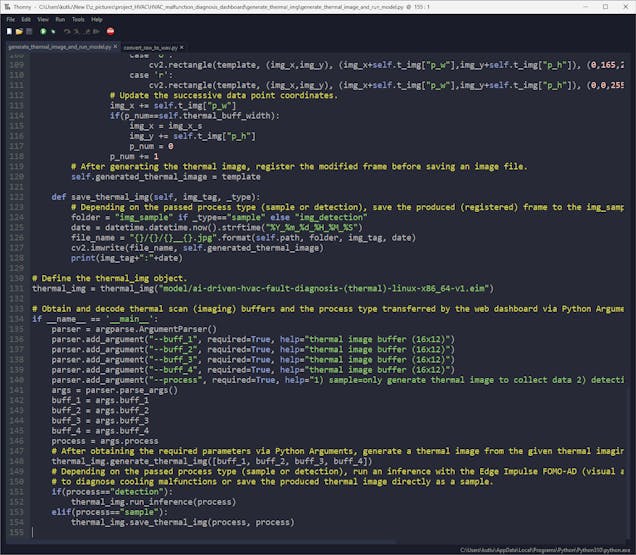
thermal_img = thermal_img("model/ai-driven-hvac-fault-diagnosis-(thermal)-linux-x86_64-v1.eim")⭐ Obtain and decode thermal scan (imaging) buffers and the process type transferred by the web dashboard as Python Arguments.
⭐ After obtaining the required parameters, generate a precise thermal image from the passed thermal scan (imaging) buffers.
⭐ Depending on the passed process type (sample or detection), run an inference with the Edge Impulse FOMO-AD visual anomaly detection model to diagnose thermal cooling malfunctions or save the produced thermal image directly as a sample.
if __name__ == '__main__': parser = argparse.ArgumentParser() parser.add_argument("--buff_1", required=True, help="thermal image buffer (16x12)") parser.add_argument("--buff_2", required=True, help="thermal image buffer (16x12)") parser.add_argument("--buff_3", required=True, help="thermal image buffer (16x12)") parser.add_argument("--buff_4", required=True, help="thermal image buffer (16x12)") parser.add_argument("--process", required=True, help="1) sample=only generate thermal image to collect data 2) detection=generate thermal image and run an inference") args = parser.parse_args() buff_1 = args.buff_1 buff_2 = args.buff_2 buff_3 = args.buff_3 buff_4 = args.buff_4 process = args.process # After obtaining the required parameters via Python Arguments, generate a thermal image from the given thermal imaging buffers. thermal_img.generate_thermal_img([buff_1, buff_2, buff_3, buff_4]) # Depending on the passed process type (sample or detection), run an inference with the Edge Impulse FOMO-AD (visual anomaly detection) model # to diagnose cooling malfunctions or save the produced thermal image directly as a sample. if(process=="detection"): thermal_img.run_inference(process) elif(process=="sample"): thermal_img.save_thermal_img(process, process)![]()
![]()
-
18Step 5.3: Running the web application on LattePanda Mu
Since LattePanda Mu is a budget-friendly compute module providing consistent multitasking performance thanks to Intel N100 quad-core processor and 8GB LPDDR5 memory, I decided to host the web application on LattePanda Mu combined with its Lite Carrier board.
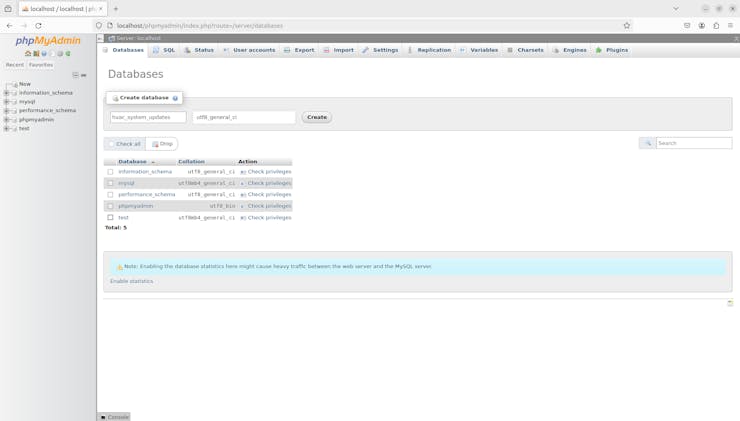
#️⃣ After setting up the XAMPP application (lampp) on LattePanda Mu, open the phpMyAdmin tool on the browser manually to create a new database named hvac_system_updates.
![]()
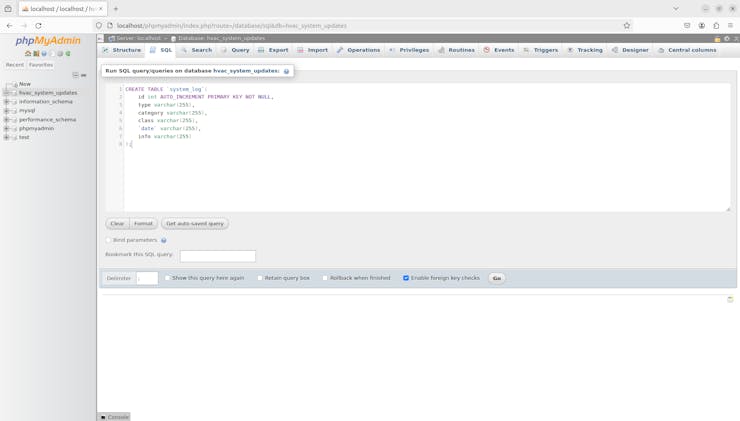
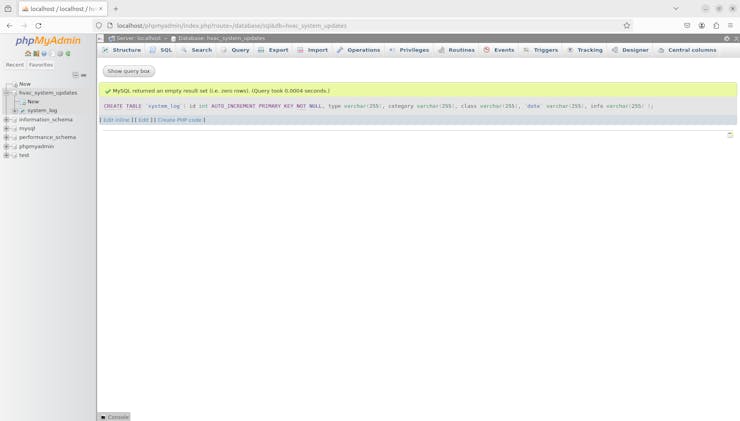
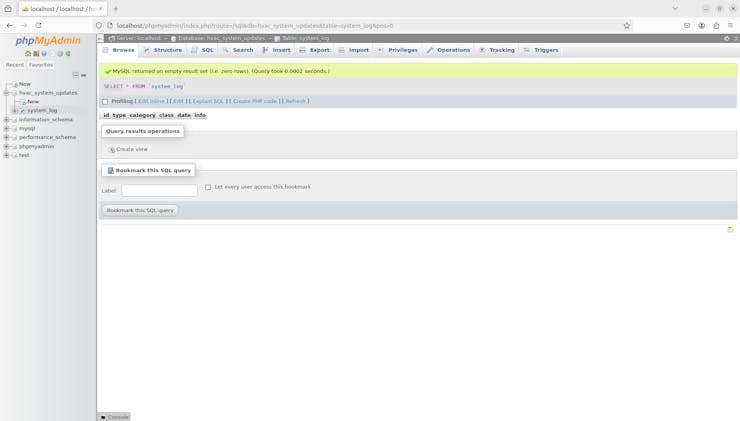
#️⃣ After adding the database successfully, go to the SQL section to create a MariaDB database table named system_log with the required data fields.
CREATE TABLE `system_log`( id int AUTO_INCREMENT PRIMARY KEY NOT NULL, type varchar(255), category varchar(255), class varchar(255), `date` varchar(255), info varchar(255));
![]()
![]()
![]()
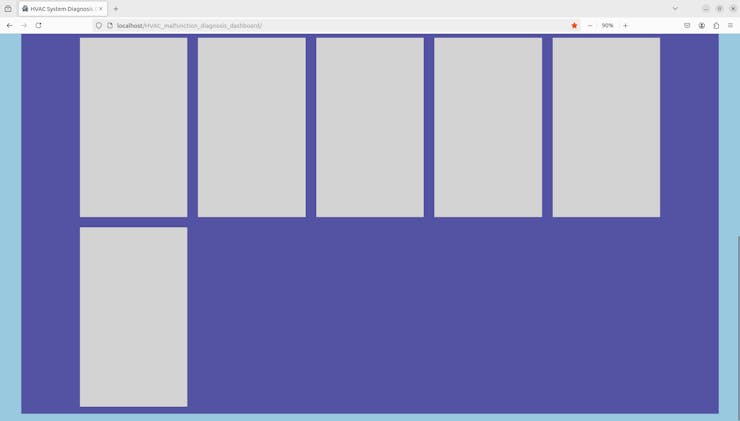
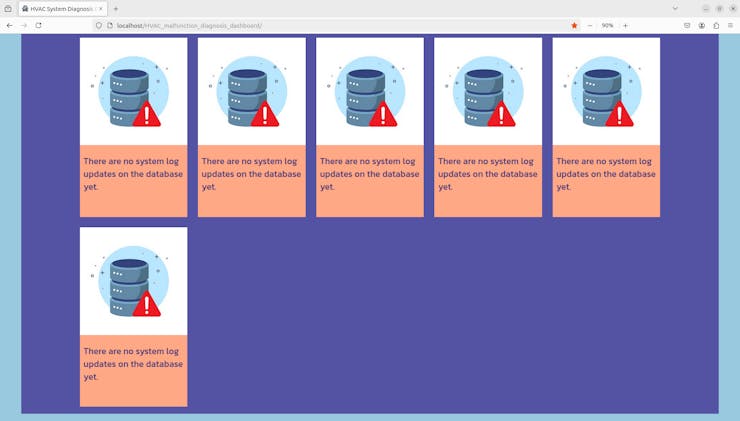
⚠️🔊♨️🖼️ After running the web dashboard for the first time, the home (index) page waits for obtaining the latest system log updates registered on the MariaDB database table.
⚠️🔊♨️🖼️ If there is no registered system log update in the database table, the index page displays the default placeholders to notify the user.
![]()
![]()
![]()
![]()
-
19Step 6.a: Setting up XIAO ESP32C6 on Arduino IDE
Although XIAO ESP32C6 is a production-ready and compact IoT development board, before proceeding with the following steps, I needed to set XIAO ESP32C6 on the Arduino IDE, install the required libraries, and configure some default settings.
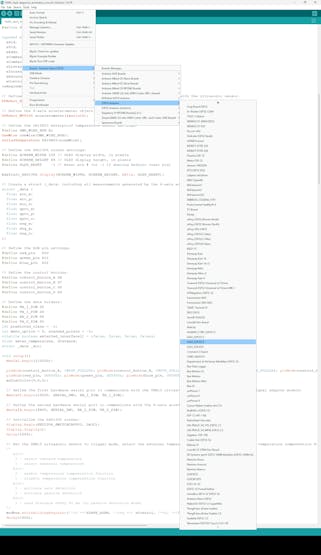
When I was setting up XIAO ESP32C6 on the Arduino IDE, the current stable release of the Arduino-ESP32 board package (2.0.15) did not support the ESP32-C6 chipset. Therefore, I utilized the latest development release (3.0.0-rc1).
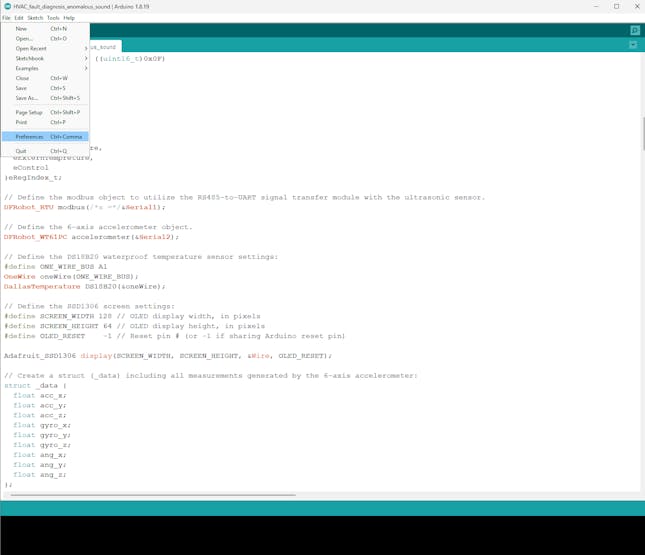
#️⃣ First, remove the Arduino-ESP32 board package if you have already installed it on the Arduino IDE.
![]()
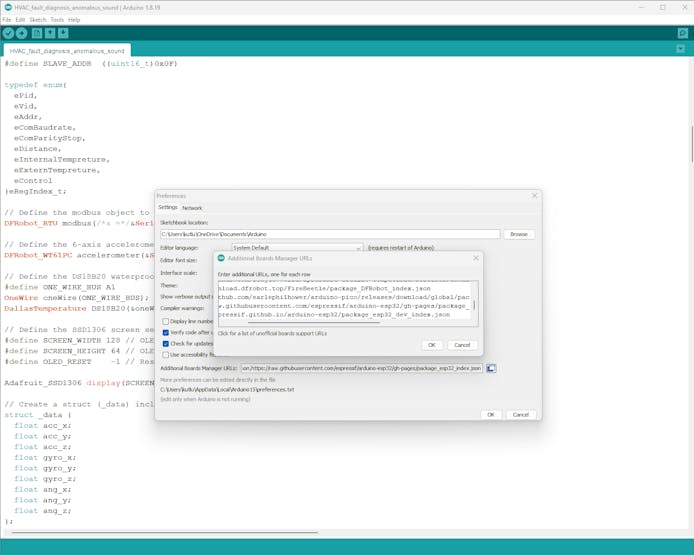
#️⃣ Then, go to Preferences ➡ Additional Boards Manager URLs and add the official development version URL for the Arduino-ESP32 board package:
https://espressif.github.io/arduino-esp32/package_esp32_dev_index.json
![]()
![]()
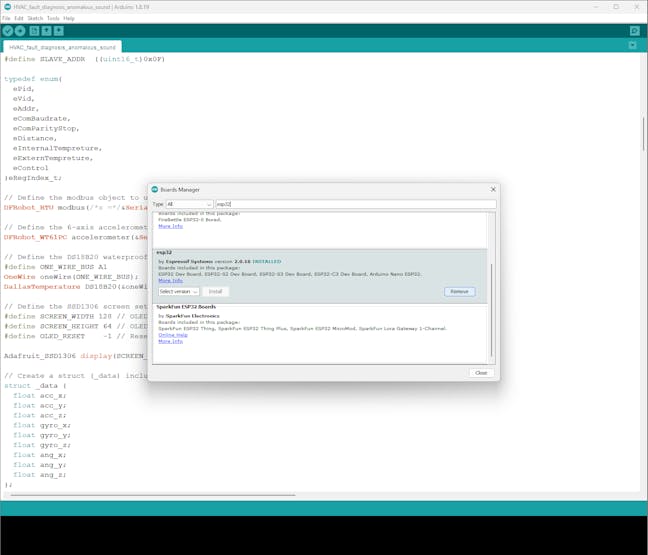
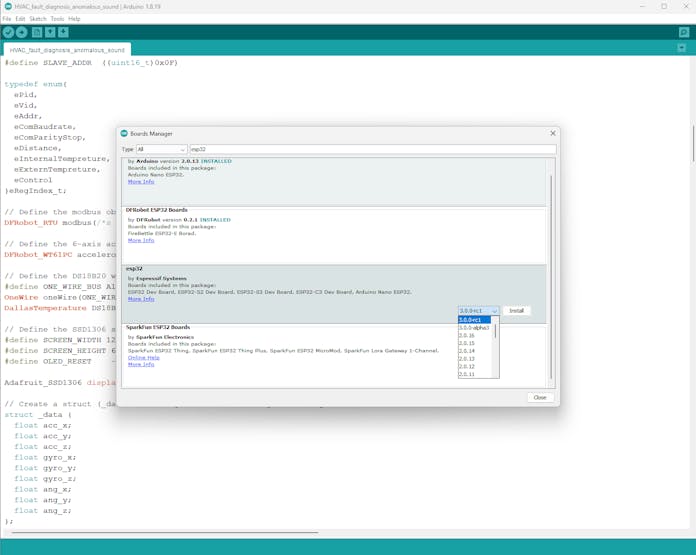
#️⃣ To install the required core, navigate to Tools ➡ Board ➡ Boards Manager, search for esp32, and select the latest development release — 3.0.0-rc1.
![]()
#️⃣ After installing the core, navigate to Tools ➡ Board ➡ ESP32 Arduino and select XIAO_ESP32C6.
![]()
#️⃣ Download and inspect the required libraries for the components connected to XIAO ESP32C6:
Adafruit_SSD1306 | Download
Adafruit-GFX-Library | Download
#️⃣ If the Arduino IDE shows the correct port number but fails to upload the given code file, push and release the RESET button while pressing the BOOT button. Then, XIAO ESP32C6 should accept the uploaded code in the BootLoader mode.
-
20Step 6.b: Setting up Particle Photon 2 on Visual Studio Code and enabling data transmission with the Particle Cloud
Even though C++ is available for programming Particle development products, the Arduino IDE is not suitable due to the additional requirements for the Particle Device OS. Fortunately, Particle officially supports Visual Studio Code (VSCode) and provides the Particle Workbench, which is an integrated development and debugging environment. Since the Particle Workbench capitalizes on the built-in IntelliSense features of VSCode, it makes programming Photon 2 straightforward and effortless.
#️⃣ First, download Visual Studio Code (VSCode) from the official installer.
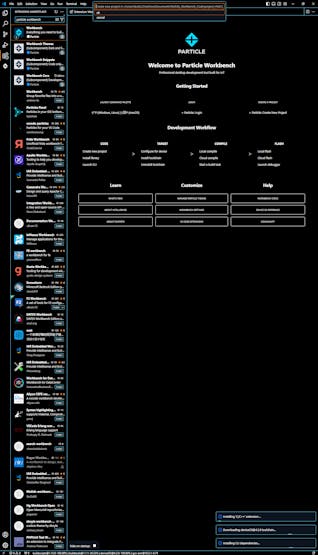
#️⃣ After installing VS Code, go to Extensions Marketplace and search for the Particle Workbench extension.
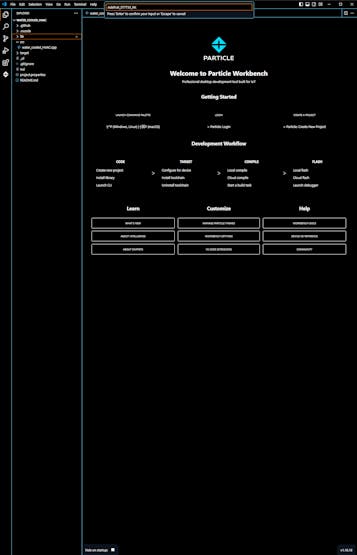
#️⃣ While downloading the Workbench extension, VSCode should install and build all dependencies automatically, including the device toolchain, C++ extension, Particle CLI, etc.
![]()
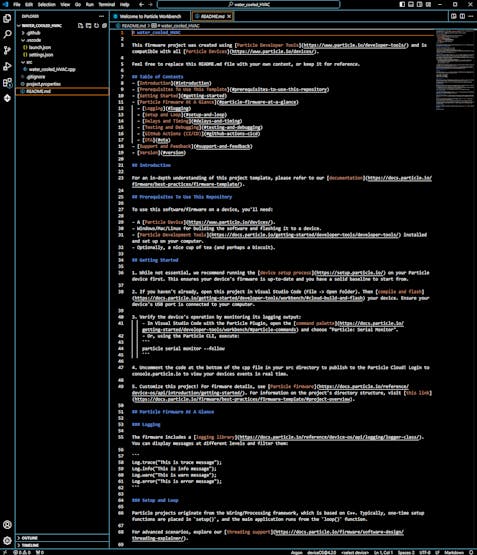
#️⃣ After downloading the Workbench extension, go to the Command Palette and select Particle: Create New Project. Then, enter the project directory name.
![]()
After creating a new project successfully on VSCode, I decided to utilize the Particle web-based setup wizard to configure the required settings for the Particle Cloud easily, providing step-by-step instructions.
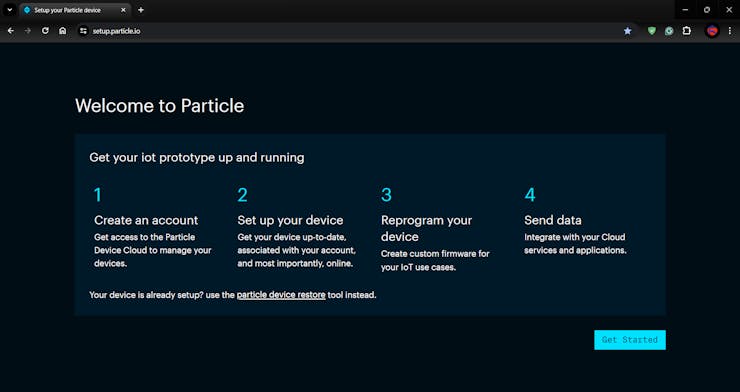
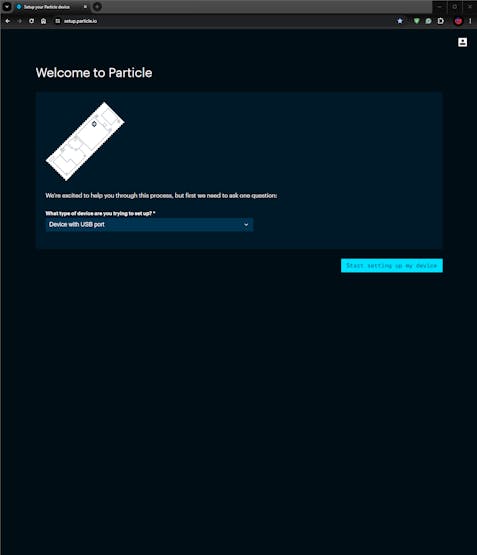
#️⃣ First, open the Particle setup wizard on the browser.
![]()
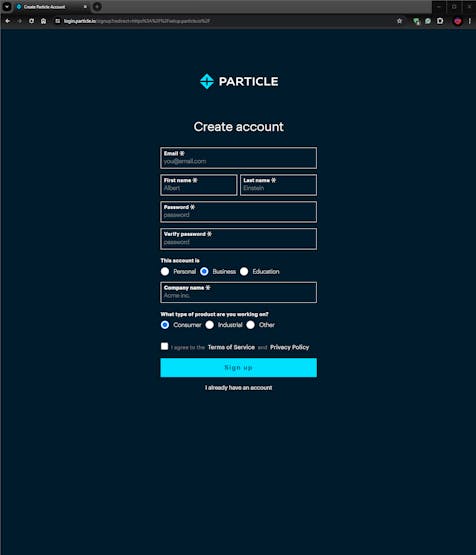
#️⃣ After initiating the setup process, the wizard requests the user to create a Particle account.
![]()
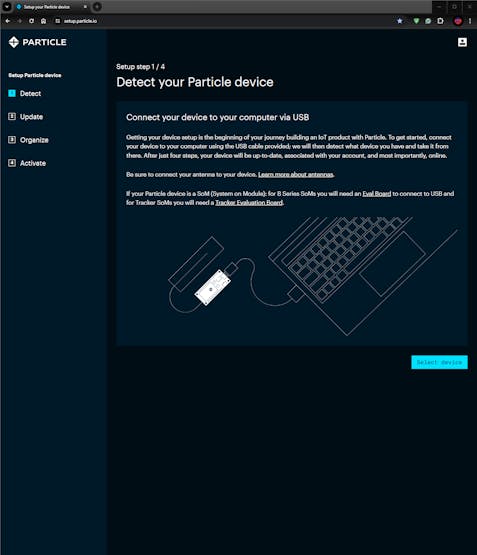
#️⃣ After creating a new account, connect Particle Photon 2 to the computer through the USB port and resume the setup process.
![]()
![]()
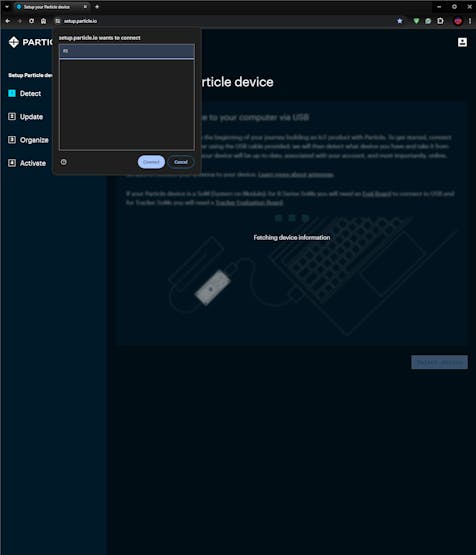
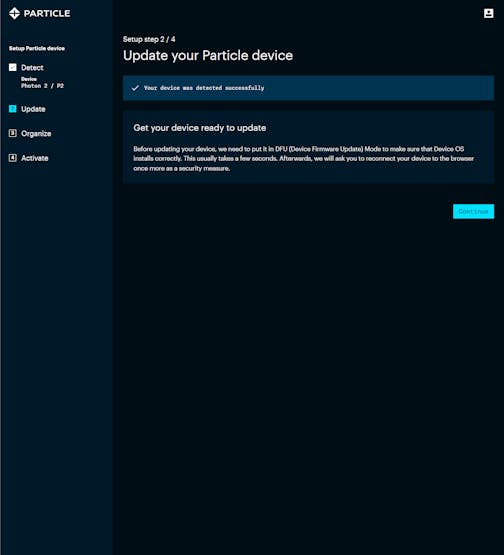
#️⃣ Then, the setup wizard should recognize Photon 2 (P2) and fetch the board information automatically.
![]()
![]()
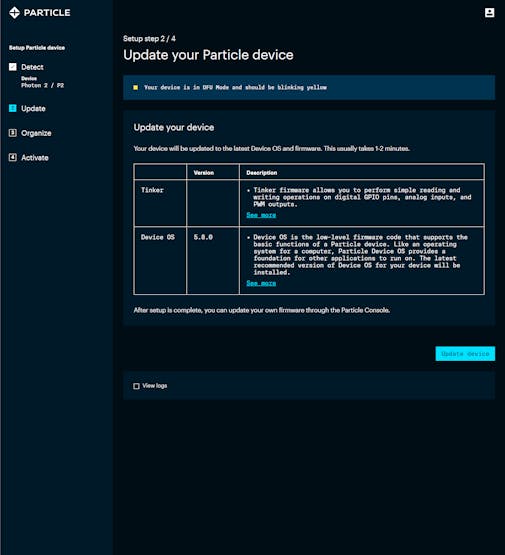
#️⃣ After getting the board information, the setup wizard updates Photon 2 to the latest Device OS and firmware.
![]()
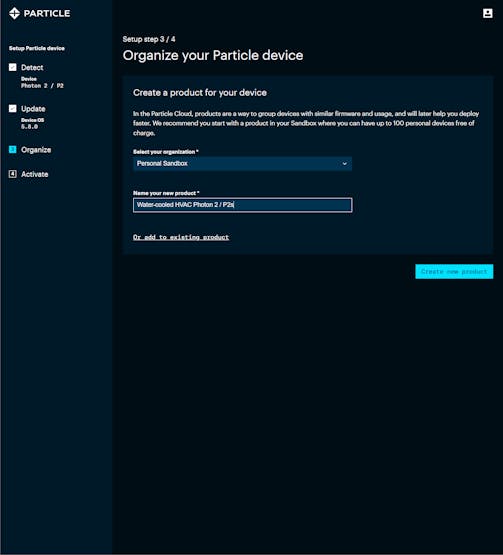
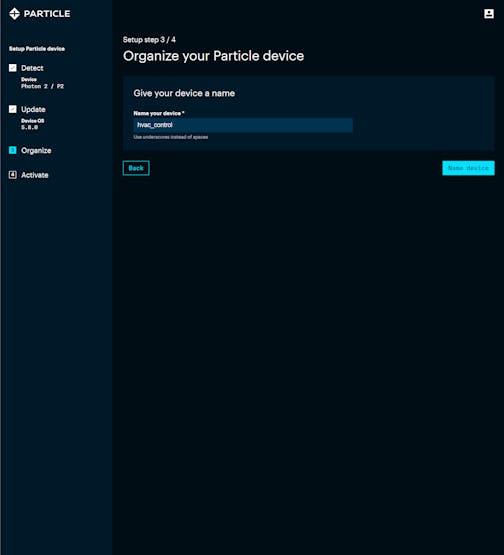
#️⃣ After updating Photon 2, create a new product (device group) and add Photon 2 to the created product with a unique name — hvac_control.
![]()
![]()
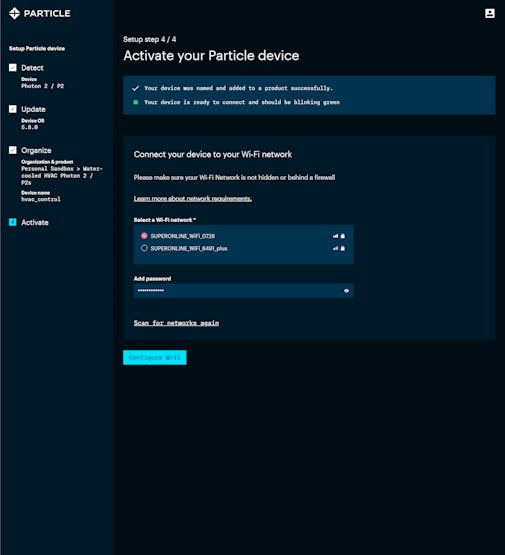
#️⃣ Connect Photon 2 to a Wi-Fi network in order to enable data transmission with the Particle Cloud.
![]()
![]()
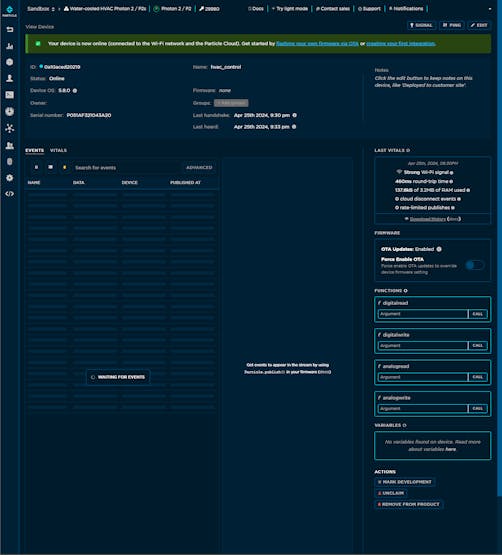
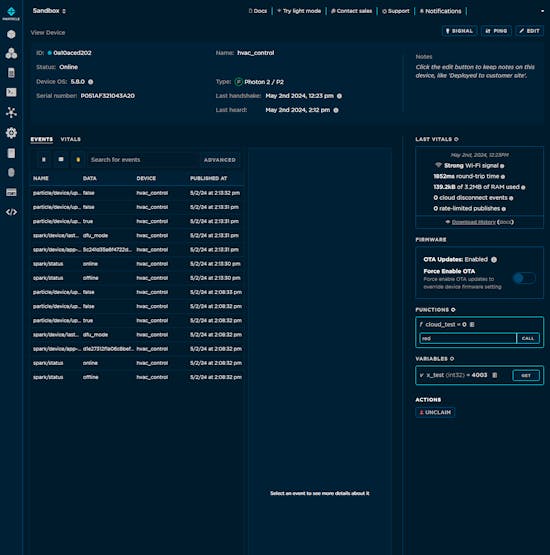
#️⃣ Finally, go to the Particle Console to check whether the Cloud connection is established successfully.
![]()
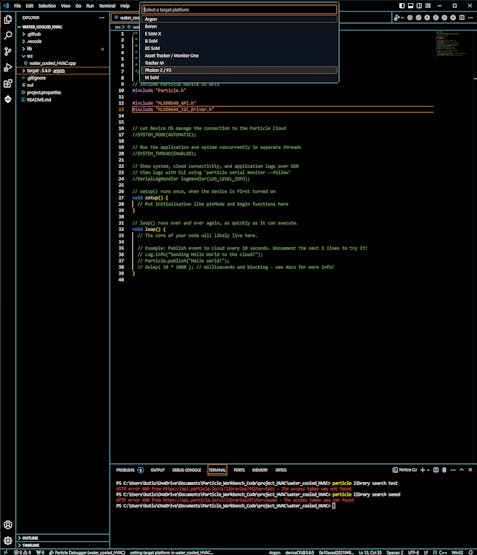
#️⃣ After setting up Photon 2 successfully via the web-based setup wizard, return to the Workbench extension and select Particle: Configure Project for Device on the Command Palette.
#️⃣ Choose the compatible device OS version and select the target platform — Photon 2 / P2.
![]()
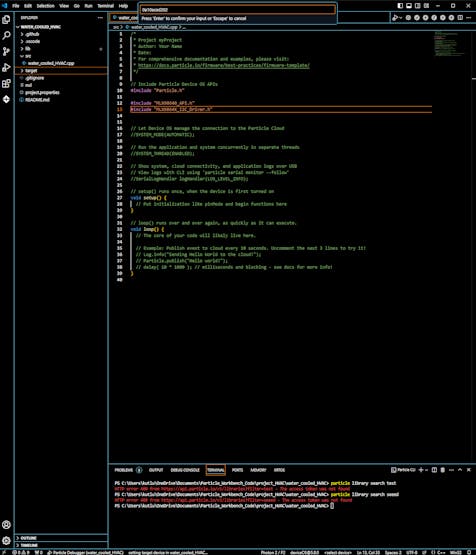
#️⃣ Then, obtain the device ID from the Particle Console and enter it on the Workbench extension to enable extra features, such as cloud compiling.
![]()
![]()
Even though Particle supports Arduino libraries, integrating them into the VSCode Workbench extension is not a simple copy-paste process.
The Particle development environment requires the following file structure to compile a library. The src folder must contain all of the essential library files (.cpp and.h).
- MyLibrary/
- examples/
- usage/
- usage.ino
- src/
- MyLibrary.cpp
- MyLibrary.h
- library.properties
- README.md
- LICENSE
Thus, we need to modify the file structure of an existing Arduino library if it is not compatible with that of Particle.
Nevertheless, Particle provides a plethora of production-ready Arduino libraries maintained by the Particle community. Thus, adding officially supported Arduino libraries to the Workbench extension is uncomplicated.
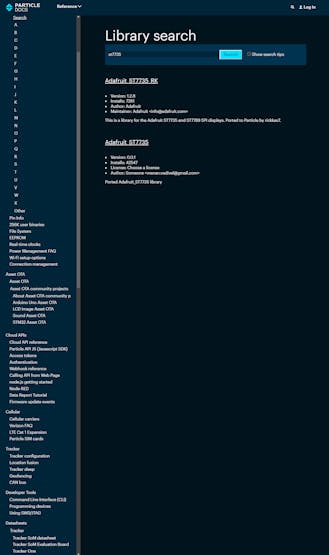
#️⃣ First, search for the required library on the Particle libraries ecosystem via the Library search tool.
#️⃣ If there is a supported version of the library in the ecosystem, go to the Workbench Welcome Screen and click Code ➜ Install library.
#️⃣ Then, enter the library name to install the given library with all dependencies.
Following the discussed steps, I installed these libraries from the Particle libraries ecosystem:
Adafruit_GFX_RK | Inspect
Adafruit_ST7735_RK | Inspect
After installing the supported libraries, I modified the remaining Arduino libraries required for the components connected to Photon 2:
Seeed_Arduino_MLX9064x | Inspect
You can download the Arduino libraries I modified for the Particle development environment below.
![]()
![]()
After completing setting up libraries, I tested the connection quality between Photon 2 and the Particle Cloud by utilizing the provided cloud transmission methods — Particle.variable() and Particle.function().
![]()
After ensuring consistent cloud data transmission, I needed to generate a user access token to make the web application (dashboard) employ the Particle Device Cloud API to communicate with the Particle Cloud.
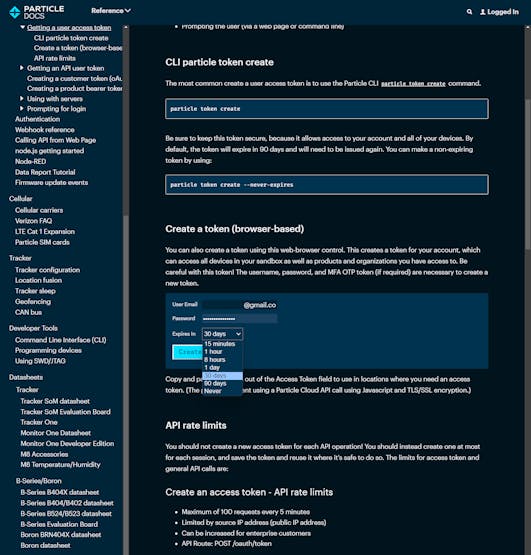
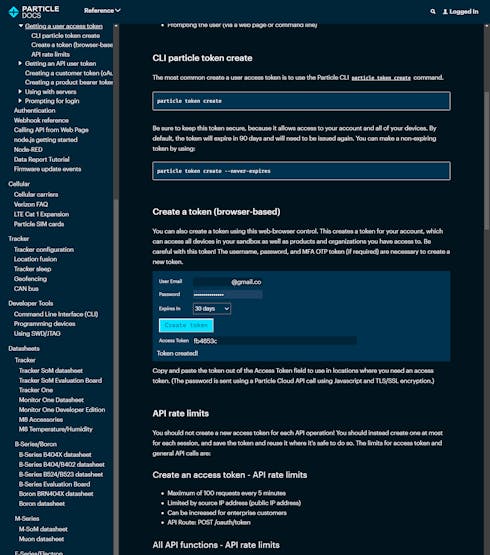
Despite the fact that the Particle CLI lets the user generate access tokens, you can also create a token using the official web-based token generation tool on the browser.
#️⃣ After signing in to your account, go to the web-based token generation tool, enter the expiration time, and create a new user access token.
![]()
![]()
AI-driven Sound and Thermal HVAC Fault Diagnosis
Identify the faulty components via anomalous sound detection and diagnose ensuing cooling malfunctions via thermal visual anomaly detection.


Discussions
Become a Hackaday.io Member
Create an account to leave a comment. Already have an account? Log In.