Close
0%
0%

Han SAOlo

Oh. They've encased him in Carbonite. He should be quite well protected. If he survived the freezing process, that is.

Similar projects worth following
Inspired by a cybertruck simple add-on, this Han Solo simple add-on uses exposed HASL for art and the silkscreen for a 3D effect.

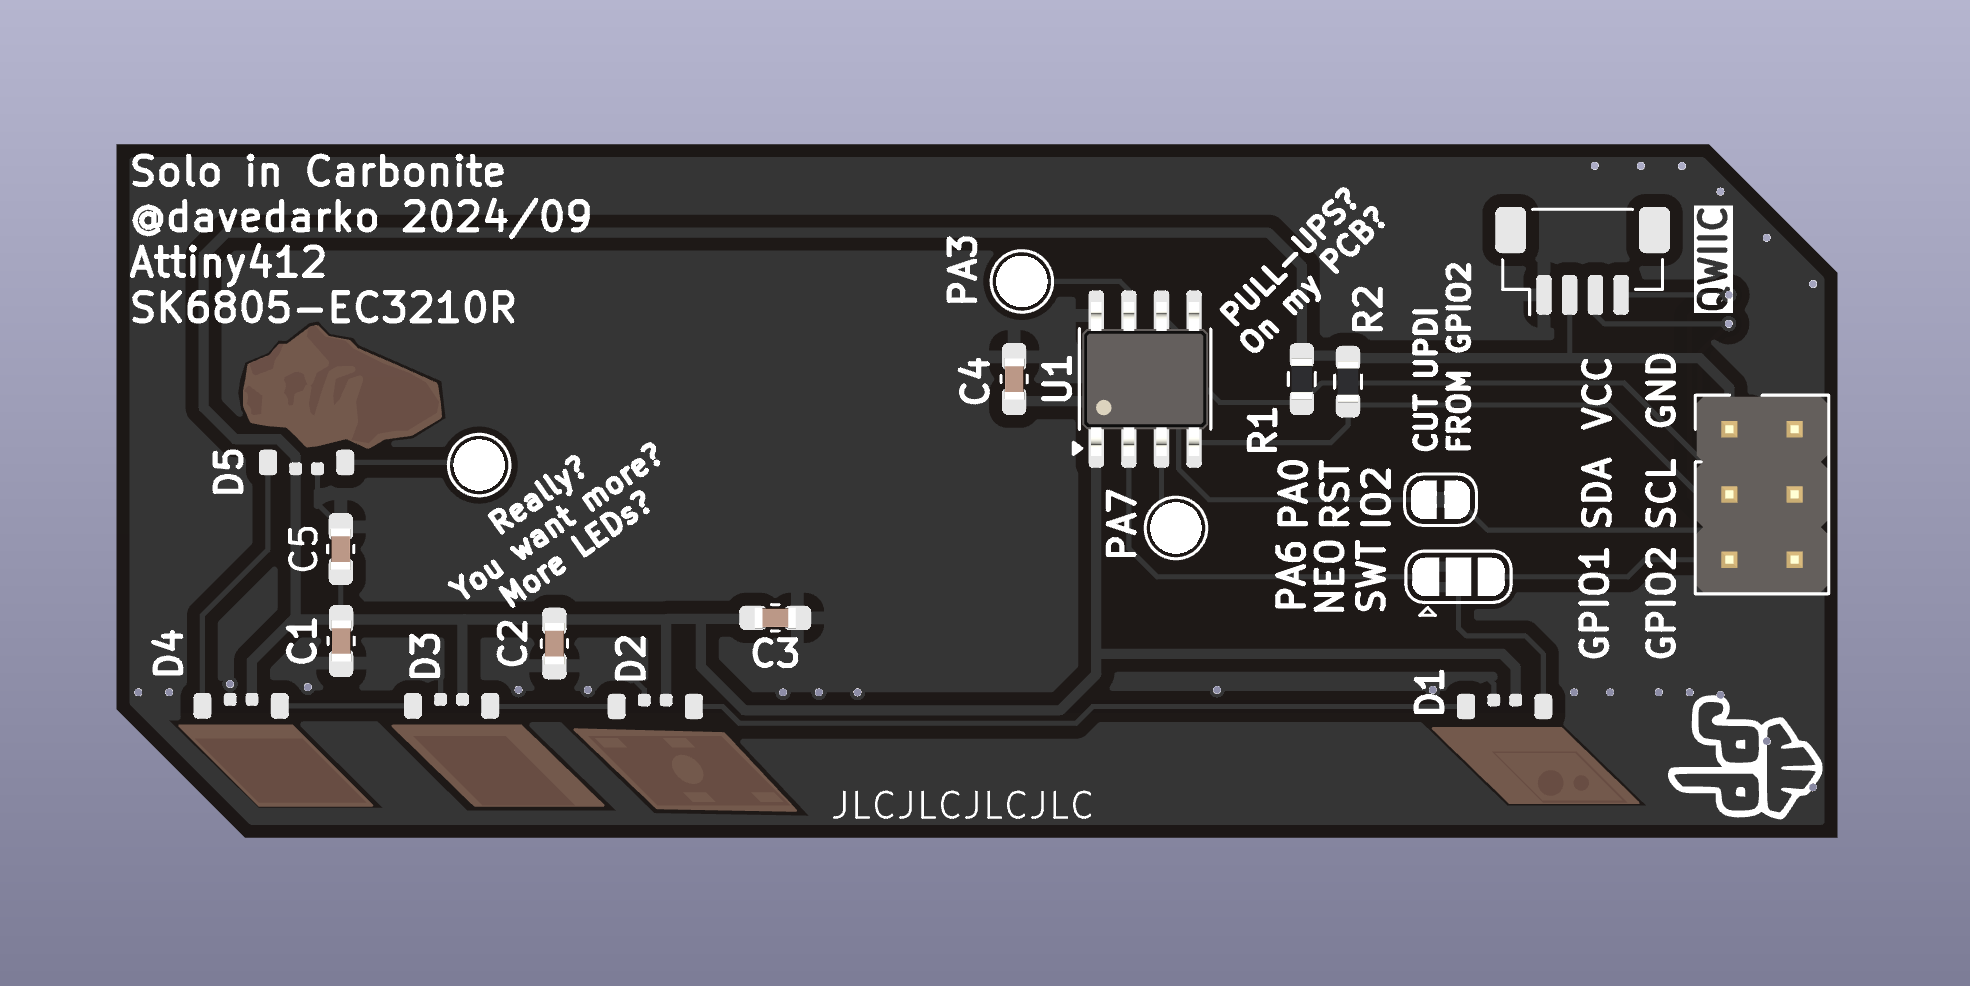
after the warmup with #hello my name is SAO I wanted to do something artsy with controlled blink. Han Solo was inspired by a cybertruck simple add-on, that used a lot of exposed copper that's covered in "silver" HASL. After starting a list of possible simple add-ons for the #Supercon 8 - Add On Contest , I very much liked the idea of an Han Solo simple add-on, but wanted to add some LEDs as well. Some brainstorming later  I came up with this "dimetric" view, basically using 45 degree angles for depth. The animation is roughly based on the blinking sequence of the  defreezing scene in ROTJ. Realising that the black solder stop mask was see-through if no copper was behind it, I used that to make his face glow when the de-freeze animation hits.

Screenshot 2024-10-13 at 23.34.49.png

Portable Network Graphics (PNG) - 2.07 MB - 10/13/2024 at 21:41

Preview

IMG_20241013_232937.jpg

JPEG Image - 1.02 MB - 10/13/2024 at 21:40

Preview

VID_20240926_224517.mp4

MPEG-4 Video - 3.04 MB - 09/27/2024 at 05:40

Download

solo.mp4

MPEG-4 Video - 4.66 MB - 09/16/2024 at 12:57

Download

  • 1 × ATTINY412
  • 5 × SK6805-EC3210R

  • Some thoughts after SuperCon

    davedarko11/11/2024 at 14:38 1 comment

    This was the most popular simple add-on that I handed out and even before there were some people writing me that they'd like to have one. Before next year's Europe event, that has a high chance of happening again in Berlin, and before Congress, I'd like to make an update to this badge. 

    The badge needs a place for a pin and a CR2032 battery, so it can be usd stand alone as well and I can gift it to friends unaware of SAO headers and pinouts of such! I can't find notes on the foot print I made for #K.I.T.T. - KNIGHT RIDER badge/brooch, but I have one kit with me and plenty of pins and battery cases at home still.

  • Final Version

    davedarko10/13/2024 at 21:53 0 comments

    I've added two more memes to the design, plus some additional silkscreen drawings for the "bottom" part. I created an "IIC ready" logo, as I don't feel strong about adding any cool I2C features like @InstantArcade (Bob) added to his #Hack-Man SAO  

    Someone on twitter made a joke about an AT-ATiny being used and I liked that, so I stole that :)

    Just need to add hotglue to 30 badges and I'm ready for Supercon!

  • a sponsored post: why I order from JLCPCB

    davedarko10/03/2024 at 18:35 4 comments

    This box is special :) A week ago this box with 10 PCBs of my Han Solo simple add-on arrived - fully assembled- at my place! I only had to program them to make them work, everything else was sponsored, populated and soldered by JLCPCB! Seeing these blue boxes in the hand of my post person always make me very happy. Most of you are probably aware of JLCPCB, but fun-fact - aparentlly so are 5.4 million users!

    The PCBs inside came in a pink bubble wrap burrito, nothing was loose or able to scratch the important soldermask of this project. I never had to complain about packaging with them and I'm always using the boxes for project storage and carrying them to the hackspace and back. 

    And here they are. The back is populated with the ATTiny412, all resistors and capacitors, side glowing LEDs and two sockets, a JST-SH and a 2x3 header, as the regular IDC connector was too big for the design. JLCPCB offers a variety of colours that are great for pcbart, but in this case I was very pleased with the black PCB option already. 

    If you mark your PCB with JLCJLCJLCJLC and select "order number (select position)", then they will put the order number where you want - which is very important for badgeart like here!

    Here are the color options for the standard and advanced FR4 PCBs.

    If you have never used them before, now is the time - they even have coupons at the moment, up to $80 when you sign up. But there's always a coupon for something, as they usually have some for assembly or a new thing they are trying. Especially when you do a small run for prototypes, it really comes in handy that their prices start at $2 for 5 PCBs - and the quality is amazing.

    That's not all they're doing though, they also 3D print things and offer CNC services, worth to check out! I definitely want to try out their flex PCBs as well in the future.

  • First version soldered

    davedarko09/16/2024 at 12:59 0 comments

    After having a wonderful moment unpacking the PCBs, I still had to wait for the LEDs to be delivered. This weekend though, they finally arrived.

    So I quickly soldered the LEDs very carefully and the Attiny202 onto the board with some capacitors. First realisation was, that the regular neopixel Arduino code is way too big. There's an example of a static tinymegacore library, that worked though.

    The footprint of the LED I made myself, so naturally I forgot to check what the schematics symbole looked like. Here I mixed up two pins, which meant the LEDs had no chance of shining.

    Secondly, I used the programming pin as the LED data pin, something I corrected in the second version. For testing the code I've added 4 regular WS2812B LEDs on a string instead, to see if the code would work on a different pin as expected. Not sure why the CH340E USB-C programmer wouldn't work for serialUPDI, but I still had an FTDI dongle somewhere and that worked just fine to program the attiny.

    Recently I've been contacted by JLCPCB and they offered to sponser a small run of PCBs and I think this is a great opportunity for this boards second run. The Attiny202 seemed too busy with just the neopixels already, and to keep things open for I2C communication, I have replaced the Attiny202 chip with an Attiny412.

    Fixing some labels, adding one more LED, Pullup resistors for I2C, some test points and a qwiic connector, I think I'm happy with the board design.

  • to the judges

    davedarko09/04/2024 at 22:40 0 comments

    This is too big (>6cm tall) to fit the size constrains and uses a certain mouse franchise. Meme's without copyright infringement is hard.

View all 5 project logs

Enjoy this project?

Share

Discussions

jeremy.geppert wrote 09/27/2024 at 22:30 point

LOOKS AWESOME! You nailed it with the light sequence and the shine through on the face!

  Are you sure? yes | no

davedarko wrote 09/27/2024 at 22:50 point

Thank you so much :)

  Are you sure? yes | no

jeremy.geppert wrote 09/27/2024 at 13:22 point

This board is beautiful! How's it progressing? 

  Are you sure? yes | no

davedarko wrote 09/27/2024 at 14:39 point

pretty much done :) I need to post an update later

  Are you sure? yes | no

Phil Weasel wrote 09/16/2024 at 13:42 point

Damn, the HASL finish really adds to the effect. 👌

  Are you sure? yes | no

Alex wrote 09/11/2024 at 20:25 point

nice...what happened to the extra two holes at the connector for the perspective look?

  Are you sure? yes | no

davedarko wrote 09/12/2024 at 10:05 point

I've probably forgotten them, but now I'm thinking that they might up as a good way to add a programming pin anyways, hmm. 

  Are you sure? yes | no

Elliot Williams wrote 09/10/2024 at 14:44 point

"Meme's without copyright infringement is hard".  

Parody is very often Fair Use for exactly that reason!  

https://corporate.findlaw.com/intellectual-property/parody-fair-use-or-copyright-infringement.html

But we are also not lawyers. 

  Are you sure? yes | no

Similar Projects

Does this project spark your interest?

Become a member to follow this project and never miss any updates