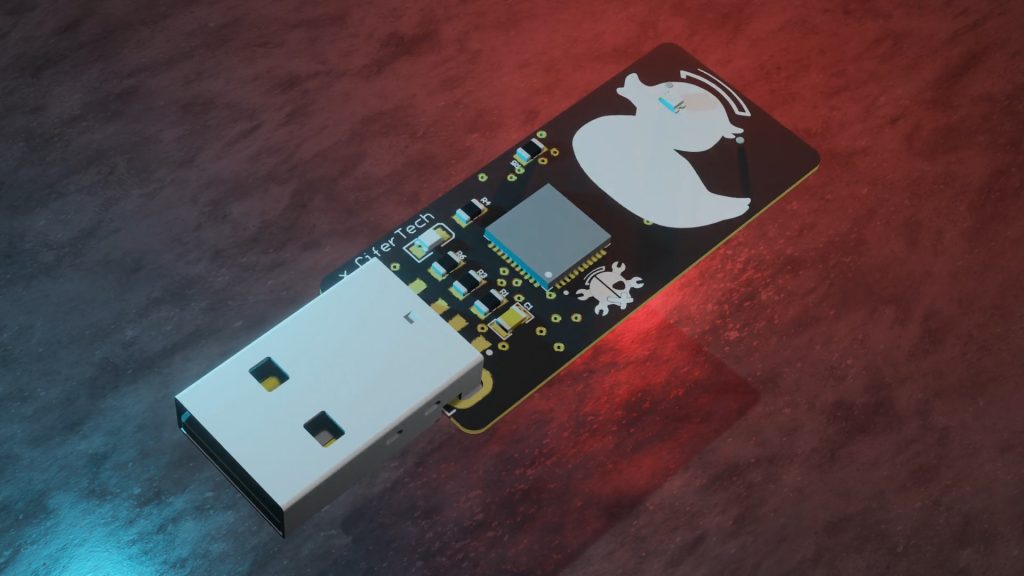
 CiferTech
🎯 Features
Hardware Features:
- ATmega32u4 Microcontroller: The brain of the device, capable of simulating a USB keyboard.
- SD Card Support: Store and load scripts from an SD card for flexibility in payload execution.
- AM1117 3.3V Voltage Regulator: Ensures stable power supply to the components.
- LED Indicators: Provide visual feedback on different device states like script execution, SD card errors, or script loading.
- SMD Components: Space-saving surface-mount components make the EvilDuck compact and ideal for DIY PCB design.
- Male USB A Connector: Ensures easy plug-and-play usage with any computer system.
Software Features:
- Predefined Commands: EvilDuck supports a variety of keystroke commands such as STRING, DELAY, CTRL, ALT, and many more.
- Flexible Script Loading: EvilDuck can load scripts from an SD card, making it easy to swap payloads on the go.
- LED Feedback: Customizable LED feedback based on script execution status, SD card presence, and other error conditions.
- Easy-to-Write Scripts: EvilDuck uses simple commands to write powerful scripts that can execute keystroke-based payloads.
🎯 Core Functions
EvilDuck’s core functions revolve around simulating a USB keyboard and sending keystrokes to the target machine in rapid succession. The primary operations include:
- Keystroke Injection: EvilDuck can simulate typing commands, passwords, or payloads, just like the well-known USB Rubber Ducky.
- Automated Payload Execution: With scripts stored on the SD card, EvilDuck automatically reads and executes predefined commands.
- LED Feedback: The LED indicators help in identifying the status of the script execution or any issues like missing SD cards or scripts.
🧰 Getting Started
Getting started with the EvilDuck project is straightforward. Here's how to begin:
Hardware:
1. Gather Components:
- ATmega32u4 microcontroller
- SD card reader
- SMD LEDs
- AM1117 3.3V voltage regulator
- Resistors and wires for connections
- Male USB A connector
2. Gather Components: ATmega32u4 microcontroller SD card reader SMD LEDs AM1117 3.3V voltage regulator Resistors and wires for connections Male USB A connector
3. Build on Breadboard: If you're experimenting with the EvilDuck and don't have a custom PCB ready, you can assemble the components on a breadboard for testing.
4. Soldering: If you're printing a PCB, solder the components (ATmega32u4, SD card reader, LEDs, and resistors) carefully. The SMD components make this more compact but require precision in soldering.
Software:
1. Install Arduino IDE: EvilDuck scripts are written and uploaded using the Arduino IDE.
2. Set Up Libraries: Make sure to install necessary libraries like Keyboard.h for simulating keystrokes.
3. Write Your Payload: Create your script and load it onto the SD card. A script may look something like:
GUI r DELAY 500 STRING notepad ENTER DELAY 1000 STRING EvilDuck is live!ENTER
4. Load the Script: Insert the SD card into the SD card reader connected to the EvilDuck and plug it into the target machine.
- EvilDuck Commands
When creating scripts for EvilDuck, you use a set of predefined commands to simulate keystrokes and control the flow of script execution. Each command performs a specific action, such as typing text, pressing a key, or introducing a delay. Understanding these commands and how to use them effectively is crucial for writing scripts that work smoothly.
Below is an in-depth explanation of the available commands for EvilDuck:
1. STRING
The STRING command types out a string of text, just as if you were manually typing on the keyboard. This is useful for typing out phrases, commands, or any text-based input.
Syntax:
STRING <text>
Example:
STRING Hello, World!
This command types "Hello, World!" wherever the cursor is active.
 clewsy
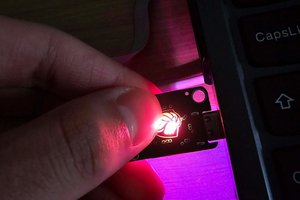
 allexoK
 Dilshan Jayakody
 Ricardo Daniel de Paula
The EvilDuck Project sounds fascinating! It’s great to see an open-source alternative to the USB Rubber Ducky that is both cost-effective and customizable. This DIY keystroke injection tool, capable of mimicking a USB keyboard and executing pre-written scripts, seems perfect for cybersecurity enthusiasts interested in penetration testing. Using easily accessible hardware components makes it even more appealing for those looking to experiment and learn. https://www.the-disneyhub.com