lukasz.iwaszkiewicz
-
2017 Entry!
03/21/2017 at 21:21 • 0 comments!!!Advertisement warning!!!
Check out my 2017 entry : https://hackaday.io/project/20463-data-flow-language-and-board-for-iot-automation
Thanks!
-
Image conversion and algorithm
08/18/2014 at 13:07 • 0 commentsTo print a row on the head, I have to send a stream of 832 bits via HDAT line. I am considering only a graphic data, i.e. printer won't generate any fonts for itself (at least for now). So for purpose of printing any color image in any format, some preprocessing on the host must be undertaken. Steps to do:
- 1. Resize the image to 832 pixels wide.
- 2. Reduce the color palette to grayscale.
- 3. Reduce image depth further to 4 shades i.e. 2 bits per pixel.
- 4. Apply dithering.
- 5. Output the raw byte stream.
- 6. For debugging purposes convert the resulting byte stream to C header, so the test image could be embedded in the source code and later on the flash memory.
Surprisingly the task was not as easy as I thought. It turns out, that the topic is quite complicated. For example look at those pages listed below, how many detailed information they contain:
- http://en.wikipedia.org/wiki/Color_quantization
- http://en.wikipedia.org/wiki/Dither
- http://www.imagemagick.org/Usage/quantize/
The last one may give you idea what tool I am using. It is a standard command line Swiss army knife for graphics manipulation available (often by default) on any *nix system. BTW my system is a Ubuntu 14.04, 64bit running on i5 and i7. After lots of tweaking (3 evenings or more) I came up with satisfactory solution:
1. Generate a "color palette". In my case only 4 shades : black, white and two grays:
convert -size 1x4 gradient:black ~/gradient_levels.png
2a. Perform steps 1-5 in one go, and output the result in form of viewable PNG image (for easy inspection):
convert IMG_7245.JPG -resize 832 -colorspace sRGB -set colorspace RGB -colorspace Gray -dither FloydSteinberg -remap ~/gradient_levels.png -depth 2 ~/franek.png
2b. Or alternatively output in raw format (notice the output image extension):
convert IMG_7245.JPG -resize 832 -colorspace sRGB -set colorspace RGB -colorspace Gray -dither FloydSteinberg -remap ~/gradient_levels.png -depth 2 ~/franek.gray
3. Make a *.h file (huge):
xxd -i ~/franek.gray > /home/iwasz/workspace/test07/src/franek.h
Resulting *.h file can be quite huge. Look at this for example. Every byte contains 4 pixels, each 2 bits wide. Black ones has value of 0x0, dark gray is 0x1, light gray is 0x2 and white is 0x3. So draft algorithm may look like that :
bit monochrome[832];
for each line
for k = 0; k < number of colors - 1 (i.e. 3); ++k
for each 2 bit pixel (color)
if color <= k
set corresponding bit in monochrome array to 1;
transfer monochrome array;
issue the DST signal;
In other words I spit the DST signal duration (let it be D ms) to 3 durations. First I turn on all black pixels, turn on the heat and wait D/3 ms. Then I turn on dark gray ones (black are still on) and after turning on the heat I wait another D/3 ms. Finally I add light gray pixels to the ones already switched on and repeat the heating for D/3 ms. This coarse description is implemented here.
-
The grayscale idea
08/18/2014 at 10:14 • 0 commentsAs I stated in a comment down below, the most tricky part of the whole gizmo is the thermal element of the head. Depending on the model it has typically from something around 300 to 832 thermal elements which are responsible for printing each dot in a row. So theoretically you can print a black line spanning the whole paper width at once, but this would involve heating up all 832 heat elements at once too (i refer to my original head which is 4 inches wide and has 832 pixels in row). This in turn require lots of current, because each pixel is lit by applying some quantity of heat, and heat requires power. Thus heads are divided into pages which can be turned on and off independently, which gives you an option to divide printing a row into smaller and less power hungry tasks. Every page is activated by its own signal called DST (I'm using SEIKO terminology). Basically driving a DST-n line high applies heat to all heat elements residing in n-th page whose corresponding bits in the latch register were set to 1 (see my comment somewhere below). Manuals of the heads include quite extensive and complex mathematical formulas for calculating the duration of the DST pulse. It depends on many factors including the paper type, number of pixels simultaneously lit, voltage you are using, temperature of the head and more. At the end you always have a duration which would provide you a clean deep black printout. But I thought that between black and white you could try to print shades of gray simply by dividing the DST duration by some factor. After a little bit of experimentation it turned out that 2 intermediate shades are the best that can be done on my head with paper I had. The most limiting factor here, I think, is the paper which is covered with dye chemicals not evenly enough, which gives you visible artifacts and grain on a solid black printout. Those papers I own are simply not designed for such tasks, but I believe there are better options (take the USG printouts on some glossy thick paper for example). So as you can see, there is no point of increasing the number of intermediate shades of gray due to inaccuracy of the result. In the next post I'll try to explain the basics of the printing algorithm.
-
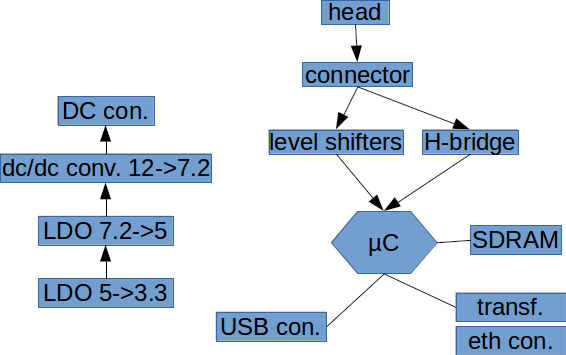
Rough diagram
07/30/2014 at 22:46 • 0 commentsOn the picture below I tried to depict most important or most expensive parts that will comprise my design. On the left side you have power supply part which would provide 3 voltages. 7.2V is for the heaters and the stepper motor (now the lab's power supply is making it). It has to be a switching dc/dc converter because heaters can draw enormous amount of current (). 5V is for the head's logic and in current state 5V is supplied by the USB connected to the TIVA evaluation board which then is passed to the head. 3V3 is for the µC.
![]()
I included the FFC connector on my diagram, because these things tend to be quite expensive when I checked them on farnell and I wanted to include all most expensive parts on the drawing to get a glimpse of what the final cost may be. The plan is to make this device as cheap as possible to be able to eventually make a product out of it.
-
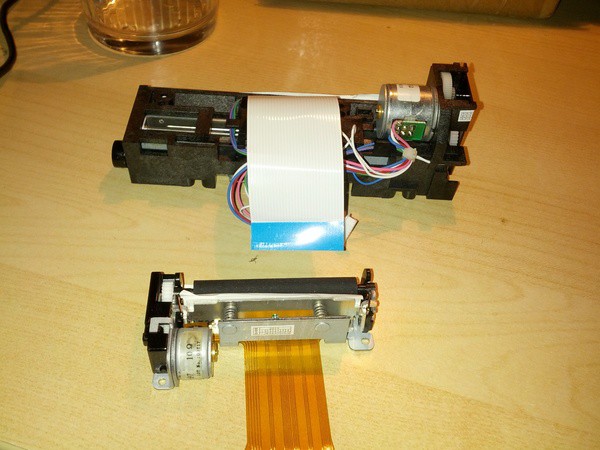
2 new printer heads
07/22/2014 at 23:00 • 0 commentsBrand new heads to experiment with:
![]()
These are newer models of my old head which is now obsolete. Not to mention that these are not original Seiko ones, but cheaper replacements (not so cheap though). The bigger one is compatible with LTPV445 and const me $33 and the smaller one is also compatible with something which Seiko made, but I forgot what. This smaller prints on 2 inch paper and cost $7.50, so it is much more affordable option. But I am still looking for something cheaper, especially regarding this bigger 832 dots wide one.
IoT thermal grayscale printer shield
Arduino shield (will work standalone also) which would print on a thermal paper. Serial, USB and Ethernet communication, open source.