 kutluhan_aktar
-
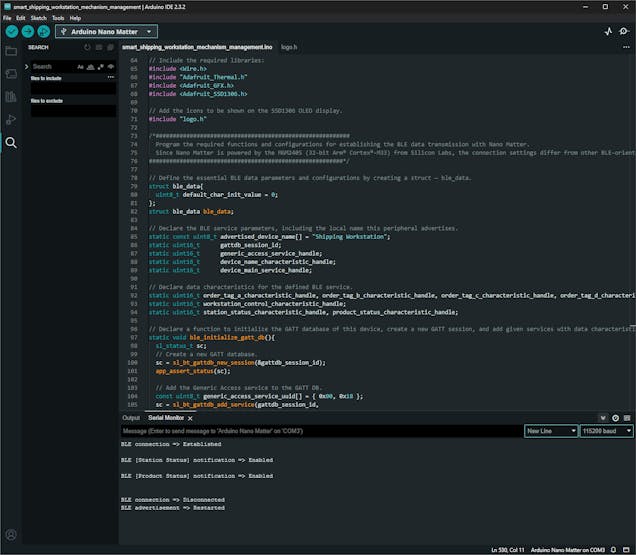
21Step 8: Programming Arduino Nano Matter to finalize the workstation control panel
To prepare monochromatic images in order to display logos on the SSD1306 OLED screen and print bitmaps with the thermal printer, I followed the exact same process.
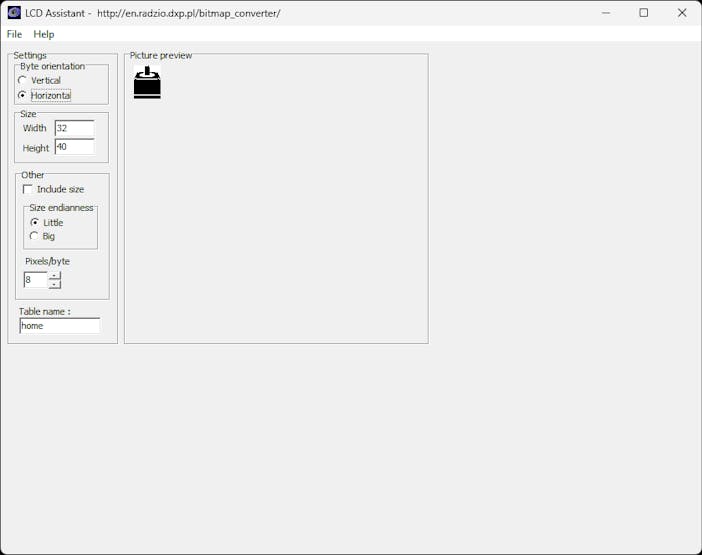
#️⃣ First, convert monochromatic bitmaps to compatible C data arrays by utilizing LCD Assistant.
#️⃣ Upload a monochromatic bitmap to LCD Assistant and select Vertical or Horizontal, depending on the screen type.
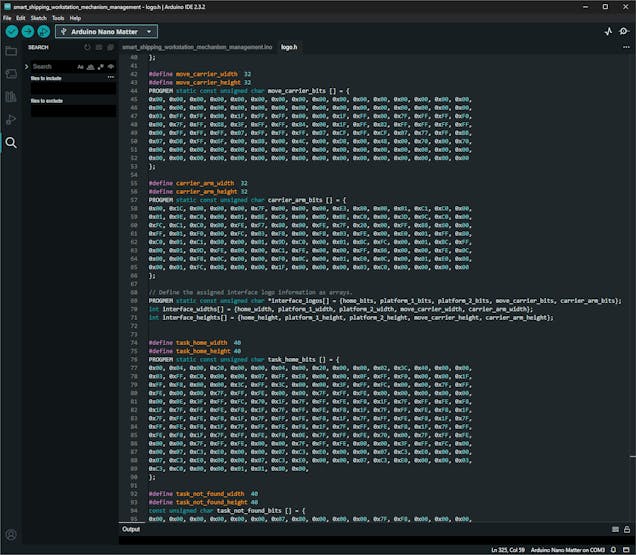
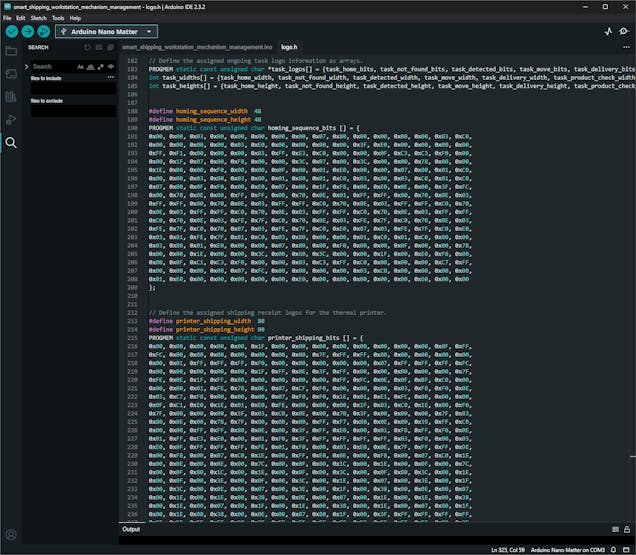
#️⃣ Then, create a header file (logo.h) to store all the converted C data arrays.
⭐ In the logo.h file, I defined multi-dimensional arrays to group the assigned logos and their sizes — width and height.
// Define the assigned ongoing task logo information as arrays. PROGMEM static const unsigned char *task_logos[] = {task_home_bits, task_not_found_bits, task_detected_bits, task_move_bits, task_delivery_bits, task_product_check_bits};int task_widths[] = {task_home_width, task_not_found_width, task_detected_width, task_move_width, task_delivery_width, task_product_check_width};int task_heights[] = {task_home_height, task_not_found_height, task_detected_height, task_move_height, task_delivery_height, task_product_check_height};![]()
![]()
![]()
#️⃣ Since I needed to assign unique UUID sets (128-bit) to BLE services and data characteristics individually, I employed this online UUID generator.
As explained in the previous steps, the workstation performs various features requiring interconnected networking and multiple development board integrations. Thus, the described code snippets represent the different aspects of the presented code file. Please refer to the actual code files to inspect functions thoroughly.
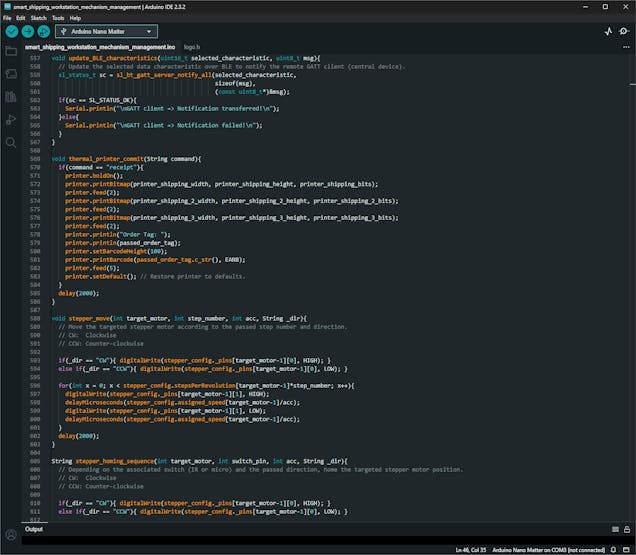
📁 smart_shipping_workstation_mechanism_management.ino
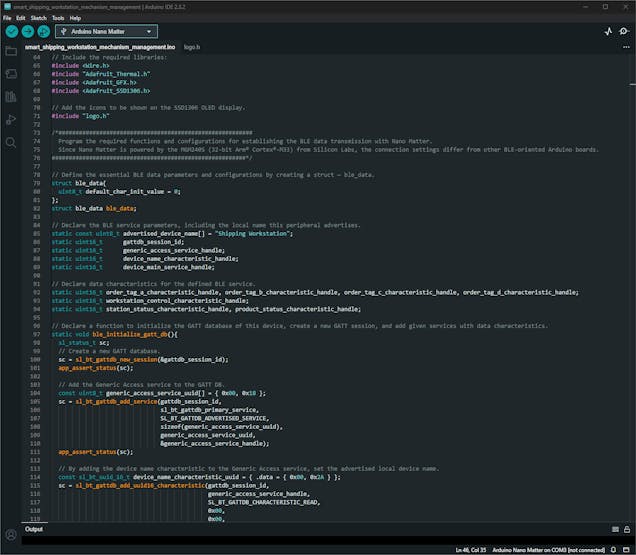
⭐ Include the required libraries.
#include <Wire.h>#include "Adafruit_Thermal.h"#include <Adafruit_GFX.h>#include <Adafruit_SSD1306.h>
⭐ Import the logo.h file to obtain the converted C arrays.
#include "logo.h"
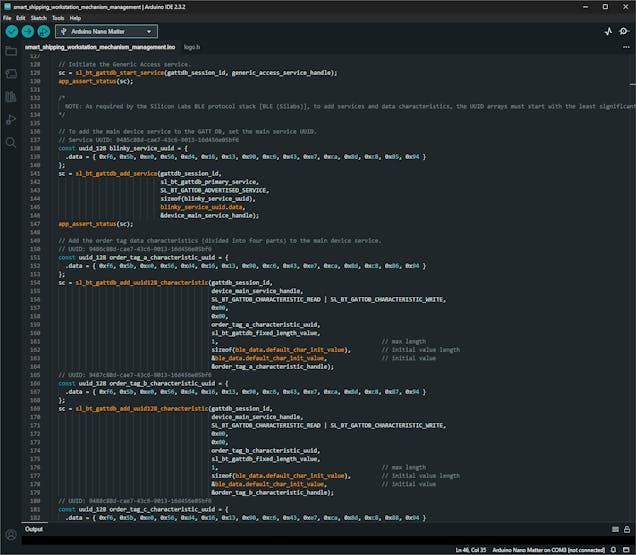
⭐ Declare the essential BLE service parameters and data characteristics.
⭐ Then, declare the ble_initialize_gatt_db function to initialize a GATT database, create a new GATT session, and add services with assigned data characteristics.
❗ As required by the Silicon Labs BLE protocol stack [BLE (Silabs)], while adding services with the assigned data characteristics, the associated UUID arrays must start with the least significant bit (LSB) from right to left (rightmost).
Service UUID: 9485c88d-cae7-43c6-9013-16d456e05bf6
0xf6, 0x5b, 0xe0, 0x56, 0xd4, 0x16, 0x13, 0x90, 0xc6, 0x43, 0xe7, 0xca, 0x8d, 0xc8, 0x85, 0x94
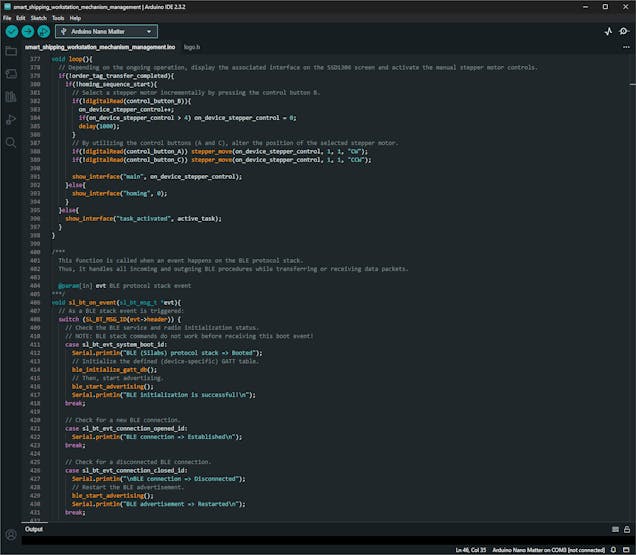
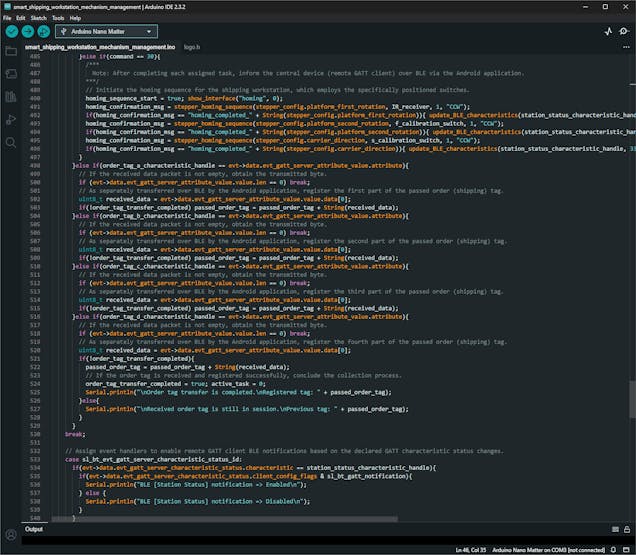
static void ble_initialize_gatt_db(){ sl_status_t sc; // Create a new GATT database. sc = sl_bt_gattdb_new_session(&gattdb_session_id); app_assert_status(sc); // Add the Generic Access service to the GATT DB. const uint8_t generic_access_service_uuid[] = { 0x00, 0x18 }; sc = sl_bt_gattdb_add_service(gattdb_session_id, sl_bt_gattdb_primary_service, SL_BT_GATTDB_ADVERTISED_SERVICE, sizeof(generic_access_service_uuid), generic_access_service_uuid, &generic_access_service_handle); app_assert_status(sc); // By adding the device name characteristic to the Generic Access service, set the advertised local device name. const sl_bt_uuid_16_t device_name_characteristic_uuid = { .data = { 0x00, 0x2A } }; sc = sl_bt_gattdb_add_uuid16_characteristic(gattdb_session_id, generic_access_service_handle, SL_BT_GATTDB_CHARACTERISTIC_READ, 0x00, 0x00, device_name_characteristic_uuid, sl_bt_gattdb_fixed_length_value, sizeof(advertised_device_name) - 1, sizeof(advertised_device_name) - 1, advertised_device_name, &device_name_characteristic_handle); app_assert_status(sc); // Initiate the Generic Access service. sc = sl_bt_gattdb_start_service(gattdb_session_id, generic_access_service_handle); app_assert_status(sc); /* NOTE: As required by the Silicon Labs BLE protocol stack [BLE (Silabs)], to add services and data characteristics, the UUID arrays must start with the least significant bit (LSB) from left to right. */ // To add the main device service to the GATT DB, set the main service UUID. // Service UUID: 9485c88d-cae7-43c6-9013-16d456e05bf6 const uuid_128 blinky_service_uuid = { .data = { 0xf6, 0x5b, 0xe0, 0x56, 0xd4, 0x16, 0x13, 0x90, 0xc6, 0x43, 0xe7, 0xca, 0x8d, 0xc8, 0x85, 0x94 } }; sc = sl_bt_gattdb_add_service(gattdb_session_id, sl_bt_gattdb_primary_service, SL_BT_GATTDB_ADVERTISED_SERVICE, sizeof(blinky_service_uuid), blinky_service_uuid.data, &device_main_service_handle); app_assert_status(sc); // Add the order tag data characteristics (divided into four parts) to the main device service. // UUID: 9486c88d-cae7-43c6-9013-16d456e05bf6 const uuid_128 order_tag_a_characteristic_uuid = { .data = { 0xf6, 0x5b, 0xe0, 0x56, 0xd4, 0x16, 0x13, 0x90, 0xc6, 0x43, 0xe7, 0xca, 0x8d, 0xc8, 0x86, 0x94 } }; sc = sl_bt_gattdb_add_uuid128_characteristic(gattdb_session_id, device_main_service_handle, SL_BT_GATTDB_CHARACTERISTIC_READ | SL_BT_GATTDB_CHARACTERISTIC_WRITE, 0x00, 0x00, order_tag_a_characteristic_uuid, sl_bt_gattdb_fixed_length_value, 1, // max length sizeof(ble_data.default_char_init_value), // initial value length &ble_data.default_char_init_value, // initial value &order_tag_a_characteristic_handle); // UUID: 9487c88d-cae7-43c6-9013-16d456e05bf6 const uuid_128 order_tag_b_characteristic_uuid = { .data = { 0xf6, 0x5b, 0xe0, 0x56, 0xd4, 0x16, 0x13, 0x90, 0xc6, 0x43, 0xe7, 0xca, 0x8d, 0xc8, 0x87, 0x94 } }; sc = sl_bt_gattdb_add_uuid128_characteristic(gattdb_session_id, device_main_service_handle, SL_BT_GATTDB_CHARACTERISTIC_READ | SL_BT_GATTDB_CHARACTERISTIC_WRITE, 0x00, 0x00, order_tag_b_characteristic_uuid, sl_bt_gattdb_fixed_length_value, 1, // max length sizeof(ble_data.default_char_init_value), // initial value length &ble_data.default_char_init_value, // initial value &order_tag_b_characteristic_handle); // UUID: 9488c88d-cae7-43c6-9013-16d456e05bf6 const uuid_128 order_tag_c_characteristic_uuid = { .data = { 0xf6, 0x5b, 0xe0, 0x56, 0xd4, 0x16, 0x13, 0x90, 0xc6, 0x43, 0xe7, 0xca, 0x8d, 0xc8, 0x88, 0x94 } }; sc = sl_bt_gattdb_add_uuid128_characteristic(gattdb_session_id, device_main_service_handle, SL_BT_GATTDB_CHARACTERISTIC_READ | SL_BT_GATTDB_CHARACTERISTIC_WRITE, 0x00, 0x00, order_tag_c_characteristic_uuid, sl_bt_gattdb_fixed_length_value, 1, // max length sizeof(ble_data.default_char_init_value), // initial value length &ble_data.default_char_init_value, // initial value &order_tag_c_characteristic_handle); // UUID: 9489c88d-cae7-43c6-9013-16d456e05bf6 const uuid_128 order_tag_d_characteristic_uuid = { .data = { 0xf6, 0x5b, 0xe0, 0x56, 0xd4, 0x16, 0x13, 0x90, 0xc6, 0x43, 0xe7, 0xca, 0x8d, 0xc8, 0x89, 0x94 } }; sc = sl_bt_gattdb_add_uuid128_characteristic(gattdb_session_id, device_main_service_handle, SL_BT_GATTDB_CHARACTERISTIC_READ | SL_BT_GATTDB_CHARACTERISTIC_WRITE, 0x00, 0x00, order_tag_d_characteristic_uuid, sl_bt_gattdb_fixed_length_value, 1, // max length sizeof(ble_data.default_char_init_value), // initial value length &ble_data.default_char_init_value, // initial value &order_tag_d_characteristic_handle); // Add the workstation control characteristic to the main device service. // UUID: 9490c88d-cae7-43c6-9013-16d456e05bf6 const uuid_128 workstation_control_characteristic_uuid = { .data = { 0xf6, 0x5b, 0xe0, 0x56, 0xd4, 0x16, 0x13, 0x90, 0xc6, 0x43, 0xe7, 0xca, 0x8d, 0xc8, 0x90, 0x94 } }; sc = sl_bt_gattdb_add_uuid128_characteristic(gattdb_session_id, device_main_service_handle, SL_BT_GATTDB_CHARACTERISTIC_READ | SL_BT_GATTDB_CHARACTERISTIC_WRITE, 0x00, 0x00, workstation_control_characteristic_uuid, sl_bt_gattdb_fixed_length_value, 1, // max length sizeof(ble_data.default_char_init_value), // initial value length &ble_data.default_char_init_value, // initial value &workstation_control_characteristic_handle); // Add the station status and product characteristics to the main device service to notify the remote GATT client (central device) over BLE. // UUID: 9491c88d-cae7-43c6-9013-16d456e05bf6 const uuid_128 station_status_characteristic_uuid = { .data = { 0xf6, 0x5b, 0xe0, 0x56, 0xd4, 0x16, 0x13, 0x90, 0xc6, 0x43, 0xe7, 0xca, 0x8d, 0xc8, 0x91, 0x94 } }; sc = sl_bt_gattdb_add_uuid128_characteristic(gattdb_session_id, device_main_service_handle, SL_BT_GATTDB_CHARACTERISTIC_READ | SL_BT_GATTDB_CHARACTERISTIC_NOTIFY, 0x00, 0x00, station_status_characteristic_uuid, sl_bt_gattdb_fixed_length_value, 1, // max length sizeof(ble_data.default_char_init_value), // initial value length &ble_data.default_char_init_value, // initial value &station_status_characteristic_handle); // UUID: 9492c88d-cae7-43c6-9013-16d456e05bf6 const uuid_128 product_status_characteristic_uuid = { .data = { 0xf6, 0x5b, 0xe0, 0x56, 0xd4, 0x16, 0x13, 0x90, 0xc6, 0x43, 0xe7, 0xca, 0x8d, 0xc8, 0x92, 0x94 } }; sc = sl_bt_gattdb_add_uuid128_characteristic(gattdb_session_id, device_main_service_handle, SL_BT_GATTDB_CHARACTERISTIC_READ | SL_BT_GATTDB_CHARACTERISTIC_NOTIFY, 0x00, 0x00, product_status_characteristic_uuid, sl_bt_gattdb_fixed_length_value, 1, // max length sizeof(ble_data.default_char_init_value), // initial value length &ble_data.default_char_init_value, // initial value &product_status_characteristic_handle); // Initiate the main device service. sc = sl_bt_gattdb_start_service(gattdb_session_id, device_main_service_handle); app_assert_status(sc); // Then, commit the GATT DB updates. sc = sl_bt_gattdb_commit(gattdb_session_id); app_assert_status(sc);}⭐ Declare the ble_start_advertising function to enable the BLE advertisement and configure advertisement parameters.
static void ble_start_advertising(){ static uint8_t advertising_set_handle = 0xff; static bool init = true; sl_status_t sc; // For once, create an advertising set and configure the advertising interval as 100ms. if (init){ sc = sl_bt_advertiser_create_set(&advertising_set_handle); app_assert_status(sc); sc = sl_bt_advertiser_set_timing( advertising_set_handle, 160, // minimum advertisement interval (milliseconds * 1.6) 160, // maximum advertisement interval (milliseconds * 1.6) 0, // advertisement duration 0); // maximum number of advertisement events app_assert_status(sc); init = false; } // Generate the advertising information packet. sc = sl_bt_legacy_advertiser_generate_data(advertising_set_handle, sl_bt_advertiser_general_discoverable); app_assert_status(sc); // Start advertising and enable BLE connections. sc = sl_bt_legacy_advertiser_start(advertising_set_handle, sl_bt_advertiser_connectable_scannable); app_assert_status(sc);}⭐ Define the thermal printer object for passing commands through the hardware serial port of Nano Matter — Serial1.
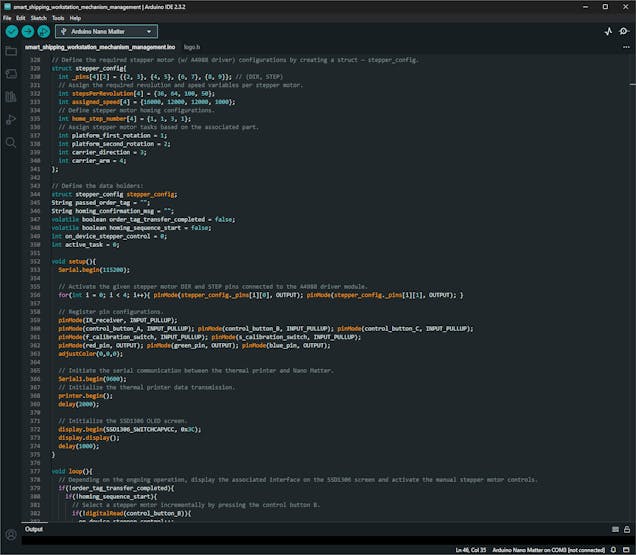
Adafruit_Thermal printer(&Serial1);
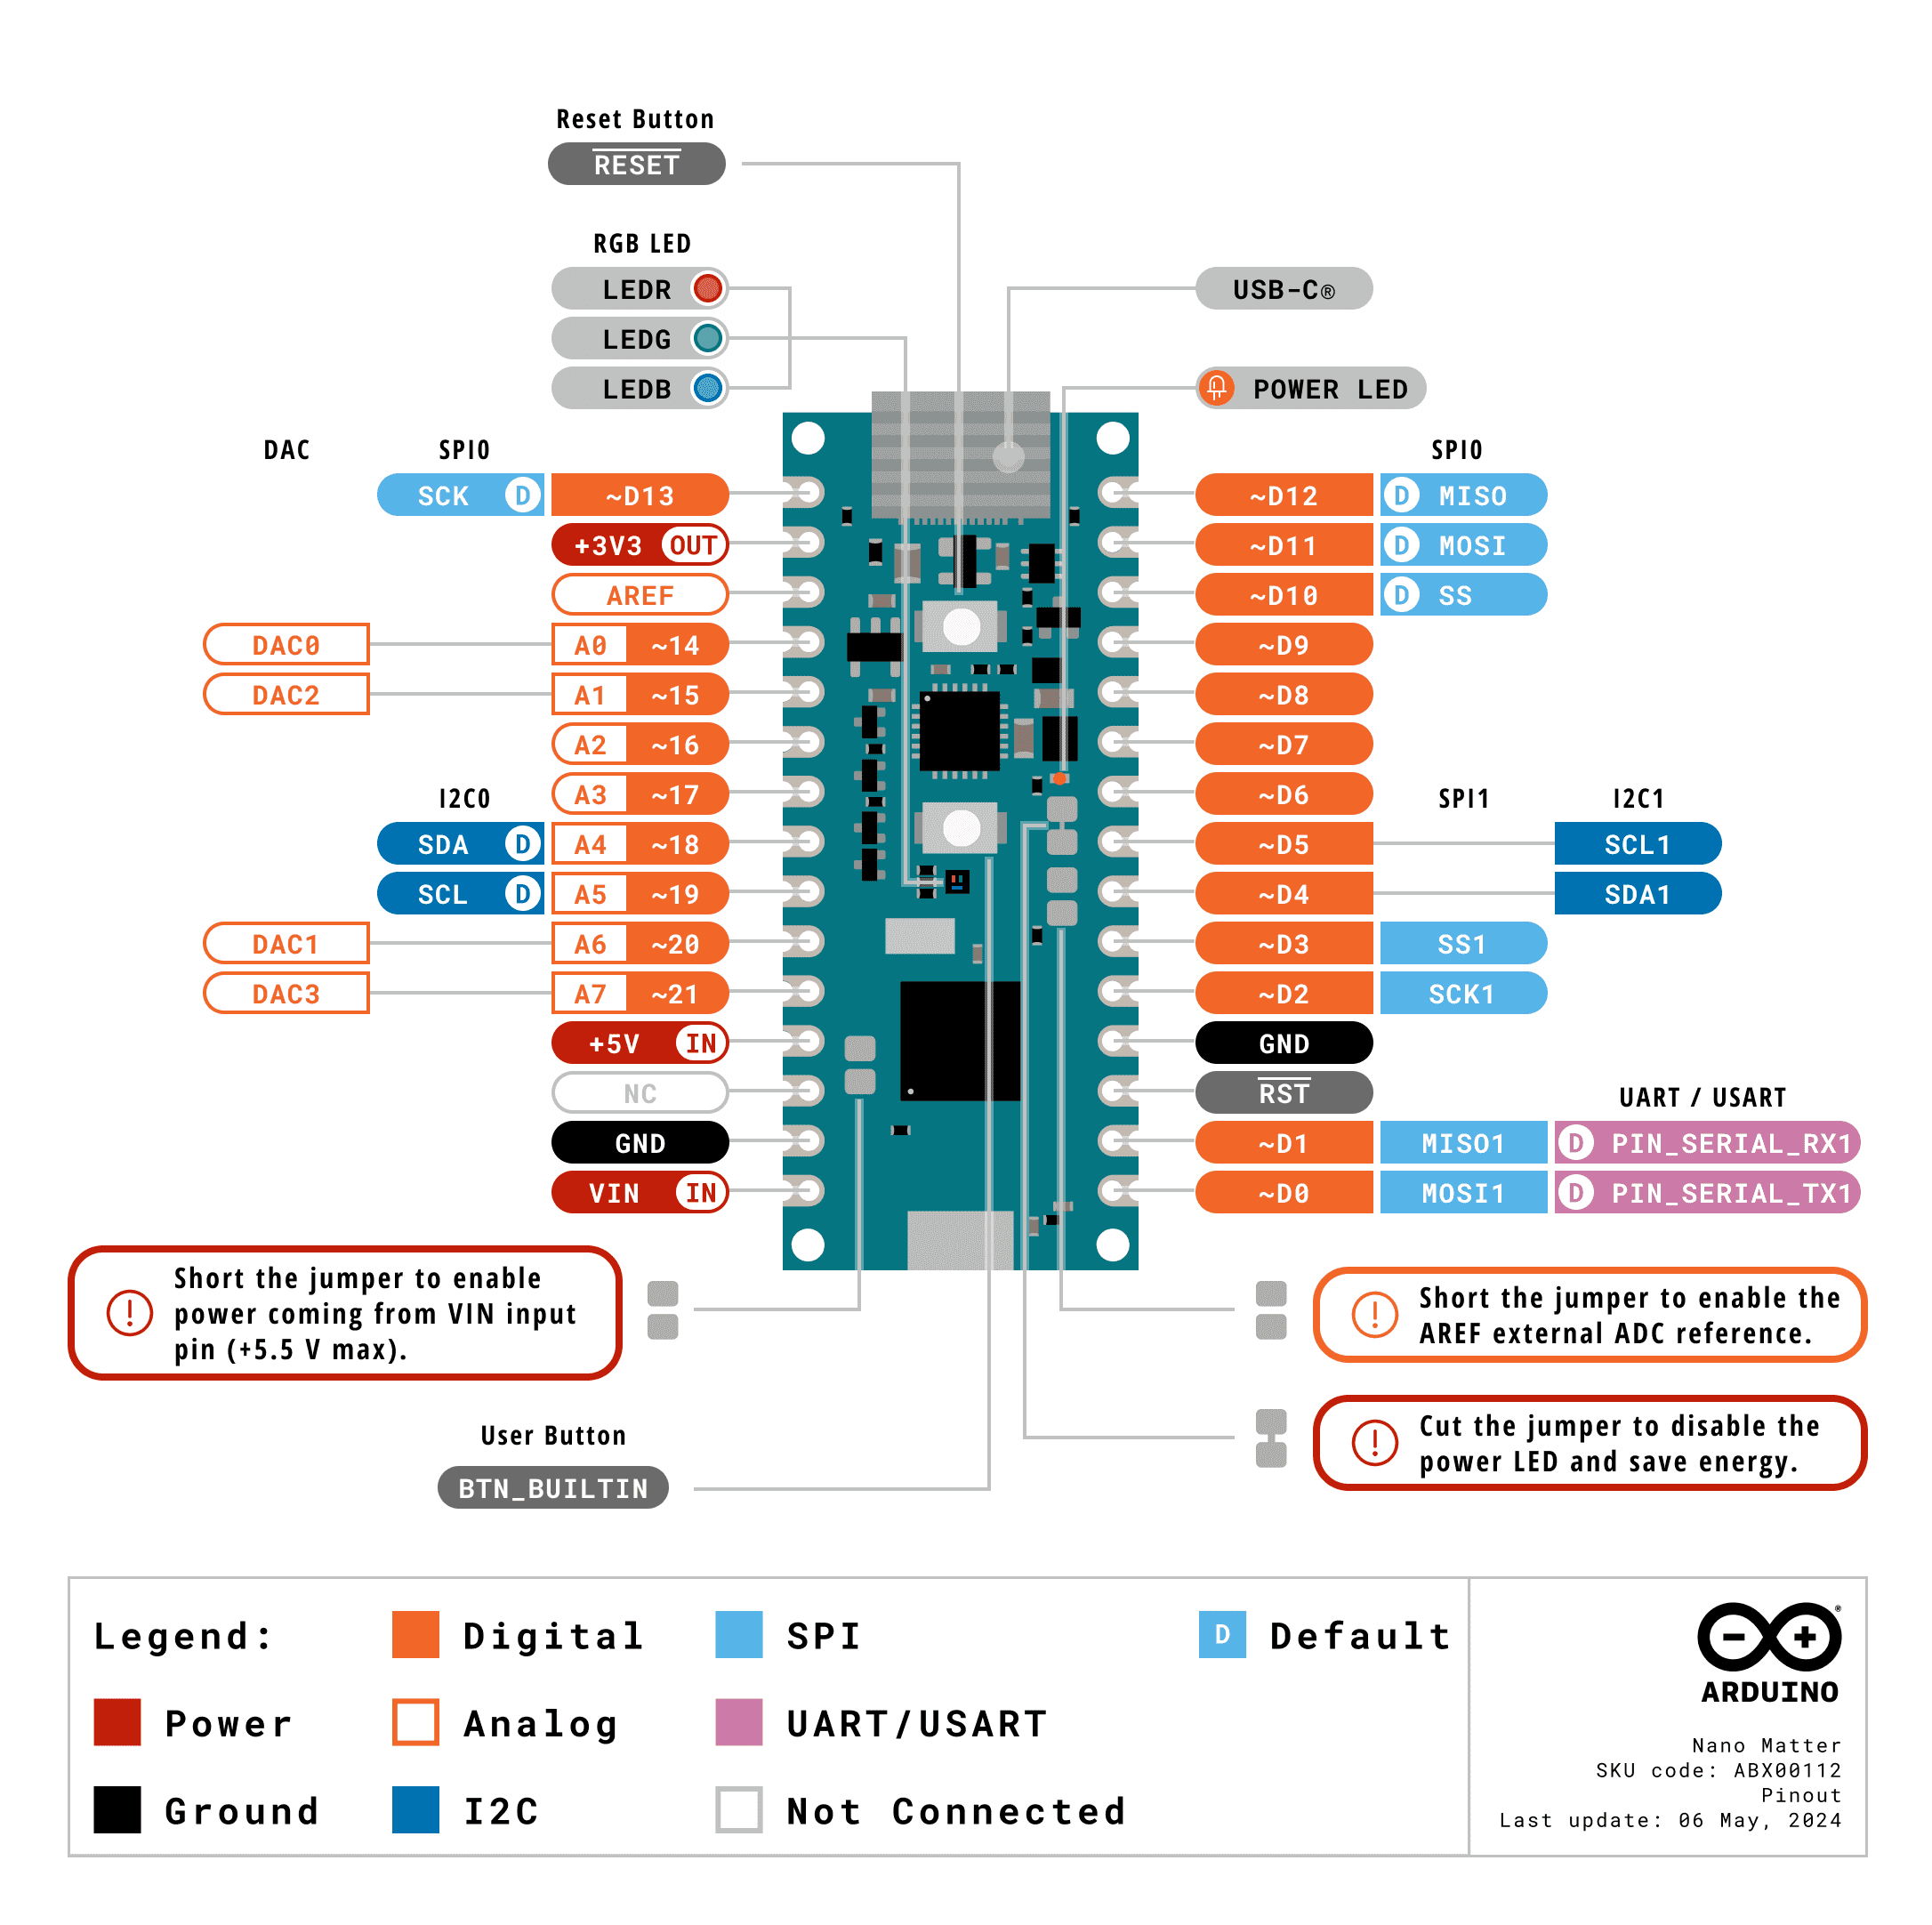
⭐ Define the required Nema 17 stepper motor (attached to A4988 driver modules) configurations by creating a struct — stepper_config — so as to assign and call variables per stepper motor efficiently.
struct stepper_config{ int _pins[4][2] = {{2, 3}, {4, 5}, {6, 7}, {8, 9}}; // (DIR, STEP) // Assign the required revolution and speed variables per stepper motor. int stepsPerRevolution[4] = {36, 64, 100, 50}; int assigned_speed[4] = {16000, 12000, 12000, 1000}; // Define stepper motor homing configurations. int home_step_number[4] = {1, 1, 3, 1}; // Assign stepper motor tasks based on the associated part. int platform_first_rotation = 1; int platform_second_rotation = 2; int carrier_direction = 3; int carrier_arm = 4;};🤖 After declaring fundamental variables and configurations, I started to program all the workstation control panel features showcased in the following steps. You can view the code files on GitHub with thorough commentary.
![]()
![]()
![]()
![]()
![]()
![]()
![]()
![]()
-
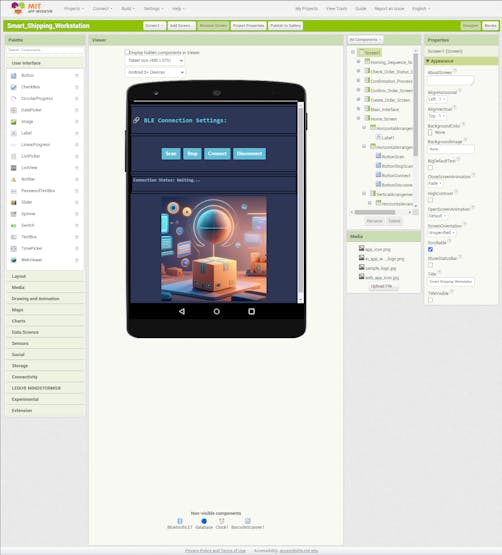
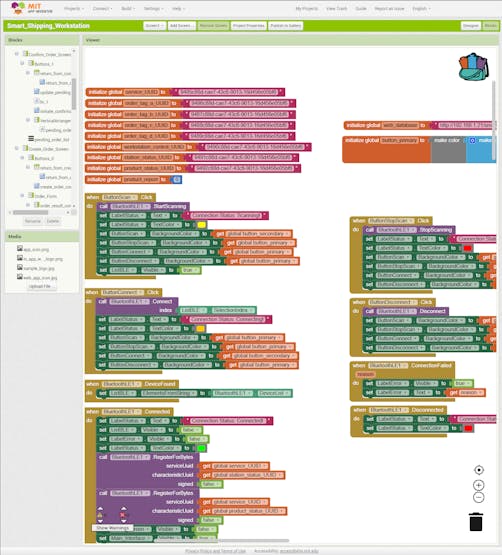
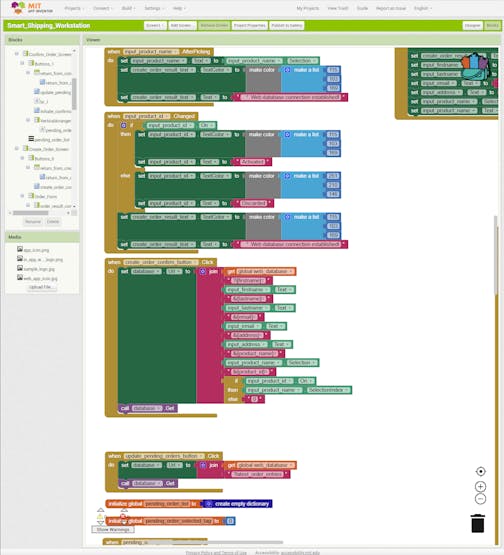
22Step 9: Developing the mobile (Android) workstation application w/ MIT APP Inventor
To capitalize on the reliable BLE connectivity enabled by Nano Matter, I decided to develop a mobile workstation application (Android) operating as the workstation interface. Thanks to the Wi-Fi connectivity natively provided by a smartphone, the mobile application also works as the proxy between the workstation control panel (based on Nano Matter) and the web workstation application.
Since I am familiar with MIT App Inventor's syntax and structure for programming Android applications, I decided to develop my mobile application with MIT App Inventor, which is an intuitive visual programming environment that allows developers to build fully functional applications.
Since this mobile application is open-source, you can download its APK file below to test the available features on a compatible smartphone. Unfortunately, since MIT App Inventor employs a blocks-based (drag-and-drop) tool to facilitate programming, I cannot provide a code file for the mobile application. Nonetheless, MIT App Inventor lets developers review or modify applications by importing project files in the AIA format.
Thus, you can inspect my mobile application design and programming process by opening this application's AIA file on your account.
#️⃣ First, create an MIT App Inventor account.
#️⃣ After downloading the project's AIA file (Smart_Shipping_Workstation.aia), import it into your account.
❗ Since MIT App Inventor does not provide functions for BLE data transmission natively, I utilized the latest version of the BluetoothLE extension to enable BLE connectivity for my mobile application. In this tutorial, you can get more information about the extension features.
![]()
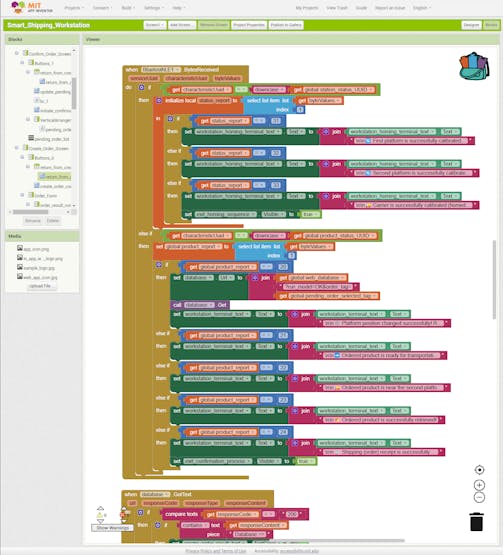
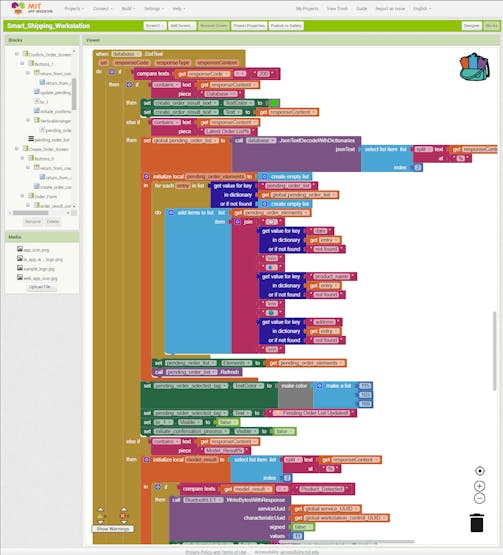
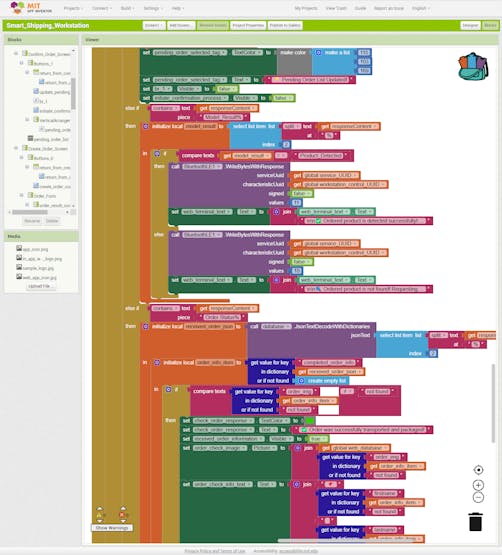
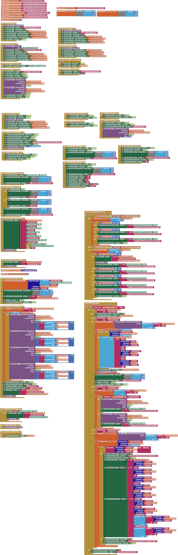
#️⃣ After importing the project's AIA file, you can review or modify my coding blocks via the Blocks editor.
In the following steps, I will elucidate all of the accessible features of this mobile application.
![]()
![]()
![]()
![]()
![]()
![]()
![]()
![]()
After installing my mobile application on a compatible Android smartphone, I did not encounter any connectivity or data transmission problems while running the available features.
![]()
![]()
-
23Step 10: Developing the web workstation application on Raspberry Pi 5
As discussed earlier, I decided to develop a versatile web application to manage the MariaDB database server hosted by Raspberry Pi 5, run the Edge Impulse FOMO object detection model, and transfer the detection results with the modified model resulting images.
Since I had already set up the essential firmware to develop the web application, I immediately started to configure the required web application settings on Raspberry Pi 5.
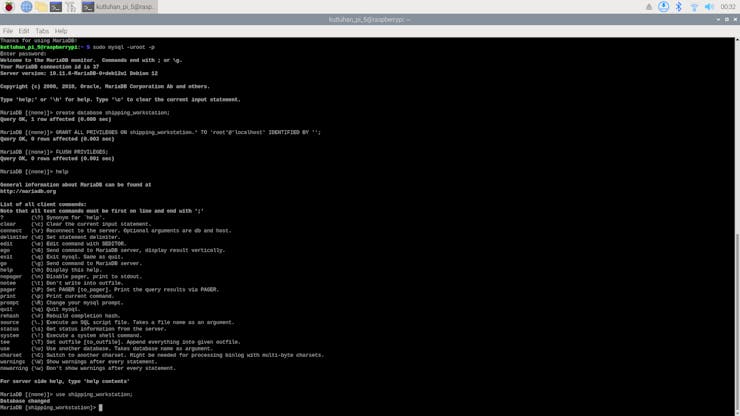
#️⃣ First, I created a new MariaDB database named shipping_workstation by utilizing the integrated terminal prompt.
sudo mysql -uroot -p
create database shipping_workstation;
GRANT ALL PRIVILEGES ON shipping_workstation.* TO 'root'@'localhost' IDENTIFIED BY '';
FLUSH PRIVILEGES;
#️⃣ Then, I created a database table (orders) with the required data fields under the new database.
use shipping_workstation;
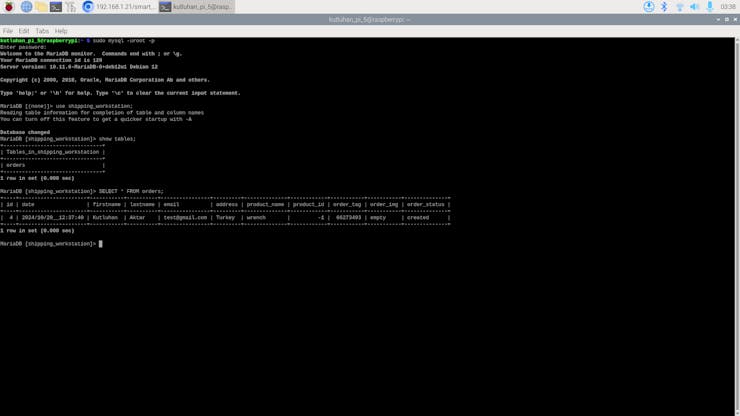
CREATE TABLE `orders`( id int AUTO_INCREMENT PRIMARY KEY, `date` varchar(255), firstname varchar(255), lastname varchar(255), email varchar(255), address varchar(255), product_name varchar(255), product_id int, order_tag int, order_img varchar(255), order_status varchar(255) );
![]()
![]()
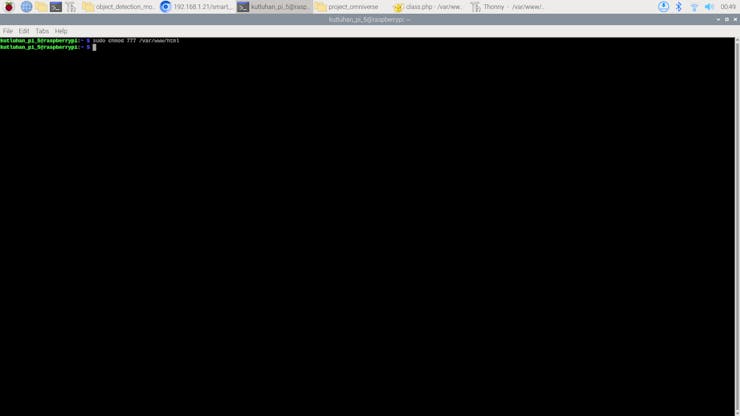
#️⃣ Since the application folders and files under the root folder of the Apache server are restricted, I changed permissions to enable file creation and modification while running the web application.
sudo chmod 777 /var/www/html
![]()
After setting up the mentioned web application configurations, I started to program the application features on Raspberry Pi 5.
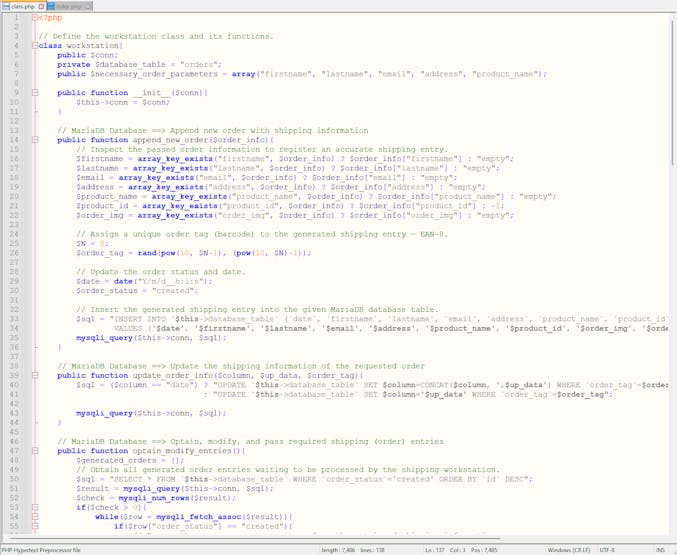
📁 class.php
⭐ To bundle all functions under a specific structure, declare the workstation class.
⭐ In the append_new_order function:
⭐ Check the array keys of the passed order information to register an accurate shipping entry.
⭐ Generate a unique order tag (barcode) number — EAN-8.
⭐ Then, insert the generated shipping entry with the entry creation date into the given MariaDB database table.
public function append_new_order($order_info){ // Inspect the passed order information to register an accurate shipping entry. $firstname = array_key_exists("firstname", $order_info) ? $order_info["firstname"] : "empty"; $lastname = array_key_exists("lastname", $order_info) ? $order_info["lastname"] : "empty"; $email = array_key_exists("email", $order_info) ? $order_info["email"] : "empty"; $address = array_key_exists("address", $order_info) ? $order_info["address"] : "empty"; $product_name = array_key_exists("product_name", $order_info) ? $order_info["product_name"] : "empty"; $product_id = array_key_exists("product_id", $order_info) ? $order_info["product_id"] : -1; $order_img = array_key_exists("order_img", $order_info) ? $order_info["order_img"] : "empty"; // Assign a unique order tag (barcode) to the generated shipping entry — EAN-8. $N = 8; $order_tag = rand(pow(10, $N-1), (pow(10, $N)-1)); // Update the order status and date. $date = date("Y/m/d__h:i:s"); $order_status = "created"; // Insert the generated shipping entry into the given MariaDB database table. $sql = "INSERT INTO `$this->database_table` (`date`, `firstname`, `lastname`, `email`, `address`, `product_name`, `product_id`, `order_img`, `order_tag`, `order_status`) VALUES ('$date', '$firstname', '$lastname', '$email', '$address', '$product_name', '$product_id', '$order_img', '$order_tag', '$order_status')"; mysqli_query($this->conn, $sql); }⭐ In the update_order_info function, update the given column (data field) with the passed information. If the given data field is date, concatenate the new and older dates.
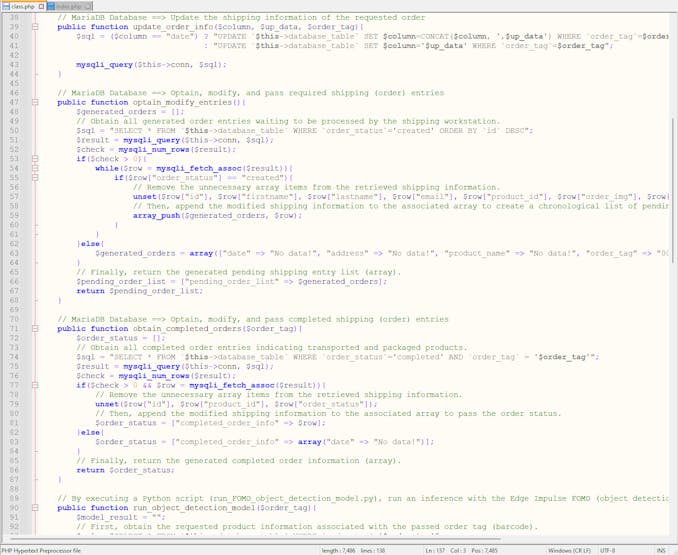
public function update_order_info($column, $up_data, $order_tag){ $sql = ($column == "date") ? "UPDATE `$this->database_table` SET $column=CONCAT($column, ',$up_data') WHERE `order_tag`=$order_tag" : "UPDATE `$this->database_table` SET $column='$up_data' WHERE `order_tag`=$order_tag"; mysqli_query($this->conn, $sql); }⭐ In the obtain_completed_orders function:
⭐ Obtain all completed order entries indicating transported and packaged products.
⭐ Remove the unnecessary array items from the retrieved shipping information.
⭐ Append the modified shipping information array to the associated multidimensional array.
⭐ Then, return the generated multidimensional array.
public function obtain_completed_orders($order_tag){ $order_status = []; // Obtain all completed order entries indicating transported and packaged products. $sql = "SELECT * FROM `$this->database_table` WHERE `order_status`='completed' AND `order_tag` = '$order_tag'"; $result = mysqli_query($this->conn, $sql); $check = mysqli_num_rows($result); if($check > 0 && $row = mysqli_fetch_assoc($result)){ // Remove the unnecessary array items from the retrieved shipping information. unset($row["id"], $row["product_id"], $row["order_status"]); // Then, append the modified shipping information to the associated array to pass the order status. $order_status = ["completed_order_info" => $row]; }else{ $order_status = ["completed_order_info" => array("date" => "No data!")]; } // Finally, return the generated completed order information (array). return $order_status; }⭐ In the run_object_detection_model function:
⭐ Obtain the requested product information associated with the passed order tag (barcode).
⭐ Then, execute the given Python script to run an inference with the Edge Impulse FOMO object detection model to classify the sample product currently positioned under the USB webcam connected to Raspberry Pi 5.
⭐ Decode the JSON object transferred by the Python script to obtain the model resulting information.
⭐ As the Python script transfers the detected product class after running the FOMO object detection model:
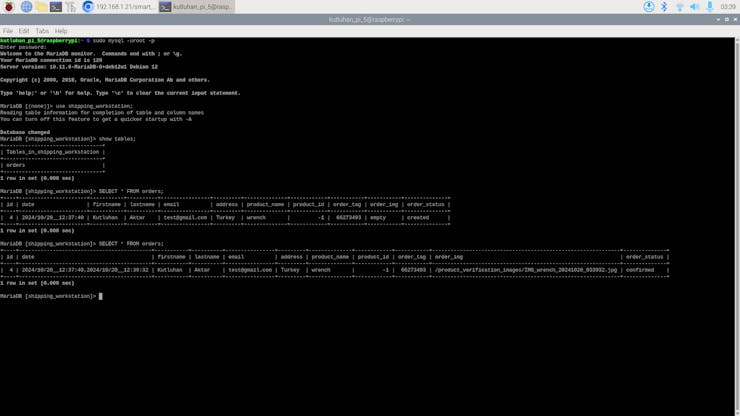
⭐ If the ordered product is successfully found, enable the product transportation procedure and change the order status to completed. Then, append the order completion date and the path of the model resulting image generated by the Python script to the associated database entry.
⭐ Otherwise, enable the first rotating platform position change procedure.
❗ Since the web application executes the given Python script via the shell_exec function, it is not possible to observe debugging errors instantly like using the terminal. Thus, I appended 2>&1 to the command line in the shell_exec function to display debugging errors on the browser directly. In this regard, I was able to develop the web application way faster.
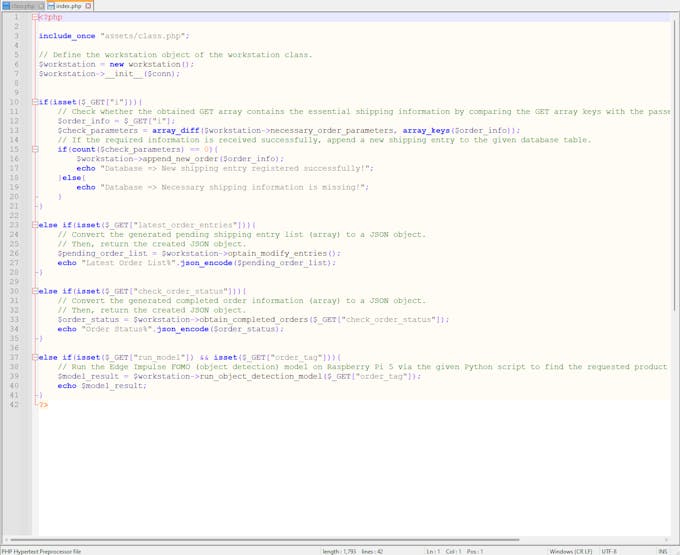
public function run_object_detection_model($order_tag){ $model_result = ""; // First, obtain the requested product information associated with the passed order tag (barcode). $sql = "SELECT * FROM `$this->database_table` WHERE `order_tag`='$order_tag'"; $result = mysqli_query($this->conn, $sql); $check = mysqli_num_rows($result); if($check > 0 && $row = mysqli_fetch_assoc($result)){ // Get the requested product name from the MariaDB database table. $requested_product = $row["product_name"]; // Then, execute the given Python script to classify the product sample currently positioned under the USB camera. $path = str_replace("/assets", "/object_detection_model", dirname(__FILE__)); $run_Python_script = shell_exec('sudo python3 "'.$path.'/run_FOMO_object_detection_model.py" 2>&1'); // Add 2>&1 for debugging errors directly on the browser. // Decode the JSON object transferred by the Python script to obtain the model resulting information. $model_resulting_data = json_decode($run_Python_script); // As the Python script transfers the detected product class after running the FOMO object detection model, check whether the ordered product was successfully found. if($model_resulting_data->detected_product_class == $requested_product){ // If so, make the shipping workstation transportation request via the Android application. $model_result = "Model_Result%Product_Detected"; // Change the order status to completed. $this->update_order_info("order_status", "completed", $order_tag); // Then, update the order completion date of the given order (shipping) entry. $date = date("Y/m/d__h:i:s"); $this->update_order_info("date", $date, $order_tag); // Also, append the product confirmation (model resulting) image path generated by the Python script to the order entry. $this->update_order_info("order_img", $model_resulting_data->product_confirmation_image, $order_tag); }else{ // Otherwise, make the shipping workstation current product position change request. $model_result = "Model_Result%Product_Not_Found"; } }else{ $model_result = "The passed order tag does not exist in the MariaDB database."; } // Finally, return the model detection result. return $model_result; }📁 index.php
⭐ Check whether the obtained GET array contains the essential shipping information by comparing the GET array keys with the required data fields.
.../?i[firstname]=Kutluhan&i[lastname]=Aktar&i[email]=test@gmail.com&i[address]=Turkey&i[product_name]=wrench&i[product_id]=0
⭐ If the required information is received successfully, append a new shipping entry to the given MariaDB database table.
if(isset($_GET["i"])){ // Check whether the obtained GET array contains the essential shipping information by comparing the GET array keys with the passed parameter names. $order_info = $_GET["i"]; $check_parameters = array_diff($workstation->necessary_order_parameters, array_keys($order_info)); // If the required information is received successfully, append a new shipping entry to the given database table. if(count($check_parameters) == 0){ $workstation->append_new_order($order_info); echo "Database => New shipping entry registered successfully!"; }else{ echo "Database => Necessary shipping information is missing!"; }}⭐ Run the Edge Impulse FOMO object detection model by executing the given Python script to find the requested product associated with the passed order tag.
else if(isset($_GET["run_model"]) && isset($_GET["order_tag"])){ // Run the Edge Impulse FOMO (object detection) model on Raspberry Pi 5 via the given Python script to find the requested product associated with the passed order tag. $model_result = $workstation->run_object_detection_model($_GET["order_tag"]); echo $model_result;}🤖 To review the programming of the web application features showcased in the following steps, you can inspect the code files on GitHub with thorough commentary.
![]()
![]()
![]()
![]()
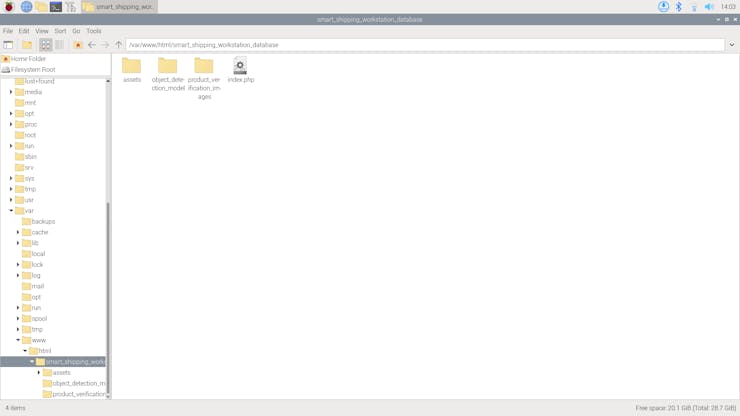
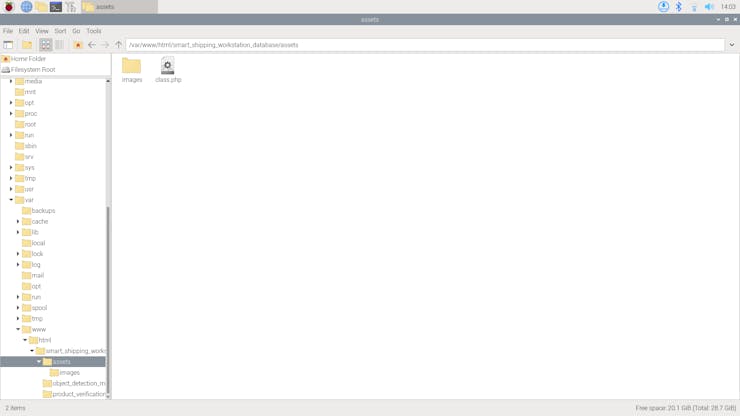
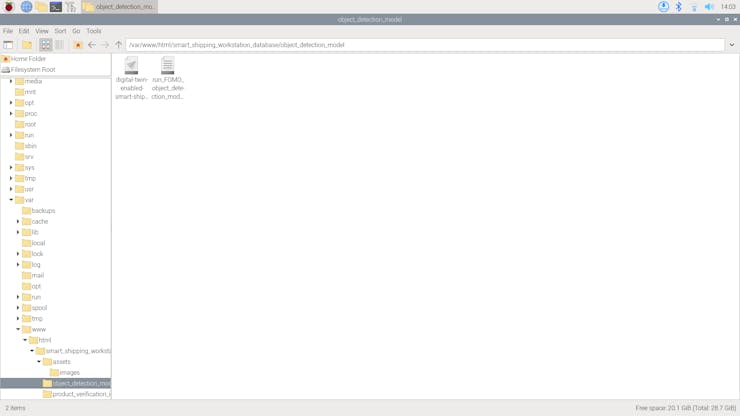
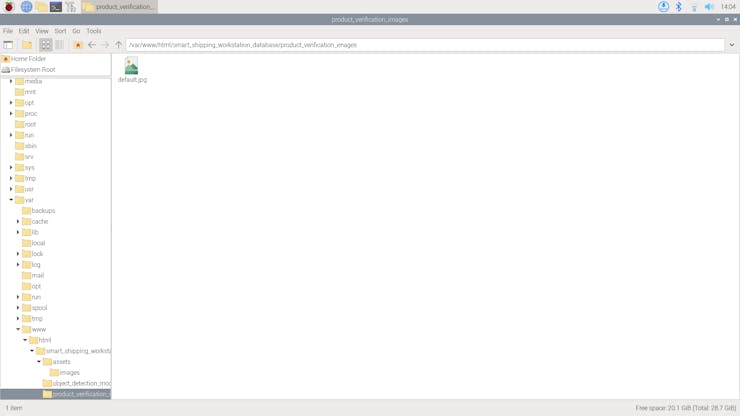
📁 Complete web application syntax:
- /assets
- /images
- class.php
- /object_detection_model
- digital-twin-enabled-smart-shipping-workstation-linux-aarch64-v2.eim
- run_FOMO_object_detection_model.py
- /product_verification_images
- default.jpg
- index.php
![]()
![]()
![]()
![]()
-
24Step 10.1: Setting up the FOMO object detection model on Raspberry Pi 5
While programming the web application, I needed to configure some settings on Raspberry Pi 5 to run the Edge Impulse FOMO object detection model successfully.
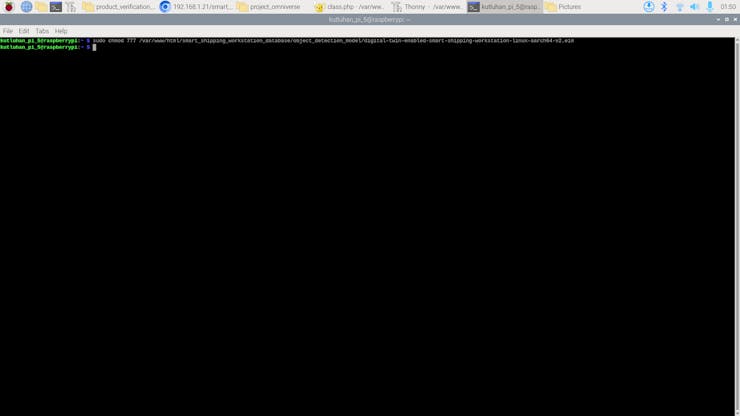
#️⃣ First, I changed the file permissions of the model file — Linux (AARCH64) application (.eim) — via the terminal to make it executable.
sudo chmod 777 /var/www/html/smart_shipping_workstation_database/object_detection_model/digital-twin-enabled-smart-shipping-workstation-linux-aarch64-v2.eim
![]()
Even after changing the permissions, the web application cannot access some Raspberry Pi 5 features requiring the root user (super-user) privileges while executing Python scripts, such as accessing frames captured by the attached USB webcam.
Although assigning super-user privileges to different users is a security risk, I decided to give the web application the ability to execute commands with root user privileges. In this case, it was applicable since the installed Apache server is only operating as a local development environment.
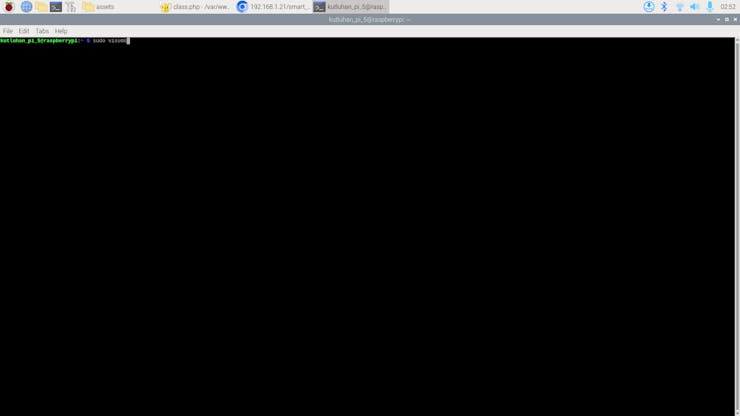
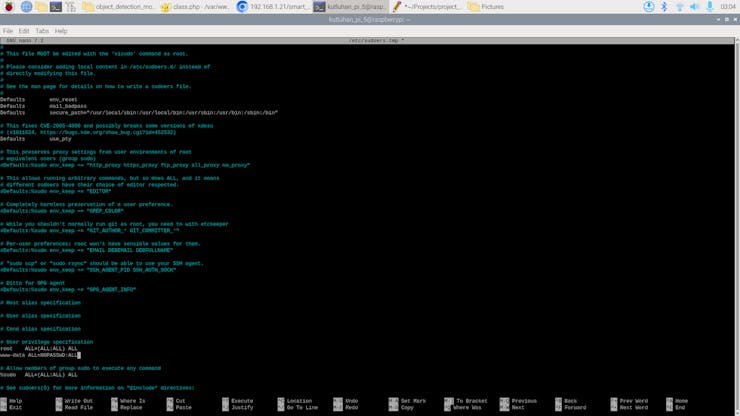
#️⃣ To change user privileges, open the sudoers file and alter it safely on the terminal.
sudo visudo
#️⃣ Since the Apache server employs www-data as the user name while accessing features, add these lines to the end of the sudoers file to enable the web application with root user privileges.
www-data ALL=NOPASSWD:ALL
![]()
![]()
#️⃣ After running the FOMO model successfully, I checked whether the web application saves the model results generated by the Python script to the given MariaDB database table successfully via the MariaDB prompt on the terminal.
show tables;
![]()
![]()
-
25Step 10.2: Running the configured model via the Python SDK
#️⃣ First, install the pre-built OpenCV Python package.
❗ If you do not run a virtual environment on Pi 5, the system may throw an error while trying to install packages via pip. To simply solve this issue, you can add --break-system-packages.
sudo pip3 install opencv-contrib-python --break-system-packages
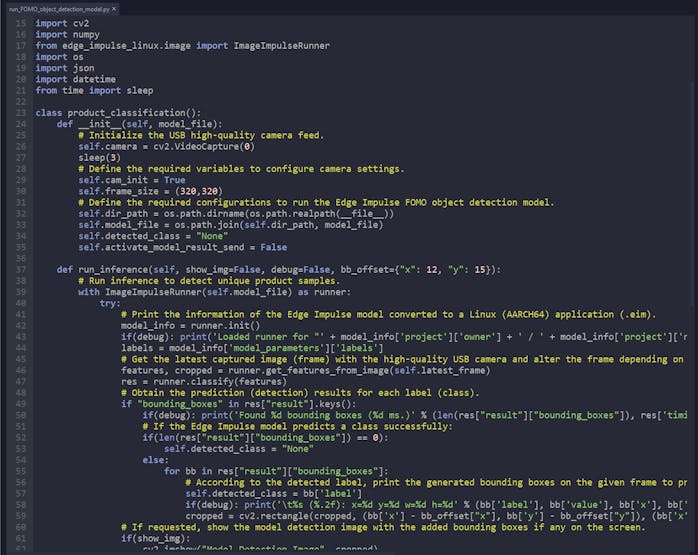
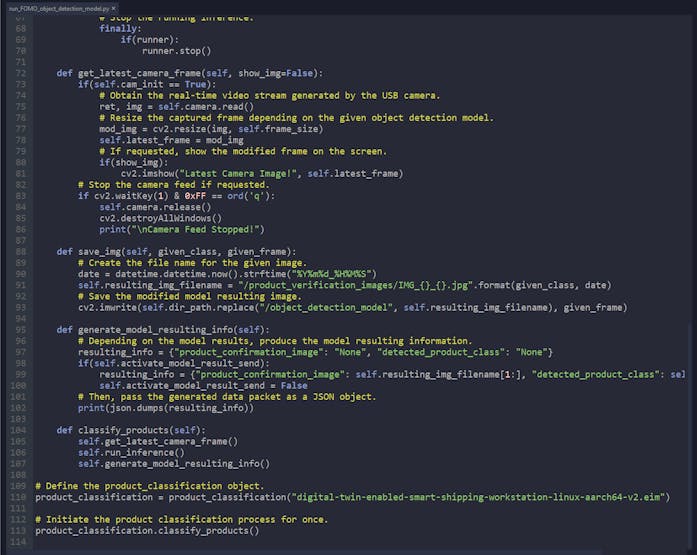
📁 run_FOMO_object_detection_model.py
⭐ Include the required modules.
import cv2import numpyfrom edge_impulse_linux.image import ImageImpulseRunnerimport osimport jsonimport datetimefrom time import sleep
⭐ To bundle all functions under a specific structure, declare the product_classification class.
⭐ In the __init__ function, initiate the high-quality USB webcam feed and declare the required variables.
def __init__(self, model_file): # Initialize the USB high-quality camera feed. self.camera = cv2.VideoCapture(0) sleep(3) # Define the required variables to configure camera settings. self.cam_init = True self.frame_size = (320,320) # Define the required configurations to run the Edge Impulse FOMO object detection model. self.dir_path = os.path.dirname(os.path.realpath(__file__)) self.model_file = os.path.join(self.dir_path, model_file) self.detected_class = "None" self.activate_model_result_send = False
⭐ In the run_inference function:
⭐ Get the latest frame captured by the high-quality USB webcam and transform the frame depending on the given model configurations.
⭐ Run an inference with the Edge Impulse FOMO object detection model to obtain the prediction (detection) results.
⭐ According to the detected label and generated bounding box coordinates, draw the bounding box with specified offsets on the passed frame to produce the model resulting image.
⭐ Then, save the produced model resulting image and enable data transfer for model results.
def run_inference(self, show_img=False, debug=False, bb_offset={"x": 12, "y": 15}): # Run inference to detect unique product samples. with ImageImpulseRunner(self.model_file) as runner: try: # Print the information of the Edge Impulse model converted to a Linux (AARCH64) application (.eim). model_info = runner.init() if(debug): print('Loaded runner for "' + model_info['project']['owner'] + ' / ' + model_info['project']['name'] + '"') labels = model_info['model_parameters']['labels'] # Get the latest captured image (frame) with the high-quality USB camera and alter the frame depending on the given model so as to run an inference. features, cropped = runner.get_features_from_image(self.latest_frame) res = runner.classify(features) # Obtain the prediction (detection) results for each label (class). if "bounding_boxes" in res["result"].keys(): if(debug): print('Found %d bounding boxes (%d ms.)' % (len(res["result"]["bounding_boxes"]), res['timing']['dsp'] + res['timing']['classification'])) # If the Edge Impulse model predicts a class successfully: if(len(res["result"]["bounding_boxes"]) == 0): self.detected_class = "None" else: for bb in res["result"]["bounding_boxes"]: # According to the detected label, print the generated bounding boxes on the given frame to produce the model resulting image. self.detected_class = bb['label'] if(debug): print('\t%s (%.2f): x=%d y=%d w=%d h=%d' % (bb['label'], bb['value'], bb['x'], bb['y'], bb['width'], bb['height'])) cropped = cv2.rectangle(cropped, (bb['x'] - bb_offset["x"], bb['y'] - bb_offset["y"]), (bb['x'] + bb['width'] + bb_offset["x"], bb['y'] + bb['height'] + bb_offset["y"]), (255, 0, 255), 3) # If requested, show the model detection image with the added bounding boxes if any on the screen. if(show_img): cv2.imshow("Model Detection Image", cropped) # As detecting a class successfully, save the produced model resulting image and activate the model resulting data transfer. if(self.detected_class != "None"): self.save_img(self.detected_class, cropped) self.activate_model_result_send = True # Stop the running inference. finally: if(runner): runner.stop()⭐ In the generate_model_resulting_info function, produce the model resulting information and pass the generated data packet as a JSON object.
def generate_model_resulting_info(self): # Depending on the model results, produce the model resulting information. resulting_info = {"product_confirmation_image": "None", "detected_product_class": "None"} if(self.activate_model_result_send): resulting_info = {"product_confirmation_image": self.resulting_img_filename[1:], "detected_product_class": self.detected_class} self.activate_model_result_send = False # Then, pass the generated data packet as a JSON object. print(json.dumps(resulting_info))🤖 For further inspection, you can review this code file on GitHub with thorough commentary.
![]()
![]()
-
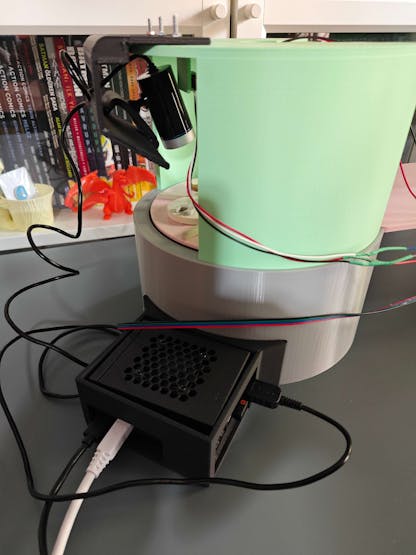
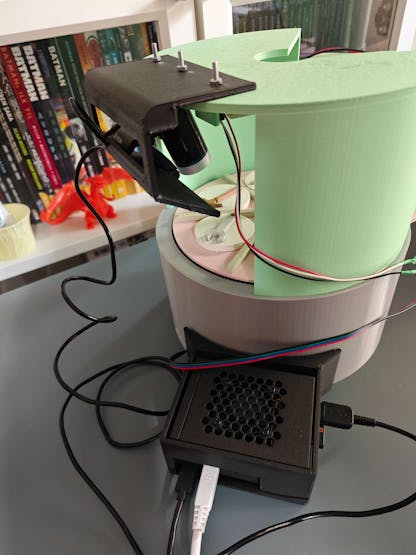
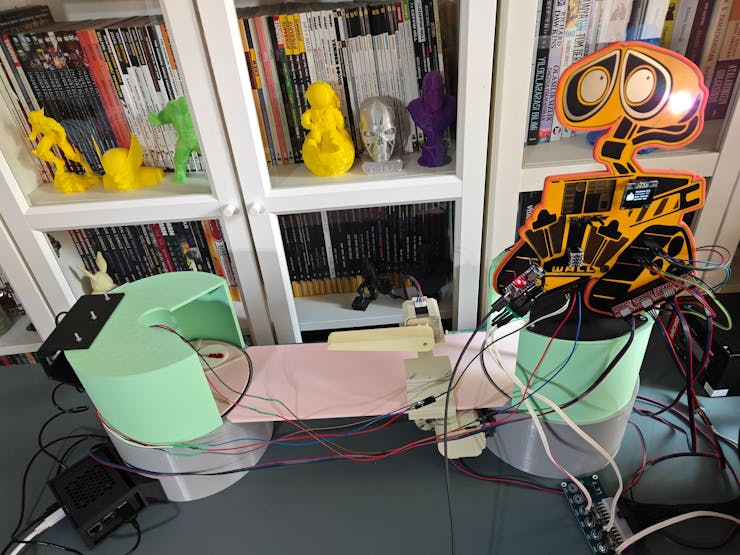
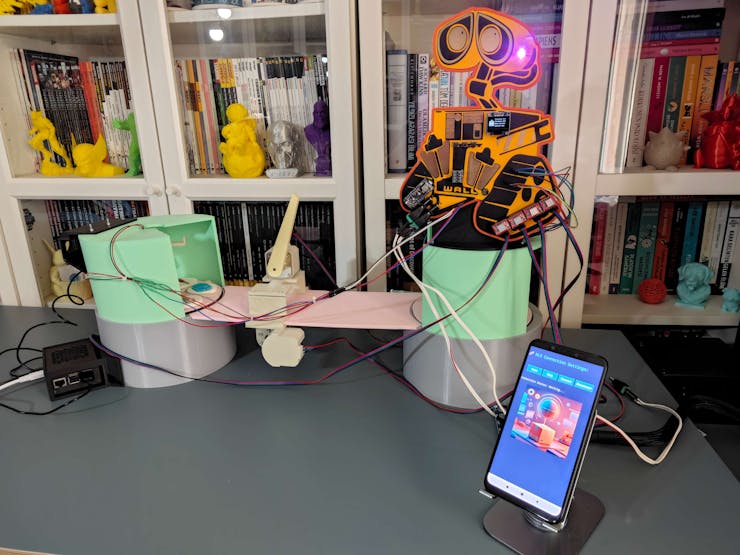
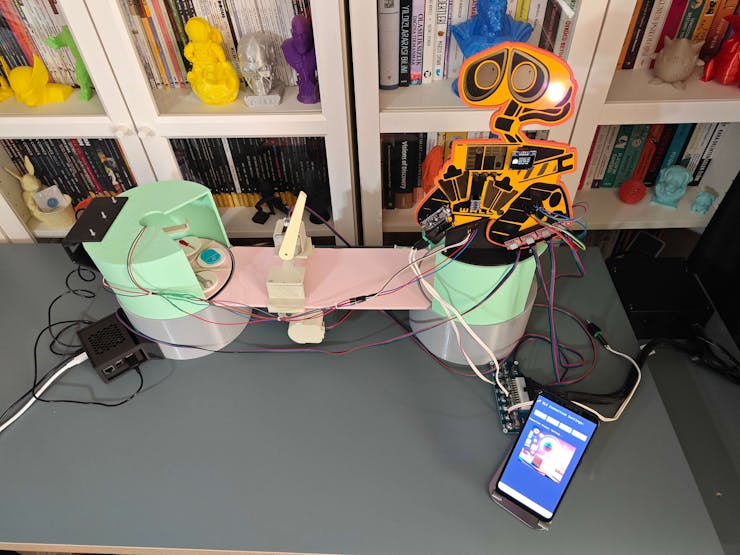
26Final Step: Conducting experiments with the real-world shipping workstation to validate and showcase all interconnected features
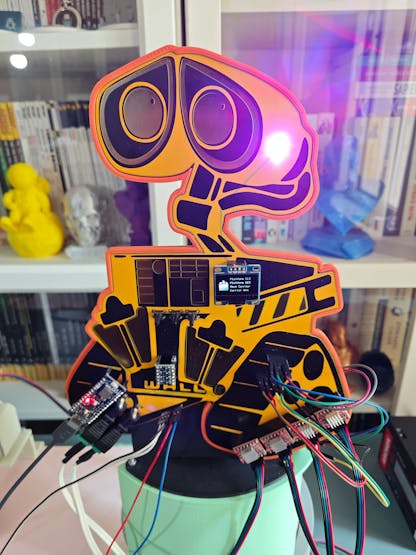
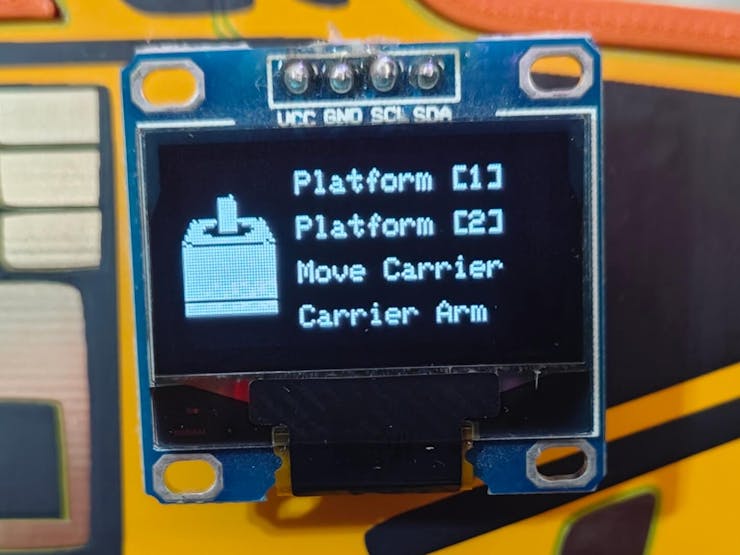
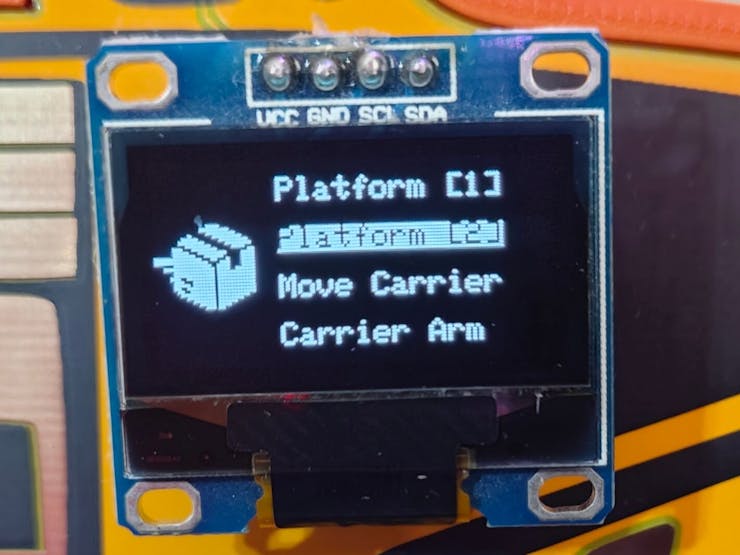
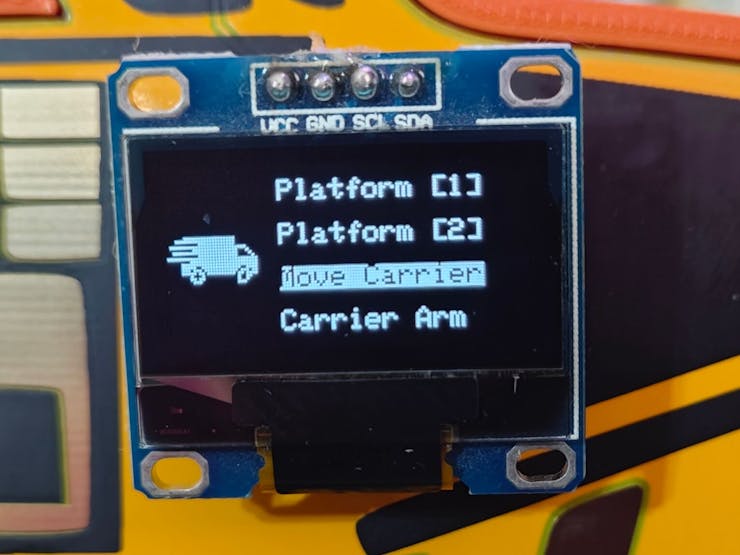
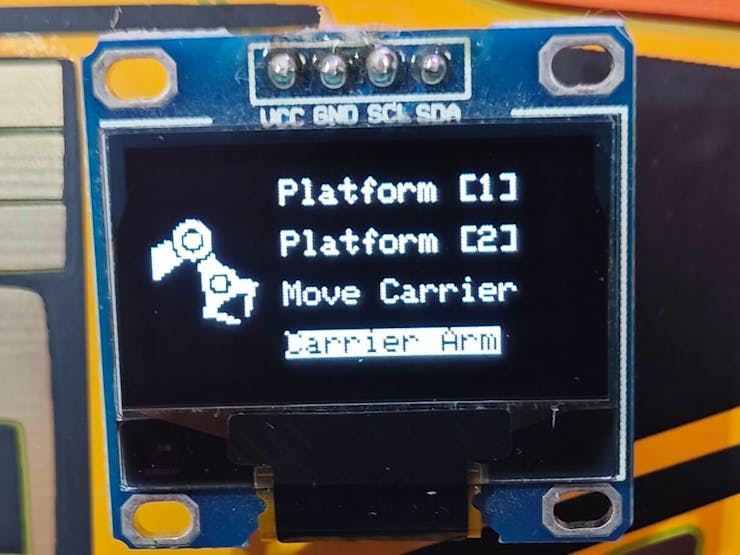
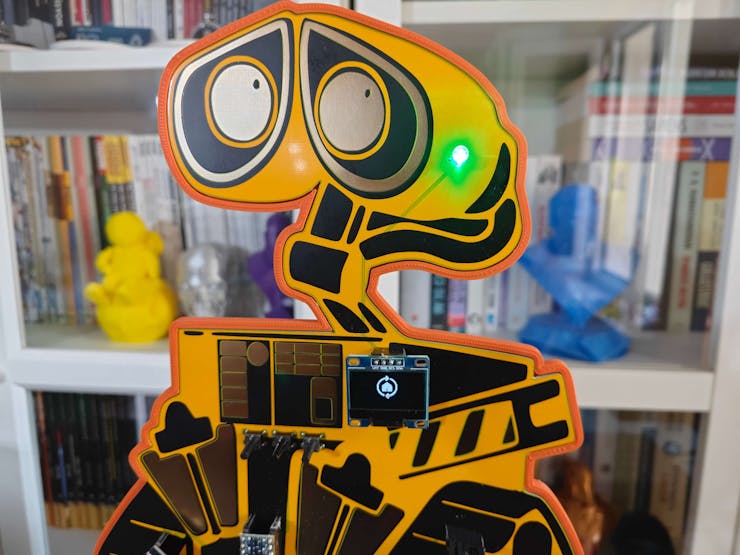
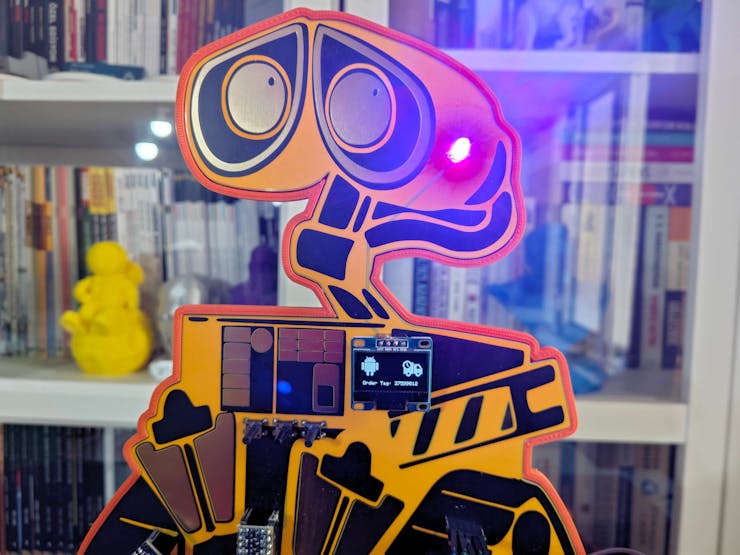
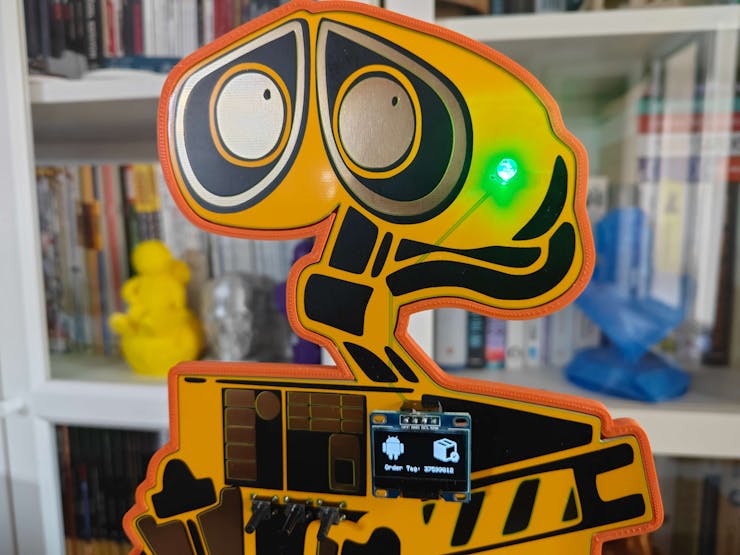
🚚📦📲 The shipping workstation control panel (Wall-E PCB) allows the user to calibrate each Nema 17 stepper motor position via the control buttons:
- Control Button [B] ➡️ Select
- Control Button [A] ➡️ Move Clockwise
- Control Button [C] ➡️ Move Counter-clockwise
🚚📦📲 While calibrating positions, the workstation control panel turns the RGB LED to white.
![]()
![]()
![]()
![]()
![]()
![]()
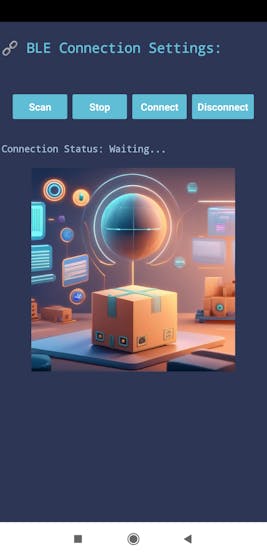
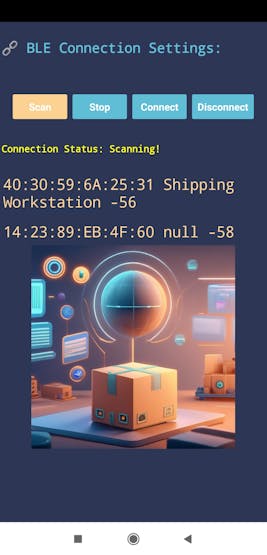
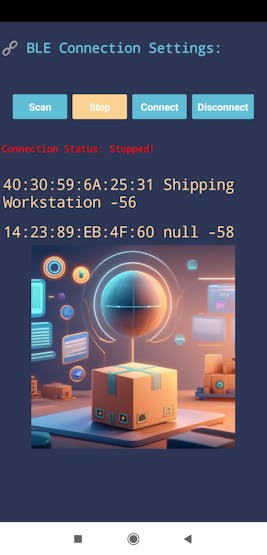
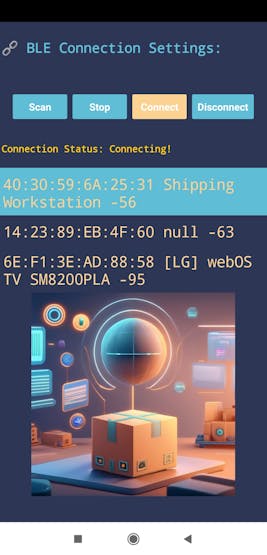
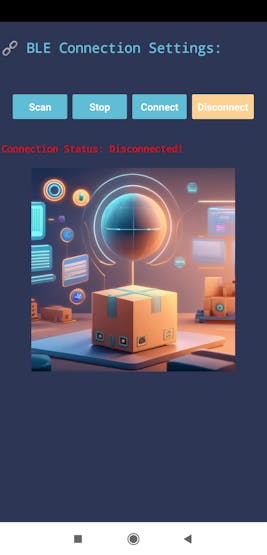
🚚📦📲 The mobile workstation application (Android-compatible) enables the user to establish a BLE connection with the workstation control panel through Nano Matter.
🚚📦📲 After establishing a successful BLE connection, the mobile application gives the user permission to access the workstation interface.
![]()
![]()
![]()
![]()
🚚📦📲 If the user activates the automated homing sequence, the mobile application communicates with the workstation control panel to initiate the sequence in accordance with the selected homing methods:
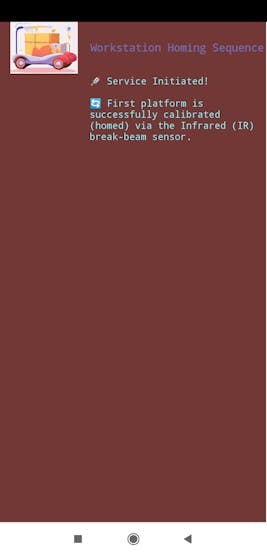
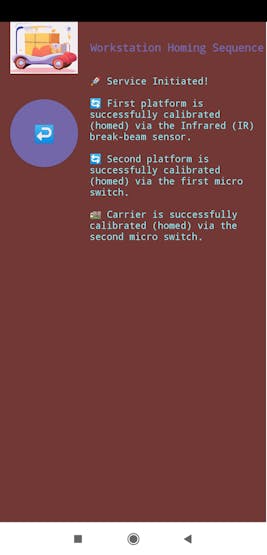
🚚📦📲 The first rotating platform utilizes the IR break-beam sensor to synchronize the 200-step per rotation pattern for 60° turns via its specified rotation pin.
🚚📦📲 The second rotating platform utilizes the first micro switch to align the face separator toward the transportation road via its specified rotation pin.
🚚📦📲 The transportation carrier employs the second micro switch to position itself near the center of the transportation road.
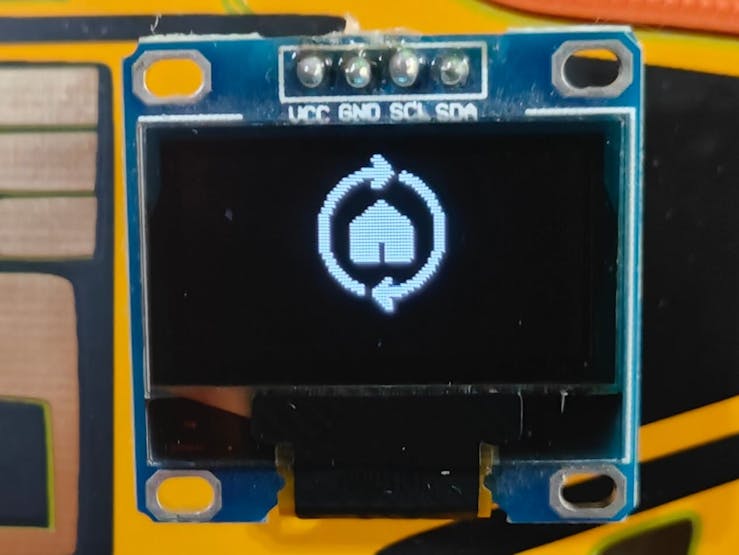
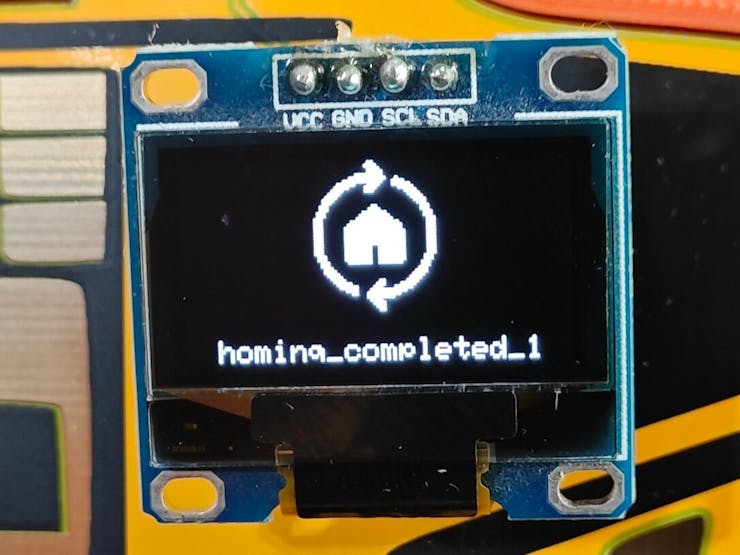
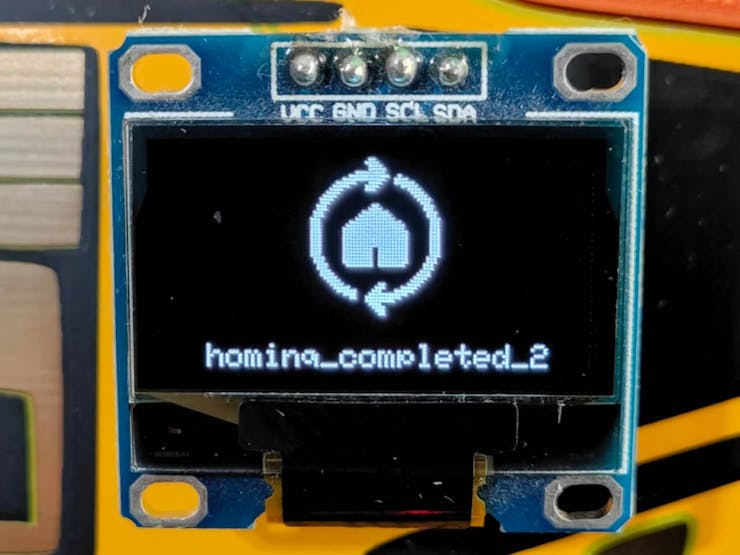
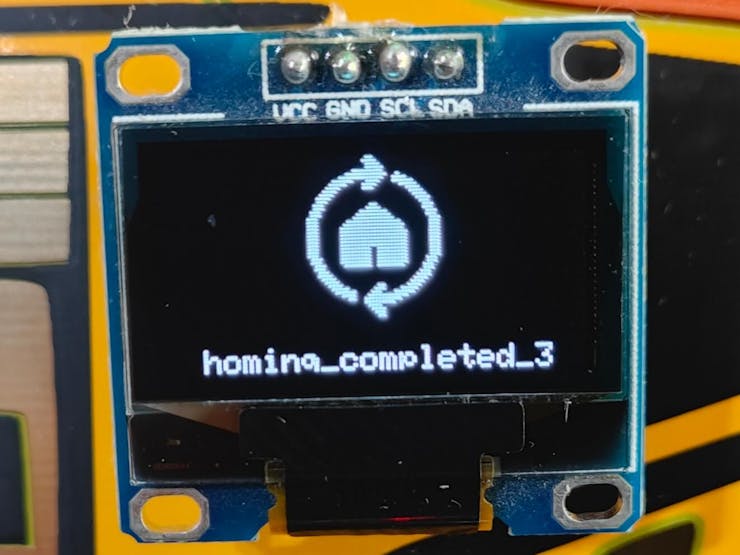
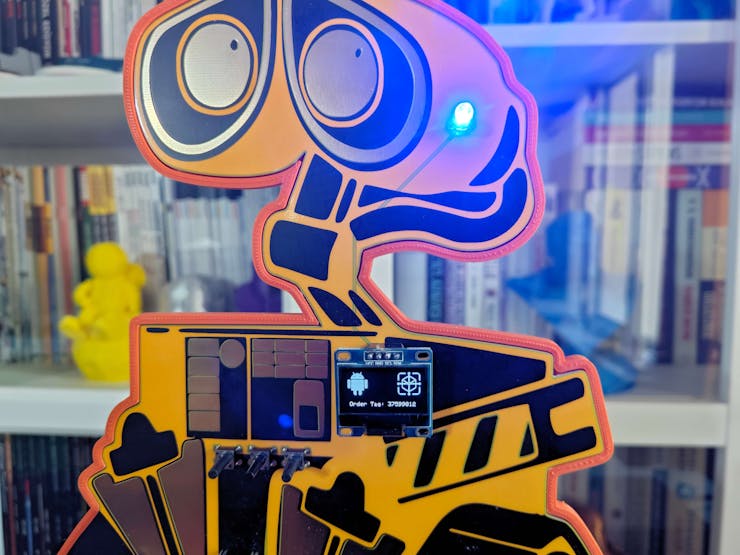
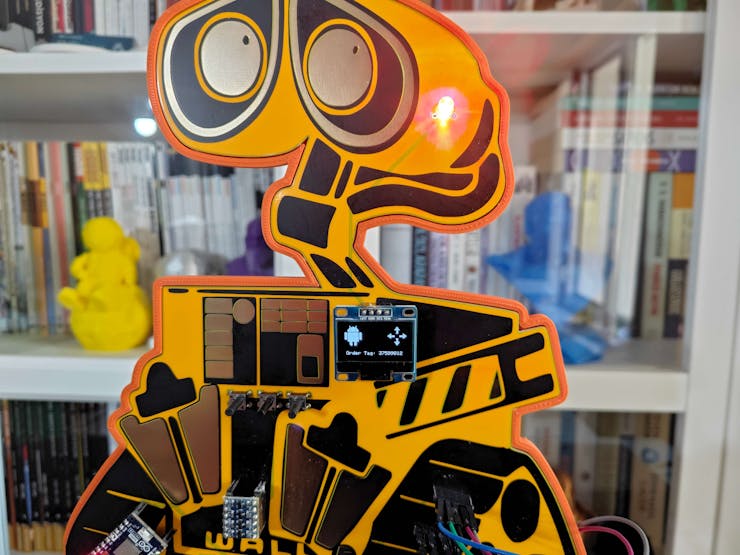
🚚📦📲 The workstation control panel turns the RGB LED to green while performing the homing sequence and notifies the user of the sequence progress on the SSD1306 display.
![]()
![]()
![]()
![]()
![]()
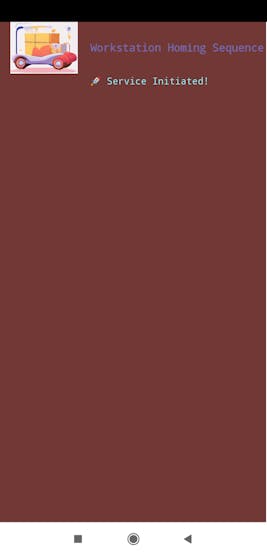
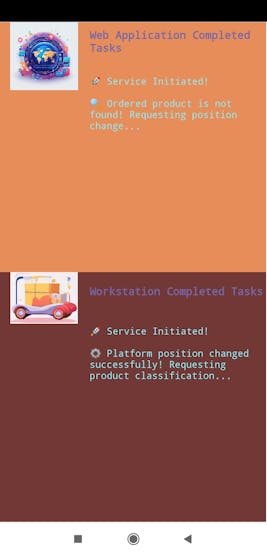
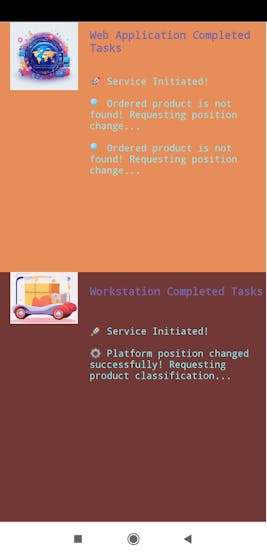
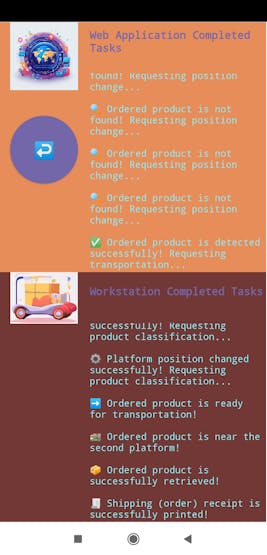
🚚📦📲 Since the control panel and the mobile application exchange data packets continuously as the homing sequence continues, the mobile application informs the user of each completed task via the dedicated terminal.
![]()
![]()
![]()
🚚📦📲 Via the Wi-Fi connectivity natively provided by the smartphone, the mobile application communicates with the web workstation application and operates as the proxy between the web application and the workstation control panel.
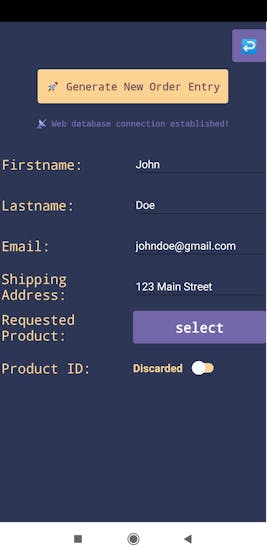
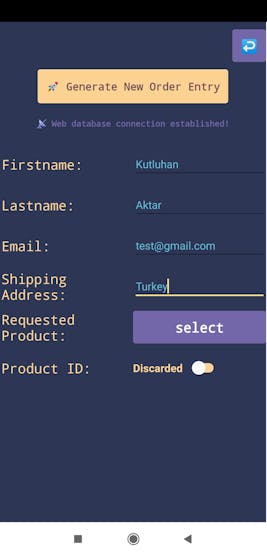
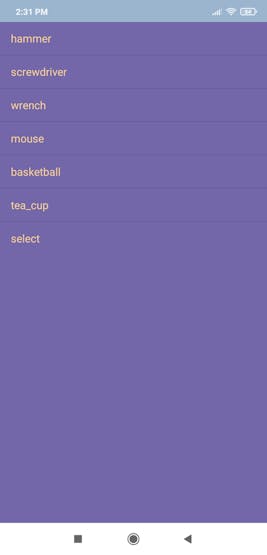
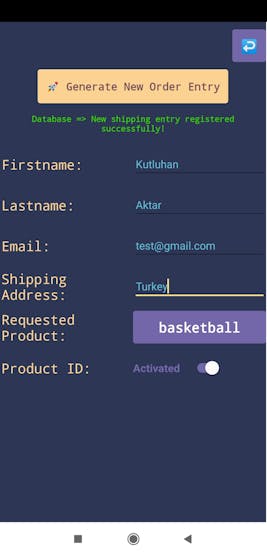
🚚📦📲 In this regard, the mobile application enables the user to select one of the available products and transfer order information to the web application.
🚚📦📲 Then, the web application generates a unique order tag (barcode) number (EAN-8) and registers the received order information with the assigned order tag to the MariaDB database table hosted on Raspberry Pi 5 to generate a new shipping entry.
![]()
![]()
![]()
![]()
![]()
![]()
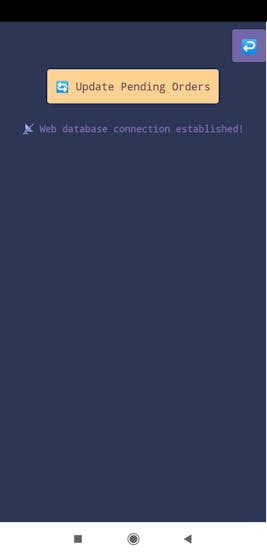
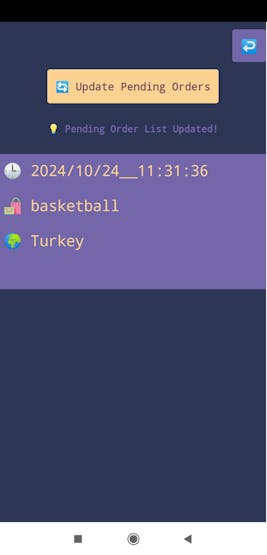
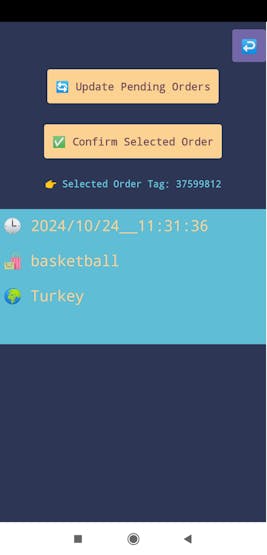
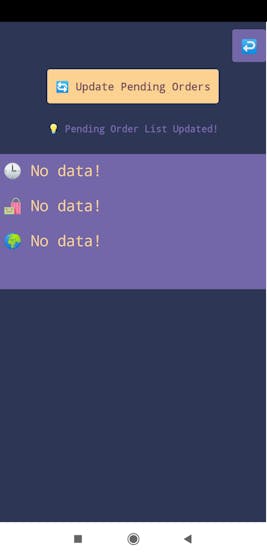
🚚📦📲 The mobile application lets the user request all pending shipping entries from the web application and review them chronologically.
![]()
![]()
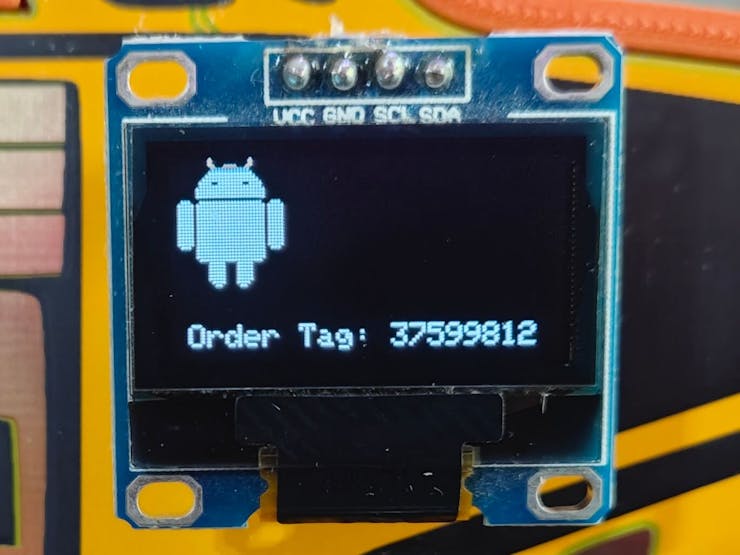
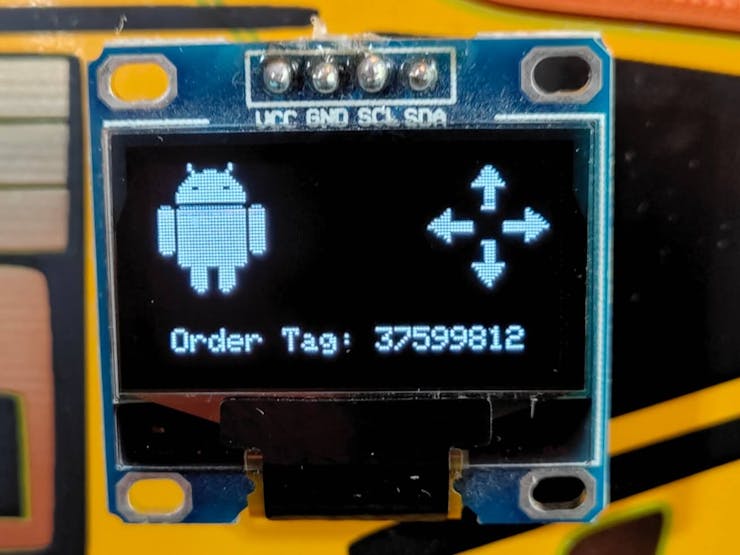
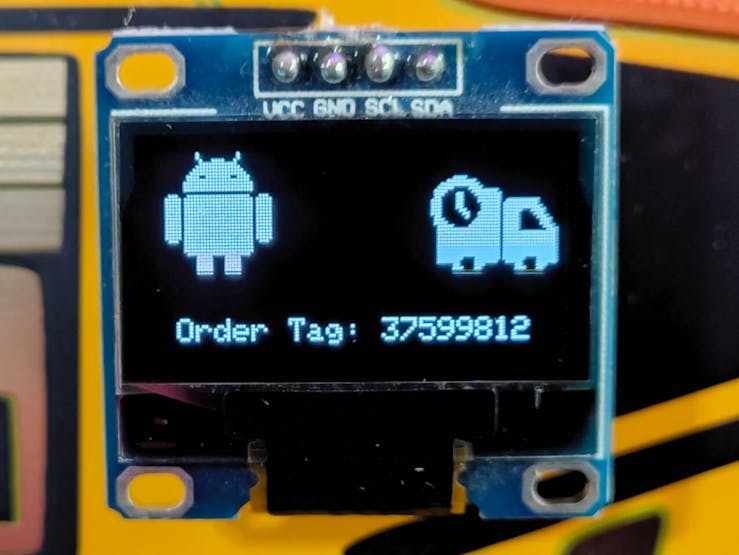
🚚📦📲 After selecting a shipping entry, the mobile application reveals its unique order tag.
![]()
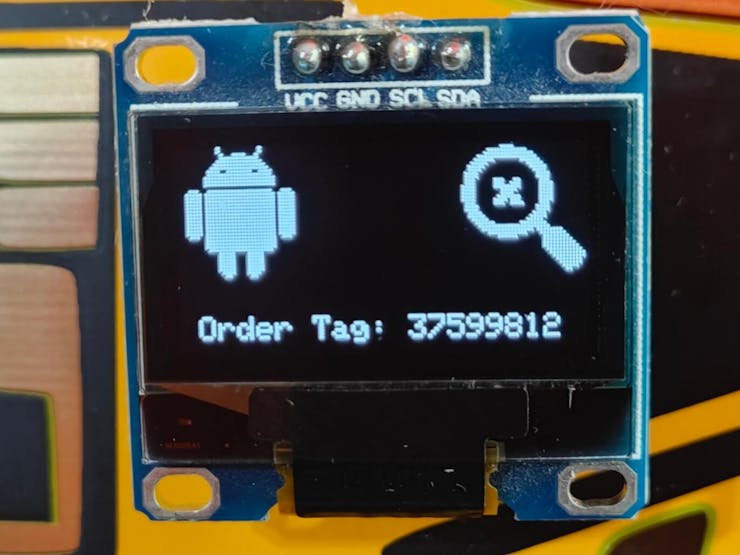
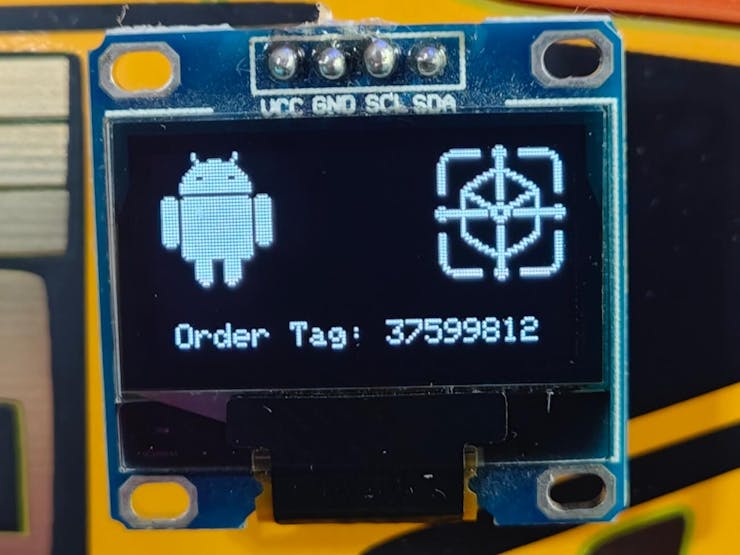
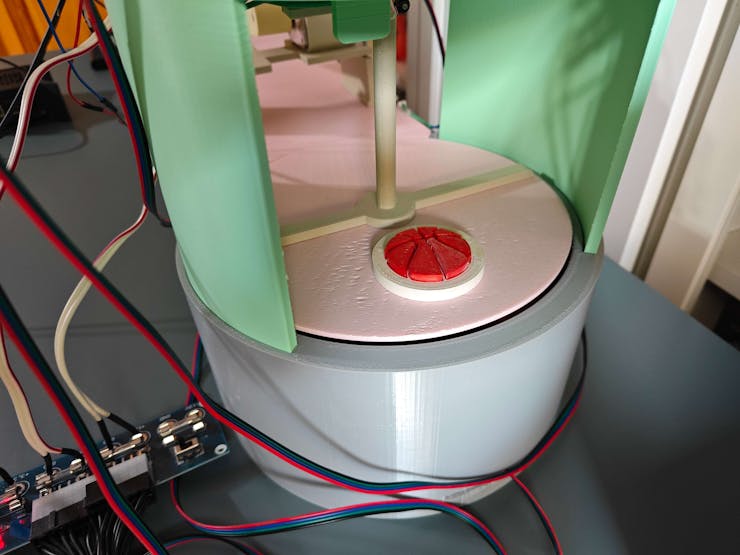
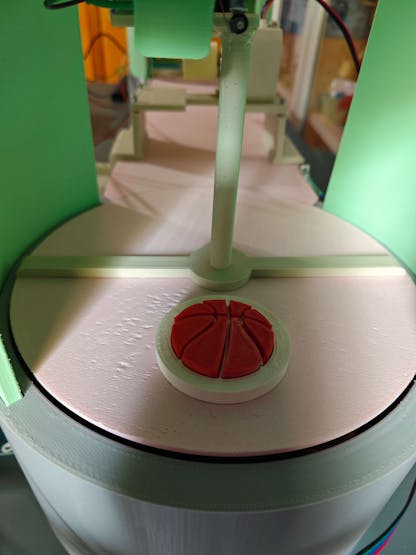
🚚📦📲 If the user activates the order confirmation process for the selected shipping record, the mobile application communicates with the web application so as to run the Edge Impulse FOMO object detection model to detect whether the sample product currently seen by the USB webcam is the ordered product of the given entry.
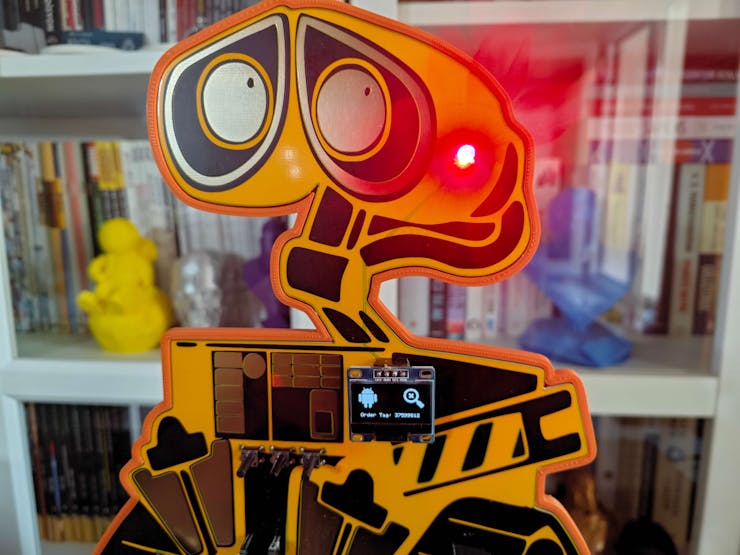
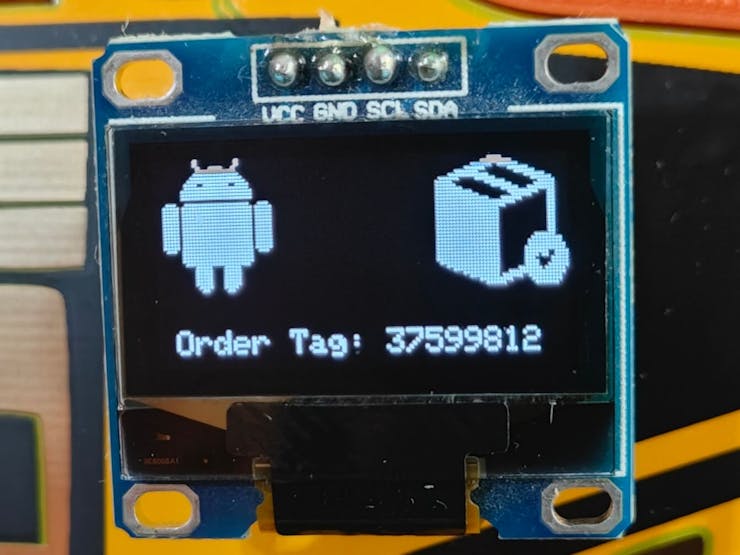
🚚📦📲 The workstation control panel notifies the user via the SSD1306 screen when the order confirmation process starts.
![]()
![]()
![]()
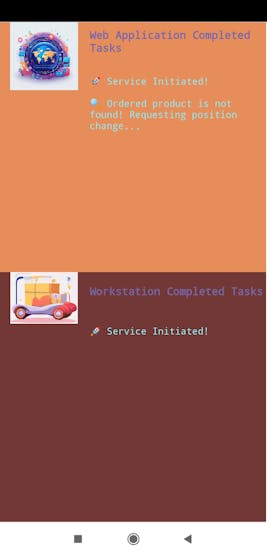
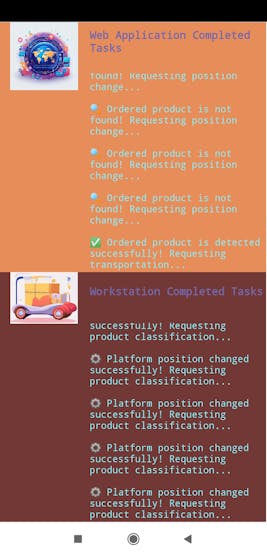
🚚📦📲 If the FOMO object detection model cannot find the ordered product, the web application dictates the mobile application to communicate with the workstation control panel so as to change the first rotating platform position to place the succeeding sample product under the USB webcam.
🚚📦📲 The workstation control panel product position change procedure:
- Swivel the first platform by 60 degrees to bring the succeeding sample product under the USB webcam.
🚚📦📲 While changing the product position, the control panel turns the RGB LED to red and notifies the user via the SSD1306 screen.
🚚📦📲 After successfully changing the product position, the mobile application dictates the web application to rerun the object detection model.
![]()
![]()
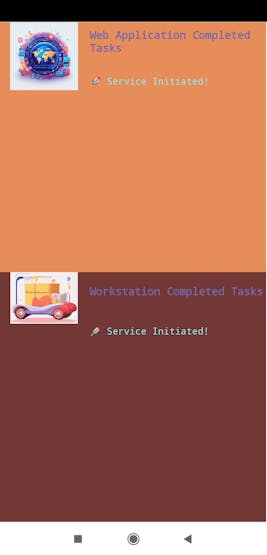
🚚📦📲 Since the mobile application exchanges data packets with the web application and the workstation control panel continuously and simultaneously as the order confirmation process continues, the mobile application informs the user of each completed task performed by the web application and the control panel via their dedicated terminals.
![]()
![]()
![]()
🚚📦📲 Until finding the requested (ordered) product successfully, the mentioned assignments continue in a loop.
![]()
🚚📦📲 When the FOMO model detects the ordered product successfully, the web application dictates the mobile application to initiate the automated product transportation process.
🚚📦📲 Then, the workstation control panel moves the ordered product from the first platform to the second platform via the transportation carrier for packaging.
🚚📦📲 While carrying the ordered product, the mobile application and the control panel inform the user of the transportation progress via the dedicated terminal and the SSD1306 screen respectively.
🚚📦📲 The workstation control panel product transportation procedure:
- Swivel the first platform by 180 degrees to prepare the requested product for transportation.
- After completion, turn the RGB LED to blue.
- Bring the transportation carrier near the first platform and adjust the carrier arm to pull the ordered product.
- Move the carrier to the road midpoint while moving (pulling) the ordered product.
- Then, rearrange the carrier position to place the ordered product towards the opposite side of the carrier.
- Adjust the carrier arm to push the ordered product.
- After completion, turn the RGB LED to yellow.
- Move the carrier to the second platform while moving (pushing) the ordered product.
- After transporting the product successfully, return the carrier to its default position.
- Finally, swivel the second platform by 180 degrees to present the retrieved product.
- After completion, turn the RGB LED to magenta.
![]()
![]()
![]()
![]()
![]()
![]()
![]()
![]()
![]()
![]()
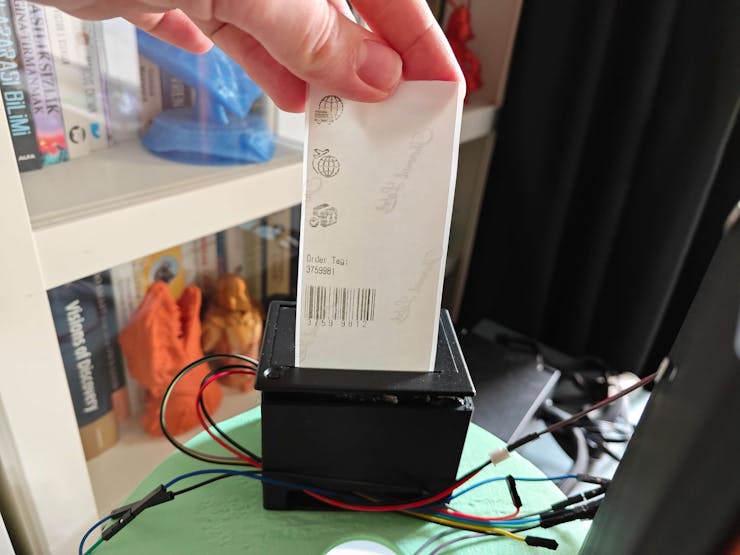
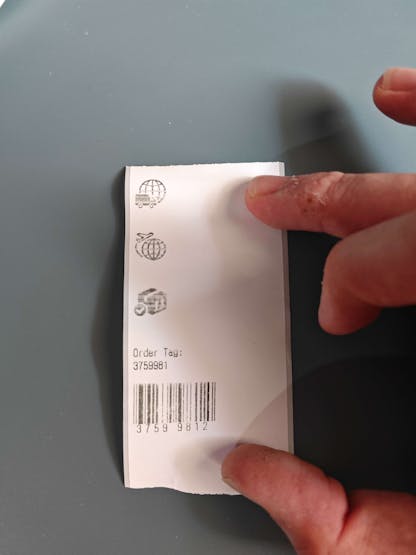
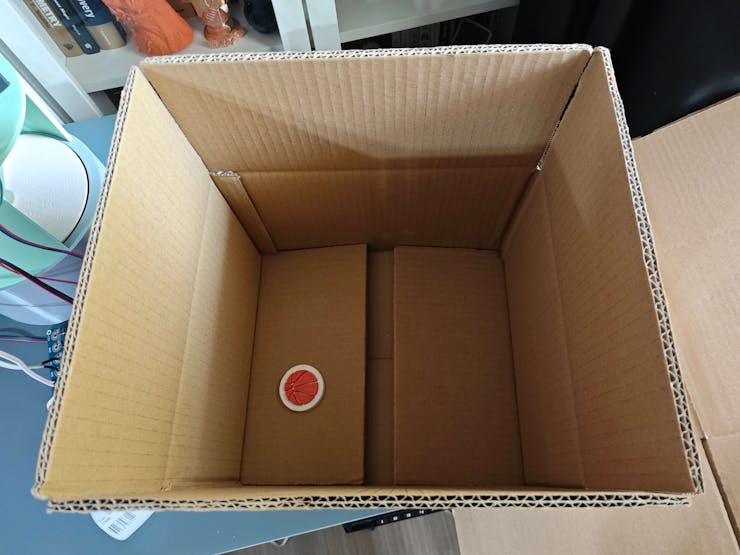
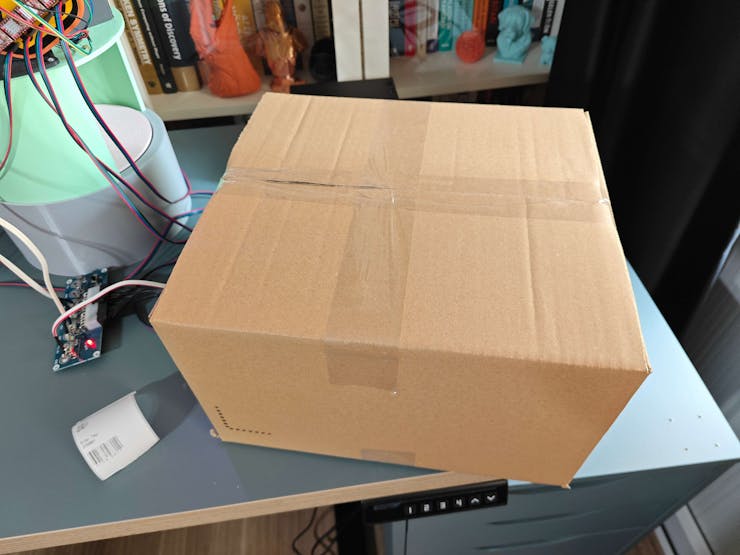
🚚📦📲 After moving the ordered product successfully, the workstation control panel prints a shipping receipt with the assigned order tag in the EAN-8 barcode format. The thermal printer utilizes a sticker paper roll to make receipts fastenable to cardboard boxes.
🚚📦📲 After printing the shipping receipt, the control panel informs the user by turning the RGB LED to green. As discussed, the mobile application also informs the user of completed tasks via the dedicated terminal.
![]()
![]()
![]()
![]()
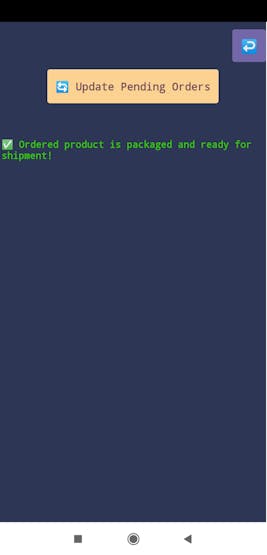
🚚📦📲 After concluding the order confirmation and product transportation processes successfully, the web application appends the completion date and the produced model resulting image path to the finalized shipping entry to remove it from the pending orders.
![]()
![]()
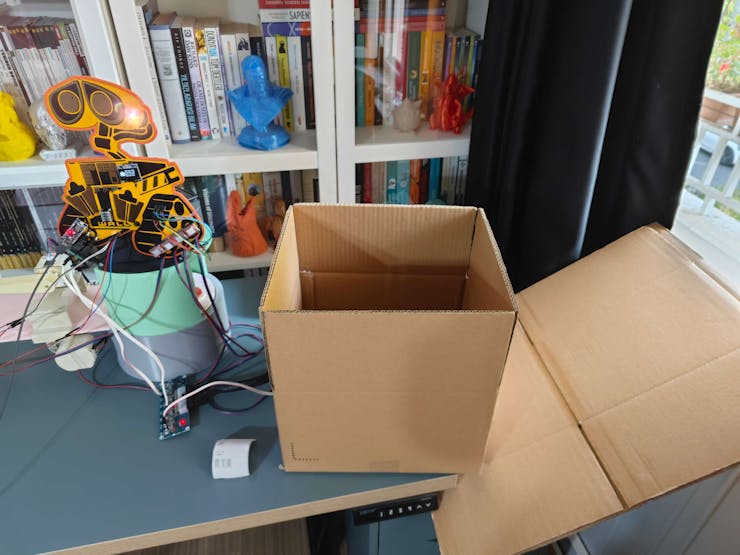
🚚📦📲 Then, the retrieved sample product becomes ready for packaging.
![]()
![]()
![]()
![]()
![]()
![]()
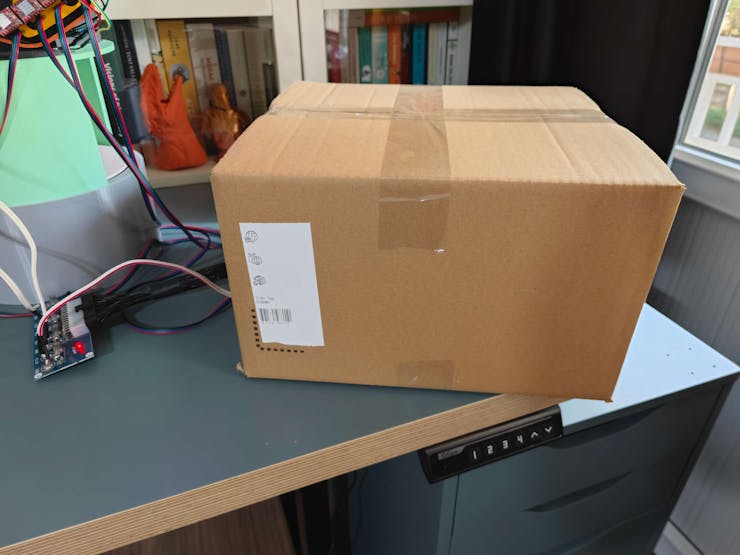
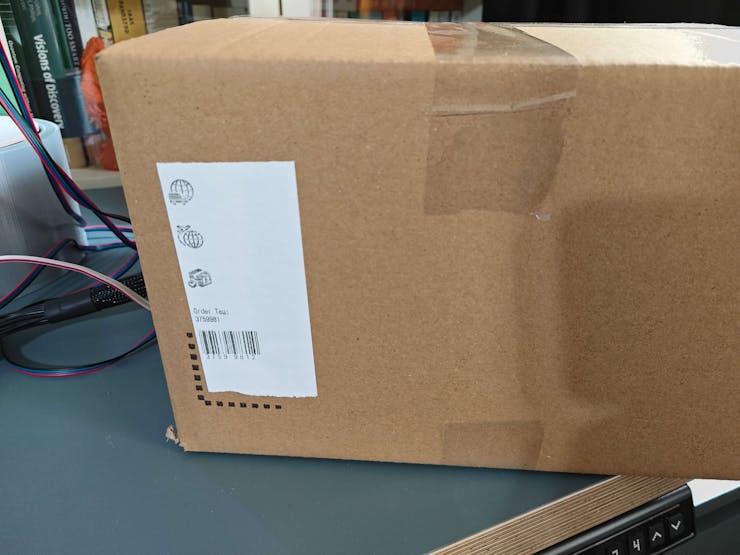
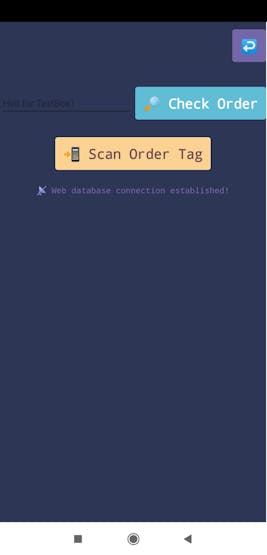
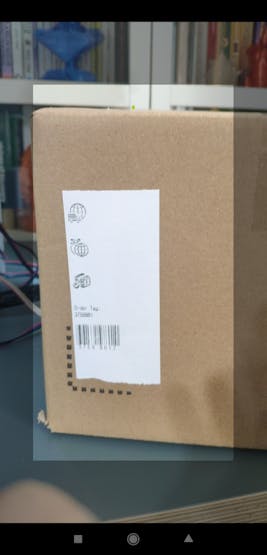
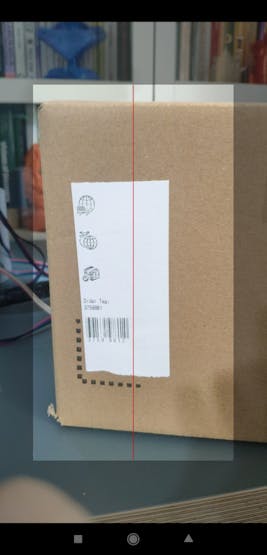
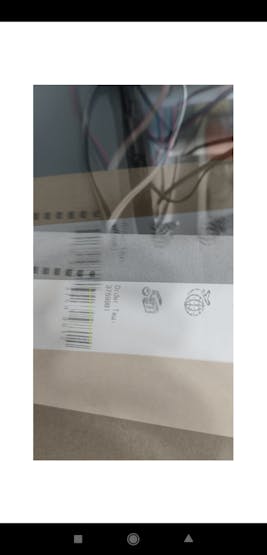
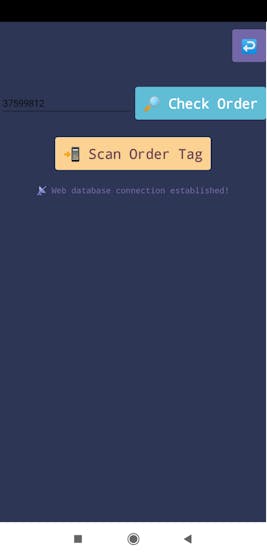
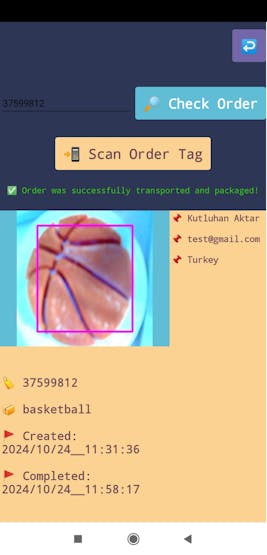
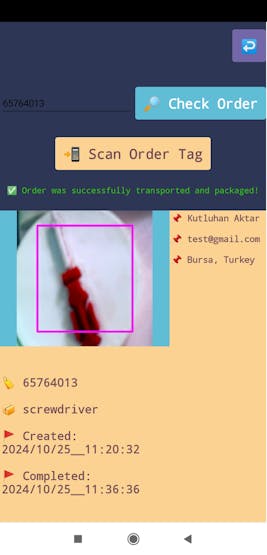
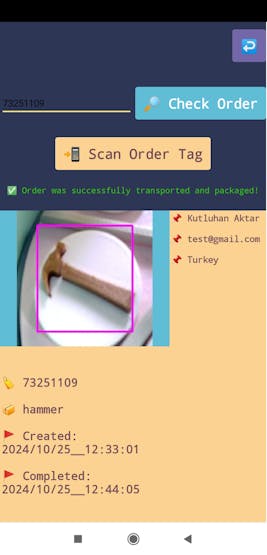
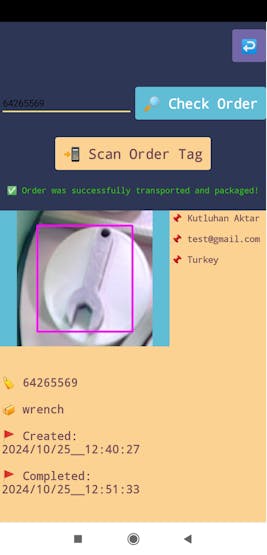
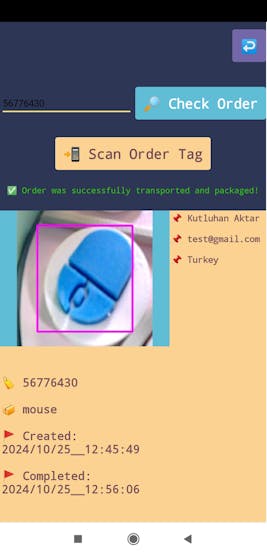
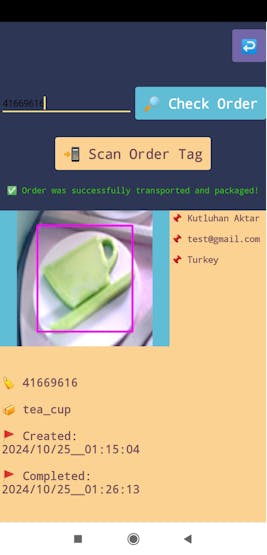
🚚📦📲 After packaging products and fastening shipping receipts to the boxes, the mobile application allows the user to scan order tags converted into the EAN-8 barcode format via the smartphone camera.
🚚📦📲 After scanning an order tag successfully, the mobile application enables the user to request detailed shipping information from the web application and review the associated model resulting image highlighting the ordered product via the modified bounding box.
![]()
![]()
![]()
![]()
![]()
![]()
![]()
![]()
![]()
![]()
![]()
🚚📦📲 After finalizing all assignments with the workstation control panel, the mobile application lets the user terminate the established BLE connection securely via the exit (X) button on the interface.
![]()
![]()
🖥️ For debugging, Nano Matter prints progression notifications on the serial monitor.
![]()
-
27Further Discussions
By applying physically accurate digital twins to develop AI-oriented solutions for industrial-level shipping operations even before building real-world mechanisms or products, we can achieve the following:
🚚📦📲 develop adaptive product manufacturing procedures,
🚚📦📲 build secure, cost-effective, and efficient industrial facilities,
🚚📦📲 advance the precision of industrial-level shipping operations,
🚚📦📲 design safe, practical, cost-effective, and efficient real-world mechanisms,
🚚📦📲 forfend concomitant risks of assembling an industrial manufacturing system from scratch,
🚚📦📲 reduce exorbitant overhaul costs due to the lack of internal design blueprints,
🚚📦📲 review virtual components thoroughly to obtain the optimum performance from their real-world counterparts for multifaceted operations.
![]()
-
28Project GitHub Repository
The project's GitHub repository provides:
- Control panel code files (Nano Matter)
- Mobile application AIA and APK files (Android)
- Web application code files (Raspberry Pi 5)
- PCB design files (Gerber)
- 3D part design files (STL and OBJ)
- Edge Impulse FOMO machine learning model (EIM)
-
29Schematics
![]()
Digital twin-enabled Smart Shipping Workstation
Exploring the digital twin synthetic data generation and AI-oriented advancements on real-world shipping operations with NVIDIA Omniverse.


Discussions
Become a Hackaday.io Member
Create an account to leave a comment. Already have an account? Log In.