Close
0%
0%

Simple Temperature Monitor

ESP8266-01 + DS18b20

robRob
Similar projects worth following
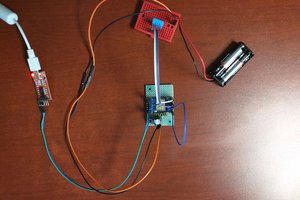
I decided to build a couple of wireless temperature monitors to keep track of the upstairs versus downstairs temperatures. I'm using an ESP8266-01 with Arduino OTA access for testing and updates. The temperature probe is a ds18b20, and it uses an old iPhone USB charger for power. To get the voltage down to 3.3v, I use a NTE 1904 voltage regulator. The whole thing is enclosed in a case. The software is written using the Arduino IDE, and broadcasts on UDP port 12345 (just picked one). I then wrote a simple python UDP listener that also logs the readings (1 per minute) to an influx database. Lastly, I view the findings in Grafana. Both Influx and Grafana are free and work across a variety of platforms (mine is an old Mac Mini).

This took about 1.5 hours today to build. I suck at soldering or it probably would have been faster. For influxdb and Grafana, I simply followed the instructions on the respective websites.

I'm thinking I might add some calibration code to the ESP code just to fine tune things a bit, but for now, everything is working.

The Arduino OTA stuff for the ESPs is really great. Makes modifying and testing ESP code so easy!!!

  • 1 × ESP8266-01
  • 1 × NTE 1904 Power Management ICs / Linear Voltage Regulators and LDOs
  • 1 × DS18B20 Sensors / Temperature, Thermal
  • 1 × 4.7K Resistor
  • 1 × Power Connector

View all 7 components

  • Python Listener Code

    Rob03/02/2017 at 23:23 0 comments

    #!/usr/bin/python
    
    import socket, requests
    from subprocess import call
    
    UDP_PORT = 12345
    UDP_IP = ""
    
    sock = socket.socket(socket.AF_INET, socket.SOCK_DGRAM)
    sock.bind((UDP_IP,UDP_PORT))
    print "Listening on UDP port: "+str(UDP_PORT)
    while True:
            data, addr = sock.recvfrom(1024)
            print addr[0],data
    
            if data.find("->"):
                    influxValueFind = data.find("->")+3
                    influxValue = data[influxValueFind:influxValueFind+5]
                    influxLoc = data[data.find("(")+1:data.find(")")]
                    r=requests.post('http://10.0.1.202:8086/write?db=mydb', 'temperature,host=ESP00000,location=%s value=%s'%(influxLoc,influxValue))
    

  • Arduino IDE

    Rob03/02/2017 at 23:05 0 comments

    #include <ESP8266WiFi.h>
    #include <WiFiUdp.h>
    #include <NTPClient.h>
    #include <OneWire.h>
    #include <DallasTemperature.h>
    #include <ArduinoOTA.h>
    
    // Temperature Stuff
    // Set GPIO for DS18B20
    #define ONE_WIRE_BUS 2
    // OneWire Instance
    OneWire oneWire(ONE_WIRE_BUS);
    // Use Dallas stuff
    DallasTemperature sensors(&oneWire);
    
    // Wifi Stuff
    const char *ssid = "*******"; // Your SSID
    const char *password = "*******"; // Your Password
    WiFiUDP ntpUDP;
    IPAddress ipMulti(10, 0, 1, 255); // My network happens to be 10.0.1.XXX, change to whatever your network is
    unsigned int portMulti = 12345;
    
    // NTP Client
    NTPClient timeClient(ntpUDP, -18000);
    
    // Timer instead of delay (delay messes up OTA)
    unsigned long previousMillis = 0;
    const long interval = 60000;
    
    void setup() {
      Serial.begin(115200);
      Serial.println("Initializing");
      WiFi.mode(WIFI_STA);
      WiFi.disconnect();
      delay(100);
      // Start temperature library
      sensors.begin();
      // Start Wifi
      WiFi.begin(ssid, password);
      while (WiFi.status() != WL_CONNECTED) {
        delay(500);
        Serial.print(".");
      }
      // Start NTP
      timeClient.begin();
      // All the OTA Stuff
      ArduinoOTA.onStart([]() {
        Serial.println("Start");
      });
      ArduinoOTA.onEnd([]() {
        Serial.println("\nEnd");
      });
      ArduinoOTA.onProgress([](unsigned int progress, unsigned int total) {
        Serial.printf("Progress: %u%%\r", (progress / (total / 100)));
      });
      ArduinoOTA.onError([](ota_error_t error) {
        Serial.printf("Error[%u]: ", error);
        if (error == OTA_AUTH_ERROR) Serial.println("Auth Failed");
        else if (error == OTA_BEGIN_ERROR) Serial.println("Begin Failed");
        else if (error == OTA_CONNECT_ERROR) Serial.println("Connect Failed");
        else if (error == OTA_RECEIVE_ERROR) Serial.println("Receive Failed");
        else if (error == OTA_END_ERROR) Serial.println("End Failed");
      });
      ArduinoOTA.begin();
      Serial.println("Ready");
      Serial.print("IP address: ");
      Serial.println(WiFi.localIP());
    
    }
    
    void loop() {
      // Timer code
      unsigned long currentMillis = millis();
      if (currentMillis - previousMillis > interval) {
        previousMillis = currentMillis;
        getTimeandTemp();
      }
      ArduinoOTA.handle();
    }
    
    char sendudp(String sendit) {
      ntpUDP.beginPacket(ipMulti, portMulti);
      ntpUDP.println(sendit);
      ntpUDP.endPacket();
    }
    
    void getTimeandTemp() {
      String str;
      timeClient.update();
      sensors.requestTemperatures();
      str = "(Downstairs) at: " + String(timeClient.getFormattedTime()) + "/" + String(timeClient.getEpochTime()) + " -> " + String(sensors.getTempFByIndex(0)) + "F";// Change the label (Downstairs) to whatever you like
      sendudp(str);
    }
    

View all 2 project logs

Enjoy this project?

Share

Discussions

Terry wrote 11/13/2018 at 19:58 point

I'm running the code on a esp-01 512.  It runs fine.  I'm running the Python code on a RPI3 with Python 2.7 because the print statements looked line Py 2.

The first post the pi gets looks great but the subsequent one bombs with about 4 error messages.  One is trying to write to 10.0.1.202:8086.

Anyway; I'll post the full error string if you think you can help.

Update:  I commented out all below print addr {0}, data  and it works fine.

I'll do my own printing.

Good project !  I'll be integrating it with this program

(https://github.com/engineertype/MAX31855/tree/master/MAX31855/examples/MAX31855x8) running on a esp-12.

  Are you sure? yes | no

Pabluski wrote 03/03/2017 at 03:18 point

I did a similar project using a nodemcu 0.9 and DHT11 ... I noticed that the nodemcu gives off a fair amount of heat. I have not put it in an enclosure yet. Does your enclosure affect the temperature reading?

  Are you sure? yes | no

Rob wrote 03/03/2017 at 12:03 point

I punched a hole into each side of the enclosure, and the sensor is mounted on the outside of the enclosure with only the leads going into the enclosure (very small slit).  As of today (about 11 hours of running), it tracks with my home thermostat, so I'd say that if there is heat, it isn't affecting the reading.

  Are you sure? yes | no

Similar Projects

Does this project spark your interest?

Become a member to follow this project and never miss any updates