 RupR
RupR-
Pipo launches it campaign on Crowd Supply !
06/20/2025 at 13:50 • 0 commentsAfter months of preparation, the project has come a long way.
And I am thrilled to share the great news that the funding campaign has launched on CrowdSupply !
If you have any questions on the project you will also find a Discord invite on the launch page below.-> Check it here ! : https://www.crowdsupply.com/pipo-interfaces/pipo
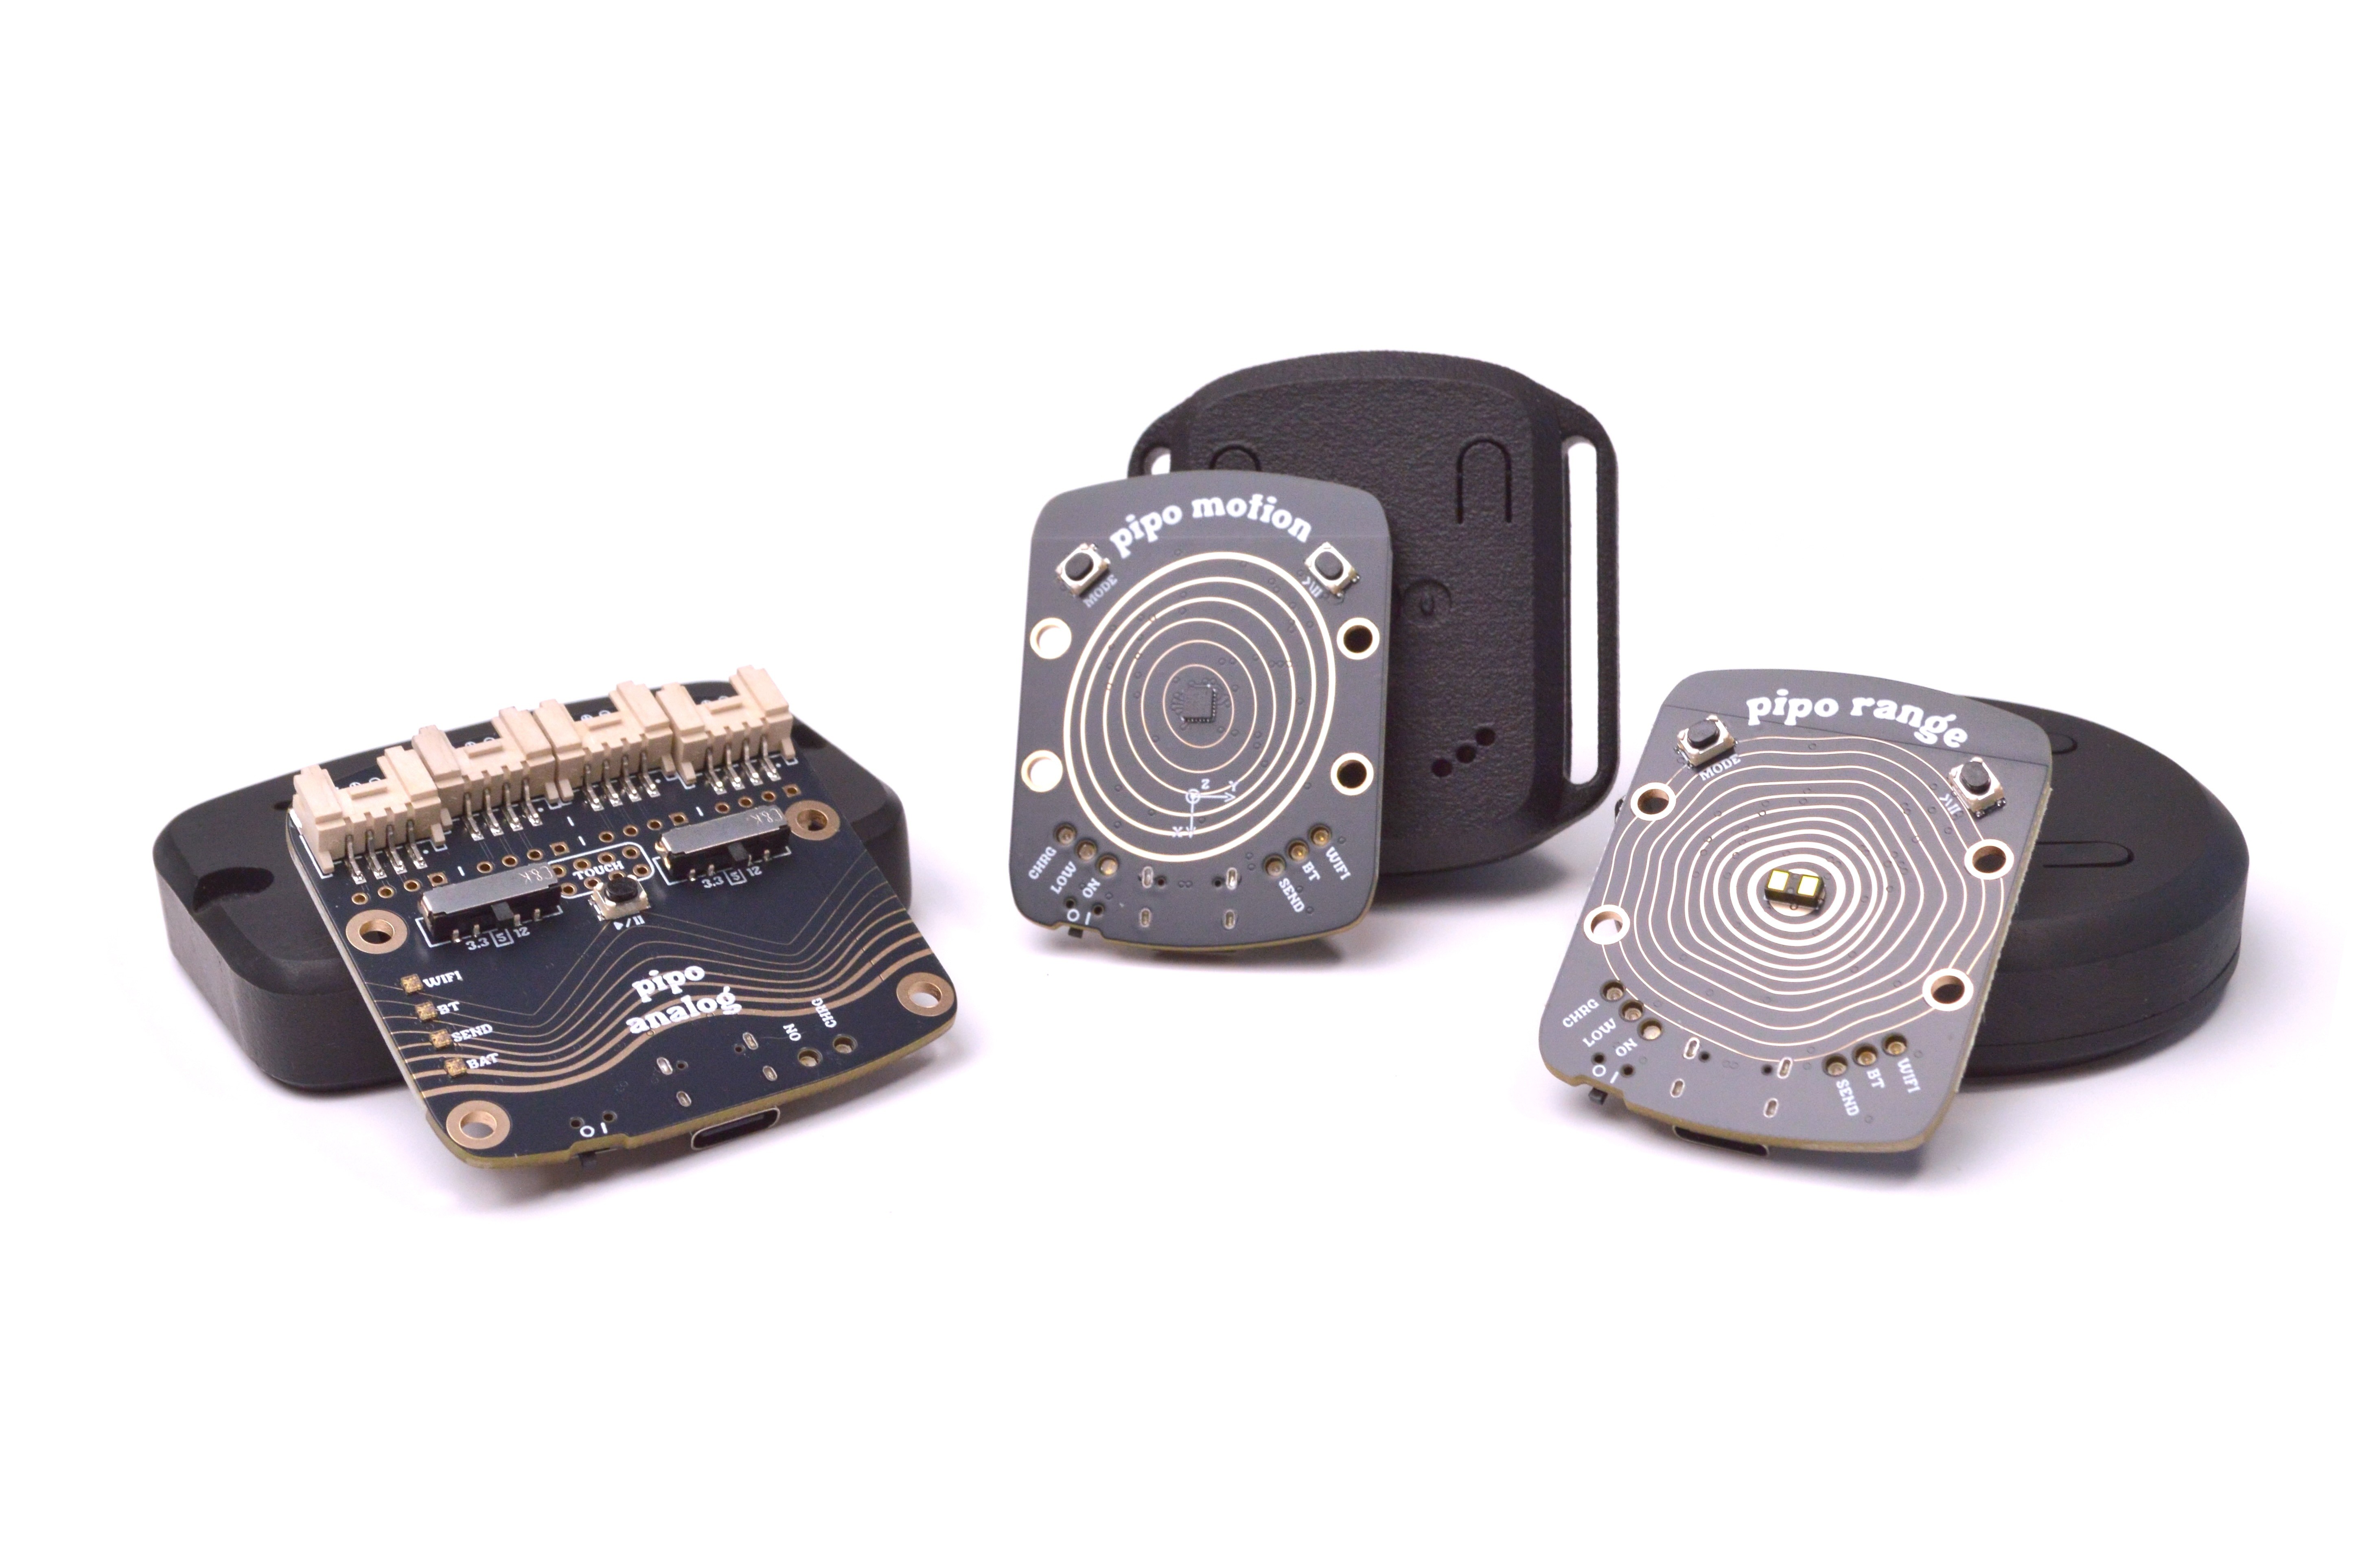
On the technical espects, Pipo software grew a lot to meet its goal, to make it easy to acquire on a PC almost anything wirelessly:
It now leverages the dual AP+STA Wifi mode of the Esp32-s3, allowing to use a direct and a network connection simultaneously with its own network manager, and also received many performance improvements (task distribution, memory allocation, etc...). And it is not finished !![]()
-
Comparing 3D printing options
05/30/2025 at 14:35 • 0 commentsIt's been a while I haven't posted. Having to juggle between the actual development of Pipo, it's upcoming campaign, and other side activities, it's been hard to find time to share with you some progress.
With this log, I want to quickly share some pictures from a comparative test I just made of various 3D printing technologies and material.
The comparison was done for the new case design of Pipo Motion, the wireless MiDi & OSC creative motion sensor I am developping.
Note: this project will be publicly released soon on CrowdSupply if you want to have a look
I choose this case among the 3 other Pipo types because it will be used more intensively, probably receiving more shocks and tension while having thin geometries, and I want this case to be robust while qualitative.
I compared 6 types of 3D printing types here, 3 industrial options and 3 FDM (which actually turns in 4 technologies)Having a good Fdm experience, I did not considered any declination of PLA as I consider it not durable enough for a small serie production. I had many occurrences of parts degradation over rather short periods of times, no matter the brand or the type.
As well, JLC black Resin is unfortunately not in this comparison. I have been using it for many prototypes and have been rather satisfied since it is a good balance overall.
I would note the following points about it:
- black is not very deep. on thin wall, light goes through easily
- the surface finish is not truly homogeneous, some areas can be glossy while some other will be matte
- the value for money is good.Now, let's see the comparison
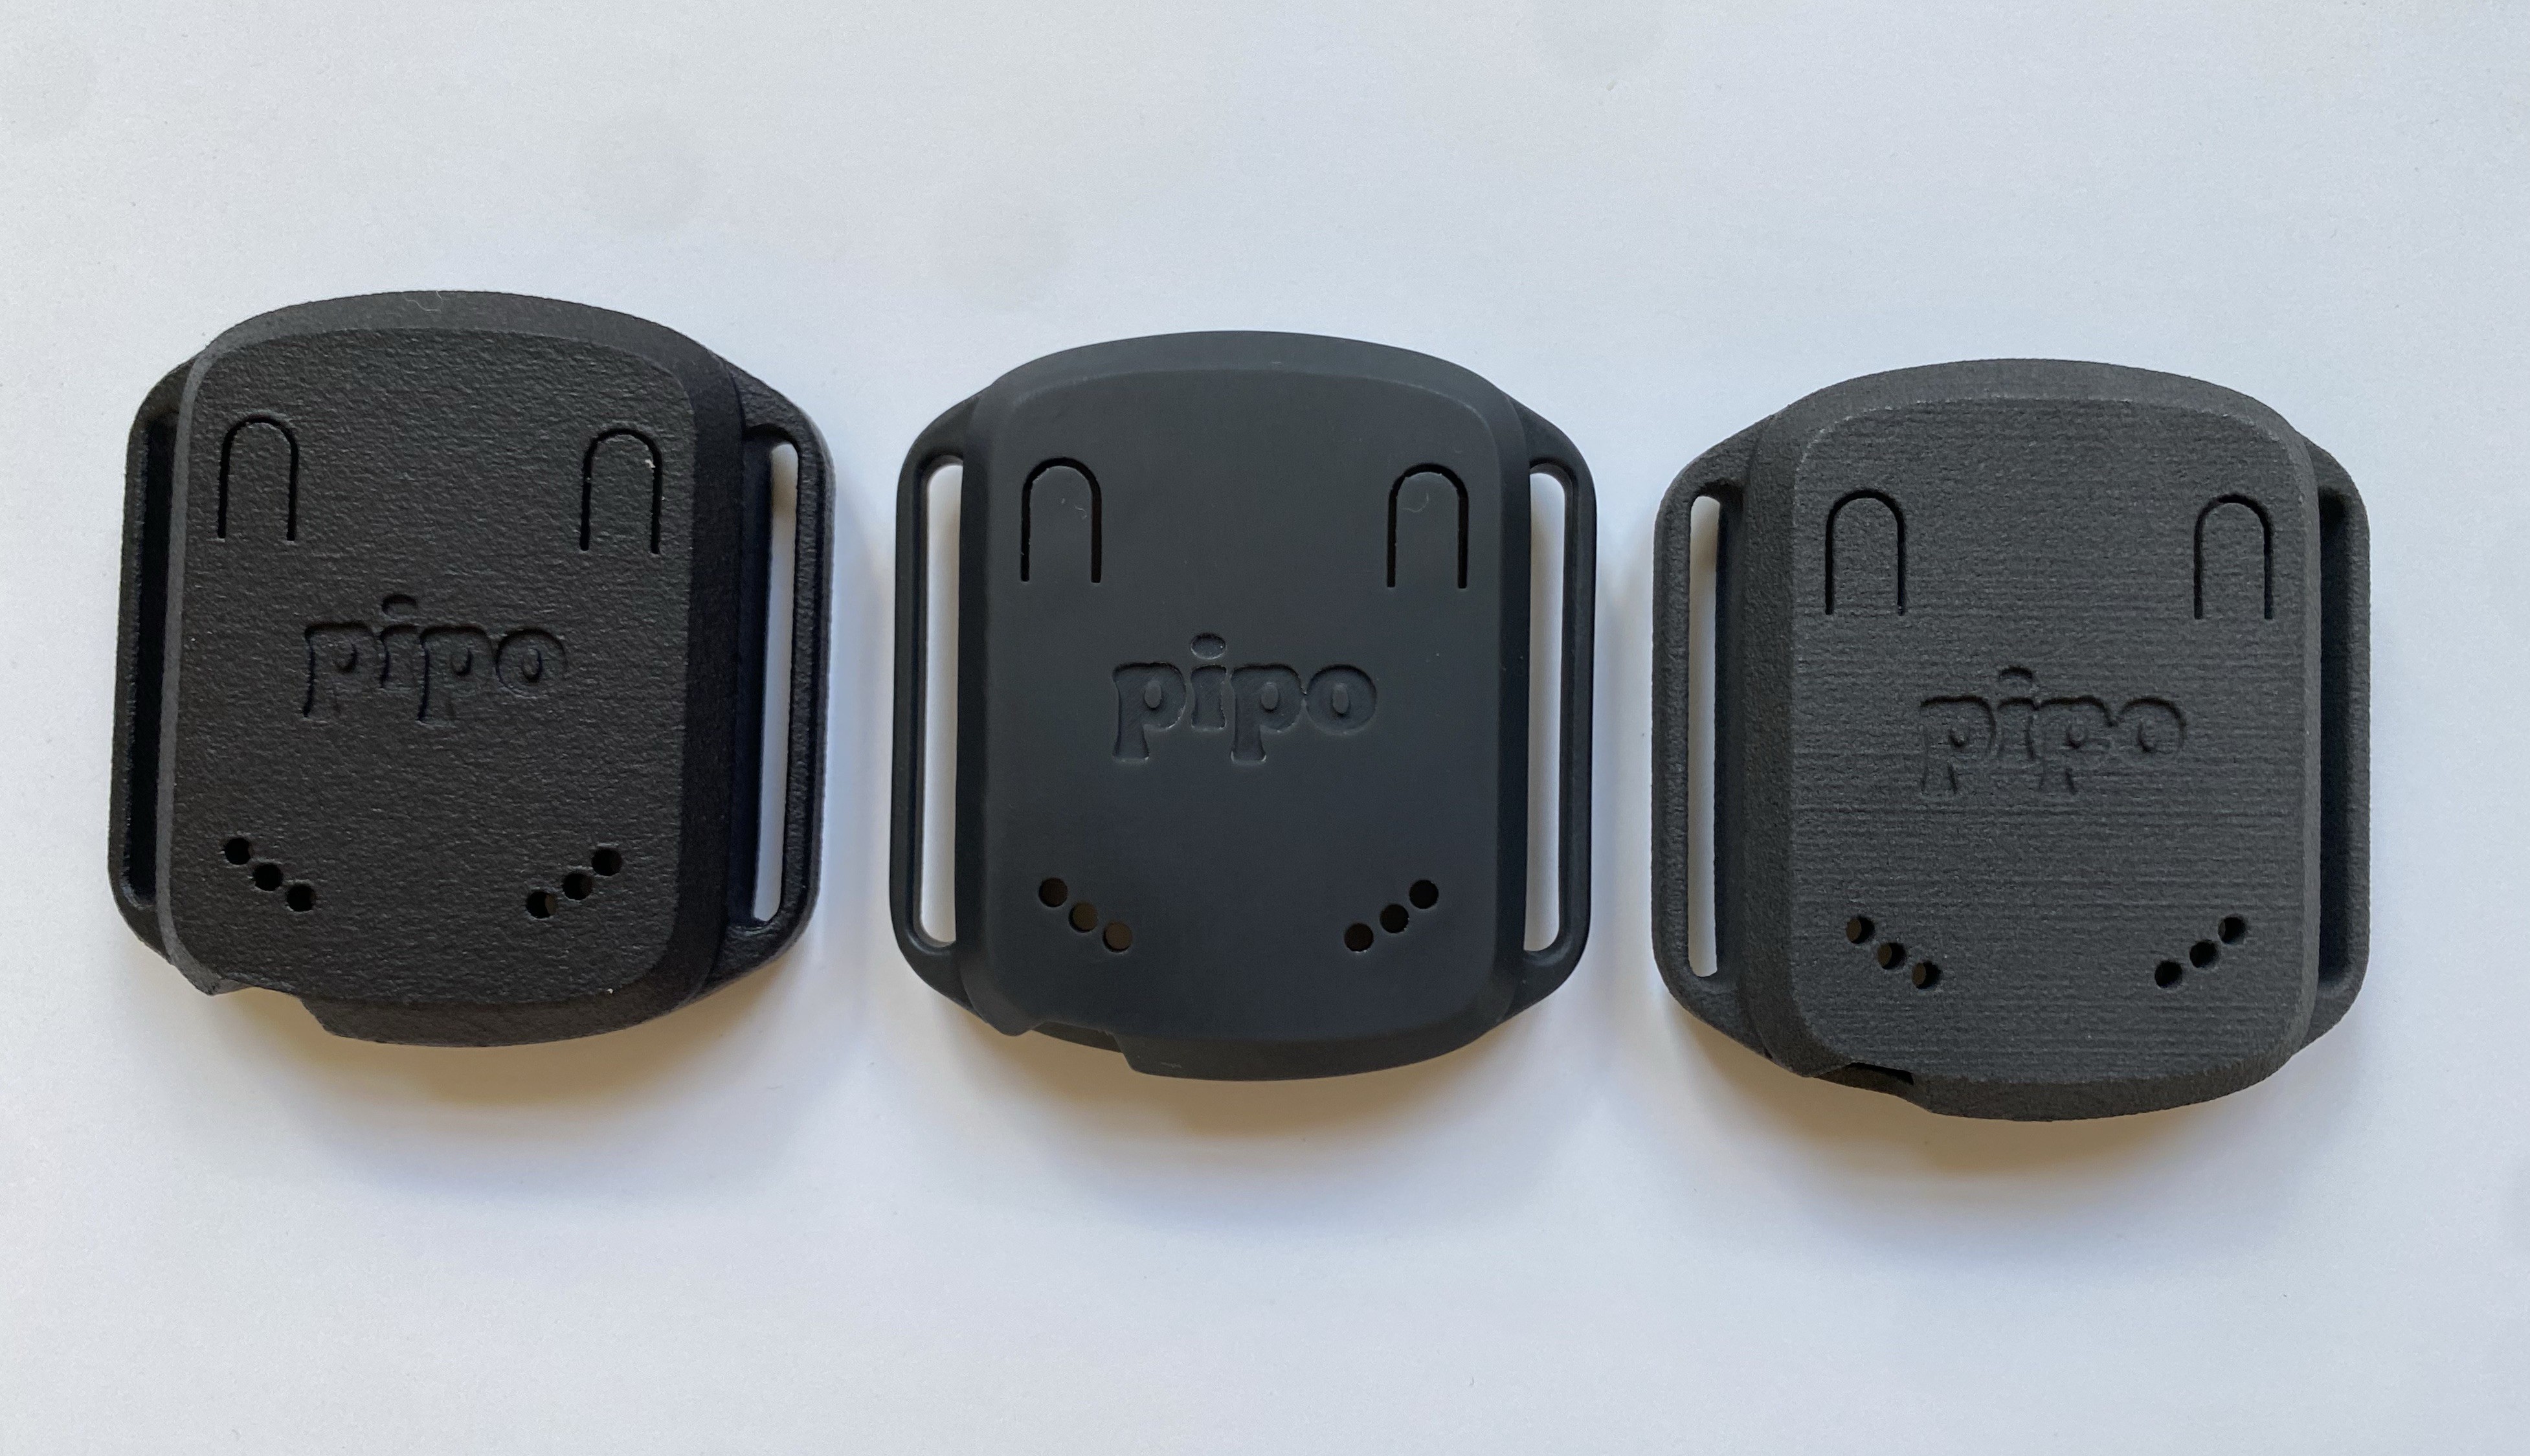
Industrial overview:
Left: PA12-HP
Center: SLA Black Resin
Right: 3201PA-FAll 3 seam very robust while providing some flexibility.
![]() PA12-HP (MJP)
PA12-HP (MJP) ")
- rather rough surface, but visually homogenous texture
- provides a very nice feeling of robustness and quality
- the most expensive of this test
Black Resin (SLA)
")
- compared to the "JLC Black", this one is more greyish
- details are very good
- (the surface does not look as scratched in real life)
- surface is roughness is very good. visual homogeneity is good but not perfect
- surface is soft to touch.
3201PA-F (SLS)
")
- printing layers are slightly visible
- more flexible
- The black is not deep, more like a dark grey, and catches the fingerprints fat very easily
- Provides a good robustness feeling too
FDM overview
(Left PA12-CF, center PETG, right TPU)The finish on a part with this amount of detail is not at the level of the other techniques, while I designed this part initially for FDM.
 PA12-CF
- would be the best overall if the logo in the middle was not there since it is too detailed
- good homogenous satin finish
- very rigid
PETG:

- good all rounder
- my PEI print bed gives 2 surface texture on the part
- the details are not very refined
TPU

- was curious to see how it would behave with this geometry. It turns out to be too soft
- rather shiny with average details
- Not much to says as this is not an appropriate material for this use
That's it for today, if you have questions or want more pictures, just ask !
-
Selecting the right distance sensor
02/20/2025 at 18:14 • 0 commentsBefore even starting to layout a schematic for the new modules, the first steps was to select the sensors and peripheral for my Esp32-s3.
1) Choose the right technology for your application
The use cases for Pipo are the ability to track a hand, medium/large obstacles, or detect people approaching.
Having some experience with distance sensing from past interactive projects builds, I already knew the latest Time Of Flight sensors would be good candidates to try out, but I did not had sharp specifications upfront since manufacturers do not spec their sensor for how good they are at reliably detecting a hand or a human body...
But let's go over the most common distance sensor types and see what criterion had to be taken into account for this project. (proximity sensors are excluded):
- refresh rate
- maximum range
- Field of View
- accuracy
- environment immunity
- compactness
- price
Here a high level comparison table for distance sensors
Freq Max range FoV Acc Immunity Size $ Ultrasonic sensors medium medium medium low good medium-big low IR reflection sensor fast low medium medium low medium medium Time of Flight sensor medium to fast medium medium to large good average tiny medium Lidar style ranging sensor fast high very small good good big High In case of Pipo, the Ultrasonic sensor were eliminated due to their low accuracy and size, IR sensor due to their poor immunity and rather low range, while the great performance of Lidar was not sufficient to balance their size and cost.
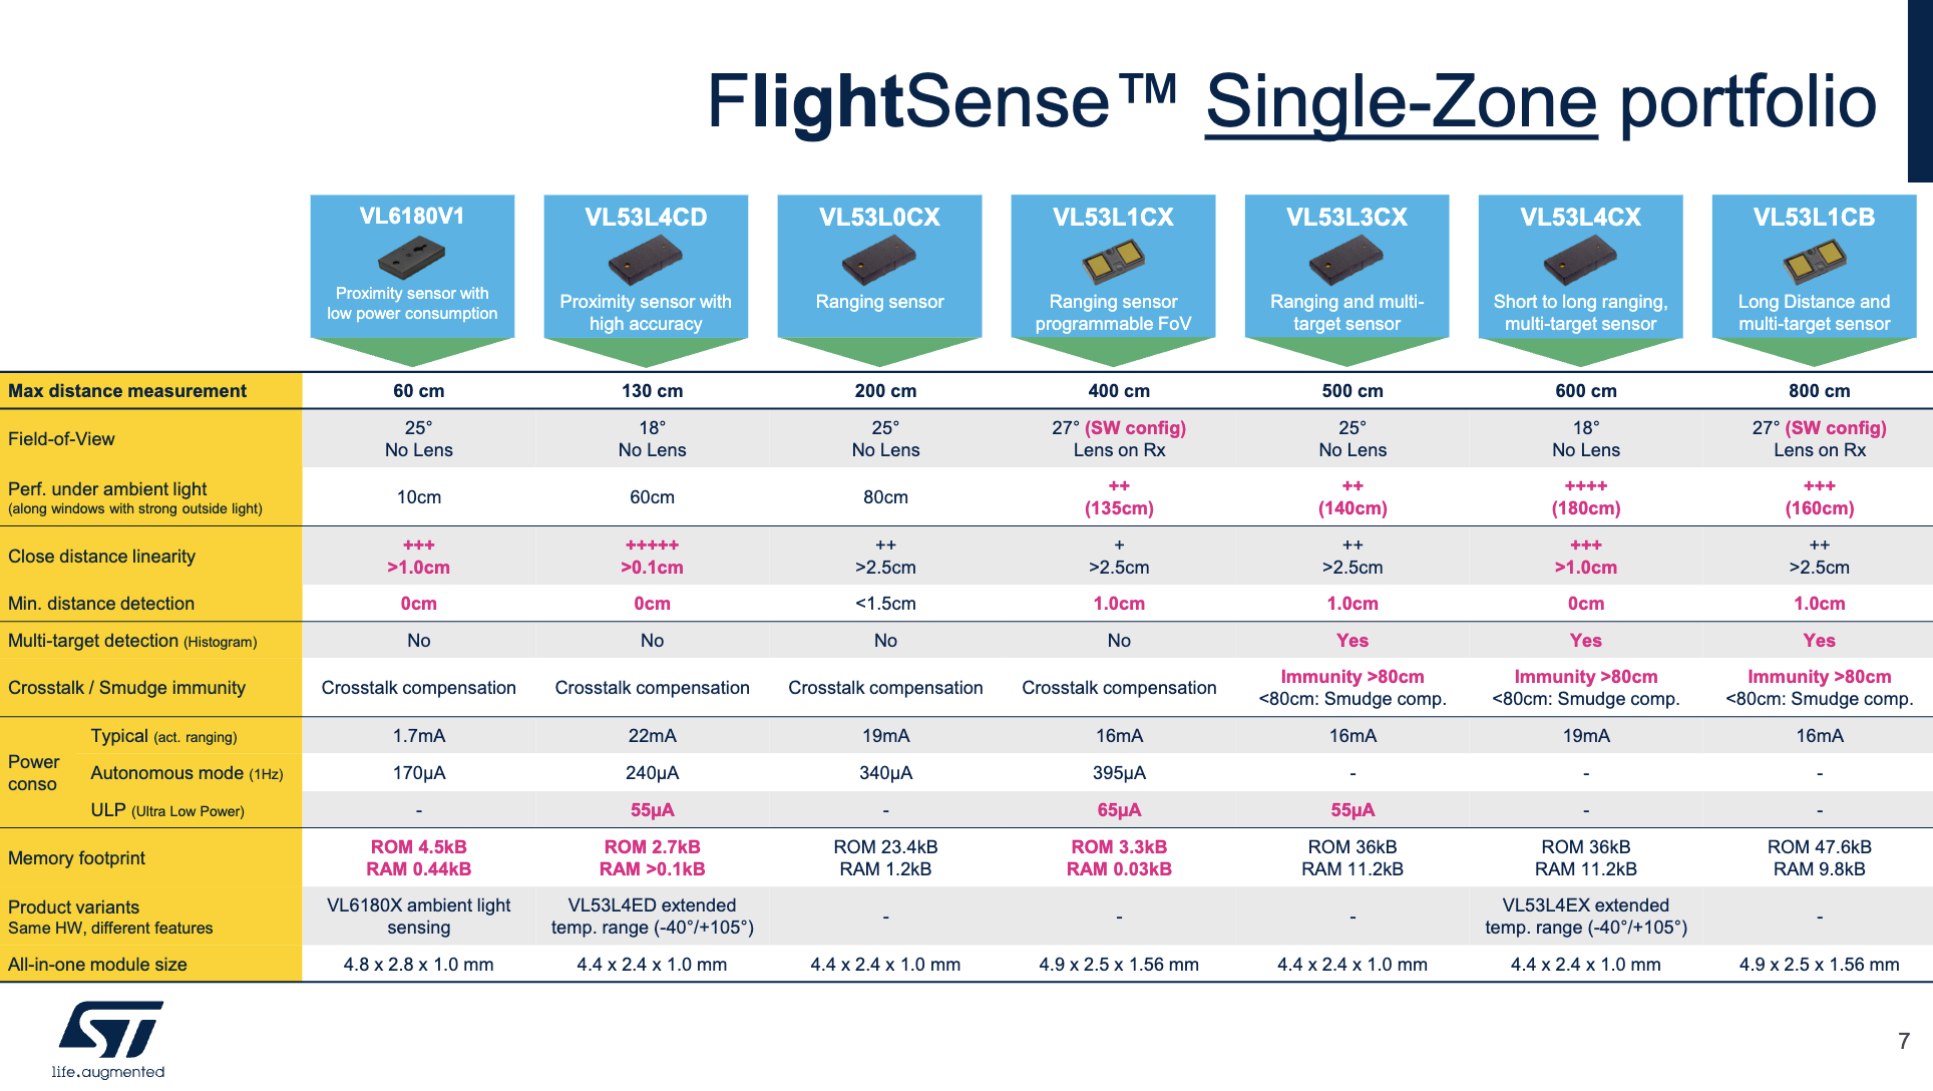
2) Identify and source all candidatesWhile I tried to look for different manufacturers, I was always brought back to St Microelectronics, who has the largest product range and has good open library support available.
I could find the interesting following table to navigate their product range.But don't be fooled by the nice looking numbers provided for the maximum range measurement.
In most cases, these numbers are given for indoor use (no IR) on a white target covering the field of vision which doe not reflect use cases we are interested in.
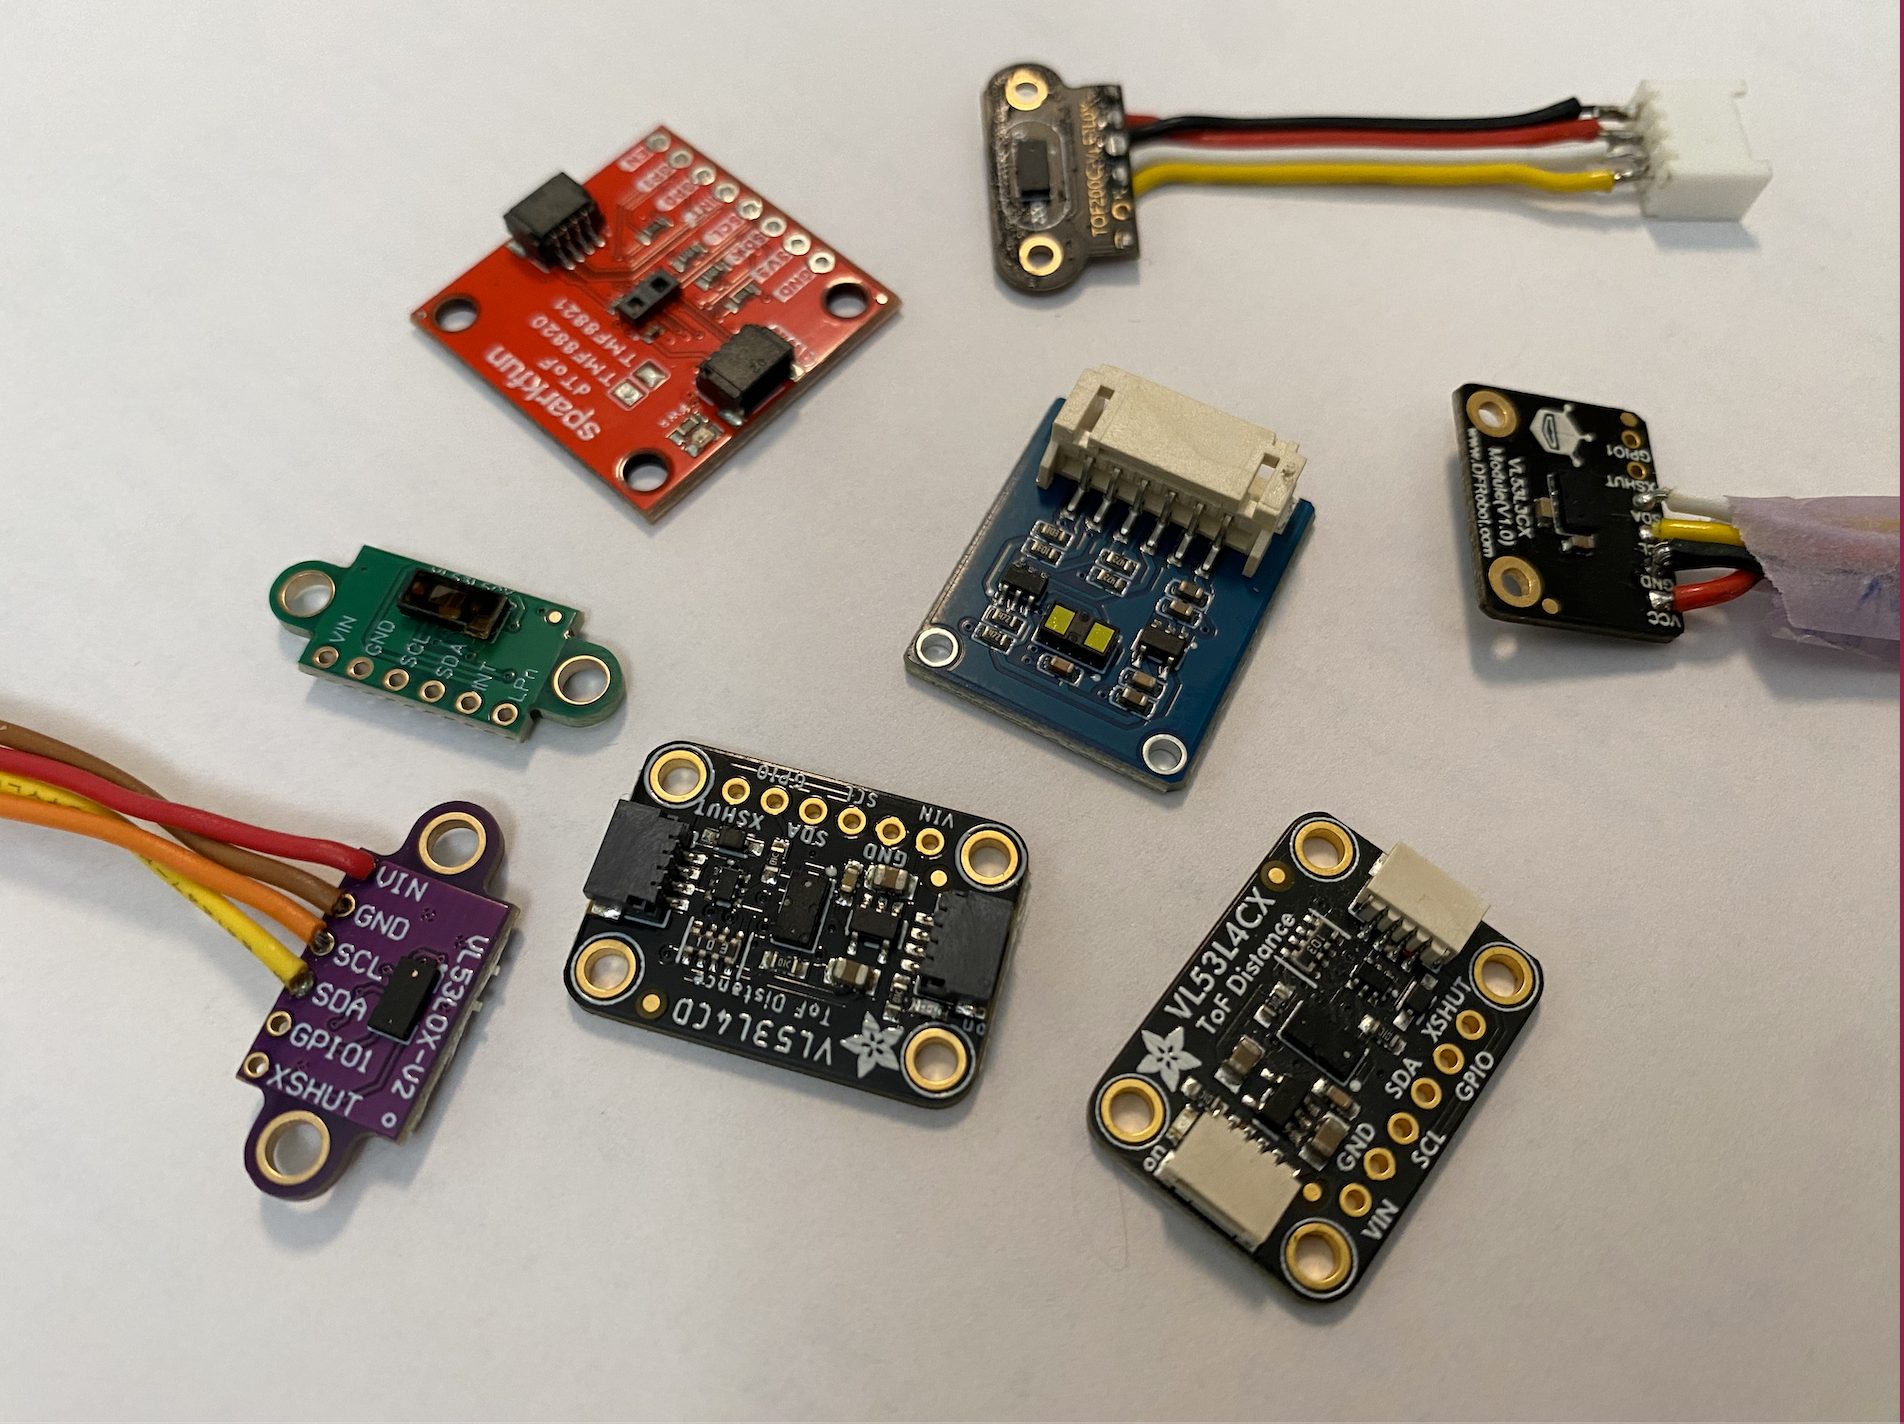
In this situation, the best is to test, datasheets are not always enough. Buy a bunch of them and start testing.
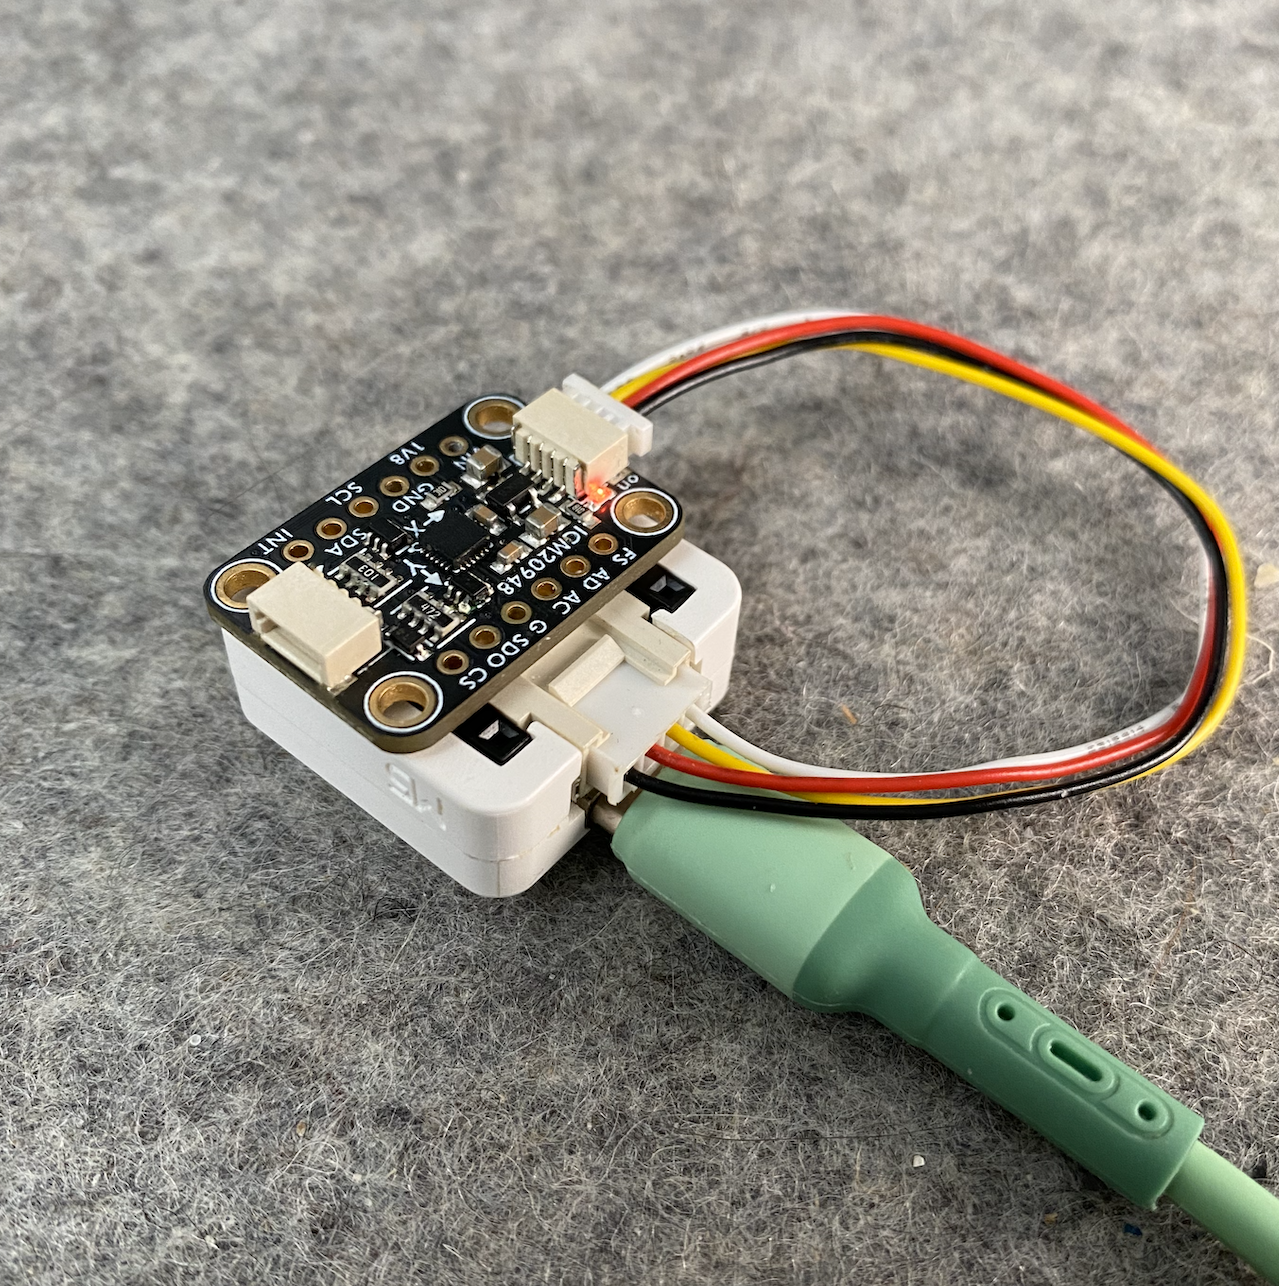
For these tests I like to use an M5 stack Atom Esp32-s3 instead of the standard devkit, because it is compact and has the grove connector, allowing for a reliable and rapid connection.
3) Test planI defined some tests conditions to help me estimate their potential performance in my use cases.
To assess their performance I used different target types and sizes, tested different sensor modes depending on the models, and defined different measurements to execute in each case.
A good test plan is key to obtain relevant results.After processing the results, the tests confirmed the 2 best performer were VL53L4CX and VL53L1CB.
But my tests allowed me to define the real ranges achieved in my application. Tracking a hand or a body were far from the theoretical value, while still very decent for my application.
These sensors can detect people up to roughly 3m (further if 0 IR ambient), and a hand up to roughly 80cm.
Doing this whole process also allowed me to familiarize with the libraries, explore the settings, and get a good grasp on all the pros and cons of pursuing with ToF sensors which is important before building around it.
-
When your POC makes you restart from scratch
02/03/2025 at 11:10 • 0 commentsAfter a non-negligible development effort, the initial proof of concept (POC) was finally mature enough to be faced with real world use cases.
I hooked up a bunch of different sensors and actuators to it, to test out what I could build with such a creative I/O box:
- a midi mechanical sequencer using some cardboard, an infinite servo, and a few IR barrier sensors. The sensors were reading the rotating sequence punched in the cardboard, sending notes to a DAW on my computer.
- an Etch A Sketch game one can play like a theremin with distance sensors
- controlling a led strip with knob
These first attempts worked out decently, and using this new tool made things so much quicker to setup rather than starting from scratch with an Arduino that it comforted me on the added value of the project. But I also got highly frustrated by some of the (un)practicalities with the current design:
- Connectors, while having chosen them carefully for being snap-in and detachable turned out to be rather impractical.
- The wireless capabilities of the whole device was completely undermined by its size. This limited a lot the potential applications
- Being compatible with almost any sensor was not so great since a lot of them do not perform that well depending on situations or need specific processing to get practical signals from them
On the other side, this proof of concept also gave me a glimpse of the remaining very large development challenges I would have to face to bring such an initial concept to a rather mature state.
Aside from the technical and design issues, I also had to realize the too large application scope resulting from too many features with too much flexibility made the communication around the project very difficult.
It was the right time to rethink the whole concept. Putting all this work in a drawer was a painful step to take, but moving away from it and starting all over again was the only way to leverage all the learning of the past months to rebuild on much stronger foundations.Of course the new approach came out from playing around with the POC. Highly frustrated by the impracticable cables going to the sensors, I though about making them wireless. And this simple idea made me move entirely toward a fully modular approach which turned out to be the best answer for so many more aspects of the project than just the wiring. Splitting the project into modules brought many key improvements:
- each module is specialized to a limited feature set. Sensors and hardware is curated, processing optimized.
- modules can be much smaller, wireless, and therefore can be easily embedded into objects or used as wearable.
- the project can scale over time by adding new modules/features to the family
- modules all share the same code base simplifying the development
And that's how the development of the current shape of Pipo modules (re)started.
As a conclusion of this process, I would keep the following toughs for the future:- Try out your concept as fast and early as possible (and without actually designing/developing if you can)
- Less is more. Focus on core features/functions.
- Get feedback early
- Identify what is the true added value in your project
-
From the idea to the first prototype
01/16/2025 at 14:32 • 0 commentsA) Set yourself a path
When I started working on the project I had a few strong idea to guide the developement:- bring together all the great opportunities offered by the arduino/maker/IoT ecosystem in scope of creative applications
- make a project that does not need coding and is flexible => can be (re)configured through a graphical user interface
- keep the project as durable as possible and run open source code
B) Go all over the path
Being a rather technical person, I also had many other ideas and technical wishes which I was willing to try out. Way too many ! The first concept I worked on turned out to be way to complex. And while I knew this common engineer bias, it is sometime very difficult to find what is the essence of what you are trying to do. But I knew the first design would not be the one, still it got me an excellent experimenting platform to identify core features.Hence the first concept was to make a generous I/O board packed with features. A bit like a sound card, which can connect with all kind of peripherals. The interface would allow to set input or output types, condition the signal, and propagate it between different kind of I/Os, like a virtual web patcher, but running on the chip.
The hardware had:
- 12 GPIO which could be configured as ADC, Touch, or connect to any I2C module
- Hardware midi port
- Ethernet with PoE
- DMX
- an OLED display
- and more...
After couple of month of design and development time, I got a partially working demonstrator (of course missing a bunch of features), but enough to put it against real world use cases.
C) Make it real I decided to develop this proof of concept with circuitpython on an esp32-s3. This allowed me to create a mock-up very quickly. I could easily setup a webserver with web-sockets, perform asynchronous tasks with asyncio, etc... I could find libraries for almost anything I needed, and the community is very responsive.
I was also rather surprised by how good the overall performance was. In my scope of a proof of concept, it saved me so much development time that I could definitely bear some of the drawback associated with circuitpython.
But on the long run, I could also realize why some more experienced developers do not recommend circuitpython when things get more serious, and had myself to move away from it for the next iterations. The biggest struggle I faced in my case was the fact it is was evolving too quickly: the newer releases causes the previous ones not to be truly finalized, but newer versions would then break some libraries compatibility. For a long term development, this is a rather unstable and exhausting framework to work with. But I am definitely eager to see how this environment stabilizes over the years since I truly think it has a lot of potential.
The interface was developed in vue.js. Not having much experience in web development back then I followed some friend recommendation. The practical component structure of vue.js and its accessibility made it a good choice. The resulting page allowed for a lot of development flexibility and there was no performance issue serving it from the esp.
This gave me a nice sandbox to explore and test the concept. -
The roots of the project:
01/16/2025 at 13:40 • 0 commentsBuilding an installation that reacts to real world has many facets. It often involves touching on everything: design, fixtures, hardware, music, visuals, etc...
While connecting a software running on a PC to the real world data might sound trivial for some of you, hackaday reader, the electronics work behind it is far from negligible if want to go beyond a basic breadboard-like setup. Doing the design, wiring, coding, interfacing with software, testing sensors and getting the most out of them... even when you know your way with all the development boards available, this remains time consuming. And whenever you need to adjust some settings, you would have to reprogram it. So for those who begin with code and electronics, it might simply feel like mission impossible !
Having interfaced piles of arduino too many times for various projects over the years, the reflection for a solution started. And that's how the development of Pipo began, to bring a standardized system that is quick and easy to setup, flexible and accessible to more people.
This project hopes to give super powers to beginners and creatives, and provide a fast, feature-rich solution to more advanced users, so that you can spend time working on all the other aspects of your creation without struggling with proper sensing and interfacing.
 PA12-HP (MJP)
 ")
")
")
 PA12-CF


 I decided to develop this proof of concept with circuitpython on an esp32-s3. This allowed me to create a mock-up very quickly. I could easily setup a webserver with web-sockets, perform asynchronous tasks with asyncio, etc... I could find libraries for almost anything I needed, and the community is very responsive.