Close
0%
0%

EnviroPi Temp Monitor

Combining a Raspberry Pi Zero 2 WH computer with an Adafruit MCP9808 temperature sensor.

Similar projects worth following
For my first project on Hackaday, I am combining a Raspberry Pi Zero 2 WH with an Adafruit MCP9808 temperature sensor for real-time ambient temperature monitoring. To achieve as much, the EnviroPi Temp Monitor logs air temperature measurements every second to a structured CSV file for later analysis.

The goal is to partially quantify my living environment. Because capturing this data with Python and later visualizing it using JavaScript, enables me to uncover how habits, appliances or even weather conditions influence indoor climate.

This project is the first step in a broader journey of DIY self-quantification; using open-source hardware and software to measure, analyze and understand my surroundings. It is also an exploration into electronics and programming as creative outlets, blending practicality with personal curiosity.

This project provides a step-by-step guide for replicating and running an environmental monitoring setup using a Raspberry Pi Zero 2 WH and an Adafruit temperature sensor. 

You will need to upload the provided Python script to your Raspberry Pi via SSH  and execute it. However, since you may want the program to continue running even after closing your terminal session, it is recommended to use Screen in order to maintain its operation in the background.

Once the setup is active, allow the system to collect temperature data for your desired duration, as the Raspberry Pi and sensor will continuously log readings. After gathering sufficient data, you can transfer the generated CSV file from the Raspberry Pi to your main computer for further analysis.

The project includes three visualizations for exploring your collected temperature measurements. The first displays a 24-hour average of all recorded data. The second offers a detailed breakdown by day. Finally, the third visualization presents a line graph of hourly averages.

It’s worth noting the Python script generates approximately 3-4 MB of data per day, though this may vary depending on factors like sampling frequency or environmental conditions.

When preparing to visualize your data, be aware rendering these graphs can be resource-intensive. The process may take several minutes to complete due to the volume of data being processed, and it may consume more RAM than anticipated.

To ensure smooth operation, allocate sufficient system resources before launching the visualizations or consider processing smaller datasets incrementally if needed. This will help improve performance while maintaining accuracy in your temperature analysis.
app.py

The primary Python script for recording temperature readings.

x-python - 1022.00 bytes - 01/28/2025 at 02:38

Download

  • 1 × Raspberry Pi Zero 2 WH
  • 1 × Adafruit MCP9808 Temperature Sensor
  • 4 × Breadboard Jumper Wires

  • The EnviroPi Temp Monitor Hackaday Project Is Complete

    Bret Bernhoft07/30/2026 at 06:20 0 comments

    After 18 months of development, assembly and troubleshooting, I am proud to officially mark the EnviroPi Temp Monitor as "complete." While the final hardware and software integration represent a significant milestone, the true value of this project is the evolution of my workflow. 

    This journey has served as a masterclass in building complex systems, specifically in the following areas:

    • Having a clear North Star for what the device should do is essential, but remaining agile enough to pivot allows a project to cross the finish line
    • Giving myself the space to struggle with complex problems enables me to transform challenges into accomplishments
    • Documenting my logic, setup and code changes from day one creates a paper trail, making troubleshooting and replication significantly easier
    • Engaging with the Hackaday community reinforces the importance of sharing knowledge to help the next project succeed

    I intend to carry these methodologies into all my future builds. By adopting a documentation-first approach and an iterative philosophy, I can streamline my development cycle. Thus shortening the time from concept to completion while increasing the professional quality and reliability of final products.

    This journey has replaced my initial hesitation and skepticism with confidence in making custom electronics. I am no longer just building a device; I am refining a process. I look forward to sharing my next adventure.

  • Expanded Existing Project Setup Instructions With New Step

    Bret Bernhoft06/04/2026 at 01:29 0 comments

    Today I reviewed and expanded the setup instructions for this project, which combines a Raspberry Pi Zero 2 WH with an Adafruit MCP9808 temperature sensor. The main priority was identifying whether any important steps were missing from the project instructions.

    After reviewing the current sequence, I added a new instruction step for installing the required Python dependencies before running the temperature logging script. This new step explains how the project requires adafruit-blinka and adafruit-circuitpython-mcp9808, which allow the Raspberry Pi to communicate with the MCP9808 sensor through Python and the I2C interface.

    I also reviewed the app.py file used by the project and confirmed Python’s built-in modules do not need to be included in the dependency list. From there, I created the contents for a simple requirements.txt file and added the new instruction, which is titled "Install The Required Python Dependencies". 

    Finally, I considered how this new dependency step fits into the larger project flow, especially before running the logger inside a screen session. This makes the instructions more complete and should help future users avoid errors when reproducing the project.

  • Project Documentation Is Taking Longer Than Originally Expected

    Bret Bernhoft03/23/2025 at 07:44 0 comments

    Given this is my first Hackaday project, I did not fully know what to expect regarding a time commitment from start to finish. With this said, what has surprised me the most is how much work goes into properly documenting all of the production details. From explaining the individual steps involved, to refactoring Python and JavaScript programs.

    Originally I had intended to take only two months in order to complete the EnviroPi Temp Monitor project. At the moment I am writing this log entry, it has already been two and a half months, with more documentation and assembly left to do. By the time this endeavor is finalized, I foresee a total of four months of effort going into wrapping it all up.

    Despite the coding, refactoring, documenting and publishing taking longer than assumed, I am grateful to be spending the correct amount of time needed in order to ensure a quality outcome. I would like for anyone to be able to follow this project's notes in pursuit of building their own version of an EnviroPi Temp Monitor. It is important to me that I do a high-quality job from the get-go.

  • Ending Data Collection After Thirty Three Days

    Bret Bernhoft03/01/2025 at 01:47 0 comments

    After thirty three days of collecting temperature readings, I have turned off the Raspberry Pi Zero 2 WH computer. And I will no longer be gathering data for this experiment. As I feel I have enough information to work with towards completion.

    The final CSV file is 78 MB in size, which means the program collected 2.363 MB of data each day. The same CSV file contains 2.75 million measurements, or one for each second between January 27th, 2025 and February 28th, 2025. That is quite a lot from my perspective.

    Looking back on this self-quantification experiment, I am able to see how much I have learned since the beginning. I can also see where overcoming my trepidation about building electronics has now paid off. Documenting the process on Hackaday has been eye opening for me.

    But there are still more details to explore before I walk away from this project. I would like to add a couple more steps to the EnviroPi Temp Monitor page. As well as expand on the details section for other newcomers who may be interested in building this project for themselves.

  • Results From Sixteen Days Of Temperature Readings

    Bret Bernhoft02/13/2025 at 02:44 0 comments

    After running this project for roughly sixteen days, the CSV file containing all of the temperature measurements (from the MCP9808 sensor) is roughly thirty nine megabytes in size. Which is almost two and a half megabytes of data gathered every day; a little less than originally estimated.

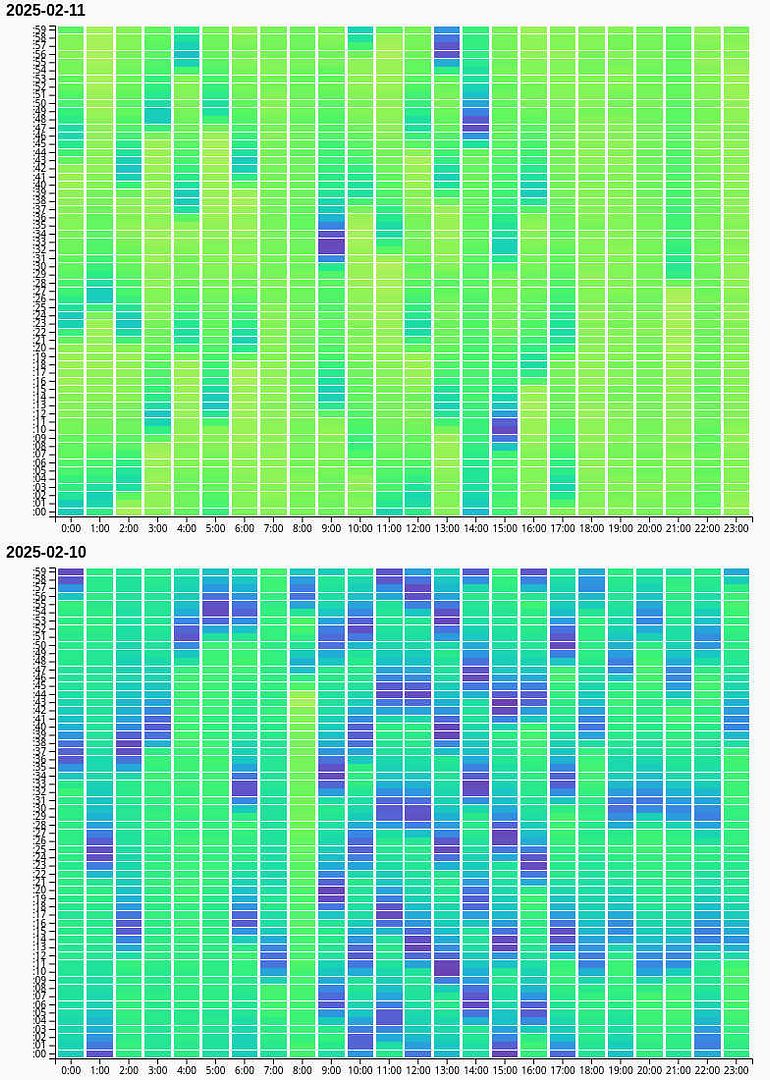
    What I have also noticed is every twenty four hour period has a distinct fingerprint or pattern, in terms of the temperature readings collected. This is validated with the visualizations provided for each calendar day using the HTML and JavaScript files available on GitHub. Further still, by referencing the same graphs, I am able to determine the exact minute when environmental services in my home are automatically turned on. All being rather interesting and revealing to me. 

    Please see the screenshot below for an example of what is stated in the above paragraph:

    This self-quantification project has been a lot of fun to build, document and maintain. I expect to be actively gathering temperature readings for a little less than two more weeks. Resulting in a total of four weeks worth of entries. When completed, I will be moving on to another similar project, to be documented via a Hackaday project page.

  • Temperature Measurements Actively Being Recorded

    Bret Bernhoft01/28/2025 at 02:33 0 comments

    After a couple hours of work, to my great delight and relative astonishment, the Adafruit MCP9808 sensor has been successfully connected to the Raspberry Pi Zero 2 WH computer. The contraption is actively measuring ambient temperatures once per second, and storing said data in a common, local CSV file.

    I will run this experiment for roughly two or three weeks. Afterwards, I will export and visualize the information using D3; my favorite data graphing JavaScript library. In the meantime this "EnviroPi Temp Monitor" project needs to be clearly organized, including the addition of Python scripts and instructions on how to replicate.

    To keep things interesting, I am dreaming up my next Hackaday.io project. But that is fun for another time. Let's stay (mostly) focused on what is already in front of us. There is still a bit more to do here.

  • My First Attempt At Soldering Was A Success

    Bret Bernhoft01/16/2025 at 02:44 0 comments

    Tonight I soldered header pins to the Adafruit sensor I am using for this project. I noticed the temperature on my Weller soldering iron varied quite a bit during the soldering process. But after cleaning the iron's tip, everything stabilized as expected.

    What makes this soldering especially interesting and notable to me, is the fact tonight is my first time ever trying. And it was a success. The joints are solid, there are no solder bridges and I didn't use excessive material.

    The next step is to test the sensor component's connectivity with my Raspberry Pi computer. If I am able to verify the two are communicating, I can write the software for collecting temperature readings. And get this project on its way in earnest.

  • Purchased Soldering Equipment Today

    Bret Bernhoft01/11/2025 at 03:00 0 comments

    As this is my first Hackaday.io project, it is also my first attempt at soldering. While I have already been using Raspberry Pi computers and the Python programming language for self-quantification, my experience with assembling electronics is relatively limited. I have built numerous desktop PCs, but only a few devices weighing less than a pound or two.

    Today I purchased the equipment needed to solder. Once the hardware arrives, I will begin this journey by connecting header pins to the Adafruit MCP9808 temperature sensor. From there, I will be using jumper cables to connect said sensor to a Raspberry Pi Zero 2 WH. At which point I will write a program to have this apparatus collect temperature data every few seconds, adding those measurements to a growing CSV file. Which will later be visualized using the D3 JavaScript library.

    I will update this project again in the near future when there is more to share.

View all 8 project logs

  • 1
    Pre-Soldering Component And Tool Checklist

    Before diving into soldering, take a few minutes to prepare properly. Which will likely save you time, frustration and damage to components and yourself. This step is all about setting yourself up for success. 

    Gather the right tools for this part of the project:

    • Temperature-controlled soldering iron
    • Rosin-core solder
    • Tweezers
    • Safety gear
    • Helping hands platform
    • Desoldering wick
    • Header pins
    • Adafruit MCP9808 sensor

    This pre-soldering preparation might seem like extra work before you even begin, but it’s actually where we prevent most common headaches known to derail electronics projects. All problems which become exponentially harder to diagnose later in the build process. Such as:

    • A poorly soldered joint can cause intermittent connections
    • False readings from your temperature sensor
    • Permanent damage to delicate components

    By taking a few moments to verify your tools and components, you’re essentially building a quality control system into your project before the first drop of solder touches your board.

  • 2
    Solder Header Pins Onto The Adafruit MCP9808 Temperature Sensor

    After acquiring the necessary components, the first step is to solder header pins onto the Adafruit MCP9808 temperature sensor, in order to secure a firm connection for data transfer. To accomplish this I used a Weller Soldering Kit, helping hands platform and protective eye goggles.

    The soldering process, from start to finish, took me roughly thirty minutes. Although said session was my first ever attempt at soldering. So, depending on your experience level, this step may take less time for you.

    After completing this step, to ensure the header pins were properly connected, I removed the newly assembled sensor from the helping hands platform and gently attempted to "wiggle" the header pins loose. To my great delight, my soldering firmly embedded the header pins into the sensor board.

  • 3
    Connect The Adafruit MCP9808 Sensor To The Raspberry Pi Zero 2 WH GPIO Pins

    Assuming your soldering of the MCP9808 header pins was successful, the next step is to connect the sensor to your Raspberry Pi Zero 2 WH using four jumper wires. To accomplish this, I used four female-to-female jumper wires purchased online to connect the sensor's pins directly to the Pi's GPIO header.

    Before connecting the jumper wires to either the sensor or the RPi, please make sure your Raspberry Pi computer is powered off. This is to avoid short circuits or accidental damage. As well, your jumper cables should ideally be twelve inches or less in length, to avoid picking up unwanted environmental noise.

    Once your preparations for this step are complete, the specific connections you will need to make are as follows:

    MCP9808 PinRaspberry Pi PinDescription
    VIN3.3V (Pin 1)Power supply
    GNDGND (Pin 6)Ground
    SCLGPIO3/SCL (Pin 5)I2C Clock
    SDAGPIO2/SDA (Pin3)I2c Data

    Make sure the jumper wires you are connecting the temperature sensor to the Raspberry Pi with are snug and well-fit. Especially before powering on the RPi computer.

    As a side note, never connect the MCP9808 VIN pin to the 5V (pin 2 on the Raspberry Pi) or other high-voltage pins. This will damage your sensor and/or Pi.

View all 10 instructions

Enjoy this project?

Share

Discussions

Similar Projects

Does this project spark your interest?

Become a member to follow this project and never miss any updates