 imanolink
-
1Cutting the Wooden Pieces
-
Gear 1 : 144 teeth, 36 cm diameter
Gear’s hole : 5mm x 3mm
Gear 2 : 60 teeth, 15 cm diameter
Gear’s hole : 5mm diameter
-
Gear 3 : 16 teeth, 4 cm diameter
Gear’s hole : 5mm x 3mm
-
Gear 4 : 20 teeth, 5 cm diameter
Gear’s hole : 5mm diameter
-
Gear 5 : 64 teeth, 16 cm diameter
Gear’s hole : 5mm diameter
-
Hour hand : 60 mm × 20 mm
Hour hand's hole : 5mm diameter
-
Minute hand : 80 mm × 20 mm
-
Dial : 23.8 cm diameter
Dial's hole : 5mm diameter
Dial's engraved numbers
N.B. :
-
You may cut out the numbers separately if you want to glue them onto the dial instead of engraving them.
-
If you want different gear dimensions, you can use the website https://geargenerator.com.
-
-
23D Printing the Pieces
Three E blocks (see over dimensions in the logs)
-
Axis 1 (cylinder) : 5mm diameter x 12mm height
-
Axis 2 (cylinder) : 5mm diameter x 12mm height
N.B. : Once again, if you want to create your own dimensions, you can take inspiration from the elements provided in the files.
-
3Assembly
Glue Gear 1 to Gear 3, making sure the holes are aligned.
-
Do the same with Gear 4 and Gear 5.
-
Glue the Axis 2 of Gears 4 and 5 to the dial. To determine where to glue it, adjust its distance from the center of the dial using Gear 2 as a guide.
-
Glue Axis 1 to the hour hand.
-
Make two holes in the lower bar of each E block (the largest one) for the screws.
-
Do the same with Gear 1.
-
File the screws so they don’t extend past the lower bar of each E block (to avoid blocking Gear 5).
-
Screw the E blocks to Gear 1.
-
Insert Gear 1 and Gear 3, which are glued together, onto the motor.
-
Pass Axis 1 and the hour hand through the dial.
-
Pass Axis 1 through Gear 2.
-
Assemble Gear 5 to Gear 3 by passing Axis 2 (glued to the dial) through Gears 4 and 5, which are glued together.
-
Assemble Gear 2 and Gear 4, passing the dial between the central and upper bars of each E block.
N.B. : Make sure to file the E blocks and Gear 5 if necessary.
-
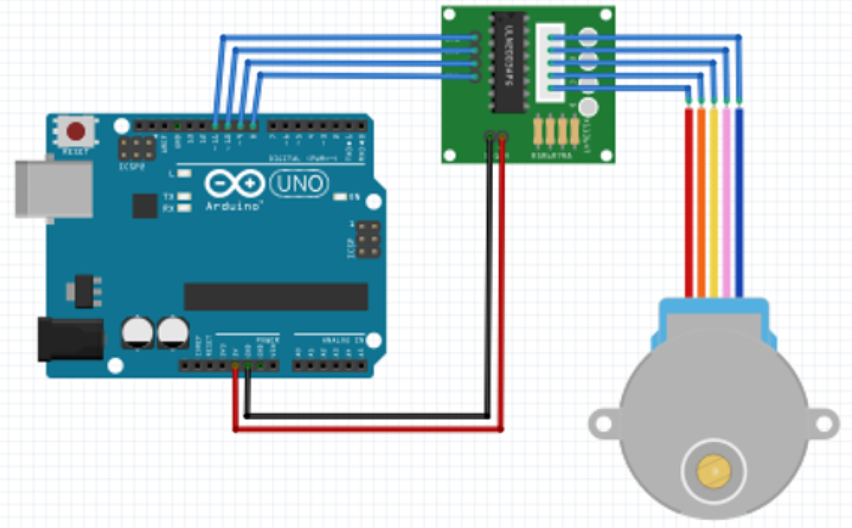
4Wiring
Follow these instructions to wire the motor
![]()
-
5Code
You can see over the code that we used in the files
LilBen the clock
This semester, we made a beautiful clock that is coming directly from the future.
Discussions
Become a Hackaday.io Member
Create an account to leave a comment. Already have an account? Log In.