 fannylarradet
-
1Step 1
For this tutorial you will need :
- Biograph infinity
- Developer tools
- Connection instrument SDK ( not provided in developer tools, you need to specifically ask it to Thought Technology)
You steps that will have to be done :
- First you need to create an application to receive the data and give the link to biograph
- Then you need to add a channel with the devices you want to read from the flexcomp
- Finaly you need to add a screen to display this channel and link it to connection instrument
In this tutorial we will send a GSR sensor and a BVP sensor value to the application
-
2Step 2
Create an application
You can modify the example application given with the connection instrument SDK according to your needs.
Personally I couldn’t make the sample TestClient work on my windows computer. I have :
Error MSB6006 “cmd.exe” exited with code2.If you can run it then you can skip the following .
The solution I came up with is to create a new application and to copy the data:
- create a new Visual C++ Win32 console application on visual studio 2015
- Reproduce the file hierarchy of the TestClient app ( all .cpp in sources Files; all .h in Header Files)
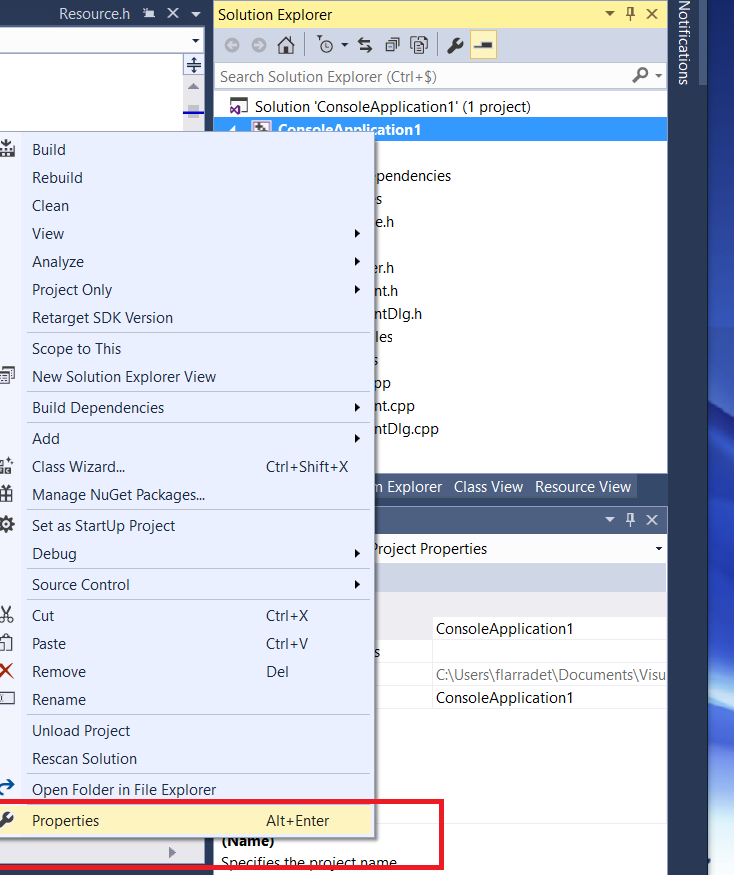
- Right click on the name of your project and choose Properties
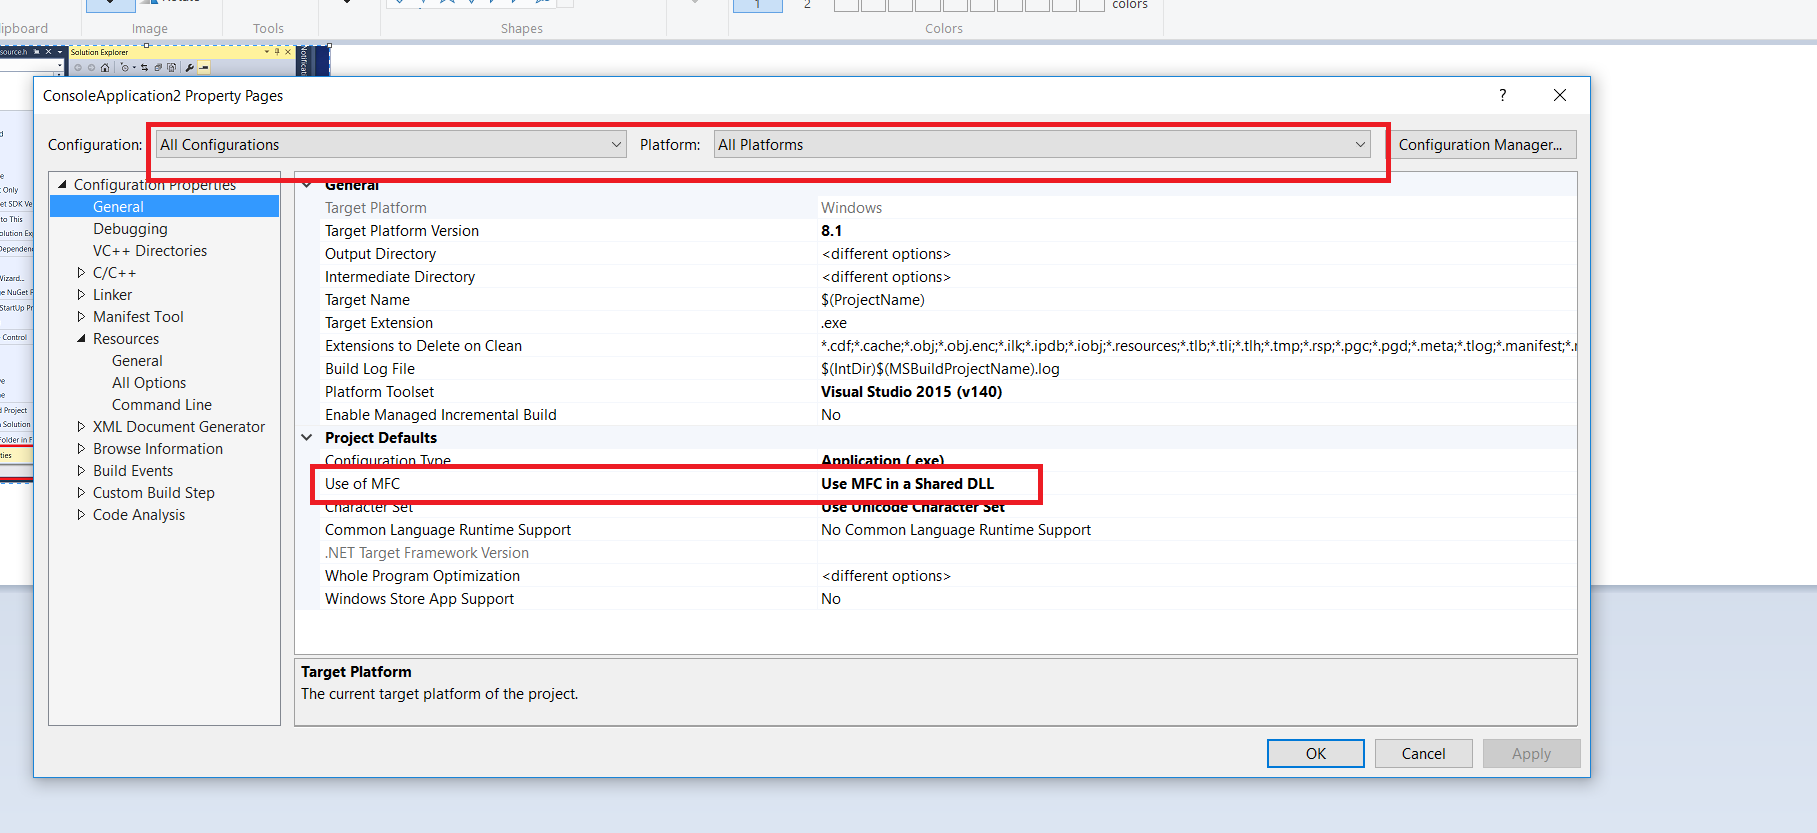
 Choose All configurations and use of MFC select “Use MFC in a Shared DLL
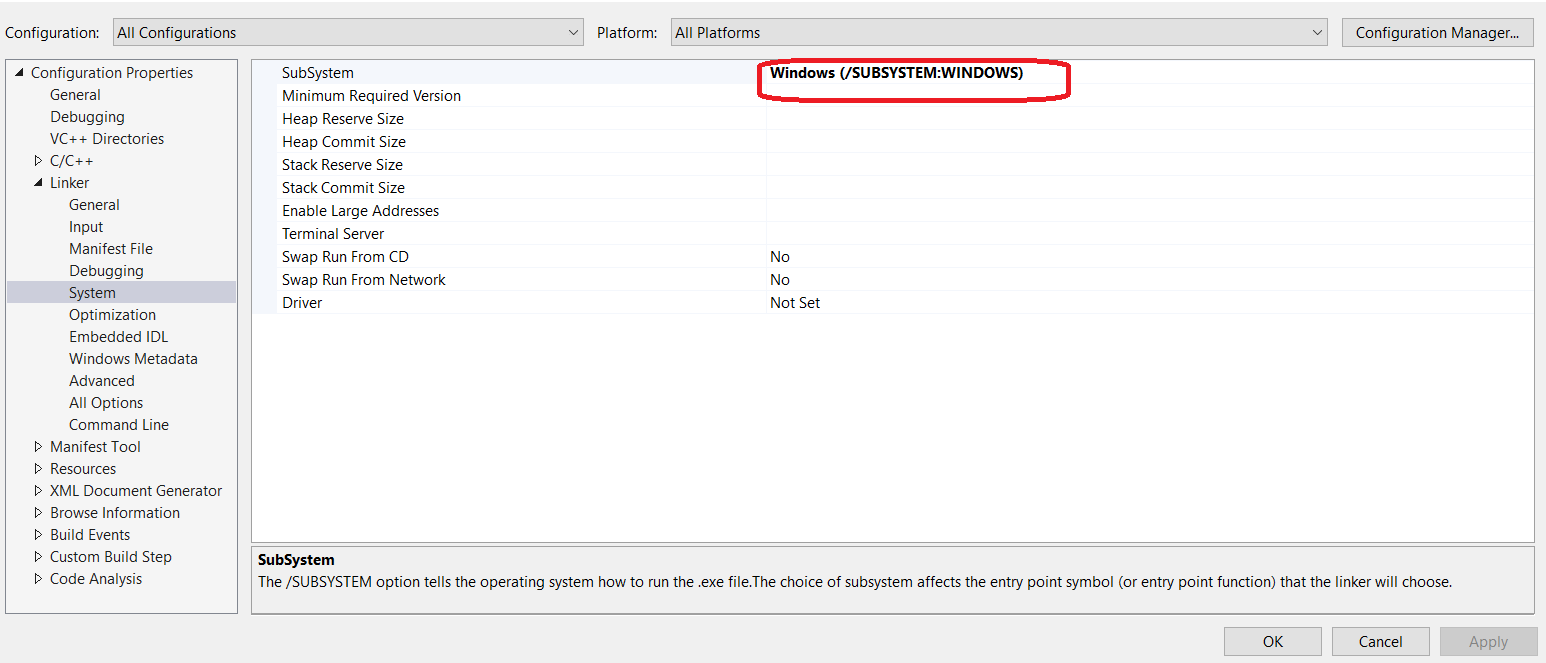
- In Linker -> System -> subsystem choose Windows
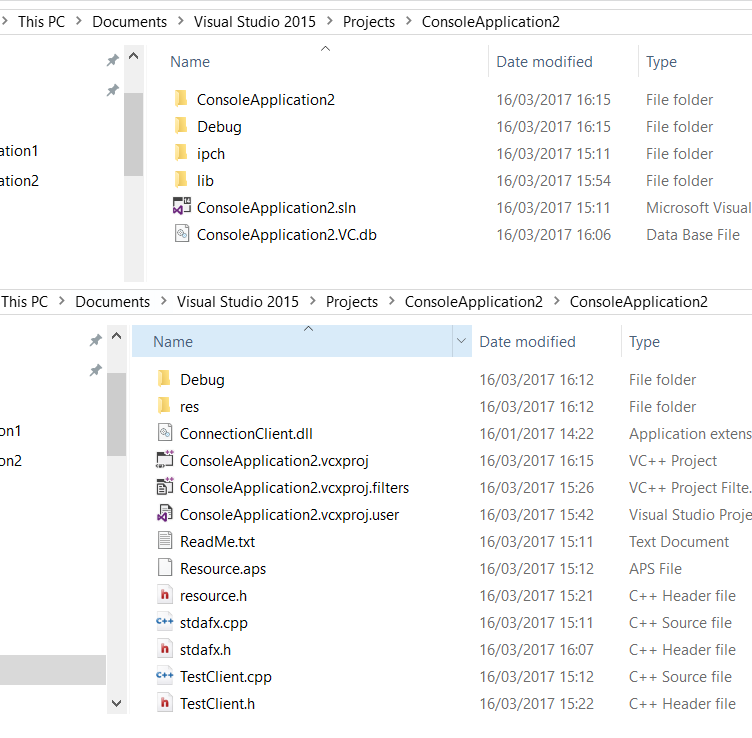
- Create a folder lib in your project and copy past it from the TestClient application: ConnectionClient.dll;ConnectionClient.h ; ConnectionClient.lib
- Copy the res folder from TestClient under the inner folder of your project. Copy ConnectionClient.dll in the inner folder of your project. Your project should look like this:
- In TestClientDlg.cpp change
#include "../../ConnectionTools/ConnectionClient.h"to
#include "../lib/ConnectionClient.h"and#ifndef NDEBUG #pragma comment( lib, "../../ConnectionTools/Debug/ConnectionClientD.lib" ) #else #pragma comment( lib, "../../ConnectionTools/Release/ConnectionClient.lib" ) #endifto#ifndef NDEBUG #pragma comment( lib, "../lib/ConnectionClient.lib" ) #else #pragma comment( lib, "../lib/ConnectionClient.lib" ) #endif- In stdafx.h add :
#define _WINSOCK_DEPRECATED_NO_WARNINGSNormaly at this point you should be able to run the application without error from the compiler.
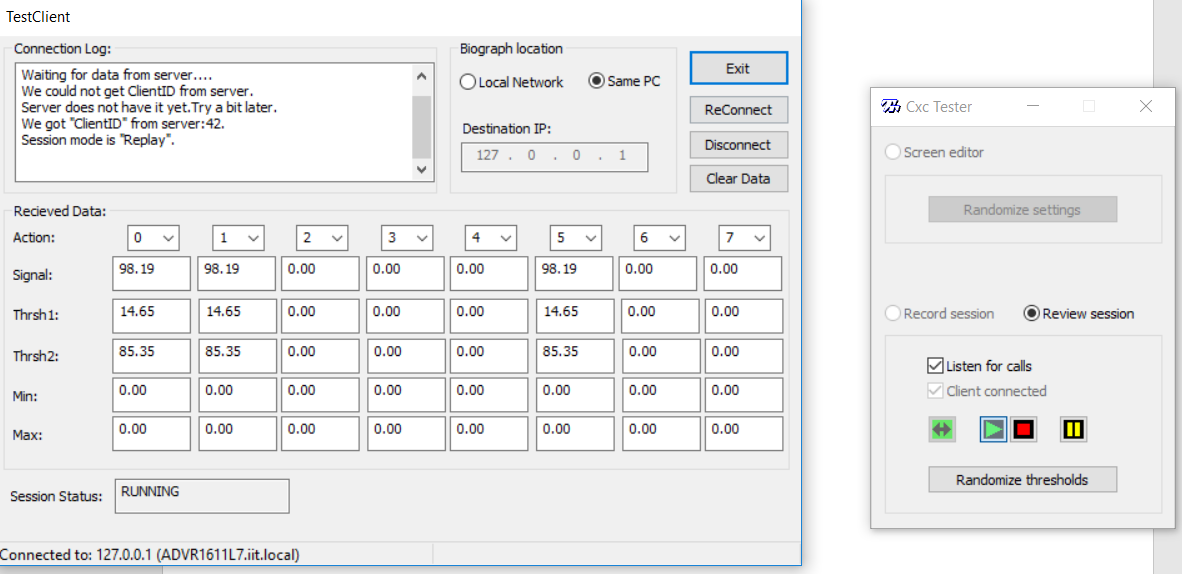
You can try that It is working with the provided server simulator :
- Run ServerSimulator.exe
- Choose Review session
- Click Listen for calls
- Run your application
Numbers should be changing.
Once the application created, you need to link it to biograph:
- First go to C:\ProgramData\Thought Technology\Infiniti\Externals
And create a file : name_of_your_app.xml
- Then go to the connection instrument folder of your SDK and go to Utilities.
Open AddPath.exe , browse to your application.
Leave the second link unchanged ( it should link to the previously created file)
-
3Step 3
Add a channel
You can also use pre-set channels if you want.
Now in order to get the data from the flexcomp we need to inform biograph of what kind of data we are going to read.
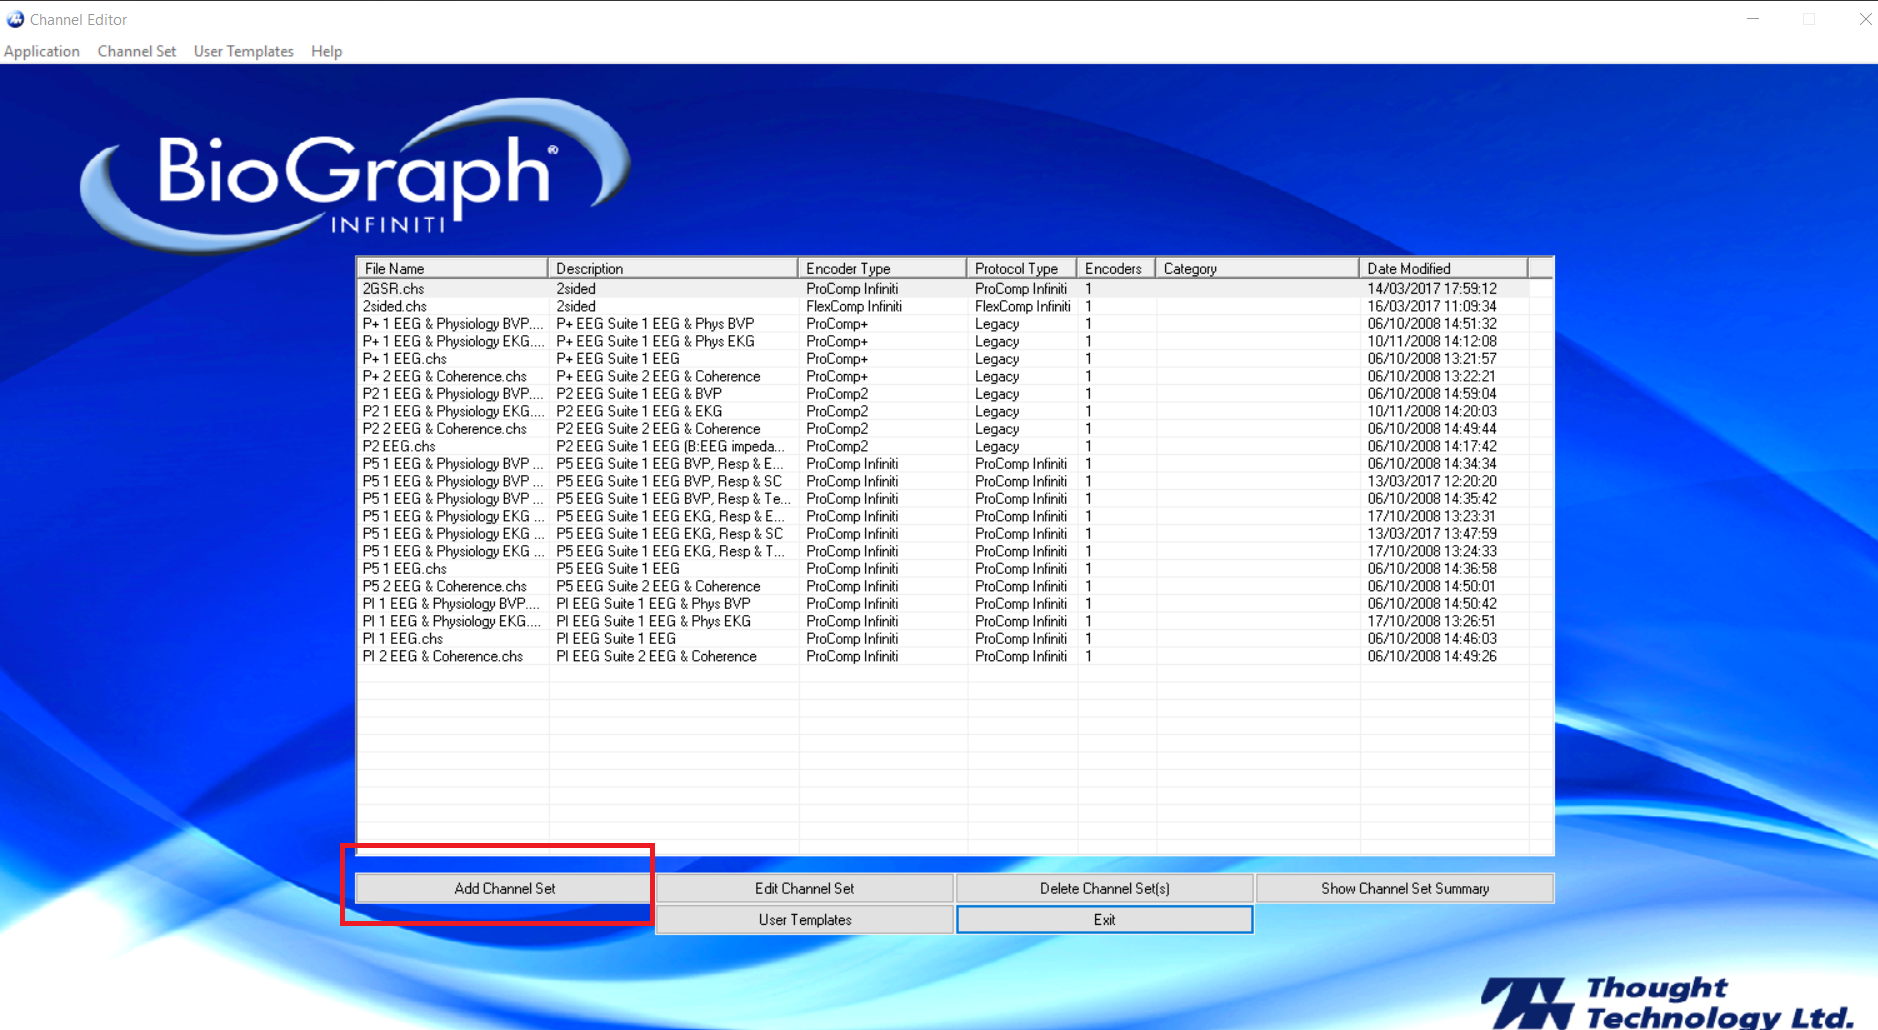
- Open channel editor
- Add channel set
- Choose Wizard Mode and click OK
- Choose you Encoder Type and protocol type (personally I have a FlexComp Infiniti but only ProComp option works for me )Give a name to your channel in “Type Channel Set Description”
Give a name to your channel in “Type Channel Set Description”
- Then click Next two time.
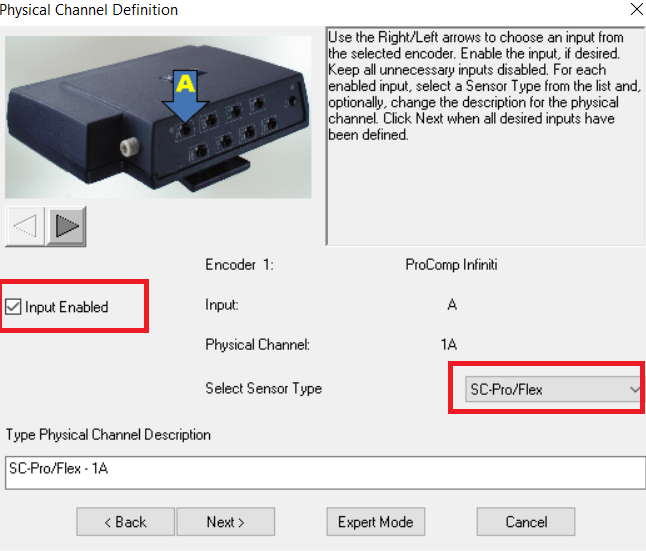
You must be in “Physical Channel Description” screen
Set a channel for each sensor you want to read from. ( the input name correspond to the name of the input in the flexcomp device ) :
- First click on “input enabled”
- Then choose the type of sensor you want to read
Then click on the arrow to set another channel/input/sensor/letter
You don’t have to set all the channels, only the number of sensor you have.
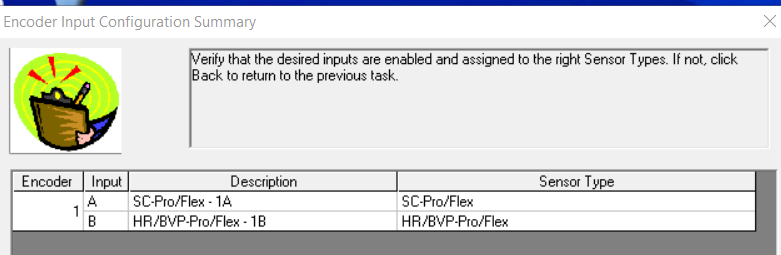
In our case we have only two sensor, so we will set Input A to SC-Pro/Flex and Input B to HR/BVP-Pro/Flex
Then click next
- Click next until you reach the Virtual channel generation preferencesChoose “generate virtual channels automatically”
Choose “generate virtual channels automatically”
- Click use existing preferences
- Click finish and save your channel
Your new channel should now appear in the list .
Exit Channel editor
-
4Step 4
Add a screen
Now that we have a new channel we need to decide how to display the data . ( this is necessary even if you don’t need to display the data )
- Open biograph Screen editor
- Click on “Add Screen”
- Give a title for your screen in Description
Choose your newly created channel set in the list and click on OK
- An empty blue screen appears.
- Display the data :
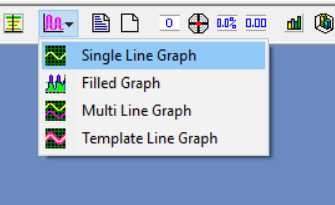
- Choose the type of graph you want. In this tutorial we will use single line graphs .
- Click on the screen where you want the graph to be
- Choose
the channel you want to display
We will choose 1A to display our GSR (SC-Pro) sensor - Right click on the graph and choose "Auto-scale"
- Right click and choose instrument setting. Here you can customize your graph
You can display several graph and many customization are possible.
Even if you don’t want to display the graphs, if you do not add ALL of the channel you want to send in this screen, you will not be able to select them in the next part.
- Add connection client :
- Click
on the connection Instrument icon
- Click anywhere empty in the screen
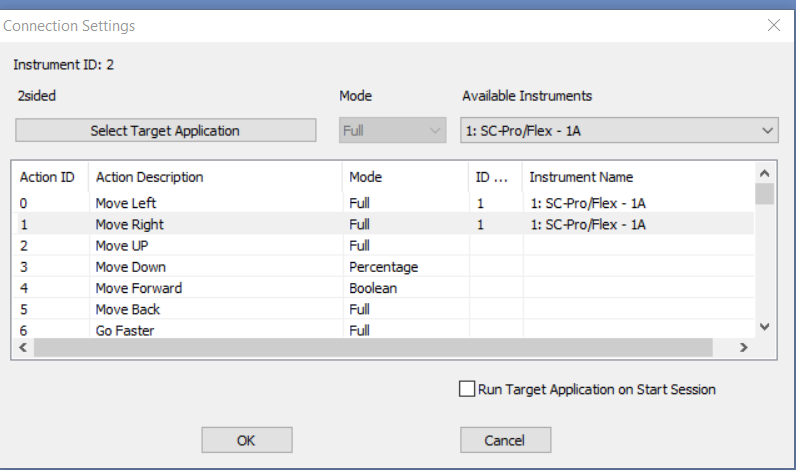
- Click on “select Target Application”, your application name should be on the list. If it is not, it mean there is a problem with your .xml file. I suggest you start over the “link to biograph” part in “ create an application"
- For each number choose a channel input. ( click on the row and select available instrument )
- Click
on the connection Instrument icon
And1= B ( BVP sensor)
Sometimes available instrument appears empty but it is not, try to click on the empty slots to see if you can select it
If the channel you want to send do not appear in Available instrument it means you haven’t created an associated graph( see previous section “Display the data “ )
- Now you should see your connection instrument added to your screen
Exit and save
Close the software
-
5Step 5
Send the data
Now that everything is ready, we can send the data :
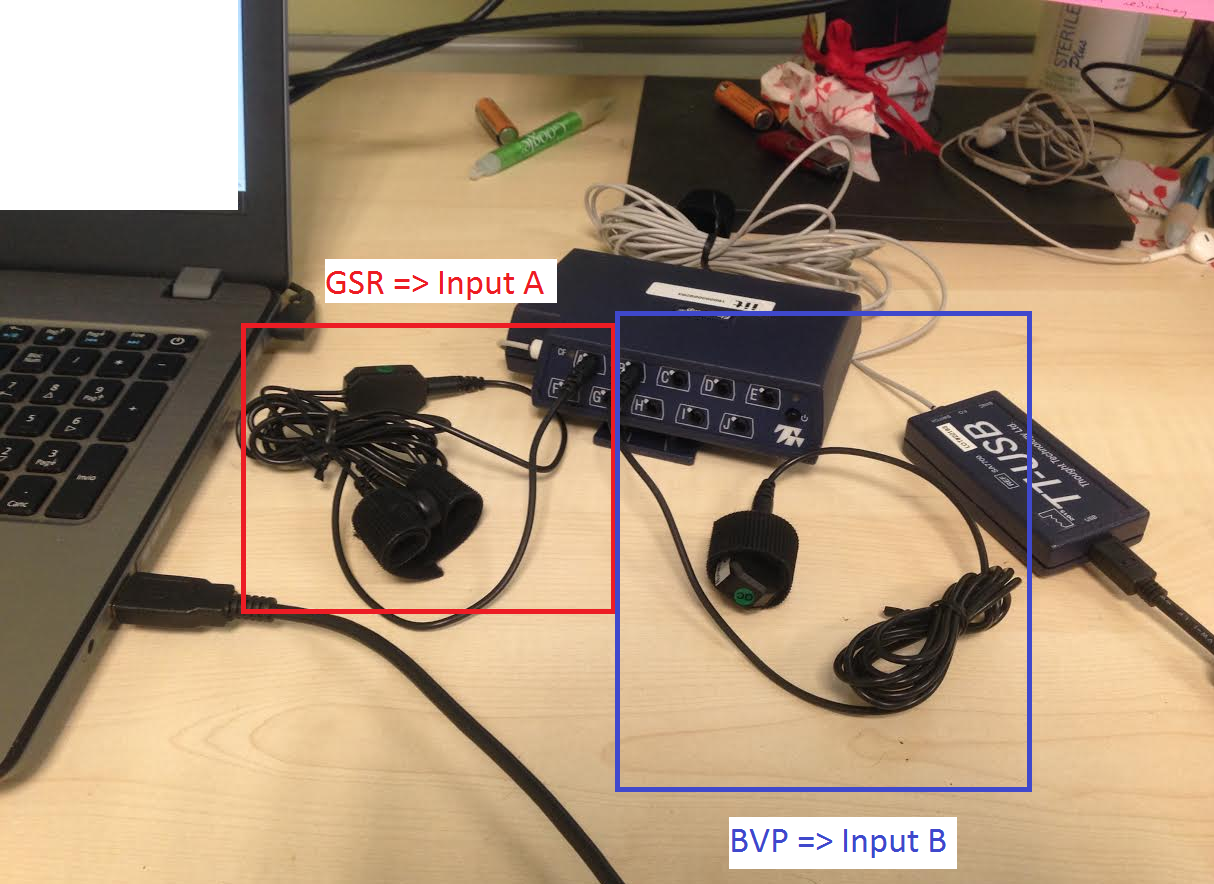
- Plug your sensor in the flexcomp device following the channel you have set previously.
In our case we have set that the GSR sensor is in channel A and the BVP sensor in channel B
Plug the flexComp to the computer and turn it on.
So we plug the sensor like so:
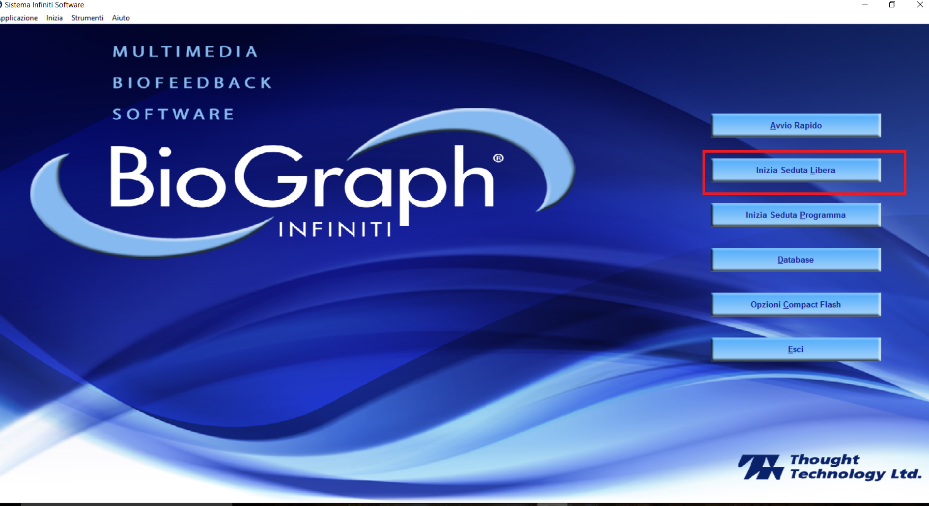
- Open biograph
- Choose“ start open display session”
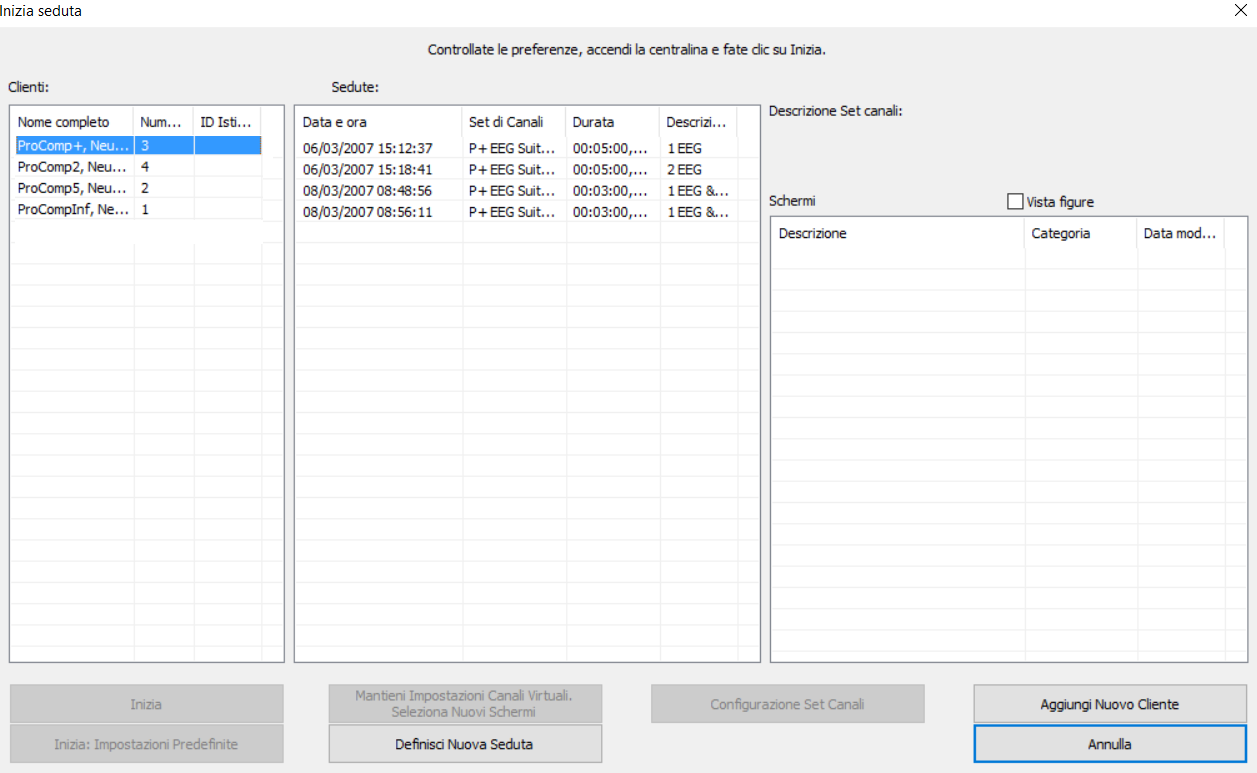
- Double click on the first item of the first list
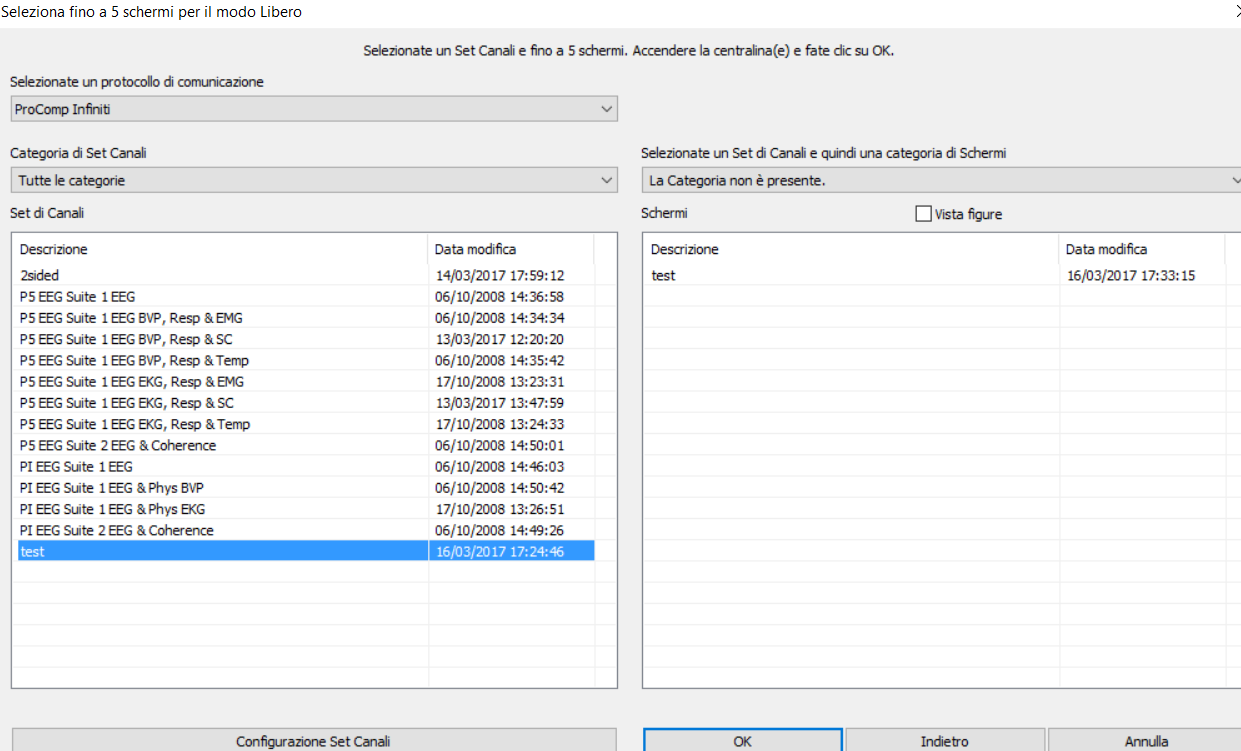
- Select your communication protocol ( the same as the one you put when you created the channel ) Select your newly created channel on the list
- Your newly created Screen should appear on the right part of the screen. Select it Click ok
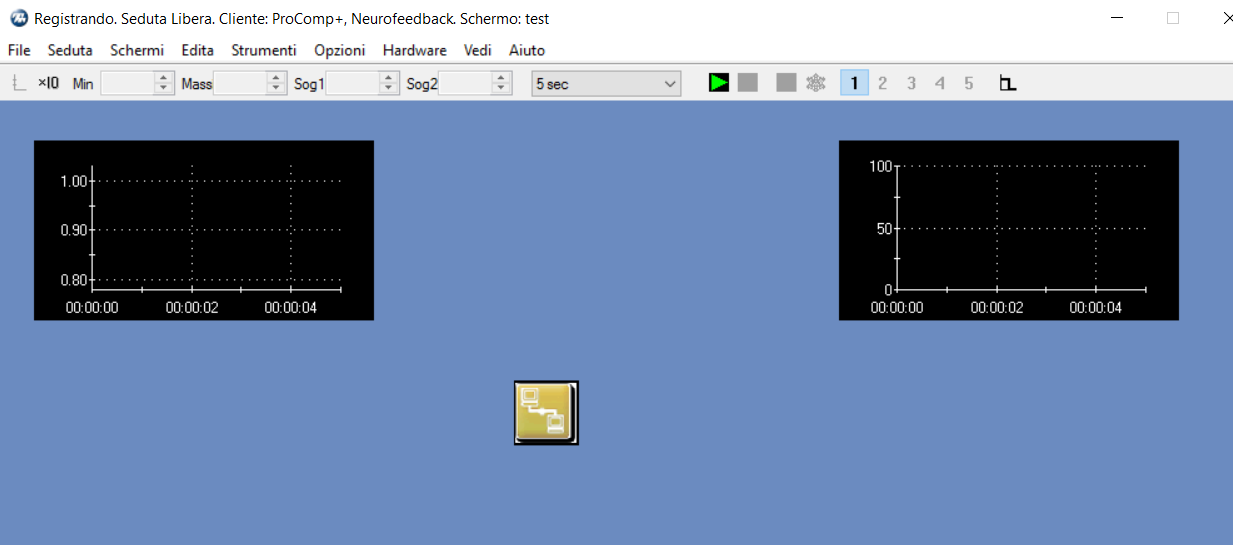
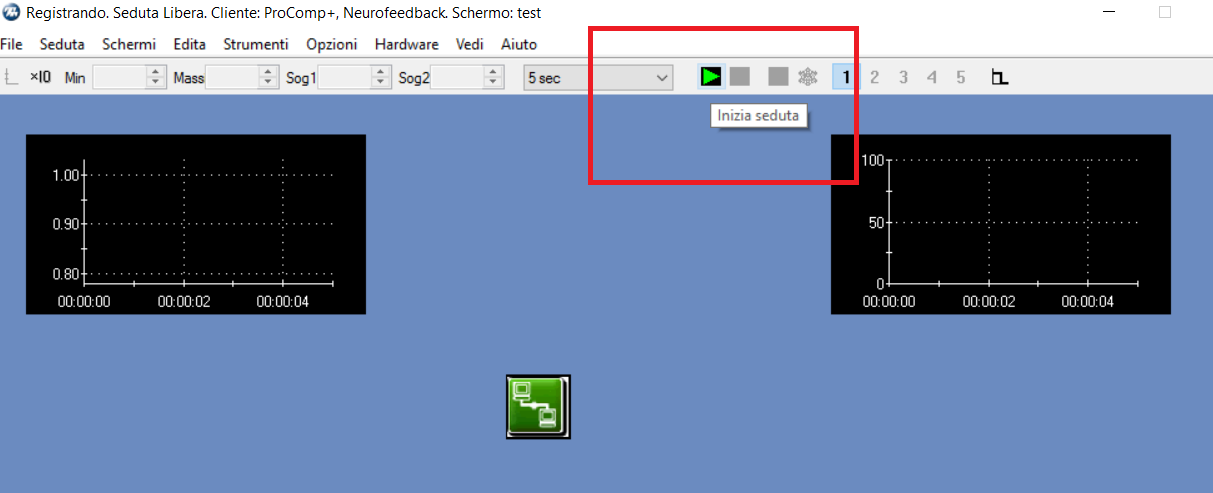
- Your set up screen should open:
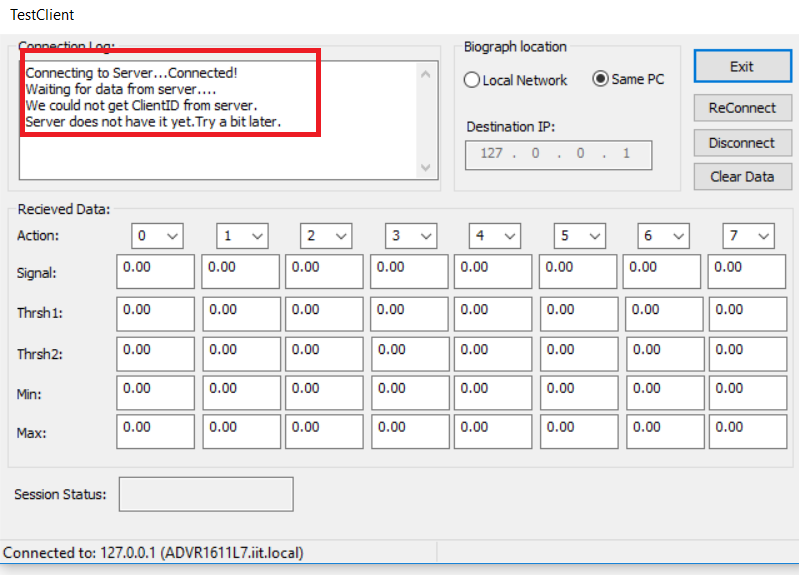
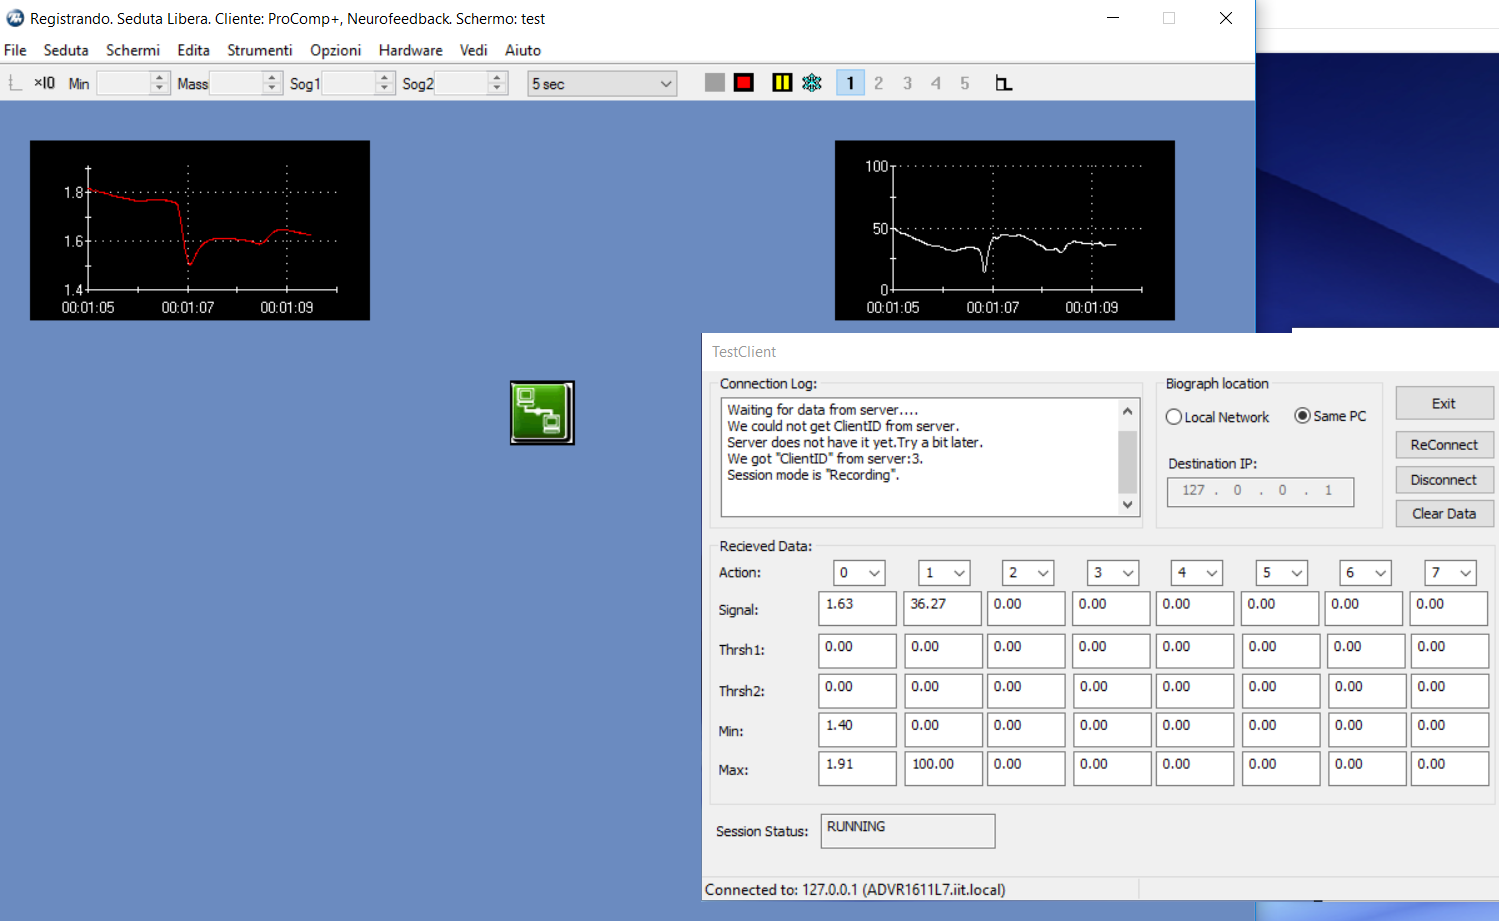
- Run your application on visual studio
Your application should now say connected to server
- On biograph, press the green play button
- Your graph should now be displayed and your application should display data values in live
You can now modify the application to use the data the way you want!
ENJOY
-
6Step 6
Now that your application correctly receive the data, you can send it to unity. I chose to send it through sockets.
The application is in C++ and the unity code in C# so you need to make those two communicate.
C++ Client
- create the socket in TestClientDlg.cpp
add includes
#include <sstream>
#include <iomanip>
#include <iostream>
#include <fstream>
create the socketCTestClientDlg::CTestClientDlg(CWnd* pParent /*=NULL*/) : CDialog(CTestClientDlg::IDD, pParent) { ... createSocket(); }void CTestClientDlg::createSocket() { OutputDebugString(L"start socket\n"); WSADATA wsaData; struct addrinfo *result = NULL, *ptr = NULL, hints; int iResult; // Initialize Winsock iResult = WSAStartup(MAKEWORD(2, 2), &wsaData); if (iResult != 0) { printf("WSAStartup failed with error: %d\n", iResult); OutputDebugString(L"WSAStartup failed\n"); } ZeroMemory(&hints, sizeof(hints)); hints.ai_family = AF_UNSPEC; hints.ai_socktype = SOCK_STREAM; hints.ai_protocol = IPPROTO_TCP; // Resolve the server address and port iResult = getaddrinfo("localhost", "6003", &hints, &result); if (iResult != 0) { OutputDebugString(L"getaddrinfo failed\n"); WSACleanup(); } // Attempt to connect to an address until one succeeds for (ptr = result; ptr != NULL;ptr = ptr->ai_next) { // Create a SOCKET for connecting to server ConnectSocket = socket(ptr->ai_family, ptr->ai_socktype, ptr->ai_protocol); if (ConnectSocket == INVALID_SOCKET) { printf("socket failed with error: %ld\n", WSAGetLastError()); OutputDebugString(L"socket failed\n"); WSACleanup(); } // Connect to server. iResult = connect(ConnectSocket, ptr->ai_addr, (int)ptr->ai_addrlen); if (iResult == SOCKET_ERROR) { closesocket(ConnectSocket); ConnectSocket = INVALID_SOCKET; continue; } break; } freeaddrinfo(result); OutputDebugString(L"connection\n"); if (ConnectSocket == INVALID_SOCKET) { printf("Unable to connect to server!\n"); OutputDebugString(L"connection failed\n"); WSACleanup(); }send the data each time you receive it
std::ostringstream ss;
for (int i = 0; i < 2; i++)
		{
				int iSel = m_cbAction[i].GetCurSel();
				int index = m_cbAction[i].GetItemData(iSel);
				CString strText;
				strText.Format(_T("%.2f"), g_aActionStates[index].nLast);
				m_editSignals[i].SetWindowText(strText);
				const char* text_start = "start";

                               // wait for unity to be ready to receive
				if (state == 0)
				{
					// wait for start
					char buffer[5];
					recv(ConnectSocket, buffer, sizeof(buffer), 0);

					u_long iMode = 1;

					ioctlsocket(ConnectSocket, FIONBIO, &iMode);

					if (std::equal(text_start, text_start + 5, buffer))
					{
						OutputDebugString(L"ok started\n");
						state = 1;
						// pass socket to non blocking mode
						u_long iMode = 1;
						begin_time = clock();

						ioctlsocket(ConnectSocket, FIONBIO, &iMode);
					}
					state = 1;

				}
                               // save the data into a string
				ss << ";" << g_aActionStates[index].nLast;

                                //and display it on the application
				strText.Format(_T("%.2f"), g_aActionFormats[index].nScaleMin);
				m_editMin[i].SetWindowText(strText);

				strText.Format(_T("%.2f"), g_aActionFormats[index].nScaleMax);
				m_editMax[i].SetWindowText(strText);

				strText.Format(_T("%.2f"), g_aActionFormats[index].nThreshold1);
				m_editThresh1[i].SetWindowText(strText);

				strText.Format(_T("%.2f"), g_aActionFormats[index].nThreshold2);
				m_editThresh2[i].SetWindowText(strText);

		}
               // because we need a constant size, if the size is not big enough , add 0s ( the size is usualy constant , put the number you need here according to your data )
		std::string s(ss.str());
		int toAdd = 18 - s.size();
		while (toAdd>0)
		{
			ss << '0';
			toAdd--;
		}
		s = ss.str();
                // send to unity the string containing both GSR and BVP datas
		sendSocket(s, 18);
// function to send data to unity void CTestClientDlg::sendSocket(std::string msg, int size) { // to display on the screen what you are sending std::ostringstream ss; ss << msg << '\n'; std::string s(ss.str()); std::wstring To(s.begin(), s.end()); LPCWSTR Last = To.c_str(); OutputDebugString(Last); // to actualy send to unity send(ConnectSocket, &msg[0u], size, 0); } -
7Step 7
C# server in Unity
now you need to make the communication in unity
Create a socket_manager empty object with the associated socket_manager following code :
using UnityEngine;
using UnityEngine.UI;
using System.Collections;
using System.Collections.Generic;
using System.Linq;
using System;
using System.IO;
using System.Net.Sockets;
using System.Net;
using System.Text;
using System.Diagnostics;
using System.Threading;

public class socket_manager : MonoBehaviour
{
    public Socket sock;

    // Use this for initialization
    void Start()
    {
        TcpListener listener= new TcpListener(6003);
        listener.Start();
        sock = listener.AcceptSocket();

        // make the script permanent
        DontDestroyOnLoad(this);
    }

   public String getBioData()
    {
        try
        {
            Stream s = new NetworkStream(sock);
            StreamReader sr = new StreamReader(s);

            string msg = "";

            for (int j = 0; j < 18; j++)
            {
                msg += (char)sr.Read();
            }
            print(msg);

            return (msg);
        }
        catch (Exception )
        {
            return (";0;0");
        }
    }

   // to send socket from unity to visual studio application
    public void sendSocket( string msg, int size)
    {
        Stream s = new NetworkStream(sock);
        StreamReader sr = new StreamReader(s);

        s.Write(Encoding.ASCII.GetBytes(msg), 0, size);
        s.Flush();
        print("sended");
    }
}
Because socket_manager is a premanent script you can use it in other scenes. Once you want to receive data simply call
socket_manager socketManager = socket.GetComponent<socket_manager>(); socketManager.sendSocket("start", 5); -
8Step 8
You need to open applications in this order:
- open biograph
- run unity program( it will be freezed until it connects to biograph) , be sure you saved your work before, if anything goes wrong you might have to kill unity application
- open visual studio application ( at this point, unity should have unfreezed)
- click play on biograph
Live Biograph unity communication
This project tend to explain how to use biodata using biograph Inifnity flexComp from thought technology in Unity in live


Discussions
Become a Hackaday.io Member
Create an account to leave a comment. Already have an account? Log In.
It is important to know that the connection instrument creation does not update if you add a channel graph AFTER you created the connection instrument. You must delete it and recreate it .
Are you sure? yes | no