Dimitar
-
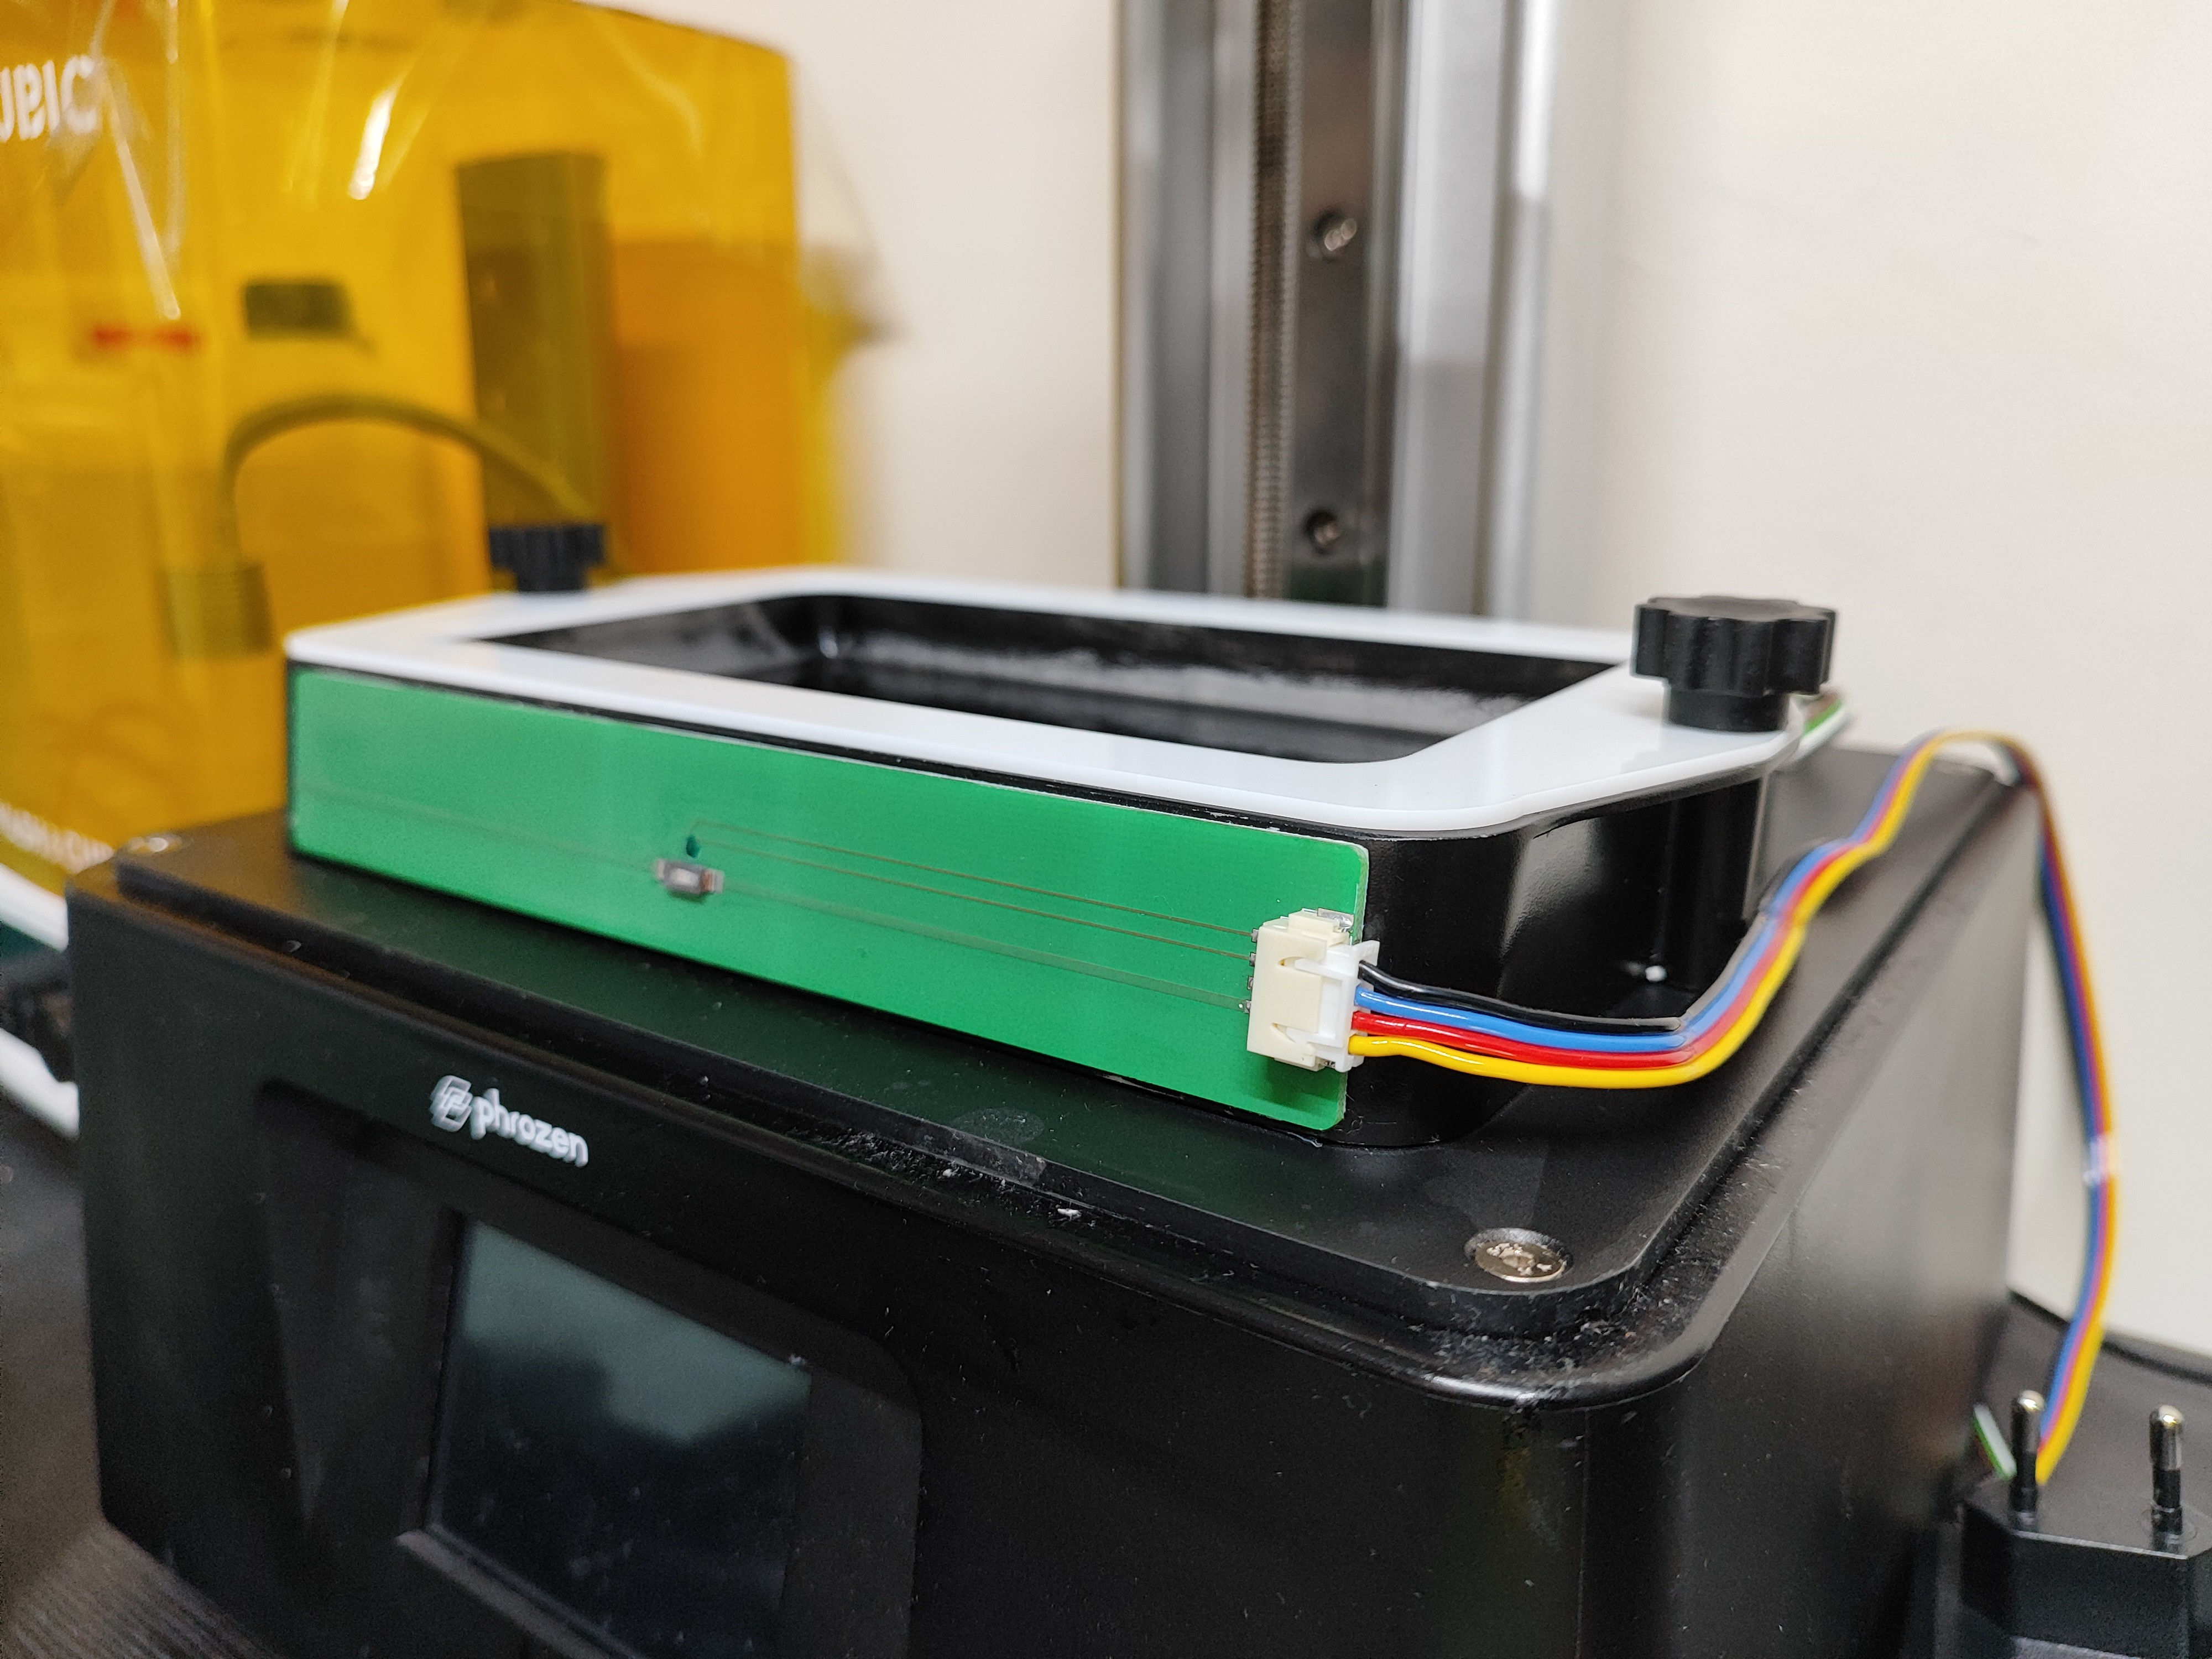
New cable arrangement.
03/16/2026 at 10:01 • 0 comments![]()
The heater have new style of cables. Now just one connector and we have flat cable for better routing.
-
New features
03/03/2026 at 19:35 • 0 comments -
First serries production
03/02/2026 at 14:23 • 0 commentsHello all,
![]()
The first serries production of the heater is done! Thanks to everyone who wanted one.
If you need you resin to be nice a toasty, drop me a massage so i can include you in the next batch!
Cheers,
M -
Code and AI
02/19/2026 at 22:35 • 0 commentsHello all.
For this project, I decided to generate as much of the code as possible using AI. The project is still ongoing, however wanted to share some thoughts.
One of the most widely discussed issues with AI systems is hallucination. I prefer to think of it as a mirage. The AI presents a clear solution — but you can never reach it.
For now, this is mostly an annoyance. However, if developers become overly reliant on AI, critical thinking will inevitably erode.
Another observation is that AI agents often don't like their own code when asked to review it. Repeatedly, I’ve requested self-review, and the system almost always identifies issues.
You would expect this “super intelligence” to have everything nailed down the first time. But that’s not the case.
We’re in an uncanny valley of code generation. At first glance it looks great, but once you look closer, it’s not the case.
There’s no doubt these systems will improve. But at this stage, caution is necessary.
Large amounts of code can be generated instantly. The looser the prompt, the messier the output.
If you ask a human engineer to “build a web server,” his or her response will likely be a series of questions. An AI agent will happily generate thousands of lines of code.
You end up with a large body of code that you now have to understand. The real issue is that you don’t know what you don’t know. So what do you keep, and what do you throw away?
AI systems are remarkably accommodating. Late at night, while working on the project, I mistakenly listed the wrong modules to modify. The error was obvious yet the AI proceeded without hesitation.
That raises a simple question: if it follows obvious mistakes so readily, how many subtle ones go unnoticed?
AI does not push back. As a chauffeur, it would happily drive you off a cliff if asked.
Using AI to generate code can quickly accumulate technical debt. This is especially true in embedded programming, where you have to deal with the messiness of the real world.
Companies don’t publish their production firmware. AI models, I assume, are largely trained on open-source repositories and hobbyist projects. While many of these are excellent, most are not.
In embedded environments, code needs to be lean, predictable, and hardware-aware. AI-generated code resembles more something written for desktop or web applications.
There’s a phrase we use: “It goes without saying.” For AI, nothing goes anywhere unless you say it.
AI systems are not proactive. They don’t anticipate unspoken constraints. That limitation exists for safety reasons — we don’t want AI making unchecked decisions.
But humanity’s most useful tools have always been the most dangerous ones.
Humans learn best by doing — and by getting things wrong. Mistakes are part of mastery.
When AI generates the majority of the work, we risk losing some of that edge. What happens if an entire generation grows up relying on tools like ChatGPT?
The AI itself is powerful. But power in inexperienced hands rarely leads to good outcomes.
As AI tools improve, fewer people may feel compelled to pursue technical careers. If that trend continues, we could face a shortage of highly skilled professionals capable of handling complex failures, security breaches, or serious crises.
When AI-powered systems misbehave — and they inevitably will — who will pick up the pieces?
Replacing large portions of the workforce with AI solutions introduces additional risks.
Institutional knowledge does not disappear when employees leave. Former employees still retain a deep understanding of internal systems. AI does not eliminate human factors such as insider threats or social engineering. AI might be intelligent, but humans are cunning.
Moreover, centralized AI-dependent infrastructure introduces systemic vulnerabilities. What happens during a major power outage, a solar storm, a natural disaster, or a large-scale infrastructure disruption? Who remembers notpetya, when global shipment stopped?
There is also tension between AI providers and technology companies. AI developers invest enormous resources into training proprietary models. Meanwhile, businesses must protect their own intellectual property.
Locally hosted models are useless. In a way, nobody wants to be the underdog.
We are widely acknowledged to be in a global race toward more advanced AI systems. As capabilities grow, governments may impose restrictions on access, especially around dual-use concerns.
Companies building critical systems on external AI infrastructure should at least consider the possibility of regulatory limits or bans.
These reflections are not an argument against AI-assisted development. On the contrary, AI is a great force multiplier. It accelerates prototyping, testing, and enables iteration speeds that would have been unrealistic just a few years ago.
However, I would not discard my programming textbooks just yet.
The AI revolution is only beginning. Rather than replacing professionals, it may ultimately increase the demand for experienced engineers — especially in a time of crisis.
Cheers,
M.
-
Feature list
12/22/2025 at 12:55 • 0 comments![]()
Hello all,
At the moment, I’m quite happy with the hardware. The main focus now is shifting to the software side of the project. Below is a short feature list covering both existing and planned functionality for the heater.
---------- more ----------Current features
-
Pre-heat – You can set a pre-heat cycle of up to 30 minutes. During this time, the heater is set to 55 °C, which helps bring the vat up to temperature more quickly.
-
Timer cut-off – If you know how long your print will take (for example, from your slicer), you can set a timer and the device will automatically turn off when the time is up.
-
Auto screen rotation – The device can be used either vertically or horizontally, and the screen will automatically adjust its orientation.
-
Additional settings – Screen brightness, sleep timer, sound on/off, Wi-Fi on/off, and more.
Planned / TBD features
-
Web app – The web interface will look just like the on-device UI. When Wi-Fi is enabled, you’ll be able to connect from a phone or PC and control the heater remotely.
-
MQTT support for Home Assistant – This will allow easy integration with Home Assistant for the more tech-savvy users.
-
Chime and splash screen – Just because I can… and because it looks cool.
-
Power recovery – If power is lost, the heater will resume from where it left off once power is restored.
-
Update utilities – Implementing A/B slot updates for safer and more reliable firmware upgrades.
-
Heater detection – If no heater is connected or a heater fails, the device should detect this and display a warning. Currently, it will “work” even with no heater attached.
-
Power limiting for under-rated USB-PD chargers – USB-PD adds an extra layer of safety, as it shuts down if too much current is drawn. However, users with chargers limited to 20 V @ 1 A may find the heater doesn’t turn on at all. We need to handle this more gracefully by providing feedback to the user and limiting power appropriately so the heater can still operate.
Cheers M.
-
-
MITOSHI VHS-1
12/16/2025 at 21:00 • 0 commentsHello all,
I haven’t been working on the vat heater alone— Oliver from Miniset studio has been helping me out. He is the first person besides me to have one, and he has provided valuable feedback on features as well as run various tests.
On top of that, he created this amazing design, which you can download here. It’s called VHS1, which stands for Vat Heating System 1. I’m really grateful for his contributions to the project and for this fantastic design.
Here are some words from him:
"Hi, I'm Oliver and I've been a tester for the device for the last few weeks. In some respects an ideal tester: I am an avid user of 3D printers, live in an area where it is much too cold in winter and have no idea about electronics. So I had doubts at first whether I could assemble such a kit at all - completely unfounded, since the assembly was limited to a few screws and plugs into sockets. Fiddly, but not complicated. And I had warm resin, great! It's one of those devices that you don't want to miss once you get used to it. I was amazed at how much better the prints become. I use a certain resin (Ameralabs XVN-50), which has always created layer lines for me before - very annoying. With this heater I now have velvety surfaces - if only I had known that earlier!
Probably my most valuable feedback was the design of the housing: originally the device was designed exclusively for operation next to the printer, but I wanted it under the hood, attached to the column. That's how I designed the current concept of the VHS-1: usable in two orientations (horizontal or vertical) with a display that reacts to the orientation. Mitko immediately loved this approach... After a few iterations, we are now both satisfied with the design: the case is functional, sturdy, easy to assemble and take apart, and has a charming retro chic feel."![]() ---------- more ----------
---------- more ----------![]()
![]()
Cheers,
M
-
Lets talk PCBs
12/05/2025 at 16:12 • 0 commentsHello all,
When I started this hobby, there were no affordable PCB fabrication services. We had to make PCBs ourselves with toner transfer and Ferric Chloride. Later, some people started using CNC routers to mill their own boards. All of these processes work, but they’re slow, messy, and far from ideal.
The real game-changer for makers was the rise of low-cost PCB manufacturers. For just a few dollars, you can now get professionally made boards with solder mask and silkscreen.
Of course, not all fabs are created equal.
This post is sponsored by PCBWay, but as you’ll see, I’m not holding back on my opinions.Comparison: PCBWay, JLCPCB, AISLER
Here’s how I personally rank the “big three” PCB manufacturers:
Category PCBWay JLCPCB AISLER Quality Good Satisfactory Excellent Speed Excellent Excellent Good Capabilities Excellent Good Good Price Good Excellent Good Packing & Postage Excellent Excellent Good Customer Support Excellent Excellent Satisfactory Ease of Use Good Good Excellent ---------- more ----------AISLER Quality
AISLER produces what I consider the highest quality boards. Their default finish for 4-layer PCBs is ENIG (gold). The solder mask and silkscreen are extremely durable.
For my first revision, this was essential—I made plenty of mistakes, and the board went through dozens of heat cycles on a hot plate, soldering iron, and hot-air station. Nothing lifted, discolored, or chipped. Perfect for SMD parts with small footprints or BGAs. ENIG makes life a lot easier.
One downside: AISLER’s penalization and CNC routing leave noticeable mouse bites. You need to manually clean them up, which is annoying for front panels or if you’re making a small production run.
PCBWay Quality
PCBWay’s default finish is leaded HASL. Nothing wrong with that, but it’s not suitable for BGAs.
Their solder mask is good, the silkscreen probably the best among the three, but both can chip if you apply heavy rework heat. Their routing, however, is excellent: smooth, clean edges with no post-processing needed.JLCPCB Quality
JLCPCB also defaults to leaded HASL. Their solder mask is functional but thinner and less consistent. In some spots, I can scratch it with a fingernail. I tend to use JLCPCB for simple or low-component-count projects.
To be clear: all three fabs can produce higher-grade boards, but I’m comparing their lowest-tier options, which most hobbyists use.
Speed
Chinese fabs are lightning fast. PCBWay and JLCPCB often ship within the same week I place the order.
AISLER is slower. I’m not sure why—they may have different internal processes—but I’ve had boards sit a full week after fabrication before shipping.
Capabilities
AISLER has a limited set of options—fewer board thicknesses and fewer advanced features—but what they do offer is very high quality. They have multiple solder mask colors, but charging 470 EUR for color options is a joke.
PCBWay is by far the most versatile.
14 different thicknesses, 13 copper weights, every solder mask color you can imagine, and even color printing on the PCB—all without major price hikes.JLCPCB comes in a close second: lots of options at very reasonable prices.
Price
If you’re a maker prototyping designs or learning hardware, JLCPCB is the most budget-friendly. They constantly run coupons and promotions.
PCBWay is a close second.
AISLER is the most expensive. At first glance, their pricing looks comparable, but you receive three boards instead of five (the standard quantity from the Chinese fabs), so the cost per board is higher.
Packing and Postage
JLCPCB is unbeatable here. I don’t know how they do it, but even using China Post, they somehow pre-pay taxes and import fees. The boards just show up at my doorstep. Magic.
AISLER is second. Being in Europe means no customs, and they now offer tracking. Unfortunately, they use Deutsche Post, which is slow across the EU. Faster shipping costs significantly more.
PCBWay comes last. Even though the boards themselves were free for me (this post is sponsored), the customs fees were higher than what I’d pay ordering from JLCPCB. When something arrives in the EU from China, you must pay import tax + VAT + a customs handling fee, which comes to roughly 35 EUR. PCBWay could really take a page from JLCPCB’s logistics playbook.Update: it turns out this is not the case! The options is there and it is called DHL(IOSS) for skipping this 35 EURO representation tax. There is also Global Direct Shipping which is cheap and includes the taxes.
Customer Support
Here, China wins again. PCBWay and JLCPCB have extremely responsive support. If there are questions, issues, or clarifications needed, they contact you immediately.
AISLER feels understaffed. Emails often go unanswered. The last time I needed help, I had to leave a negative Google review before I got a response—not ideal.
Ease of Use
I love AISLER’s website. It’s clean, fast, and well-organized. You don’t need to export gerbers manually—just upload your PCB design file and you’re done.
PCBWay and JLCPCB both work fine, but their interfaces feel more cluttered and require more manual steps.
Final Thoughts
This is my honest experience after using all three services. Each has strengths and weaknesses, and the real trick is choosing the right fab for the right job.
Cheers,
M -
Thermal interface.
10/26/2025 at 17:10 • 0 commentsHi,
I was thinking how to glue the heaters to the vat. Also the vat is hollow inside. This was a concern for people, because air is bad conductor of heat.
I found this glue AS1803. On paper it has pretty good thermal characteristics, which one is to expect for 85 euros. I used to fill the gaps and attached the heaters to the vat.
![]()
I ran a test, with the hollow vat + high temp double sided tape / fancy glue and filled gaps. This is the result:
![]()
I recorded the temperature of the heaters and the temperatures of the inside of the vat. In both cases the vat reached 51° the only difference is that it reached it one minute faster.
Is the tape the best - no. Does it make sense to spend 80 euro for one minute improvement, also no.
The tape is way easier and cleaner to use, the only tools you need is an exacto knife.
In conclusion: I am relived that this expensive glue did not do a much of a difference and in general that the hollow vat is not a concern.
Cheers,M
-
Vat cooldown
10/11/2025 at 10:00 • 0 commentsNext simulation I wanted to run is how fast does the vat loose heat.
There is a number of assumption. One is that the whole vat is the same temp. In practice this is never the case. So the question what is the vat temperature depends where you measure. I decided that I will measure the temperature on the inside of the long side of the vat. In a sense there the temperature should be highest because the heater is located on the outside of the same wall. Next assumption is that the vat is empty. And the third one is we will test it a single lumped thermal mass.
Since I already have a 3D model of the vat I can get the volume, and the surface of the vat. I can also measure the weight of it.
![]()
Again we are pretty close to the real deal. This gives me a starting point for another experiment. The walls of the vat are empty which is terrible for thermal conductivity. I plan to fill the gaps with AS1803 which is a great thermal conductivity and this will double as glue for the heaters as well. Will it make such a big difference to justify the price?
![]()
Cheers!
M.
-
Simulation time.
10/08/2025 at 15:13 • 0 commentsAfter the first use of the heater in a real world environment, for a thirteen hour print at 12° C, something was clear. Just controlling the temperature of the PCB heaters is not enough. Two things became apparent. First one is that the PCB heaters will come up to temperature before the resin even has a chance to worm up. The second is that if we run the heaters up to 35° it will take for ever to heat the hole vat.
We need to run the heaters at 60° in the beginning (this is the maximum that I have set for safety) to warm up the vat as quickly as possible. After set amount of time switch to mode to maintain the temperature. The question is what is this amount of time?
Now can we just add a user defined timer to run the heater on max power before it goes to temperature keeping mode. The answer is yes, but is any fun - no.
We need to simulate the vat + resin combo how they heat up and how much heat they loose to the environment. How much heat can the heaters themselves produce. And the last major player is the interface between the heaters and vat. We do have a sensor for ambient temperature and with this info we can make a formula that will give us the amount of time we need to run the heaters at 60° to reach the user set temp. We have a few assumption, the vat is full and we have not run the heater before.
I already modeled the heater using GNU Octave. I also made a test using a real heater and logged its temperature.
![]()
Math works... who would know. I think this is quite nice. Now I need to model the rest and work out the formula.
Cheers,
M
Vat Heater for Resin 3D Printers
Keep your resin at the right temperature with this USB-PD powered vat heater featuring ESP32 control, dual channels, and fan support.