 Zduka
RCKid started as a pile of spare parts that I wanted to convert into a controller for some old Lego motors I had lying around so that I can build RC cars for my kids. It was supposed to be very primitive gamepad-like device. And while that ship sailed a long time ago, it's how RC sneaked into the name.
Over the years there have been some attempts to make it happen, I have (of course:) bought a few components for it )(H bridge modules, converters, etc.), designed a simple API for the wireless protocol and obsessed about form factors, charging and power envelopes. At one point I was particularly proud of myself when I had a breadboard on with a puny ATTiny3216 that controlled 4 programmable IO ports (servo, rgb, analog, digital) and 2 motors, which in their connector selected between 9V and 5V power supply.
But a few weeks ago, I started designing the latest iteration. Instead the ATTiny (which I now consider very expensive) it uses the Puya I am simultaneously trying to bring to life. I also took the BOM optimization ideas that I learned recently to my heart and I have redesigned the controller brick entirely to keep the costs really down. Here is what it is supposed to do, as well as a picture of the designed board:
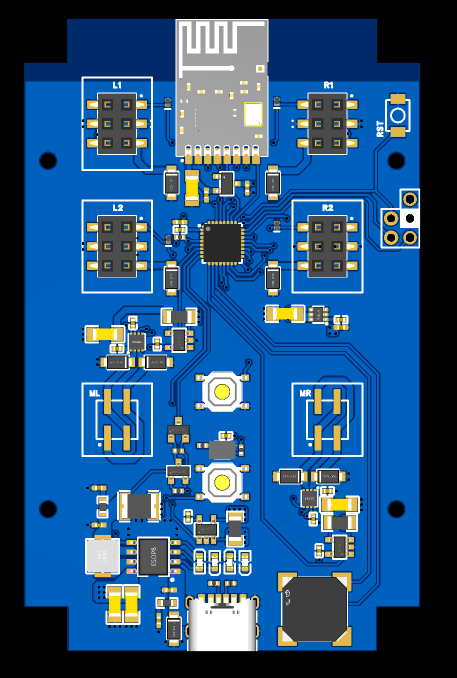
- runs off 18650 li-ion cell, or 2 in parallel. This means a *lot* simpler charging
- I am using IP5306, which is a Chinese chip designed for power banks. It integrates charger (2A max) and a boost converter to 5V capable of 2.1A output into a single chip and single external coil. It has many drawbacks (can't power the device while charging, cannot be really controlled by the MCU, requires dedicated power button), but is super cheap
- everything runs at 5V, including the motors
- I have kept the 2 motors and 4 GPIO extenders and their reversible connectors made of cheap headers
- onboard is single RGB light for signaling, buzzer for sounds, NRF24L01P+ Si clone for comms and a second button for the MCU for advanced functions
- instead of INA219 and I2C I am using much cheaper INA180 and the ADC on the MCU to determine the battery level, total power envelope and left & right motor current to detect stalls. Motors and GPIO pins can be powered off by the MCU when needed
I have an idea of a really simple and robust assembly of this (with the li-ion cells on the bottom part of the board). And overall, I think I have made the right calls in terms of usability vs price ratio. That said, at this point the board design is wishful thinking since I haven't yet brought the Puya chip - but it is also a lasting record of how well I read the datasheets, i.e. how much the design changes before the ordering.
If all goes well, I would like to have this ready for Xmas delivery:)
Discussions
Become a Hackaday.io Member
Create an account to leave a comment. Already have an account? Log In.