Close
0%
0%

Tutorial: Cloth-detecting Shirt Folding Robot

Cardboard servo-controlled Arduino robot that uses an ultrasonic sensor error to only activate in front of cloth

Similar projects worth following
0 followers
I found that when an ultrasonic sensor goes in front of porous materials like cloth, the value returns as very high. So I singled out that value and made a robot that detects shirts and folds them. This was a fun project to make!

  • 6 × SG90 Mini Servo motor
  • 4 × MG90 Servo motor
  • 1 × Arduino

  • 1
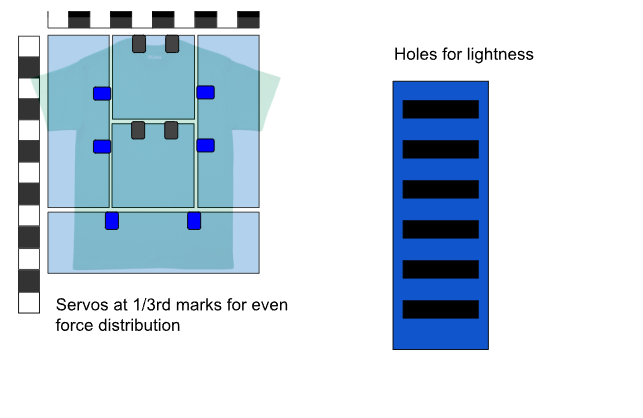
    Cut cardboard flaps

    Take one of your shirts and make folding lines where you would usually fold. Use those to find the dimensions of your cardboard flaps. 

  • 2
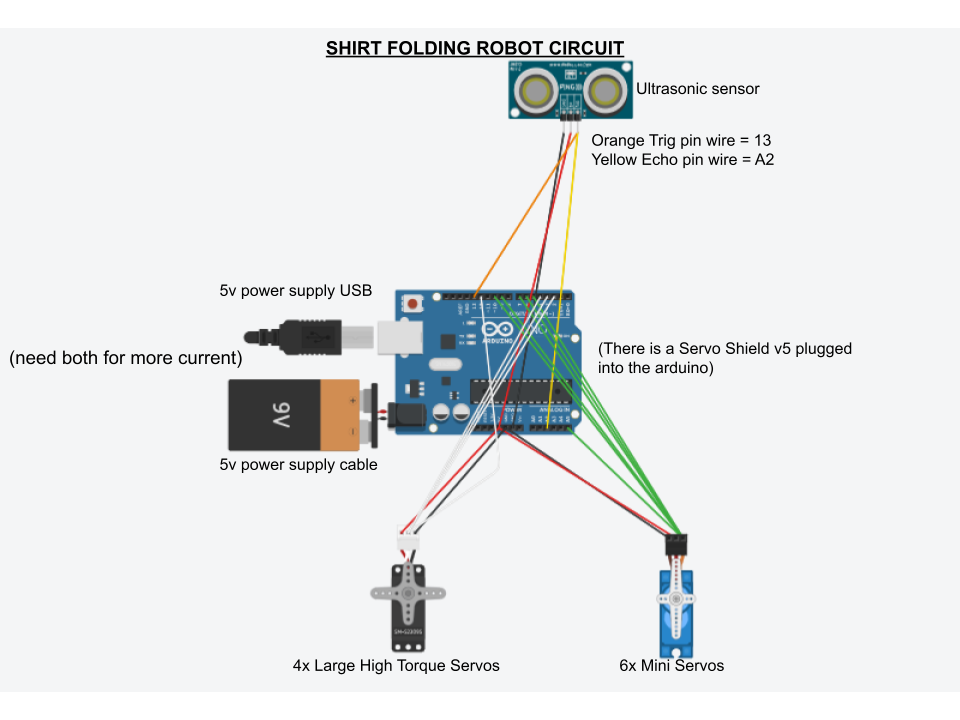
    Wire servos and ultrasonic sensor to an arduino using a breadboard or servo shield.

  • 3
    Initialize servos and code your own sequence to fold your clothes (whichever order works best for you). For the ultrasonic sensor code, using Serial.print() to find the value your ultrasonic sensor spikes at when pointed at fabric. Once you have that, set
    #include <Servo.h>
    Servo Lo;
    Servo Lt;
    Servo Ro;
    Servo Rt;
    Servo Bo;
    Servo Bt;
    Servo Mo;
    Servo Mt;
    Servo Eo;
    Servo Et;
    
    
    int delay_val = 500;
    int angle = 120;
    int go = 0; 
    char detect = "on"; 
    
    const int trigPin = 13;
    const int echoPin = A2;
    long duration;
    int distance;
    
    void setup() {
      Serial.begin(9600);
      pinMode(trigPin, OUTPUT);
      pinMode(echoPin, INPUT);
      Lo.attach(7);
      Lt.attach(10);
      Eo.attach(12);
      Et.attach(2);
      Mo.attach(4);
      Mt.attach(3);
      Bo.attach(9);
      Bt.attach(A5);
      Ro.attach(5);
      Rt.attach(6);
    
      Bo.write(180);
      Bt.write(180);
      Lo.write(0);
      Lt.write(0);
      Ro.write(0);
      Rt.write(0);
      Mo.write(0);
      Mt.write(0);
      Eo.write(0);
      Et.write(10);
    }
    
    void Routine(){
      if (go > 0) {
        delay(delay_val); 
        Bt.write(180 - angle);
        Bo.write(180 - angle);
        delay(delay_val);
        Bt.write(180);
        Bo.write(180);
        Rt.write(angle);
        Ro.write(angle);
        Lt.write(angle);
        Lo.write(angle);
        delay(delay_val);
        Rt.write(0);
        Ro.write(0);
        Lt.write(0);
        Lo.write(0);
        
        delay(delay_val);
        Mt.write(260);
        Mo.write(260);
        delay(870);
        Mt.write(0);
        Mo.write(0);
        
        delay(400);
        Mt.write(0);
        Mo.write(0);
        Et.write(270);
        Eo.write(270);
        delay(800);
        Et.write(10);
        Eo.write(0);
        delay(3000);
      } 
    }
    
    void loop() {
      Serial.println(distance);
      digitalWrite(trigPin, LOW);
      delayMicroseconds(2);
      digitalWrite(trigPin, HIGH);
      delayMicroseconds(10);
      digitalWrite(trigPin, LOW);
      duration = pulseIn(echoPin, HIGH);
      distance = duration * 0.034 / 2;
      
      if (distance > 300) {
        go = 1;
        Routine();
        go = 0;
      }
    }

View all 3 instructions

Enjoy this project?

Share

Discussions

Similar Projects

Does this project spark your interest?

Become a member to follow this project and never miss any updates