 Rohan Barnwal
Introduction
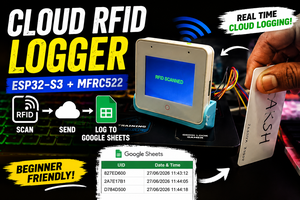
The ESP32-S3-BOX-3 is one of the most feature-packed ESP32 development boards available today. It combines a high-resolution capacitive touchscreen, Wi-Fi, Bluetooth, audio support, and a powerful dual-core ESP32-S3 processor into a single compact development platform.
While many examples demonstrate its display or AI capabilities, there are very few projects showing how to integrate external SPI peripherals like the MFRC522 RFID reader alongside the built-in display.
Since both the display and the RFID reader rely on SPI communication, many beginners assume they cannot be used together. In reality, with proper SPI initialization and chip-select handling, both devices can work seamlessly on the same ESP32-S3.
In this project, we'll build a simple RFID scanner that reads the UID of any RFID card and displays it instantly on the ESP32-S3-BOX-3 touchscreen using the LovyanGFX graphics library.
Why This Project?
The ESP32-S3-BOX-3 is rapidly becoming one of the most popular development boards for embedded GUI applications.
However, one challenge that many developers face is integrating additional SPI peripherals without interfering with the onboard display.
This project demonstrates a clean and reliable method to connect an MFRC522 RFID reader while continuing to use the BOX-3 display normally.
The same approach can later be expanded into projects such as:
- RFID Attendance System
- Smart Door Lock
- NFC Login Terminal
- library Management
- Smart Inventory Tracking
- Industrial Access Control
Circuit Connections
MFRC522 ESP32-S3-BOX-3
SDA GPIO10
SCK GPIO12
MOSI GPIO11
MISO GPIO13
RST GPIO9
VCC 3.3v
GND GND
How It Works
When an RFID card is placed near the MFRC522 module, the reader captures the card's unique identifier (UID).
The ESP32-S3 reads this UID over SPI and immediately displays it on the touchscreen while simultaneously printing it to the Serial Monitor.
Although both the display and RFID reader use SPI communication, they coexist without conflict because each device uses its own chip-select line.
This makes it possible to build much larger touchscreen applications while continuing to use external SPI peripherals.
Programming
The project is written using the Arduino IDE
The following libraries are used:
- LovyanGFX
- MFRC522v2
- SPI
LovyanGFX handles the onboard display while the MFRC522v2 library communicates with the RFID reader.
After initializing both devices, the program continuously waits for a new RFID card. Whenever a card is detected, its UID is converted into a hexadecimal string and displayed on the screen.
Giving Your Project a Professional Finish
Building a working prototype is often only the first step of any hardware project. Whether you're developing an Arduino project, an ESP32 based IoT device, a robotics system, an embedded application, or even a custom PCB, there eventually comes a point where you want the final build to look clean, organized, and professional
While breadboards and exposed wiring are perfect during development, a custom enclosure protects the electronics from accidental damage, improves cable management, makes transportation easier, and gives the project a polished appearance. For engineering exhibitions, hackathons, client demonstrations, YouTube videos, or commercial prototypes, a professionally manufactured enclosure can make a significant difference in both durability and presentation.
Over the past few months, I've ordered several custom 3D printed parts from JUSTWAY for different electronics projects, and the overall experience has been consistently positive. The printed parts arrived well packed with good dimensional accuracy, clean surface quality, and required very little post-processing before assembly.
From Prototype to Production
One thing I particularly like about JUSTWAY is that it isn't limited to only 3D printing. The platform is designed to support the complete product development cycle—from rapid prototyping to low-volume manufacturing...
Read more »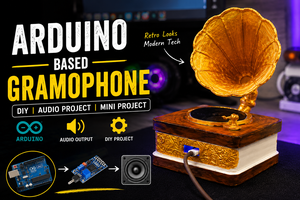
 CiferTech