 Levi
Levi

NES Radar turns a real Nintendo Entertainment System into a live air traffic scope.
Type any airport's four-letter ICAO code on the NES controller, press Start, and the aircraft actually flying near that airport right now appear as moving targets on your TV.
It works for airports worldwide. Point it at your local field and watch the approach traffic line up, or at KLAX and watch it get busy. Watch this quick video demo. Visit the GitHub repository for the latest software (python script and NES rom file)
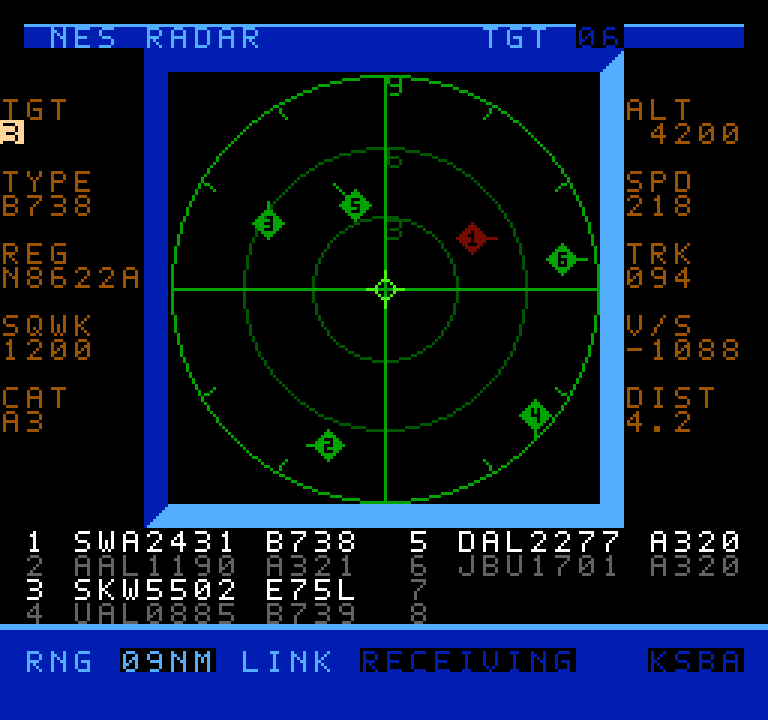
The NES can't reach the Internet, so a small server on your computer fetches live traffic from adsb.fi and streams it down the controller cable. The NES sends your airport choice back up the same cable.
This project is based on c64u-radar, a similar program for the Commodore 64.
What you need
This is a hardware project, not a download-and-play ROM.
- A real NES and a flash cartridge to load the ROM
- A 5 V FTDI USB serial cable, wired to controller port 2 (see below)
- Two 1 kΩ resistors
- A computer to run the server — on a Mac it's a self-contained binary with nothing to install; Windows and Linux run from Python source
- An Internet connection
An FT232R-compatible adapter is what this project is tested against. The server lists every serial device it finds and lets you pick, but other adapters may behave differently, electrically or in timing.
Downloads live on the GitHub Releases page: the ROM, the macOS Universal binary, the Python source archive.
Caution
Connect your vintage NES to your modern computer at your own risk. The authors are not responsible for damage caused by this experimental project.
Get a 5 V TTL cable
Use a 5 V USB-to-TTL serial cable. The recommended reproducible part is the genuine FTDI TTL-232R-5V-WE. Testing has been done with FT232R-compatible adapters at 5 V. Others may work but use at your own risk.
Do not use a 3.3 V adapter. Its 3.3 V TX output is not a reliably guaranteed logic high for every 5 V NES input buffer. A genuine FTDI TTL-232R-3V3 has 5 V-tolerant inputs but it may not drive the NES reliably. The USB ID 0403:6001 identifies the FT232R family; it does not tell you whether a cable is 3.3 V or 5 V.
You can use an old controller cable or purchase a new replacement controller cable or controller extension which can be cut to size.
Connections
With the NES powered off and USB unplugged, connect to controller port 2:
| FTDI pin | NES controller port 2 | Connection |
|---|---|---|
| GND | pin 1 — GND | direct |
| RXD | pin 3 — OUT0/LATCH | **through its own 1 kΩ series resistor** |
| TXD | pin 4 — D0 | **through a separate 1 kΩ series resistor** |
| VCC +5V | — | **not connected; insulate** |
| CTS# | — | not connected; insulate |
| RTS# | — | not connected; insulate |
Important
There are two separate 1 kΩ resistors, one in each signal direction. Do not join RXD and TXD together, and do not connect OUT0 to CTS. Insulate the unused VCC, CTS, and RTS leads individually.
Plug a normal controller into port 1 — that's what you use to enter the airport code.
Full port pinout, viewed looking into the jack on the front of the console:
               .
pin 1 GND  -- |o\
pin 2 CLK  -- |o o\ -- pin 5 +5V
pin 3 OUT0 -- |o o| -- pin 6 D3
pin 4 D0   -- |o o| -- pin 7 D4               '--'
Check your orientation before soldering. The plug's mating face and its wire/solder side are mirrored. Confirm you are counting pins in the direction above — not from the back of the connector. See the NESdev controller port pinout.
Double-check pin continuity. Do not rely on wire color alone. NES controller cables all use different colors. Identify NES-side wires by continuity and pin number, never by color alone. See the NESdev serial cable page.
A correctly built cable measures about 1 kΩ on each signal and about 2 kΩ...
Read more »
 Spawn
Spawn
 Jesse Robinson (beacon)
 danjovic