 Rémi Sarrailh
-
1Step 1
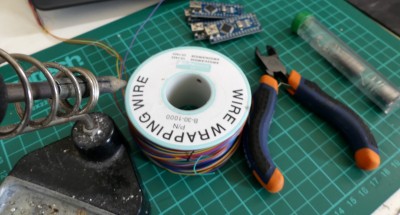
Tools needed
![]()
I use as less tools as possible to build my devices and only use anything that doesn't require a workshop (for the noise or costly equipment).
- Arduino (I recommended arduino nano ch340g clone)
- Wires : 30AWG
- Soldering Iron
- 3D printer
- Removable Adhesive (blu-tack/patafix...) / hot glue.
![]()
All components can be reuse, replace and cases are printed in PLA which is biodegradable.
-
2Step 2
Usage
- Download libreConnect
- Open usb_scanner.exe (or ./usb_scanner)
If you download libreconnect_setup.exe it will silently install arduino nano (ch340g) drivers.
You can find more information on how to use/ build it on https://github.com/madnerdorg/libreconnect/
Usb_scanner will send /info to each serial port at baudrate 115200, and if it received name:port (for ex: leds:42001) it will connect it.
Arguments
-h, --help show this help message and exit --serial SERIAL Serial port --port PORT Websocket port --secure Add SSL --power Add power management (@reboot/@poweroff) --password PASSWORD Password for the websocket --local Websocket will only be available locally --bantime BANTIME Seconds before a ban user is unbanned --retry RETRY Number of retry before ban --baudrate BAUDRATE Baudrate for serial com --keys KEYS folders where SSL certificates are -
3Step 3
HTML/JS Example
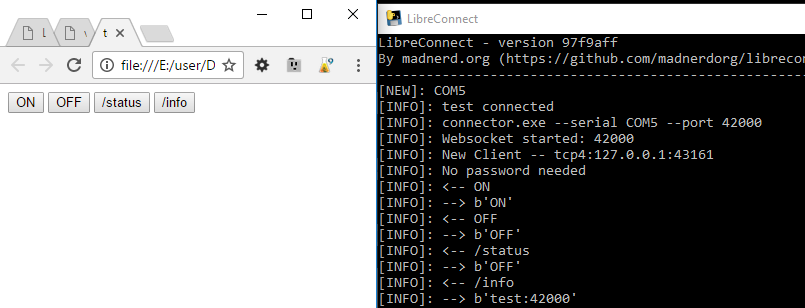
![]() Here is a basic example for the test device that will works without dependencies.
Here is a basic example for the test device that will works without dependencies.<script> /* With reconnecting-websocket.min.js var ws = new ReconnectingWebSocket('ws://localhost:42000'); */ /* Without reconnecting-websocket.min.js */ var ws = new WebSocket('ws://localhost:42000'); ws.debug = true; ws.onopen = connected; ws.onmessage = message_received; ws.onerror = error; ws.onclose = closed; //When your arduino is connected function connected(){ console.log("Connected"); } function error(){ console.log("Connection: error"); } function closed(){ console.log("Connection closed"); } //When an arduino send a message, do this function message_received(event){ console.log(event.data); } </script> <button onclick="ws.send('ON')">ON</button> <button onclick="ws.send('OFF')">OFF</button> <button onclick="ws.send('/status')">/status</button> <button onclick="ws.send('/info')">/info</button>You can find examples at madnerd.org/interface, be curious and look at the source code, and try to use the javascript console to modify its behaviour,
If you don't have an arduino, you can use websocket.org echo server.
var ws = new WebSocket('ws://echo.websocket.org');if you want to use semantic-ui and others useful libraries, download libreinterface and make a copy of blank.html.
-
4Step 4
Nodejs client
You can find an example using leds (optional) and a DHT11 sensor at github.com/madnerdorg/temphum_client.
I used nodejs as you can easily try your concept with a html/js client and then make it a headless nodejs client with few modifications.
I really recommended to use a library to automatically reconnect your devices so you don't have to worry if the device is ready.
I used rwebsocket as it have the same syntax than websocket.Here is a blink example for nodejs.
// We need to import rwebsocket
// Install: npm i rwebsocket -S
WebSocket = require('rwebsocket');

var ws = new WebSocket('ws://localhost:42000');

//You also need to add this line
ws.connect();

ws.debug = true;
ws.onopen = connected;
ws.onmessage = message_received;
ws.onerror = error;
ws.onclose = closed;

//When your arduino is connected
function connected(){
	console.log("Connected");
	ws.send("/status");
}

function error(){
    console.log("Connection: error");
}

function closed(){
    console.log("Connection closed");
}

//When an arduino send a message, do this
function message_received(event){
       console.log(event.data);
       if(event.data == "ON"){
       	ws.send("OFF");
       } else {
       	ws.send("ON");
       }
}
Start at boot
cd /opt/clients/test;/usr/local/bin/node test.js -
5Step 5
Tasker client (Android)
![]()
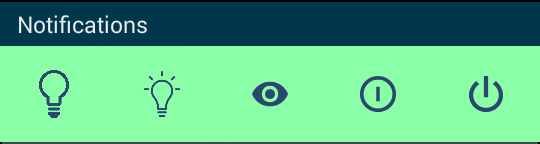
You can control your websocket using tasker.
Tasker automate tasks when something happens on your phone.
You can also use Power Toggles to make buttons on your notification bar.![]()
You can also use autovoice if you want to use Google Now voice recognition.
Here is a script I use to turn on my room with openlight.
- Create a task
- Import your code using Code/Javascript
- Remove auto exit
- Delay set to 1 seconds.
remi_on = "0x00,0x00,0x00,0x00,0x00,0x05,0x00" remi_off = "0x00,0x00,0x00,0x00,0x00,0x06,0x00" code=remi_on openlight = new WebSocket("ws://192.168.0.1:42003"); openlight.onopen = on; function on(){ openlight.send(code); } -
6Step 6
Raspberry Pi Installation
![]()
Just copy libreConnect and start it at boot.
Here is a really basic example:
Install
mkdir /opt/libreconnect
cd /opt/libreconnect
wget https://github.com/madnerdorg/libreconnect/releases/download/97f9aff/libreconnect_rpi.zip
unzip libreconnect_rpi.zip
Start at boot
Modify /etc/rc.local and add before exit 0
cd /opt/libreconnect;./usb_scanner &As it doesn't write anyfile It should works on a read-only sdcard (not tested).
If you want to use it directly in python, follow instructions here : https://github.com/madnerdorg/libreconnect#use-python-version
Make it visible in Windows Network
Samba can be used to make your Raspberry Pi easier to find on Windows.
Install samba and modify /etc/samba/smb.conf
#======================= Global Settings ======================= [global] workgroup = WORKGROUP browseable = yes load printers = no printing = bsd printcap name = /dev/null disable spoolss = yes #======================= Name ========================= #Name of your Raspberry Pi netbios name = TORENAME -
7Step 7
Raspberry Pi Autonomous installation
If you want to use LibreConnect without your home router, the easiest way is to use the hotspot mode of your smartphone.
In /etc/wpa_supplicant/wpa_supplicant.conf
ctrl_interface=DIR=/var/run/wpa_supplicant GROUP=netdev
update_config=1
network={
        ssid="yourhomeSSID"
        psk="yourpassword"
}
network={
        ssid="hotspotSSID"
        psk="hotspotpassword"
}
When you put your phone in hotspot mode, the Raspberry Pi will automatically connect it , if it can't connect to your home network.
You can then access it using html/js files on your phone. -
8Step 8
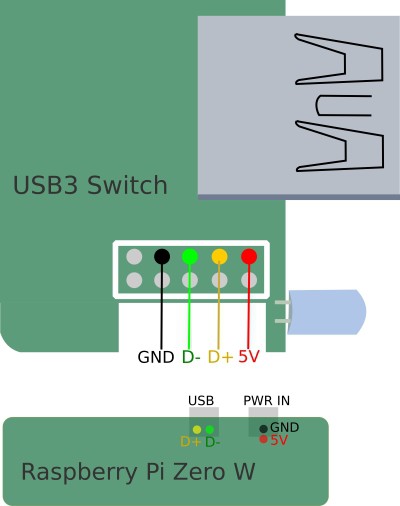
Raspberry Pi Wifi USB Hub
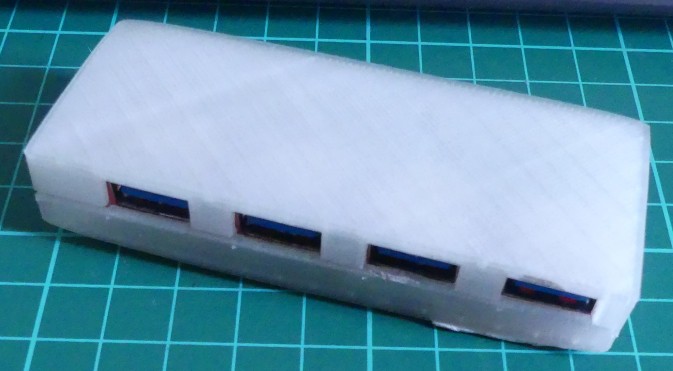
Here is a proof-of-concept of a Raspberry Pi Wifi USB Hub that fits in a pocket.
![]()
You can find stl files (and .blend) at https://github.com/madnerdorg/libreconnect/tree/master/3D/spidersocket
I used an Anker 4-Port Ultra Slim USB3 Hub.
This is an early prototype and the case need to be improve to keep the circuit in place.
Don't forget to insulate the Raspberry Pi from the usb hub.Instructions
- Remove USB Hub casing (there are no screws, just force it open)
- Desolder the usb cable.
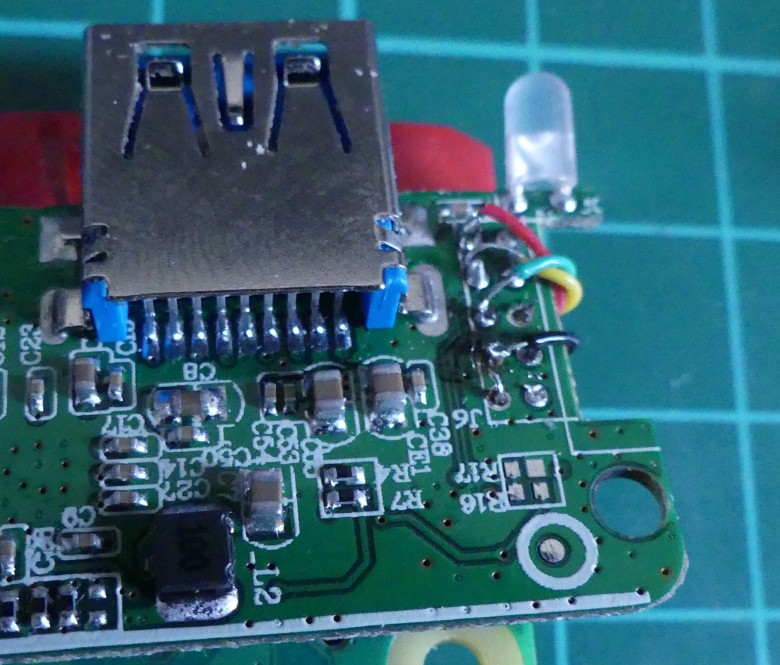
- (The hardest part) : Solder the usb hub with the Raspberry Pi, since we are using USB2 we just need 4 cables.
![]()
![]()
-
9Step 9
Code an interface using a web browser
In the demos, there is a web application to code your own interface.
Go to madnerd.org/interface/editor.html (I recommended that you download the demo to use it locally)
![]() Click on the green icon to edit the code of the page using codemirror:
Click on the green icon to edit the code of the page using codemirror:![]()
The code will be injected inside this div, when you saved it.
<div id="application" class="custom-code"></div>Code is saved inside localStorage in your browser, you can create as much pages as you like, using the red button
![]()
You can also share your code using upload/download, this will download/upload your localStorage (for the current domain) as a json file.
The editor works on smartphone/tablet using firefox/chrome, I recommended using a bluetooth keyboard or a least this key layout (Hacker's keyboard)
You can use the javascript variable isComputer to change how the application behave on a phone or a computer.
Plug and play connected devices
Plug an arduino on any USB port to connect it.

 Here is a basic example for the

 Click on the green icon to edit the code of the page using codemirror:
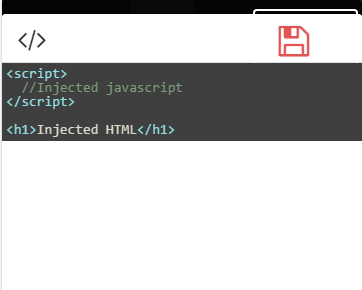

Discussions
Become a Hackaday.io Member
Create an account to leave a comment. Already have an account? Log In.