Dennis
-
Adding a webserver and webpage to Anna2 for an IOT user interface.
06/12/2017 at 01:34 • 0 commentsI have already setup remote desktop to talk to the Raspberry Pi. It’s great for writing code on the Raspberry Pi but is not great for running the code. Trying to display live camera feeds from the RPI on the remote desktop will work for a short time and then lock up.
A webserver and a dynamic webpage should be a better choice, plus the webpage will allow the Anna2 to communicate with any web enable device. The Raspberry Pi makes this very easy.Here’s a nice step-by-step to load both:
https://www.raspberrypi.org/learning/lamp-web-server-with-wordpress/worksheet/I didn’t load Word Press yet. I’m thinking about writing a php enabled webpage from scratch. After loading Apache2 and php, you can navigate to the location of the site in terminal by entering “cd /var/www/html”. Open leafpad to edit the webpage with “sudo nano leafpad index.php” and add the script for the webpage. Save the new webpage as “index.php” and delete the original html site with” sudo rm index.html”.
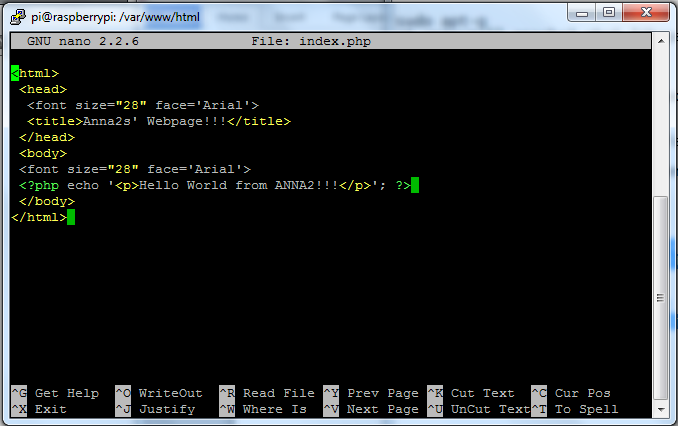
I entered the below script with leafpad and saved it as index.php to test the webpage.
![]()
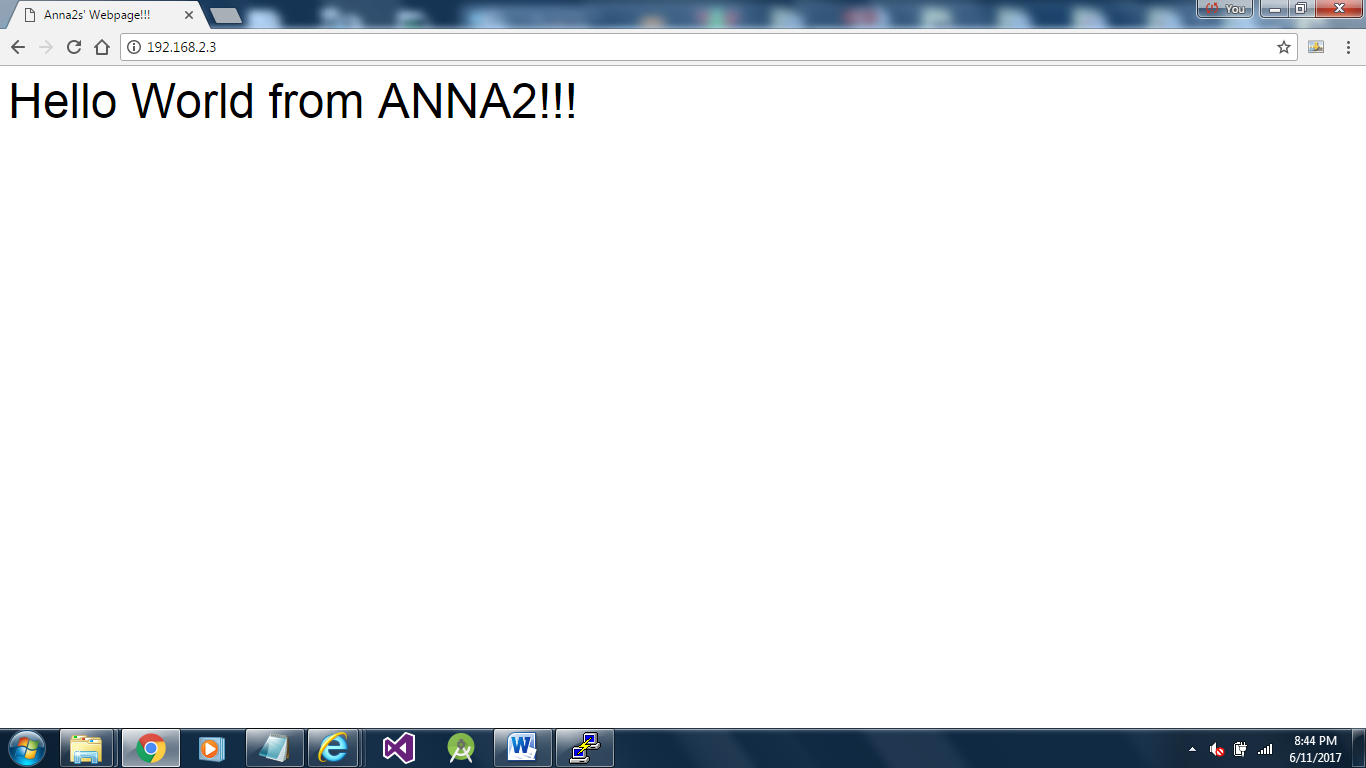
Then I opened a browser and entered the IP address my RPI is connected to on my WIFI router and the results are below. YAY success!!! Anna2 now has a Webpage!!!
![]()
-
Next step with Tensor Flow, Tflearn and Datasets
06/08/2017 at 02:35 • 5 commentsIn order for a machine to harvest a crop it needs to be able to see and identify the crop. After putting together an algorithm to train a model, I found the raspberry Pi remote desk top I’m using doesn’t seem to get along too well with the model. Actually, it crashes during training. I decided it would be better to train the model on my laptop and run the model on the Raspberry pi.
It was obvious python was not designed for a Windows machine and scipy turned out to be very difficult to load. I ended up loading WinPython 3.5.2 which had scipy preinstalled and it was easy to add tensor flow and tflearn after that.
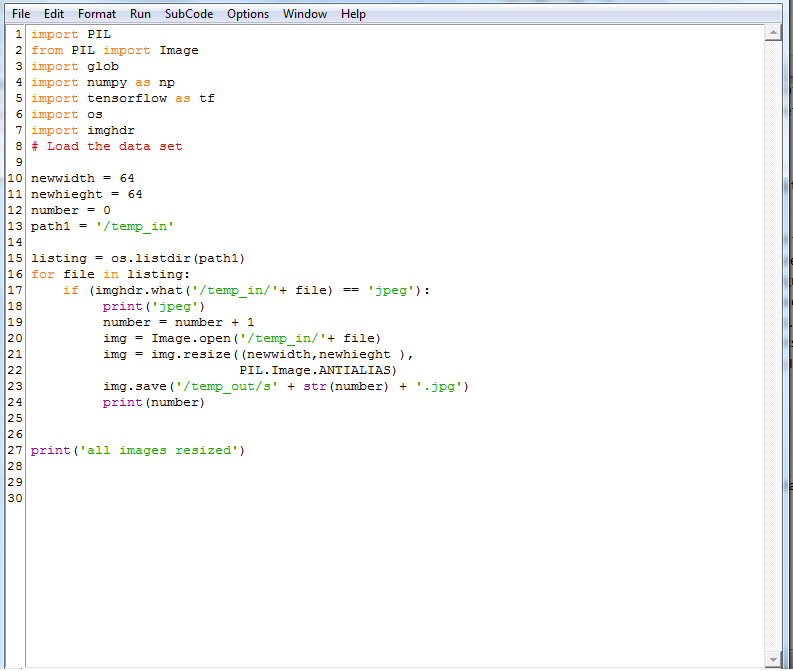
Next, I wanted to be able to use my own dataset. I decided a strawberry would be a good target to start with. It would be very tedious to search and individually save the thousands of images needed to train a model. Luckily, I found a Google app called Fatkun batch download image and it worked great for saving the images. Next, I needed to resize them all to the same size. I started with a model based on cifar-10, with 32x32x3 size images. After testing, I had better luck with a larger image of 64x64x3. Below is a short program I wrote to resize the images for me. It not only resizes but also counts the images as it resizes them so I would know how many images I had. After the strawberry images, I also loaded additional images such as dogs, cats and birds and “non-strawberry” images.![]()
Below is the algorithm I’m using to train the model. It works but still needs some work. I loaded a few strawberry pictures in a test folder to test the model. It does identify most on the images as strawberries. It is a good start.
from __future__ import division, print_function, absolute_import
#from skimage import color, io
#from scipy.misc import imresize
import numpy as np
from sklearn.cross_validation import train_test_split
import os
import scipy
from glob import globimport tflearn
from tflearn.data_utils import shuffle, to_categorical
from tflearn.layers.core import input_data, dropout, fully_connected
from tflearn.layers.conv import conv_2d, max_pool_2d
from tflearn.layers.estimator import regression
from tflearn.data_preprocessing import ImagePreprocessing
from tflearn.data_augmentation import ImageAugmentation
from tflearn.metrics import Accuracy# Load the data set
strawberry_files = sorted(glob('/strawberry_64_sm/*.jpg'))
nonstrawberry_files = sorted(glob('/non_strawberry/*.jpg'))
n_files = len(strawberry_files) + len(nonstrawberry_files)
print(n_files)
size_image = 64
allX = np.zeros((n_files, size_image, size_image, 3), dtype='float64')
ally = np.zeros(n_files)
count = 0
for f in strawberry_files:
try:
img = io.imread(f)
new_img = imresize(img, (size_image, size_image, 3))
allX[count] = np.array(new_img)
ally[count] = 0
count += 1
except:
continue
for f in nonstrawberry_files:
try:
img = io.imread(f)
new_img = imresize(img, (size_image, size_image, 3))
allX[count] = np.array(new_img)
ally[count] = 1
count += 1
except:
continue
######## test-train split
X, X_test, Y, Y_test = train_test_split(allX, ally, test_size=0.1, random_state=42)# encode the Ys
Y = to_categorical(Y, 2)
Y_test = to_categorical(Y_test, 2)
###################################
# Image transformations
#################################### normalisation of images
img_prep = ImagePreprocessing()
img_prep.add_featurewise_zero_center()
img_prep.add_featurewise_stdnorm()# Create extra synthetic training data by flipping & rotating images
img_aug = ImageAugmentation()
img_aug.add_random_flip_leftright()
img_aug.add_random_rotation(max_angle=25.)
###################################
#
###################################
# Define te network architecture:# Input is a 64x64 image and 3 color channels
network = input_data(shape=[None, 64, 64, 3],
data_preprocessing=img_prep,
data_augmentation=img_aug)
print('step one start')
# Step 1: Convolution
network = conv_2d(network, 32, 3, activation='relu')
print('step 2 start')
# Step 2: Max pooling
network = max_pool_2d(network, 2)
print('step 3 start')
# Step 3: Convolution
network = conv_2d(network, 64, 3, activation='relu')
print('step 4 start')
# Step 4: Convolution
network = conv_2d(network, 64, 3, activation='relu')
print('step 5 start')
# Step 5: Max pooling
network = max_pool_2d(network, 2)
print('step 6 start')
# Step 6: Fully-connected 1024 node neural network
network = fully_connected(network, 1024, activation='relu')
print('step 7 start')
# Step 7: Dropout
network = dropout(network, 0.5)
print('step 8 start')
# Step 8: Fully-connected neural network with two outputs
network = fully_connected(network, 2, activation='softmax')
# Tell tflearn how to train the network
acc = Accuracy(name="Accuracy")network = regression(network, optimizer='adam',
loss='categorical_crossentropy',
learning_rate=0.001, metric=acc)
# Training
model = tflearn.DNN(network, checkpoint_path='strawberry.tflearn',
max_checkpoints=3, tensorboard_verbose=0)#Train for 100 epochs
model.fit(X, Y, validation_set=(X_test, Y_test), batch_size=100,
n_epoch=100, run_id='strawberry',snapshot_epoch=False, show_metric=True)
# Save the models weights
model.save('strawberry')
print("Network trained and saved")#Reload the weights to test the model
model.load('./strawberry')
print('strawberry model reloaded')####test model load and test agianst the test images
import glob
for image in glob.glob("/test_image/*.jpg"):
print(image)
img = scipy.ndimage.imread(image, mode="RGB")
img = scipy.misc.imresize(img, (64, 64),
interp="bicubic").astype(np.float32, casting='unsafe')
print(model.predict([img])) -
Googles Tensor flow, Deep Learning Neural Network and Raspberry Pi
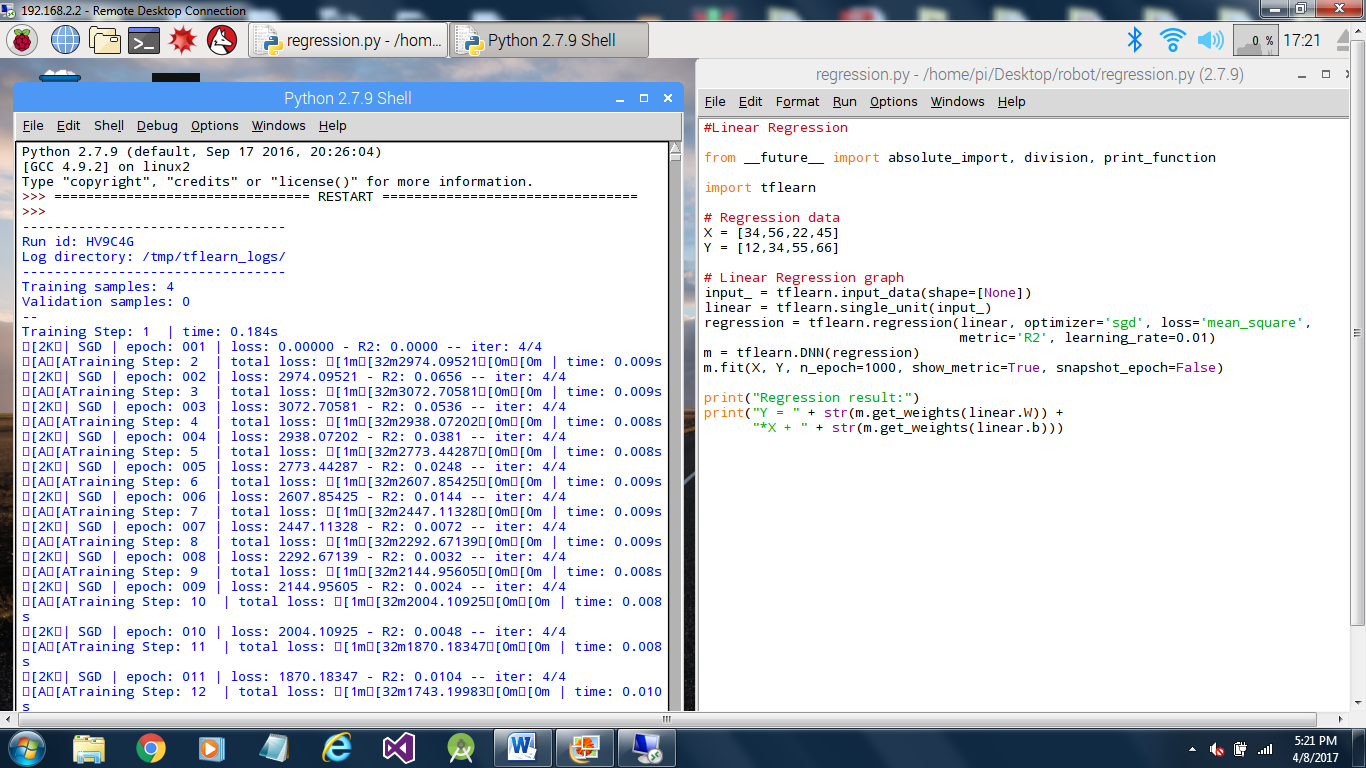
04/08/2017 at 21:29 • 0 commentsI wanted to dive into deep learning networks on this project and decided Google’s Tensorflow would be a place to start with a lot of online resources available. I loaded tensorflow, tflearn and the dependencies. Everything seems to be working. Below, the Raspberry Pi is running a linear regression example.
So far, so good!
![]()
-
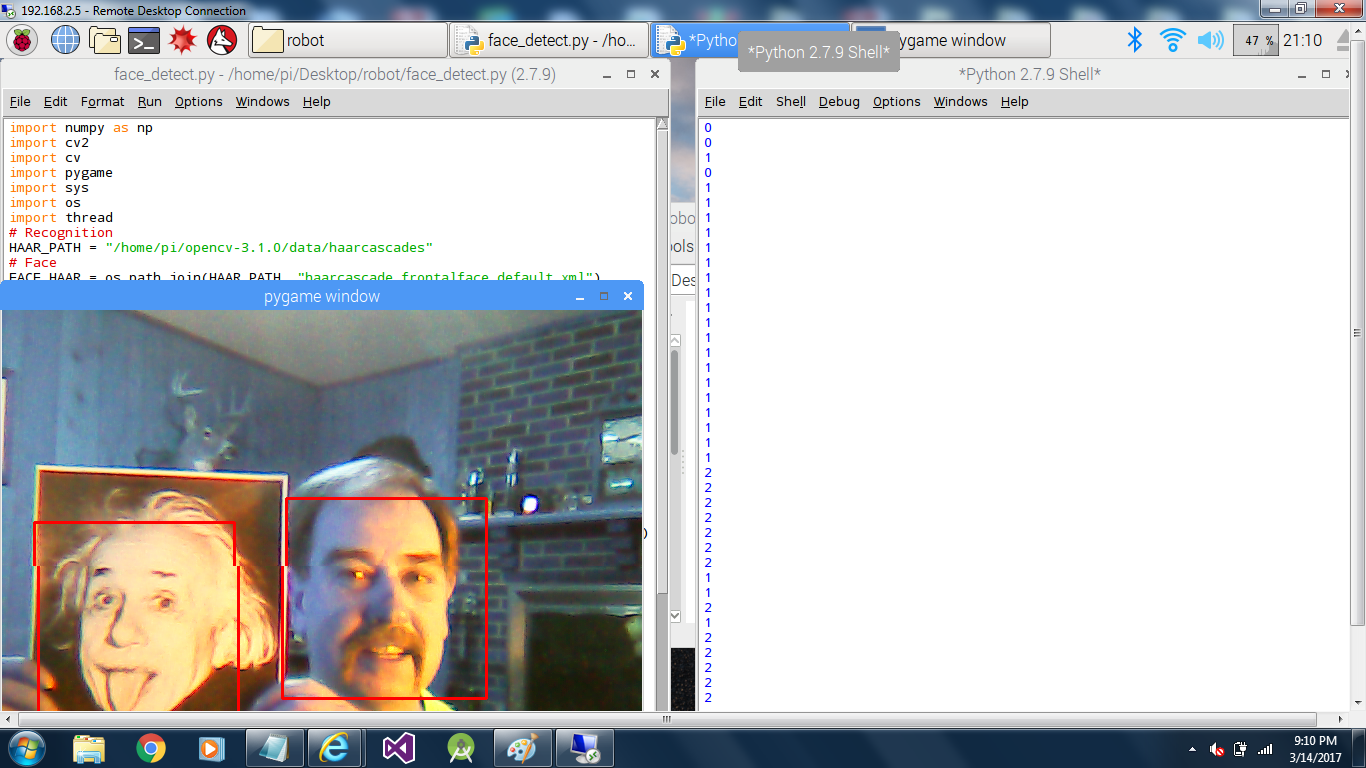
First step--load the first tool OpenCV:
03/31/2017 at 00:35 • 0 commentsI loaded OpenCV on the Raspberry Pi. I didn’t think there was a need to go through too many details with a lot of tutorials on loading OpenCV on Raspberrys online. Below is a short program to test OpenCV. I used pygame to display the results on my remote desktop.
# Set up haarcascades
HAAR_PATH = "/home/pi/opencv-3.1.0/data/haarcascades"
# Face
FACE_HAAR = os.path.join(HAAR_PATH, "haarcascade_frontalface_default.xml")
face_cascade = cv2.CascadeClassifier(FACE_HAAR)#Set up cam and pygame
cam = cv2.VideoCapture(0)
pygame.init()
#create fullscreen display 640x480
screen = pygame.display.set_mode((640,480),0)while(True):
ret, frame = cam.read()
gray = cv2.cvtColor(frame, cv2.COLOR_BGR2GRAY)
gray_small = cv2.resize(gray, (160,120))
faces = face_cascade.detectMultiScale(gray_small, 1.3 , 5)
for (x,y,w,h) in faces:
cv2.rectangle(frame,(x*4,y*4),((x*4) + (w*4),(y*4) + (h*4)),(255,0,0),2)
pg_image = pygame.image.frombuffer(frame.tostring(),(640,480) ,"RGB")
screen.blit(pg_image, (0, 0)) #Load new image on screen
pygame.display.update()
print len(faces)
for event in pygame.event.get():
if event.type == pygame.QUIT:
pygame.quit()
cam.release()
cv2.destroyAllWindows()
sys.exit()I plugged in a USB Camera and ran the program.
Here’s the results…It works!
![]()
Anna2 aka A2 the agbot!
Anna2 is a general purpose agricultural robot with an advanced vision system, OpenCV and deep neural network models.