 Fred Fourie
-
1Build your own TPL5111 PIPECAM!
INTRO
The Pipecamera project has grown into something a bit bigger than what I originally envisioned (Hi-ho scope creep). To accommodate the project growth and the original project constitution I've decided to split the project into two lanes:
- a ready to use Pipecam product with a user interface, field ready and no assembly required, built for long term use.
- a DIY Pipecam, built for rapid, cheap deployment, assembled by the users themselves.
This post will be discussing the core principals and operations of the DIY TPL5111 Pipecam. I'm not able to do a detailed step-by-step guide at this stage, so this post will aim to give you all the information you require to figure it out yourself. I hope that this will give someone enough information to get them going.
I have discussed the housing in the logs before, so this will only deal with the ELECTRONICS and SOFTWARE.
******************************************************************************
ELECTRONICS
Parts and what they do:
Raspberry Pi Zero W (Any Raspberry Pi will do the job)
- The main camera controller
- The actual camera
https://www.adafruit.com/product/3573
- The timer circuit
- Flips a switch ON every X seconds, where X is determined by the resistance set by the onboard pot.
- X is limited from 1s to 2hours
- Recommend that you set it to 47kΩ for ~6min (56kΩ for ~10min) interval. See here.
- The 5V power circuit
- Handles battery charging
- The power source
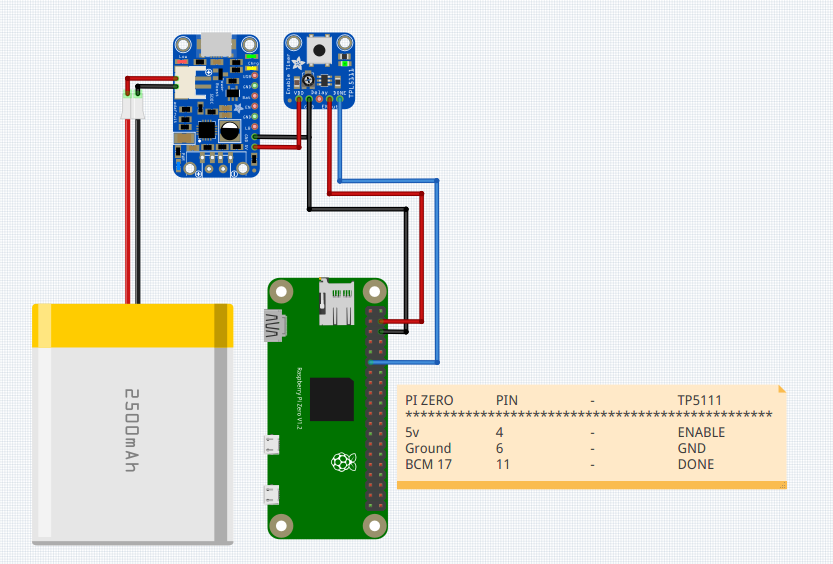
Putting it together:
![]()
******************************************************************************
SOFTWARE
For this, I'm skipping the pi OS install process. I recommend you use RASPBIAN STRETCH LITE and create a default user.
The pi setup:
After the OS setup has been completed, install and set up the camera. Find a pretty good guide here:
https://www.makeuseof.com/tag/set-up-raspberry-pi-camera-module/
Once that has been done get the operating script here:
https://github.com/FredFury/pipecam/blob/master/TPL5111_pipecam.py
Put the script in your directory of choice. Default is:
/home/pi/Then, add the script to your rc.local. This will run the script on start-up. (ref: https://www.raspberrypi.org/forums/viewtopic.php?t=46113) To do this run the following command:
nano /etc/rc.localThen add the following code before the "exit 0" line:
string=$(vcgencmd get_camera)
substring="detected=1"
if test "${string#*$substring}" != "$string"
then
    python /home/pi/TPL5111_pipecam.py    # Camera connected start capture
else
    echo  -e "\e[31mCamera not found!\e[0m"    # Camera not connected.
fi
The code above first checks that the raspi camera is present before running the script.
TPL5111_pipecam.py
The main operating script will still needs some tweaks and should be considered as under development. The script can be found here:
https://github.com/FredFury/pipecam/blob/master/TPL5111_pipecam.py
The script runs a command to take a photo and then shuts down** immediately.
** Note that this is NOT a 'safe' shutdown.
Python modules used:
- os
- gmtime
- strftime
- RPi.GPIO
This script should be set to run on boot via the rc.local (or which ever method works best for your application)
******************************************************************************
Workflow:
- Once powered ON (battery is connected) the TPL5111 will read the resistance over the pot, which will determine the timer interval.
- The TPL5111 waits for the timer to fire
- Once the timer fires, the TPL5111 switches the VDD to ENABLE, which causes a 5V output.
- The Pi will receive power and boot up. This takes about 30sec if you've tweaked the boot, otherwise, allow 1-2minutes
- A script will run on the pi to take a photo
- Once the photo has been taken, the pi flips BCM 17 to HIGH, to let the TPL5111 to go back to sleep.
- Repeat from step 2
PipeCam: Low-Cost Autonomous Underwater Camera
Low cost autonomous underwater camera for long term deployments and exploration
Discussions
Become a Hackaday.io Member
Create an account to leave a comment. Already have an account? Log In.
I am working on this project. I use a tp5110 but I don't think it makes much difference for my purposes. Basically I found some errors in your code involving the path being wrong and also as you mentioned the shutdown process is a bit sloppy. I also changed the time to localtime for the timestamp.
As for the shutdown process I followed this process:
https://raspberrypi.stackexchange.com/questions/89732/run-a-script-at-shutdown-on-raspbian
the first answer that is there. It allows the pi to turn off power with the TPL5111/TPL5110 without ignoring the shutdown. I made a bash script to put pin 17 to high and then followed that answer on stackoverflow using systemd to include it as part of the shutdown process. I believe this helps make sure the camera doesnt mess up when getting a signal to shutdown as I was getting corrupted images before.
cheers,
David
Are you sure? yes | no