-
Open EMR Server
08/20/2014 at 21:08 • 0 commentsData is collected from the embedded sensors and sent to the user’s smartphone via bluetooth. An application running on the phone sends it to an Open EMR server (http://www.open-emr.org/), which is an open source electronic medical records server, based on a LAMP stack.
The open EMR server has space in the database for storing the urine information, and several php scripts are used to store urine information. Other sensor information can easily be added to the database. The smartphone application can also pull data from the server to show the user past hydration data. The server also supports querying for specific data, for example, all urine data between two dates.
A major concern for the future is security. Protecting people's medical information is of utmost importance, so in the future all of the communications with the server should be encrypted. Additionally, it would be better not to store all of the information on a centralized server (where hackers that break into the server can access all of the data at once), but rather use the patient's own personal computer for storage.
-
The Android App
08/20/2014 at 20:03 • 0 commentsOn the Arduino side, we used the Bluetooth Mate Silver (https://www.sparkfun.com/products/12576) to send sensor data to an Android app. We created the prototype app with a simple user interface.
It has a slider control that allows the user to see all past history. In the initial version, we also developed a visualization of the RGB values with the ColorMatrix class. This gives a visual representation of the RGB color value that the sensor sees and is useful for calibration purposes.
We decided to not store any data locally, and instead have a single Open EMR server store all user data. So the app connects with this server, pulls in data asynchronously and loads the user data history into the UI.
Using the Bluetooth class, we connect with the Arduino. A button allows the user to initiate the connection between the Arduino and the phone. Once the connection is established, the Arduino continues to transmit RGB values from the color sensor and pressure values from the differential pressure sensor. After a couple of seconds, when the sensor data coming in has stabilized, the user can hit the stop button. The app will use a mvong average filter and compare it to a linear model. It'll then produce the recommendation based on that final moving average.
Here's a video demonstrating it in action: https://www.youtube.com/watch?v=sGEtdV729dg&feature=youtu.be
-
Hydration Metrics Research
08/17/2014 at 01:14 • 0 commentsWe decided to first target hydration monitoring largely because the sensor system would be easy to develop and for quick prototyping of the concept. We did some research on how hydration is currently monitored. As a side note, It has been reported that 70% of Americans are chronically dehydrated so hydration monitoring is a useful tool for the average person.
We looked at two metrics-- specific gravity and urine color.
Specific gravity:
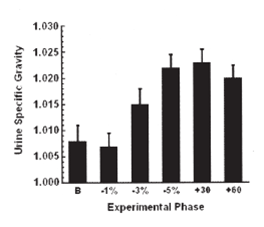
Urine specific gravity, the density of urine compared to water density, is utilized to measure how effectively the kidneys are diluting urine. This metric is commonly used in a clincal setting for determining hydration levels. According to National Collegiate Athletic Association (NCAA), it is he most practical, cost-efficient measurement of hydration status for athletes. For healthy adults, urine specific gravity generally ranges from 1.000 to 1.030 (Urine Specific Gravity).
![]()
Figure: The graph shows the effect on specific gravity as an individual is dehydrated from baseline B to 1%, 3%, and 5% less body weight. The last two bars show results after rehydration period of 30 and 60 minutes.
A significant correlation can be seen between urine specific gravity and loss of body weight due to dehydration. Urine specific gravity has been proven to be a reliable and accurate metric for clinical standard hydration assessment.
Urine Color:
![]()
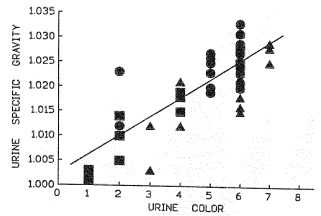
Figure: Correlation between urine color and urine specific gravity
Urine color is often used in recreational settings to determine hydration level, is best considered in comparison to each individuals relative normal color. Research has shown the correlation between urine color and other metrics that indicate a persons hydration level. For example, the figure above shows that there is a 0.77-0.96 correlation between urine color and urine specific gravity [Armstrong LE. Hydration assessment techniques. Nutr Rev. 2005;63:S40-S54]. Additionally, studies have shown that a pale yellow color of urine indicates that a person is within 1% of euhydrated body mass. Although color may not have the precision of urine specific gravity, and depends on a variety of factors, when utilized in conjunction with other metrics and in comparison to a patients relative normal, it can be an inexpensive and reliable indicator of hydration [Armstrong].
The two metrics that we incorporated aim to provide hydration information for both clinical and non-clinical settings with a straightforward process that requires no additional usage of chemicals or dipsticks to improve the users ease of experience and reducing cost.
-
Designing the Toilet Attachment
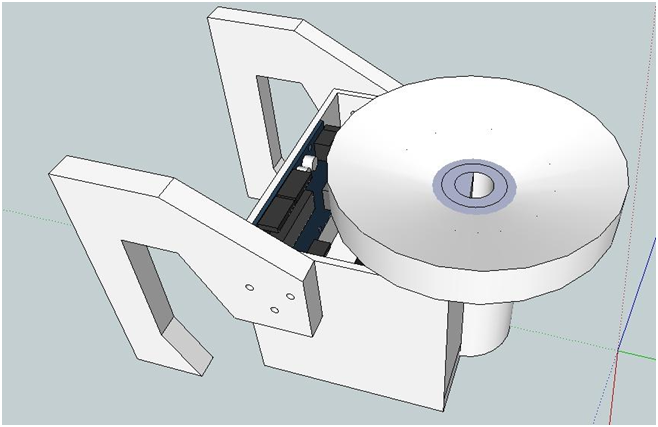
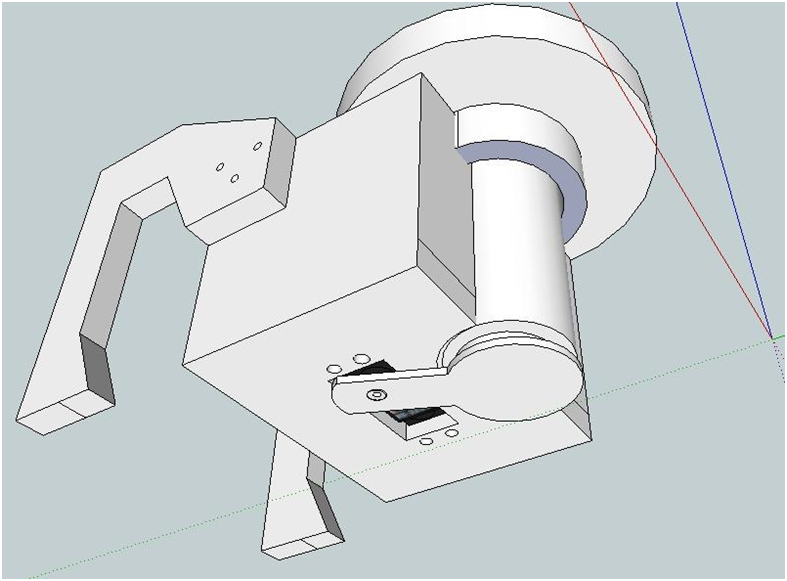
08/17/2014 at 00:42 • 0 commentsWe first designed a preliminary model of the container of the device and fabricated it using 3-D printing. The electronics sit in a small box adjacent to the urine collection cylinder. A large funnel collects the urine into the measurement cylinder. Urine in the collection cylinder is held by a servo controlled blocking mechanism. A small LED illuminates the collection chamber from the bottom, while the color sensor enters the collection chamber from the rear. Two pressure sensors enter the measurement chamber from the side. The entire device is held to the toilet bowl via two arms.
This is a very basic design that needs a lot of improvements especially with user-friendliness. First of all, it is too big and bulky. We plan on brainstorming ideas for a more non-intrusive, user-friendly urine collection receptacle.
![]()
Fig1: The Design (with lid removed, exposing the Arduino)
![]()
Fig2: Design Showing Servo Controlled Release Mechanism


