-
BicycleCompanion functional prototype
06/16/2020 at 17:18 • 0 commentsLast few weeks I've been working hard on this project and I now have a prototype built. Moreover, I have a firmware which demonstrates all the available functionality of the board: sensors, charging circuitry, screen, buttons, buzzer, etc. While there's still a lot of more features planned and polishing (mostly making the screens look nice and the user interface comfortable), I think that this is a good milestone.
The Build
When I designed the PCB I knew I would have to use a stencil since I was including some parts, such as the IMU, barometer and battery charger IC, that didn't have exposed pins but pads underneath. Moreover, these components are not particularly cheap so I didn't want to risk ruining them by reworking them if soldering went bad. So, together with the PCB, I ordered a stencil from JLCPCB and got some solder paste. This was the first time for me using this soldering process and to my surprise it worked really well in one attempt. You can see a video I put together from footage taken with my crappy digital microscope (someday I will upgrade it to get better image quality).
As you see, I placed difficult components on both sides, which was not the best idea. Next time I will only leave simple components which do not require a stencil on the bottom in order to facilitate mounting and soldering.
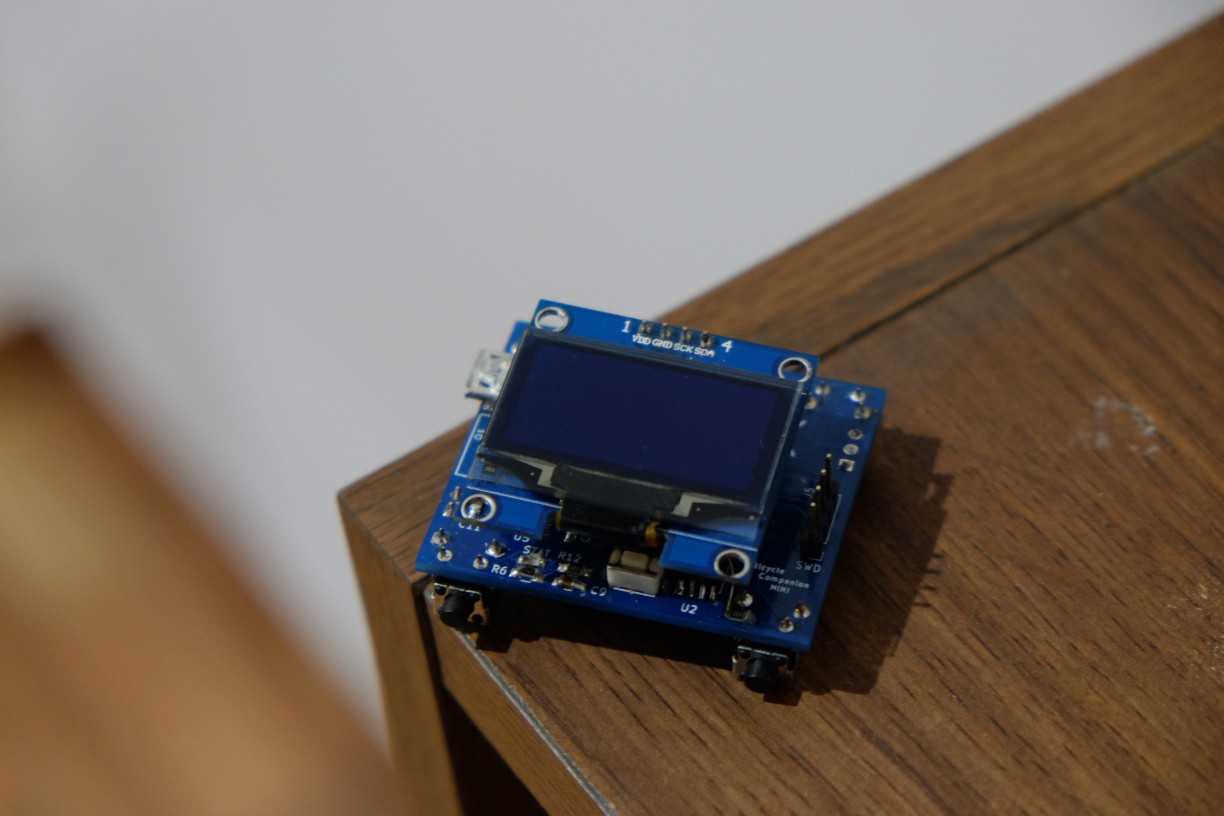
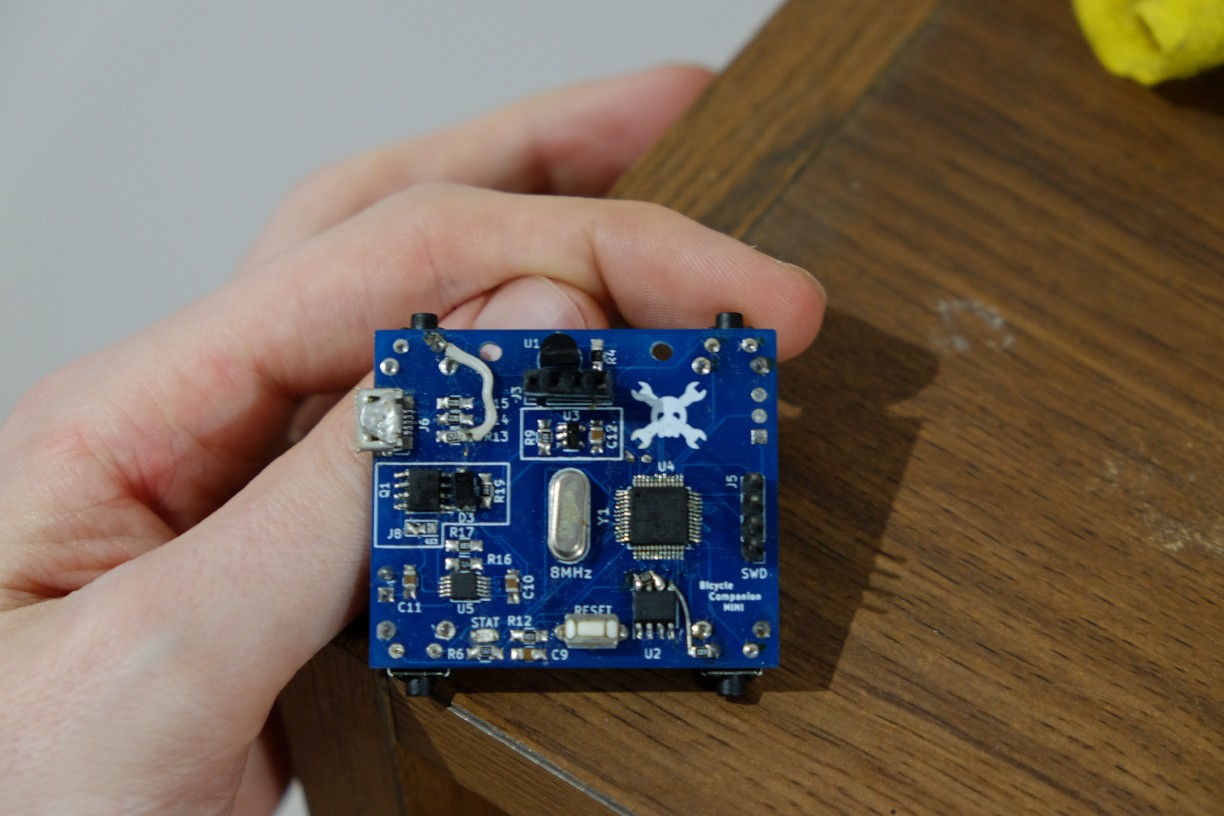
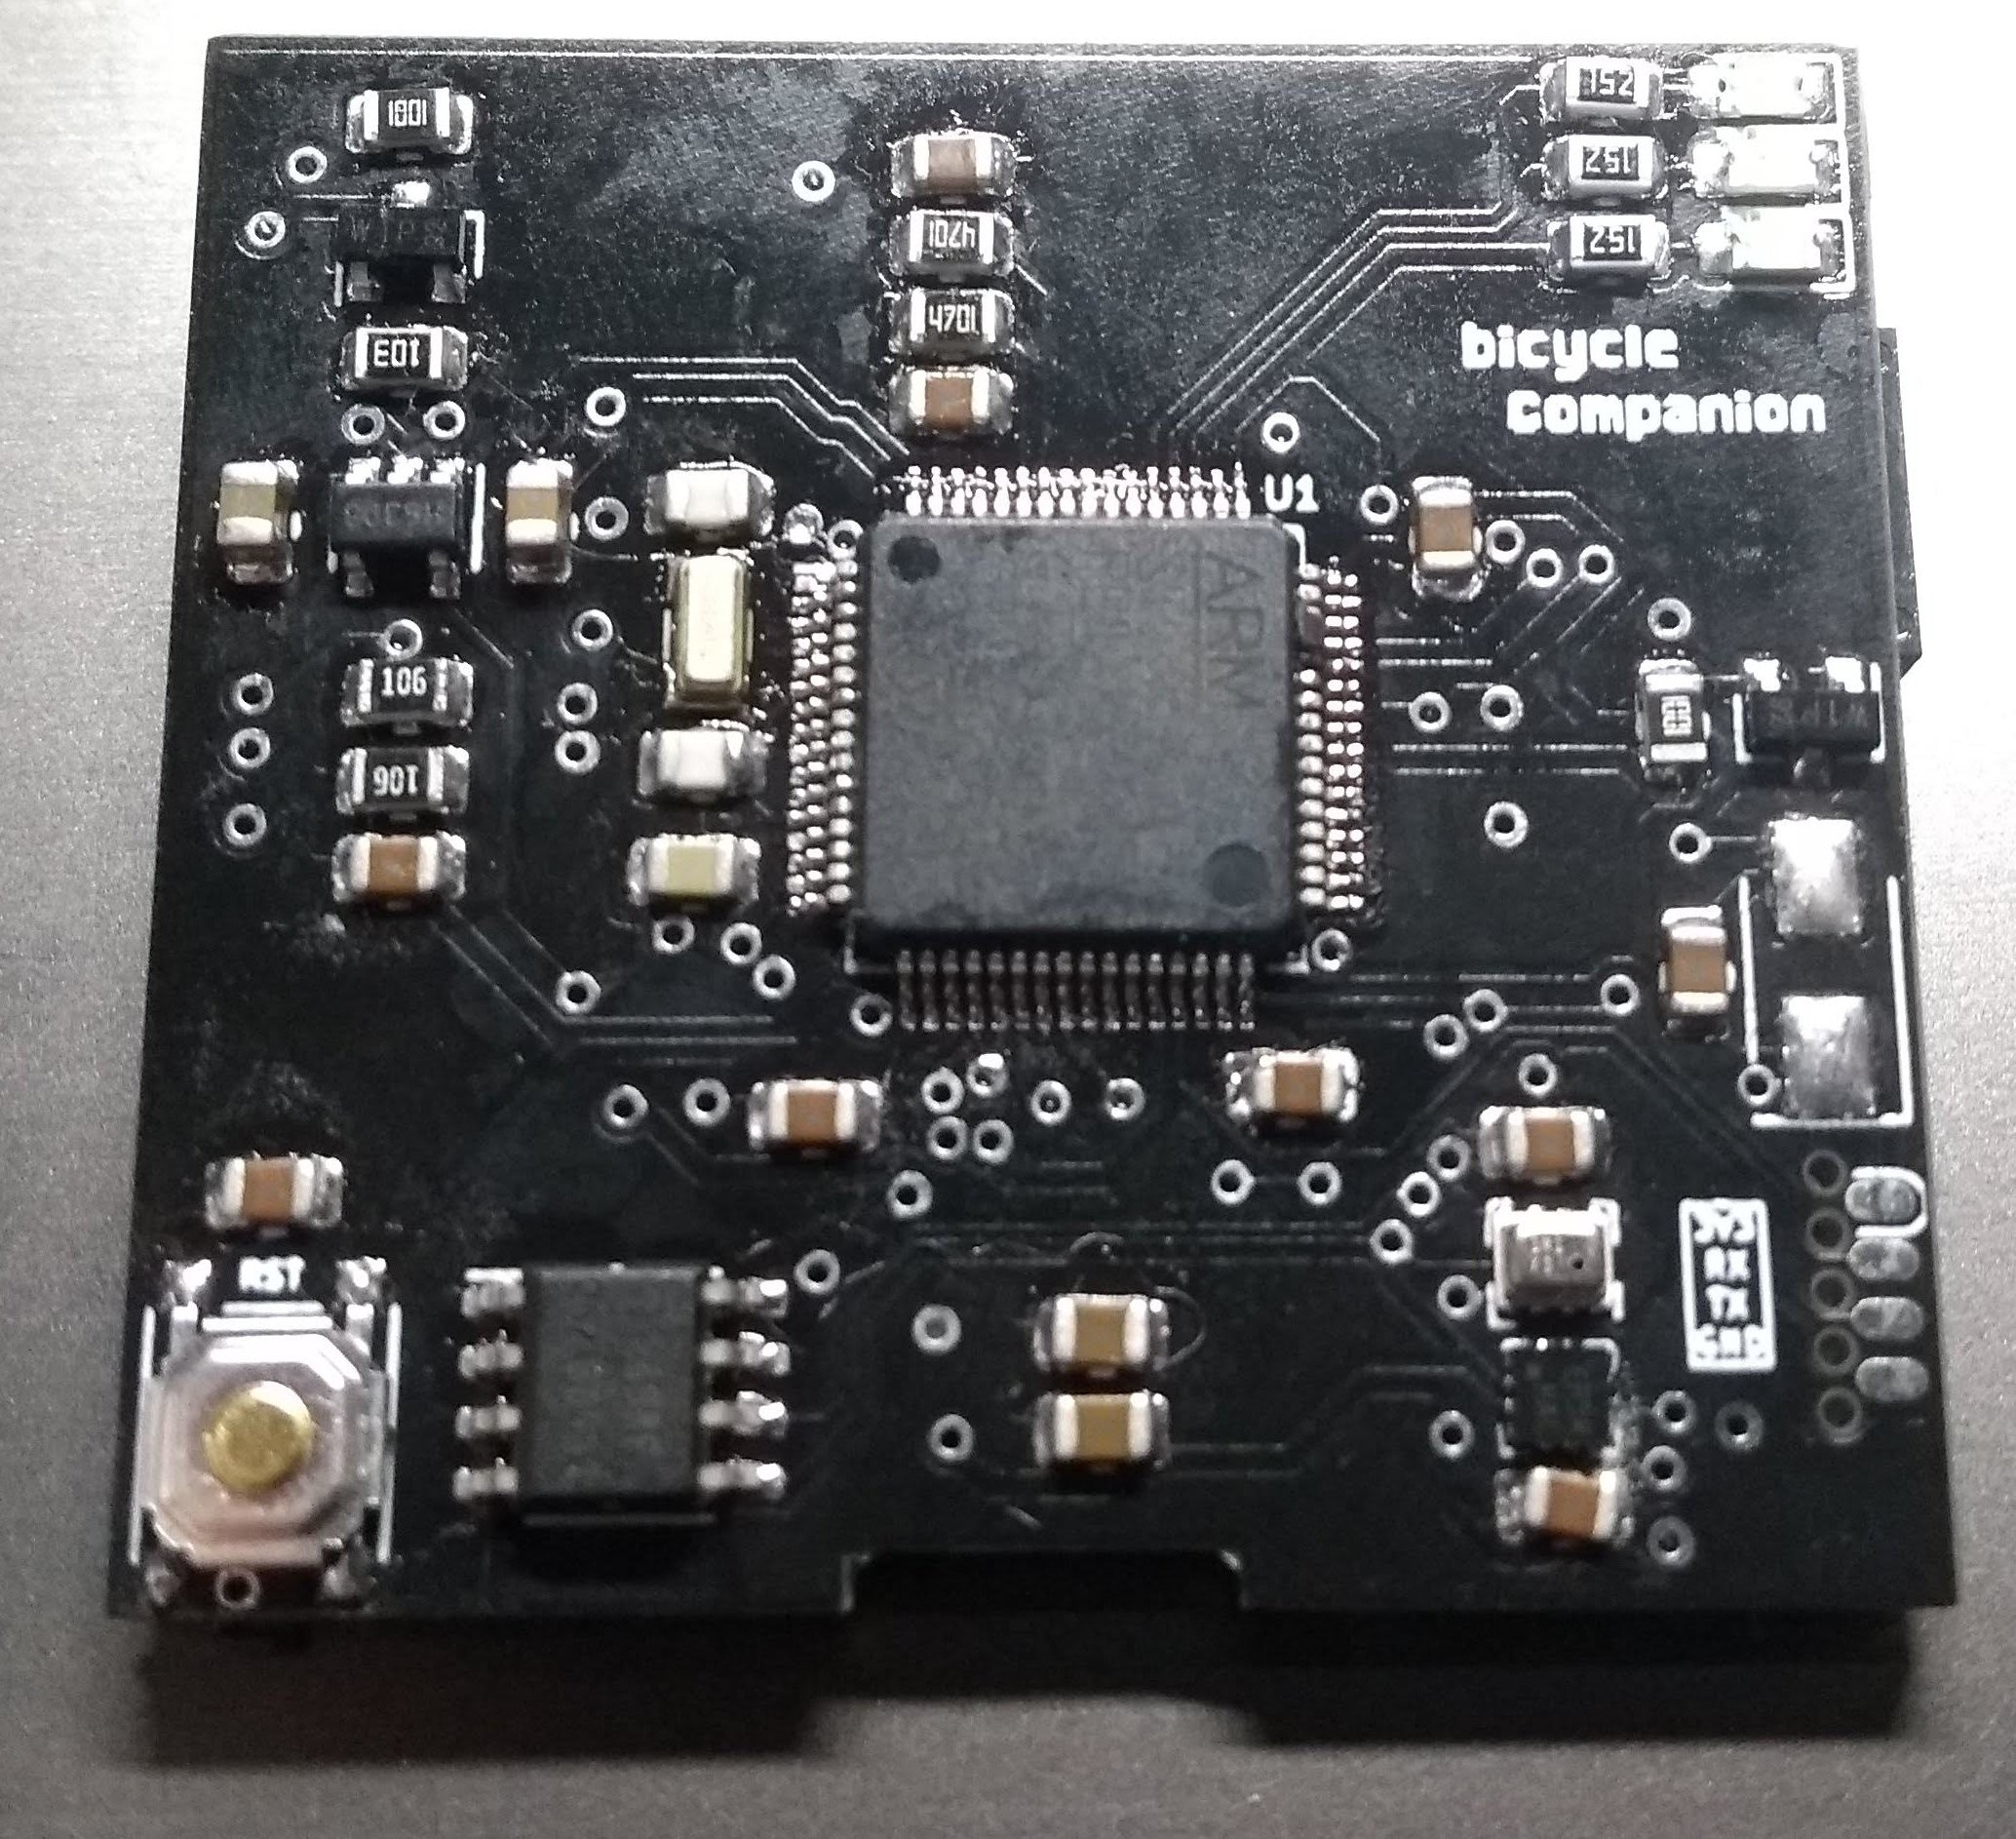
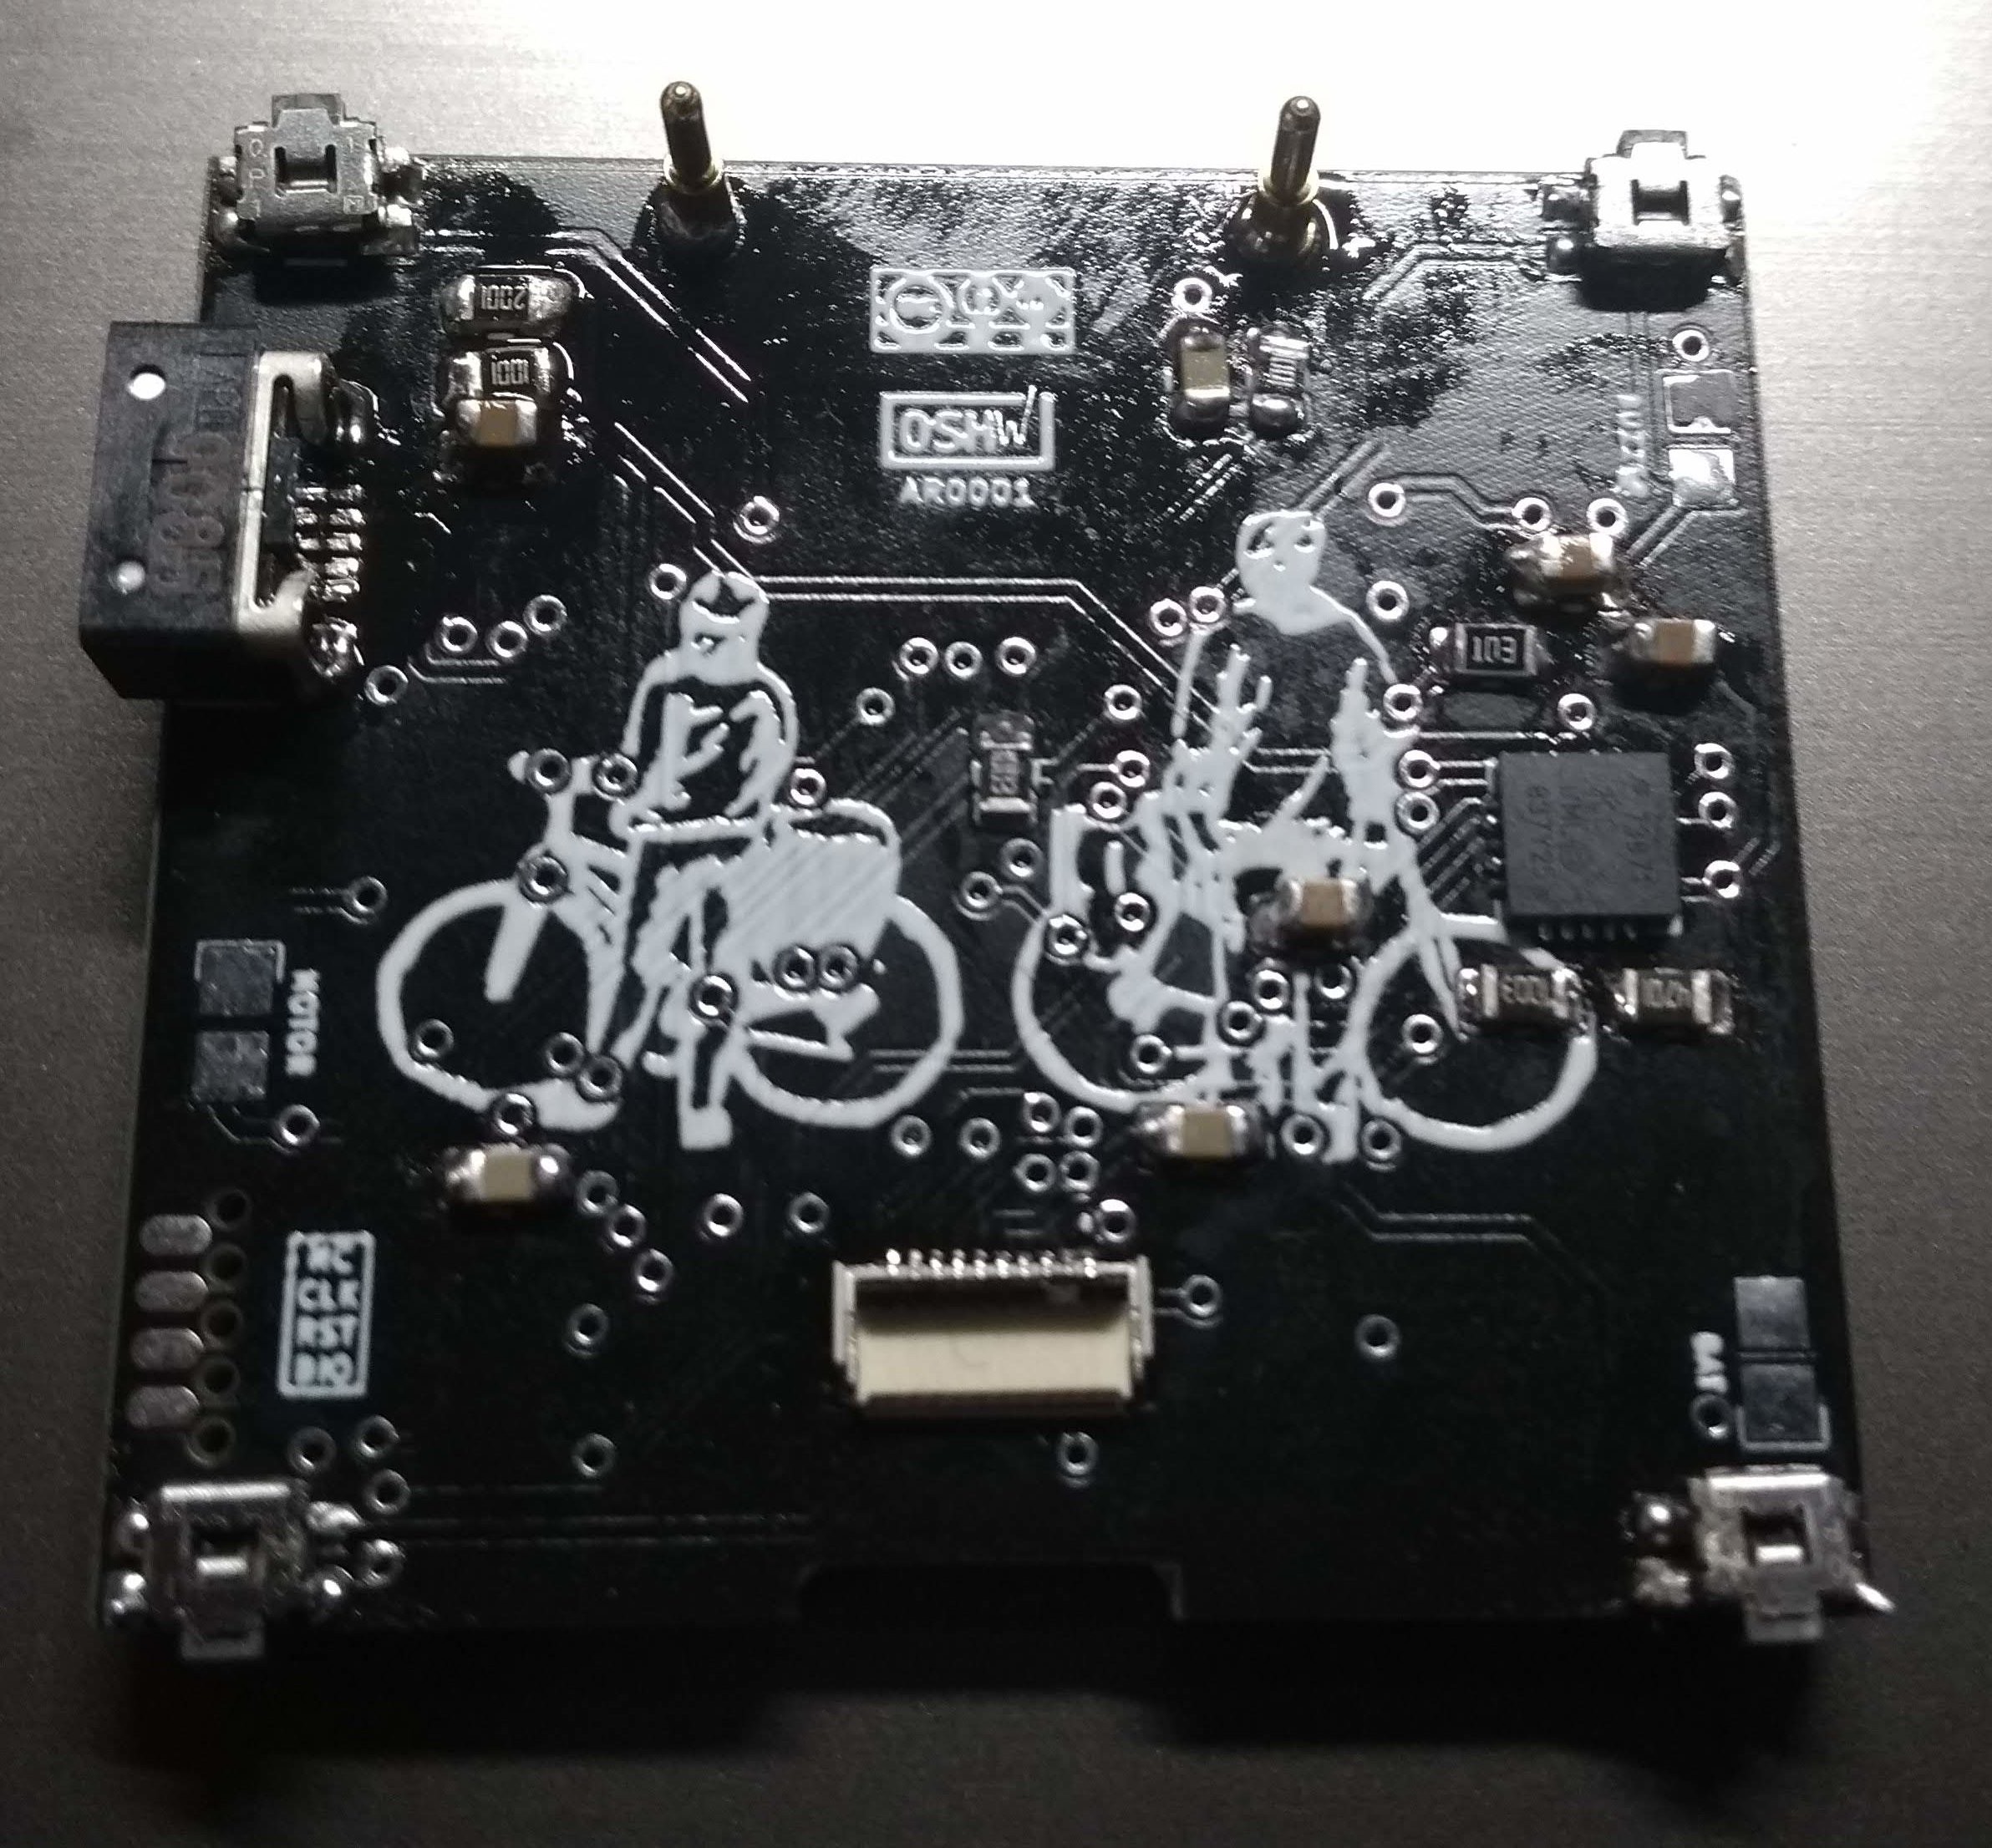
The resulting board (screen not plugged)
![]()
![]()
BTW: ignore the OSHW logo, this is not yet certified but I'm the process of doing so (need to finish the firmware).
Flashing/Debugging
For this board I decided to try out the SOICbite approach for flashing and debugging the board. This works by using a (modified) SOIC8 clamp with grabs to some pads on the edge of the PCB. In my case, this exposes 3.3V power, SWD and UART. I liked this idea since I didn't want big connectors increasing the size of the case I would use to enclose the PCB. In my experience with this approach so far I must say it is probably good for very small boards and for brief flashing/debugging periods. In my case I have the board clamped next to me all day and it is very easy for the teeth to lose contact with the PCB which leads to resets, SWD disconnections and UART errors. This is inevitable since I need to interact with the board by pushing buttons.
For this reason I decided to take advantage of the USB port and implement DFU flashing and serial communication by booting into ST's integrated USB bootloader and enabling the CDCACM device emulation in NuttX. I manage to have this working but I didn't have good results either. It seems that it easy to brick the board since the bootloader does not recognize communication errors easily. Moreover, software-based CDCACM emulation in NuttX is a bit brittle since whenever you reset the board (for example, to flash or debug it) my Linux computer gets really confused (I even managed to completely hang Linux this way).
For future boards (and for an eventual BicycleCompanion rev2) I would consider including a good SWD connector instead of the SOIC, which could be left unpopulated in the final build. However, for something that is intended to be easily hackable I think the best approach is to embed a ST-Link 2.1/BlackMagicProbe IC to the board, which would offer real debugging and hardware serial communication over USB. This can be achieved by adding an STM32F103 chip and flash either image. This would increase the BOM by approx 5/6usd, and occupy quite a bit of space on the board, but it may be worth it.
I started a list to track all improvements for an eventual revision of the board: https://gitlab.com/bicycle-companion/hardware/-/issues/6
User interface
I already had a more or less functional code base when I built the first prototype based on a Nucleo L476RG board, however there was still lot to do with the real board. Mostly, I finished all the required interfaces to on board devices and exposed functionality via specific screens, for which I used LVGL (formerly LittleVGL).
The idea is that you can move using the two top buttons between a series of screens (last one being the settings screen). There is one "main" screen which is thought to be used while riding the bicicyle and contains most useful information there. You can then go into the other screens where each one focuses on one particular kind of information. This is the list of screens with its functionality so far:
- Clock screen: displays time and date, nothing more. This is designed to be updated at a frequency of one minute and used as "screensaver" when some time has passed after not detecting wheel motion. The MCU can go into low power mode, waking up only to update the time. Eventually (maybe after a few hours) it could be completely off but the screen would then not be updated. Every other screen updates at 1Hz.
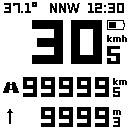
- Main (or "speed") screen: this screen shows: temperature, magnetic heading, time, speed (in big number), traveled distance, sea-level altitude and battery level indicator.
- Battery: since the big screen does not show detailed information regardy the battery state, this screen displays battery voltage, a charge-level (in percent), status (charging, discharging, etc) and an estimate of the remaining charge/discharge time.
- Temperature: current, historical minimum and maximum temperatures and a plot of the last 24hrs. The 128px resolution allows for 15min per pixel to be represented which I think is detailed enough.
- Compass: this screen displays a compass view, with a needle indicating compass direction and a middle window with exact heading in degrees. I used some of the widgets in LVGL for this and I must say it looks quite nice. Moreover, I was surprised of the precision of the magnetometer (once it is calibrated to removed soft-iron distortions). I'm also estimating roll/pitch from accelerometer in order to derotate magnetometer vector and provide accurate compass heading even when the board is not parallel to the ground. While for now I'm just taking one sample of the accelerometer (which assumes it is relatively still) it works surprisingly well. Of course when on the bike this might change, but this could be easily improved.
- Sunclock: this screen shows sunrise/sunset and sunlight time, according to the current location. This requires knowledge of GPS location and timezone. Right now this information is hardcoded but I will probably build a list of major cities in the world, each with its coordinate and nominal timezone. This is quite a bit of information but if I limit this to major cities and get get around 10k cities using available flash memory. I will work on this later though.
- Settings: right now it mostly serves to allow me to start magnetometer calibration but the idea is to be able to configure most things here. This will work with a system of menus and sub-menus.
As you see, some screens are just text printed with no effort in UI design. I will continue to work on that but I wanted to get the main functionality and set of screens done first.
Testing
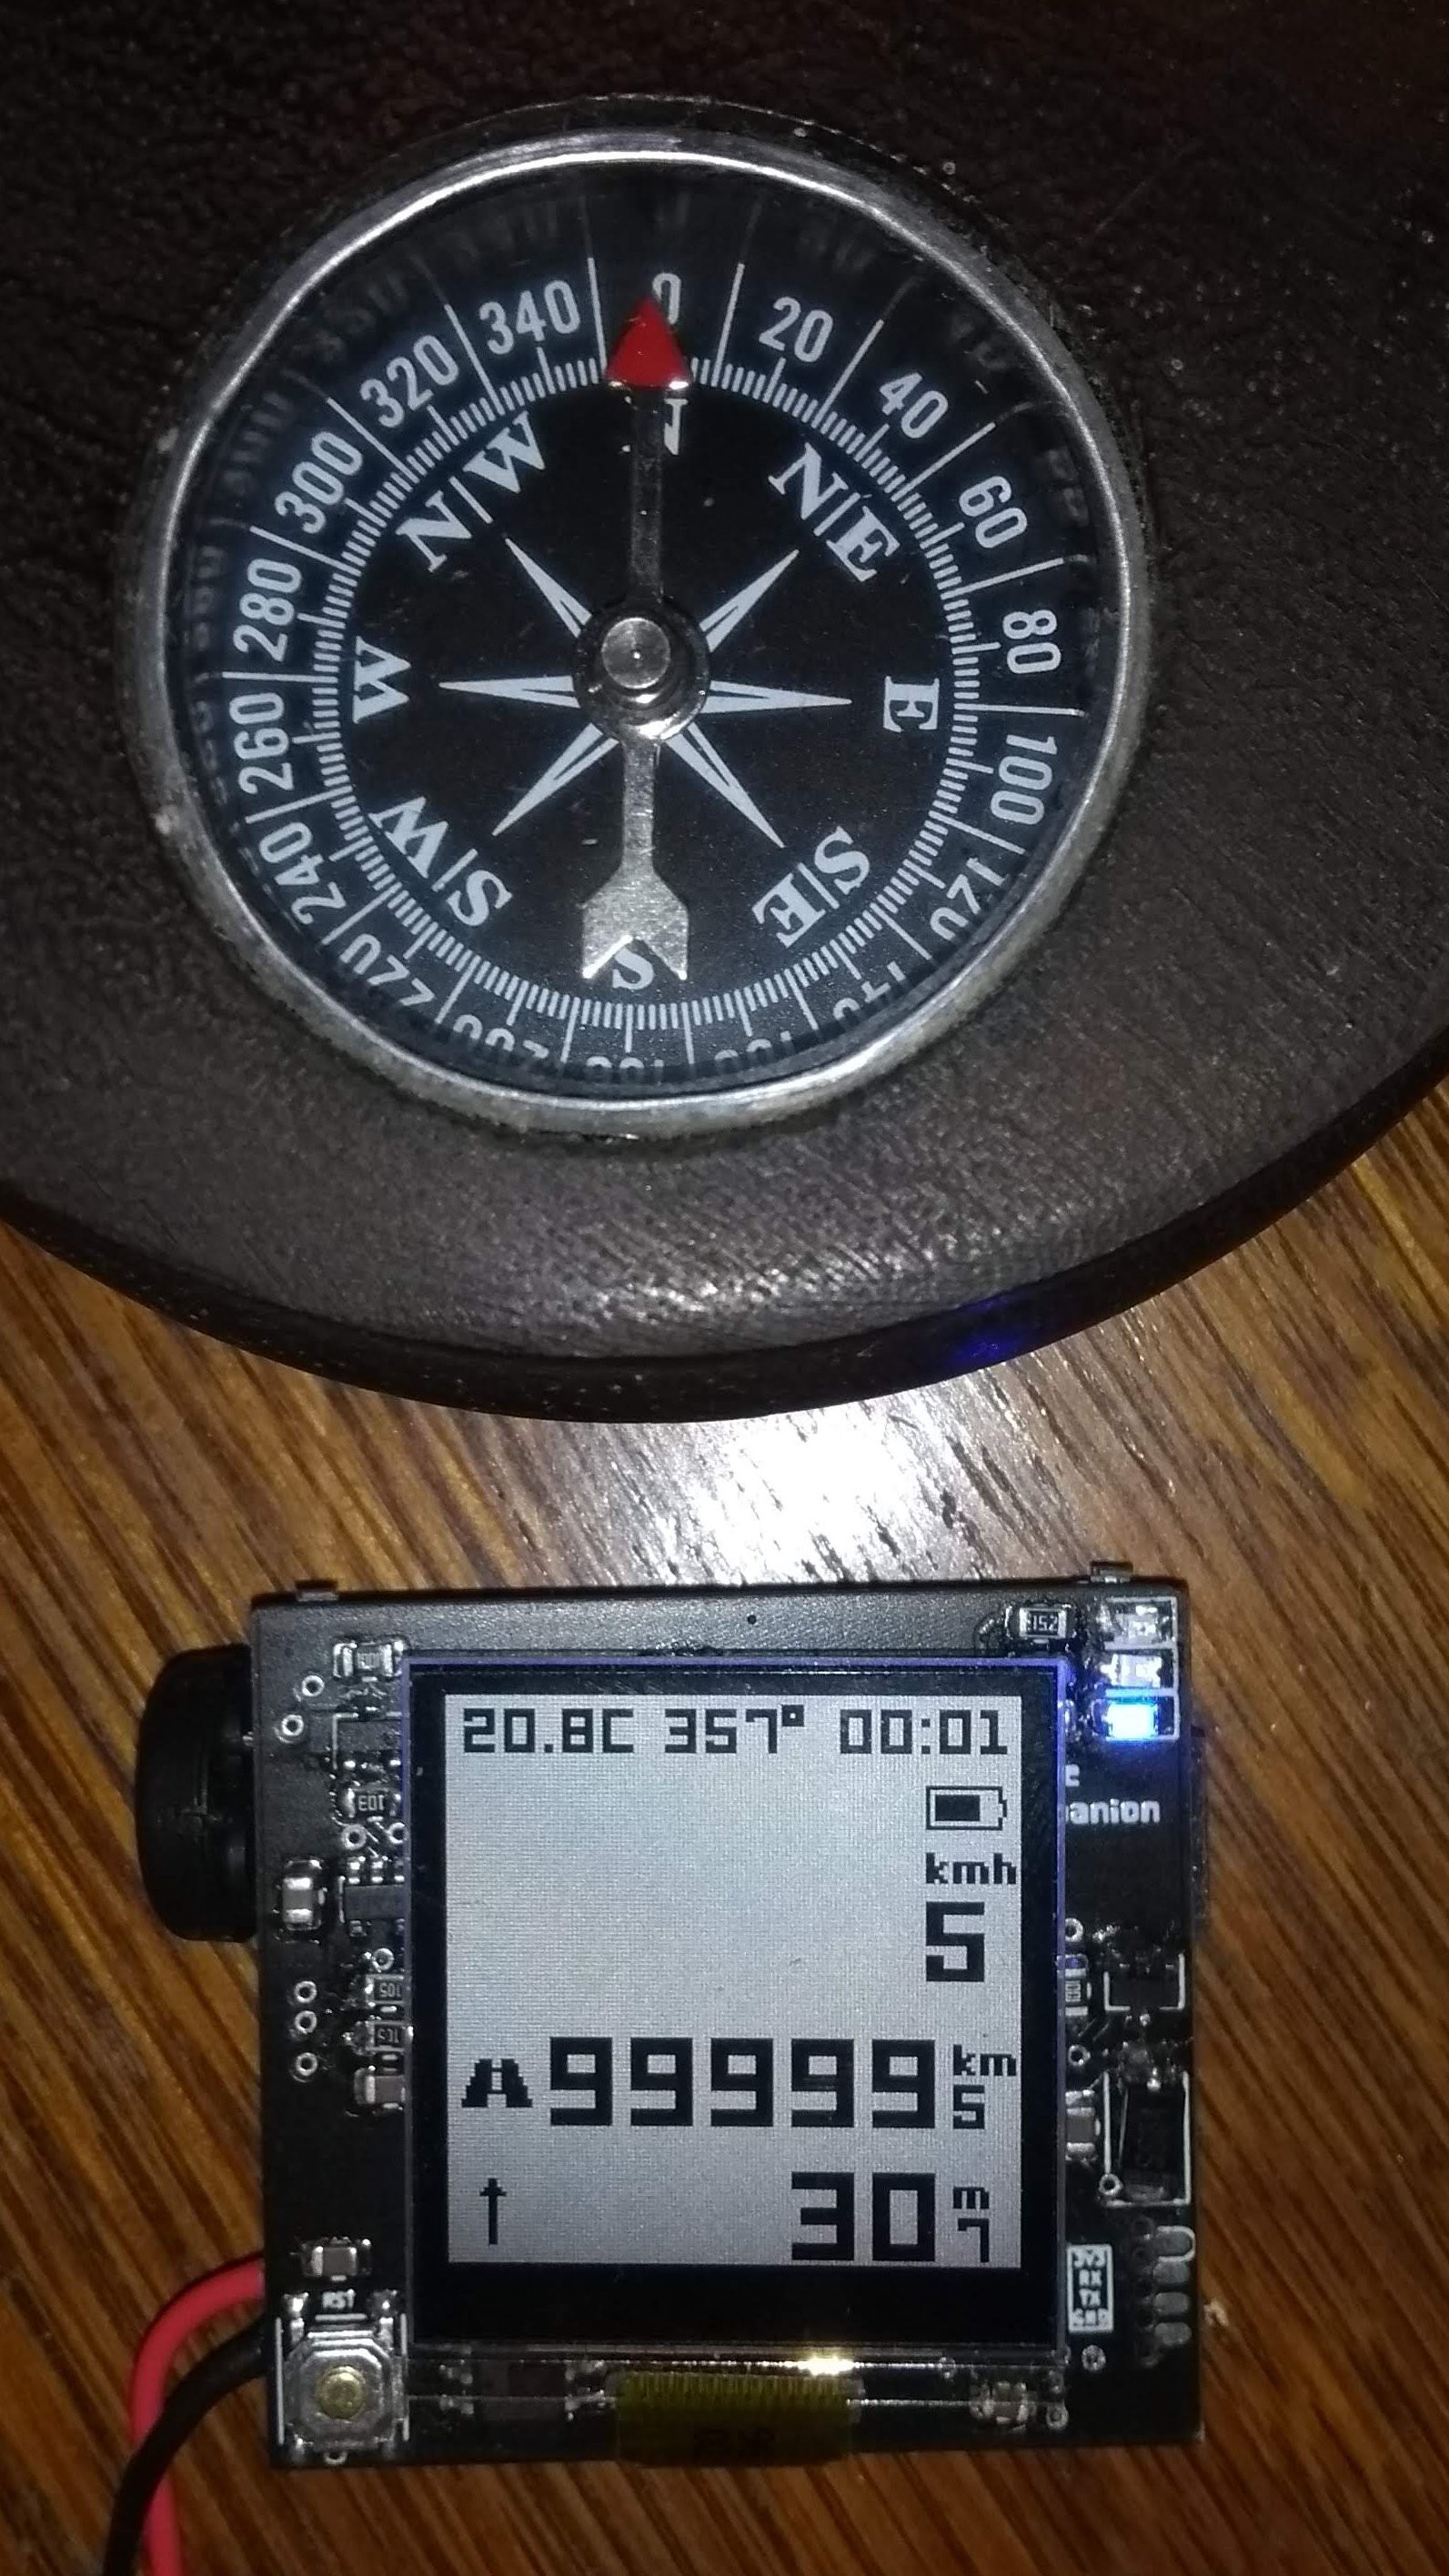
There's still lots of testing to do. Right now I only managed to compare the compass heading with an actual compass and it seems to be very precise. The barometer also seems to be precise compared to my city weather information. The battery level is also precise compared to a multimeter.
![]()
One of the main things I would like to test is the speed/distance calculation, compared to my (dumb) bicycle computer. For this I will either need to build a mount or hack my existing one (sadly I didn't have the foresight to make it compatible). Since right now I don't have access to a 3D printer, it seems I will have to rig something up for this test.
Finally, one of the most important aspects to me is to test the low-power aspect of this design. There's still a lot of things to tweak but as I selected low-power components and considered this in the design I would like to verify some power use numbers for sensors and for the MCU during sleep modes.
HackadayPrize
As you may have noticed, this project is submitted to the hackaday prize. Right now the community vote is open so if you like this project, please click "Like" on the project page. Moreover, if you have any comments, please let me know (or feel free to open issues on the GitLab page to discuss ideas for possible features I might add to the firmware or to an eventual second revision of the board).
-
Designing a case for BicycleCompanion
06/01/2020 at 21:06 • 0 commentsWhile waiting for parts (already arrived!) and PCBs (to arrive tomorrow) I decided to start designing a case for BicycleCompanion. Initially I intended to do so in OpenSCAD but, while I like the programming-based approach, it lacks certain features that can quickly make a relatively simple model become really complex to develop. I then turned to FreeCAD. I struggled to learn to use it in the past and I gave it a honest attempt, watched tutorials, etc, but the interface is really unintuitive and I couldn't go past a very basic attempt. Finally, I decided to give Fusion360 a try. I don't really like that it is a Windows only, closed-source application but at least they provide a free license for personal/hobby use. Coupled with the free Windows license I get from my University it made sense to try.
Immediately after starting Fusion360 I really liked the interface, it is completely intuitive and well thought. I must say that it took me about three attempts to start doing things right, until I really understood the philosophy behind the tool. Understanding the timeline concept was critical and once I handled that, it became really powerful. So, at my third attempt I managed to produce a decent case which is based on a bottom plate and a cover plate. Both parts hold the PCB in place between each other. I created a model of the Sharp Memory LCD which really allowed me to get a clear idea of how it would look. Finally, I created an animation from the design (it is incredibly how easy and intuitive this was):
You can see that there are four tact buttons, the waterproff USB connector, the bottom spring-contacts for wheel sensor and the Sharp LCD. This is about 4cmx4cm so really small (although could probably made smaller).
There are a few things missing. First, for robustness I should add screws to hold both pieces together. Right now, I will probably rely on friction between both parts for quick testing. The buttons will need to be covered also (maybe I will add a fexible tab). I don't think I will worry about waterproofing yet, that can be dealt later. Finally, some mounting mechanism is needed, maybe I will copy the twist-lock design of most bicycle computers.
I will also need to design a mount for this, which will expose the sensor contacts. Not sure yet which kind of contacts to use. I could make a really simple PCB and use pads, but maybe there's an easier way. Another option for the moment would be to buy a really cheap computer and break out the contacts to a custom housing.
Anyways, now that PCBs will be arriving (tomorrow, supposeddly), I only need to buy a bunch of passives locally which may take a few extra days. So, really soon I will have a finished prototype to test. I plan to make some videos of the build process (using an external camera and digital microscope), so stay tuned for that.
If you like this project, I would apprecitate if you click "Like", which helps in qualification for the Hackaday Prize.
-
Hardware tweaks and donations
05/04/2020 at 17:42 • 0 commentsHardware
Last few days I continued to tweak the hardware. I decided to remove the lightning sensor since it was: a) discontinued, b) of questionable performance. While the idea was interesting, I really don't want to add such a complex circuit which may require careful antenna tuneing and even still, from what I've read in different places, I'm not sure if the reported range and detection performance is real.
On the other hand I decided to add a small EEPROM memory (maybe around 16KB, but can be modified later easily) to hold user settings. I originally considered storing this in the on-board flash (given there's enough space left), but that would require erasing whole pages just to change one setting which would really wear it unnecessarily. I believe an EEPROM, which can erase in smaller blocks and is much longer lasting, is more suitable for this. I'm not sure yet if storing daily data (or even long term data) such as temperature, altitude variations over time, and so on, is feasible.
Lastly, I'm considering changing the IMU, which currently is 6-axis (magnetometer + accelerometer, and some weird gyro emulation from that) to a 9-axis (the LSM9DS1). While it is three times more expensive, it is incredibly low-power and would even allow for continuous measurement without wasting much battery (I'm talking about a few uA while producing readings at 10Hz). Anyway, as this would be the second time I change the IMU so I will wait a bit on this change. Downside is this is a LGA24 package which does not even expose pads to the side so it will be quite a challenge to solder it using the hot-air gun.
Donations
I realized that one major hurdle in making real-progress with this project is the fact that I don't really know when I could send this for fabrication and to buy the required components. The reason for this is that currently it is difficult for me to justify these expenses, considering current economic situation. While it not may sound much, in my country the USD exchange rate is really high compared to wages and import taxes are also in general high (I even need to resort to FedEx to even ensure the packages arrives).
So, if you're interested in this project and would like to see it moving, I would really appreciate if you could donate on my kofi page. I will soon update it to set a goal with my estimate for PCB build and components. In the mean time, here's the link:
Thank you!
-
Low Power world
04/20/2020 at 14:50 • 0 commentsI've been working on the code last few days, mostly to get NuttX to reduce power to a minimum for the STM32L476. I'm playing with various settings such as core clock speed and different sleep strategies. On preliminary tests, it would seem more efficient to not lower the clock too much so that when the MCU wakes up it does it's work really fast and goes back to sleep. I realized that updating the screen will be what mostly determines the time I stay awake, since this would be the slower operation, so I'm also optimizing that.
So far it would seem that I can get to around 2mAh while running, which would only but for less than 100ms for every second and then sleep while consuming just 7uAh. This is just the MCU though, but the rest of the devices do not use much current either and can sleep a lot.
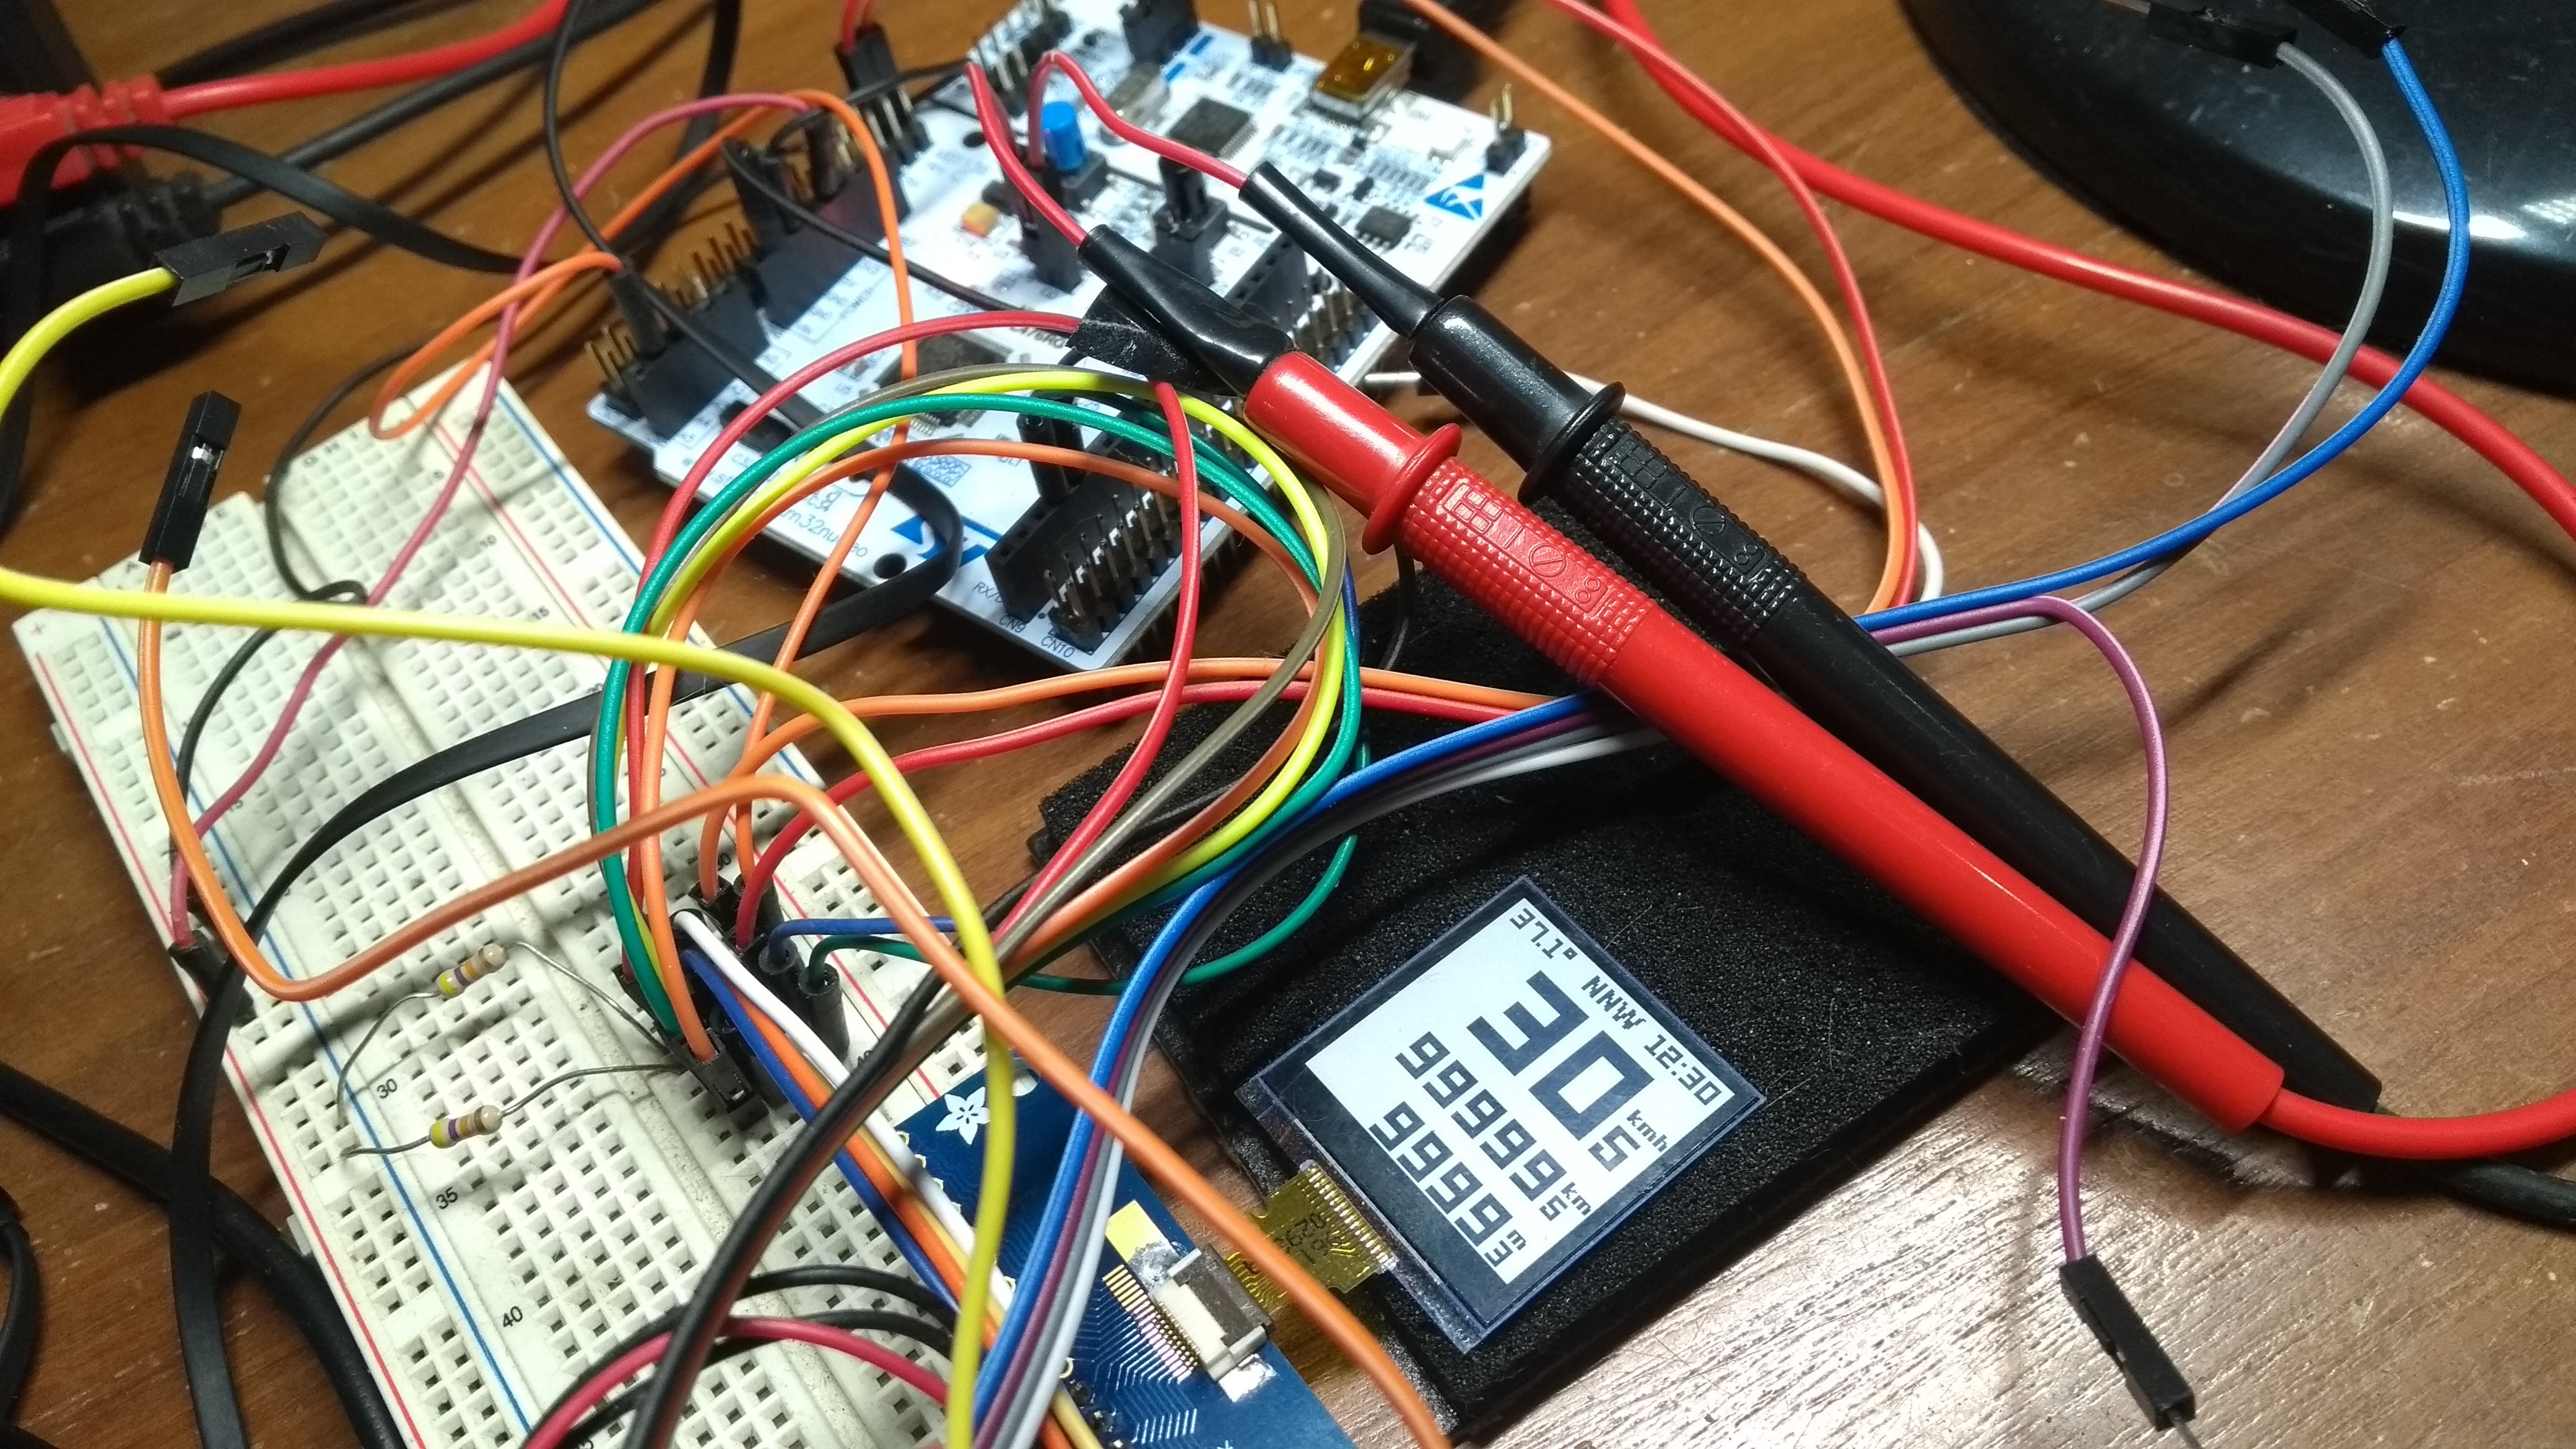
Anyways, here's a pic of my (messy) test rig showing the screen displaying some fake data. I must say it is really readable, even from an arm distance.
![]()
Next goal is to program the low power timer in counter mode to read the wheel sensor even during sleep. I could then test it with the sensor on my bicycle and get some real data.
-
Starting UI design
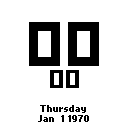
04/17/2020 at 01:59 • 0 commentsSince I will probably not be able to build the hardware soon, I decided to work a bit on the software side since at least I have a Nucleo board and the Memory LCD already. I decided to start with the user interface. First, I did some mock-ups using Gimp, which was a bit of a pain but at least I can decide exact font sizes and only then make the conversion of the fonts to C arrays for littlevgl. Moreover, I can build NuttX with the simulation target and render littlevgl to a framebuffer which maps to an X11 window. Thus, I can play with littlevgl without needing to flash the uC. First, I designed a clock screen, which could be the screen that is set when the device is asleep, which looks like this (this is a screen capture of the 128x128 px window):
If you recognize the fonts it is because I used the one that the Pebble uses, which I think is very good for this screen. Then, I designed a "main" screen which shows the speed with big numbers and has a top row of small numbers and two smaller rows of medium numbers:
If I did things more or less correctly, I shouldn't need to explain this much, but at the top you could see the temperature, compass heading and time. The bottom two rows would display traveled distance and last row, the altitude from sea-level. My idea is to have the lower two rows change by pressing the buttons. For example, you could also have moving time and, if you set a "target distance" you could have a down-counting distance and ETA time based on average speed.
I'm thinking that speed is what you will always want to see in big numbers and then you will want this extra data which you should be able to switch easily. However, I would also design some other "detail" pages where you the screen would focus on a given reading and maybe a chart of recent measurements (for example, current elevation but also the elevation profile sensed while moving as a plot, or temperature with minimum, maximum and again a plot, and so on). If you have ideas in this regard, it would be cool to know. I would also design a full-screen compass and calendar. Then I would have to think about settings, which will be probably based on menus and sub-menus.
I will also flash this to the Nucleo and see how it looks like on the real screen (which will be smaller than what you see here, since the screen is only 23x23 mm. -
Hardware design complete
04/14/2020 at 02:09 • 2 commentsI somewhat left this project in the dark for some time now, since I focused on other things and didn't had spare financial resources to invest in this. While quarantined due to COVID19 I thought about this project again and realized I never updated the project to show off my hardware design.
I actually had the hardware design complete already, which was the result of much consideration into many issues: aesthetics (not too big, not too small, good screen to device size ratio), ergonomics (I even chose tact buttons without low force, incredible that you can select this level of detail when choosing components), usability (comfortable orientation of buttons, how would the device be mounted to the bicycle) and other things.
Besides the aforementioned reasons for putting this project off, was the fact that there was an important part (the accelerometer + compass IC) that was out of stock. I waited for some weeks and it would never be restocked. Even now after many months later, it is STILL out of stock and my guess it will be discontinued. So, I decided to lookup for a replacement and to my amazement I found one similarly priced, with similar power consumption and even featuring a gyro aswell. Also, by looking at another project which also featured the Sharp Memory LCD and tried to be very low power, I found they used a nice linear regulator very VERY low quiescent current of about 8uA. I'm not sure if I'm splitting hairs here, since I'm capable of having introduced a stupid mistake that would waste precious power, but at least this was not a difficult change.
So, today I opened up the design in Kicad again, introduced these changes, put everything up on a git repo and made some pretty pictures (about time). So, behold the new BicycleCompanion:
This is the front view where you can see the IC, reset switch, piezzo buzzer (that big square at the top-left corner, yeah it is huge), three LEDs (top-right corner), the lightning sensor below its antenna (middle-top). The IMU is U5, that tiny little thing (will I be able to solder it by hand?) below the barometer + thermometer IC (U2). At the right you can see I used the SOICbyte programming header which I thing is quite cool.
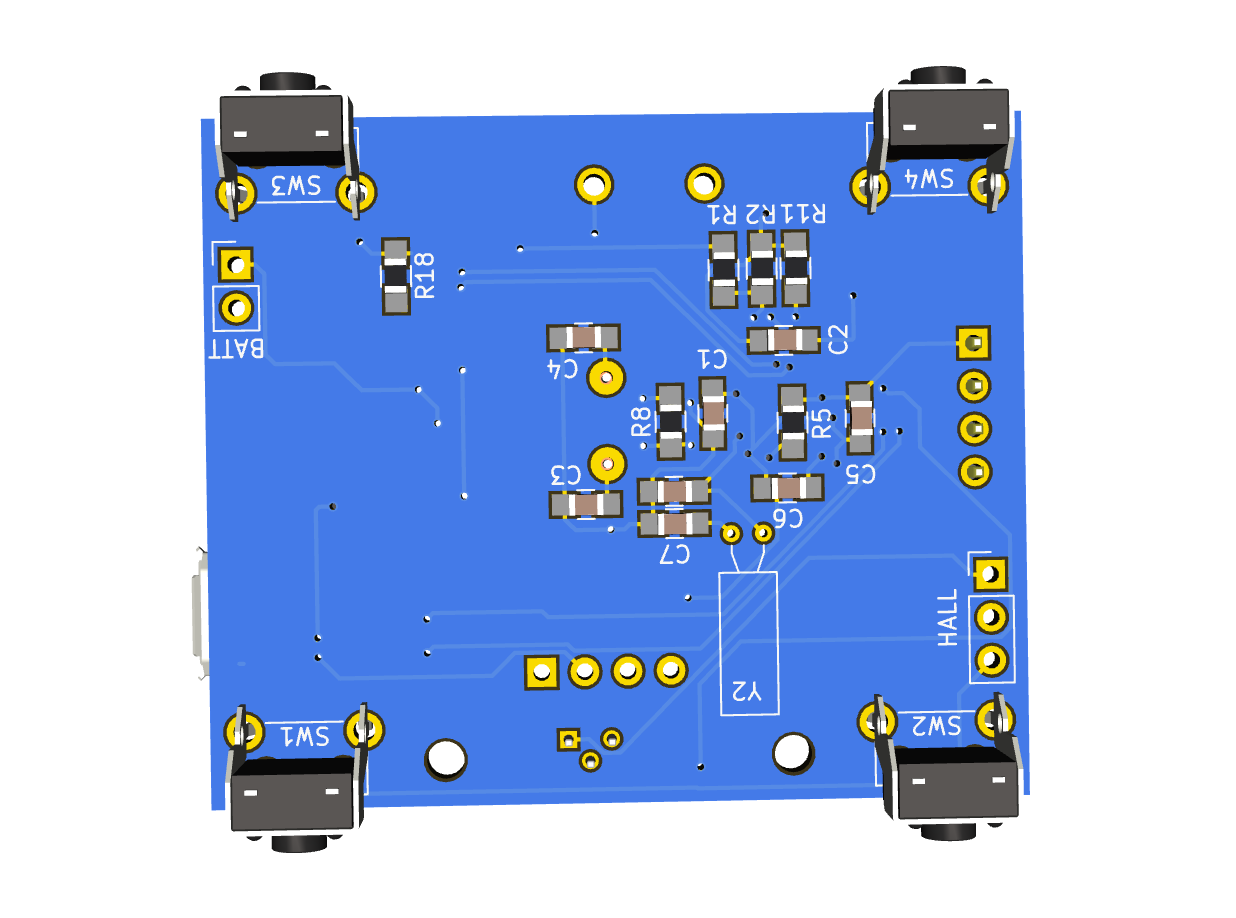
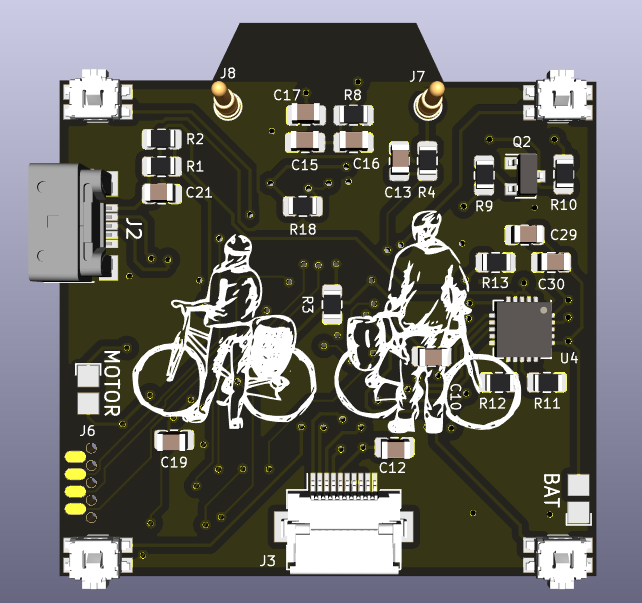
On the other side you can see the four tact switches, a waterproof USB connector and the battery charging IC (U4). The bottom connector is for the Sharp Memory LCD display which would wrap the cable to the front (hopefully I didn't mess up the positioning and this will work OK). Finally, you can see the two POGO pins at the top, which allow to connect to the reed switch sensor mounted at the bicycle fork (which will sense a magnet installed in the wheel).
Finally, there are contact pads to solder a LiPo battery (which should fit at the bottom of the PCB) and a vibrating motor for haptic feedback, alarms, etc.
There is one caveat however: now after all this time it seems that the lightning IC seems to be discontinued =(
So I'm trying to think whether to remove it from the design (and remove the "hump" on top and have a square PCB) or leave it in place for now and see if it is restocked in the future. Don't know...
Anyways, I'm quite happy with the result and I would really like to have all parts and PCB already in order to get into the programming. However, due to the quarantine, limited funds and all the complications of importing stuff to Argentina, I'm not sure when will this happen. Hopefully sometime this year I can place an order and see if this thing works. It would be really cool to eventually carry it with me on a trip and really test it.
By the way: the hardware design is not yet public, but if there's interest I can publish it. -
The wheels are in motion
11/12/2019 at 22:27 • 0 commentsWhile it may not seem so, from last log entry I made significant advances on this new revision of the project. Thus, I wanted to tell a bit of the project status.
You may also noticed I renamed the project to BicycleCompanion (dropped the MINI suffix) since I feel this is still the original project but with one more refinement step. I also renamed the (never finished) teensy-based project so that no confusion is generated.
It is also interesting that from all my (four) projects on Hackaday, this one received a constant influx of about 100 views per week. While it may be the result of google crawling the site I choose to think that there's at least some interested people. So, I hope to provide more project updates soon to show my progress.
Prototyping
While it may not be the typical choice, I'm particularly inclined towards writing the firmware for my electronics projects using the NuttX real-time operating system. In contrast to other RTOS, NuttX feels like a "tiny Linux" in that it is POSIX compatible and aims for high-level hardware abstractions. This is very good to decouple the logic from the specific hardware and maximize re-usability. However, it also comes at the cost of a steeper learning curve and friction than simple hacking something using Arduino.
As an initial development platform for BicycleCompanion, I chose to work on the ST Nucleo L476RG board, which has very good support on NuttX and also provides a very nice set of features. However, there are always some little (and not so little) things to improve in NuttX once one starts to poke around various parts of the OS.
![]()
When my Digikey order FINALLY arrived Besides some small required changes (like adding support for low-power hardware timers or LPTIM) I found that the power-management algorithm baked into NuttX was a bit high-level and did not let one to have tight control over entering and exiting low-power run modes. For this reason, during the last few weeks I reworked NuttX PM system to allow for different PM algorithms. In particular, I added a separate "greedy" algorithm that always tries to go as soon as possible into a low-power run mode (unless an application or driver requests it to stay at a specific level). This is working really well and I have already handled STOP mode on the STM32L4 succesfully.
A second important step was to tame the Sharp Memory LCD. While a driver was already present in NuttX it didn't quite fit in a low-power setting. Specifically, the Sharp Memory LCD requires a pulse between 1-60Hz to be sent all time to maintain the currently displayed data visible and at the same time avoid burn-in. The NuttX driver used a simply pin toggling mechanism tied to a timer interrupt. Thus, taking advantage of one of the LPTIM timers, I added support for PWM generation using this peripheral, which allows me to send the required pulse, even while the MCU is in deep sleep. This is also working perfectly.
In regards to the display, I also added support for the latest littlevgl library in NuttX (it officially supports an older version) and developed a simpler driver to access the LCD from littlevgl. So far I have managed to start designing a very simple system of different screens (time, speed, etc.) and a boring splash screen.
My next and final step before going into building a BicycleCompanion prototype is to test the other LPTIM in pulse-counting mode, to sense the bicycle wheel turning. I originally considered (as in the previous BicycleCompanion design) a latching hall sensor to receive pulses whenever the magnet of the wheel passed over it. However, after looking at various models, all Hall sensors tend to be a bit power hungry (a few mA when measuring). After much consideration I decided to go the easy and zero-power way: use a plain reed switch. This also has the advantage that I do not need to fabricate all the sensor mounting and so on, since there are hundreds of cheap bicycle computers and can try this on.
Circuit Design
I have more or less finalized the schematic for BicycleCompanion. I added everything I could think I would need but I could probably add other (experimental) components. For example, I'm unsure if I should add some front light system for the LCD or not. I'm not sure if it would look good enough to justify its use. Anyway, I have many free pins so if you have a recommendation for something else to add, please let me know! (but please have in mind that I'm looking into supply currents measured in uA).
At the moment this is how much of the MCU is under used. As I said, many free pins (and peripherals) still available. The USART will probably be exposed to pins for easy access to NuttX console.
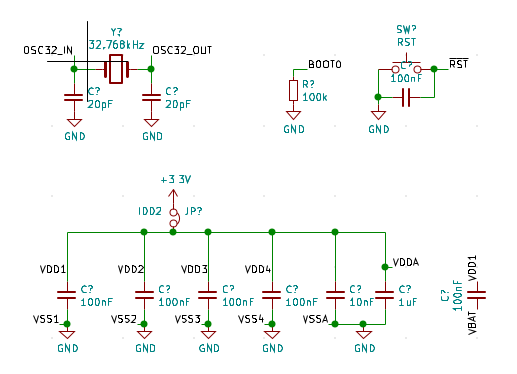
And this is the typical basic set of components required for most MCUs. I'm using the HSI 16MHz internal clock so I only need the 32.768Hz crystal to feed the RTC (and also devices such as the LPTIMs). There is the reset pin and all decoupling caps. The included jumper is to allow me to measure the current consumption of the final device by placing a meter in series.
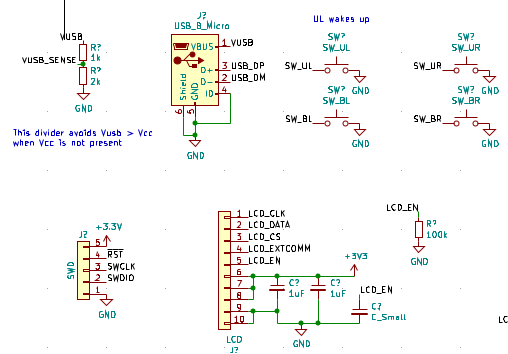
In the following you can see the four buttons, LCD, SWD and USB connector. I will probably modify the SWD connector to also expose the USART.
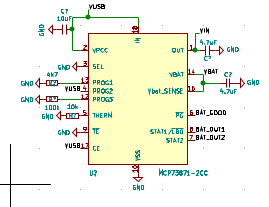
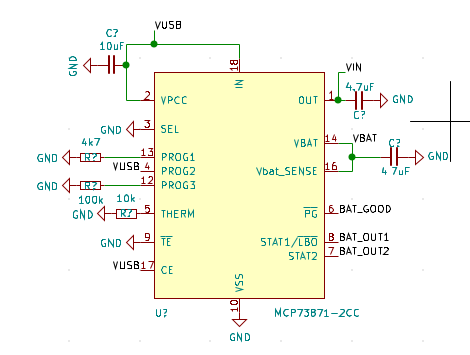
This is the charging IC which feeds from USB and charges the LiPo. It supposeddly handles powering the rest of the system simultaneously (assuming USB port gives enough current) without affecting the battery itself due to the parasitic load:
This little (but so important) part of the circuit allows me to measure the battery without actually consuming a considerable amount of power in the process:You could use only a resistor divider with high enough resistance, but you will have trouble charging the internal ADC capacitor. So, by adding an extra capacitor "outside" you suposedly avoid that problem. There may be better circuits but I did not want to over complicate this.
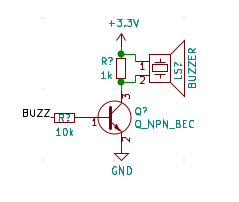
This is the piezo buzzer. Again, there are more efficient configurations but require much more components and would like to keep things simple. In this case it will simply not produce a sound as loud as it could be but I think it should be good enough:The following is the Franklin sensor which I believe is the most complex part of the design. However, it is a copy of an existing circuit so it should work OK:
I will have to consider the placement of the antenna so that I do not pick up much noise or block its reception.
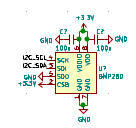
Finally, these are the BMP280 and LSM303 sensors. Again, just mostly copied from the datasheets:
I will publish another log once I get the schematic finalized and have a reasonable PCB design. Pretty pictures to come =)
Again, please let me know about any thoughts or comments about the project or the circuit in progress. -
Present and future of BicycleCompanion
09/29/2019 at 22:34 • 1 commentI've realized I didn't ever posted the final assembled version of the BicycleCompanion Mini. I actually built and tested one, and played with the code. However, I eventually lost a bit of interest. Moreover, I saw that the power consumption was higher that what would be useful and that this would require more work that I was not interested in at the time.
In any case, here are some pictures of the assembled board.
As you can see, it has some last-minute fixes. Mostly I forgot about the EEPROM I2C pullps and also the USB D+ pull-up was wrong. Other than that, everything worked perfectly. In particular, the whole circuit which chooses input power from between battery or USB (when available) as input to the regulator worked as expected. The idea for this was to avoid parasitic discharge on the battery while it was actually being charged. I think this is often overlooked in many battery powered devices and it was something I wanted to consider.
What lies ahead
While as I mentioned I originally lost interest in BicycleCompanion MINI (in the current formulation of the idea) I actually recovered interest in working in a variation of the idea, based on my own experience going on bicycle tours. In principle, what I would like to achieve is a bicycle computer / smartwatch that can last for weeks on a battery charge and be useful during bicycle tours / camping trips (in my case, I ideally combine the two). The idea is not to build the typical bicycle computer oriented towards the competitive cyclist interested in calories burned, watts, etc. but to provide the basic information that is needed during a long distance tour: distance traveled, time, temperature and similar information. I still don't want to add GPS and all that since I believe a smartphone is much more reasonable to use for this purpose. I also do not want to add bluetooth or any other connectivity since I believe it is not actually necessary and it fact I do not like to depend on a companion app (I like a device that can act independently). Similarly, I found during camping that I wanted to have the time and set wakeup alarms, which made me depend on my smartphone. This is also something which I do not like since I preserve smartphone battery to the maximum and typically turn it off once I get to the campsite. So, having a simple watch which can wake me with a vibration/sound alarm is also something I would like to have. As a result, the idea is to have a single device perform both roles. While the features I mentioned are the basic ones, I'm also interested in adding some other ones such as a compass, which can help during navigation and also to be aware of the sunset/sunrise direction during camping. Having also pressure and humidity besides temperature is also useful (or at least interesting to me when outdoors). On the software side I can also think of a simple calendar which helps tracking and planning during trips.Of course to make such a device I need to achieve very low power use in the first place and this is where I'm actually interested in working now. First, I'm in the process of getting a couple of Sharp Memory LCDs to play with, which I believe is the best choice for this. Second, I'm also going to explore the STM32L4 family of MCUs since these are too really low power. Finally, all of this will let me (and actually require for me to) learn about all the intricacies of low power design. All in all, at the moment my idea is for this to be a learning experience and see where it goes. If I start to converge on an idea I may either: a) redefine this project under the new conception or b) create a new project for it. I also may even consider a watch-only (not bicycle computer) in the form of a smartband with a very simplistic alarm/watch function (that's what the second LCD display is for) as an alternative.
In any case, if you're still interested (or have any comments), please continue following this project and feel free to speak up!
-
Coming soon...
07/31/2017 at 22:56 • 0 commentsI just received an e-mail from the PCB manufacturer to let me know the boards are ready =)
![]()
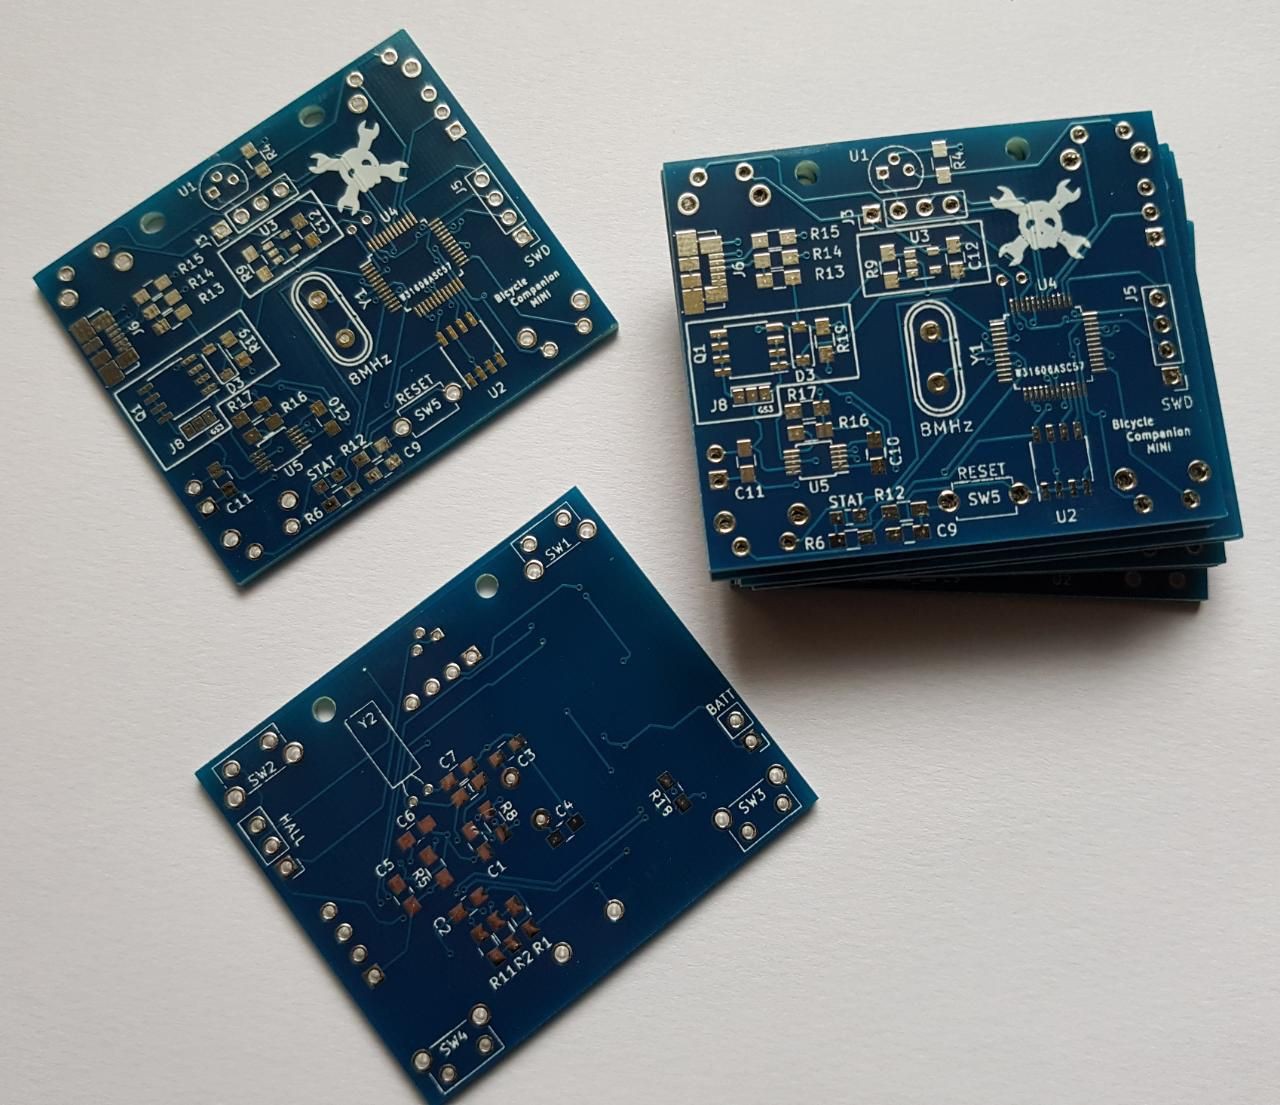
They turned out pretty nice, and even with the blue soldermask. In about a week I'll start soldering one and test it.
-
Finalizing PCB design
07/04/2017 at 22:44 • 0 commentsThis week I've bought remaining components so I have now finalized the PCB design. I did many changes and I feel I could go on forever so I decided to stop here and give it a rest.
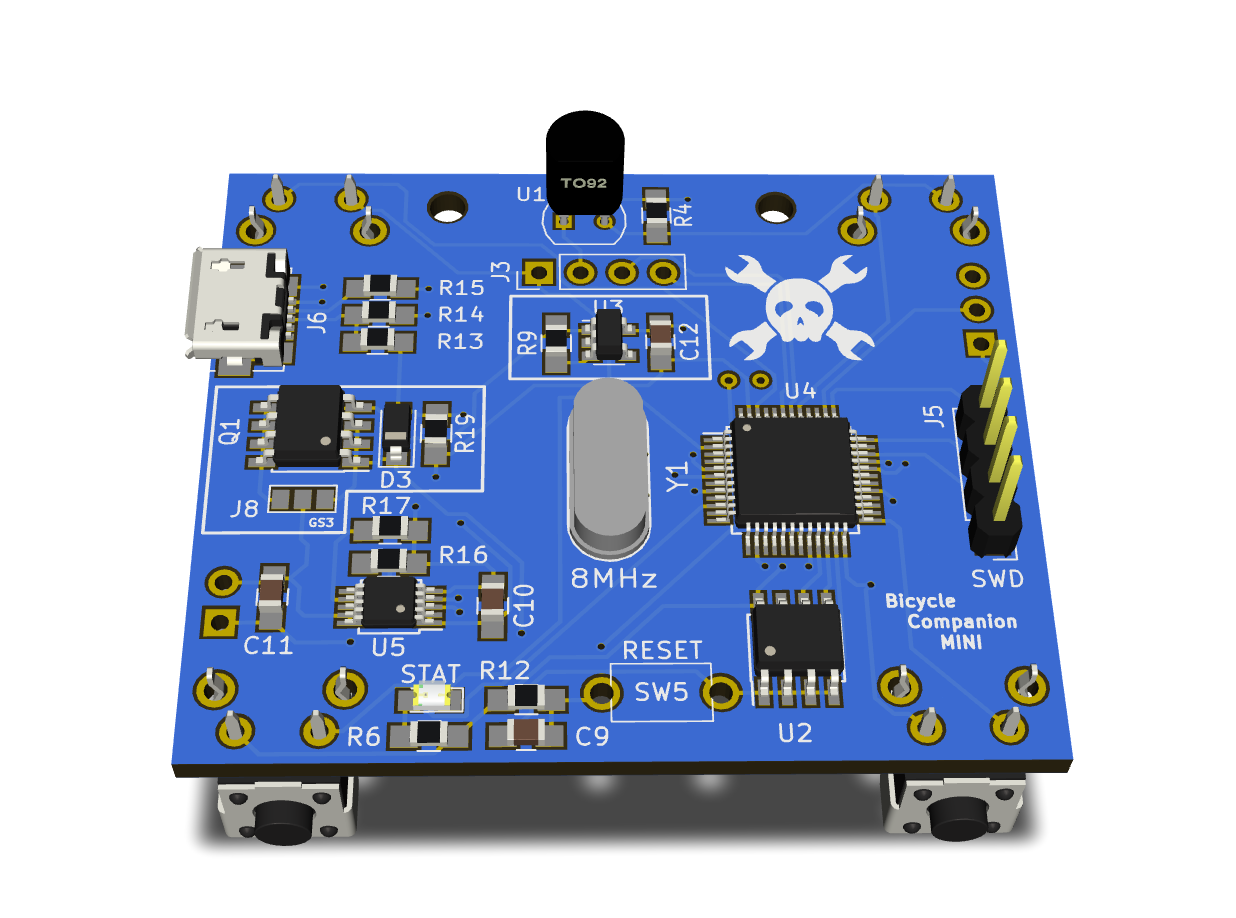
![]()
![]()
Anyway, I think that many changes were really positive since I considered how this will fit into the enclosure, what will be the space available for the battery and how things will be connected. First change was to move buttons to underside, where the battery will be. It should fit a 30x40 LiPo cell, which can have 460mAh (at least I have one of that size) and I could simply put several in parallel to improve capacity.
I also decided to remove most connectors (for battery, hall sensor and display) since they were really bulky. The display will be (in the final version) soldered to a flat cable directly to the board, with some extra length. This way you could disassemble the device and have the screen connected. The screen will be firmly mounted against the top cover so I'm not relying on the connector for mechanical support. The hall sensor will be connected via an external stereo connector. This is also a bit better in therms of removability and waterproofness (yes, I invented those two words). Having a connector which needs to go through the enclosure seems convenient but it impedes any tight seal. In any case, in the future I would do this using spring contacts or something like that, but this isn't available here so I decided to leave that for this version. Finally, same concept can be applied to battery (connect via cable connector instead of having a PCB connector) which I think is a bit more space efficient.
I will print the design and confirm how it would be in relation to the display. If everything is okay I will send the PCB for fabrication this week. Then, a long wait before I can do anything.
BicycleCompanion
A modern, low-power and hackable cycling computer designed for bicycle-touring
 Matias N.
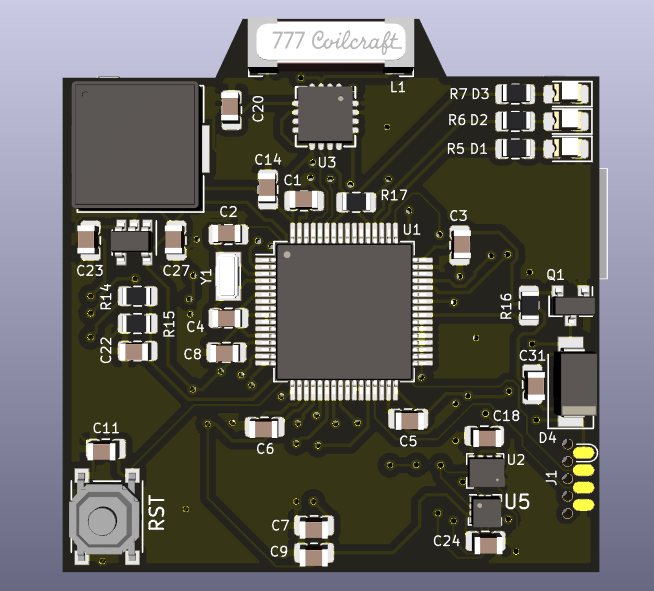 This is the front view where you can see the IC, reset switch, piezzo buzzer (that big square at the top-left corner, yeah it is huge), three LEDs (top-right corner), the lightning sensor below its antenna (middle-top). The IMU is U5, that tiny little thing (will I be able to solder it by hand?) below the barometer + thermometer IC (U2). At the right you can see I used the SOICbyte programming header which I thing is quite cool.

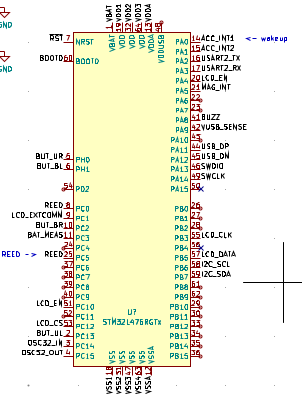 And this is the typical basic set of components required for most MCUs. I'm using the HSI 16MHz internal clock so I only need the 32.768Hz crystal to feed the RTC (and also devices such as the LPTIMs). There is the reset pin and all decoupling caps. The included jumper is to allow me to measure the current consumption of the final device by placing a meter in series.
 In the following you can see the four buttons, LCD, SWD and USB connector. I will probably modify the SWD connector to also expose the USART.
 You could use only a resistor divider with high enough resistance, but you will have trouble charging the internal ADC capacitor. So, by adding an
  The following is the Franklin sensor which I believe is the most complex part of the design. However, it is a copy of an existing circuit so it should work OK:
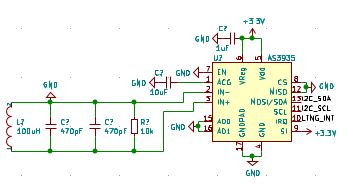 I will have to consider the placement of the antenna so that I do not pick up much noise or block its reception.