ZeroBot - Raspberry Pi Zero FPV Robot
Raspberry Pi Zero 3D Printed Video Streaming Robot
Raspberry Pi Zero 3D Printed Video Streaming Robot
To make the experience fit your profile, pick a username and tell us what interests you.
We found and based on your interests.
For the Zerobot robot there are different instructions and files spread over Hackaday, Github and Thingiverse which may lead to some confusion. This project log is meant as a short guide on how to get started with building the robot.
Where do I start?
- Raspberry Pi Zero W
- 2x ICR18650 lithium cell 2600mAh
- Raspberry camera module
- Zero camera adapter cable
- Mini DC dual motor controller
- DC gear motors
- ADS1115 ADC board
- TP4056 USB charger
- MT3608 boost converter
- Raspberry CPU heatsink
- Micro SD card (8GB or more)
- 2x LED
- BC337 transistor (or any other NPN)
- 11.5 x 6mm switch
- 4x M3x10 screws and nuts
The robot spins/ doesn't drive right
The motors might be reversed. You can simply swap the two wires to fix this.
I can't connect to the Zerobot in my browser
The Raspberry Pi itself with the SD card image running on it is able to display the user interface in your browser. There is no additional hardware needed, so this can't be a hardware problem. Check if you are using the right IP and port and if you inserted the correct WiFi settings in the wpa_supplicant.conf file.
I see the user interface but no camera stream
Check if your camera is connected properly. Does it work on a regular Raspbian install?
Zerobot and Zerobot Pro - What's the difference?
The "pro" version is the second revision of the robot I built in 2017, which includes various hardware and software changes. Regardless of the hardware the "pro" software and SD-images are downwards compatible. I'd recommend building the latest version. New features like the voltage sensor and LEDs are of course optional.
Can I install the software myself?
If you don't want to use the provided SD image you can of course follow this guide to install the required software: https://hackaday.io/project/25092/instructions You should only do this if you are experienced with the Raspberry Pi. The most recent code is available on Github: https://github.com/CoretechR/ZeroBot
All new features: More battery power, a charging port, battery voltage sensing, headlights, camera mode, safe shutdown, new UI
The new software should work on all existing robots.
When I designed the ZeroBot last year, I wanted to have something that "just works". So after implementing the most basic features I put the parts on Thingiverse and wrote instructions here on Hackaday. Since then the robot has become quite popular on Thingiverse with 2800+ downloads and a few people already printed their own versions of it. Because I felt like there were some important features missing, I finally made a new version of the robot.
The ZeroBot Pro has some useful, additional features:
If you are interested in building the robot, you can head over here for the instructions: https://hackaday.io/project/25092/instructions
The 3D files are hosted on Thingiverse: https://www.thingiverse.com/thing:2800717
Download the SD card image: https://drive.google.com/file/d/163jyooQXnsuQmMcEBInR_YCLP5lNt7ZE/view?usp=sharing
After flashing the image to a 8GB SD card, open the file "wpa_supplicant.conf" with your PC and enter your WiFi settings.
After a few people ran into problems with the tutorial, I decided to create a less complicated solution. You can now download an SD card image for the robot, so there is no need for complicated installs and command line tinkering. The only thing left is getting the Pi into your network:
If you don't want the robot to be restricted to your home network, you can easily configure it to work as a wireless access point. This is described in the tutorial.
EDIT 29.7. Even easier setup - the stream ip is selected automatically now
The goal for this project was to build a small robot which could be controlled wirelessly with video feed being sent back to the user. Most of my previous projects involved Arduinos but while they are quite capable and easy to program, there are a lot of limitations with simple microcontrollers when it comes to processing power. Especially when a camera is involved, there is now way around a Raspberry Pi. The Raspberry Pi Zero W is the ideal hardware for a project like this: It is cheap, small, has built in Wifi and enough processing power and I/O ports.
Because I had barely ever worked with a Raspberry, I first had to find out how to program it and what software/language to use. Fortunately the Raspberry can be set up to work without ever needing to plug in a keyboard or Monitor and instead using a VNC connection to a remote computer. For this, the files on the boot partition of the SD card need to be modified to allow SSH access and to connect to a Wifi network without further configuration.
The next step was to get a local website running. This was surprisingly easy using Apache, which creates and hosts a sample page after installing it.
To control the robot, data would have to be sent back from the user to the Raspberry. After some failed attempts with Python I decided to use Node.js, which features a socket.io library. With the library it is rather easy to create a web socket, where data can be sent to and from the Pi. In this case it would be two values for speed and direction going to the Raspberry and some basic telemetry being sent back to the user to monitor e.g. the CPU temperature.
For the user interface I wanted to have a screen with just the camera image in the center and an analog control stick at the side of it. While searching the web I found this great javascript example by Seb Lee-Delisle: http://seb.ly/2011/04/multi-touch-game-controller-in-javascripthtml5-for-ipad/ which even works for multitouch devices. I modified it to work with a mouse as well and integrated the socket communication.
I first thought about using an Arduino for communicating with the motor controller, but this would have ruined the simplicity of the project. In fact, there is a nice Node.js library for accessing the I/O pins: https://www.npmjs.com/package/pigpio. I soldered four pins to the PWM motor controller by using the library, the motors would already turn from the javascript input.
After I finally got a camera adapter cable for the Pi Zero W, I started working on the stream. I used this tutorial to get the mjpg streamer running: https://www.youtube.com/watch?v=ix0ishA585o. The latency is surprisingly low at just 0.2-0.3s with a resolution of 640x480 pixels. The stream was then included in the existing HTML page.
With most of the software work done, I decided to make a quick prototype using an Asuro robot. This is a ancient robot kit from a time before the Arduino existed. I hooked up the motors to the controller and secured the rest of the parts with painters tape on the robot's chassis:
After the successful prototype I arranged the components in Fusion 360 to find a nice shape for the design. From my previous project (http://coretechrobotics.blogspot.com/2015/12/attiny-canbot.html) I knew that I would use a half-shell design again and make 3D printed parts.
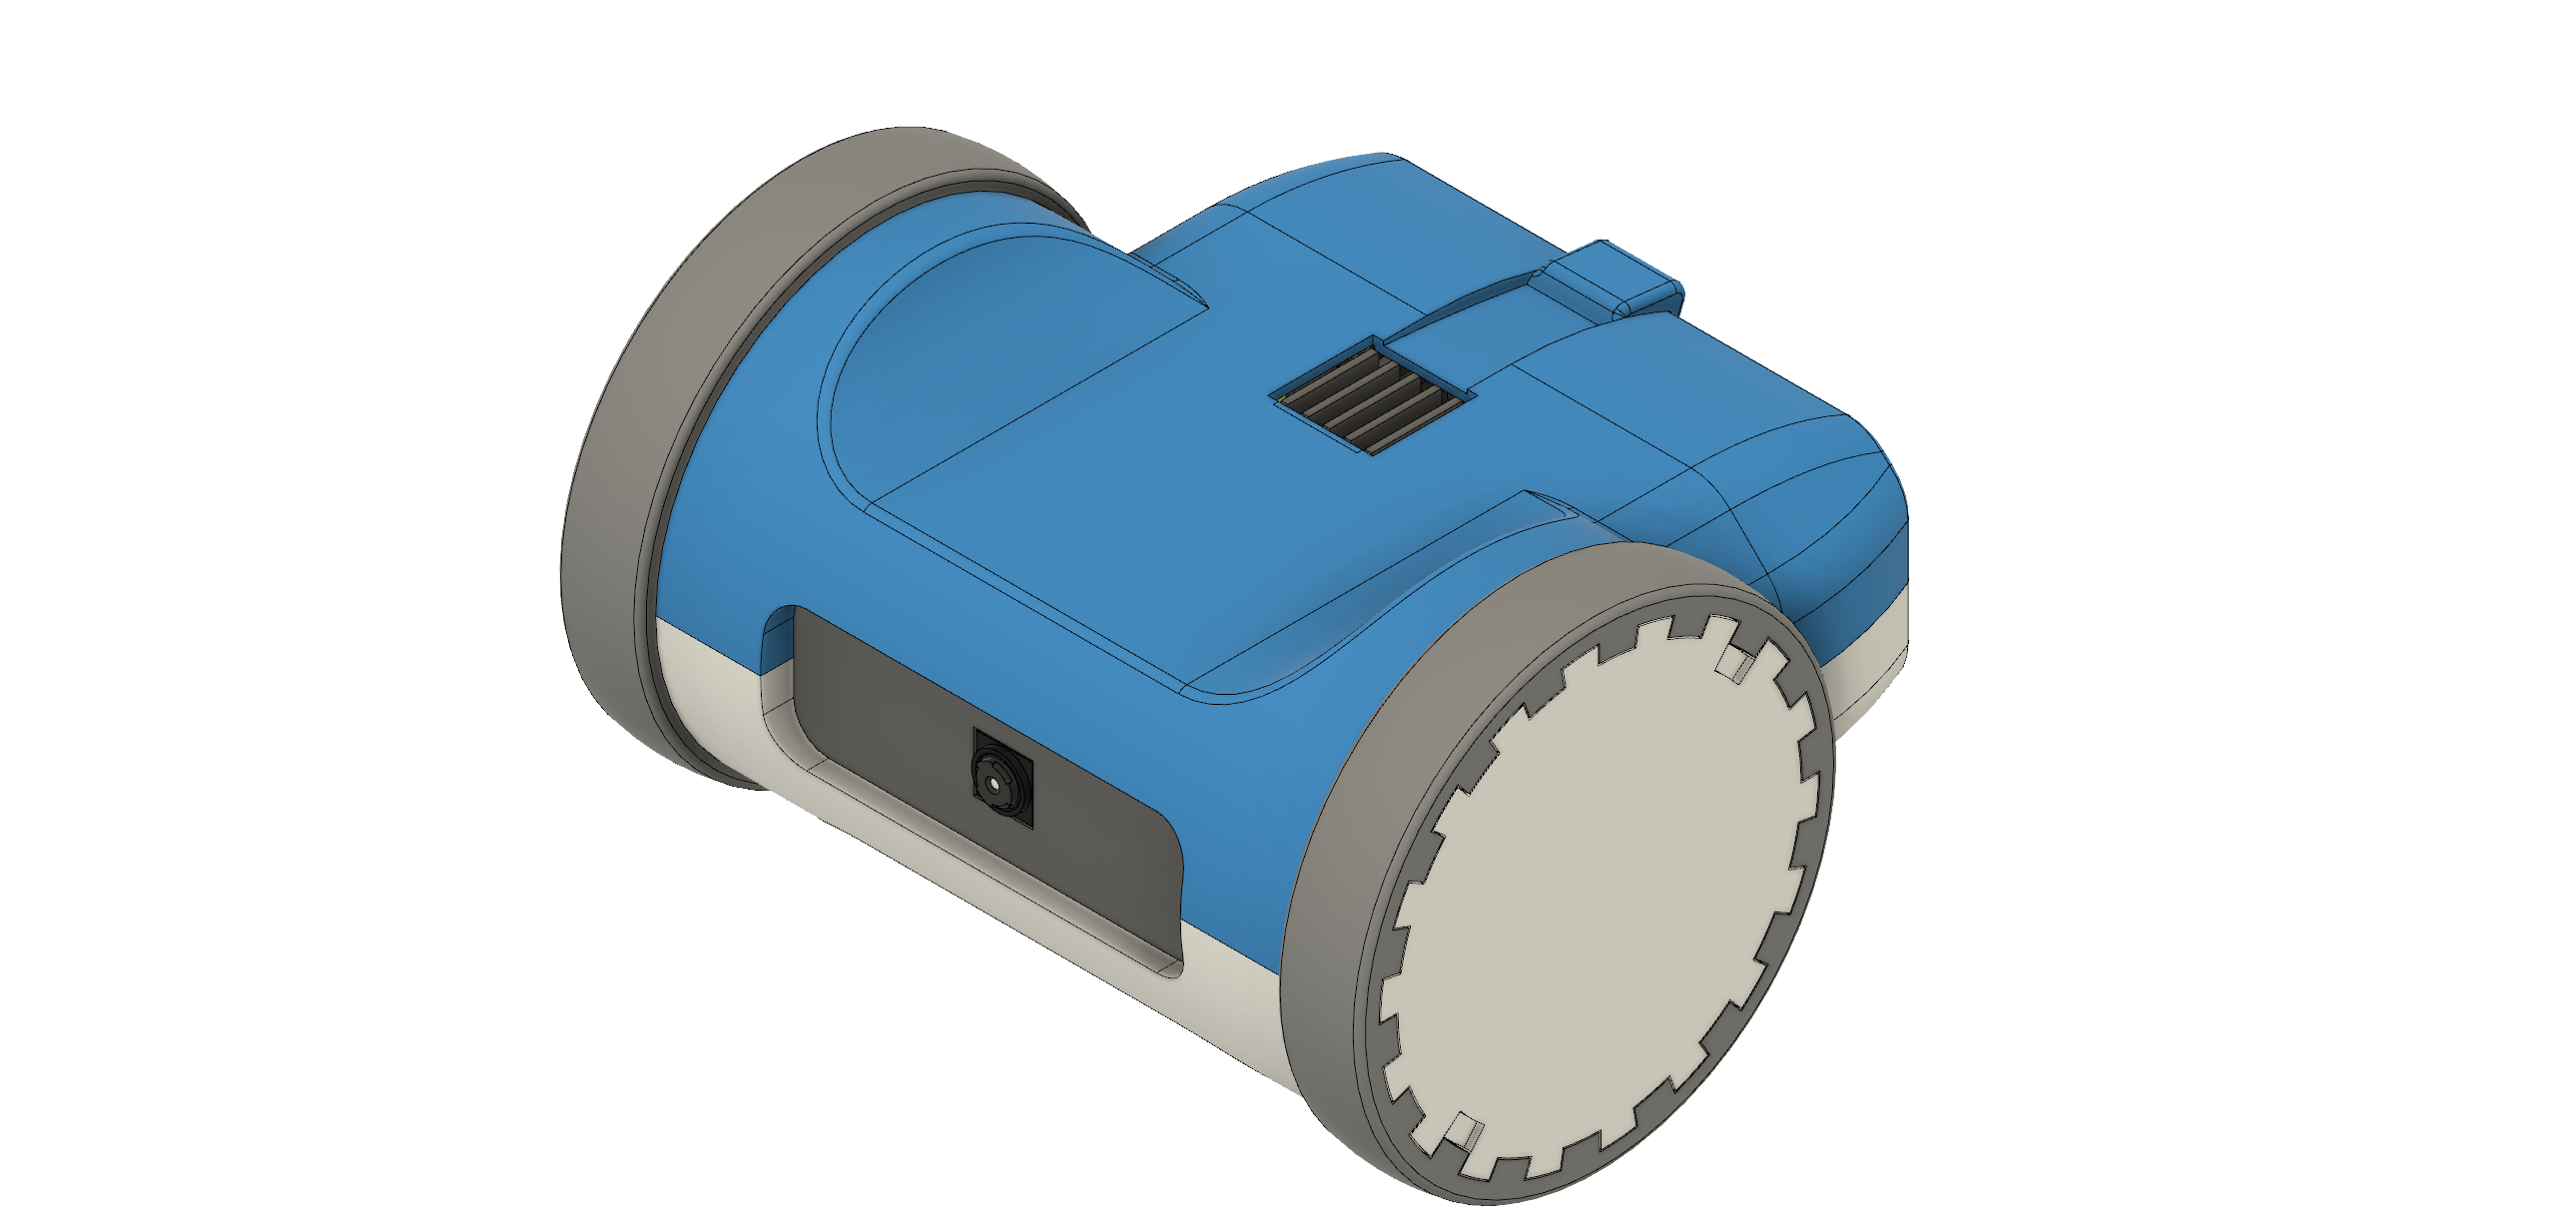
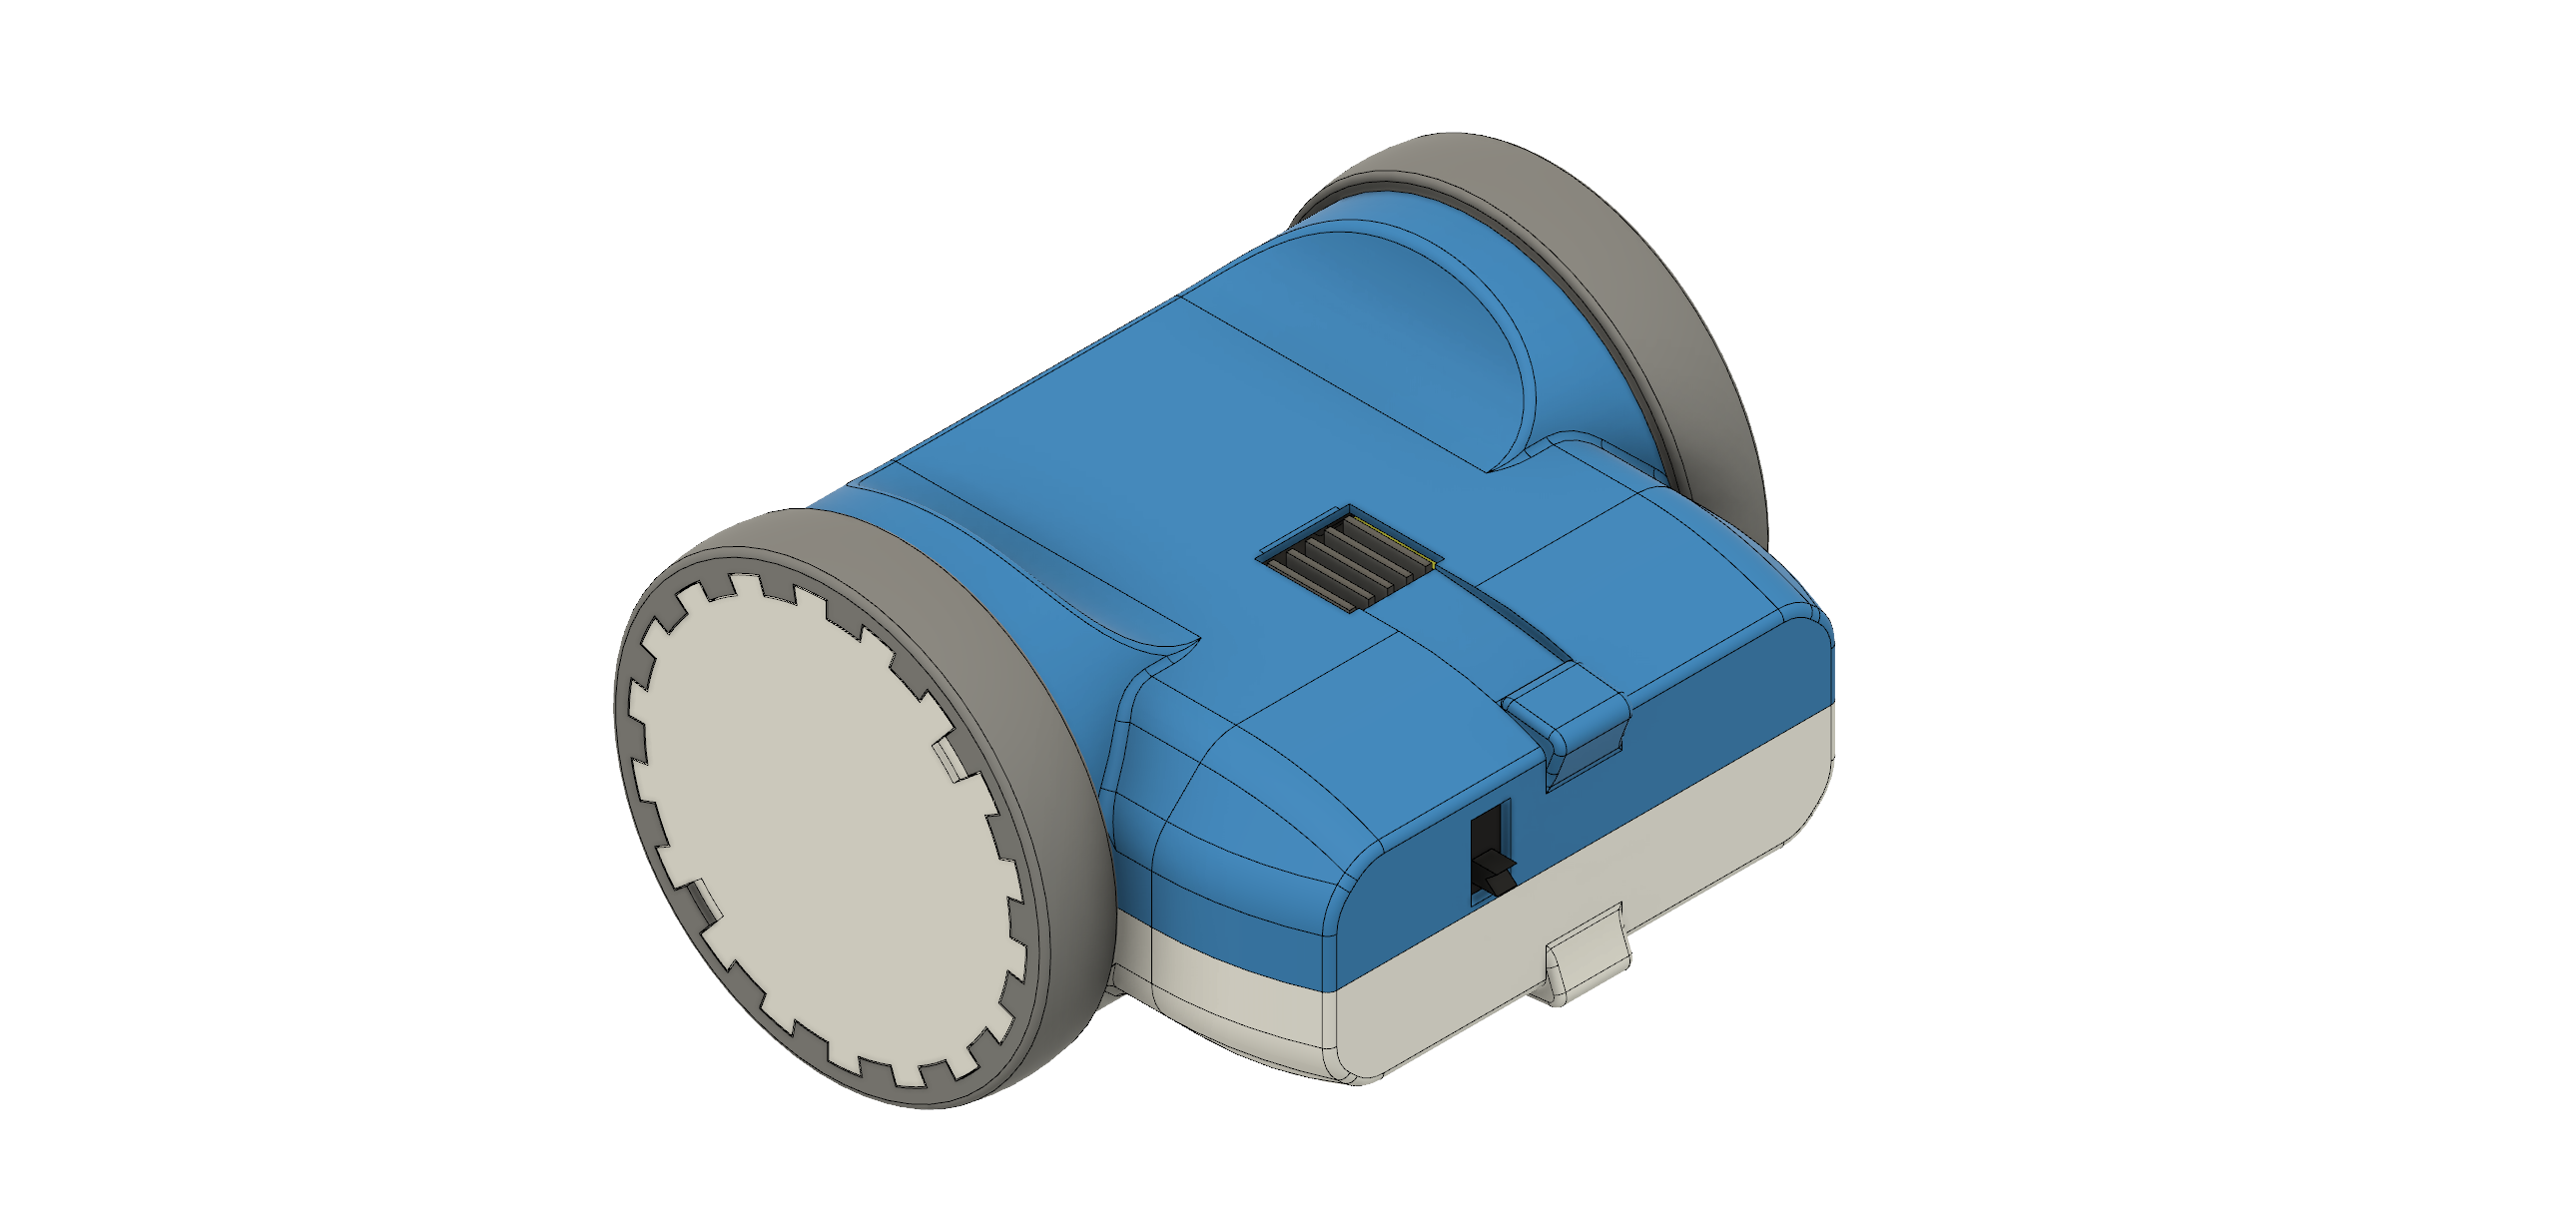
The parts were printed in regular PLA on my Prusa i3 Hephestos. The wheels are designed to have tires made with flexible filament (in my case Ninjaflex) for better grip. For printing the shells, support materia is necessary. Simplify3D worked well with this and made the supports easy to remove.
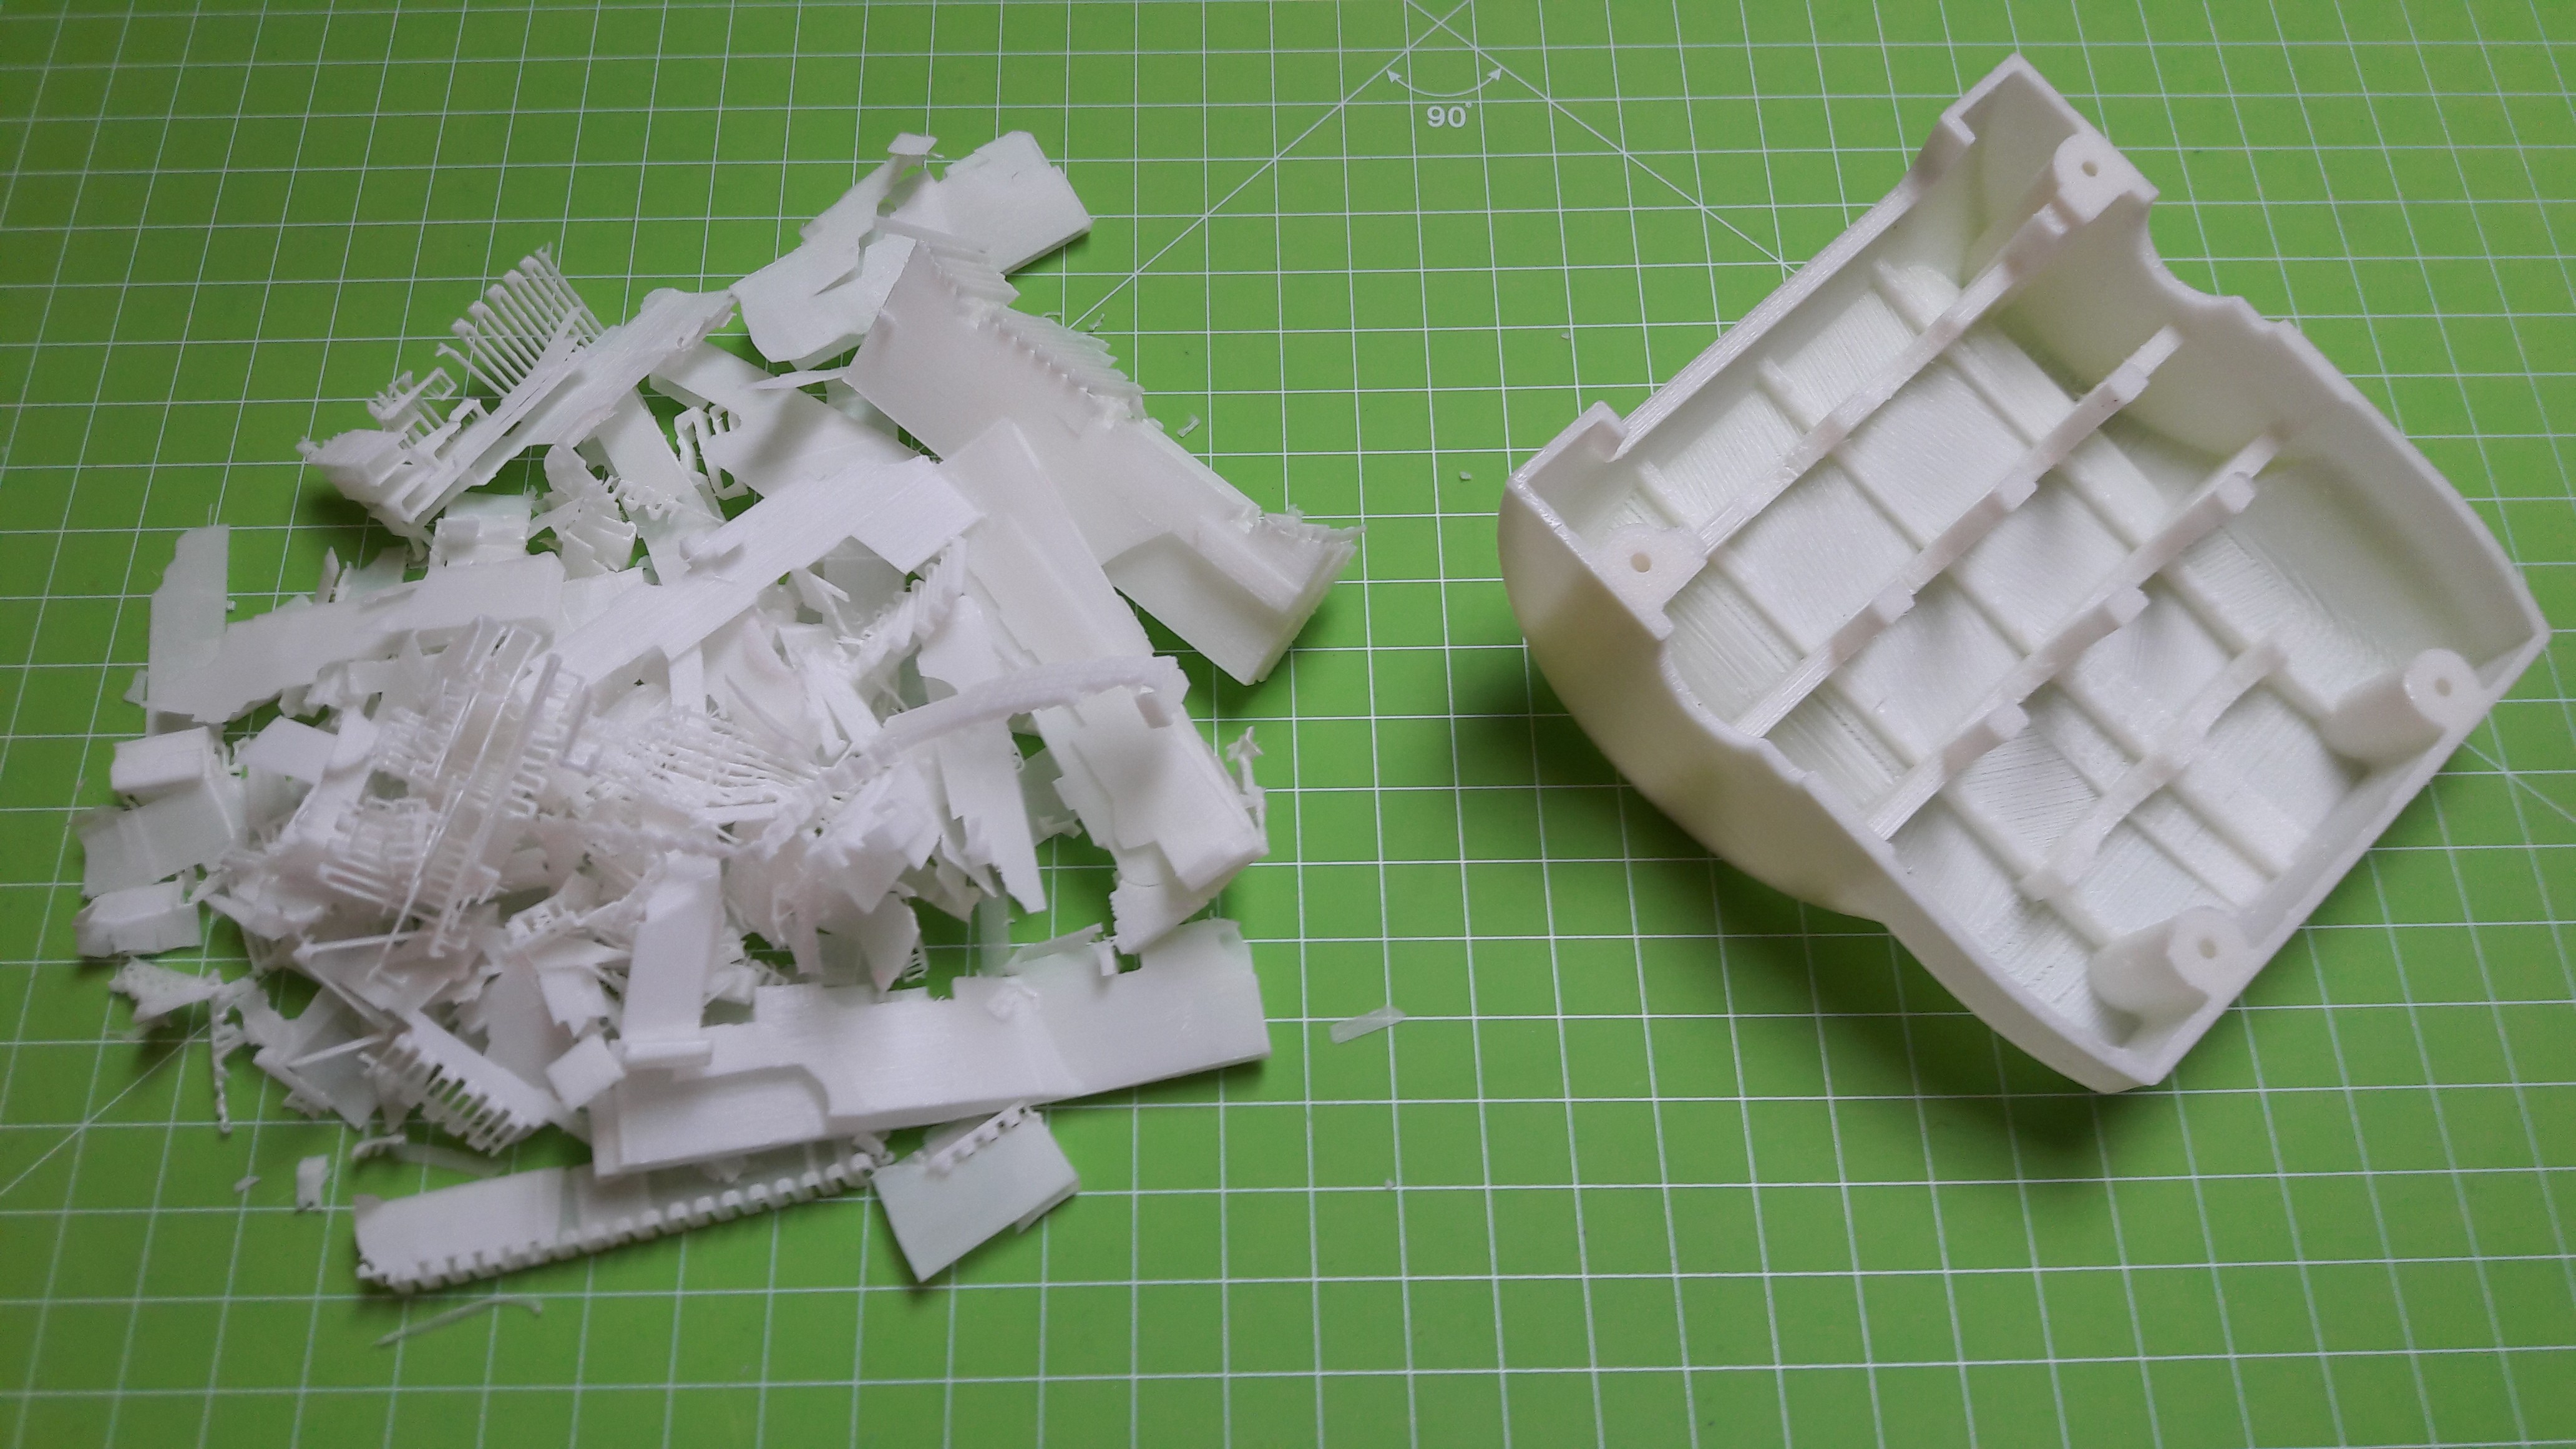
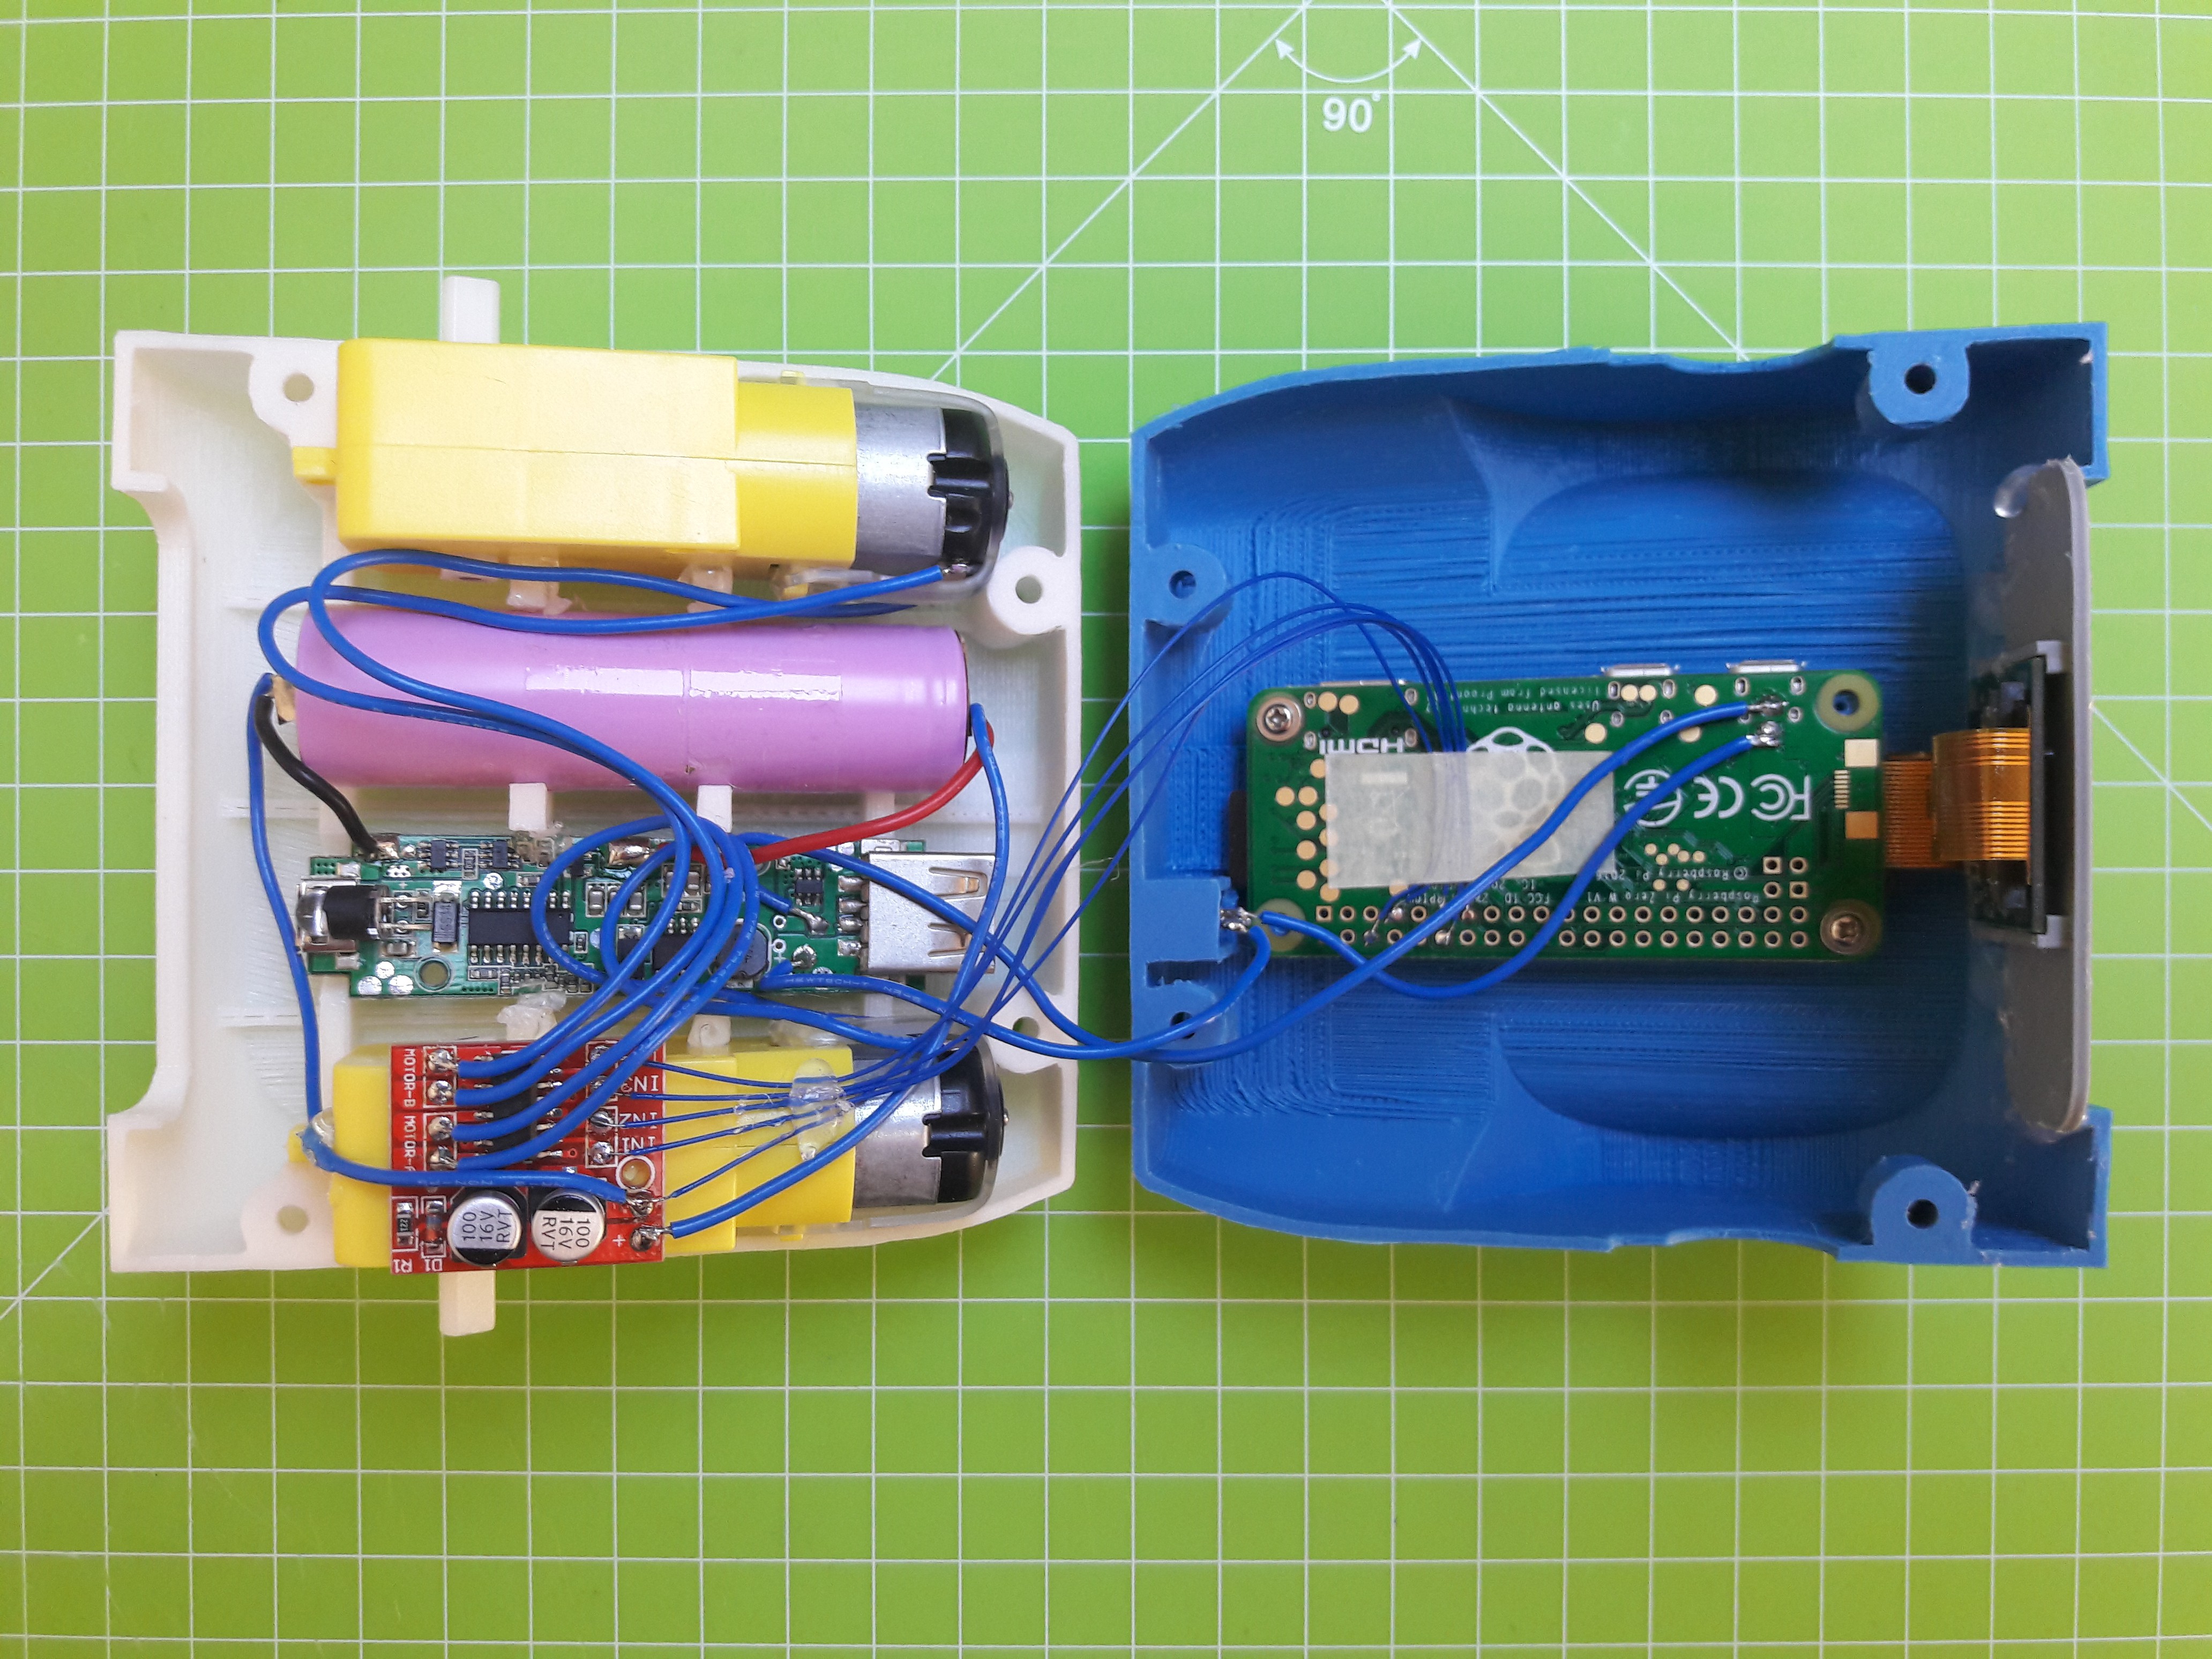
After printing the parts and doing some minor reworking, I assembled the robot. Most components are glued inside the housing. This may no be professional approach, but I wanted to avoid screws and tight tolerances. Only the two shells are connected with four hex socket screws. The corresponding nuts are glued in on the opposing shell. This makes it easily to access the internals of the robot.
For...
Read more »DISCLAIMER: This is not a comprehensive step-by-step tutorial. Some previous experience with electronics / Raspberry Pi is required. I am not responsible for any damage done to your hardware.
I am also providing an easier alternative to this setup process using a SD card image: https://hackaday.io/project/25092/log/62102-easy-setup-using-sd-image
https://www.raspberrypi.org/documentation/installation/installing-images/
This tutorial is based on Raspbian Jessie 4/2017
Personally I used the Win32DiskImage for Windows to write the image to the SD card. You can also use this program for backing up the SD to a .img file.
IMPORTANT: Do not boot the Raspberry Pi yet!
Access the Raspberry via your Wifi network with VNC:
Put an empty file named "SSH" in the boot partiton on the SD.
Create a new file "wpa_supplicant.conf" with the following content and move it to the boot partition as well:
ctrl_interface=DIR=/var/run/wpa_supplicant GROUP=netdev
update_config=1
network={
    ssid="wifi name"
    psk="wifi password"
}
Only during the first boot this file is automatically moved to its place in the Raspberry's file system.
After booting, you have to find the Raspberry's IP address using the routers menu or a wifi scanner app.
Use Putty or a similar program to connect to this address with your PC.
After logging in with the default details you can run
sudo raspi-config
In the interfacing options enable Camera and VNC
In the advanced options expant the file system and set the resolution to something like 1280x720p.
Now you can connect to the Raspberry's GUI via a VNC viewer: https://www.realvnc.com/download/viewer/
Use the same IP and login as for Putty and you should be good to go.
sudo apt-get update
sudo apt-get upgrade
sudo apt-get install apache2 node.js npm
git clone https://github.com/CoretechR/ZeroBot Desktop/touchUI
cd Desktop/touchUI
sudo npm install express
sudo npm install socket.io
sudo npm install pi-gpio
sudo npm install pigpio
Run the app.js script using:
cd Desktop/touchUI
sudo node app.js
You can make the node.js script start on boot by adding these lines to /etc/rc.local before "exit 0":
cd /home/pi/Desktop/touchUI
sudo node app.js&
cd
The HTML file can easily be edited while the node script is running, because it is sent out when a host (re)connects.
Create an account to leave a comment. Already have an account? Log In.
That's great to hear, thanks!
About the wire management: Do not use more than one boost converter module. Some of my images show two, but both won't fit. Also, if you are using a flat lipo battery maybe you can break off the parts of the printed case that would hold the standard batteries. That might give you some more room. But the most important thing is to get the wires as short as possible.
Great project! I got mine up and running tonight. I have a quick question, is there a way in software to to rotate the camera image? It seems to be flipped on mine? Its odd, because it looks like I installed it correctly.
Yes, that can be fixed easily. In the file start_stream.sh in the folder touchUI on the desktop you have to remove „-vf -hf“. Use VNCviewer to get access to the user interface, then change the file with a text editor and reboot.
How long does this robot last on a full charge? and what is the overall dimensions of the robot? Thanks.
At least two hours, probably a lot more depending on the usage.
95mm length, 115mm width, 70mm height
Hi very nice project. I didn't see diode to protect Dual Channel DC Motor Driver. It is not necessary to reduce damage on MOS ?
Thanks
I guess the IC on the board has internal diodes, or else the H-bridge would not work. There is also a diode soldered to the board, that might just be for reverse polarity protection.
Hi. This is a great project! Thanks for all your hard work! I got the image downloaded to an SSD and the software seems to be running fine. Just waiting on a few more parts to arrive so in the meantime I decided to get the nuts glued into the shell. This has proven to be quite frustrating for me. Wondered if anyone had any tips on how they did this and what type of glue they used. It was hard to apply the glue and then try to position the nut in place with tweezers but maybe I’m doing something wrong?
Thanks!
Thanks! The easiest way would be to stick a longer m3 bolt though the plastic part and to screw it into the nut. Before pulling on the bolt to sink the nut in place, apply a few drops of glue to the nut. This way the nut is aligned perfectly.
Ahhh. Brilliant - don’t know why I didn’t think of that ! Thanks!
Hi.
Why is the ADS1115 powered at 3.3 volts? According to the data sheet, it can be up to 7 volts. Does that have a definite reason?
In order to communicate via i2c with the Raspberry Pi, the ADS1115 also needs to run at 3.3V. The ADS1115 has two pullup resistors that you could desolder, then it would work at 5V. But I though setting it to 3.3V was the easier option.
Hi all, The zerobot works as a charm but when I forward the port through my router, I get only access to the remote CTL but I receive no video stream. Any advice ? Thx !
There are two ports that you have to forward, 9000 and 3000.
User averneus wrote that he got this to work in the comments here: https://hackaday.io/project/25092/instructions
Thank you so much !
I certainely read that to quickly! My bad !
Hi
I want to connect with ssh, but I don't know the user and pass
Hi Max,
I try your code during I wait to receive component. When I hit "Off" button, my pi shutdown even if I answer "cancel". So in the code I saw :
if(confirm("This will shutdown the Pi.\nAre you sure?"))
alert('Shutting down...\nPlease wait 20s before turning the power off.')
socket.emit('power', 1);
I guess "{ }" are missing !? And alert() and socket.emit() are always executed...
So I wrote that :
if(confirm("This will shutdown the Pi.\nAre you sure?")){
alert('Shutting down...\nPlease wait 20s before turning the power off.');
socket.emit('power', 1);
}else{
alert("Okay, on the road again!");
}
I aim to redesign the body to avoid support and add lego compatibility. I will tell you more.
Very very thanks for your work. Beautifull job!
Best regards
Thanks, Good catch! I must have though I was using Python. Will be fixed asap.
Hey, why is the USB port and Ethernet disabled in the given image?? Is there any particular reason, what if I turn it on. How to turn it on?
Sorry about the late answer. If you scroll down on this site, spencerjack96 has asked the same question and got a solution from someone.
Thanks for the detailed description of the process, it turned out very cool https://192168ll.mobi/ 192.168.1.1
Hi, I love this project. I have yet the Pi zero and motors. I ordered the other components.
I have some idea to upgrade this robot after my first try :
- make body "Lego" (and "Lego technic") compatible
- improve code to add other stuff (other light, servo, WS2812 lights).
Best regards
Hey nice job! wondering why your project didn't win the 2017's edition?
[this comment has been deleted]
I'm not exactly sure what the link does. What version of the image file are you using? Have you tried adding ":3000" after the IP? This should get you to the interface immediately.
Did it work before you upgraded to the newer version? The message that you get should only show when the port is not entered after the ip, but I'm no sure about that. In most occasions it might be easier to download the Zerobot Pro image and flash that to the sd card.
This looks awesome - I am trying to buy the components to make one.
What is the little board between your battery and one of the motors?
Hi. Did you lock down the USB ports as they don't appear to work booting from a fresh image :(
Sorry for the late answer. Yes, at some point I configured the usb port as a usb-lan bridge to my computer. It should be reversible but I would have to look that up.
that explains why i couldnot pair the ps3 controller directly. had to do pair separately via pc app
if you can please do so next step is trying to add a usb mic and speaker
you need to edit /boot/cmdline to remove modules-load=dwc2,g_ether .. and remove the reference dtoverlay=dwc2 from /boot/config.txt
seems to work
i dont know but doing a update and upgrade killed node and a few other things. what should i do?
I'm not sure what that problem could be. Maybe it installed a new version of that is not compatible with the code. If nothing else works you can flash the SD image again.
yeah but im adding other features like ps3 controller,audio mic and sound and i got the robot also to samba share files.
Maybe you can try to run the node script from the command line to see if there are any errors. But I‘m not an expert on this.
picked up a new pi 5mp and did a bit of testing everythung works and even the pcb works but not the ccd. ill find a new ccd hopefully
hi! I'm creating your robot, unfortunately i haven't your same motor driver so I've tried with this model:
2Pcs L9110S H Bridge Stepper Motor Dual DC Driver Controller Module
https://banggood.app.link/3sYiDdaOvH. The wbe interface works and the motor too, but both motors sping with no sense, not according with the direction given by the web interface. Do you thing the driver is wrong or can it works with this project too? I'm using same wiring diagram
Your motor driver should be compatible.
The Raspberry generates a voltage between 0 and 3.3V on the output pins that are connected to the driver. Try using a multimeter to check if the voltages change when you move the joysticks.
Maybe it's just a simple problem with the wiring of these pins.
with multimeter i read on both motor tension within a range of + 3,26 and -3,26V, depending on the joystick directions, but the problem is that when I move the joystick:
- forward -> M1 spin forward, M2 not move
- right -> M1 and M2 move forward
- left -> M1 spin backward
- backward -> M1 spin backward , M2 spin forward
How can I debug this kind of problem, there is some mapping on the SW to set?
As you're describing it, the behavior of motor 1 is correct. M2 would need to be reversed and is also missing one direction of movement. This still looks like a wire that is attached to the wrong pin. You can configure the directions via software but that would be the same as reversing the motor cables.
Try measuring the voltage between each pin and ground instead of between two output pins (the negative voltage would suggest that you did that previously).
You can also test the motor driver without the raspberry using a 5V or 3V source on the input pins to see if the motors are turning.
It's difficult to tell even from looking at the cad model. I don't have such a cable but it could work. Maybe it's a bit too short, you have to try it.
ok got bot up and running 40mm cable works bends are almost too tight.
Become a member to follow this project and never miss any updates
 Max.K
Max.K
 Jacquin
 Dennis
 Wes Freeman
This has been so much fun putting together. The software was a breeze to install thanks to all your hard work. Everything seems to work fine. I tested the software and the motors move, the video works and the lights turn on! I ended up using a lithium ion battery pack from adafruit because I wasn't having much success soldering the two batteries together . My main problem right now is wire management. Right now I can't fit everything in the case. I'm working on cutting down the length of the wires, because I made them too long. Anyone have tips on other ways to save space? Thanks!