-
First blog from the scraptop
02/16/2018 at 12:14 • 0 commentsYES - exclamation mark
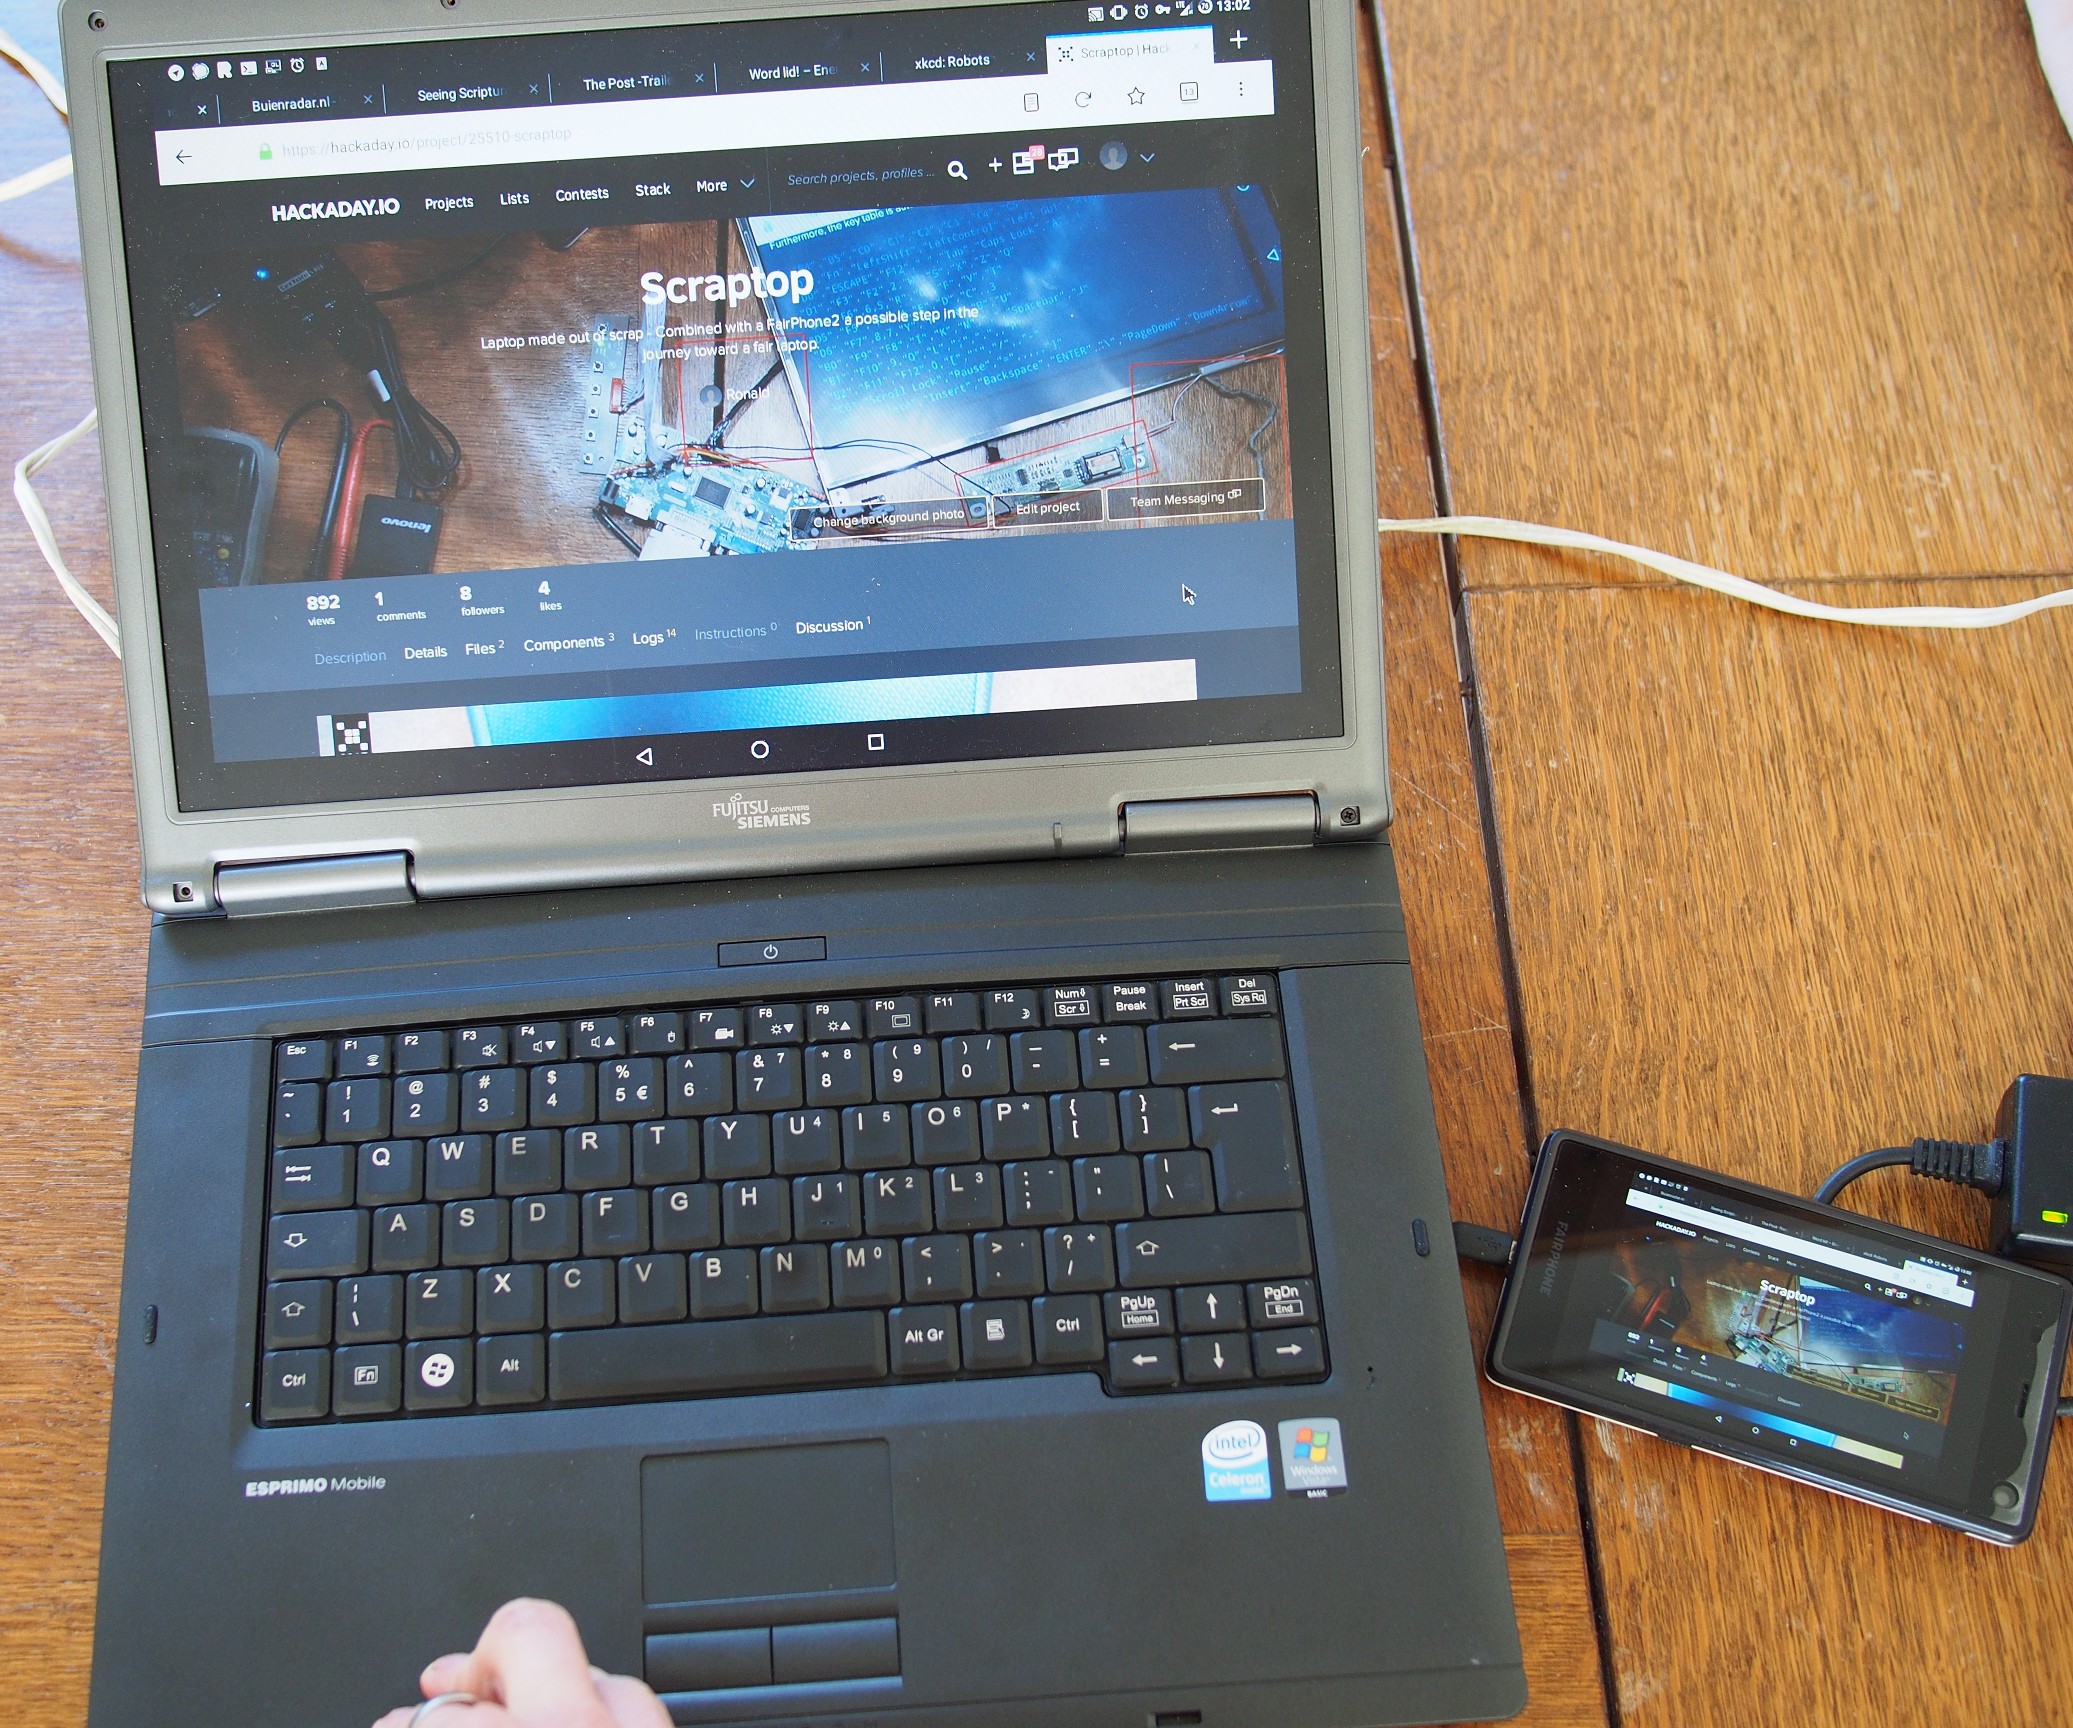
It's working
![]()
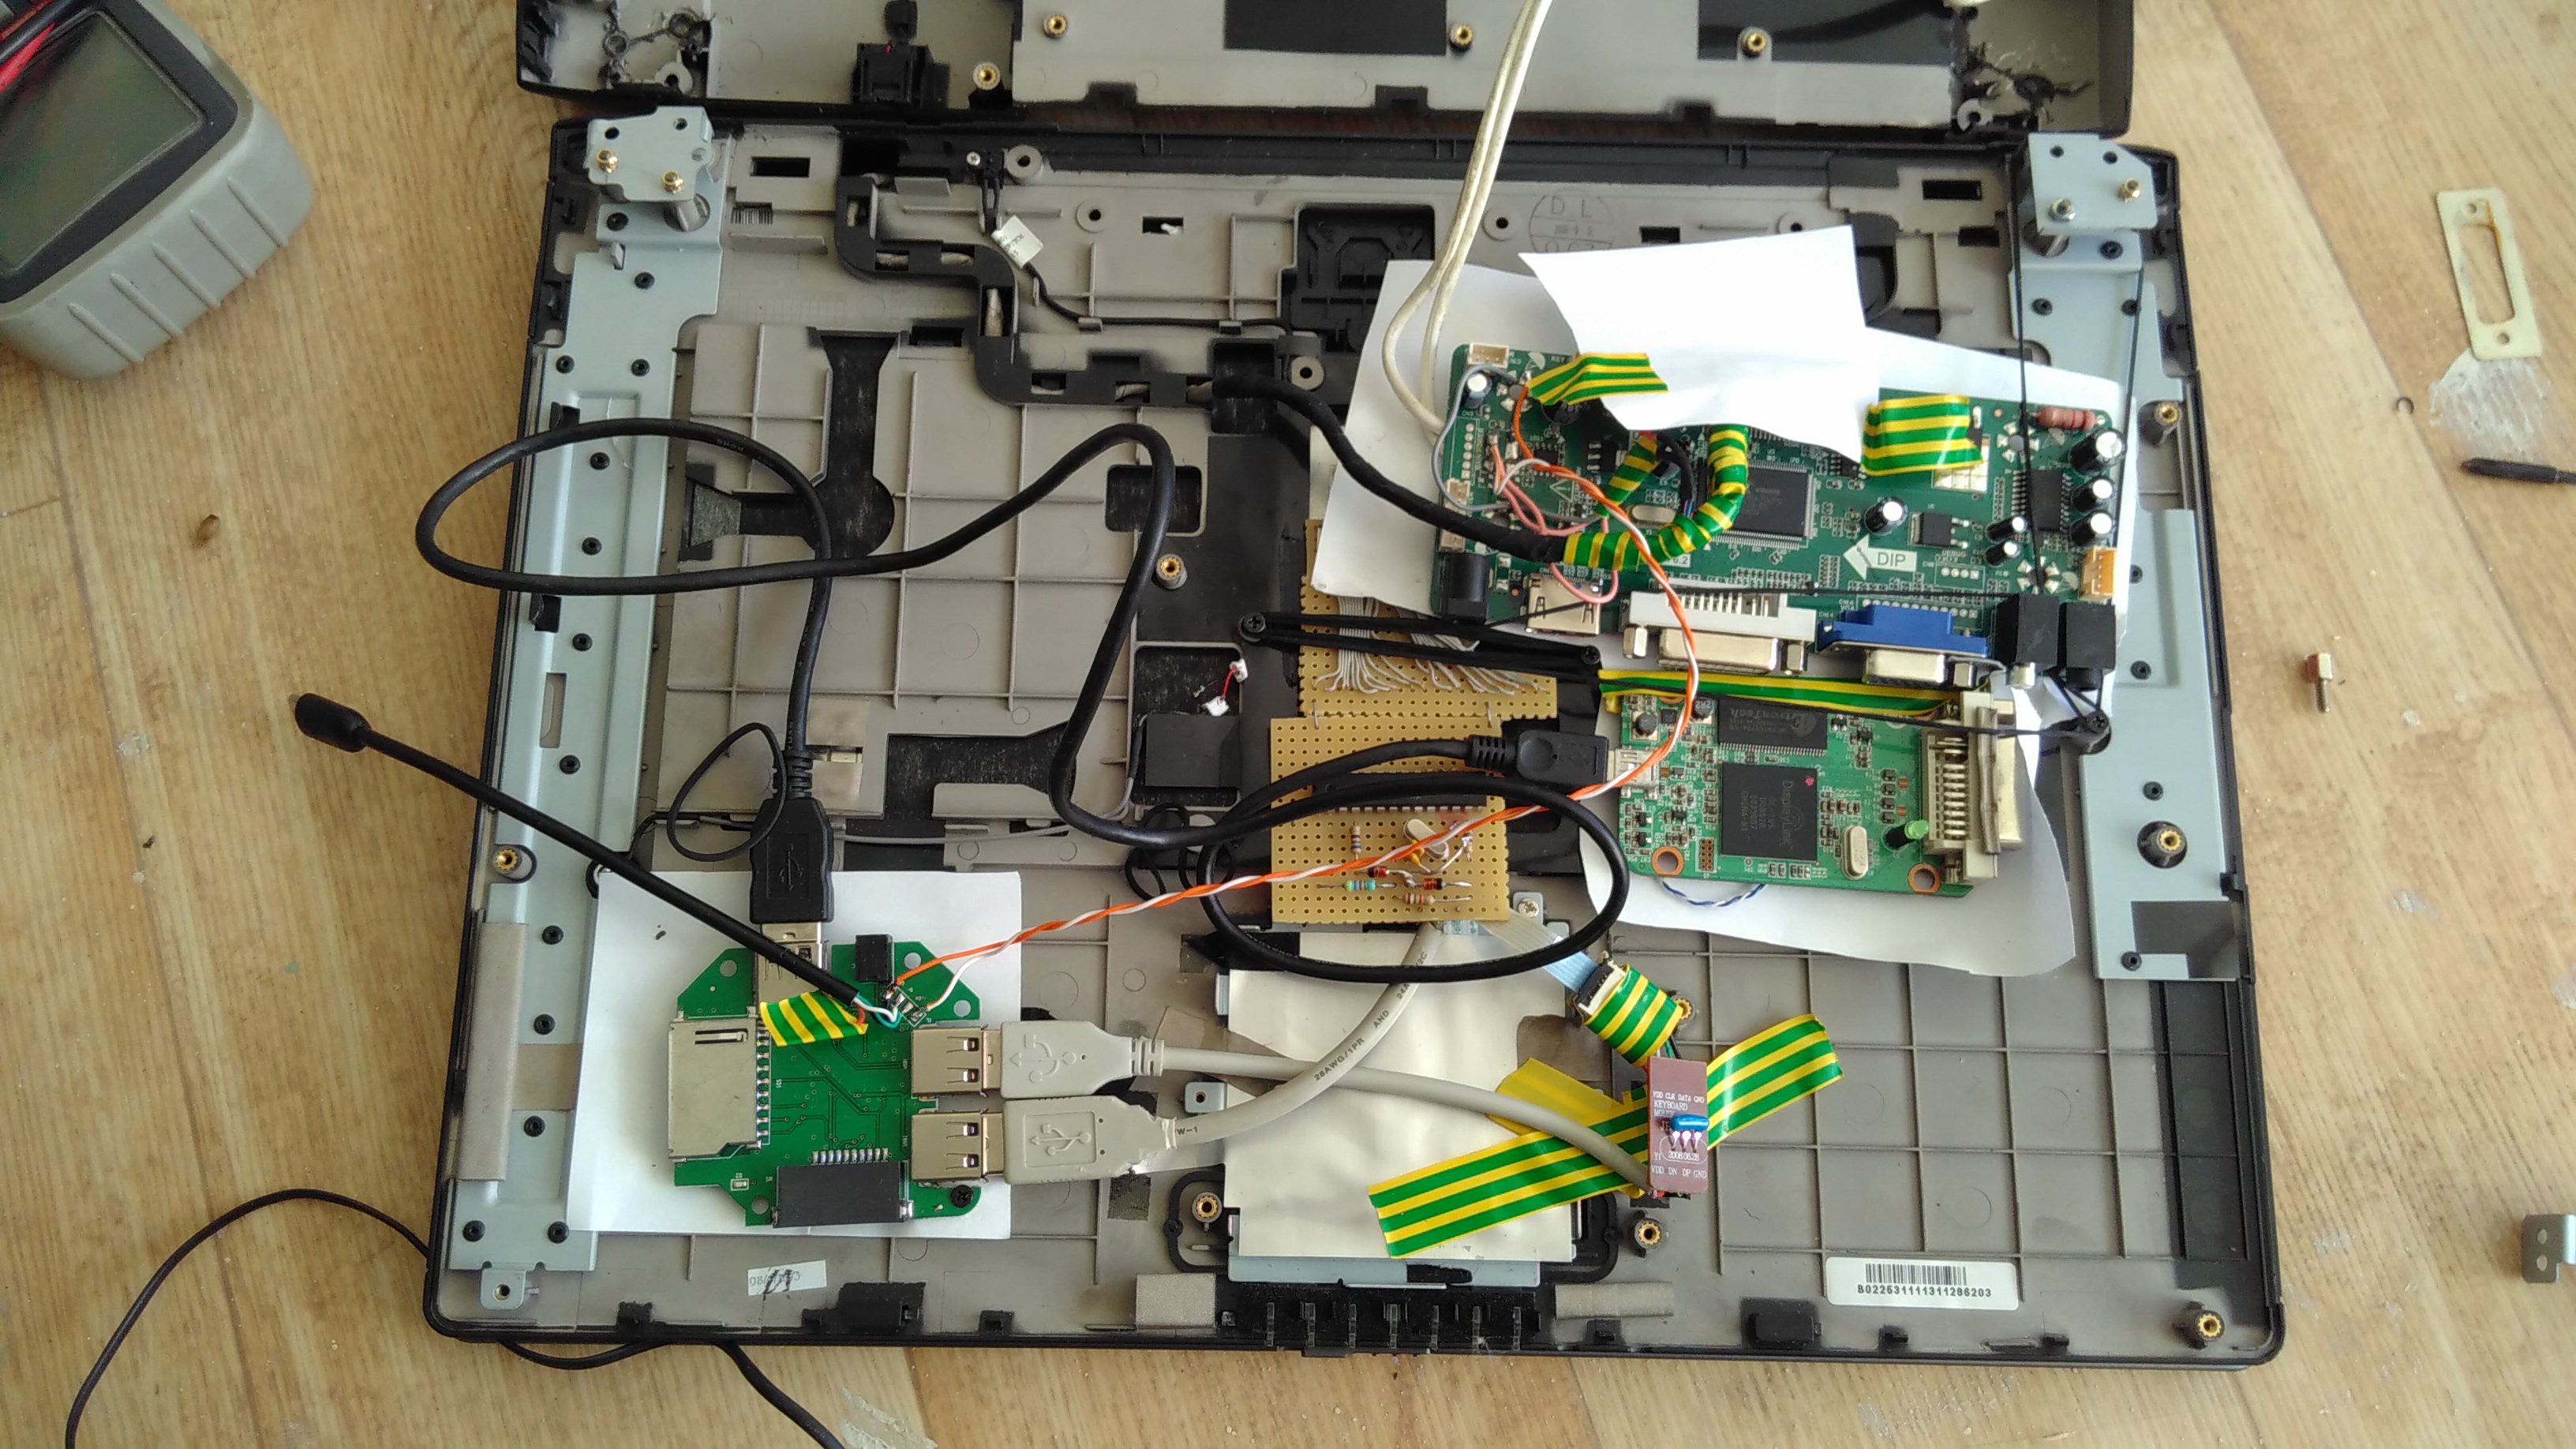
There are some issues with the keyboard - first the 'a' key was not working and when I fixed it, the shift key failed. Ah well... Just needs some fine tuning. Everything fits in;
![]()
All on 5V too, but more on that later.
-
Minimalist DVI - second try
02/09/2018 at 17:15 • 0 commentsFirst DVI connection has failed, as I said a few posts ago. Here again a picture of the DVI connector:
![]()
By Ionuion at English Wikipedia, CC BY-SA 3.0, https://commons.wikimedia.org/w/index.php?curid=4379981
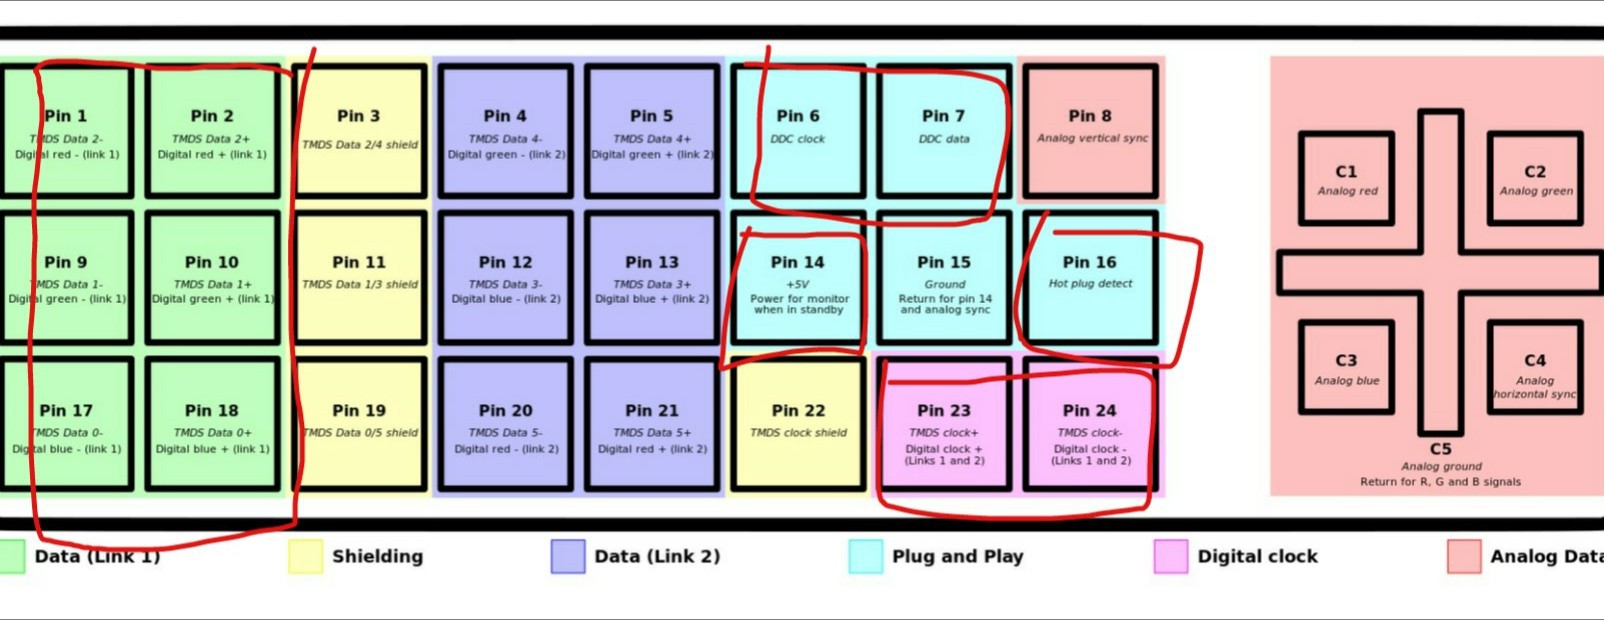
Also on Wikipedia is noted that single link DVI works up to 1920 × 1200, only after that the second link is activated. I figured the shielding isn't very much needed and the GND can be wired on a more convenient location![]()
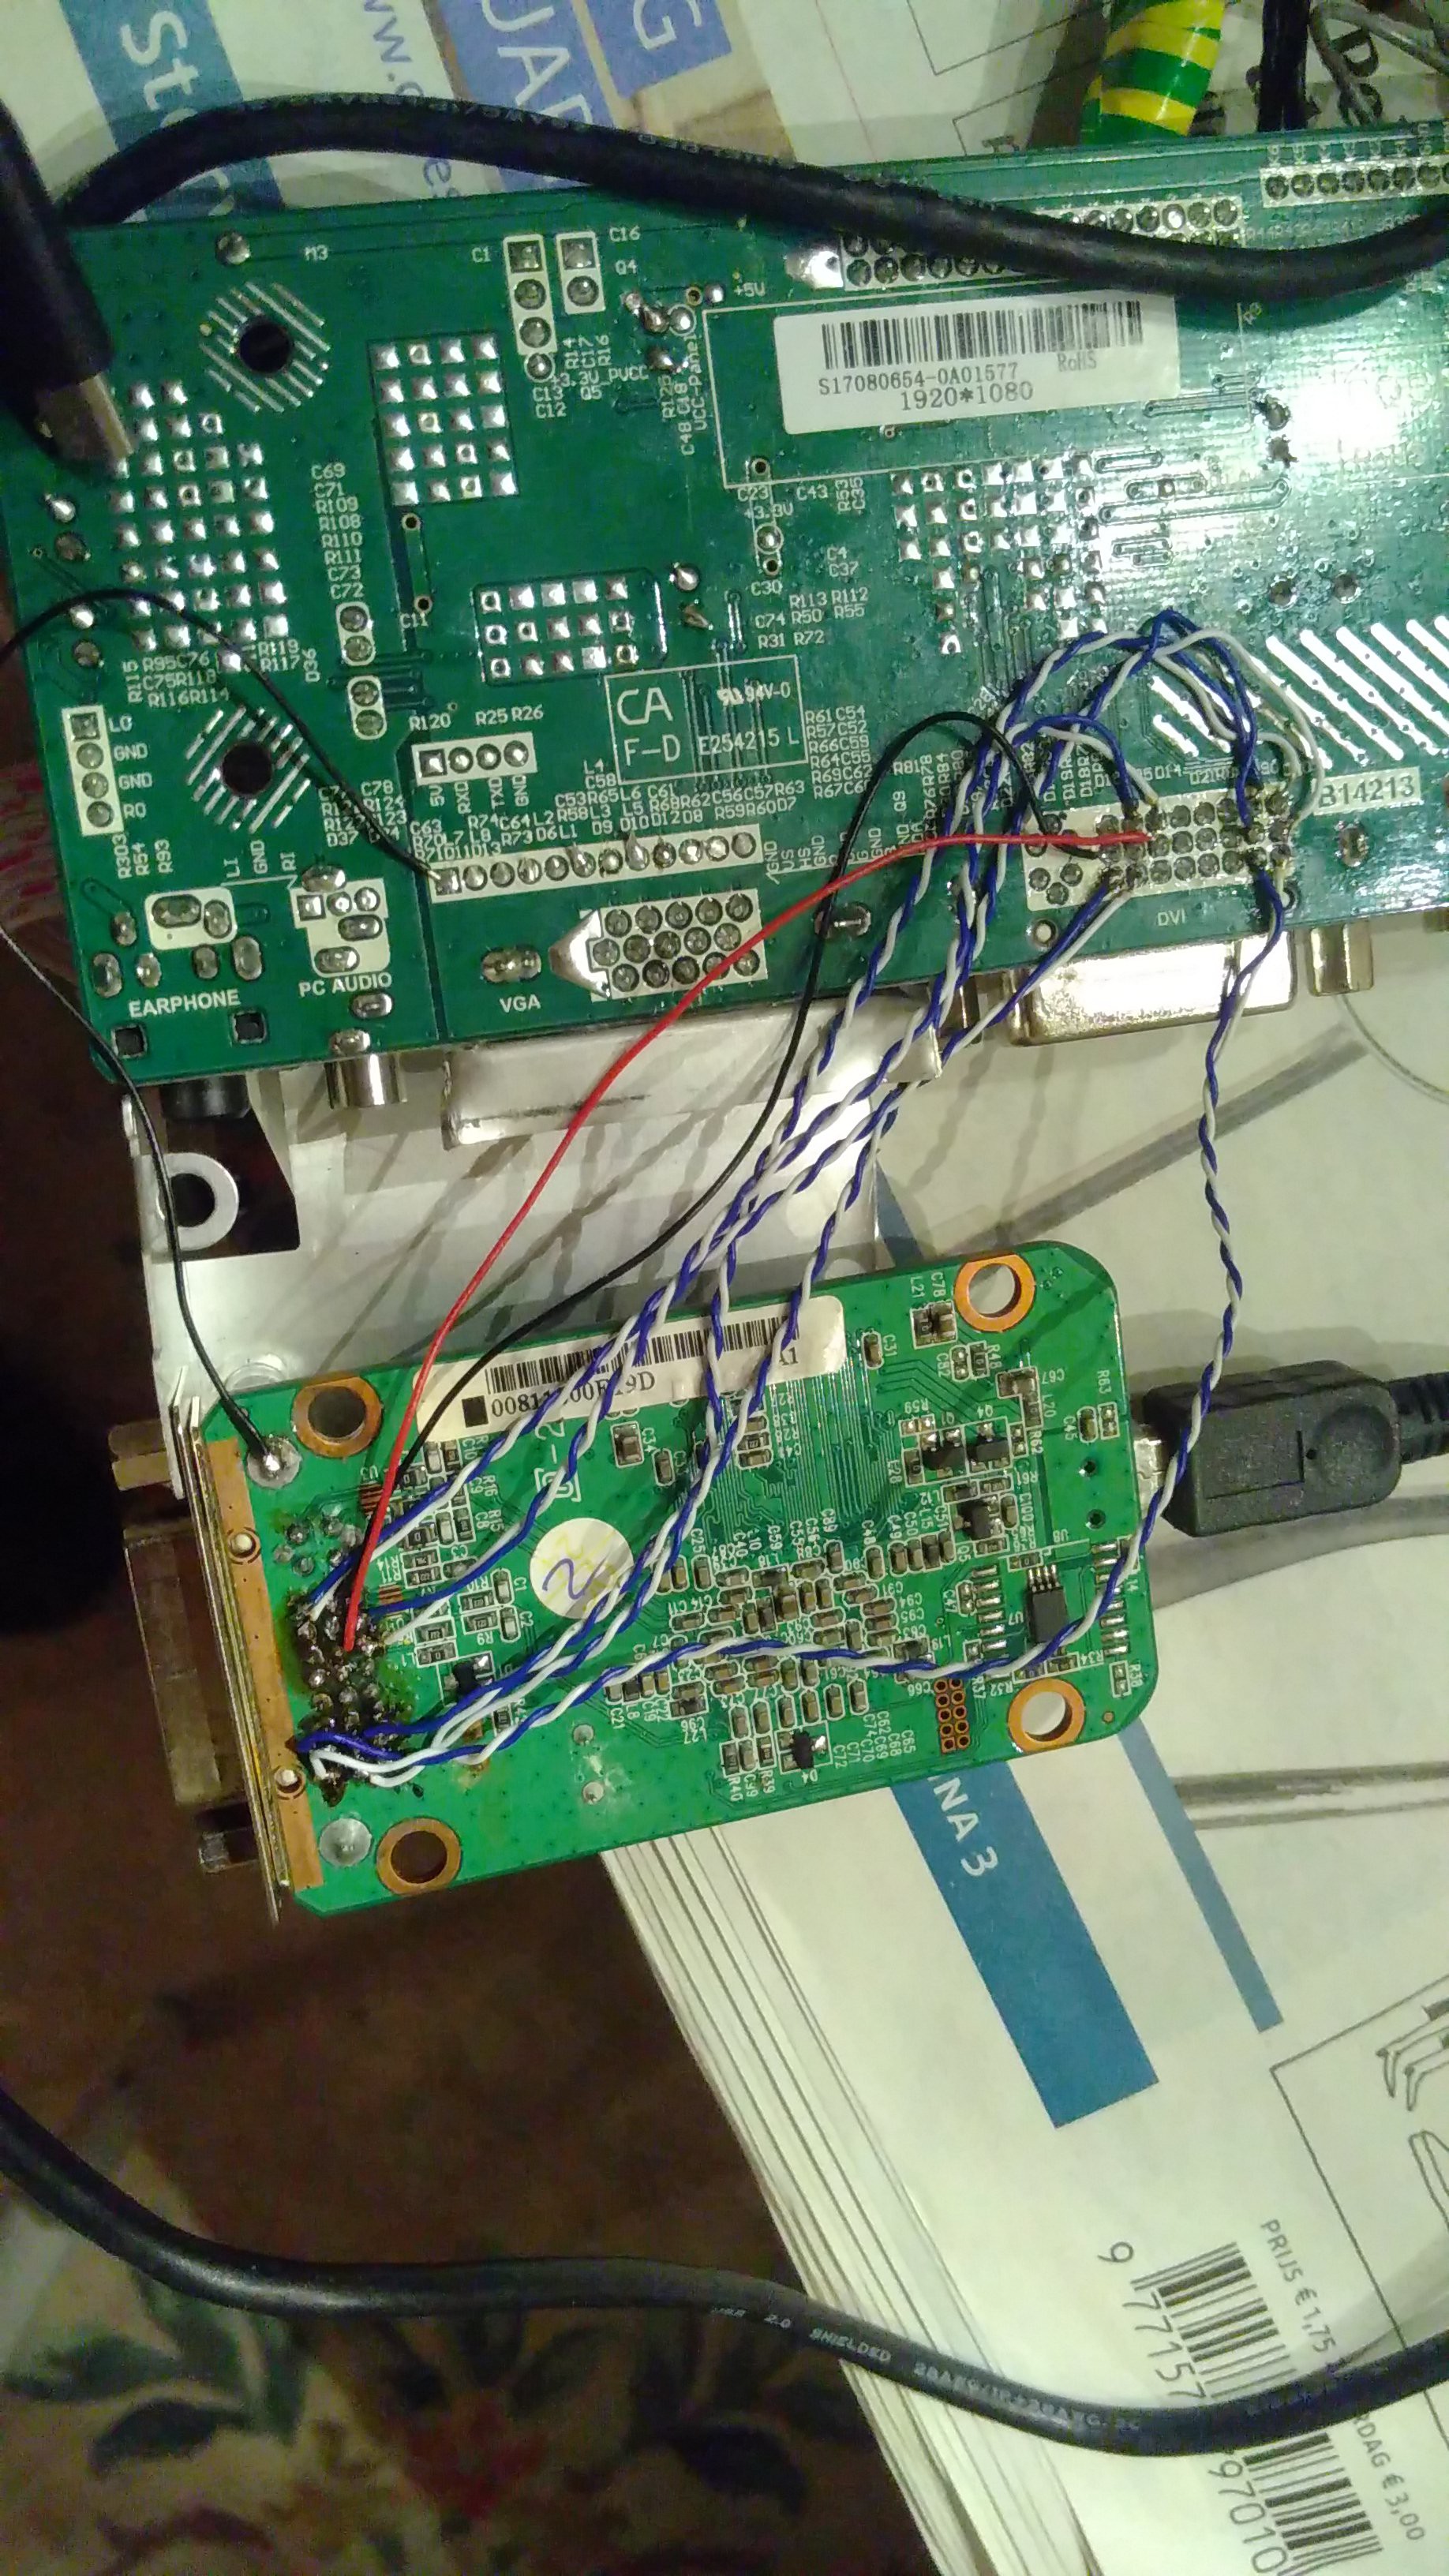
![]() It works! With only 13 wires. I knew the DDC cables were correct because I had used them for VGA, but still it was a surprise that I didn't make a mistake. :)
It works! With only 13 wires. I knew the DDC cables were correct because I had used them for VGA, but still it was a surprise that I didn't make a mistake. :) -
Full keyboard working!!!
01/22/2018 at 20:54 • 0 commentsIt's there! A daring:
avrdude -p m8 -c usbtiny -u -v -U lfuse:w:0x1f:m -U hfuse:w:0x40:mhas run, and now I lost my hardware reset capability - and won the PC6 line so I can use modifier keys in addition to all other keys.
It's still a bit flaky now and then, but I was able to type this blog post without much trouble (except for the spurious Ctrl+A every now and then, that was quickly to be fixed with a Ctrl+Z...)
Even duckduckgo'ing for spurious using the ctrl+t, tab, enter, ctrl+w and the selecting of full words using ctrl+shift+arrow all work! Woohoo! :)
-
Preparing the boot loader for disabling reset
01/15/2018 at 20:34 • 0 commentsThe ATMega8 falls short 1 data line to scan all the matrix rows and columns. I tried different solutions using a diode to do bidirectional scanning (+5V/high impedance/GND) for one of the data lines. Parasitic capacitance, non-zero resistance of the button (it's about 80 ohms IIRC) and the need for both a pull-up and a pull-down resistor on the pin, combined with the diode were just too much: I read nothing. Without the diode it kind of worked, but then only unidirectional. And I had to do some pin toggling and wait not too long for the parasitic capacitors to (dis)charge or I would read something unexpected...
So I need to disable the Reset pin. That's a bit scary. To see if I'll still be able to update the bootloader, and to make entering the bootloader a little more convenient, I decided to try the 'make update' functionality of USBAspLoader, and the change I made was that I can now enter bootloader by pressing the "P" button when inserting the keyboard. And it works! :)
See the small change in my own fork: https://github.com/zeekoe/USBaspLoader/commit/b4a26c5f4f4fb5a620630d5aa0ba0e0990053c55
Sadly, USBAspLoader can't seem to set fuses (that might be something only an external programmer can), so I need to connect it for one time to disable the reset line.
Alongside I found the missing UpArrow,PageUp,LeftArrow on the keyboard, so now is my matrix complete!
-
Connecting the Synaptics TM278 touchpad
12/20/2017 at 21:48 • 2 commentsI figured now is the time to try to get the touchpad working. Some searching on the internet shows that touchpads normally have a PS/2 or a USB interface. So it must be doable.
Finding the pinout
Searching on the internet showed me that there is no standard. There was this, which helped me later on, because one of the pinouts here is close to mine (but mirrored). My measurements from the touchpad in the original laptop were as follows:
1: 5V - 2: around 1V - 3: GND - 4: 5V - 5: (resistance) - 6: GND*
My first guess was that 4 was a pulled up data line, and 5 a clock line that was idling. I think. Or I thought 2 was clock. I don't know anymore. Anyway, both 1 and 6 could be the power supply. To verify that guess without trying at the risk of blowing the thing up, I measured my way through the ribbon cables. Two ribbon cables are involved: motherboard (cable) switches (cable) touchpad. The first thing that struck me was that even though the connectors and the cables were the same, the pinout was completely different.
Only the pins 1-2-3-6 were connected to the touchpad, to pins 2-6-5-1*
GND was of course an easy one to find. The buttons were connected to the touch pad at pins 3 and 4. That left the V+ and the clk, data lines. Measuring the resistance led me to finding the V+: a resistance of 0 ohms rapidly going up, indicating a small decoupling capacitor being charged. The two 'open resistance' lines could both be CLK and DATA.
After measuring this, my guess was that it would be USB; that has a pull up on one of the lines. After the max of 4 tries (USB D+/D-, USB D-/D+, PS/2 CLK/DATA, PS/2 DATA/CLK) I got no response whatsoever. A night's sleep later and a better look: I didn't connect one of the wires correctly. Now I did, and my 4th updated try was working!
Found pinout & connected to a USB adapter
The final pinout, in USB colors is:
Red, Black, RightButton, LeftButton, Green, White for the TM278 itself (pins 1..6)
Red, NC, NC, Green, White, Black for the motherboard connector (see below for a clear image)
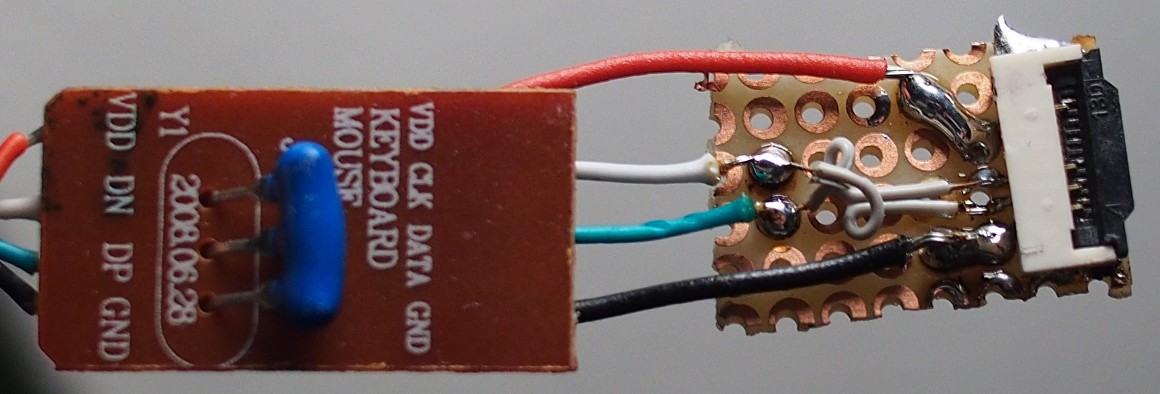
Opening up a PS/2 to USB adapter (keyboard + mouse) that was lying around showed a nice small PCB. Some careful soldering later (with one of the PCB pads split up so the two tiny wires could be connected) I got it working and robust enough to fit inside the laptop. I removed the two NC pins.
The CLK and DATA had to be mirrored which is done by the tiny wires.
Sadly, the 'mouse' is not detected when I plug it into the USB hub before plugging the hub into a computer. Perhaps I need some disconnect/reconnect simulation logic for this to automatically work.
* Please only trust the final pinouts. I did my best to write down my scribblings correctly, but may have made a mistake. Or: even don't trust the final pinouts. Measure yourself if you want to be sure. :)
Project renamed
I like "Scraptop" better. Sounds good, and describes what it is.
-
Soldering many tiny wires ...again
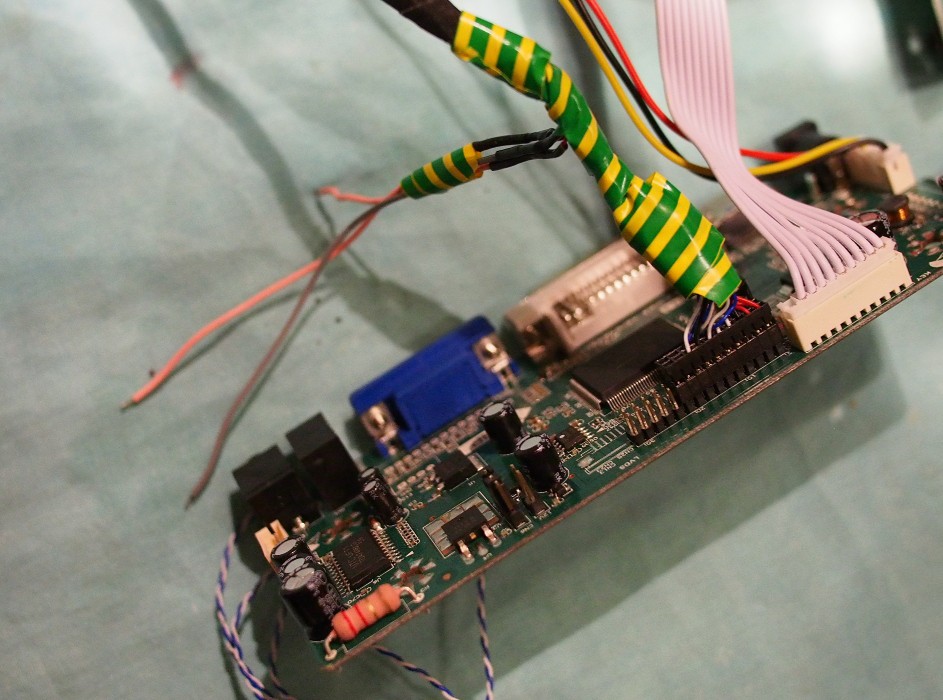
12/03/2017 at 21:25 • 0 commentsThe first thing that needed to be done, was soldering the new connector to the old wire, to be able to fit everything in the laptop again. It all looked like 4 twisted pairs (white/blue), some GND wires and some V+ wires (Vss? Vdd? Vcc? I never know what they mean without the context). At least, that's on the end of my new shiny adapter PCB. On the TFT it seemed to have one additional twisted pair, but instead of something looking like GND and V+ a lot of rainbow coloured wires. At least this was consistent with the inverter colouring (red - orange - yellow - green - blue - purple, meaning: 2x GND, 2x V+ and an enable & PWM signal somewhere - I'll write up on that later). The twisting didn't match for all, some ground wires seemed signal wires and one of the V+ wires (red colour) seemed GND. Ah well.
TL; DR: many wires. Colouring strange. Just cut & solder 1-by-1. Result:
![]()
Sorry, I already had the tape on... Anyway, it worked the first time - a miracle. BTW, the grey - pink - pink wires are GND, V+ and PWM for the inverter, on which I'll write later.
Then the wiring from the USB2DVI to this PCB. Trusty pinouts.ru to the rescue. I discovered that DVI has 2 links, of which apparently one is needed up to Full HD-ish @60Hz. That last info was from wikipedia, which also had clear information on what data channels are for link 1 and for link 2. I should have looked at the nice picture:
![]()
By Ionuion at English Wikipedia, CC BY-SA 3.0, https://commons.wikimedia.org/w/index.php?curid=4379981
...because looking now at the picture it all really looks logical.
I did not. I counted the pins, tried to figure out how everything was mirrored from screen to connector to under side of PCB, wired everything up, accidentally mixed up the red channel of link 1 and link 2, corrected it, connected everyting and... it didn't work. I pulled off all the wires, 13 in all, only to find afterwards that the DisplayLink Presenter software seems to only work again after a fresh reboot, not giving a screen on the second USB connect. I almost thought the USB2DVI was dead. Connecting it to my PC gives a kernel panic.
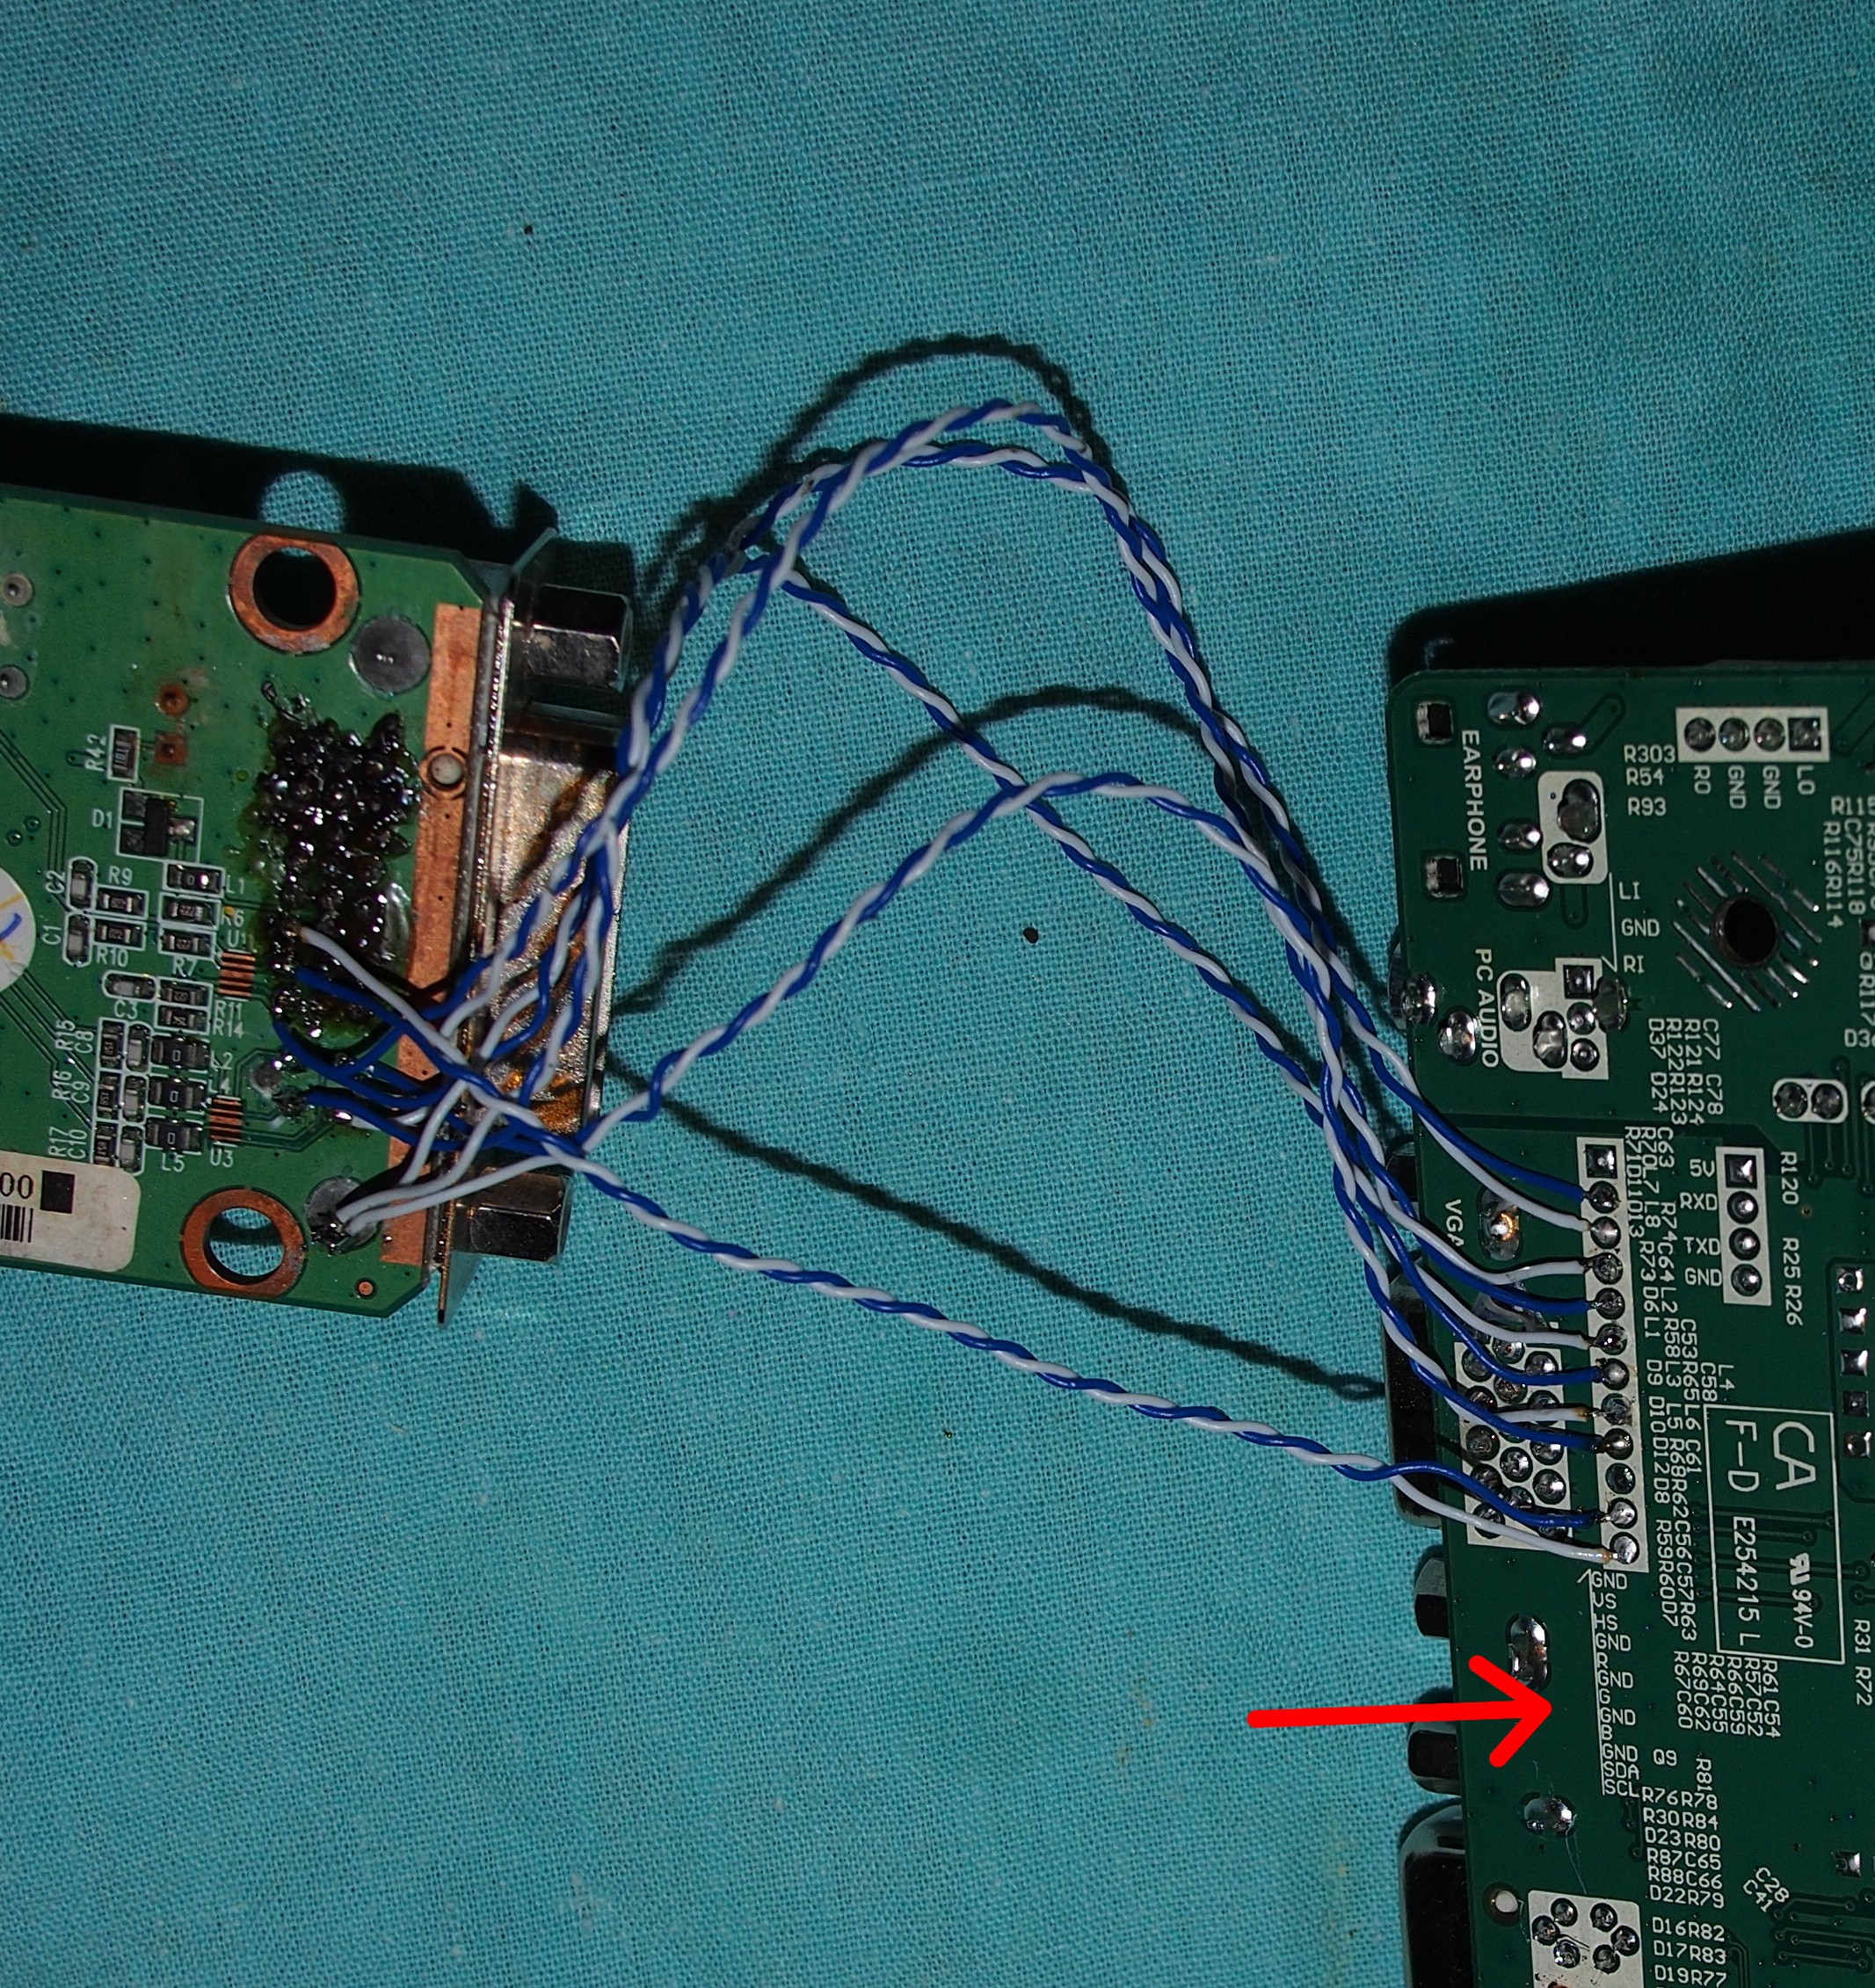
A few days later I tried again, and it all works well. After thinking for a while "if only I would have bought a VGA adapter" I thought of the analog part of DVI. Looked up this nice wiring scheme from pinouts.ru again, and only about 20 minutes later I had this:
![]()
There even was a conveniently very simple VGA connection strip, completely with printed naming, on the PCB. Only 8 wires needed. Because I had some twisted pairs left (from the old LVDS wire) I did the colour signals with their own GND paired.
And it works at once!
Still thinking if I will keep it this way, or rewire. Because this way I might need to correct overscan etc. At least I have the GND and I2C monitor ID wires already wired up correctly for VGA or DVI alike...
-
LCD working!
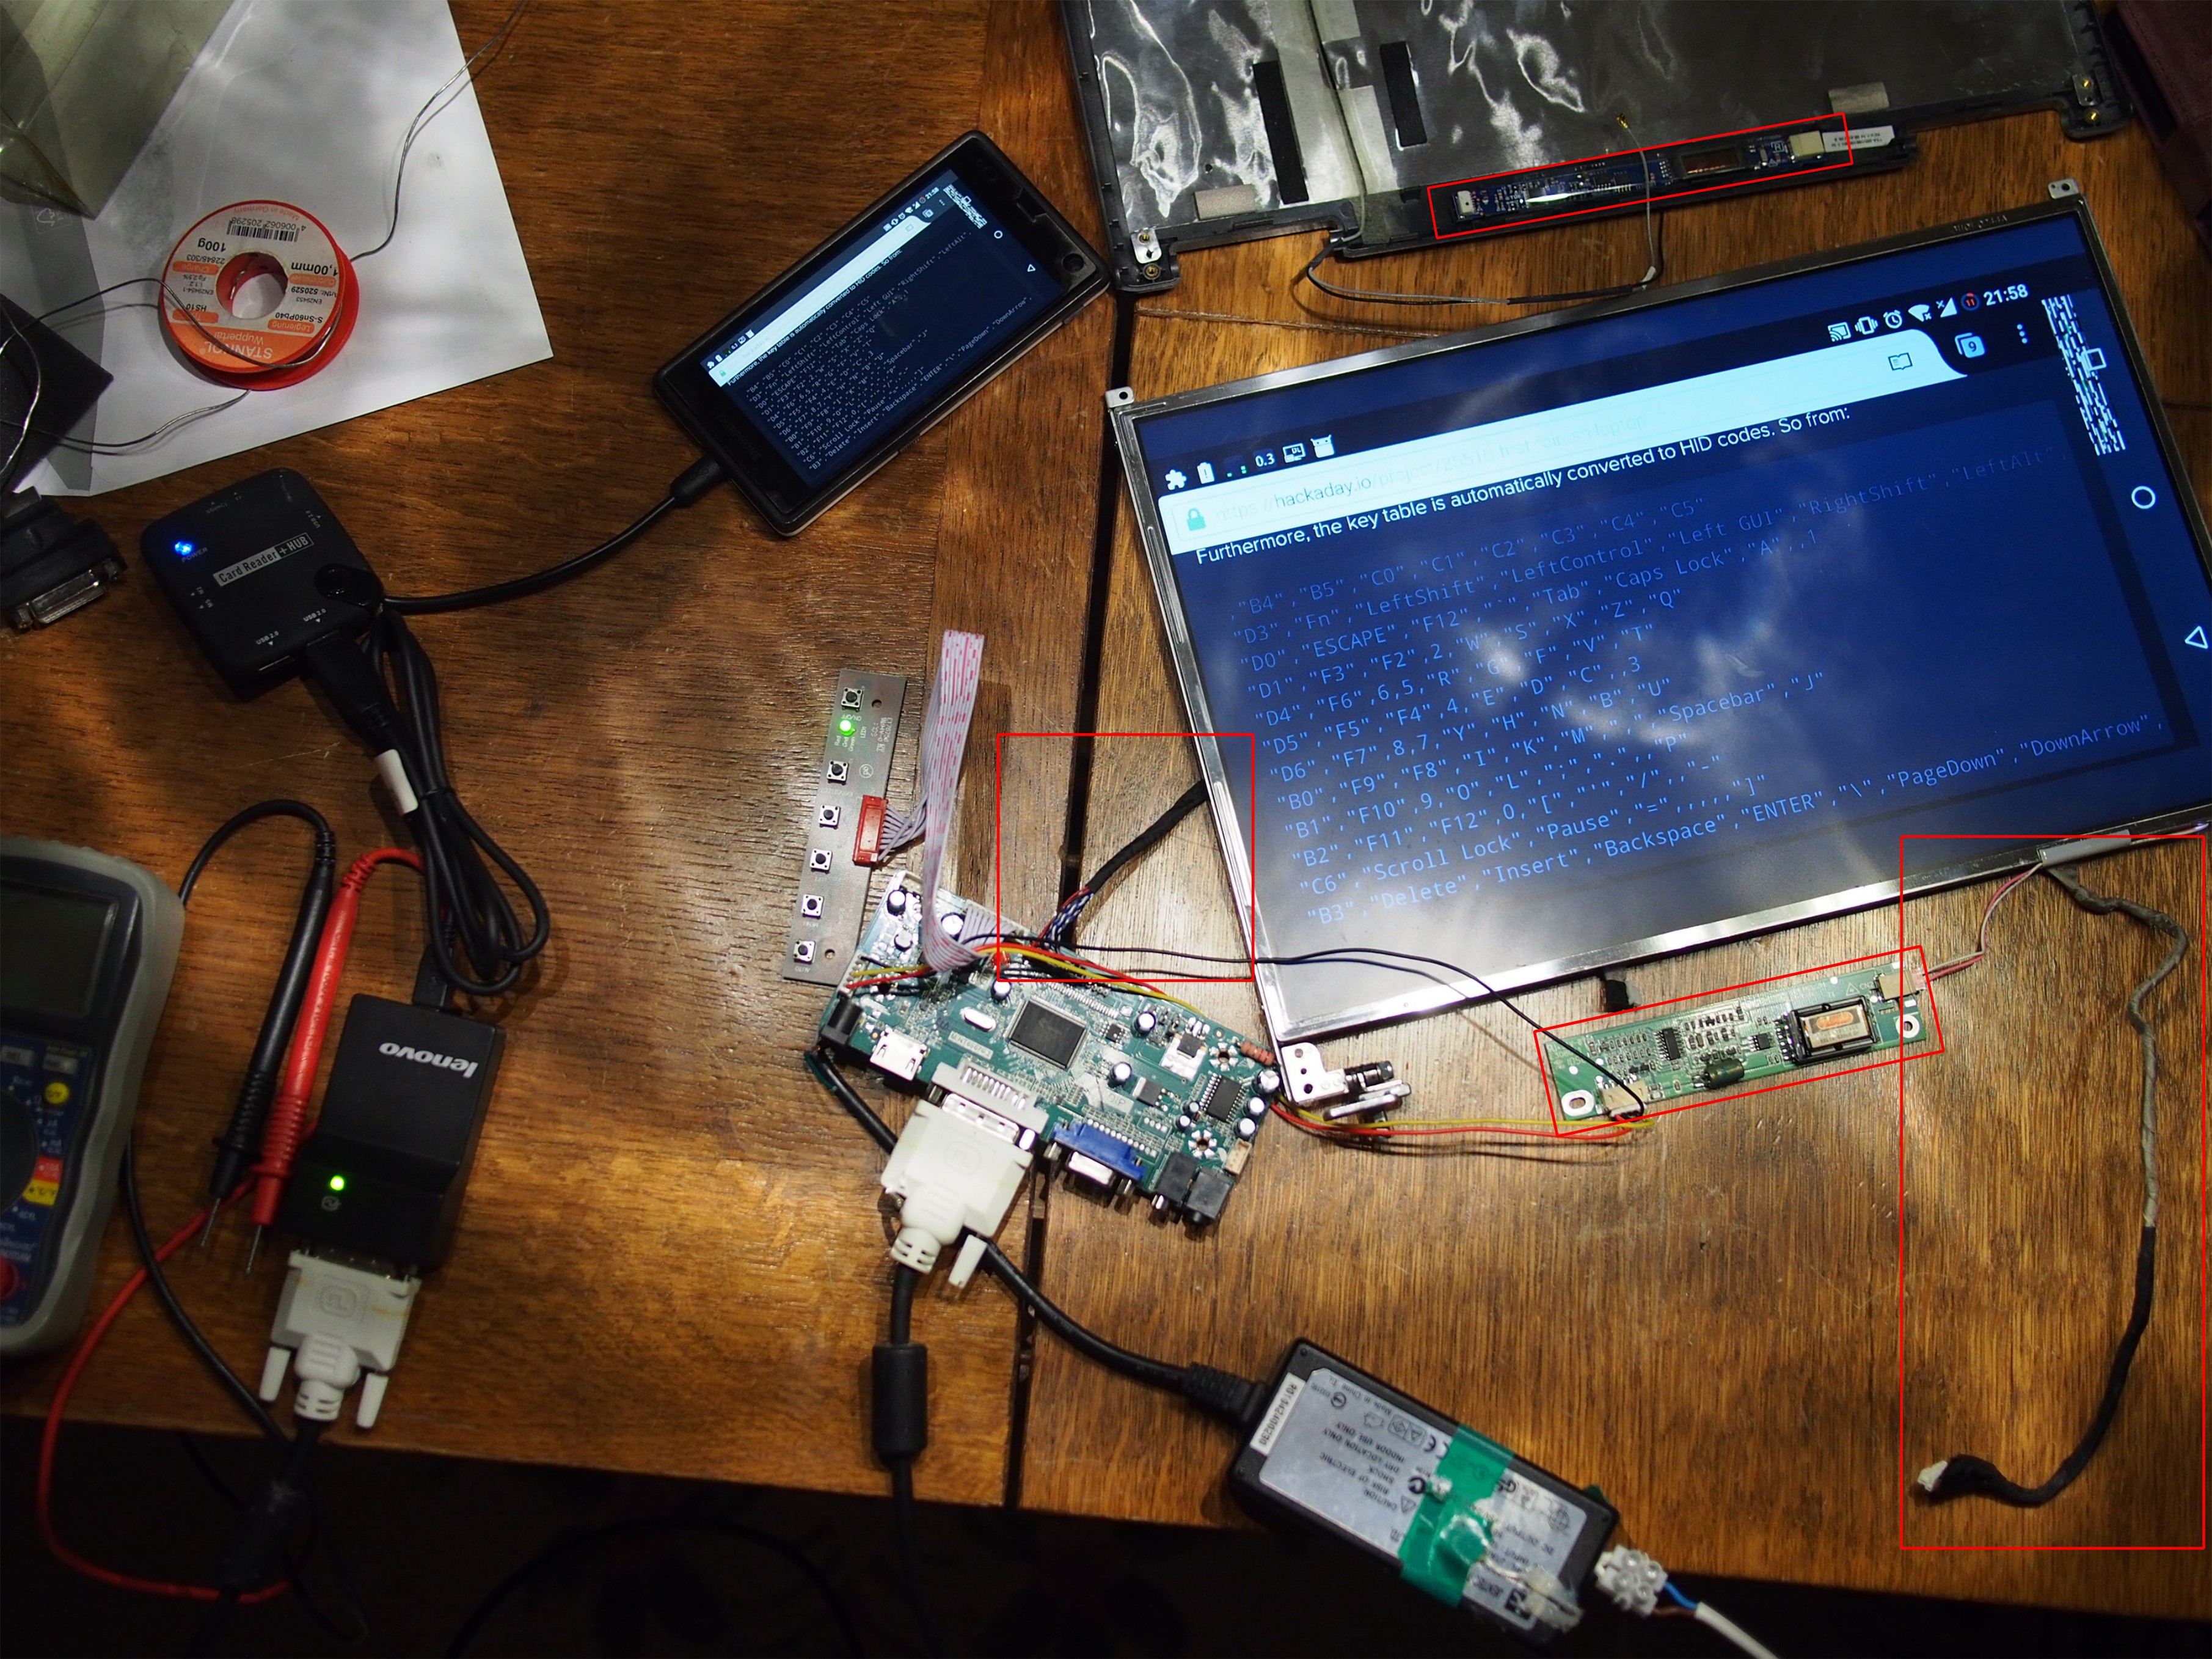
11/16/2017 at 21:26 • 0 commentsIt's working! As expected, quite easily. Connect everything & go. Now I only have to cram everything into the laptop housing. :-) Don't worry about the empty top & bottom row and the garbled right part of the screen, I have some problems with my touch screen so I fiddled with 'wm size' & 'wm overscan' on Android.
There are a few challenges here again. At the bottom left, the 'old' LVDS cable can be seen. Left of the screen, the new one can be seen. It's something like half as long. That probably will be a bit of cutting wires, soldering, and hoping afterwards it still works...
The CCFL power module is another one. The old one can be seen at the top of the LCD, the new one at the bottom. Quite some size difference... Maybe I can reuse the old one.
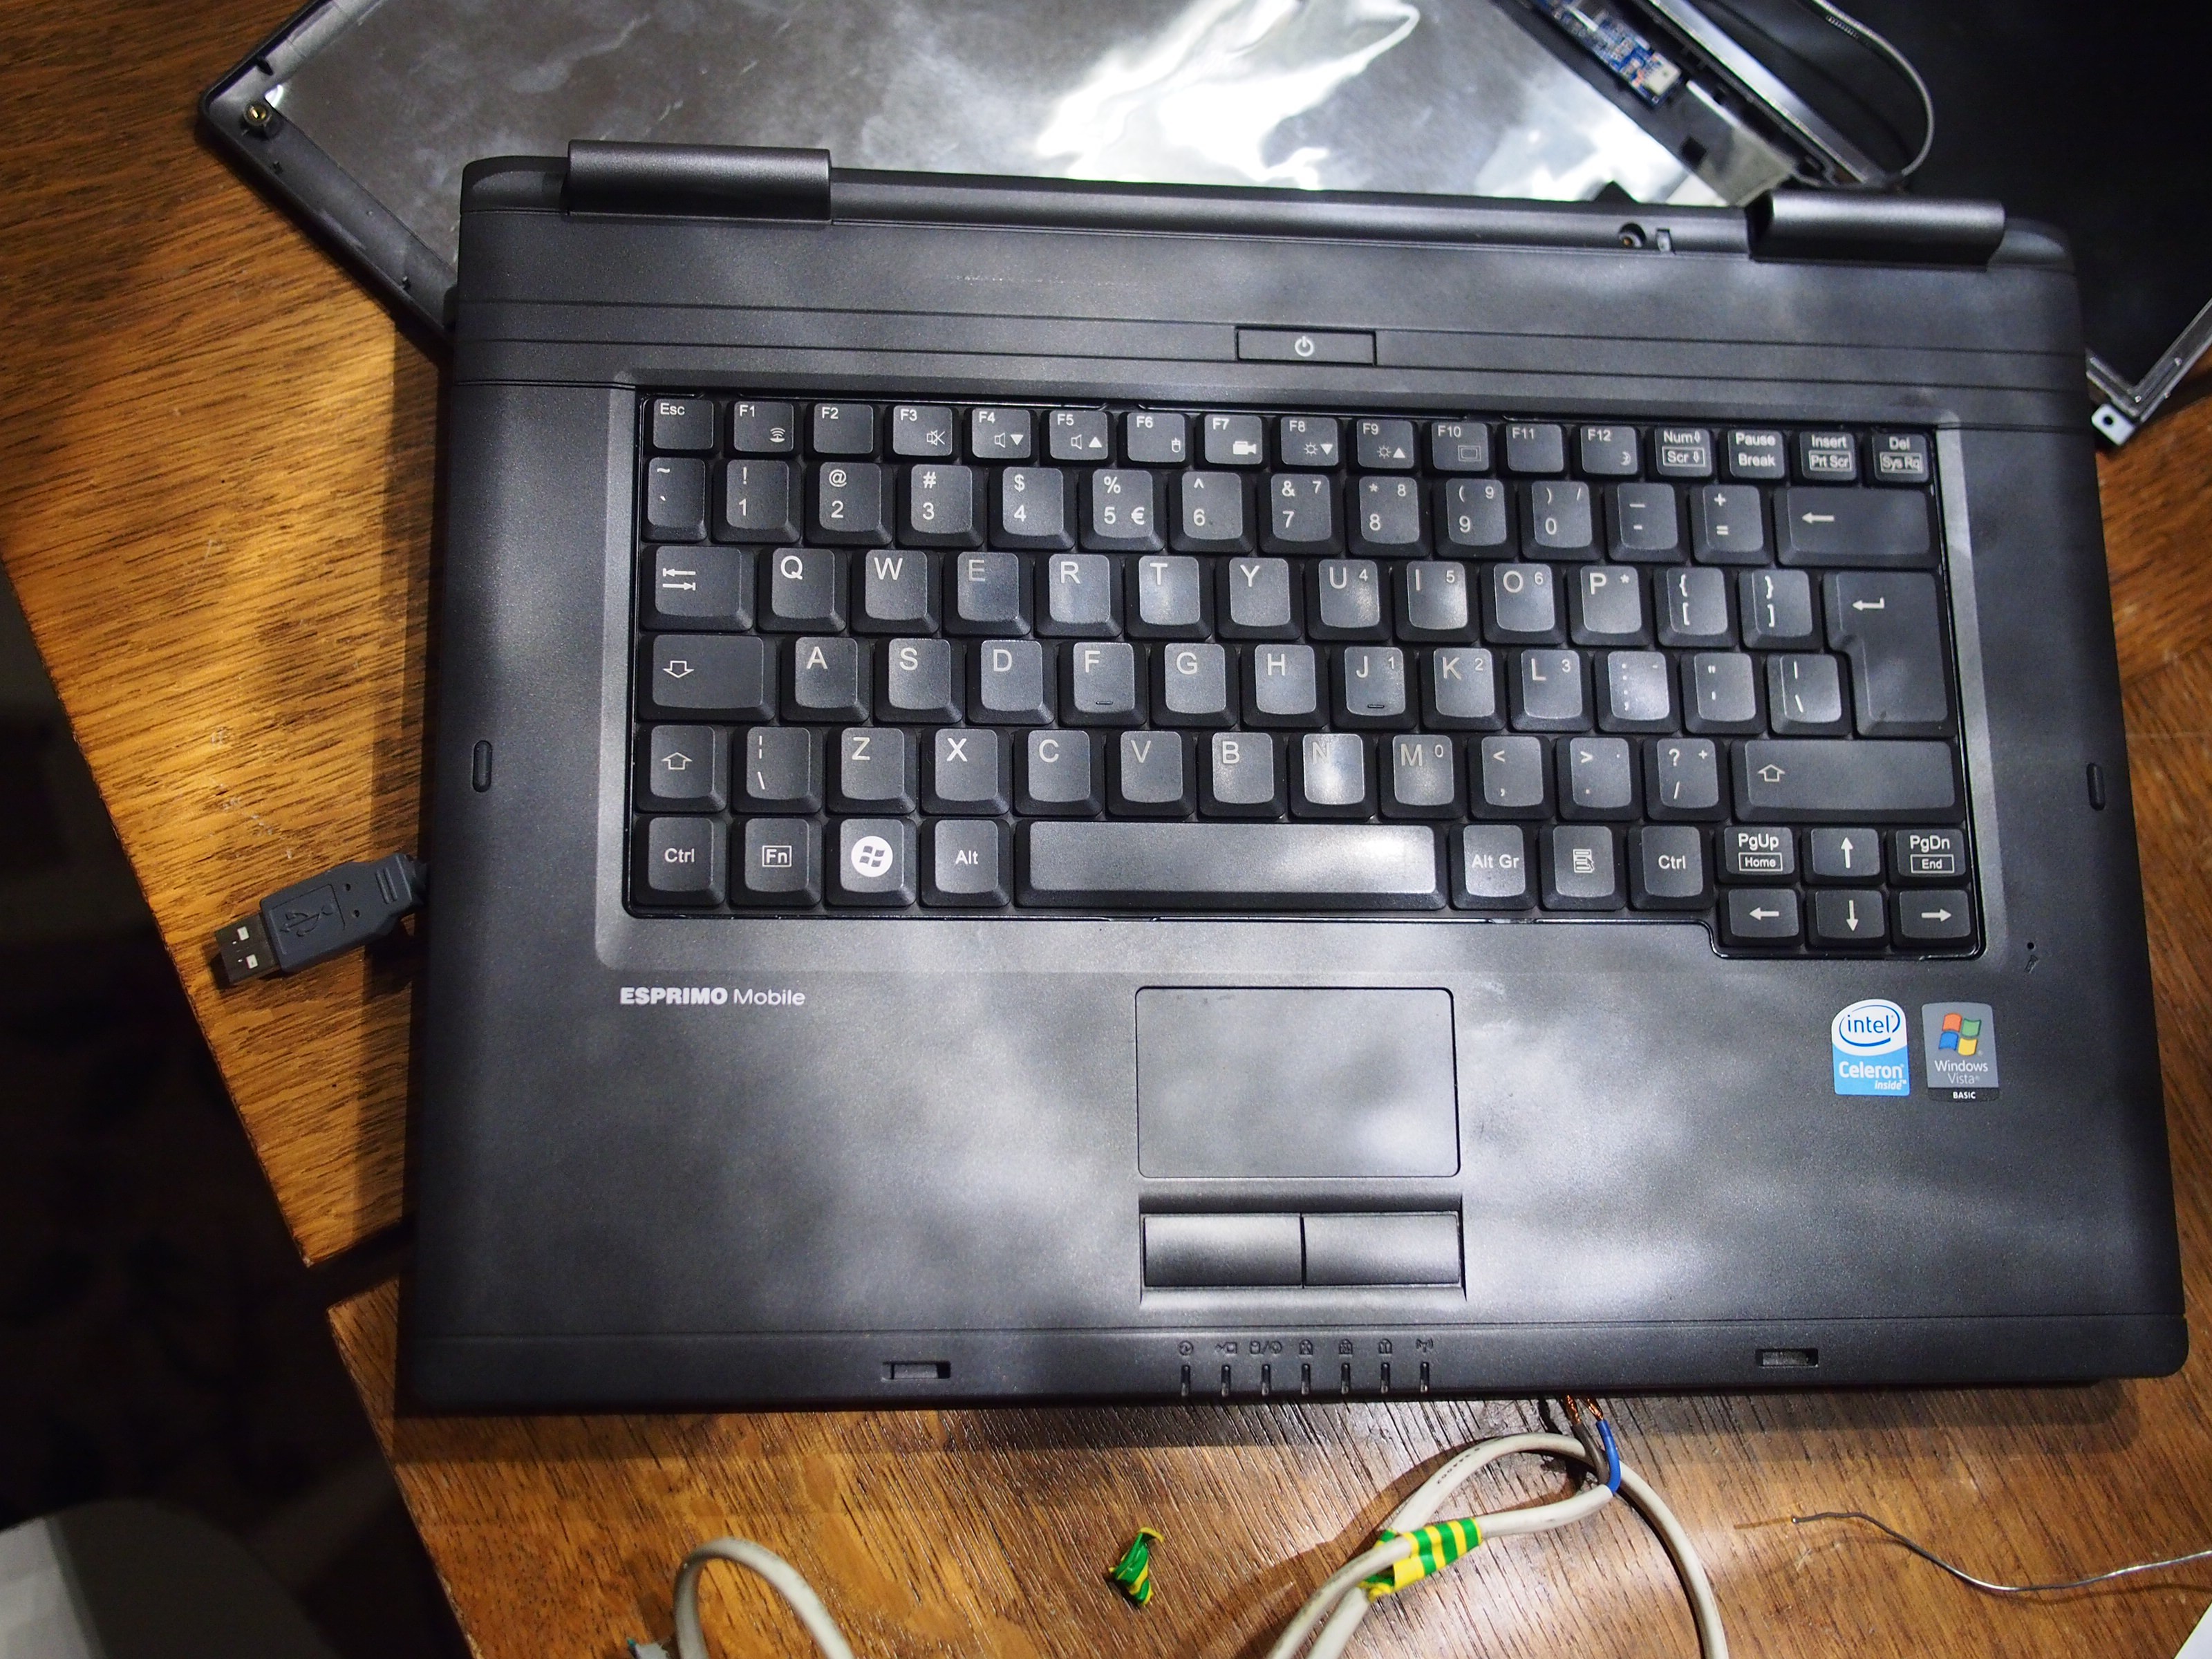
The keyboard fits in the housing:
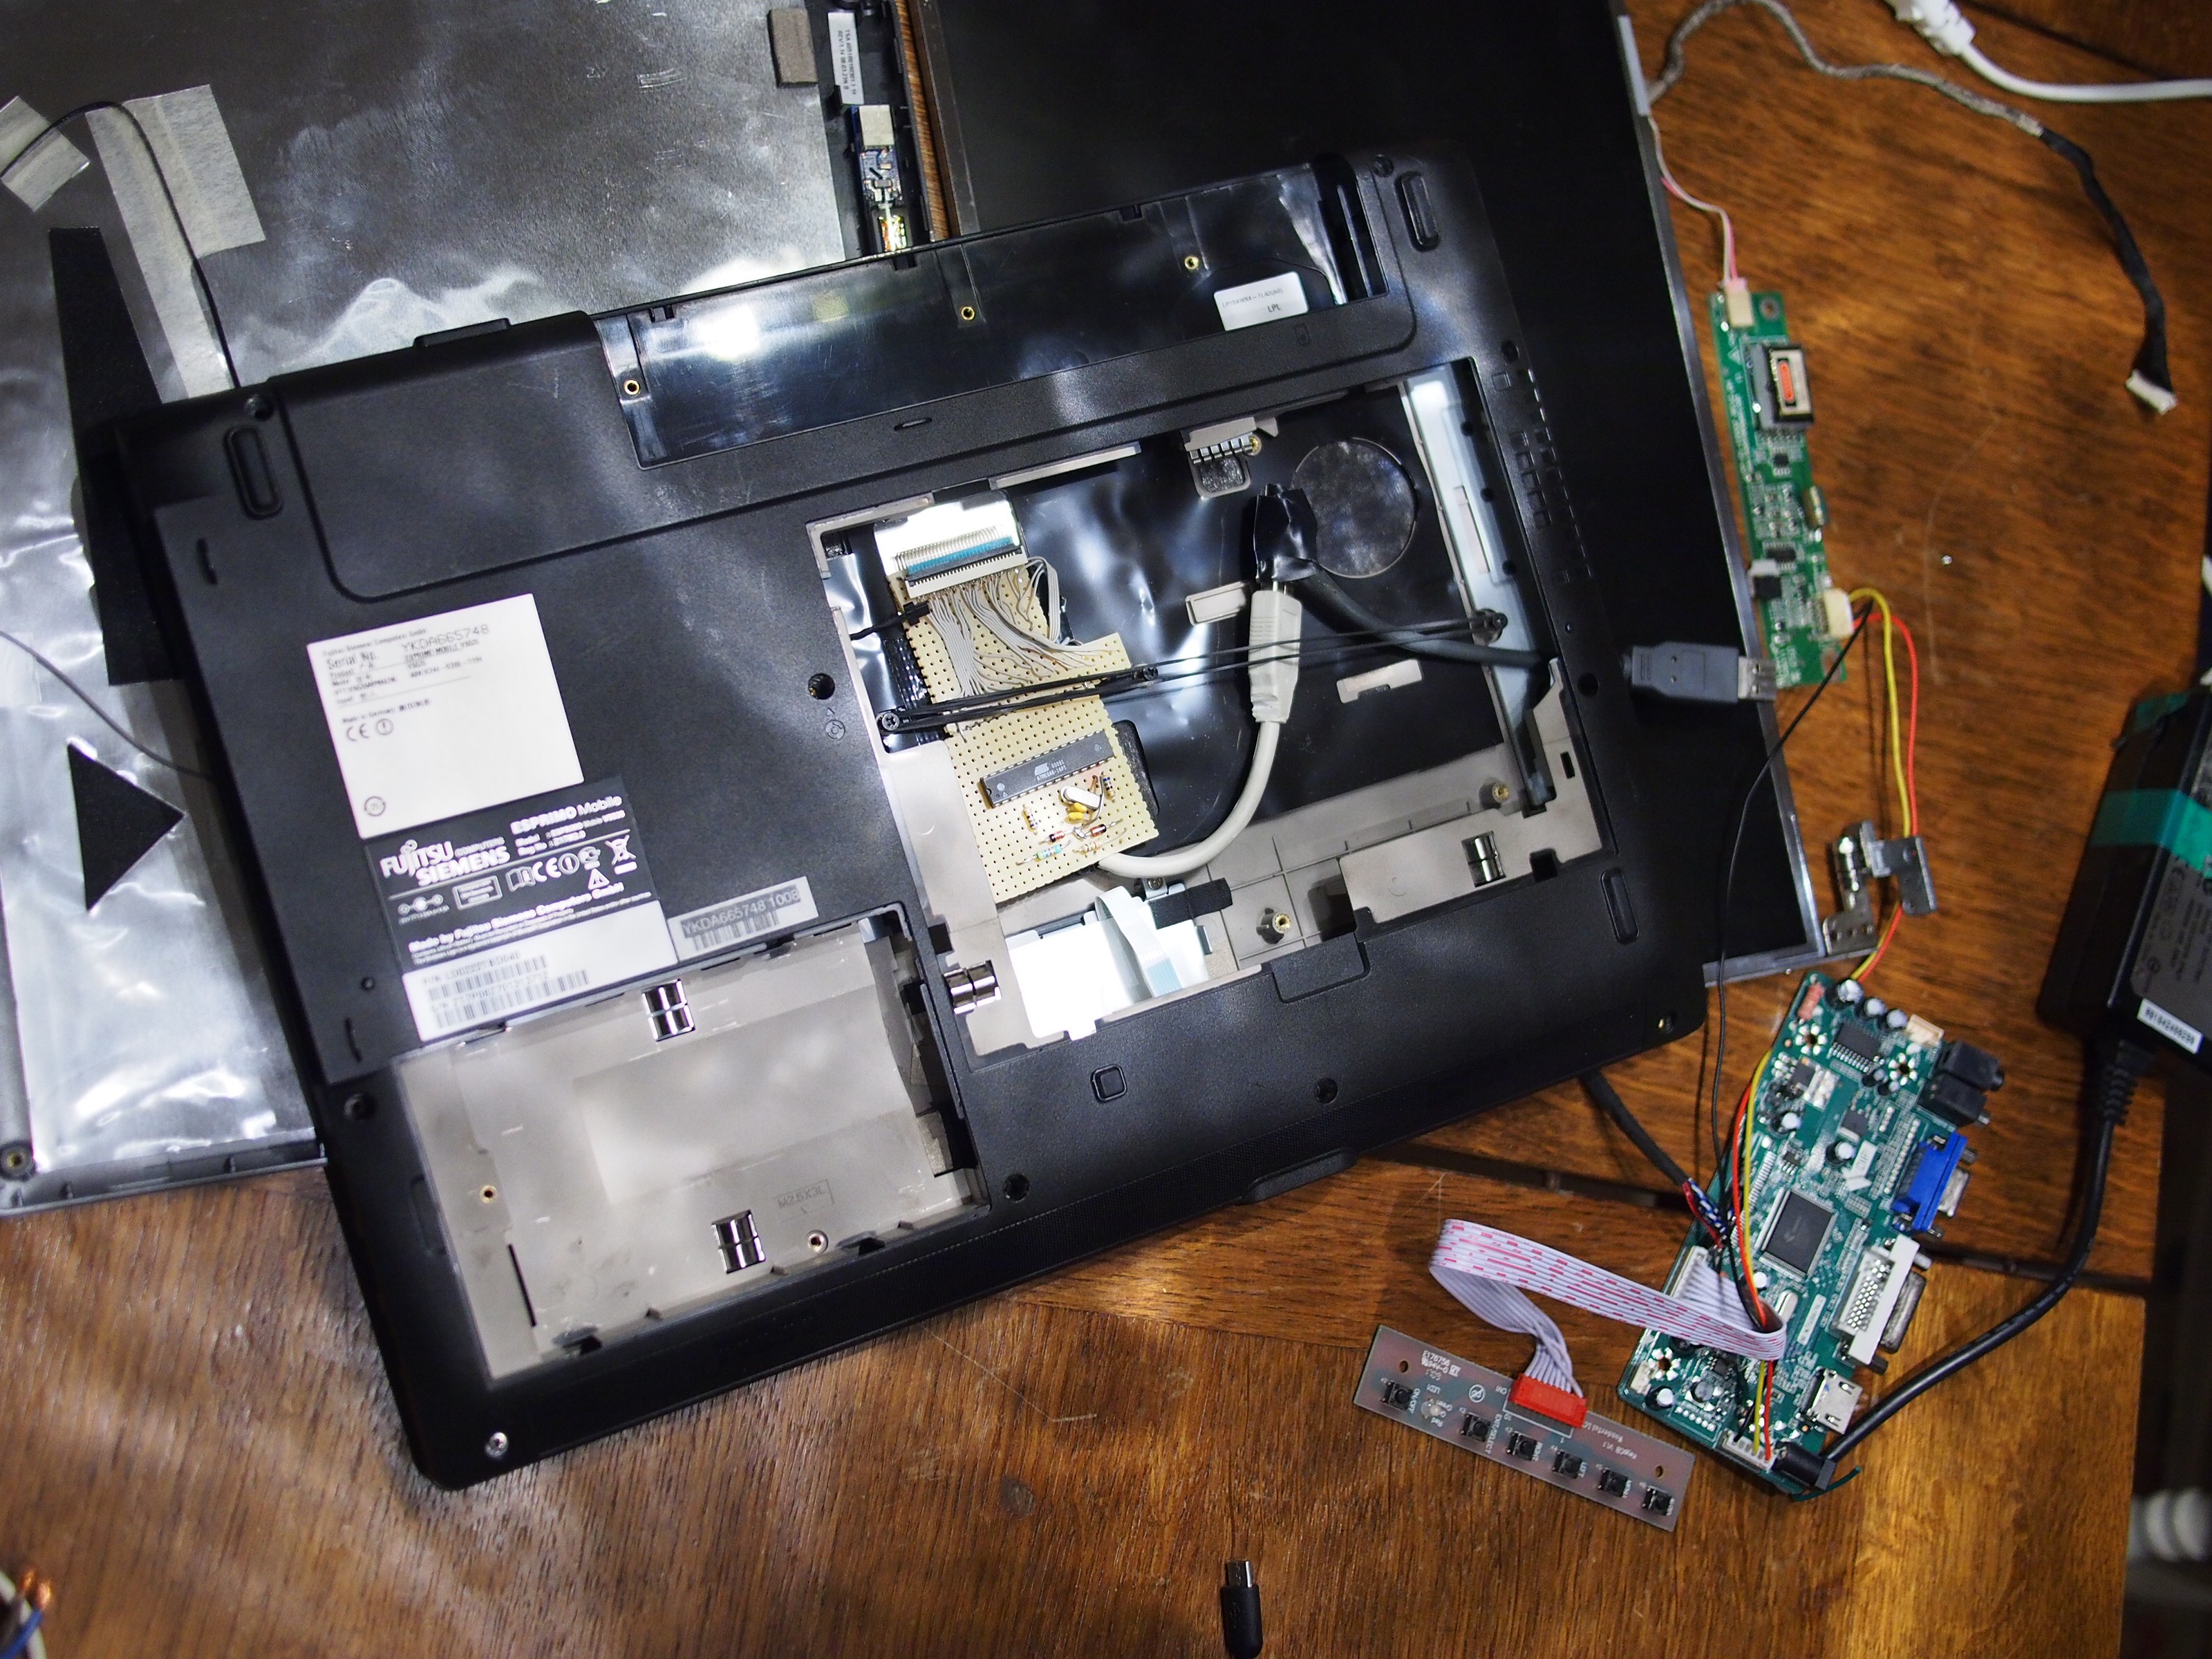
And there's quite some space left: at the left bottom there used to be a hard drive, above that there was the DVD writer, and then the main board at the right half. I'd like to be able to shove in my phone somewhere (perhaps the DVD location) and also still have the option to use the old battery. And stuff in the power adapter. Looking at the PCBs it might just, or might just not be doable.
Then there's the touch pad: it's probably PS/2 with badly documented pinout. Might or might not be able to use it.Funny BTW, buying a LCD driver on eBay. The OSD was on Chinese... My guess that the language was the last one of the settings options was right, so I could put it on a language that I understand better.
If I'd do this again, I would use a bigger ATmel chip to be able to drive the LCD menu from the laptop keyboard (Fn+brightness). Now I think I'll put the buttons somewhere on a reachable location.
-
Keyboard scanning code working
11/01/2017 at 20:50 • 0 commentstthi liinee i ttypeed ith the nyhkbd
New zip file
So, we improved a bit, looking to the sentence above. :-) Still not all wires connected. New zip file containing the source code is uploaded. No proper license is in place yet, but please consider it GPL for now.
Key repeat challenges
Speed is well now, however, some keys still repeat. I need to investigate why. It seems that in USB HID, the keyboard is responsible for managing long key presses. If I don't send a '0'-report, the computer sometimes thinks the key keeps on repeating. If I don't send a '0'-report very quickly after sending the initial key report, I get multiple keys. So if I want 'standard' behaviour (long press does: for about the first half a second 1 key report, then continuous key reports until key unpressed. Of course all debounced).
I think I implemented code for the first part (1 key report, then stop). However, this works well for the u, y, h, and not for the tttttttttt, iii, ffffffff, for example. Needs some further investigation...
Code generation
For speed purposes I didn't create a for loop with complex logic for the scanning code, but multiple blocks of almost similar code. Because typing this is a bad idea, I created a code generation tool. As seen in an earlier blog I started out on Python. However, I didn't realize that after working for 364 days as a professional Java developer, my Java is much better than my Python nowadays. So I switched. Still don't know a lot about java's weird class path thingies while running from the command line, but I created a run.sh file in the zip that works.
Furthermore, the key table is automatically converted to HID codes. So from:
,"B4","B5","C0","C1","C2","C3","C4","C5"
"D3","Fn","LeftShift","LeftControl","Left GUI","RightShift","LeftAlt","RightAlt","RightControl"
"D0","ESCAPE","F12","`","Tab","Caps Lock","A",,1
"D1","F3","F2",2,"W","S","X","Z","Q"
"D4","F6",6,5,"R","G","F","V","T"
"D5","F5","F4",4,"E","D","C",,3
"D6","F7",8,7,"Y","H","N","B","U"
"B0","F9","F8","I","K","M",",","Spacebar","J"
"B1","F10",9,"O","L",";",".",,"P"
"B2","F11","F12",0,"[","'","/",,"-"
"C6","Scroll Lock","Pause","=",,,,,"]"
"B3","Delete","Insert","Backspace","ENTER","\","PageDown","DownArrow","RightArrow"
to:
char key_matrix[11][8] =
{
    { 0x00,0xE1,0xE0,0xE3,0xE5,0xE2,0xE6,0xE4},
    { 0x29,0x45,0x35,0x2B,0x39,0x04,0x00,0x1E},
    { 0x3C,0x3B,0x1F,0x1A,0x16,0x1B,0x1D,0x14},
    { 0x3F,0x23,0x22,0x15,0x0A,0x09,0x19,0x17},
    { 0x3E,0x3D,0x21,0x08,0x07,0x06,0x00,0x20},
    { 0x40,0x25,0x24,0x1C,0x0B,0x11,0x05,0x18},
    { 0x42,0x41,0x0C,0x0E,0x10,0x00,0x2C,0x0D},
    { 0x43,0x26,0x12,0x0F,0x33,0x37,0x00,0x13},
    { 0x44,0x45,0x27,0x2F,0x34,0x38,0x00,0x2D},
    { 0x47,0x48,0x2E,0x00,0x00,0x00,0x00,0x30},
    { 0x00,0x49,0x2A,0x28,0x31,0x4E,0x51,0x4F},
};
The scanning code is also generated from the keyboard matrix (the port/pin numbers are being read from the first row / first column of the input file). The scanning code looks like:
char scan() {
    DDRD |= (1 << 3); // set as output
    pins = read_pins();
    if (pins != 8) {
        return key_matrix[0][pins];
    }
    DDRD &= ~(1 << 3); // set as input again

(...)

    DDRB |= (1 << 3); // set as output
    pins = read_pins();
    if (pins != 8) {
        return key_matrix[10][pins];
    }
    DDRB &= ~(1 << 3); // set as input again

    return 0;
}
The generated code is just sent to stdout, but that's good enough for now.
Will keep you posted!
BTW, in an earlier blog I mentioned "I also still have to find out if I used the correct bit fiddling operators, but I think I have it right." Of course I was wrong, it's never first time right. I made all pins output instead of input, and some other small things. Oh well...
-
Lots of cliffhangers, no code... yet.
10/29/2017 at 21:06 • 0 commentsthi lin i typd on th nyhkbd
Or: "this line is typed on the anyhkbd". But... I didn't connect all wires yet, and some other stuff is slightly malfunctioning. However, the matrix scanning code is working! It's too ugly to release even on hackaday, so that'll have to wait for a few days.
Other news: a few days ago I ordered an NT68676 (HDMI+DVI+VGA)Controller Board Monitor Kit for LP154WX4(TL)(A3). That should do the trick for the TFT panel that's in the laptop.
That's it for now...
Scraptop
Laptop made out of scrap - Combined with a FairPhone2 a possible step in the journey toward a fair laptop.

 It works! With only 13 wires. I knew the DDC cables were correct because I had used them for VGA, but still it was a surprise that I didn't make a mistake. :)

 And there's quite some space left: at the left bottom there used to be a hard drive, above that there was the DVD writer, and then the main board at the right half. I'd like to be able to shove in my phone somewhere (perhaps the DVD location) and also still have the option to use the old battery. And stuff in the power adapter. Looking at the PCBs it might just, or might just not be doable.