Close
0%
0%

Smart Intercom

Real-Time system that allow to pass only authorized/invited people, using Face-Recognition or NFC cards.

Similar projects worth following
The principle of operation:

* Person approaches to the intercom
* Looks at the camera
* The system compare his face with authorized people
* If it finds it, then the door opens and a person can enter
* There is also another way to pass;
* The person with the pass card place it to the Rfid location and the door opens if it finds the code of this card in its database
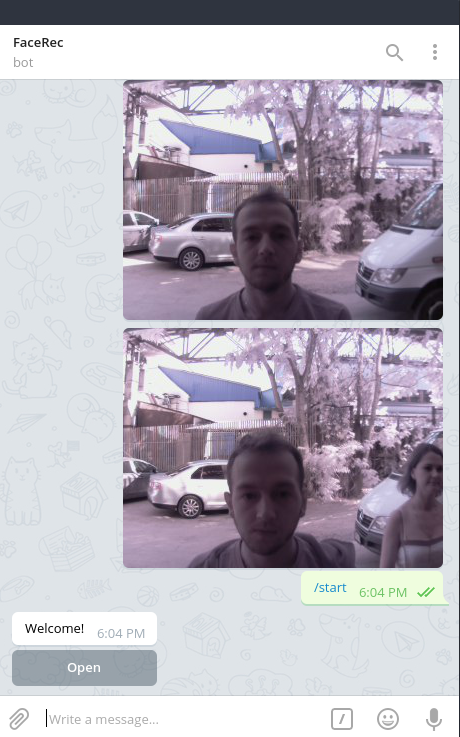
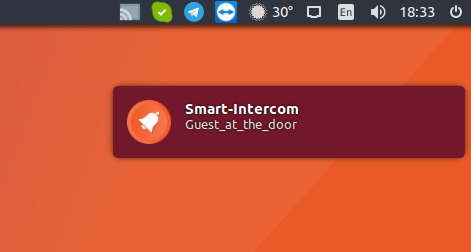
* Push-button sends notification with photo to Ubuntu PC and telegram bot, where you can open the door.

**This project is still in work. Everyday i'm working on improving this project. I hope the final version will be more beautiful :)

The principle of operation:

  • Person approaches to the intercom
  • Looks at the camera
  • The system compare his face with authorized people
  • If it finds it, then the door opens and a person can enter
  • There is also another way to pass;
  • The person with the pass card place it to the RFID location and the door opens if it finds the code of this card in its database

**This project is still in work. I hope the final version will be more beautiful.

Preparation:

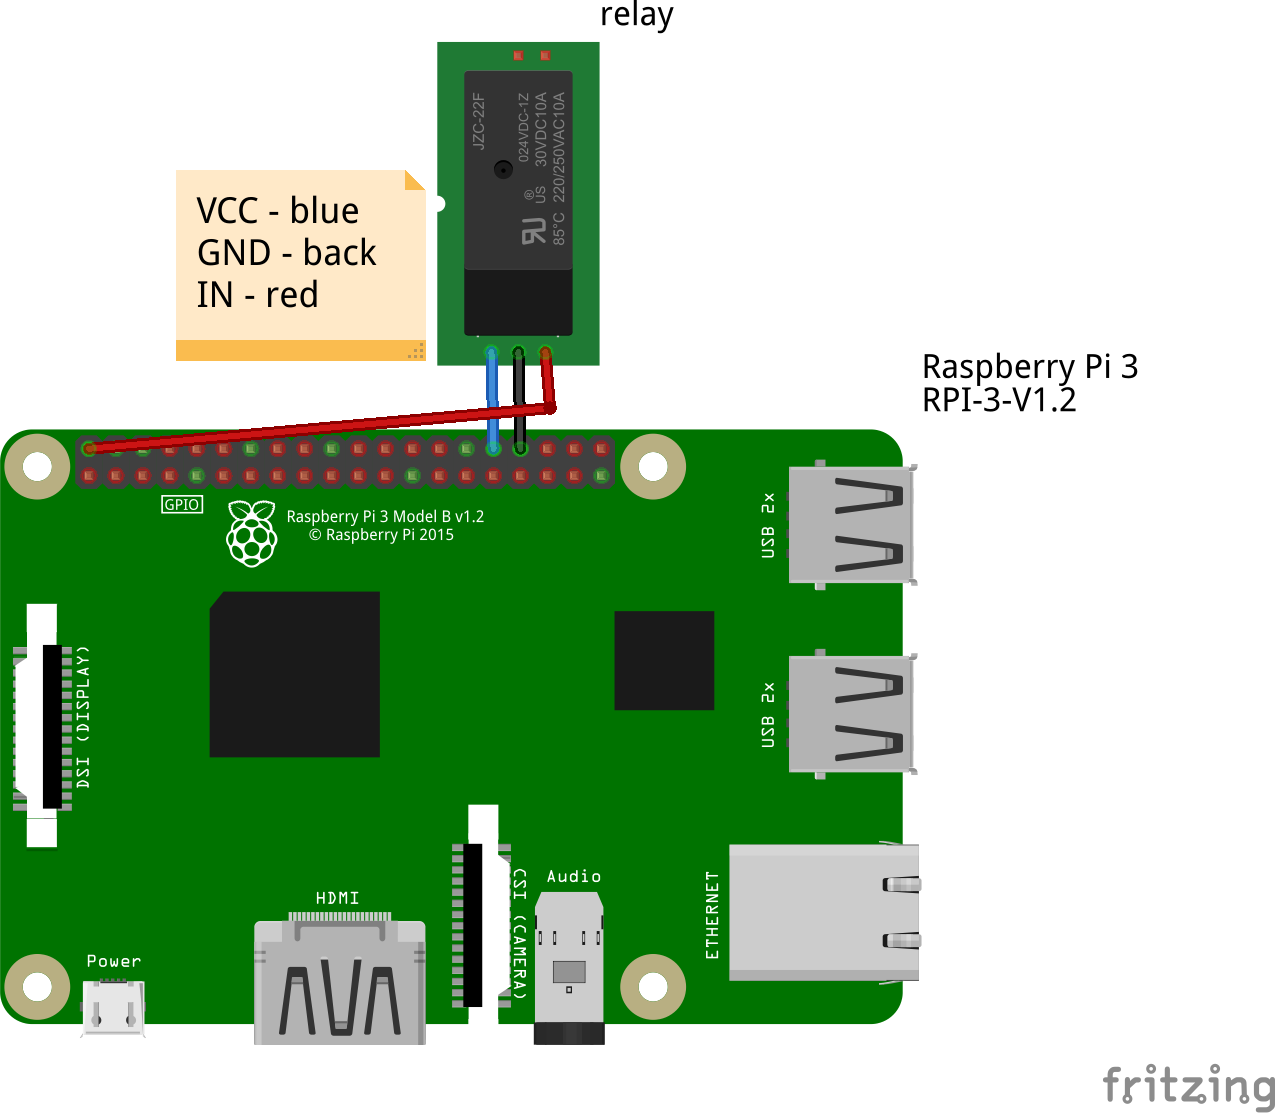
Relay connection

  • Connect relay to RPI 3. In my case i used GPIO12 pin for data , 5v for power and you can choose any GND.

You can test the relay with shell script, just create a simple sh script:

nano open.sh
chmod +x open.sh
sh open.sh

paste the code below and run it

Script code:

#!/bin/bash 
echo 12 > /sys/class/gpio/export 
echo out > /sys/class/gpio/gpio12/direction 
echo 0 > /sys/class/gpio/gpio12/value 
ping -c 1 localhost 
echo 12 > /sys/class/gpio/export 
echo out > /sys/class/gpio/gpio12/direction 
echo 1 > /sys/class/gpio/gpio12/value 

Camera connection

  • Connect camera module and enable it in raspi-config:

Open the raspi-config tool from the Terminal:

sudo raspi-config

Select Enable camera and hit Enter, then go to Finish and you'll be prompted to reboot.

To test that the system is installed and working, try the following command:

raspistill -v -o test.jpg

Led Connection

Connect your led to any gpio you want + GND. In my case i used GPIO16 for green led and GPIO26 for red. When you are done, test it:

Create 2 simple python scripts for green and red led with following content:

from gpiozero import LED 
from time import sleep 
led = LED(16) 
while True: 
   led.on() 
   sleep(3) 
   led.off() 
   led.cleanup() 
from gpiozero import LED 
from time import sleep 
led = LED(26) 
while True: 
   led.on() 
   sleep(3) 
   led.off() 
   led.cleanup() 
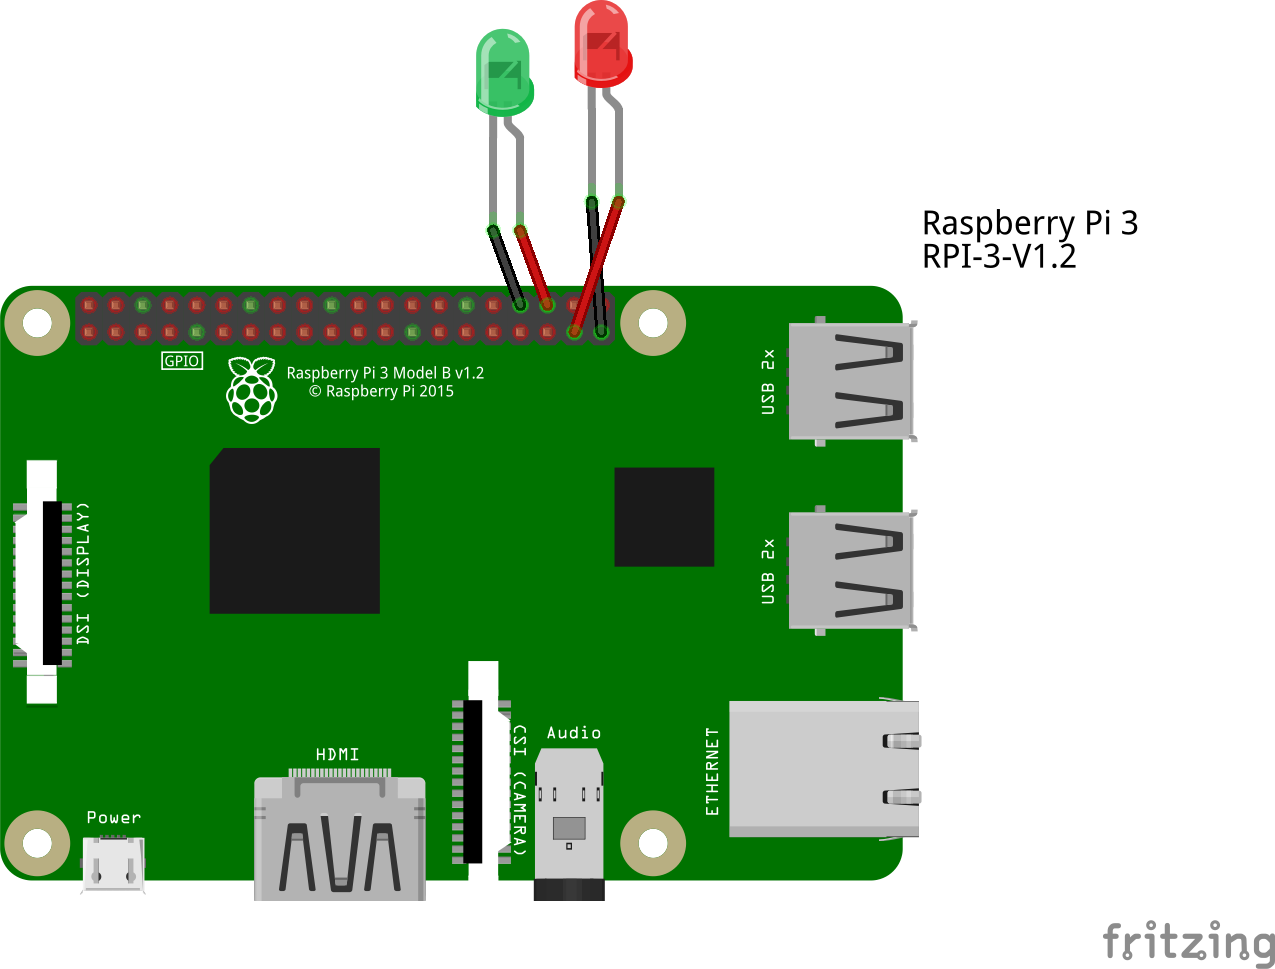

And then test it. If led's are glowing, then everything works good.

python led.py
python led2.py

Face Recognition Script

Install this module from pypi using pip3(or pip2 for Python 2):

pip3 install face_recognition 

Create directory "pic" and "unknown" in Documents for example and place there some face pics of people you know. My case it's ("/home/pi/Documents/pic/") and ("/home/pi/Documents/unknown/").

Create python script with following code

import face_recognition 
import picamera 
import numpy as np 
import os 
camera = picamera.PiCamera() 
camera.resolution = (320, 240) 
output = np.empty((240, 320, 3), dtype=np.uint8) 
print("Loading known face image(s)") 
ep_image = face_recognition.load_image_file("/home/pi/Documents/pic/ep.jpg") 
ep_face_encoding = face_recognition.face_encodings(ep_image)[0] 
vl_image = face_recognition.load_image_file("/home/pi/Documents/pic/vl.jpg") 
vl_face_encoding = face_recognition.face_encodings(vl_image)[0] 
face_locations = [] 
face_encodings = [] 
while True: 
   print("Capturing image.") 
   camera.capture(output, format="rgb") 
   face_locations = face_recognition.face_locations(output) 
   print("Found {} faces in image.".format(len(face_locations))) 
   face_encodings = face_recognition.face_encodings(output, face_locations) 
   for face_encoding in face_encodings: 
       match = face_recognition.compare_faces([ep_face_encoding,vl_face_encoding], face_encoding) 
       name = "<Unknown Person>" 
       os.system("python /home/pi/led2.py &") 
       import time 
       date_string = time.strftime("%Y-%m-%d-%H:%M:%S") 
       camera.capture("/home/pi/Documents/unknown/image-" + date_string + ".jpg") 

Test it

python facerec.py

RFIDConnection

Pins:
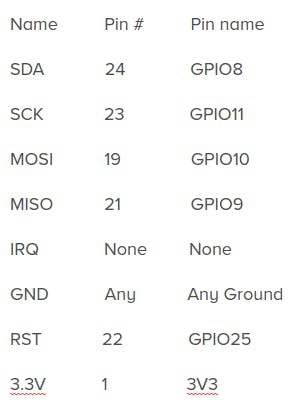
We need this to connect our RFID module to Raspberry pi 1.

  • Preparation
$ sudo nano /etc/modprobe.d/raspi-blacklist.conf
#blacklist spi-bcm2708
$ sudo apt-get install python-dev
$ git clone https://github.com/lthiery/SPI-Py.git
$ cd SPI-Py
$ sudo python setup.py install
  • read.py When the script finds authorized card, it opens user picture on the remote RPI 3 (runs led scripts), then it opens the door.
import MFRC522 
import signal 
import os 
continue_reading = True 
MIFAREReader = MFRC522.MFRC522()...
Read more »

open.sh

x-shellscript - 288.00 bytes - 08/01/2017 at 07:58

Download

led.py

x-python - 148.00 bytes - 08/01/2017 at 07:58

Download

led2.py

x-python - 149.00 bytes - 08/01/2017 at 07:58

Download

facerec_on_raspberry_pi1.py

x-python - 1.75 kB - 08/01/2017 at 07:58

Download

read-nfc.py

x-python - 1.52 kB - 08/01/2017 at 07:58

Download

  • 1 × Raspberry pi 3
  • 1 × Raspberry pi 1
  • 1 × RPI LCD 3.5 inch
  • 1 × RFID reader/writer module MFRC522
  • 1 × Relay SRD-05VDC-SL-C

View all 8 components

  • Going to get rid of RPi 1 and NFC

    Evghenii09/19/2017 at 14:33 0 comments

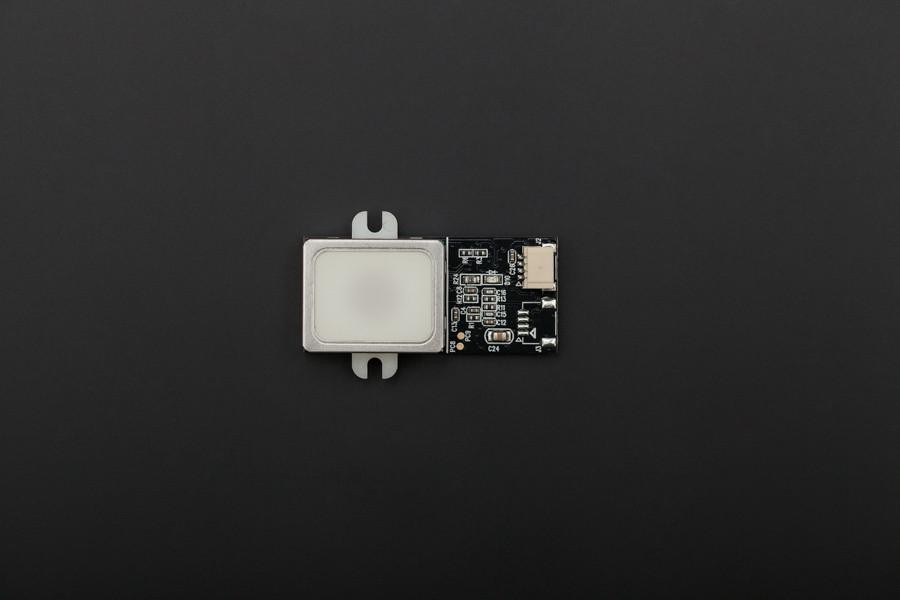
    Gonna get rid of RPi 1 and NFC in favor of fingerprint scanner connected to RPi3.
    Updates are coming...

  • Adding timing to push-button

    Evghenii09/12/2017 at 12:15 0 comments

    In order to disable entrance in specific hours via push-button, i made the following  bash script:

    #!/bin/bash
    
    H=$(date +%H)
    if (( 7 <= 10#$H && 10#$H < 19 )); then 
        echo between 7AM and 19PM
    sh /home/pi/action.sh
    elif (( 19 <= 10#$H && 10#$H < 7 )); then 
        echo between 19PM and 7AM
    sh /home/pi/error.sh
    else
        echo go to bed
    fi

    action.sh - opens the door between 7 am and 19 pm

    error.sh - displays restriction image between 19 pm and 7 am

    error.sh script

    #!/bin/bash
    DISPLAY=:0.0 XAUTHORITY=/home/pi/.Xauthority /usr/bin/feh --hide-pointer -x -q -D 5 -B black -F /home/pi/error.png &
    ping -c 4 localhost 2>/dev/null
    DISPLAY=:0.0 XAUTHORITY=/home/pi/.Xauthority xdotool key "x"
    

    P.S to run this script you will need to install xdotool

    sudo apt install xdotool

  • Temporary solution for any visitors

    Evghenii09/11/2017 at 14:24 0 comments

    Temporary solution for any visitors, push the button and enter.
    In my case it is needed in day time, because of many visitors throughout the day.
    Gonna make it schedule to enable/disable in day/night time.

  • Pic

    Evghenii08/04/2017 at 12:08 0 comments

    feh --hide-pointer -x -q -D 5 -B black -F /path/to/image.png

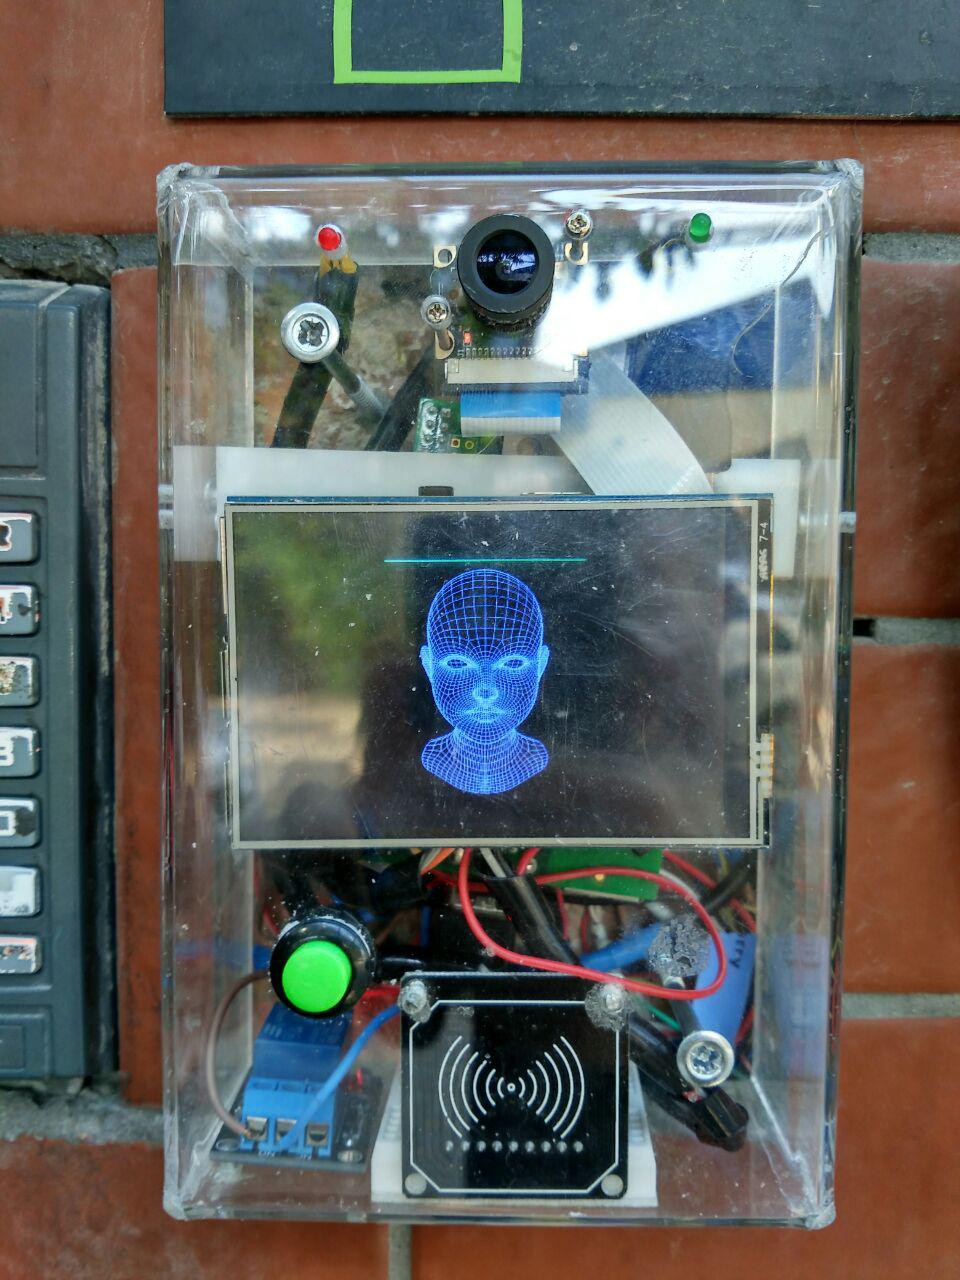
  • That is how it looks now

    Evghenii08/01/2017 at 07:29 0 comments

    I know it's ugly. Want to hide all that with some pretty sticker.

  • Check-check

    Evghenii08/01/2017 at 07:23 0 comments

  • Telegram bot

    Evghenii08/01/2017 at 07:10 0 comments

    Made telegram bot for Smart Intercom. It sends last pic when buttons is pressed and can open the door.

    Face.py

    # -*- coding: utf-8 -*-
    import config
    import telebot
    import os
    import time
    import requests
    import subprocess
    import simplejson
    import sys
    from telegram import InlineKeyboardButton, InlineKeyboardMarkup
    from telebot import types
    bot = telebot.TeleBot(config.token)
    @bot.message_handler(content_types=["text"])
    def any_msg(message):
        keyboard = types.InlineKeyboardMarkup()
        keyboard2 = types.ReplyKeyboardMarkup(row_width=2, resize_keyboard=True)
        callback_button1 = types.InlineKeyboardButton(text="Open", callback_data="open")
    #    callback_button2 = types.InlineKeyboardButton(text="Last Photo", callback_data="photo")
        keyboard.add(callback_button1)
        bot.send_message(message.chat.id, "Welcome!", reply_markup=keyboard)
    @bot.callback_query_handler(func=lambda call: True)
    def callback_inline(call):
        if call.message:
            if call.data == "open":
                script1 = subprocess.check_output("sshpass -p a ssh root@10.14.0.63 sh /home/pi/Documents/open.sh 2>/dev/null", shell=True)
                bot.edit_message_text(chat_id=call.message.chat.id, message_id=call.message.message_id, text=script1)
    #        if call.data == "photo":
    
    #            bot.edit_message_text(chat_id=call.message.chat.id, message_id=call.message.message_id, text=script2)
    if __name__ == '__main__':
        bot.polling(none_stop=True)
    def run(self):
            while True:
                self.updates()
                time.sleep(1)
    if __name__ == '__main__':
        bot.polling(none_stop=True)

     config.py

    # -*- coding: utf-8 -*-
    token = 'TOKEN'

  • Button + Telegram

    Evghenii08/01/2017 at 07:04 0 comments

    #!/usr/bin/python
    import RPi.GPIO as GPIO
    from subprocess import call
    from datetime import datetime
    import time
    import os
    shutdownPin = 29
    shutdownMinSeconds = 5
    debounceSeconds = 0.01
    GPIO.setmode(GPIO.BOARD)
    GPIO.setup(shutdownPin, GPIO.IN, pull_up_down=GPIO.PUD_UP)
    buttonPressedTime = None
    def buttonStateChanged(pin):
        global buttonPressedTime
        if not (GPIO.input(pin)):
            if buttonPressedTime is None:
                buttonPressedTime = datetime.now()
        else:
            if buttonPressedTime is not None:
                elapsed = (datetime.now() - buttonPressedTime).total_seconds()
                buttonPressedTime = None
                if elapsed >= shutdownMinSeconds:
                    call(['shutdown', '-r', 'now'], shell=True)
                elif elapsed >= debounceSeconds:
    		os.system("sh /home/pi/tgphoto.sh FaceRec /var/www/html/last.jpg > log.out 2> /dev/null")
                    os.system("sshpass -p password ssh root@10.14.0.89 -p1337 notify-send -i /usr/share/icons/gnome/32x32/actions/ring2.png Smart-Intercom Guest_at_the_door")        
    GPIO.add_event_detect(shutdownPin, GPIO.BOTH, callback=buttonStateChanged)
    while True:
        time.sleep(5)

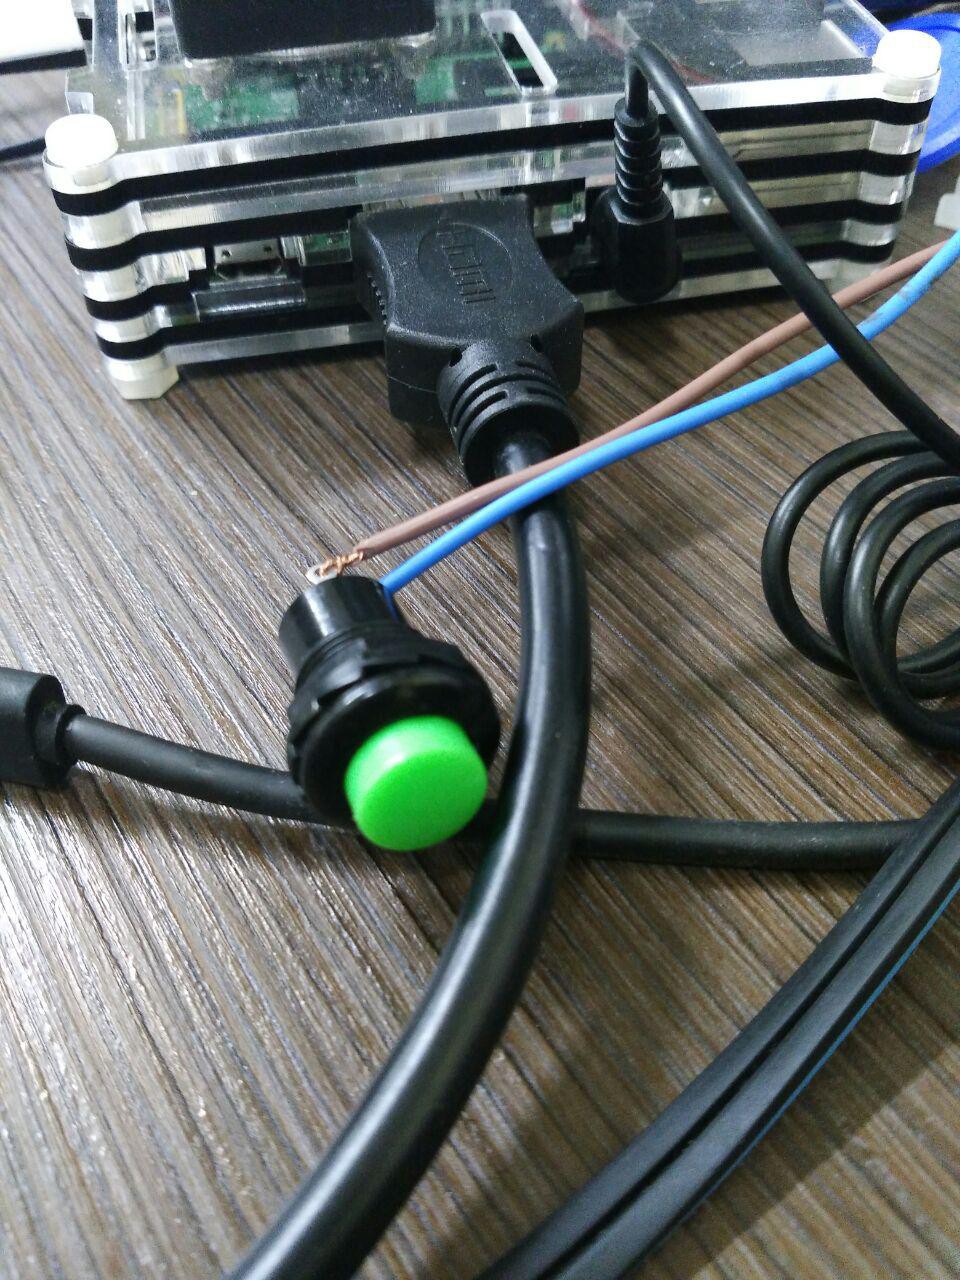
    Added pushbutton to Smart Intercom.

    It sends you last photo to telegram bot and sends notification to Ubuntu Desktop PC.

  • Push-button

    Evghenii08/01/2017 at 07:00 0 comments

    Adding pushbutton to smart intercom.

    Got some ideas what should it execute, still deciding 

  • Web interface

    Evghenii08/01/2017 at 06:55 0 comments

    Working on WEB interface for Smart Intercom.

    Now it has only open and close buttons. Planning to add photo upload to register new people for recognition.

View all 11 project logs

Enjoy this project?

Share

Discussions

Luca Ruggier wrote 11/10/2017 at 08:01 point

very impressive! I will set this up soon!

  Are you sure? yes | no

Similar Projects

Does this project spark your interest?

Become a member to follow this project and never miss any updates