Close
0%
0%

Battery Desulfator Kit, TESLA 12V compatible

This is a fast, heavy-duty Pulse Engine derived from my Commercial grade desulfator. Up to 80% battery yields overnight.

Similar projects worth following
A spin-off circuit from a 5 yr project with proper science, instrumentation and a lot of effort. https://www.youtube.com/watch?v=Dd0HBqpBgok
This multiple award winning project is being commercialized @ protofabtt@gmail.com. I wanted to enable the DIY community worldwide to be able to perform both 'manually monitored' and DIY-automated lead acid battery regeneration from the perspective of cost effective recycling by mitigating spent battery transportation & remanufacturing and the carbon footprint associated with it. The approach is suitable for all types of lead acid batteries . Now HEV (NiMH capable and soon Li-Ion ready) No chemicals are required.Note the B4 and after (overnight) pics of a regenerated cell in an car battery and the removal of the white sulfate. Process is also Deep Cycle ready.This project = 2 phases. 1) Just the pulse/charge engine with integrated snubber and optoisolation for up to 250W of RMS pulsing @ up to 800 Amperes pulsed.2) A PWM pulsing c

While auto/marine batteries were used during testing, the project is suitable for Photovoltaic deep cycle . The s'ware controller makes the system GEL battery ready.  In fact, the oldest battery I regenerated was a sealed Caterpillar 100AH Photovoltaic 12V unit that sat in a tropical warehouse for 10 Years which I got at under 3V at rest. The outcome was a 50Ah fully serviceable battery within a day or two. That battery was worth $450 USD at retail when new.

 SLA, VRLA, AGM, Flooded, et al, are fine.

The 250W Pulse engine is composed of a bank of avalanche ruggedized N-Channel FETs driven by a MCP1407 driver and an opto isolated interface. It employs a bank of about 6600uF worth of LOW ESR capacitance to deliver the pulses. It requires a 36V (8A) supply and a substantial 6" x 3" x 3/8" alum. heat sink and a 120mm ball bearing cooling fan. There is a custom 12V snubber which is reverse voltage tolerant (reverse battery connection) that dissipates up to 25W of backemf energy and illuminates a lamp whose brightness indicates the amount of energy being delivered.

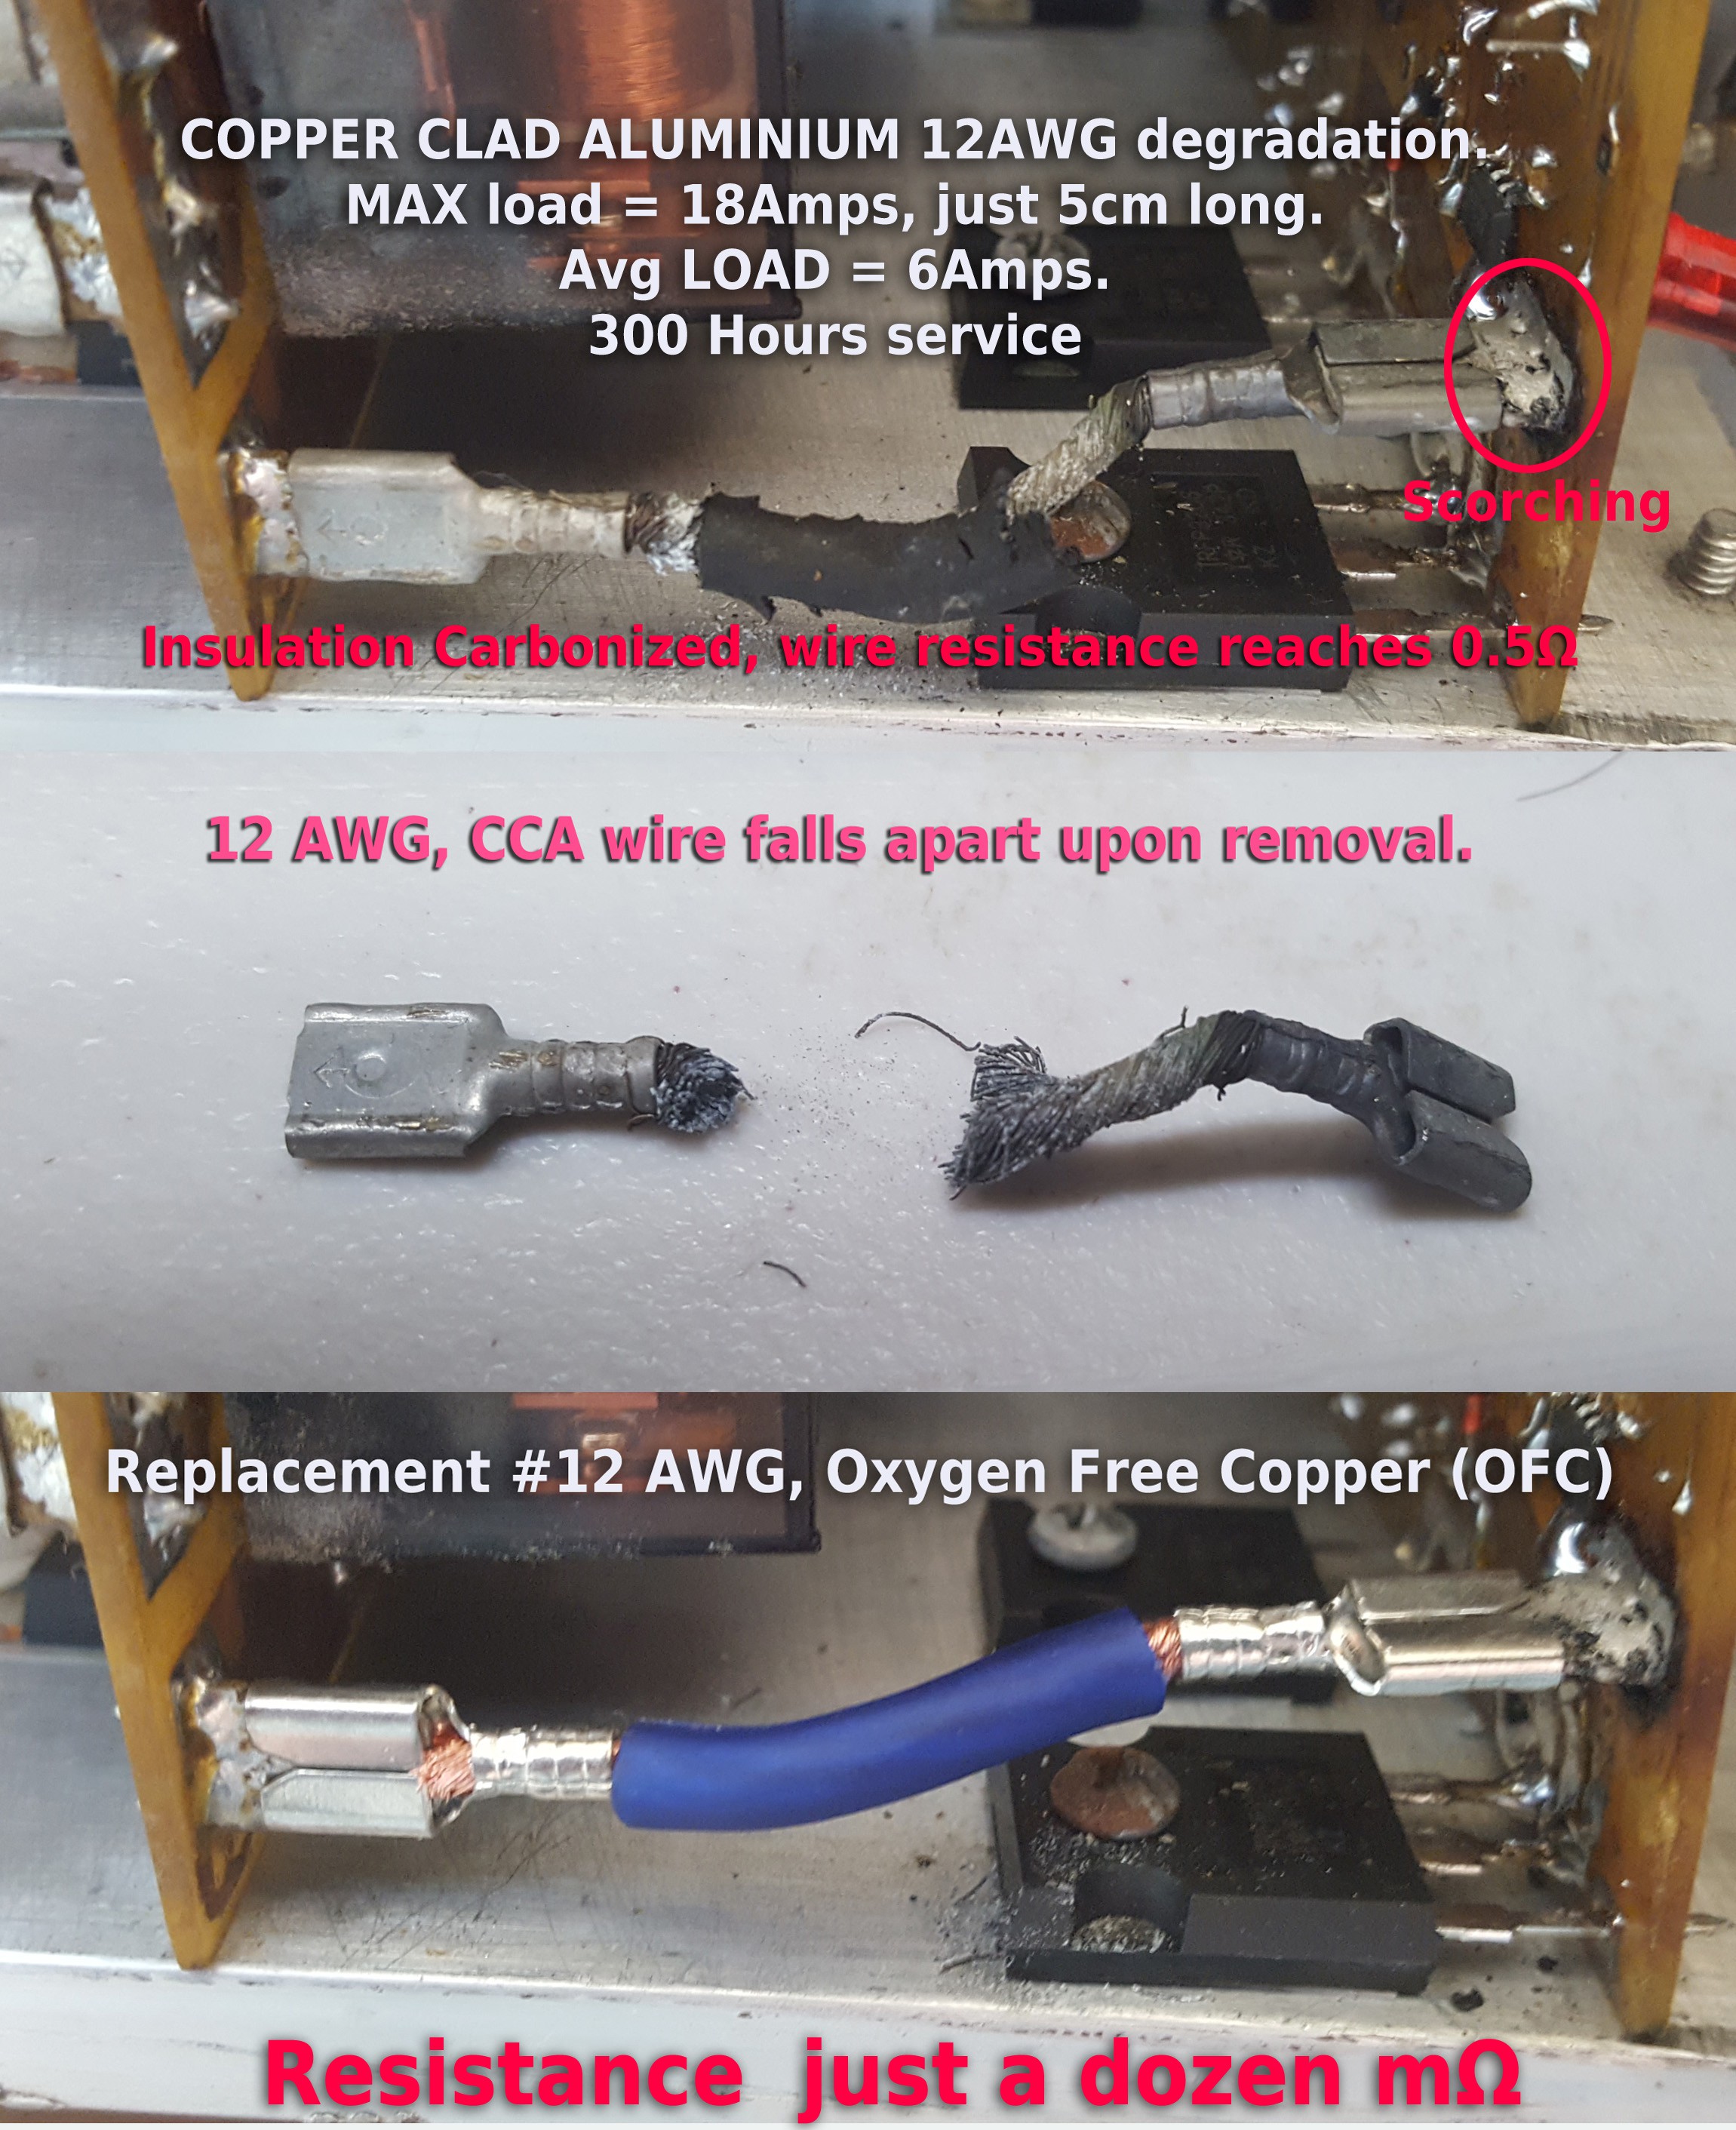
The pulse engine can drive up to 24V batteries (you'll need to add another 'series' T-20 lamp in the snubber for that). It provides for quad cabling per battery terminal for reduced inductance and resistance. Pure OFC copper cabling is recommended, not (CCA) copper clad Alum.  Dual core 12AWG audio grade cable, http://skyhighcaraudio.com/ , is suggested as it provides both flexibility and power capability with minor heating. 200A RMS clamps (100A minimum) are suggested as they have enough bite to penetrate battery post oxide.
I will look at offering the PCB or even a PCB and component kit for those who are interested in a simpler or quicker build with out the hassle of sourcing parts. This is probably more useful to those outside North America. However, part substitution is encouraged from a DIY perspective.

BTW, the techniques used to manufacture this homebrew PCB are detailed in my other hackaday projects about PCB making
TESLA 12V battery reference: https://syonyk.blogspot.com/2016/10/tesla-model-s-12v-battery-analysis.html?m=1

PulseEngineV1-schema.pdf

Easier to read PDF schematic

Adobe Portable Document Format - 66.21 kB - 07/24/2017 at 21:10

Preview

PulseEngineV1-btm-parts.pdf

Bottom layer parts placement for PCB assy. Note polarty for the capacitors and diodes. 5.5" x3.25"

Adobe Portable Document Format - 15.47 kB - 07/24/2017 at 20:21

Preview

PulseEngineV1-top parts.pdf

Top parts placement for PCB assy. Note polarity for the diodes and the pin 1 of the IC's. 5.5" x3.25"

Adobe Portable Document Format - 27.65 kB - 07/24/2017 at 20:20

Preview

PulseEngineV1-BTM LAYER.pdf

Bottom Copper layer for toner transfer, 1:1 scale. 5.5" x 3.25", already mirrored.

Adobe Portable Document Format - 29.34 kB - 07/24/2017 at 20:19

Preview

PulseEngineV1-top_layer.pdf

Top Copper layer: For toner transfer, 1:1 scale, Print and transfer. Already mirrored. 5.5" x 3.25"

Adobe Portable Document Format - 34.32 kB - 07/24/2017 at 20:18

Preview

View all 18 files

  • Useful Deepcycle Feedback

    mosaicmerc06/20/2020 at 00:12 0 comments

    I Have observed after 3 separate tests using 3 separate 250AH , 12V sealed batteries that while CCA increases  usefully after only one cycle of Regeneration, The Ah capacity increases  in steps of about 25% with repeat Regenerations.

    For instance at the onset the Battery was at 50Ah capacity, 225 CCA

    Regeneration cycle 1 = 75AH , 400 CCA

    Regeneration cycle 2 = 90Ah, 400 CCA

    When I speak of regeneration ..that applies to the automated product based,in part, on the circuit presented here. Here are the main principles of the micro-controller run system.

    The regeneration cycle is as follows:

    1) Initialization =>  battery tests for Voltage & Impedance

    2) Viability cycle => discharge to 11.9V for a 12V battery or 5.95V for a 6V battery

    3) Pulsecharge at C/20  until the battery is up to 13.2V

    4) Absorbtion test => 20 minute discharge at C/20  to validate battery voltage >11.9V or 5.95V for a 6v.

    6) Pulse charge & reflex charge in stages with thermal/voltage sensing feeding Pulsewidth control and Amperage.

    6A) Ensure a minimum absorption voltage (14.4V, temp. corrected, achieved  and then voltage limit to 14.1V for 2 to 8 hours depending on size of battery.

    7) Battery rests for 15 minutes and is  discharged  at C/8  to C/13 for 2 hours and capacity calculated based on Peukert analysis.

    8) Pulse charge  again with a 2 hour absorption/voltage controlled profile termination.

    9) Rerate CCA and report on battery AH.input, final AH capacity (C/20)  , resting V, temperature  and CCA & Impedance.

  • Project = Product

    mosaicmerc07/01/2018 at 01:28 0 comments

    Ok, so I can finally say this has transitioned to product stage. A few customers achieved and now manufacturing of the 1st 125 production units has started.
    Along the way I did some testing on 150Ah deep cycle batteries and improved the s'ware to handle them better as they have different thermal characteristics and stronger construction than starter batteries.

    The system uses both PIC and ESP12 processors to handle processing and communications independently.

    The online interface is working ok with real time science  telemetry coming back from as far as Africa now. Customers can monitor their accounts with multiple re-generators running.

    I am adding a wifi LED indicator to the front panel as WiFi loss is an issue for the telemetry.

    An automotive brake lamp combined with a Kilo Amp schottky pulse diode now handles back emf pulses from the battery and runs the output FETs mucg cooler in their SOA with no more FET avalanche burnouts.

    Replaceable battery clamps now use spade connectors and #12 AWG copper cabling x 2. Battery clamps are now tinned with lead/tin solder to counter galvanic clamp corrosion from battery out gassing.

    I have determined that in addition to de-sulfation, removal of dendrite hydrate crystals which cause cell shorting is also happening, but it can take a couple regeneration cycles for the tougher hydrate crystals. They are characterized by loss of voltage from a cell (e.g. a 10.5 to 10.8V output from a 12V battery) and cell heating during the multi hundred amp pulse process. Note that they have the same symptoms as a plate sludge shorted cell, but deep cycle cells (AGM) don't develop sludge shorts.
    http://www.power-thru.com/documents/The%20Truth%20About%20Batteries%20-%20POWERTHRU%20White%20Paper.pdf

  • Counting Ah vs Wh

    mosaicmerc08/09/2017 at 23:04 0 comments

    Something to remember when rating batteries of any kind.

    What matters is Watt hours or Kilo Watt Hours as per your utility meter.

    A lot of batteries are rated in Amp hours though and that's a bit misleading.

    When rating a lead acid battery, it is discharged to 10.5V and the Ah discharged at a C/20 rate is the standard 'rating'. So a 100Ah battery will discharge 100Ah at a 5A rate for about 20 hours.

    Faster discharging brings in the Peukert factor into significant play and this has to do with electrochemical and energy losses due to chemical changes inside the battery and heating.

    Now "counting" Ah is a common thing done on installations that hope to monitor charge efficiencies and battery performance. Charge Ah in vs discharge Ah out.  Discharge: Charge ratios of 80% eff. is a number experienced with lead acid batteries.

    HOWEVER,  with pulse charging things will change. Efficiency can go DOWN at high pulse levels.  heating losses I*I*R become significant. Since pulse charging requires a significantly higher supply voltage, you must consider Wh and not Ah as a measure.

    I recently processed a Caterpillar diesel SLI battery. It was showing around 40Ah discharge BUT only with 27Ah charged.  Well...the supply V I use is 36V, so we're actually looking at 36V * 27Ah =  972 Wh inputted vs an average 12.1V x 40Ah = 484 Wh discharged. Which ballparks to a 50% charge efficiency.

    Seems about right since the 200A battery clamps get a bit hot during the pulsing (100's of Amps) , with ONLY 2.5 mΩ loss at the battery clamps causing the heating.

    There's a bit of mild heating in the 12AWG x 8 cabling as well but some of that is conducted from the terminals. The cabling adds about 8mΩ to the loss.

    Well, with a charge eff. of 50% , why do charging with this system you might ask?

    Well here's why:

    You are dynamically stress testing each battery well beyond it's service environment to be able to qualify the battery as suitable for service and not about to die off unexpectedly from borderline internals. No regular charger does that....as i am sure we can all attest to.

    This is necessary when bringing back borderline or dead batteries. You need to know they will stand up.

    No 'battery vitamin' or chemical additive will inform you of this NEED to KNOW info.

  • OPEN Source +​

    mosaicmerc07/24/2017 at 20:39 0 comments

    Ok, it seems that Autodesk has killed off the 'Freemium" version of EagleCAD. Well, that drops a large rock in the open source pond.

    I learned EagleCAD on the Freemium license...ah well.

    I added the 1:1 scaled PDFs in the files section to allow DIY toner Transfer PCB making of the double sided 5..5" x 3.25" PCB. Note that my layout has custom SMD pads for the TO247 IRFP3206 NFETS. Bend the Transistor leads at 90° just at the thick lead shoulder and trim down the bent section to 1/8".

    I did that to make for an improved, low impedance solder joint that permits easy rework when experimenting with other transistors. It's a B*itch to remove through hole TO-247's  without overheating the drain connection and lifting the PCB copper. Also, it provides for easy transistor realignment if you don't get your heatsink 6-32 mounting holes just right. Hot air is advisable, or solder wick when doing rework.  I use a medium spade tip and about a 310°C setting on my solder station for the TO-247 rework.

    290° C is ok for first installation.

    As always, check out my other projects for DIY PCB making at home.

  • Version1 of the Pulse Engine

    mosaicmerc07/10/2017 at 16:30 0 comments

    I've uploaded the EagleCAD schematic & PCB layout files along with some useful ref. info on batteries and desulfators.

    The schematic layout is a bit spaghetti like, I'll neaten it up at some point, but it isn't very complex.

    I have to add a text file or embed some text in the schematic to explain the operation and discuss the component selection. There are 5 basic blocks:
    1) The capacitor bank (Low ESR)
    2) The NFET bank (ruggedized for hi pulse currents)

    3) The Opto-isolated gate driver for the NFET bank.
    4) The reverse voltage tolerant power snubber
    5) The fail safe crowbar (for the main fuse) for the snubber lamp.

    As noted before, use OFC #12 AWG cabling, two pairs per battery terminal with crimped 1/4" spade receptacles to match the PCB spade terminals. Heavy duty 100A or 200A battery clamps (pictured in files section) are used and the ends of the two pair cabling (per clamp) are soldered right up into the jaws of the clamp to minimize clamp losses.


  • Pulse Charging vs just Desulfating

    mosaicmerc07/09/2017 at 18:42 0 comments

    Many desulfators you can buy or find on EBAY deliver only a handful of peak Amps and very low overall average power, in fact many of them suck power from the battery while pulsing and you end up with a discharged battery in worse shape unless you have a charger attached. Thus pulse charging solves a number of issues at once. Battery charging, desulfating & dendrite destruction.

    Now the key to the removal of sulfate and destruction of dendrites or 'mossing' is significant power delivery and elevation of the cells' voltage to equalization levels. This also gasses the battery and removes electrolyte stratification, desulfating without gassing is going to take a very long time, if ever.

    The limit on this is cell temperature as heat is generated by forcing current through the resistive sulfate and the low concentration of electrolyte. Battery temperature should not exceed 50°C.

    The pulse delivery circuit in this project will deliver RMS average up to perhaps 10A and perhaps up to 1000 pulse amps with adequate heat sinking and forced air cooling.

    This requires a decent DC supply of 36V @ 11A or 400W, many 'MeanWell' types are available on EBAY. I use 8.8A, 36VDC supply or better and limit power delivery to about 7.5A max RMS as I run the system 24/7 with no a/c in the tropics.

    Worthy of mention is reflex or pulsed negative charging as well, as this has proven to be effective on stubborn batteries with crystalline sulfate. I use it, however this output board doesn't offer it. That's a different circuit element, but you can achieve it easily with a switched 12V lamp load. What this achieves is a reduction of bubble nuclei which form on the plates during charging and thus improves the electrolyte to plate contact surface and hence overall charge efficiency ramps up.

    On the matter of energy efficiency, battery impedance can range from a few milliohms when new to a couple K ohms when sulfated badly. Now efficient power transfer theory states that max. efficency takes place when the supply impedance is equal to the load. Well since large amounts of power move when the load is high (small battery impedance) the goal is to achieve a very low impedance pulse charging circuit, which this one does. Overall it's somewhere around 10 millohms when built properly mainly limited by the capacitor bank. A useful trend is the capacitors ESR drops as they heat so their operation improves when hot, limited of course to there spec. operating temps.

    Until the next update.

  • Discombobulate

    mosaicmerc07/04/2017 at 05:30 0 comments

    Ok, I have some work to separate the pulse engine schematic from the rather complex overall circuit.

    Once I do that I can publish the EAGLECAD files and BoM for those who want to get started.

    Then I'll design an integrated pulser with variable duty cycle/freq to drive this engine for the DIY folks, although a simple 555 circuit can do it as well if you want to get going quickly.

    In the meanwhile have a look at my other project, the Lead Acid Ah capacity tester/ logger. It is what I used when I was in early development to easily load test regenerated batteries and output the result to Excel to chart the battery Ahr. The principle of that unit is integrated into the complete system which does pass/fail rejection and rates each passed battery for proper service application.

View all 7 project logs

  • 1
    Build for Cooling

    There's a free license version of Eagle Cad for viewing/printing/exporting gerbers etc.

    Otherwise in the gallery you'll see a schematic and a layout guide.

    The FETs and the Snubber Schottky are laid out along the edge of the PCB for direct mounting to the 3/8" x 3" x 6" plate heat sink. The other schottky requires a bolt on heat sink, nothing excessive.

    A 120VAC , 120mm fan delivers around 80CFM blown across the FET heat sink (and the capacitors which are bottom mounted) . The PCB is then edge mounted vertically on the Alum. plate, aligned along the middle of the fan for double sided PCB cooling.

    Use 6-32 mounting hardware for the FETs and a 4-40/ insulating kit for the TO220 snubber rectifier. The 2200uF cap associated with the snubber gets quite hot so ensure proper airflow. All electrolytic caps are Low ESR 105°C types. Use quality caps like Nichicon, Rubycon, United Chemicon etc. Caps under 30 milliohms ESR should be ok.

    If you look at the layout image you'll see crosshatching along the red top copper layer...this is the solder mask stop to allow heavy solder thickening of the traces to carry heavy currents. Similarly, the bottom solder mask stop applies to the bottom traces so it's best to use the EagleCad layout which has all this done for you. I use 'used' 2.5mm solder braid to augment these traces, it works well.

    The snubber employs a T-20 21W/5W dual filament Brake lamp which provides for reverse battery connection while permitting up to 26W of continuous snubbing. The lamp also glows according to the kick back energy. Brighter = more energy that the battery is absorbing and the more energy created by the collapsing magnetic field of the battery and cabling. This means the battery's impedance is improving- a visual cue..

    This snubber is important to keep the FETs from avalanching outside their SOA and eventually failing.

    The leads on this lamp must be properly cleaned and tinned, it is bottom mounted like the capacitors.

    There is a SMD relay with an 18V zener monitoring the well being of the lamp via the associated capacitor's voltage. Once the capacitor exceeds 18V + 4.5V the 4.5V relay will pull and crowbar the main fuse. This protects the circuit from lamp failure.

    The layout uses a custom SMT pad for the FETs rather than thru hole. Bend the FET Leads @ 90° from the wider part of their leads and trim this created L shaped lead to 1/8". Tack solder the FET gates to the PCB before aligning to the Aluminum plate and marking the center spots to drill the 6-32 mounting hardware. Also, solder one pin of the Schottky snubber onto the PCB and mark its 4-40 center hole. onto the alum plate.

    Remove the AL Plate drill and tap it, then realign the PCB with the FETs and schottky, reflow the soldered joint to allow for flush strain relief mounting with the machine screws installed. Remove the screws and the plate and finish solder the semiconductors.

    When building the two quad #12 AWG, OFC cables, crimp the 1/4" spade receptacles and solder them to the cables as well. Solder the other ends of the cables right up into the jaws of the crocodile (200A) clamps to minimize clamp losses. Keep these cables as short as is feasible, perhaps 2' each.

    more details and pics to come...

View all instructions

Enjoy this project?

Share

Discussions

mosaicmerc wrote 01/14/2020 at 19:10 point

Regenerated my first TESLA, lead acid battery, from a Model 3.  Most EVs and hybrids still have them and they regenerate well being deep cycle.
https://teslatap.com/articles/12-volt-battery-compendium/#charging_12v

  Are you sure? yes | no

Vikebeer wrote 04/07/2019 at 05:34 point

Has anyone successfully made this with a video thats not hidden in a box with actual meters and not just an led screen scrolling values?

  Are you sure? yes | no

mosaicmerc wrote 10/03/2019 at 13:16 point

Well  I didn't use regular onsite meters as the IoT linkup lets me observe the process from online and remotely.
I am starting work on Hybrid battery reconditioning & service automation now.

  Are you sure? yes | no

Burger wrote 01/18/2019 at 11:56 point

For the past 5 years I have been interested in battery desulfation techniques and have seen many different engines and even built a few. I have had successes to varying degrees, but none that really blew me away.

I am very interested in your engine, as it's perhaps the most complete and powerful one I have encountered so far.

As a comparative electronics newby, I am having trouble grasping how your snubber works.

I see a diode connected to the "DRAIN_PULSE_B-" and then through the lamps to 36V. Now if I'm not mistaken, that diode will only conduct if the voltage of "DRAIN_PULSE_B-" exceeds 36V plus the voltage dropped by the diode.

My question then is what would cause "DRAIN_PULSE_B-" to exceed 36.3V (or thereabouts)?

edit: Sorry, I see now having looked at your oscilloscope image again that the voltage kicks back up to 60V when the mosfets are switched off. I was initially thrown by your comment that the trace was inverted. I understand now that you were alluding to the fact that the "DRAIN_PULSE_B-" is inverted in relation to the drive pulse rather than that the trace for the "DRAIN_PULSE_B-" was inverted, since as I understand, that line should be high (around 36V) when the mosfets are off and at or near analog ground when they are on. Is this correct? What causes the kickback that would cause the negative side of the battery to jump to 60 V, which in essence amounts to a polarity reversal?

Am I also correct in assuming that the kickback will be less as the battery improves and that therefore the lamps should get dimmer, or is it the other way around?

  Are you sure? yes | no

mosaicmerc wrote 10/03/2019 at 13:06 point

The lamps brighten as the battery improves due to the lower impedance of the battery and more current flow to the lamps.

  Are you sure? yes | no

Burger wrote 10/04/2019 at 06:57 point

Morning from sunny South Africa Mosaicmerc. It is super awesome to hear from you here after so long. Hope you are well.

I have successfully made a modified version of your design, main changes being a discrete (but powerful) mosfet driver and in addition I am feeding it all with a lab power supply at 40 Volt and 5 Amp. My only concern right now is the lm317 supplying the voltages for mosfet drive. It gets far too hot even with a fairly beefy heatsink, however, I am awaiting a bunch of tiny buck converters from Ali-Ex that will replace the lm317 in the final draft of my pulser.

The results have been remarkable to say the least. I am two batteries in (a 66 Ah car battery that was sitting at just shy of 11.8 V for 3 years and a 100 Ah deep cycle of a friend that had been ruined by a very bad charger) and both are (just about) new again!

My gratitude must go to you for hard work. For me this has been a joyful experience, building something that can accomplish the seemingly impossible.

As you may know, our country suffers from enormous unemployment as well as great power-grid instability and I can see some real possibilities for this worthy initiative.

Best regards to you,

Burger Naudé.

  Are you sure? yes | no

mosaicmerc wrote 10/04/2019 at 13:24 point

Burger, two of my complete systems with full microcontroller and IoT capability with online real time management and tracking of every battery processed are being used in Africa., Burkina Faso. The system permits automated dual battery sequencing and real time battery backup with early rejection and full CCA and AH reporting at the end of the process for every battery.  I retail the complete systems for $1200 USD.  Email:protofabtt@gmail.com

  Are you sure? yes | no

mosaicmerc wrote 10/04/2019 at 15:02 point

Burger...I use a 36V power source as the LM317 is rated at 37 V. 40V will run  it hot.

  Are you sure? yes | no

E wrote 01/16/2019 at 11:03 point

Thanks for all your work and research.  I've independently found many of the same reference documents you've included in the files section, and was kind of surprised how little real science-based info seems to be available on the topic of desulfation.

My primary focus for desulfating is to try to recover (and prolong the life of) smaller SLA batteries, usually in the 2 to 20Ah capacity range.  How does your design accommodate batteries with such different capacities?  Since your design targets seem to be for much larger storage systems (and extremely high current pulses), is your design safe for use on such relatively small devices?

  Are you sure? yes | no

mosaicmerc wrote 10/03/2019 at 13:09 point

I recently did a software upgrade to handle batteries down to 4Ah. No change to the hardware engine in this project was required.
 Also the s'ware control manages GEL battery types as well which are more sensitive to over voltage.

  Are you sure? yes | no

mosaicmerc wrote 11/24/2017 at 06:07 point

I'll be posting the operation of the complete 'official' dual processor, Wi Fi ready, regeneration system soon. The professional circuit boards are arriving soon and the graphics for the enclosure is being done.  Here's an older sneak peak video of a single processor prototype running dual batteries:

  Are you sure? yes | no

mosaicmerc wrote 07/19/2017 at 14:31 point

Answers to 1 and 2 are Yes.
I use between 500 and 1500Hz.
The current ramp is 'slow' because of parasitic inductances in the batetry and cabling etc. This is why most MHz pulsers don't work well.  I had a custom made Current Transformer purpose built for the project to give precision results. It weighs a Kg or so.

The yellow trace is the 'voltage' pulse inverted on the display, so the trace goes down when applied and the kickback goes up to the Avalanche of the FETs.

The battery develops an average increasing voltage as it acquires charge, to effectively mobilize the electochemical reaction and regenerate the battery this should be held to 'gassing' or equalization voltage.

In my control circuit (not shown) this is measured and managed.,

The IRFP3206 is specified to 840A each for pulse applications, not 200A. I have tested them to failure.

  Are you sure? yes | no

jaromir.sukuba wrote 07/21/2017 at 17:28 point

Thank you for your complete and helpful answer.

The IRFP3206 specs is indeed my fault, the pulse specs are really higher.

Is the pulse repeating frequency (you mentioned 500-1500Hz) adjustable by user? Or control circuit changes this frequency by some algorithm? How it is the frequency determined? Do you also change pulse width to stay proportional with pulse cycle (1/frequency)? Is the pulse width fixed or adjustable?

I'd love to see the heavy current transformer.

  Are you sure? yes | no

mosaicmerc wrote 07/22/2017 at 12:44 point

The pulse frequency is adjustable by the user or by a uC driving the pulsing.  Frequency change has some benefits depending on the pulse control circuit and pulsewidths which can get down to a few micro seconds when throttling currents.

The CT is about a 4" diameter composite ferrite toroid (2" thick)  with a 50 Ω transmission line output rated at 40V/A. Cost a lot, but I needed it for accurate, isolated measurement when I was pushing high pulse current dev. It's built not to magnetically saturate/heat for the application and remain linear.

The pulser design is flexible, it can be RMS current, Peak current,  voltage, temperature,frequency or pulsewidth controlled. I use a combination of all of these in a fairly elaborate algorithm to automate the system under all battery conditions.

  Are you sure? yes | no

jaromir.sukuba wrote 07/19/2017 at 09:53 point

Hello, this is very interesting project. I'm not very familiar with battery regeneration, so I have a few technical questions to understand it better:

1, As far as I understood, you are dumping energy from capacitor charged to 36V into 12V battery, in short pulses - is that correct?

2, As the battery voltage is lower than capacitor voltage, current flowing through capacitor is given by impedance of capacitors itself, internal battery impedance, MOSFET and cables. The total impedance is relatively low, hence the currents of 100's of amperes - is that correct again?

3, Looking at picture - https://hackaday.io/project/25741/gallery#ee89f2f53ebe882b6909e8e3953adc7b - what is the repeating frequency of the pulses? The blue line represents the current, AFAIK. Why does the current rise so "slow"? Due to impedance of cables and battery itself? I'm not sure how to interpret the yellow trace, though.

4, What does "elevation of the cells' voltage to equalization levels" mean?

5, IRFP3206 is specified up to 200A, though you are using four of them in paralell, they seem to be on edge of their parameters. Does this affect reliability of the device?

  Are you sure? yes | no

Similar Projects

Does this project spark your interest?

Become a member to follow this project and never miss any updates