Close
0%
0%

Scorpion 3.0

Multi tool design for the IIIrd world countries

Similar projects worth following
Scorpion 3.0 aims to be a multi purpose tool for the masses, a cheap product but not a cheap design, of what could be a better way of living for some people.

Challenge:

I'm a former Romanian HW engineer and I recently moved to Papua New Guinea for a few years. While being involved here in some technical works, I had the opportunity to travel a lot into the remote jungle sides of this country. In the rural areas, people are trying to develop better living conditions here and to begin to use some small solar panels and some lead acid batteries to power a few lights and maybe in some cases, charge their mobile phones. The technology is many times too expensive for these places and people are ending up connecting their refurbished solar panels directly to some old car batteries. This dangerous practice for a desperate cause to light up some 3W light bulbs at night, leads many times to setting the batteries or the houses on fire.

Solution:

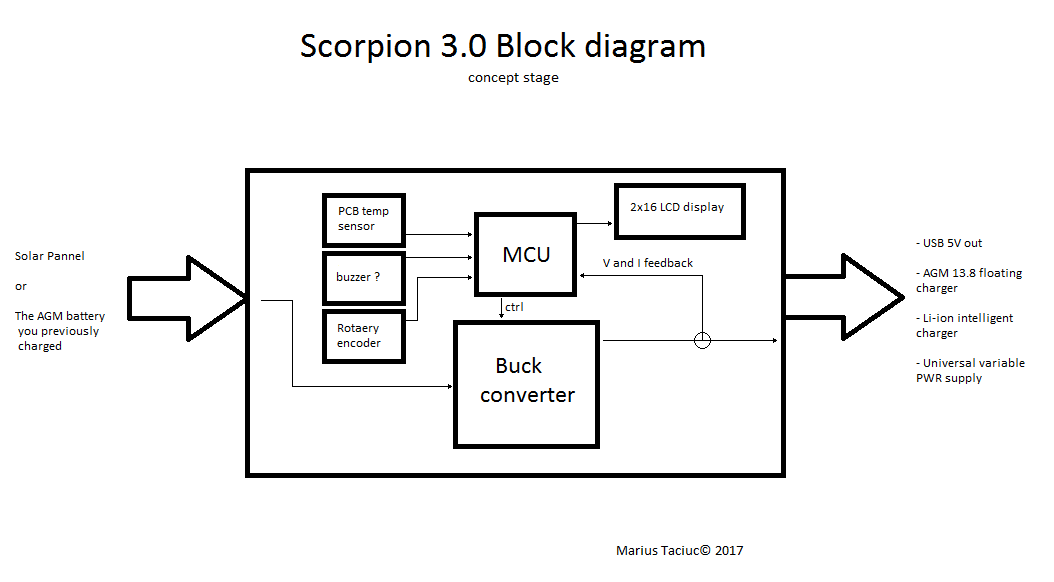
A fairly technical and good solution would be to design a low price adjustable and multi-purpose DC to DC converter power supply that is very simple to use. My idea is to have a small 40W custom built solar charger that has the possibility of converting into a battery to device power supply that can allow multiple voltages at it's output. This multi-purpose tool could have an AGM battery charger implemented in it's menu and it could also have a Li-ion battery charger. 

The aim would be to create this tool for the masses at a low price and keep it under 10$ so the people of these places could afford to buy it.

Potential benefits:

The potential benefits of having such a device are enormous. Some of them would be:

  • The possibility of having a very cheap solar charger for some AGM batteries between 7Ah and 55aH (in some cases)
  • The possibility of having a mobile phone charger. In some areas, there is mobile phone signal, but people don’t have the possibility of charging mobile phones.
  • The possibility of having access to other devices as mp3 players and audiobooks.
  • Access to radio (local news, information and other media content)(where local radio stations are available)
  • Small indoor illumination system.
  • Increasing the chance of access to education having stated all the above benefits.  

Tools to be implemented within this device:

  • Solar USB charger (SP voltages up to 40V)     

Aiming to build something that is able to convert the voltage of the solar panel (SP) down to 5V for directly charging a mobile phone

  • Solar AGM 12V battery charger (maximum charging current of @ 3A) 

Planning to add a sub menu in the software that will be able to act like an AGM solar charger. The Scorpion 3.0 should be able to provide the floating voltages of 13.6V - 13.8V

  • Intelligent Solar Li-ion battery charger (configurable number of cells)

Planning to be able to set from the menu a Li-ion battery charger. This function could allow the user to configure the number of cells or the nominal voltage of the battery they want to charge and to be able to input the C parameter of the battery. Scorpion 3.0 should know what to do with these numbers.

  •  USB charger using the power stored in the batteries by connecting the device in reverse

Scorpion 3.0 should be able to support other voltage (power) input sources like an AGM battery. In these conditions, it should be able to still function as an USB charger and as an universal variable power supply

  • Universal variable power supply that can be connected either to the SP or the charged battery

This leaves me with the need of implementing four sub-menus in the graphical interface of the display, as follows:

 - Power supply

 - AGM charger

 - Li-ion charger

 - USB 5V
Power concerns, humidity concerns and …more concerns about the Buck idea.

   I realize that this design must be water proof. In these areas, the measured humidity exceeds 80% almost everyday. I realize that having a piece of electronic - whatever thing - inside of a coconut leaves roof house, can lead to water being splashed over the case. After I will have a mature design, I plan to cover the PBG with a varnish...

Read more »

Scorpion_3_0_test_plan.docx

Test plan acoording to the ISO 16750 standards

document - 1.04 MB - 09/04/2017 at 06:03

Download

Scorpion_3_0_firmware_A4.txt

A4 variant for the Scorpion 3.0 project. Check the log for more informations

plain - 42.02 kB - 08/25/2017 at 10:26

Download

Scorpion_case_TOP.stl

STL file for the top side of the case

Standard Tesselated Geometry - 166.88 kB - 08/25/2017 at 10:06

Download

Scorpion_case_BOT.stl

STL file for the bottom side of the case

Standard Tesselated Geometry - 117.27 kB - 08/25/2017 at 10:06

Download

case print.png

Bottom case file loaded in Slic3r

Portable Network Graphics (PNG) - 206.05 kB - 08/25/2017 at 10:03

Preview

View all 20 files

  • 1 × 240R Connectors and Accessories / Telecom and Datacom (Modular) Connectors
  • 1 × 300R Capacitors / Aluminum Electrolytic
  • 1 × 2K Electronic Components / Misc. Electronic Components
  • 2 × 9K Sockets and Accessories / IC and Semiconductor Sockets and Mounting Kits
  • 2 × 1K Electronic Components / Misc. Electronic Components

View all 31 components

  • Latest HW modifications after the testing session

    Marius Taciuc11/08/2017 at 04:06 0 comments

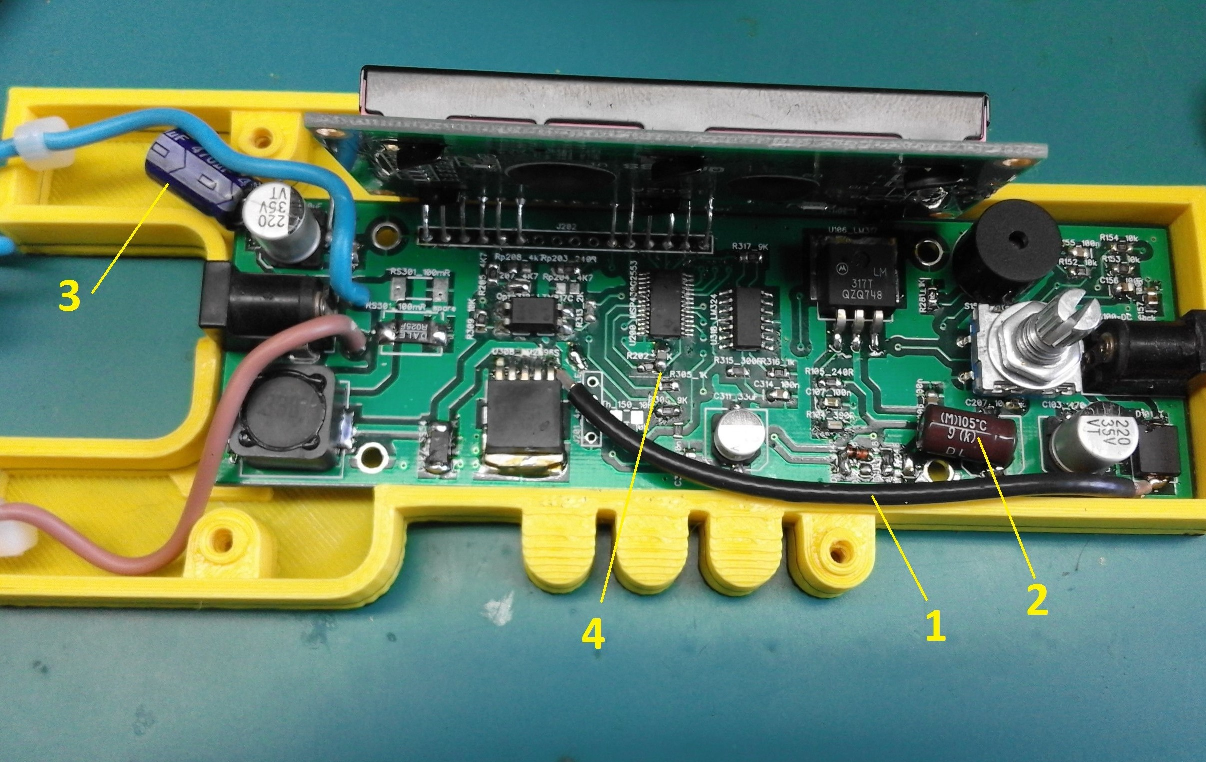
       During the testing sessions, when I was increasing the output power above 30W, sometimes the MCU would reset and I was seeing this in a jam of the chars on the display. I realized that I made a mistake in the design of the layout and that would be routing the power trace too close to the MCU and too close to the 3.3V line. When I calculated the voltage per meter for some traces, I was shown values of almost 5000V/m and clearly this is not so good for my EMC.

       The HW modiffications I did are the following: 

     1. Cut the power trace on the bottom side of the PCB and replaced it with an external shielded cable

    2. Replaced the output cap of the LM317 with a 470uF one.

    3. Doubled the size of the output filter

    4. Placed a 100nF cappacitor in parallel and very close to the MCU

    Now it works like a charm and with this firmware, I managed to output a maximum power of 45W out of it. The efficiency is very good and the LM2596 does not heat above 40C, which is a success. Normally, a C1 iteration of the layout should be created after the first series of tests. Stay tuned for more updates and hopefully some test report posts.

  • Test setup

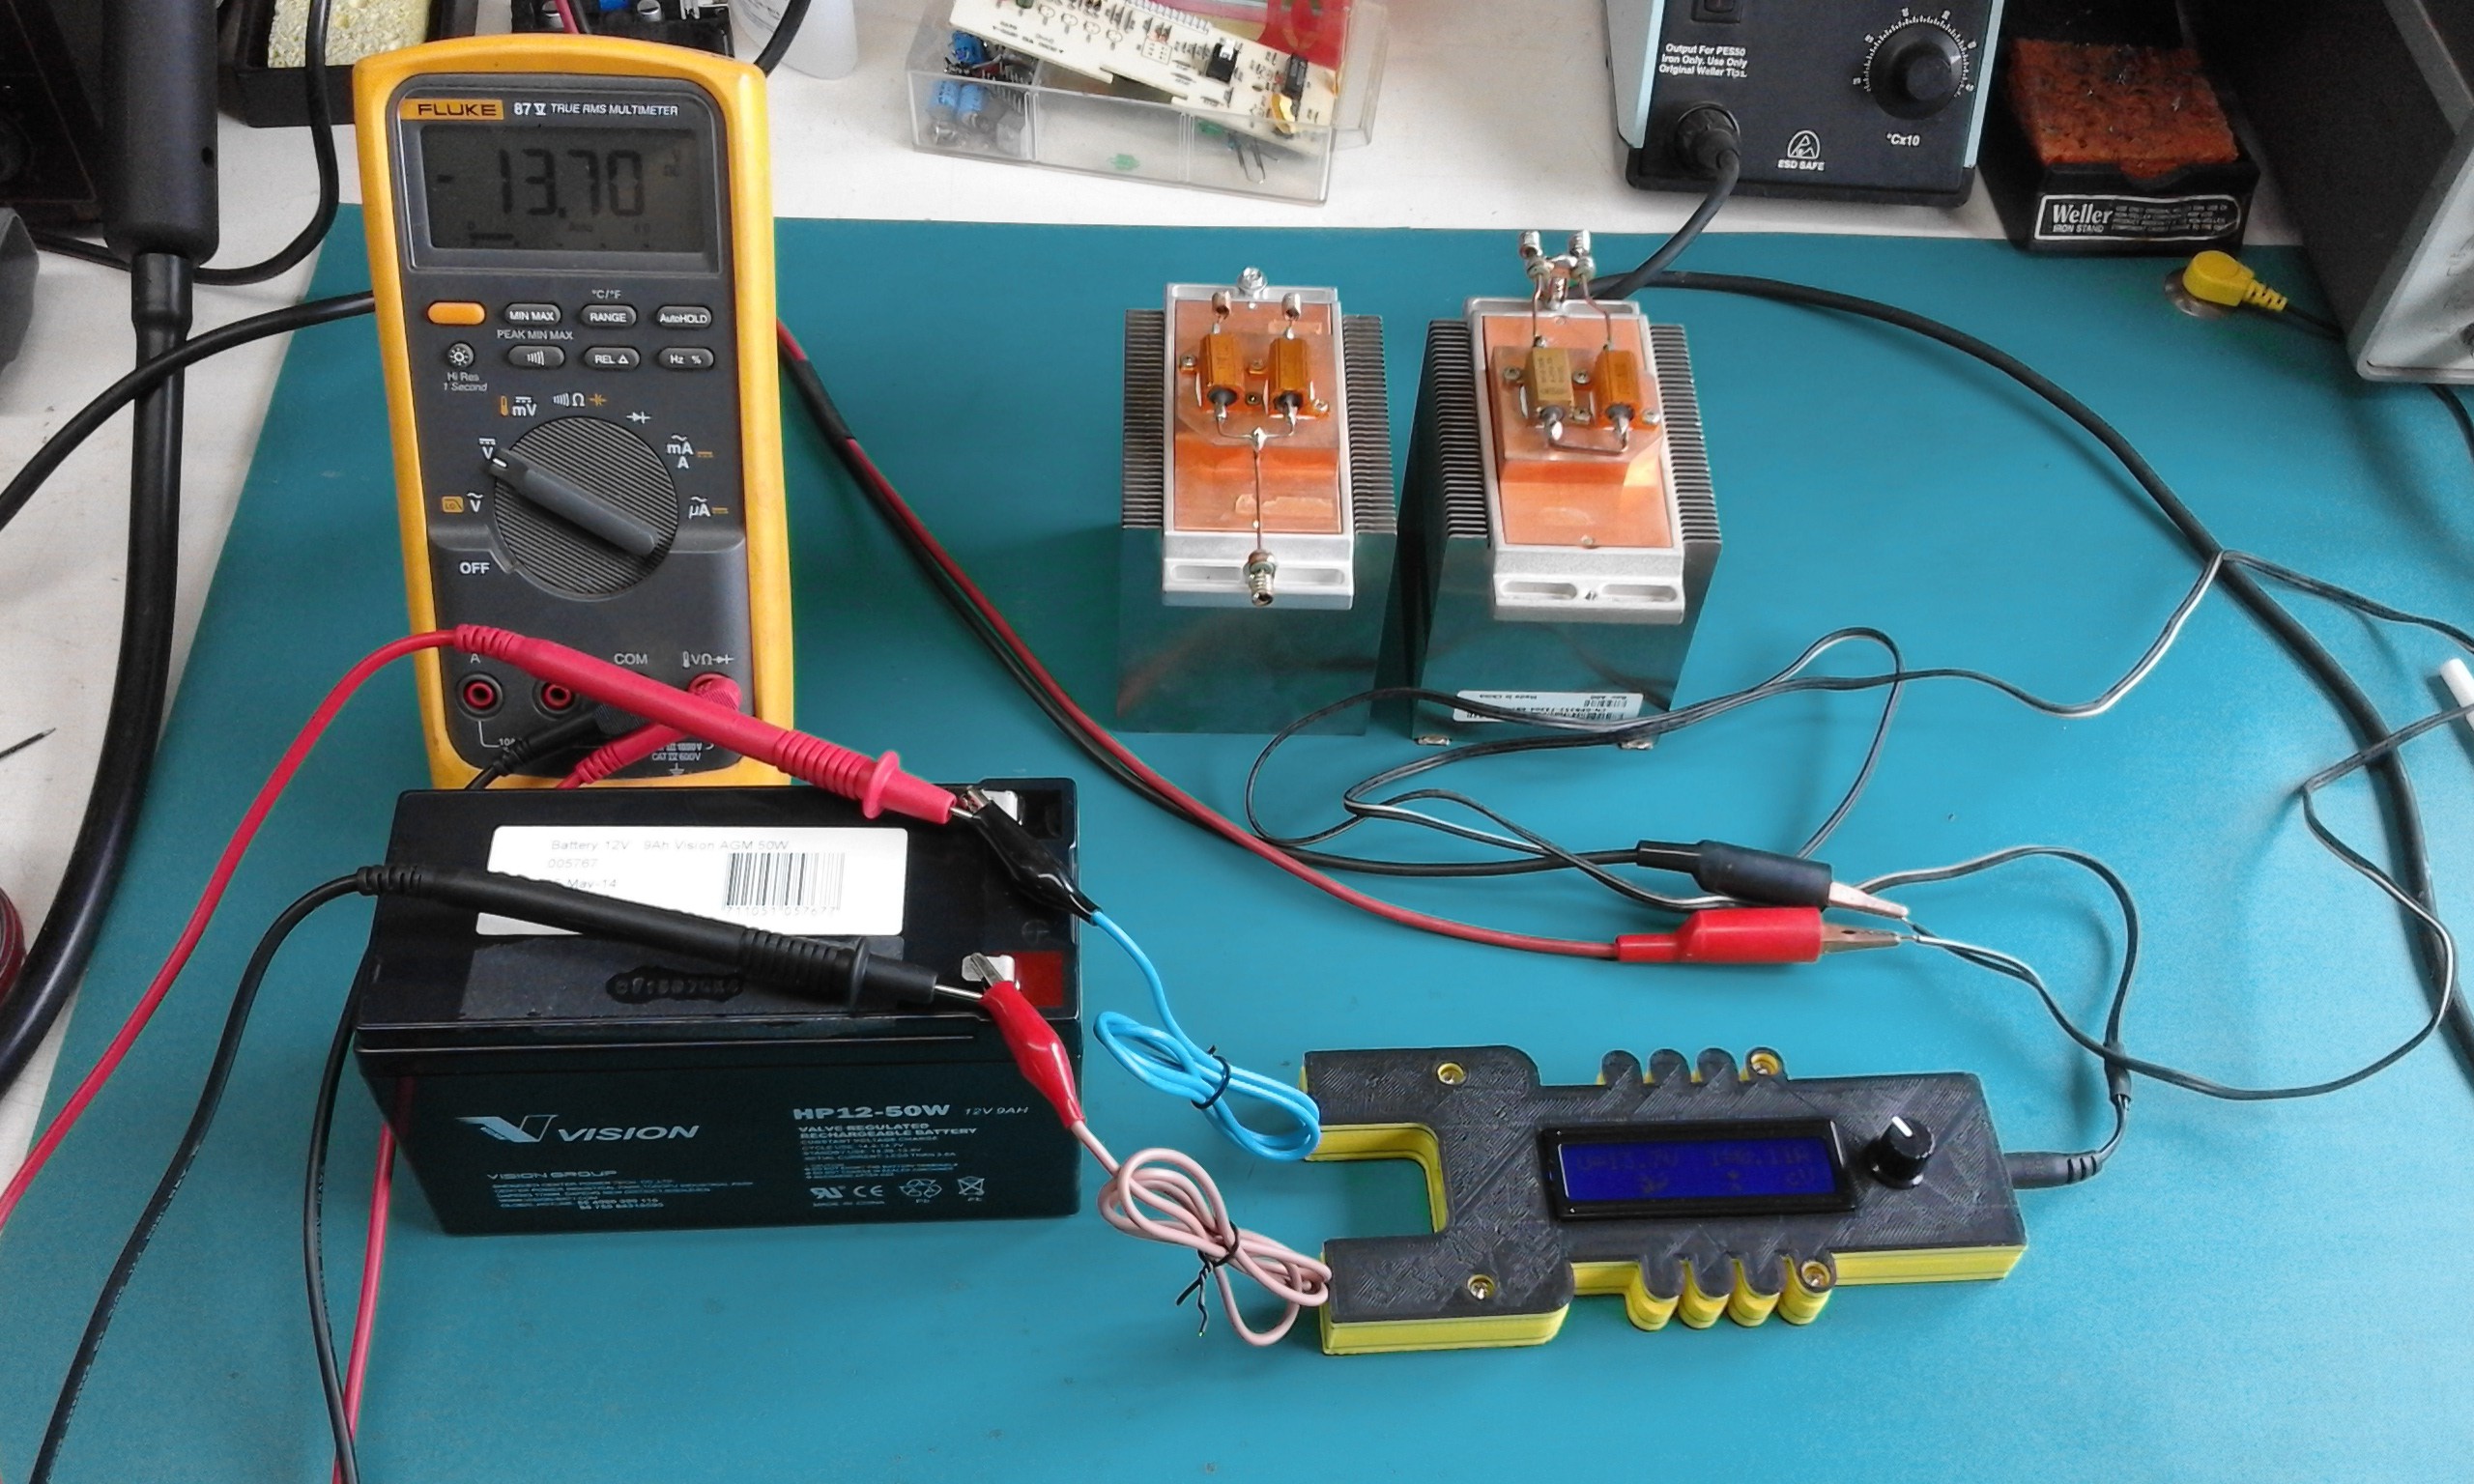
    Marius Taciuc09/28/2017 at 04:58 0 comments

    As I get ready to go through the testing of the Scorpion 3.0 unit, I saw as a good opportunity to upload some pictures

  • Test plan

    Marius Taciuc09/04/2017 at 06:36 0 comments

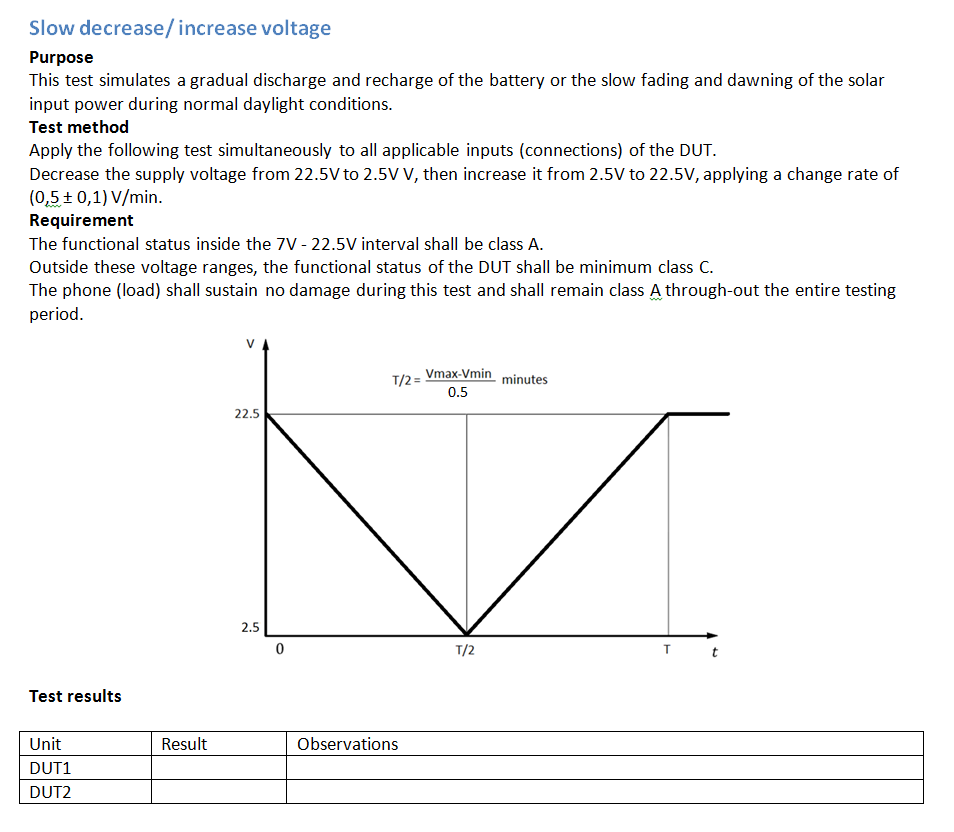
       I know I will have fun making some smoke testing my units. I added a well made test plan for testing the Scorpion 3.0. for instance, one of the tests would be connecting a reversed car battery on the unit and another test will be the short circuit one. I will also test the unit to slow decrease and increase of the input voltage. An inside extract of this test plan looks like this:

  • Added final video

    Marius Taciuc08/31/2017 at 01:12 0 comments

       Finally able to present how the actual design really looks and behaves like. I'm glad I can also show in this video a short clip with the actual 3D printing of the case. The voltage and current measurement feedback is not quite calibrated yet, as you will probably see, but the entire design looks to be very mature and stable. It's such a relief to actually have a physical device born out of nothing and to know that a couple of months ago it was just an idea in my head.  

        If you noticed, In this video, I actually have a newer software version than the one I uploaded on the project page. I hope to add this one too very soon. 

        If everything goes OK, I will start the final stage of the design, and that is testing. Watch the logs and stay tuned for updates!

  • Added A4 firmware and STL files for the case

    Marius Taciuc08/25/2017 at 10:34 0 comments

    The A4 firmware contains all the sub menus populated into the main menu, better adjusting precision for the voltage and currents, updated component values for calculating the voltage feedback and the current and many more. 

    I also added another logo message that shows the "Hackaday Prize 2017" text when the device initializes. 

    Also, as promised, all the comments are in English. Check all the files for more details. 

    Have fun and stay tuned for more updates. I added a comment at the bottom of this page stating the things that are still to come. The video is also coming soon.   

  • Happily presenting PCB

    Marius Taciuc08/16/2017 at 23:46 0 comments

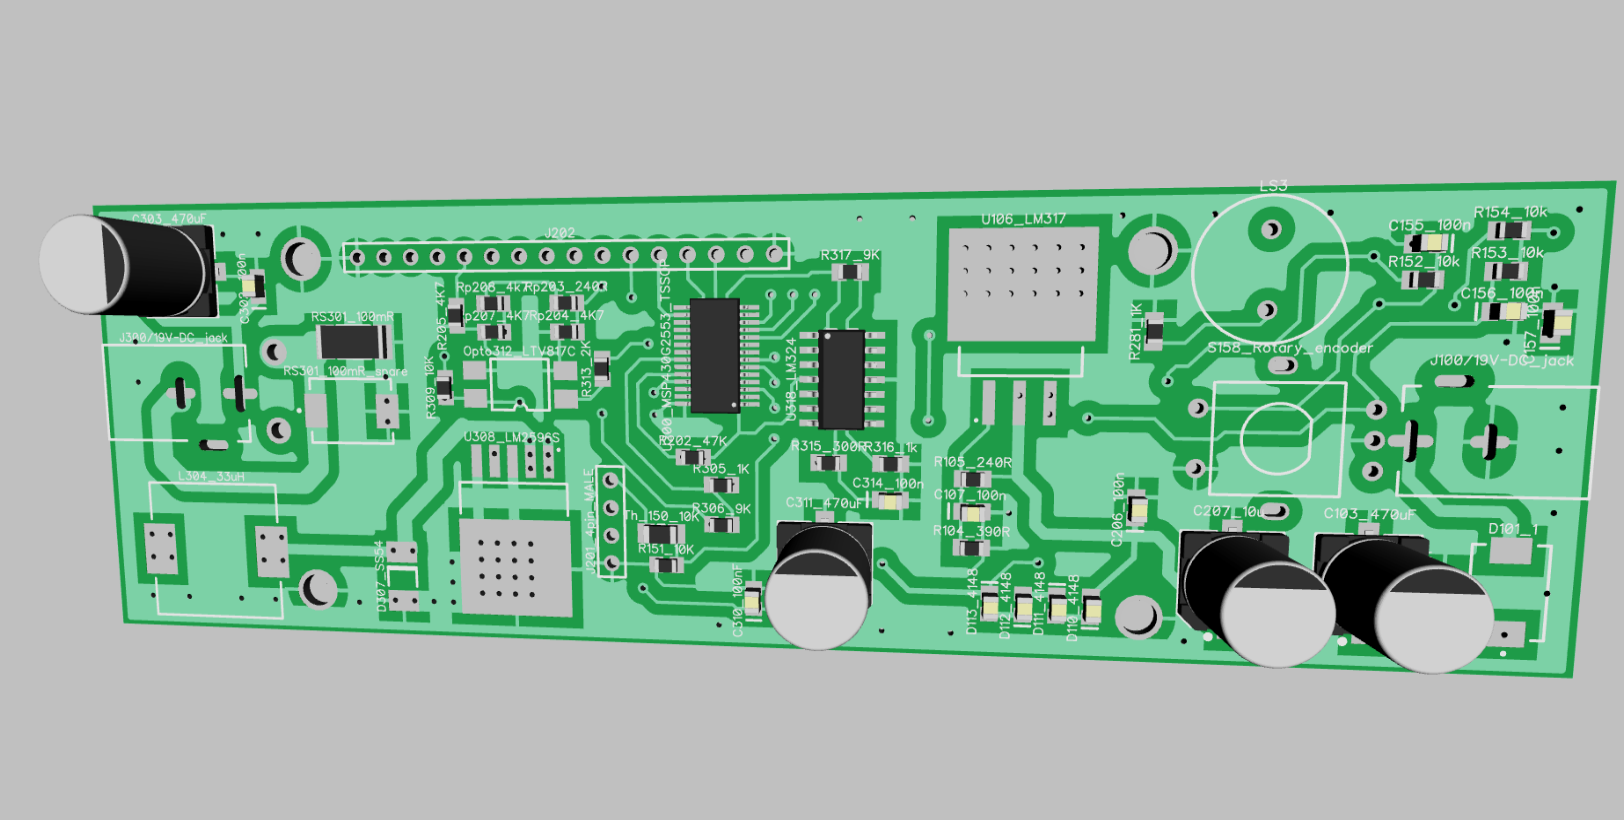
    Finally I am able to show you the actual PCB of the design and not just a rendered image of the design. 

    Stay tuned for more software updates. As the design evolves, I will post more.

  • Added Layout: Horay!

    Marius Taciuc08/07/2017 at 01:12 0 comments

    In case you are wondering who is making my PCB's, is pcbway.com.

    This PCB is designed and rendered using DipTrace. Hopefully, I will be able to take out some of the heat using those viases underneath the LM2596, to transfer some of this heat to the display mounting hole and from there to the display frame that will be popping outside of the plastic case. 

        I will probably have to print the plastic case using a white or yellow color, just to make sure that it won't heat up if it will accidentally be exposed to sun or other external sources of heat. I hope it will work and the entire thing will actually switch 40W successfully. If everything works as desired and I will approach an efficiency of 90%, this means that I will only have to dissipate @4W on this PCB (peak wattage for a limited time) and that is OK. I made some test circuits using the LM2596 and my setup and it's all looking promising. 

       Until I will be able to post pictures and movies with the actual PCBs, I'll keep updating the logs and pictures with details about how I imagine the case will look like, more technical stuff, probably some software updates and more description. 

       Stay tuned! I'm also excited to see how the final product will look like when I will be having the case and the actual PCB fitted together. It's a nice feeling to have something physically coming to life from a simple non-material Idea. 

  • B1 Schematic upload

    Marius Taciuc08/04/2017 at 03:58 0 comments

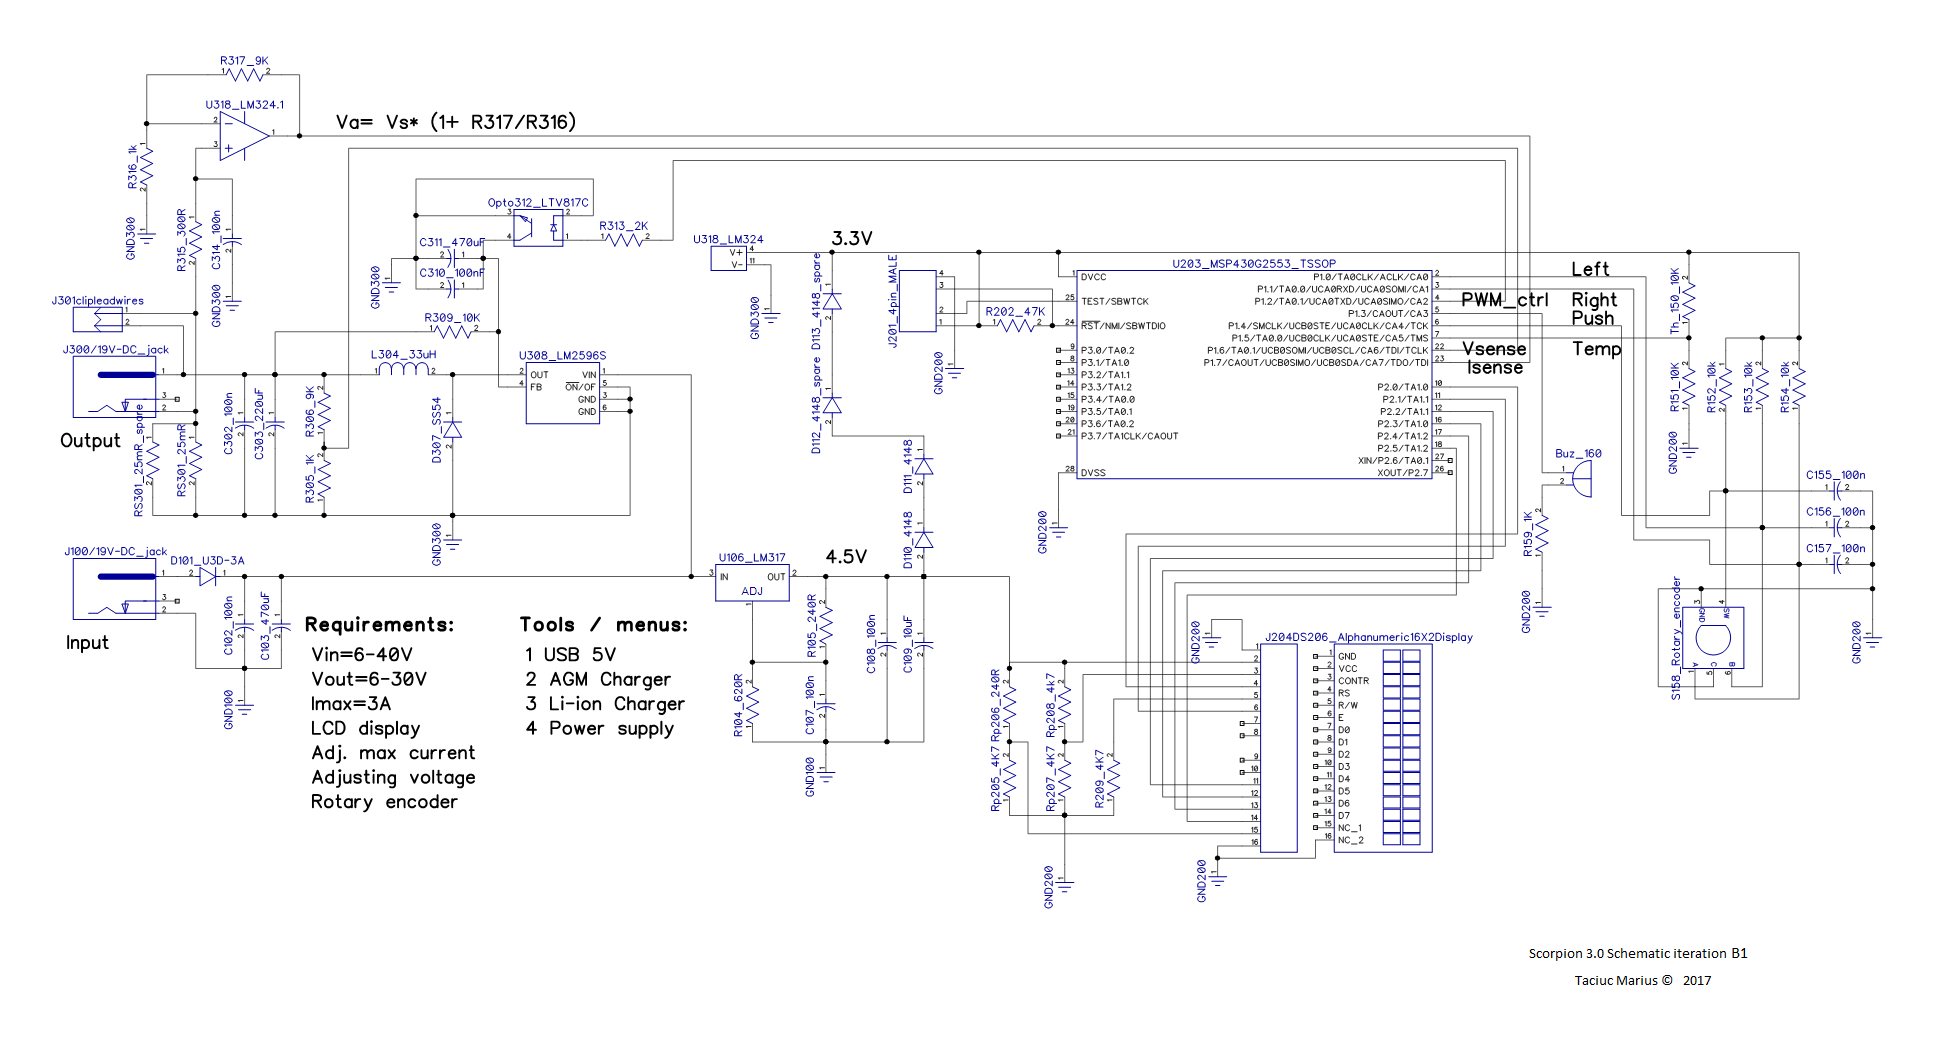
    I managed to upload the Schematic files (also) for the B1 iteration of my project. Everything is looking so pretty now. 

    As you can notice, I changed the package of the MSP430. This is what I have recently purchased and I'm gonna go with it. I also replaced the op-amp with the LM324. This one has better accuracy and it promises to add less noise to my reading. I relabeled the names of the components to make the entire design more clear. I updated some component values, re-positioned the rotary encoder and added a buzzer. 

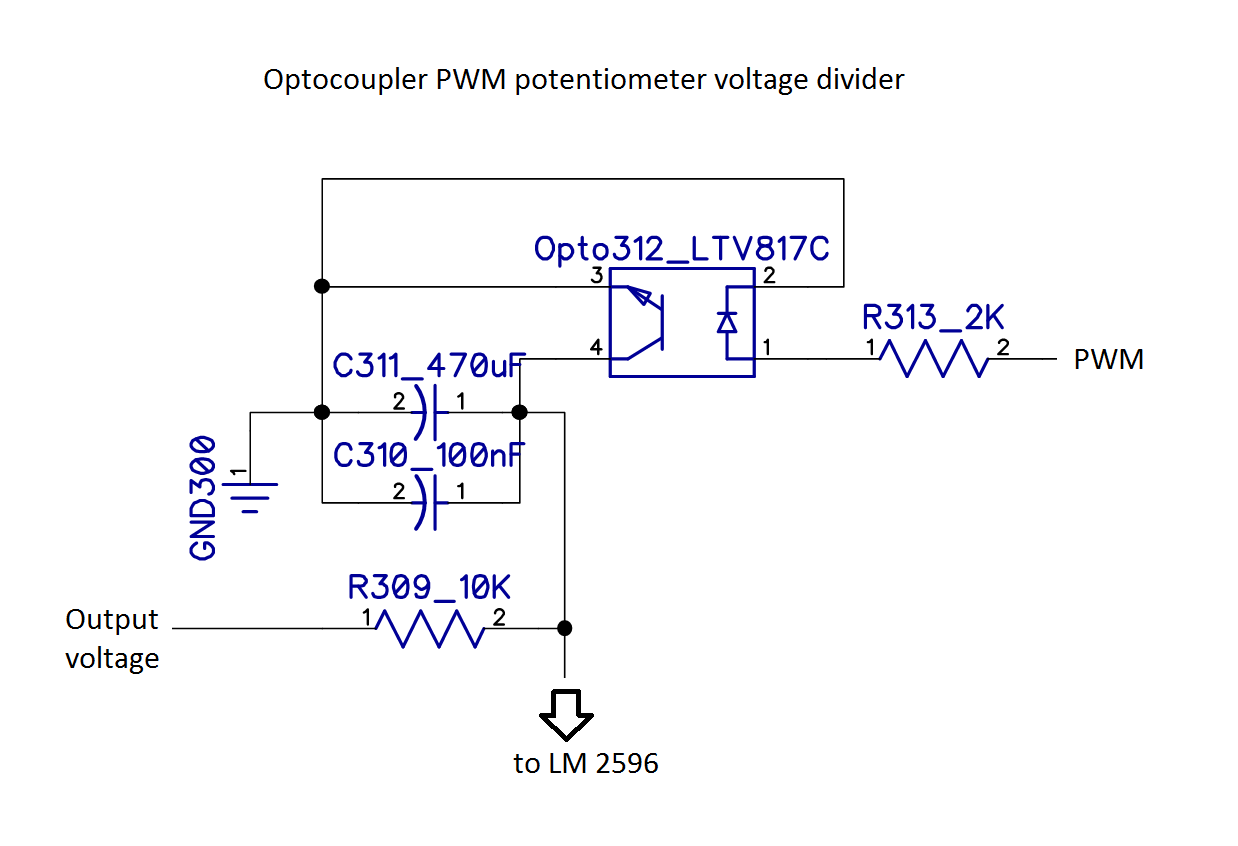
    I managed to test the control of the LM2596 using a optocoupler instead of a potentiometer  and it works just fine. I'm not sure about the resolution it will provide and i'm not sure about the range in which I will be able to adjust the output voltage, but I'm pretty confident that I can make it work, so I'm gonna go for this design. After all, if the resolution of the PWM won't be enough, I could lower the frequency and increase the resolution. (I so have to explain this in a future post)

    I think the next step would  be to come up with the layout and order some PCB's.

    Stay tuned!

  • Major change of plan

    Marius Taciuc08/03/2017 at 01:38 0 comments

    Major change of mind plan

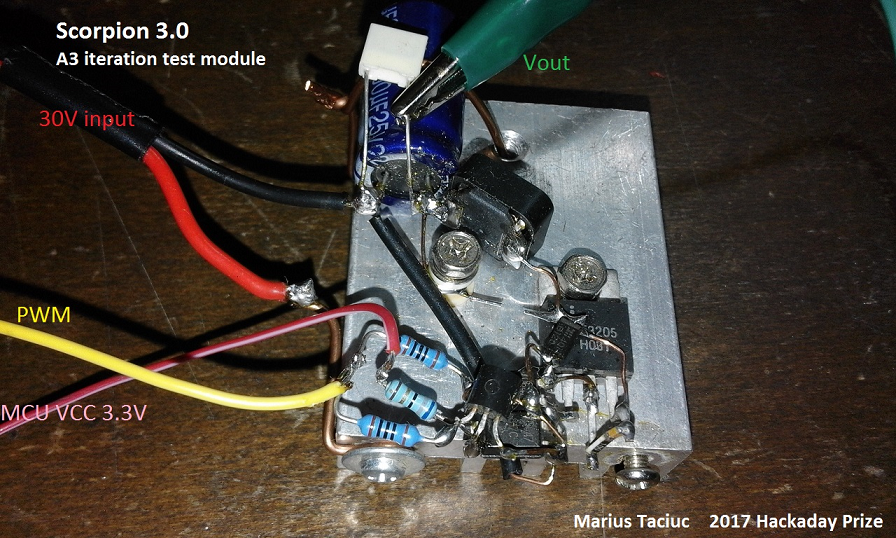
    I was able to put the A3 LTspice simulation into practice and make an actual test circuit.

    I measured the efficiency and I can tell you that I’m not very satisfied. The efficiency is between 0.6 and 0.7 depending on the input and output voltages. This is not very satisfying because for the final product I don’t want to use any heatsink. So, like I said, I would have to have more than 0.9 efficiency in order to achieve this.

    At this point is very clear to me that I won’t be able to achieve the desired slopes and switching times using a common half bridge for switching the mosfet. One good solution would be to go for a mosfet driver that has integrated half bridges and Trigger Schmidt gates. The problem is that these half bridges are usually supplied at 12V and this means that I will need another intermediate voltage regulator in my schematic.

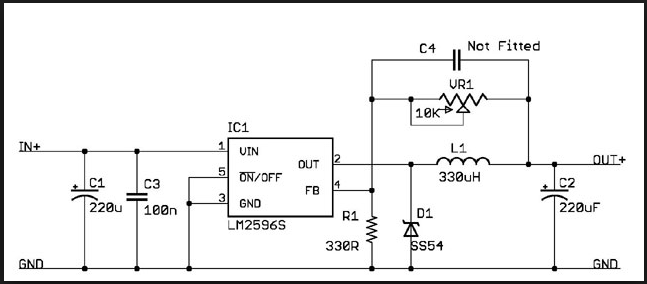
    The  best solution that I’m gonna go for, is using a an integrated Buck circuit. I’m going to use the LM2596. This is the common datasheet recommended schematic that I will have to integrate into my design.

    I could use the actual optocoupler PWM system that I have, to drive and control the LM2596. 

    Stay tuned for the schematic update.

  • Firmware upload

    Marius Taciuc08/02/2017 at 03:31 0 comments

    I uploaded the A3 firmware iteration. 

    I'm sorry it contains some comments that are not in English. I will modify this for further variants. 

    At this stage, the software contains only two of the intended four menus. In case you are wondering which tool am I using for programming the MSP430G2553, it is IAR embedded workbench. I tried Code composer, but I like IAR better. 

    I'm facing a problem, though: I have a low cost free licence which limits the code size to 8K. This code that I uploaded, has already more than 6K and I need to implement the other menus too. It is true that my code is not optimized yet, but I still face this challenge. If you have some ideas or advises about any other IAR cheap licence I could purchase, or if you know some other programming environment that allows me to use the maximum MCU memory, please message me.    

    I played a lot with the voltage divider resistor values and with the op-amp resistors, so if you find something that it's out of it's place in the mathematical formulas for calculating these values, please excuse me. 

    Stand by for updates. 

View all 16 project logs

  • 1
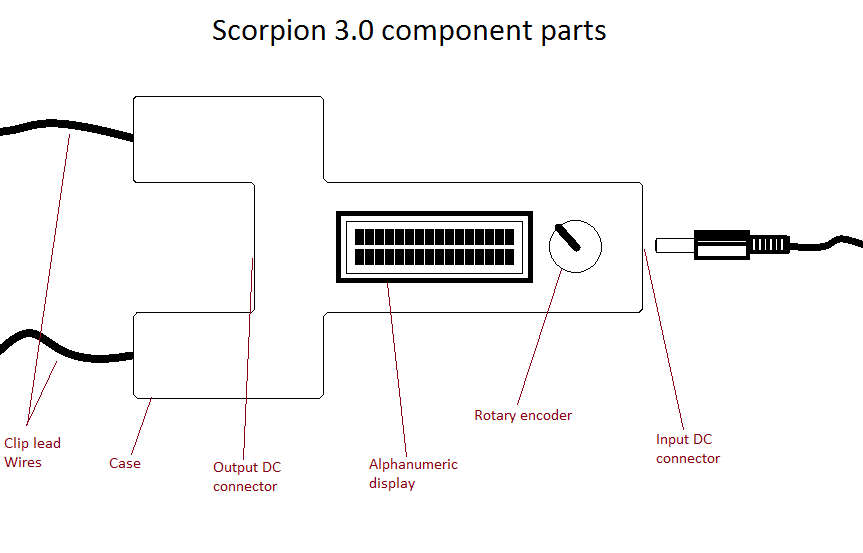
    Component parts of the Scorpion 3.0 design

    I realize that the outer shape of the case might change and the entire apearence of the project might take a new loo since is a project under development, but I'm still posting this

  • 2
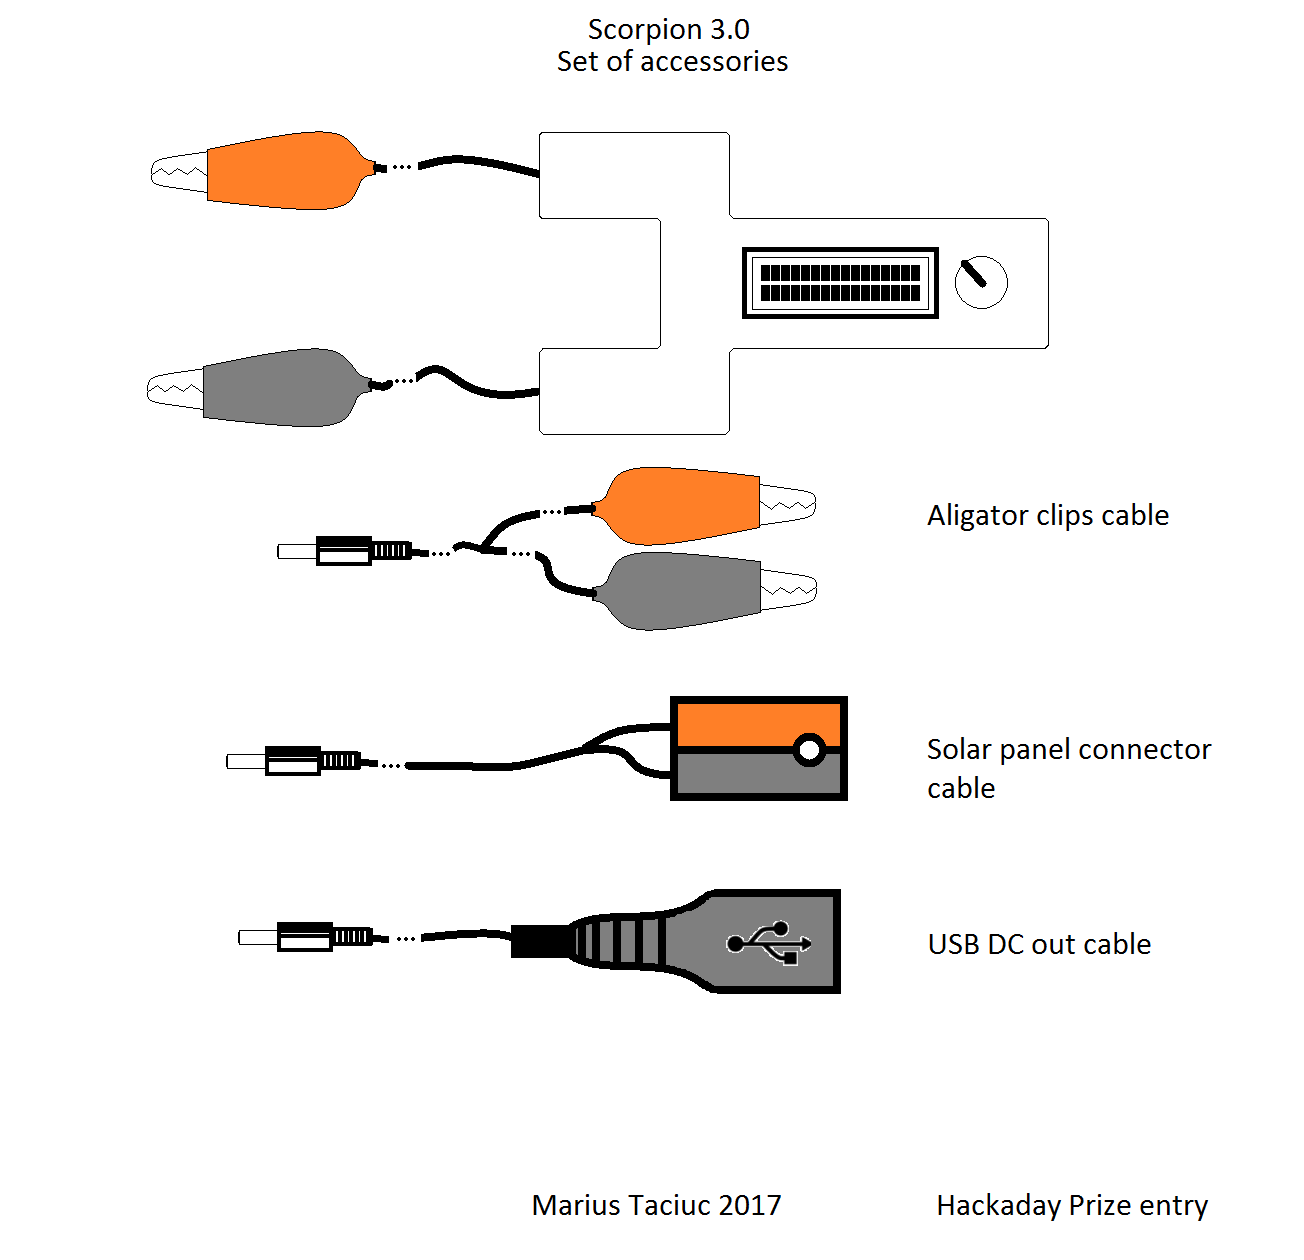
    Accessories of Scorpion 3.0

    I was thinking that these could be the necessary cables needed in some situation. I haven't decided yet witch of them shall be included in the final box of the product the customer will buy. I have to decide over the price, versus needed functions. It might sale with one cable of another at user's choice. 

  • 3
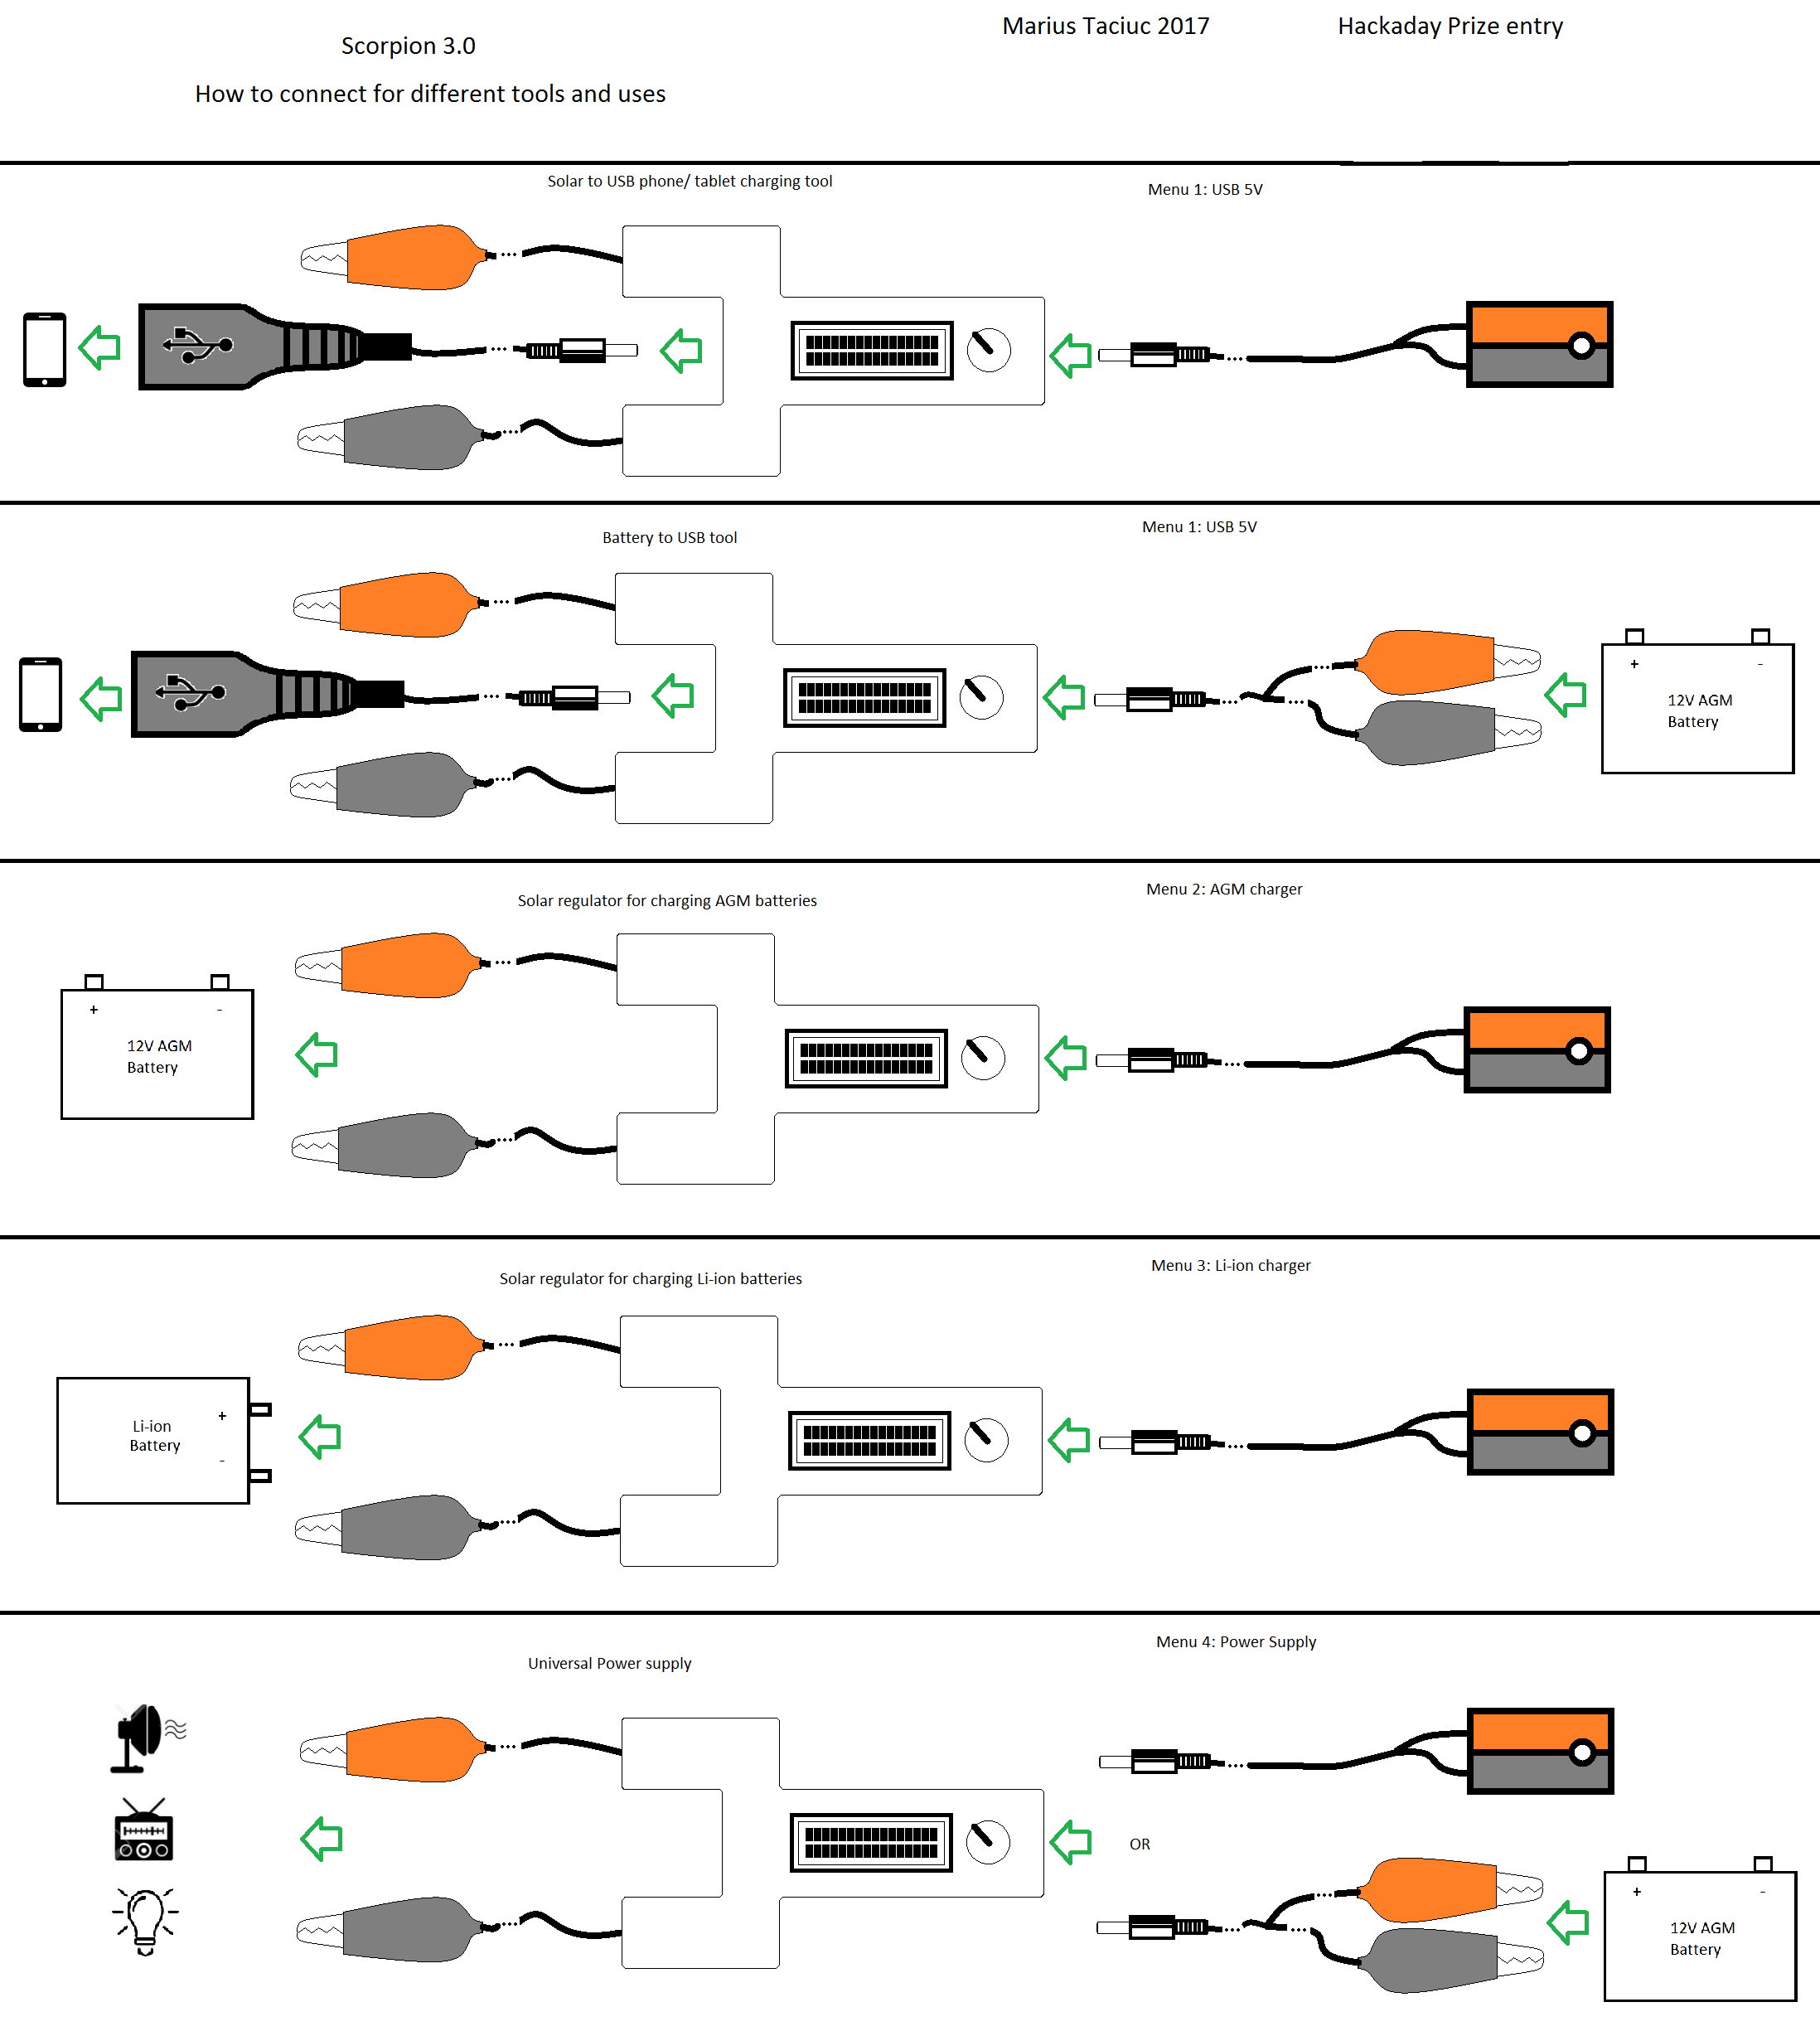
    How to connect - Instruction set

    Depending on what function of the device is desired by the user, the functionality modes can be achieved in the following configurations. I also placed a note of the used software sub-menu for the designated function

View all 3 instructions

Enjoy this project?

Share

Discussions

elisegray1106 wrote 02/21/2024 at 20:33 point

Great post! Insightful and engaging content. Keep up the excellent work. If you want to land your dream job now, visit: https://jobsearchlive.com/jobs

  Are you sure? yes | no

Digital Jio Partner Centr wrote 01/07/2022 at 07:51 point

Nice post.

[Typing Master Online Test English](https://www.blog.typingspeedtestonline.com/typing-master-online-test-english/)

[url=https://www.blog.typingspeedtestonline.com/typing-master-online-test-english/]Typing Master Online Test English[/url]

  Are you sure? yes | no

Digital Jio Partner Centr wrote 01/07/2022 at 07:50 point

Nice post. I found this is an informative and interesting post, so i think it is very useful and knowledgeable. I am glad to read this post hope your next article is are so useful for me so you are meet in next process for more information click this link below: -

<a href="https://www.blog.typingspeedtestonline.com/typing-master-online-test-english/">test-english</a>

Sweta............

  Are you sure? yes | no

Matthew Buchanan wrote 01/17/2019 at 20:28 point

i think that using a more robust model would be more efficient. considering the situations or places of the people who will use this, having a belt clip built in would be useful. i also think that making the box bigger would be a decision that pros outweigh its cons. by having a bigger box, it would be more heavy. but on the flip side you could incorporate more protection a possibly something to cushion the hardware inside. if it was 1/3 of an inch wider, it would still be a handheld device but would be more protected and durable.

  Are you sure? yes | no

Martin wrote 09/12/2017 at 16:26 point

@K.C.Lee, "invert PWM polarity": Of course, if this is possible. I would not spend an extra HW-inverter, if it replaces only something like "PWM_counter= 256-voltage".

@K.C.Lee, "PWM is a poor possibility...": I did not really find schematic in your battery charger article. But why is PWM a poor possibility? I suggest it's use (with adequate filtering) just as a DAC. And you can filter it heavily, as in most applications you do not need a fast change of the setpoint of the PSU. The PSU switching frequency is independent of the PWM frequency from the microcontroller and (as I suggested) the regulation loop is also independent from software. You can control the switching regulator in open loop, because it's regulation loop is internally in the LM2596. You do not need extra active components between the µC PWM output and the LM2596. No DAC or even ADC, no analog sawtooth, no comparator or OpAmp. A 10bit PWM counter gives you around 25mV resolution between 5V and 30V. Extra analog stuff only reduces your accuracy and increase cost.

@taciuc marius: Nice test plan - I recognize the standards for testing of automotive ECUs. :-)

  Are you sure? yes | no

K.C. Lee wrote 09/12/2017 at 17:54 point

Using timer based PWM directly is bad because you have to compromise switching frequency with resolution.  Low switching frequency means physically larger inductors, harder to filter because of the low frequency.

I made my analog PWM to have high switching frequency 300kHz while keeping the resolution high.  I need to have constant voltage or constant current or mixed under full micrcontroller control.  I did played with TL5001 with opamp feedback in first version.

PWM filtering https://hackaday.io/project/4993-dual-channel-battery-chargeranalyzer/log/16159-pwm-part-1
Power circuit: https://hackaday.io/project/4993/log/16890-power-components-more-nickel-dime-time
Sawtooth generator: https://hackaday.io/project/4993-dual-channel-battery-chargeranalyzer/log/18116-sawtooth-generator
Full schematic is here: https://github.com/FPGA-Computer/Battery-Analyzer/tree/master/Ver%202.1%20Rel%200/Eagle%20PCB
there are Eagle files as well as schematic in pdf.

It gets a bit tricky to use a buck converter as SEPIC. (You can do a Zeta, but still that LM part is horrible for my application.)  Also part doesn't work well if I want to run from USB or low voltage source such as discharging the battery.  In my case I optimize for cost not component counts as circuit complexity isn't a bother to me.  Can't beat a 339 for cost.

  Are you sure? yes | no

Martin wrote 09/12/2017 at 18:16 point

I suggested to use the PWM only as a DAC, not to drive any power switch (of an SMPS) directly (then you would have to implement the control loop in software). Taciuc suggested to use an LM2596 (a dedicated chip for step down converters), which does the 300kHz (or more) PWM.

I used a much lower PWM frequency, smoothed the PWM out with an RC filter, so no extra inductor - not large, not small - and used this voltage to inject a current to adjust the voltage setpoint.

Of course you can coarsly replicate a switch mode converter chip with OpAmps, Comparators and a roll-your-own sawtooth generator. But why? The simple switchers are really cheap (from China) and they just work. In this  switch mode regulator chips are often some more functions, to ensure loop stability and regulation over a wide range of input and output voltages and currents which are not shown in detail in the datasheet.

  Are you sure? yes | no

K.C. Lee wrote 09/12/2017 at 21:39 point

I still holds the belief that digital PWM is not ideal as a DAC for controlling power supply.  My integrator DAC has much more linear output, as high resolution as the ADC in the system (and can easily be 12-bit or higher), very low ripples in the sub LSB range.  You still use whatever chip you can as a regulator for fast transient while the microcontroller loop can compensate for droops etc.

Might want to read up on my project.  The charger can run from rated USB range.  LM part starts at 6V, thus unsuitable for my design nor is it in the correct configuration for SEPIC.  The SEPIC is retasked during discharge mode as electronic load.   The firmware could be configured to provide a regulated output on the external load terminal.  The discharge can operate down to 1V or so for NiMH cells in boost mode.  Can't do that with off the shelf switchers.

  Are you sure? yes | no

Martin wrote 09/13/2017 at 07:40 point

@K.C.Lee: You are right, in your project, the "Scorpion" solution with the LM2596 would not be useful. I think for a SEPIC converter you need a step-up chip, not a step-down. And the very wide input range may justify the homebrew controller. That's also really true: These standard chips like LM339 are really dirt cheap and circuit complexity does not equal BOM cost in this case.

But a digital PWM also can be 12bit or more. Especially in case of a battery charger/discharger you do not need a high regulation dynamics. Battery voltages don't jump. So you can use a PWM frequency of several 100Hz to several kHz. With 1kHz and 16MHz clock you get ~14bit of resolution. Use an STM32 with >65MHz of clock and you get 16 bit's. It has a reason, that modern digital audio DACs are often "1bit" (mostly sigma/delta). This reason is linearity, it's much more easy to get linearity in time - e.g. with a PWM timer and a filter than linearity over 10.000 of voltage steps.

And re ADC: Many ADCs, like the successive approximation type (*) use internally a DAC, you do it the other way round, using an ADC and an integrator, when you just need a DAC. For me that seems overly complex.

*) The EFM8UB1X CPU you used happens to have this type of ADC.

But nice if your design works and you are happy with it.

EDIT:

I just found the PDF in your GitHub page about the Battery analyzer and here you use a normal filtered PWM from the microcontroller as input to your external 250kHz SEPIC PWM generator. Similar to what I suggested. Although you have to do (can do) the control loop in software. Probably I would have used an integrated step up regulator - just to avoid to have to do this in software. But of course this depends on personal preferences. Mine happens to be in the field of hardware.

  Are you sure? yes | no

sophiacharles9090 wrote 09/07/2017 at 10:45 point

Scorpion 3.0 is a multipurpose tool for the masses, it is a cheap product but not a cheap design, of what could be a better way of living for some people. A good solution would be to design a low price adjustable and multi-purpose DC to DC converter power supply that is very simple to use https://www.reecoupons.com/categories/halloween. I hope my idea will be helpful to you. Thanks

  Are you sure? yes | no

ovidiu benea wrote 09/01/2017 at 08:08 point

Hi Marius,

All looks great!! Keep up the good work! I'm eager to see how it ends up, hopefully it will help a lot of people! Looking forward to seeing new posts about the progress, Cheers!

  Are you sure? yes | no

Marius Taciuc wrote 08/18/2017 at 03:40 point

Things that I plan to add to this project page in the following period

- CAD files and rendered pictures with the design of the case  --> done

- Software update with new menus and English comments --> done (more to come)

- Actual pictures with the case when it will be ready --> done

- Another video with the appearance of the complete hardware design after adding the case  --> done

- Test plan for Electrical Engineering tests to be performed on the unit (according to ISO16750-1 and ISO16750-2 international standards for automotive and car battery connected devices) --> done

- Test report and conclusions 

  Are you sure? yes | no

Marius Taciuc wrote 08/18/2017 at 01:07 point

Topic about the production cost

   After I posted the component list and uploaded a full excel sheet with the component prices, you are gonna ask me where do I buy my components from. The answer is Chinese market (alibaba, ebay and others). Probably you are worried about the quality of the components but I can tell you that so far it's been going good from this point of view. Keep in mind that I'm creating this design for the 3rd world countries and it is supposed to be low cost and affordable. Trolling with a chunked smile on the corner of my mouth, I can say that that's the art and beauty of creating electronics from scratch: being able to make a circuit last even if you use low quality capacitors. Just kidding guys! Don't take me too serious. :P 

   The truth is that it's a pretty robust design and I'm personally satisfied by the way it evolves. After all, I'm planning to use it myself if I get stuck in a village somewhere. I always say "be careful what electronics you create, cause one day, they might save your life. We had a few examples here on hackaday.com.

    So I'm happy that it actually turned out to be cheaper than 9$ to produce. This is just like I initially estimated and it's a good thing. Of course, I haven't got into the added cost of the actual labor, packing, accessory cables and shipping. And above all, the selling share will add to the final price. 

  Are you sure? yes | no

Marius Taciuc wrote 08/09/2017 at 06:11 point

PWM resolution discussion (as promised)

I implemented the following code for controlling my buck converter using this output PMW (as you probably saw)

#define pwm_period 700                  //PWM Period example 700*(1/16,000,000) = 43.75us / 22.857 KHz
...
//--------------------config PWM
P1SEL |= BIT2;                                     // P1.2 Select as TA0 output
TA0CCR0 = pwm_period;                    
TA0CCTL1 = OUTMOD_7;                  // TA0CCR1 reset/set output mode
TA0CCR1 = 0;                                      // TA0CCR1 PWM duty cycle
TA0CTL = TASSEL_2 + MC_1;            // SMCLK, up mode


The equation for determining the output frequency of the PWM is the following:
pwm_period*(1/16000000). After this, you come up with the period and you have to divide 1/period again, in order to establish the frequency. 16000000 is the number of oscillator cycles per second that is then internally divided and dealt with. Now, in my case I used the PWM period of 700 (correct me, I know, is actually 701), because I want a frequency that is more than the audio band. I really don’t want it to pollute my audio devices when is functioning and I really don’t want it to make audible noise. It would be awkward. Now the internal timer module, based on the values of TA0CCR0 and TA0CCR1 in this case, actually starts to count until it reaches the value of the TA0CCR0. Which means I have an internal  counting of 701 oscillations and then it starts all over again.
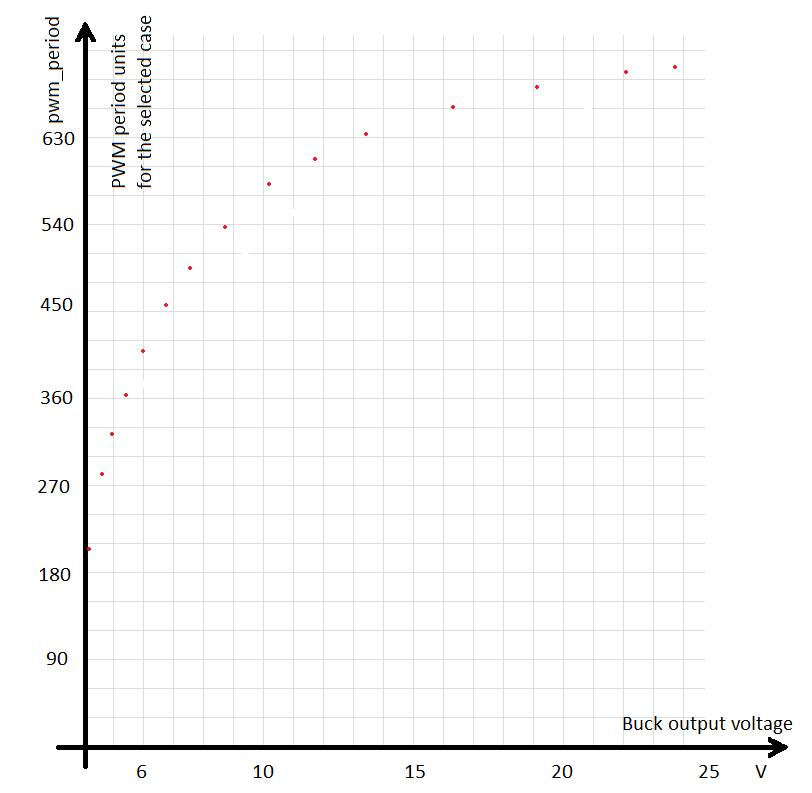
Based on the PWM filtered period, my external optocoupler will have a different internal resistance being inserted in the respective voltage divider and it will act like a potentiometer (a non-linear one). The graph of this PWM potentiometer looks like this:

So the LED of the optocoupler is actually having an external filtering capacitor that filters the PWM duty cycle in a continuous variable voltage. This means that is actually normal to see the optocpupler not opening at values of the PWM that are lower than 200, because the LED has a threshold forward voltage itself. Now, the problem is that, as you can see from the graph, I must set all my voltages from 10V to 25…30V with only 160 leftover units of my PWM scale. I want to be able to set the output voltages from 100 to 100mV and that leaves me with a necessary of at least 200 different PWM values, which I don’t have.

I implemented this piece of code in my A3 firmware and the entire system was oscillating. It was trying to set a certain voltage value using a PWM duty cycle of 615 units and then the read output voltage was too high and when it was lowering the duty cycle to 614, the output reading was too low and it was oscillating like this. 

A decent solution to the problem would be increasing the resolution by lowering the frequency on the LED. This has it’s drawbacks. Besides the fact that the parallel capacitor won’t be able to filter the LED voltage so good, I have a lot of steps to increment the PWM duty cycle register before I hit the right spot using the A3 software and this would take a few seconds to reach the desired output voltage after setting it up.

At this stage I won’t modify the hardware (except the value of the capacitor). I think I will go with a lower frequency and I will have to implement an algorithm that will make the duty cycle to jump to the right spot according to the desired output voltage.    

 
What do you think about this?

Post your suggestions, thoughts, ideas here.

  Are you sure? yes | no

Martin wrote 09/12/2017 at 11:50 point

In the above schematic pin 2 and 3 of the optocoupler is connected. So it is quite useless to use it at all. You can use an ordinary NPN transistor and save some component cost.

But I would do it still differently: Take your PWM signal from your microcontroller divide it down to 1,25V of amplitude (nominal feedback voltage of LM2596-ADJ) and feed it into an RC filter (1 to 3 stage). The output voltage is coupled via a resistor into the feedback point of the LM2596. So a current is injected, which makes the regulator think, the output voltage is to high and it regulates back.

The only drawback is that your control curve is inverted: 100% PWM ratio -> 0V out and 0% PWM ratio -> maximum output voltage.

But the advantage is it is quite linear and you don't have the high value capacitor at the feedback point of the regulator, which impairs regulation speed.

I would leave the voltage regulation to the LM2596 and not implement a software regulation loop. Just give him the desired value.

Perhaps you want to do some simulations with the free tool LTSpice as I did, when I designed a control for an LCD backlight using exactly the same approach as described above.

  Are you sure? yes | no

K.C. Lee wrote 09/12/2017 at 12:30 point

Or simply invert the PWM output polarity - probably a bit in the PWM setting.

  Are you sure? yes | no

Marius Taciuc wrote 09/13/2017 at 01:29 point

This is actually good thoughts with replacing the optocoupler with a transistor. You are right here. The thing with 100% PWM ratio equaling 0V is a bit scary and I tried it. It works in theory, but it can generate some faulty scenarios. Like, for instance I have the mobile phone already connected to the output, I connect the Scorpion 3.0 to the AGM battery and it takes 0.02s for the MCU to boot up, configure, and make the PWM 100%, but meanwhile I have a severe dirac voltage spike at the output.  

  Are you sure? yes | no

K.C. Lee wrote 09/12/2017 at 12:29 point

PWM is a poor way of controlling output voltage.  Been there done that.  I looked into ways of maintaining high resolution while not slowing the power supply switching frequency.   https://hackaday.io/project/4993-dual-channel-battery-chargeranalyzer

This is how I control the voltage similar to what Martin suggested by injecting a voltage: https://hackaday.io/project/19078-adjustable-linear-bench-supply-in-1k  The resolution is as high as your ADC, very linear and there are no PWM noise to filter.

  Are you sure? yes | no

Similar Projects

Does this project spark your interest?

Become a member to follow this project and never miss any updates