-
Initial Results of Pulse Conditioning
10/05/2017 at 02:57 • 0 commentsIt's been about 4 weeks now and some observations of the impact pulse conditioning has had on internal resistance and perhaps battery capacity are warranted. More importantly, the need for a more rigorous approach has become apparent.
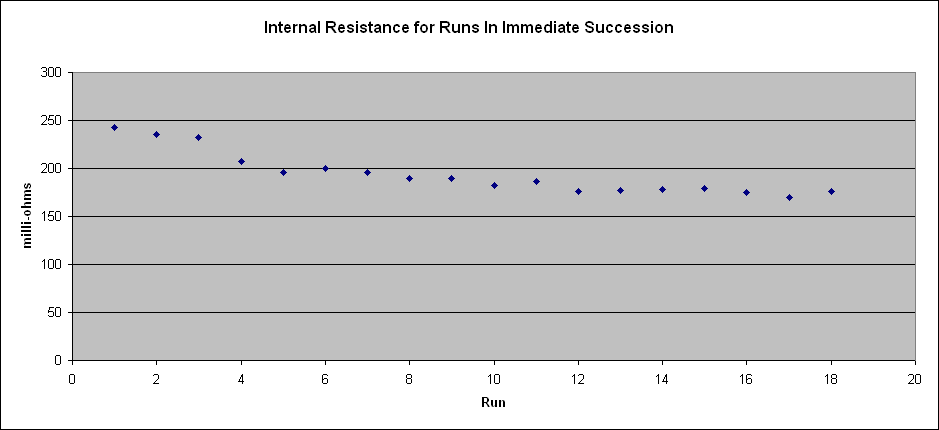
Over this time the measured internal resistance has fallen from 264 milli-ohms to 175 milli-ohms. While the reduction in the internal resistance tapered off after about 10 days, there is some support for the battery's capacity having increased as well. At the start I was recharging the battery after 3 days on the pulse conditioner. Now it runs for 5 to 6 days before I have to recharge the battery.
So my initial observations are that the pulse conditioner is beneficial. However, there are several issues with the approach and the results cannot be construed as anything other than weak support for pulse conditioners.
The biggest drawback to the approach is the lack of a control battery. With a second battery I could cycle one on the pulse conditioner whilst the other was cycled on a static load. If the static load battery showed little, or no improvement, in internal resistance then there would be much stronger support for the pulse conditioning approach.
Another drawback stems from the lack of automation. I still have to manually changeover the battery at each step of the pulse, charge, measure cycle. So the time between measurements is not constant and the level of charge and discharge varies from one cycle to the next. I clearly need to automate the cycle and let it run unattended.
The final obvious shortcoming is temperature. We are moving towards summer and the average ambient temperatures have increased over the last month. The temperature change could be influencing the results either directly via battery chemistry somehow, or indirectly by it's impact on the voltage regulator which serves at the voltage reference for hte D2A conversion. A temperature controlled testing environment would be useful to remove another source of potential error but that is beyond my reach at present.
The biggest obstacle to the full automation with the W1209 board is the need for an additional two digital outputs. I have considered two approaches. The first is using the + and - keys as both inputs and outputs. That would require some careful soldering to insert a resistor, say 2k, in series with each switch. The second approach is a 4017 counter clocked by the pin driving the relay. Then each of the decoded outputs for 1-3 from the 4017 driving a relay to perform each step of the pulse charge measure cycle.
I'm leaning towards the first approach since I don't know if I have a 4017 in the drawer and the first approach avoids any ambiguity over which step the cycle is in.
-
Version 3 of Code
09/12/2017 at 04:41 • 0 commentsAfter hours running various tests to determine when the voltage samples should be taken I concluded there was no right answer. Mind you, the sweet joy of using Forth to do this via the serial port was a reward in itself. ( Timing loops could be tested interactively, results displayed on the terminal window, etc etc. )
I settled on a longer delay before sampling the loaded voltage, or Vend in the code, then a short delay before sampling the unloaded voltage, or Vbeg in the code. Because of the way the voltage depresses over time, then recovers, I doubt there is a right way to do this. But my training in Statistical Process Control and Gauge Capability steered me in this direction.
I now have a testing method that gives me repeatable readings provided each test is run hours apart. So while the calculated internal resistance might not be the value according to some standard it should allow me to discern if my pulse conditioning circuit has any impact over time on the internal resistance.
Over the next few weeks I'll run my trials and see what happens.
-
Subtle modification to code needed
09/11/2017 at 13:00 • 0 commentsI've held off posting the updated code for the x4 resolution enhancement. What I found when I ran the test on my battery 18 times in succession was the internal resistance fell. I need to try a longer delay before measuring but time is short tonight.
-
Improved measurment resolution
09/11/2017 at 03:19 • 0 commentsThe initial project used a voltage divider to reduce the measured voltage down to less than 5V. This means the voltage resolution is about 20mV which means the internal resistance measurement for 1 amp of current is 0.020 ohms.
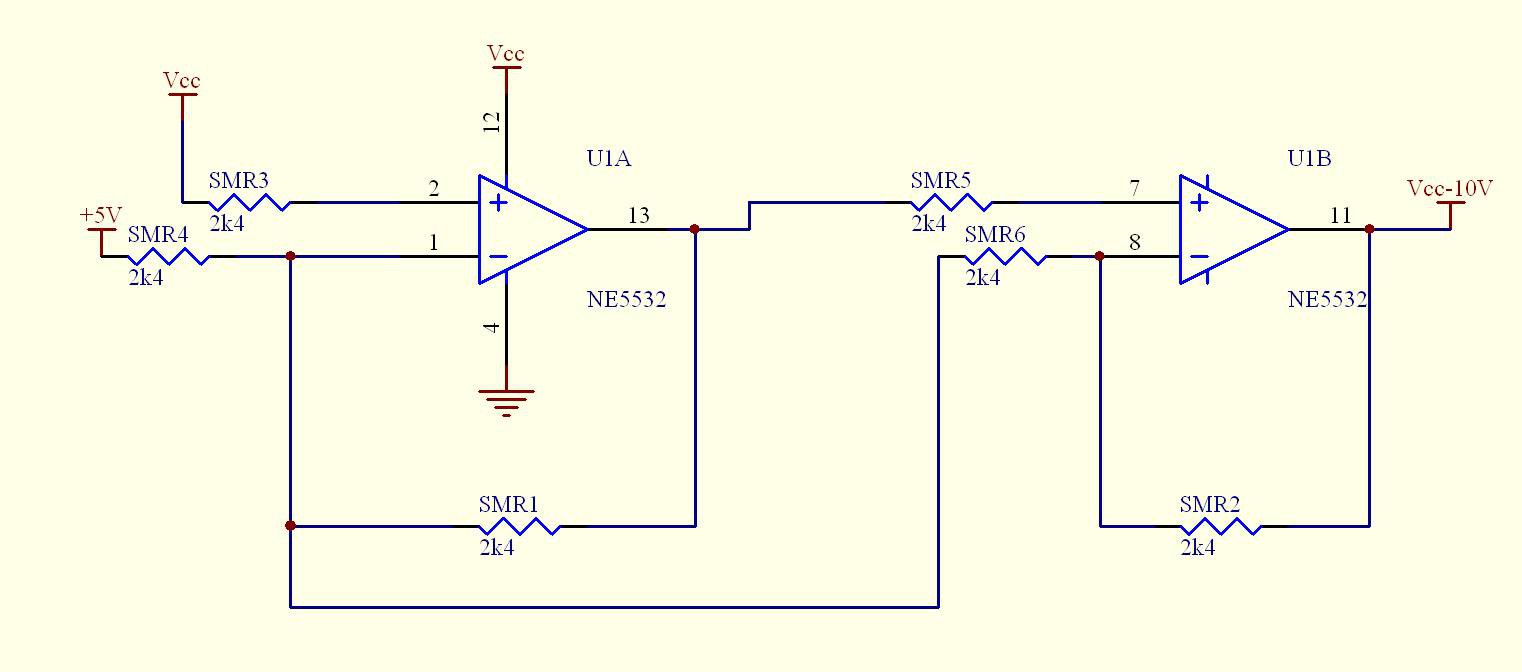
Instead of dividing by 4 with a resistor string, what if we subtracted 10V from the voltage to be measured? This would give us a voltage resolution of about 5mV with an internal resistance measurement for 1 amp of current is 0.005 ohms. This seems like a worthwhile improvement and can be easily achieved.
I had never played with a voltage subtracter before but it proved to work first time. Reaching into the junk box I pulled out a NE5532 dual op amp. I had no reason to chose this device over any other except I had hundreds I had recovered from a couple of boards. A few resistors and it was done.
![]()
While I used a NE5532 and 2.4k resistors I don't think there is anything critical about this. Just about any op amp will probably work and the resistors could be anything between perhaps 1k and 100k. As long as they are all the same value.
While this is not yet the complete measurement tool I wanted it will allow me to make some measurements on the impact, if any, pulse conditioning has on internal resistance.
-
Improvements
08/13/2017 at 13:23 • 2 commentsWhile working on a small hardware modification to improve the resolution the obvious improvement hit me: change the display for the ohms so that 200 milliohms reads as 200, not 2.
It was easy but due to the 16 bit maths it required a new word.
V2 of code posted.
Internal Resistance of Lead Acid Batteries
A project to automate the measurement of internal resistance for lead acid batteries to determine if pulse conditioning is of any benefit.

