davedarko
-
Withdrawing from prize
10/20/2017 at 13:35 • 3 commentsI just can't handle everything right now, it's all been too much lately and this hobby feels a lot more like work lately. It's supposed to be fun though, right?
-
monochrome display going grayscale?
10/13/2017 at 01:31 • 1 comment[update] random thought: there is a global brightness setting, why not play with that to get greyscale?
So I tried some greyscaling on the LCD, but my ESP code runs out of sync with the LCD that updates every pixel in a certain frequency that I don't know. So I get a sometimes grey, sometimes not so grey value and an analog TV style walking distortion on it.
https://www.sparkfun.com/datasheets/LCD/Monochrome/Nokia5110.pdf
According to this datasheet there is an OSC pin, that accepts an external clock for displaying. So here comes the "what if": could I use an attiny and spit out a frequency of around 32kHz and a "frame" / vsync pulse for the esp to check / interrupt on? that would be so cool. I could use the data in / MISO for that (tiny would be connected to CS of display as well).
Oh the stuff you think about when you have no lab / hardware :D
http://gamebuino.com/wiki/index.php?title=Grey-scale_rendering
Cool side note, the SSD1305 that's on the 1.54 OLED has exactly that integrated.[doesn't seem to be broken out on the cable though] Also from the datasheet: "There are 4-color selections to support monochrome or area color OLED/PLED." -> I think that has something to do with those split oleds, where there's an orange bar on top of the blue display etc.
https://cdn-shop.adafruit.com/datasheets/SSD1305.pdf
found a SSD1327 controlled OLED that's 128x64 and monochrome.
https://www.generationrobots.com/media/Ecran_OLED_0_96/SSD1327_datasheet.pdf
https://www.aliexpress.com/item/SSD1327OLED12864/32833020568.html
-
about using that SD card for programs
10/11/2017 at 00:51 • 2 commentshttps://tech.scargill.net/tag/another-way-to-update-flash-esp8266/
https://tech.scargill.net/espressif-save-to-flash-an-alternative/
https://github.com/raburton/rboot
http://www.esp8266.com/wiki/doku.php?id=esp8266_memory_map
https://github.com/esp8266/esp8266-wiki/wiki/Memory-Map
So if I get it this right, I need a bootloader that starts with reading the sd card to check for roms to start. Then I'd have to write that binary file into a 1MB area of the spi flash and start from there, if that is possible. Every program would have to be compiled for that sector then? Or is there a start pointer and a soft reset?
Let's call it homework.
further homework
-
current todo list
10/10/2017 at 18:58 • 0 comments- there's still no sound (design an i2c soundcard)
- case needs rework for button c (and reset)
- port gamebuino
- decide on footprint for caps and resistors and stick to it
- find a good reason why this is a hackaday prize entry
-
deauther success
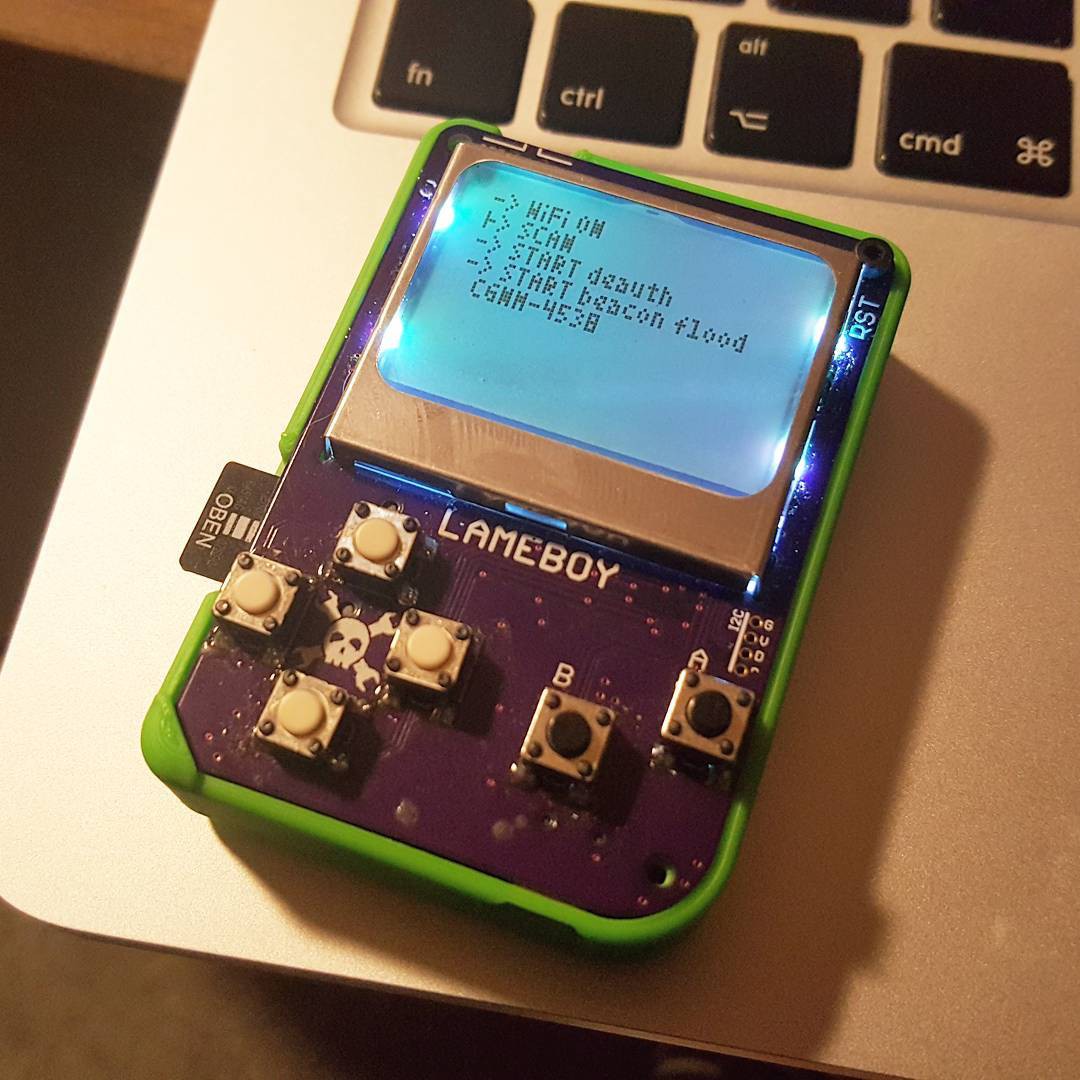
10/09/2017 at 02:18 • 2 commentsI was able to setup the Arduino IDE within my ubuntu virtualbox to compile the deauther program by spacehuhn (https://github.com/spacehuhn/esp8266_deauther) - now I can rewrite the display stuff to work with my hardware. Nice. I wanted a separate IDE for that, to make the necessary changes and also be able to work with the latest ESP8266 core on my mac. Probably would have been better with an OLED arduboy clone, since it's already working with that. Wuah, poor me, I know.
Going to make a hex once done, so it's easier to put it on (probably). I need software help at one point.
Update, display and buttons are now integrated as well, not just the server is running :)![]()
-
thoughts about platforms
10/08/2017 at 14:21 • 0 commentsLooking at my "competition" and what's on the market right now, there are two major Arduino handheld gaming platforms at the moment of writing, that pop out
Arduboyif you want to get one cheap, here's a link to their current kickstarter - special editions are already gone, but you can still get a standard version cheaper then everywhere else. (https://www.kickstarter.com/projects/903888394/arduventure-on-arduboy)
PROs
- resolution of 128x64 on an OLED is bigger (although 1.3 inch seems a bit small, the overall design is looks great)
- bigger community than Gamebuino
- rocks a transparent injection mold case
CONs
- no SD card support (there's a kickstarter for GAME BYTE, a clone that features that though https://www.kickstarter.com/projects/1276403687/game-byte)
- no external pins
Gamebuino (also Makerbuino)PROs
- SD card support for having a lot of hex files and games
- I2C and serial connection pins have headers
CONs
- although I chose the display myself, it's notable that 84x48 pixels is less than 128x64 pixels
Conclusions for this projectThere is a 1.54 inch OLED display, that seems reasonable in price to work with and maybe switch to the ESP32 to make it slightly easier to deal with buttons etc. - although I'm not sure what that means for deauther support (I think that's only possible with the ESP8266 right now, correct me if I'm wrong). But I'm pretty happy with the state of the project (except for sound, but I2C soundcard is coming https://playground.arduino.cc/Main/SIDuinoI2c - thank you @Radomir Dopieralski ) and I will continue to make this a small run thing for tindie.
-
firmware for BlinkM clones
09/29/2017 at 14:41 • 0 commentsThere are some nice features in that firmware, you can fade or jump to colors or follow a fading script.
http://www.instructables.com/id/Ghetto-Pixels-Building-an-open-source-BlinkM/
https://code.google.com/archive/p/codalyze/wikis/CyzRgb.wiki
-
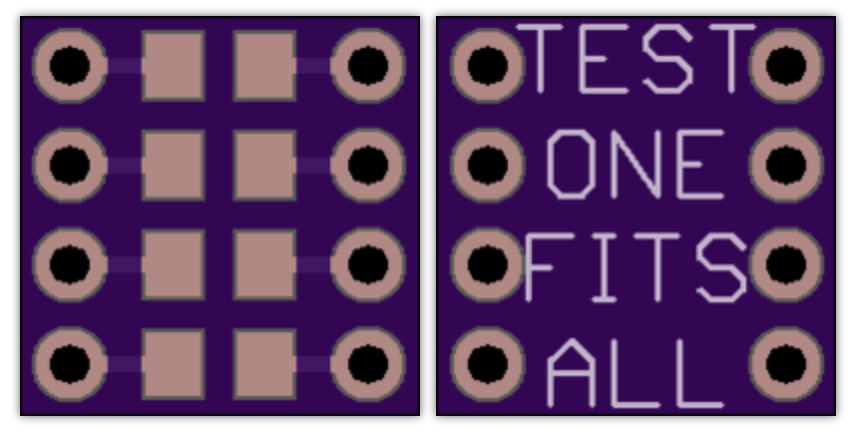
slight redesign
09/29/2017 at 14:14 • 0 commentsI always wanted to have a footprint that fit 0603 / 0805 / 1206 resistors or capacitors and for this project I finally started designing some. I'll need to test em properly, but this way everyone can use their parts with less hassle. Except for the resistor arrays, I won't change them.
![]()
-
RGB is finally working
09/20/2017 at 22:03 • 0 commentsAt the time of designing the boards it felt like a no brainer to use a BlinkM clone over I2C, because I had worked with them in my early beginnings. It took me a while though to finally burn the firmware and set the fuses right, but now I finally made it!
avrdude -c usbasp -p t45 -U lfuse:w:0xe2:m -U hfuse:w:0xdf:m
avrdude -c usbasp -p t45 -U flash:w:cyz_rgb_slave_attiny45.hex
I also found out that avrdude is able to slow down the clock frequency of SPI by itself. With -B 100 I was able to reprogram the tiny45, no matter how slow I was setting the fuses by accident.
My #a "true" in system programmer helped a lot burning the firmware onto the attiny!
Of course... of course. R and G are mixed up. gnargh. But here's a demo:
-
That is just the perfect color!
09/20/2017 at 11:50 • 9 comments![]()
LAMEBOY - another ESP12 handheld
fully portable ESP12 project with battery charging and power muxing