Carlos Garcia Saura
-
14 - HaD prize results + Want to get a detector?
11/13/2017 at 19:21 • 0 commentsIt was very rewarding to see our project reach the top 10 from the >1000 entries to the Hackaday prize :-)
Technology needs to be free for all, and this is only possible with a well motivated and supported community of makers. We are very grateful to Hackaday for organizing such a big contest to promote open projects. We are also thankful to the Open Source Hardware and Software Demonstration (OSHWDem) that took place La Coruña (Spain) this weekend, it also contributed to a great diffusion of the Open Radiation Detector and many other projects.
Thank you!
-
13 - Working on a new version
10/30/2017 at 23:38 • 0 commentsWe are working on a new design that improves upon versions 0.9 and 1.0:
- It will have rear-facing LEDs to allow easy readout from both sides of the detector.
- Instead of using a Darlington arrangement as the frontend, we are investigating whether it is possible to directly use a really good operational amplifier. This should have better linearity, temperature stability, and maybe allow calibration.
- Also, it will use an SMD buzzer to further facilitate pick-and-place assembly.
For the frontend amplifier, we are using the µCurrent by EEVblog as a reference.
Do you have any ideas on how to improve the design? Please share them in the comments!
-
12 - Hackaday Prize entry video
10/19/2017 at 11:44 • 0 commentsEdited 21/Oct/2017: We are very excited to be on the Hackaday Prize finals! Thank you Hackaday for this great opportunity to share our project with the world :-)
We have released all the documentation available for versions 0.9 and 1.0. Please let us know if you are planning to build the project and need any more information!![]()
-
11 - Sources are available! Next steps
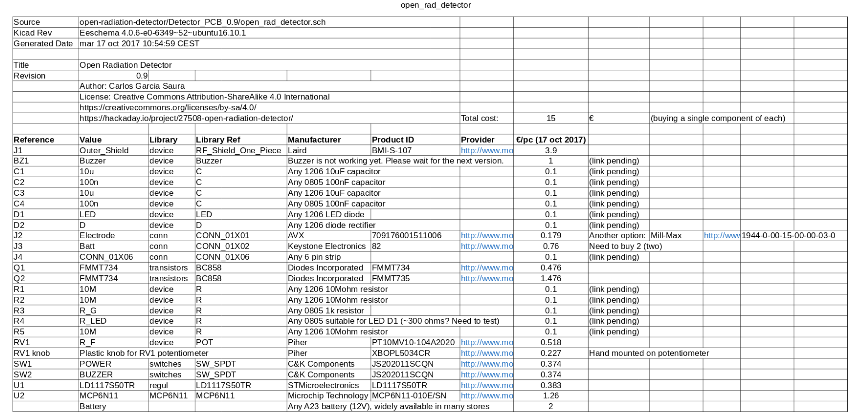
10/16/2017 at 15:36 • 0 commentsAfter testing the prototype and making some minor corrections, we have released the KiCad sources and BOM for version 0.9. Bear in mind it is still a very early version of the detector, suitable for tinkerers only! Here is the link to our GitHub repository:
https://github.com/CarlosGS/open-radiation-detector
We are already working in the next version of the detector, one that supports the buzzer and a row of LEDs that represent radiation intensity with a scale. (a strip will be much easier to read than a single led's brightness gradient).
I want to take this opportunity to thank Hackaday for promoting the creation of open source projects. The Hackaday Prize has been the biggest motivation for me to advance this project, document it and finally release it. I really hope this project can help to lower the cost and facilitate the detection of radiation sources worldwide.
I also want to thank the Grupo de Neurocomputación Biológica at Universidad Autónoma de Madrid for providing the material resources to create the prototypes, which have accelerated the project a lot.
Finally, the project has reached a point where the power of the community will help take this project to the next level. Did you find the project interesting? Do you have any suggestions to improve detection effectiveness? Please share your thoughts in the comments!
-
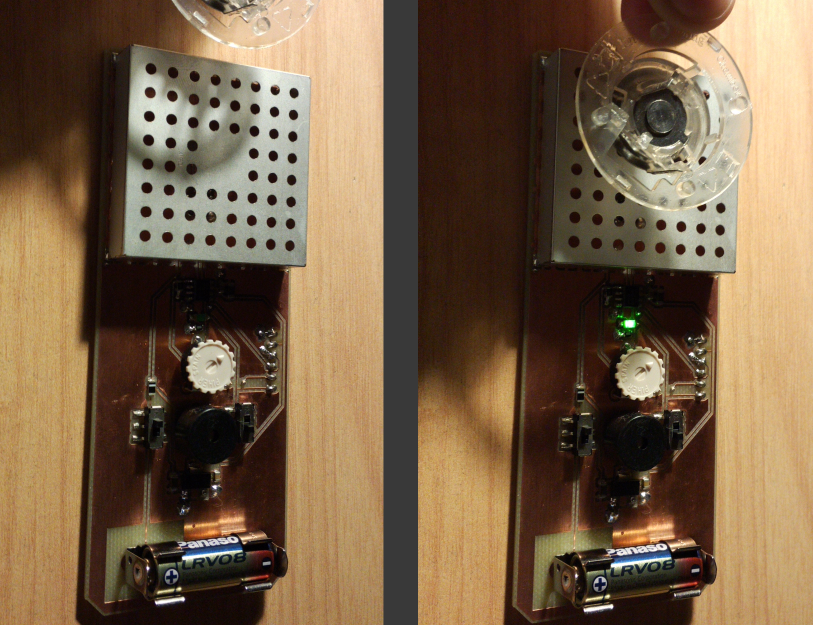
10 - It works!
10/15/2017 at 01:37 • 0 commentsThe prototype has been successful! Our latest prototype can measure radiation from the source in a smoke detector.
At first the signal was too dim and we needed to adjust the circuit's gain, after that the sensor could work by itself and notify with the on-board LED (link to video).We were most excited to see that electrostatic fields now do NOT affect the measurement! So all the modifications since last version have been for the good :-)
-
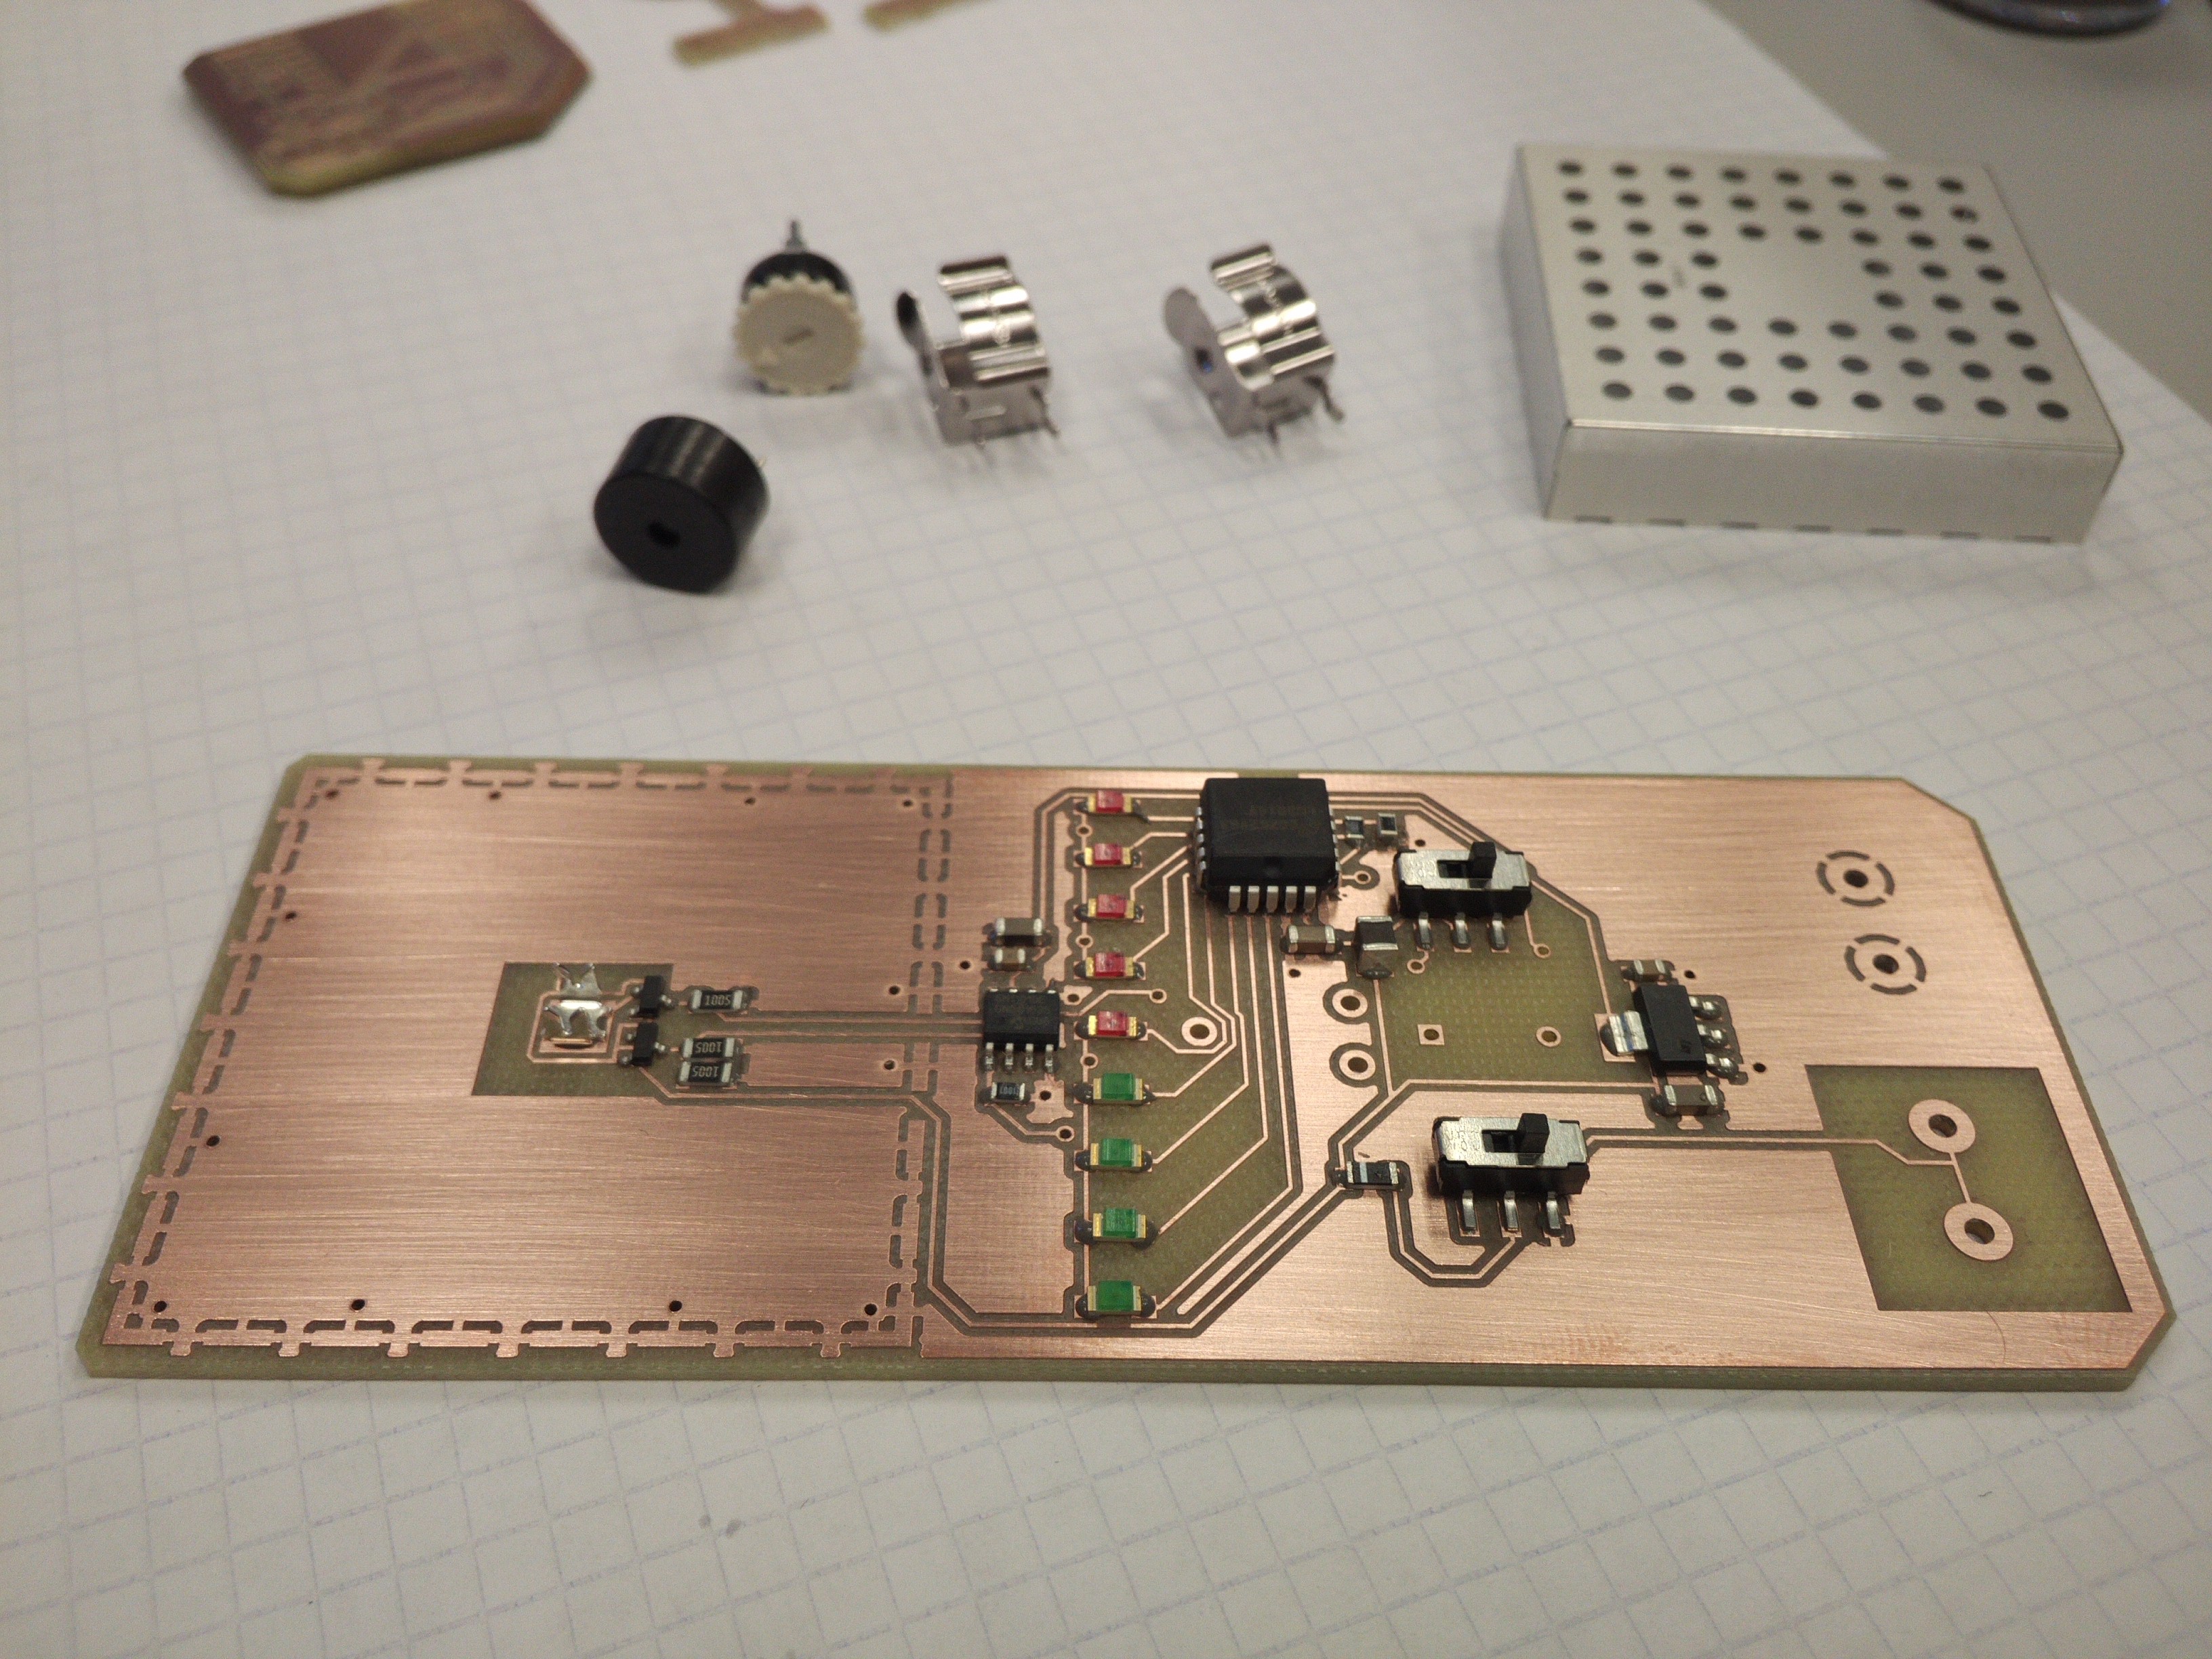
9 - PCB electrode design
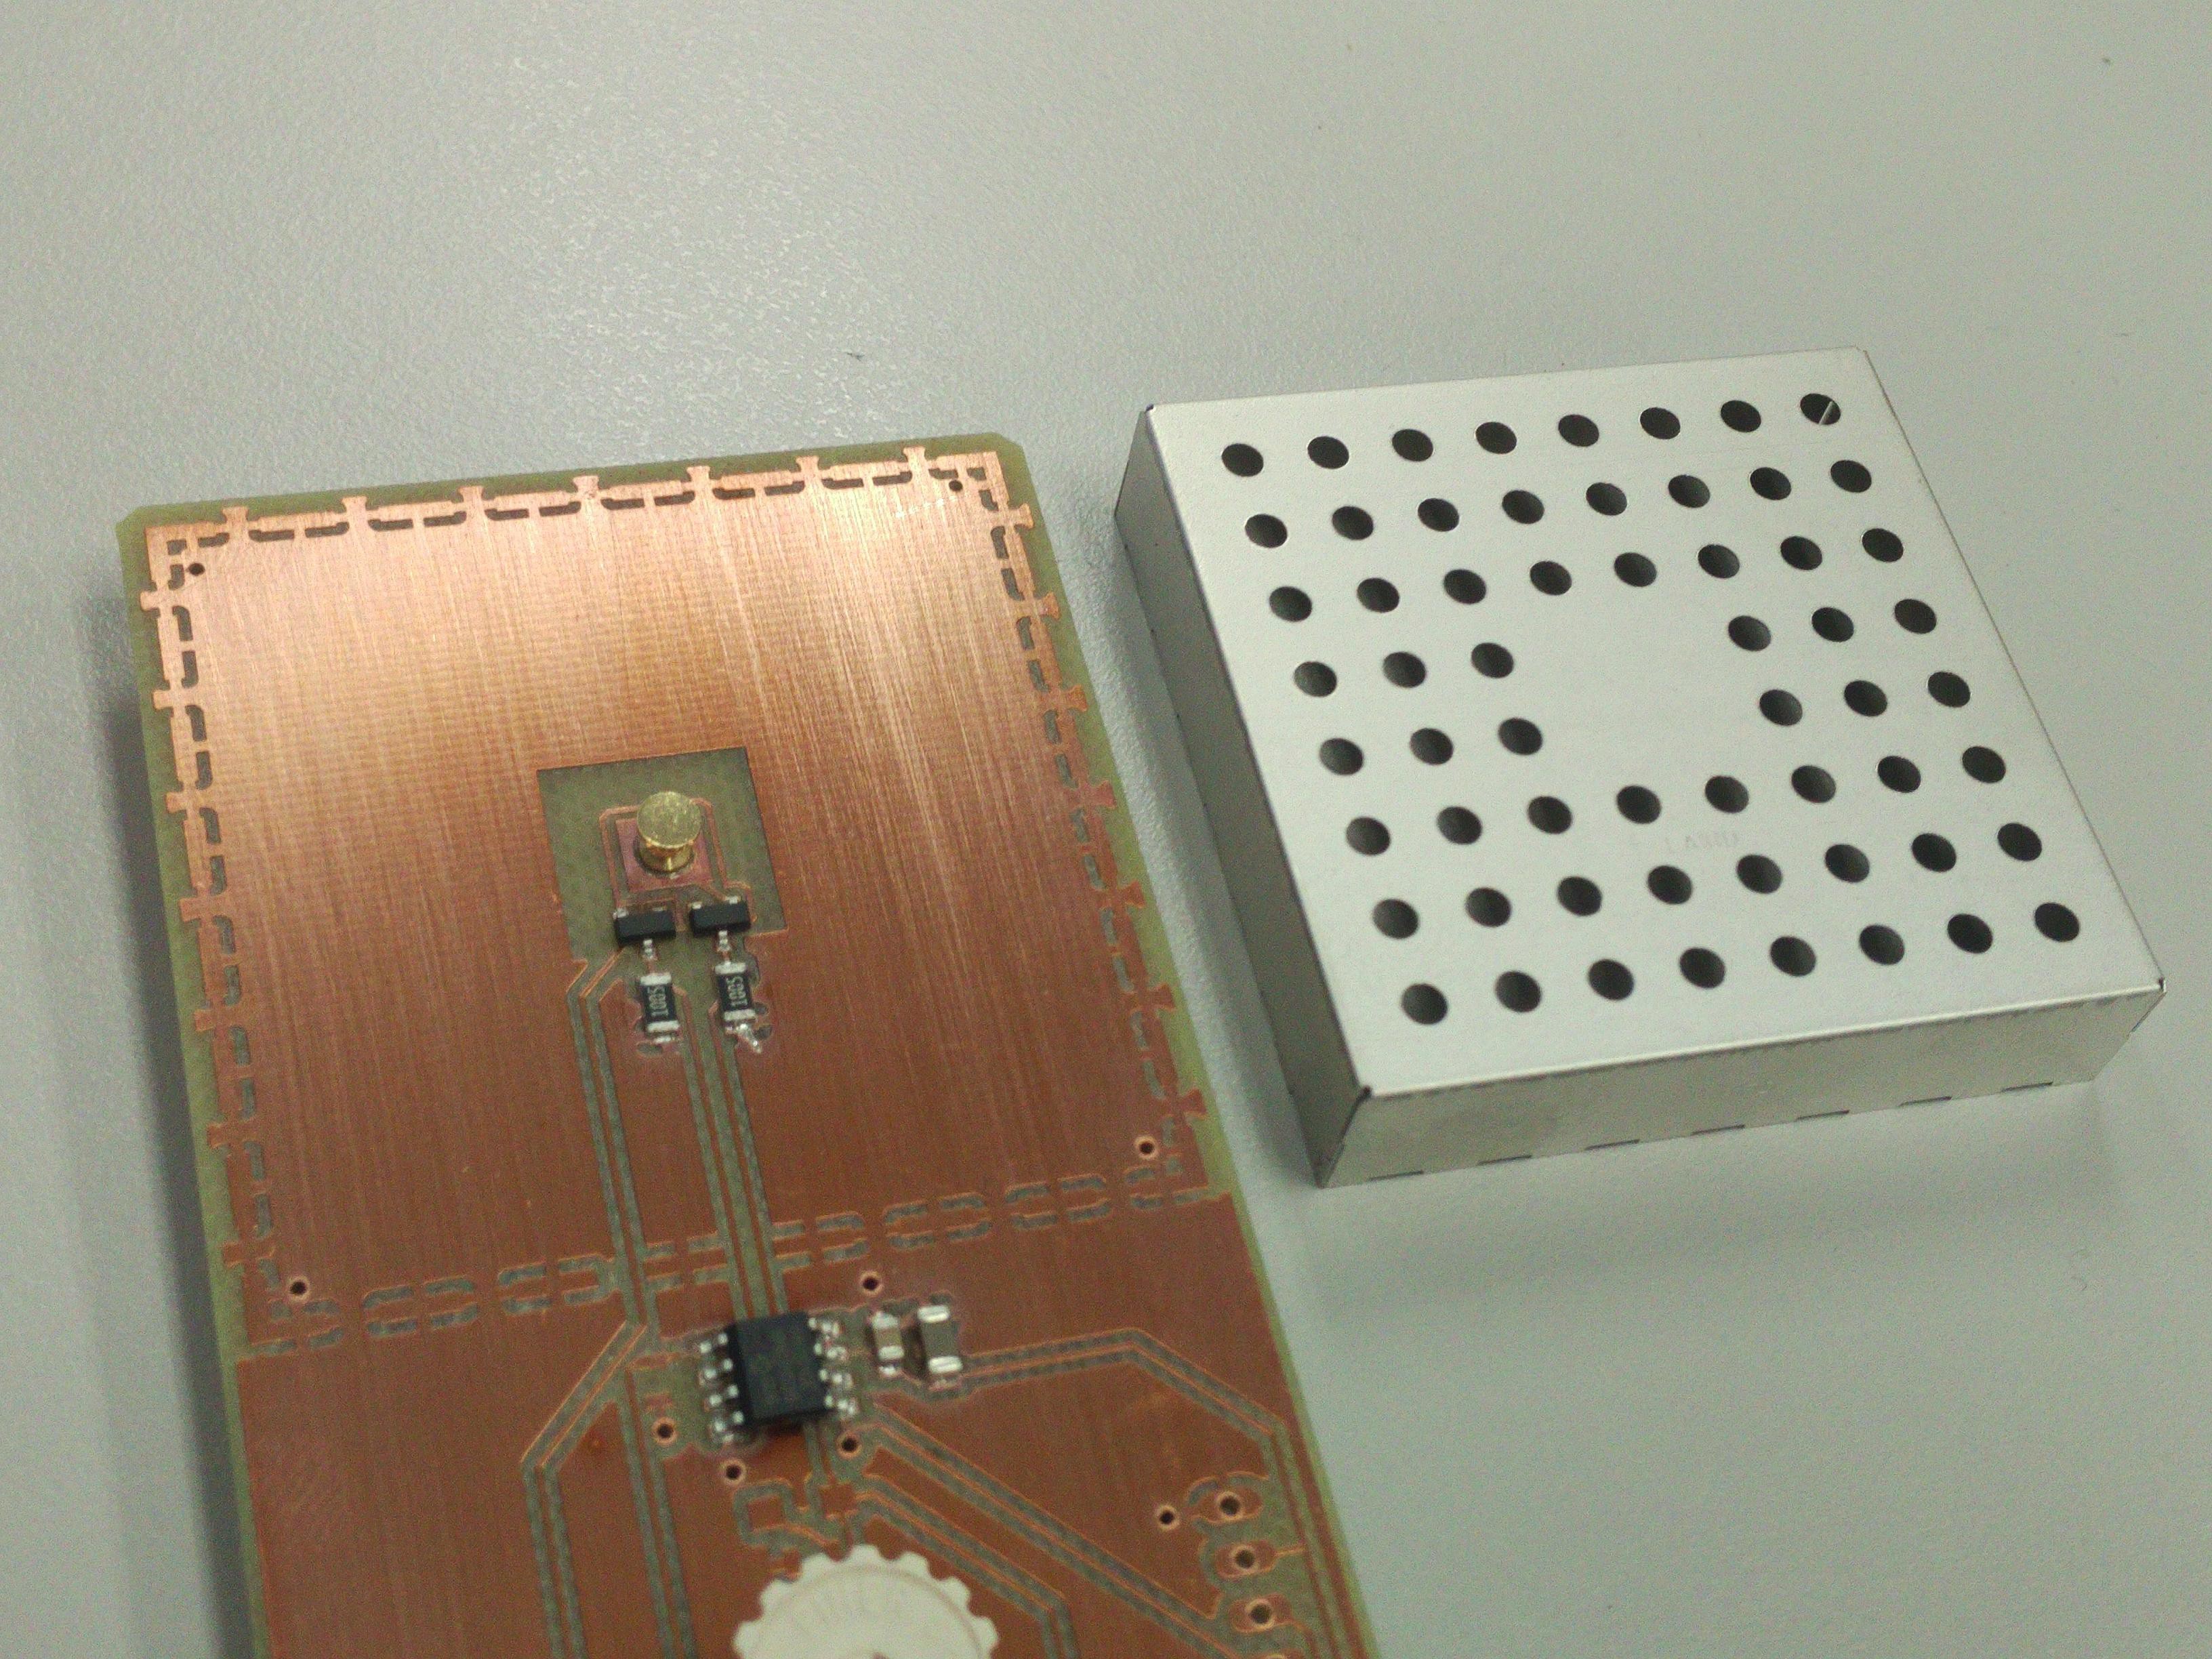
10/14/2017 at 10:01 • 0 commentsHere are some detailed pictures on the construction of the most important part of the detector: the inner amplifying electrode.
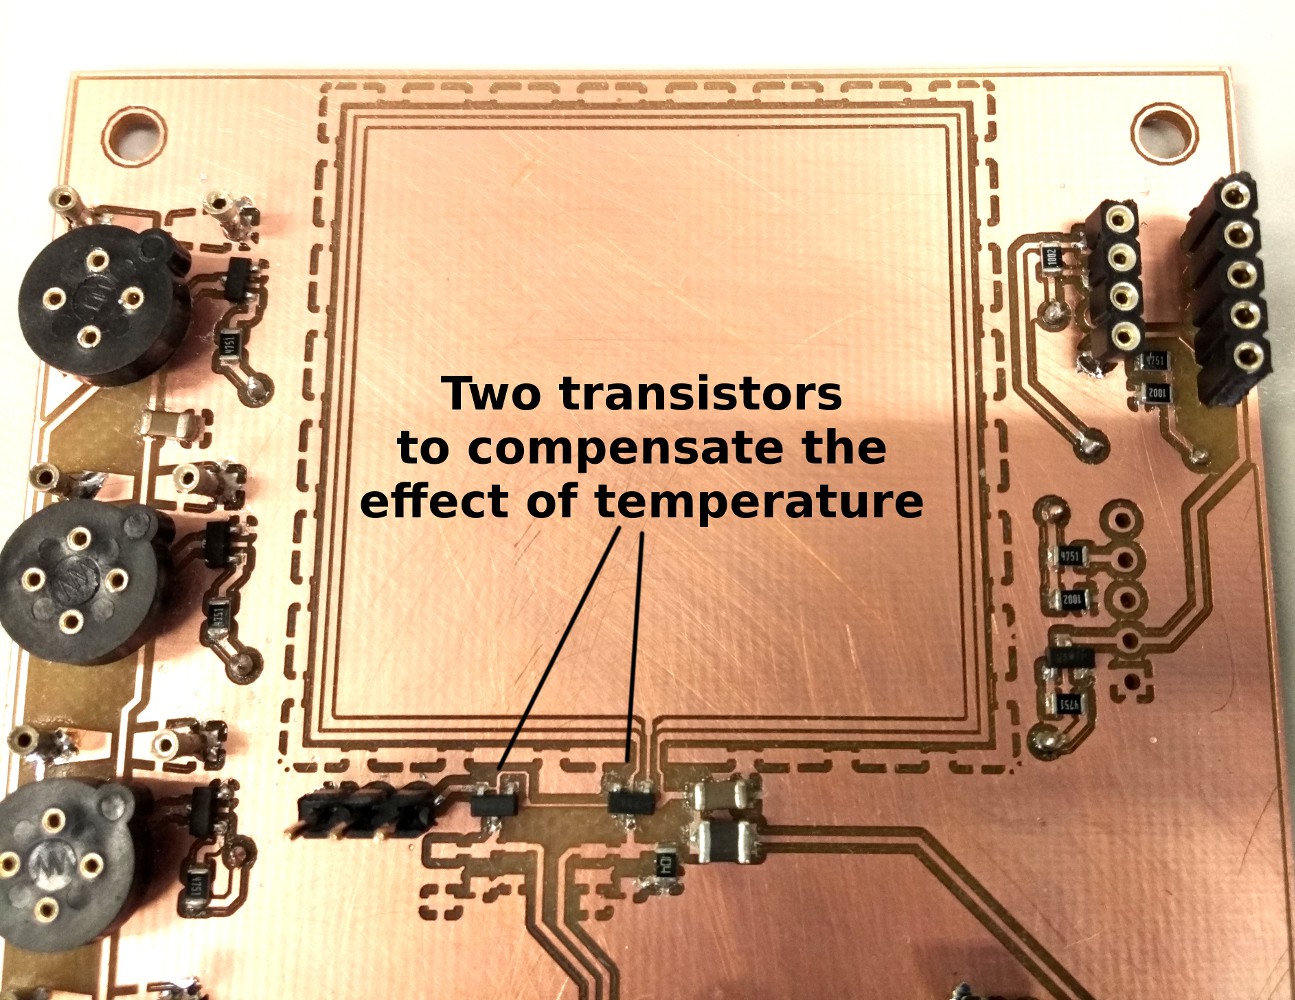
The central electrode is a surface-mount stud that captures the tiny ionization currents within the chamber. It is tightly coupled with the Darlington transistor that amplifies the signal (see the previous log entry for the schematic), this is done in order to reduce electrical noise.
Here is how the electrode assembly looks with the shielding can removed:On the bottom can be seen the instrumentation amplifier that conditions and further amplifies the signal while compensating for the temperature effects (see entries 5 and 8).
-
8 - Schematic for the amplifier circuit
10/11/2017 at 22:57 • 0 commentsSignal amplification and conditioning has been implemented with the following circuit:
Amplification is achieved with a pair of Darlington transistors, one to amplify the radiation signal and the other to compensate the effect of temperature over transistor gain (see log entry 5).
Further amplification and signal conditioning is achieved with an instrumentation amplifier. As opposed to operational amplifiers, instrumentation amplifiers produce an output that is linearly proportional to the difference between the input voltages. This allows to compensate for temperature, amplify and drive the output signal, all in a single step.
An important detail to note is the need for R5 to tune the output voltages. In theory both signals should be equal when no radiation is present, but we have observed that this is not the case due to transistor manufacture tolerances. If the reference signal is greater than the output signal, it could inhibit radiation detections in some circumstances.
In our tests we have seen that Vref is usually higher than Vsignal, so it was necessary to place an R5 that drops Vref slightly.
There is also a potentiometer (RV1) to allow the rescaling/calibration of the output signal, the maximum can be mapped to any value in the 0-5V range. This allows direct interface with Arduino and other platforms. -
7 - The hand-held detector
10/11/2017 at 00:15 • 0 commentsThis project provides two different things: a new design of manufacture-friendly ion chamber, and also a proof-of-concept device that demonstrates its sensitivity to radiation.
From the start, the idea has been to create a hand-held detector that can be used to check if an object is radioactive or not.
The sketch on the left was made at the start of the project. Next to it you can see the latest design :-)
As mentioned in the previous log entry, the ion chamber design has been modified to have a positive electrode that is smaller and placed in central position.Next entries will show more details on the schematic.
-
6 - Reducing the effect of static electricity
10/09/2017 at 22:45 • 0 commentsA big problem with our initial ion chamber prototypes was that any nearby electrostatic fields had a large effect over the radiation measurements.
Even the temperature-corrected version of the radiation detector was unusable: it produced false detections when bringing a charged pen near the detector (a harmless plastic pen that had been electrically charged by rubbing it with a cloth).
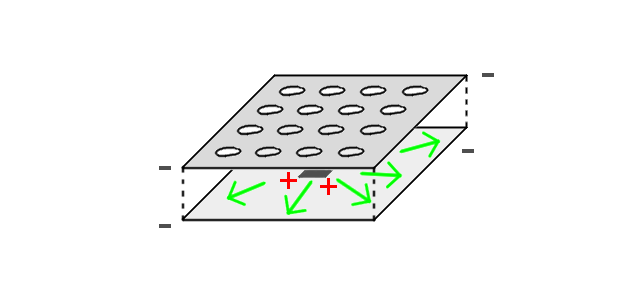
After many test we established that the problem was caused by the electrode topology. To explain this, here is a diagram of how the early prototypes looked:
As can be seen, in electrical terms the circuit is a capacitor.
This would not be an issue by itself, but we observed that the electrically charged objects only affected the detector when they were placed near the holes on the top of the metal box.
Instead the problem is related to the alignment of the internal electric field with the (spurious) external electric influences.
For the next revision, our ion chamber has been updated to use a positive electrode centred within the metal can:
This way the electric field vectors are perpendicular to any electric noise that enters the chamber through the top holes, so theoretically the circuit would be more isolated.
The new topology is also more similar to the rest of DIY ion chambers out there, and still can be manufactured with pick-and-place machines.
Next updates will show the PCB design for the first hand-held prototype. -
5 - Correcting the effect of temperature
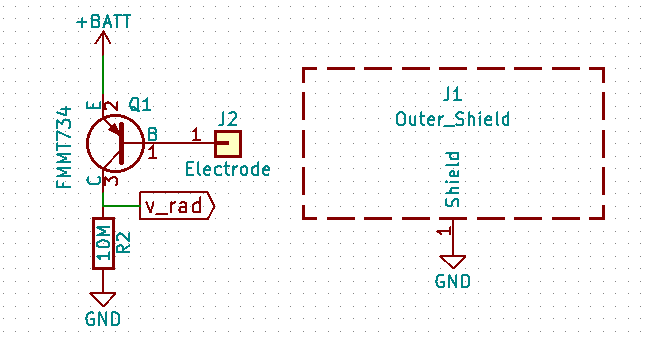
10/08/2017 at 23:20 • 0 commentsThe circuit we are using to measure radiation is derived from a DIY detector by Charles Wenzel: http://www.techlib.com/science/ion.html. It uses a high-gain Darlington transistor to amplify the tiny currents generated between the inner electrode and the outer shield.
For our design we have chosen the FMMT734 transistor, an up-to-date part with standard SOT-23 surface mount footprint. We use the PNP configuration rather than the commonly used NPN; this way it is possible to have the outer shield at ground voltage.
![]()
However in our first tests this circuit produced measurements that were very dependent on temperature. When temperature raises around the detector, the gain of the Darlington transistor is reduced and the output signal is substantially diminished.
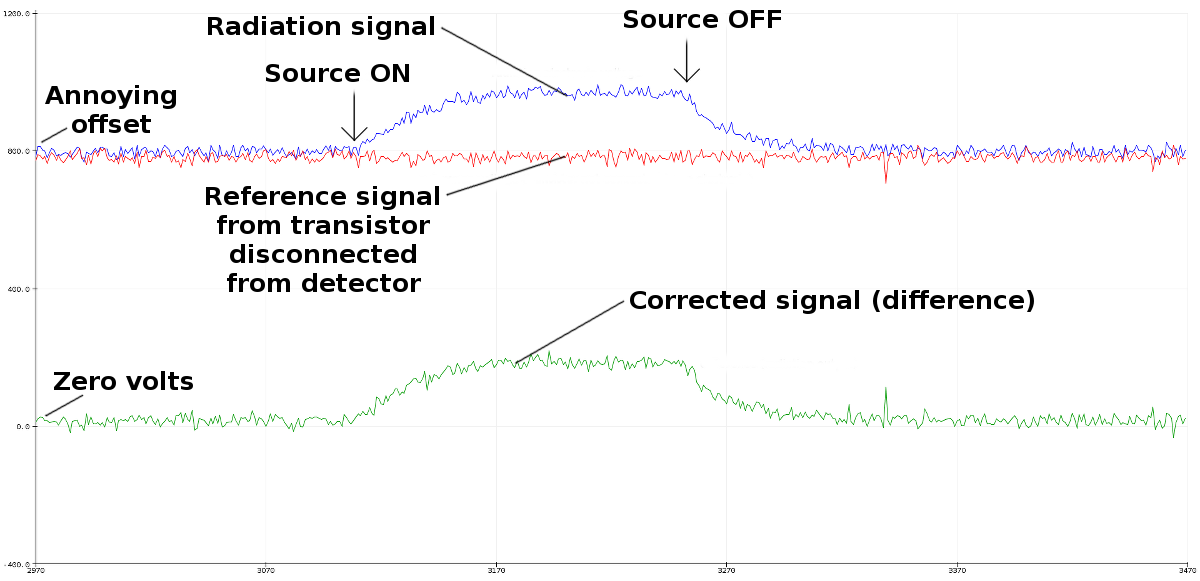
This is why the fourth iteration incorporates two transistors: one of them is connected to the electrode, and the other one is left open. The radiation measurement is then corrected by subtracting the reference output voltage from the signal coming from the main amplifier.
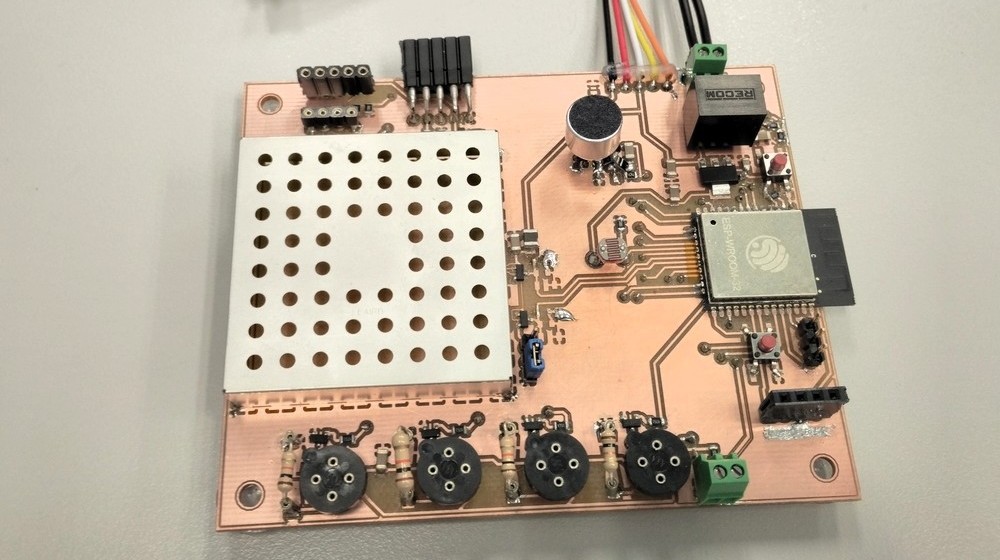
Here are two pictures of the fourth prototype. The radiation sensor is the large metallic box, the rest of components are part of a plain old, boring IoT box (Internet of Things is soo 2016..).
![]()
![]()
The fourth prototype was successful - there is a clear signal whenever the radiation source is put close to the detector. Also, the offset and the effect of temperature are removed by subtracting the reference signal from the unconnected reference transistor:
![]()
The long-term test in a WiFi connected platform has also shown that the sensor is not capable of measuring the background radiation levels. Temperature changes over the course of hours and days, and this still has a notable effect that obfuscates any traces of low radiation levels (even after correcting with the reference transistor).
However the sensor does produce a signal when radiation sources are close to the detector. We believe this sensor will be useful in a portable hand-held device that can be brought near objects to check if they are radioactive or not.
Stay tuned for more updates, and tell us what you think! :-)
Open Radiation Detector
Quickly identify radioactive materials with a pocket-sized ion chamber. Built from standard parts for easy manufacture and low cost.
 We were most excited to see that electrostatic fields now do NOT affect the measurement! So all the modifications since last version have been for the good :-)
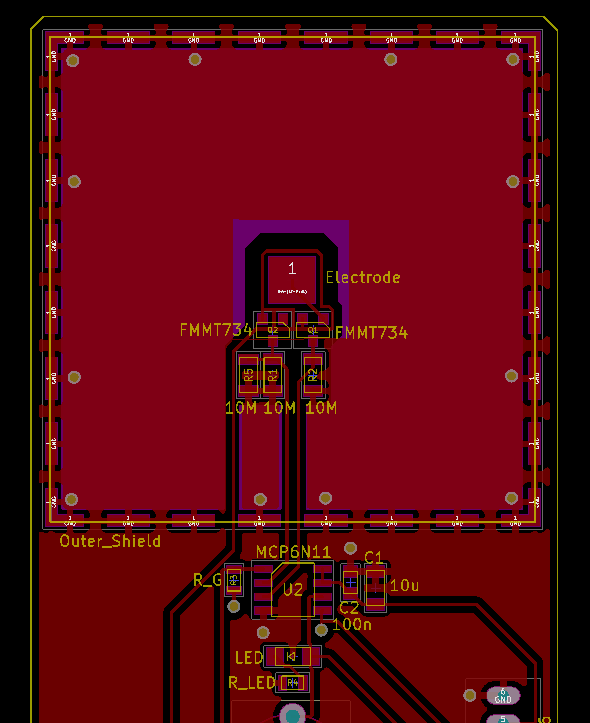 The central electrode is a surface-mount stud that captures the tiny ionization currents within the chamber. It is tightly coupled with the Darlington transistor that amplifies the signal (see
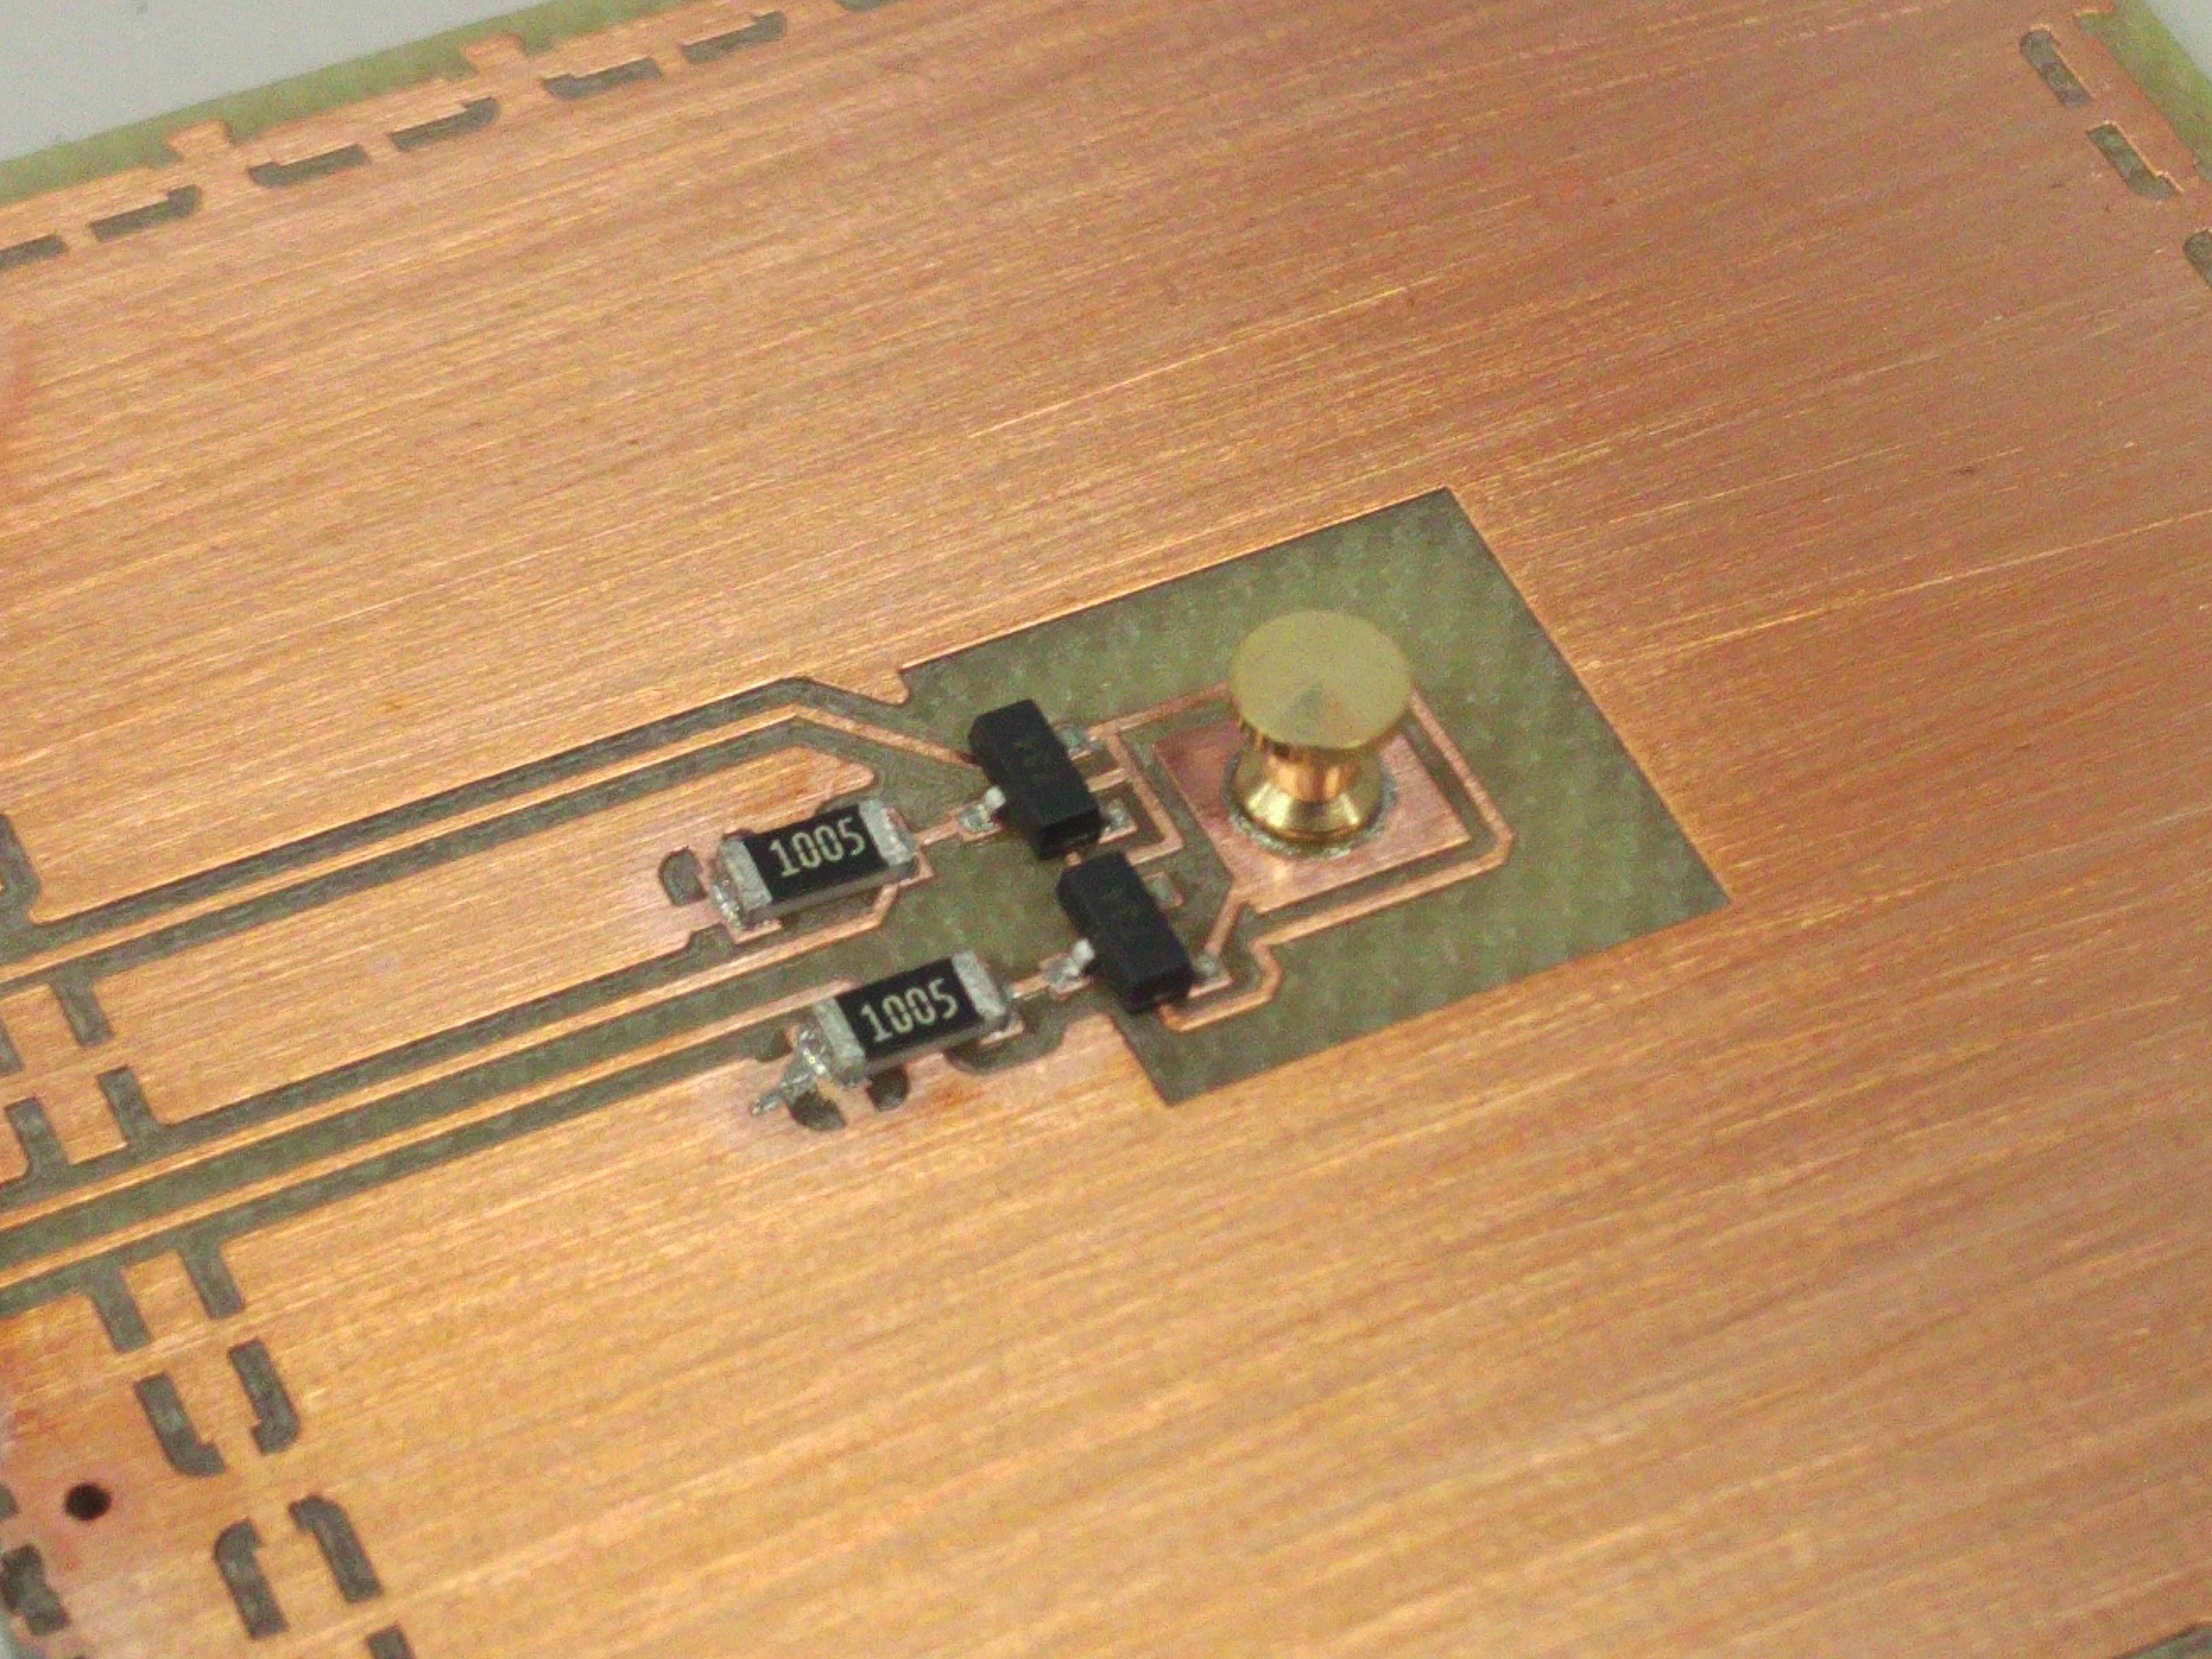
 On the bottom can be seen the instrumentation amplifier that conditions and further amplifies the signal while compensating for the temperature effects (see entries
 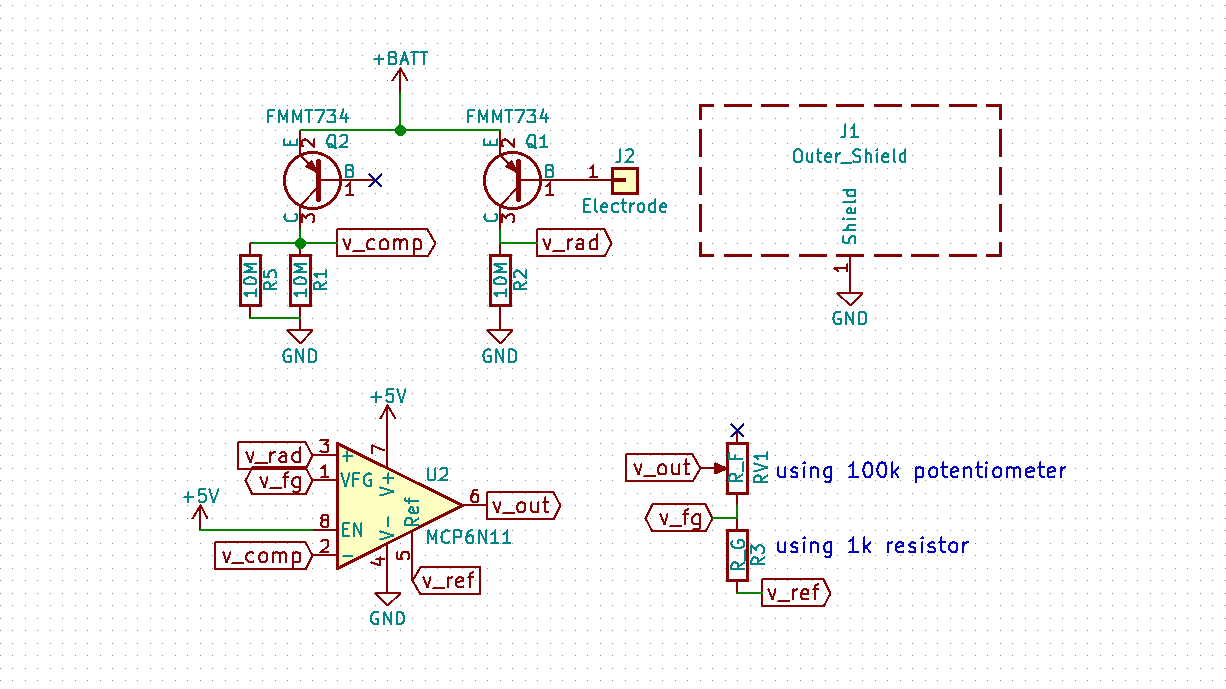 Amplification is achieved with a pair of
 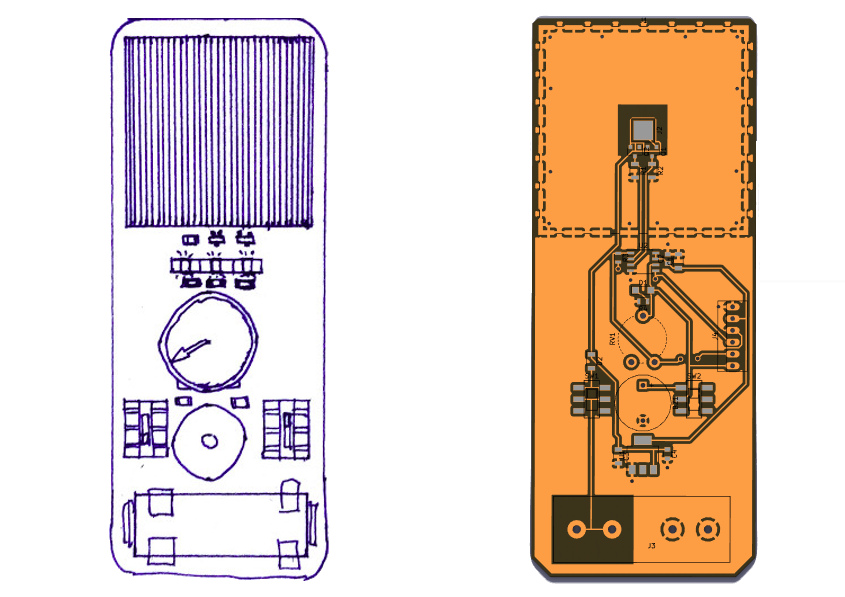 The sketch on the left was made at the start of the project. Next to it you can see the latest design :-)
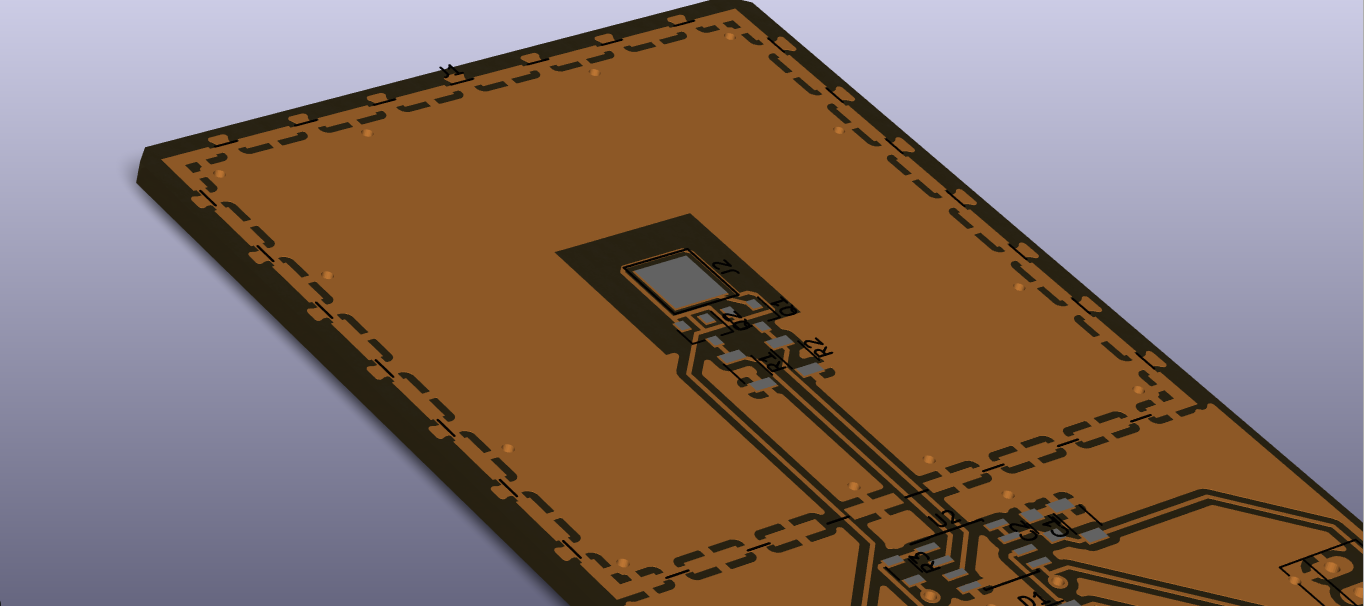 Next entries will show more details on the schematic.
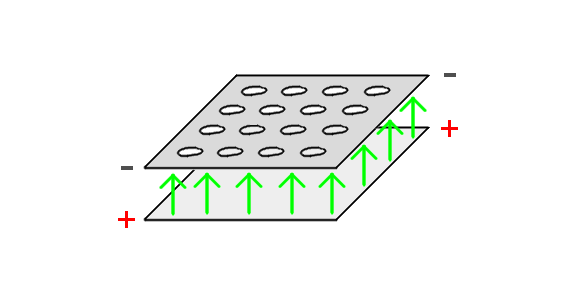 As can be seen, in electrical terms the circuit is a capacitor.