Carlos Garcia Saura
-
4 - Ionization chamber prototypes
10/08/2017 at 11:06 • 0 commentsSpark detectors, as well as Geiger counters, require of very high voltages to operate. These must be avoided in order to achieve a simple detector circuit. Dropping the requirement for a high voltage would be more safe and need less power to operate.
Ionization chambers are the solution to this problem. Rather than generating sparks or discharge pulses, they use a low voltage to separate the ions created when high energy particles interact with a gas (air, in our case). These tiny ion currents are then measured with a very simple amplifier circuit.
There is a long history of detectors based on ion chambers. They have already been used in professional radiation monitoring equipment, and moreover, many hobbyists have come up with very simple designs that can be built at home. Check out this website to learn more about DIY ion chamber radiation detectors: http://www.techlib.com/science/ion.html
The simplicity and high sensitivity of ion chamber detectors makes them ideally suited for this project.
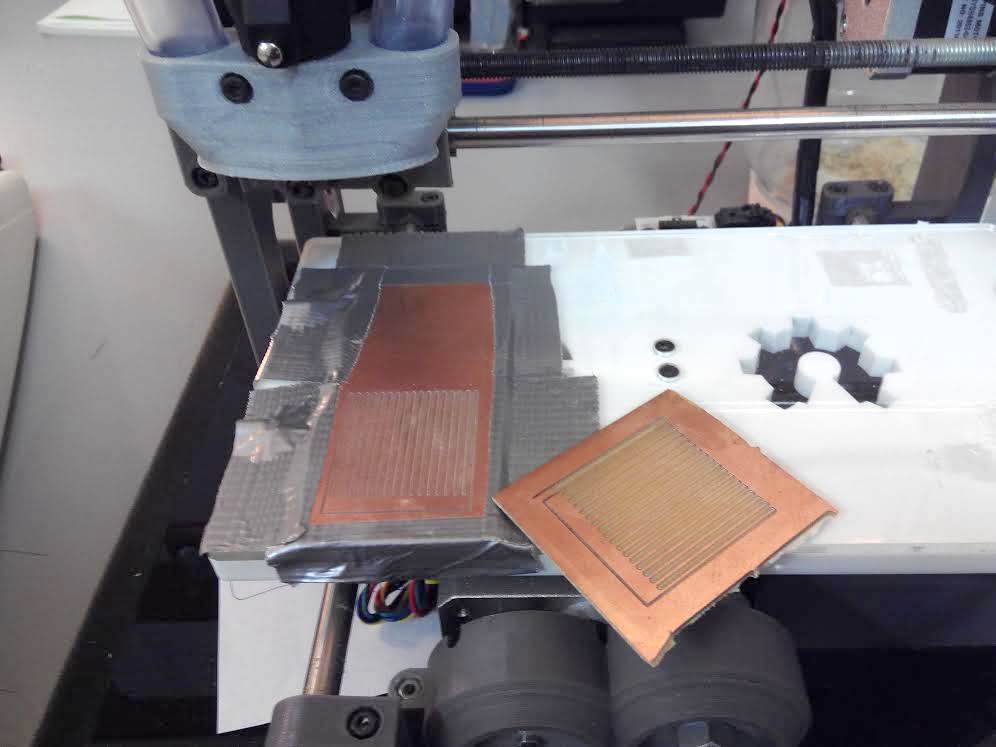
Our first iteration used the same layout as the "spark detector attempt" we showed in log entry 3.
![]() Instead of applying a high voltage that causes sparks, using it as a ionization chamber means we applied a low potential (12V) and measured the tiny ion currents induced by radiation.
Instead of applying a high voltage that causes sparks, using it as a ionization chamber means we applied a low potential (12V) and measured the tiny ion currents induced by radiation.This design did NOT work because there is only a tiny volume of air between the electrodes, and plenty of leakage between the "finger plates" as contact surfaces are large.
The second iteration started as a very ugly prototype that we are not going to mention again:
![]() Let's focus on the "pretty" prototypes instead.
Let's focus on the "pretty" prototypes instead.The idea behind the new design is as follows:
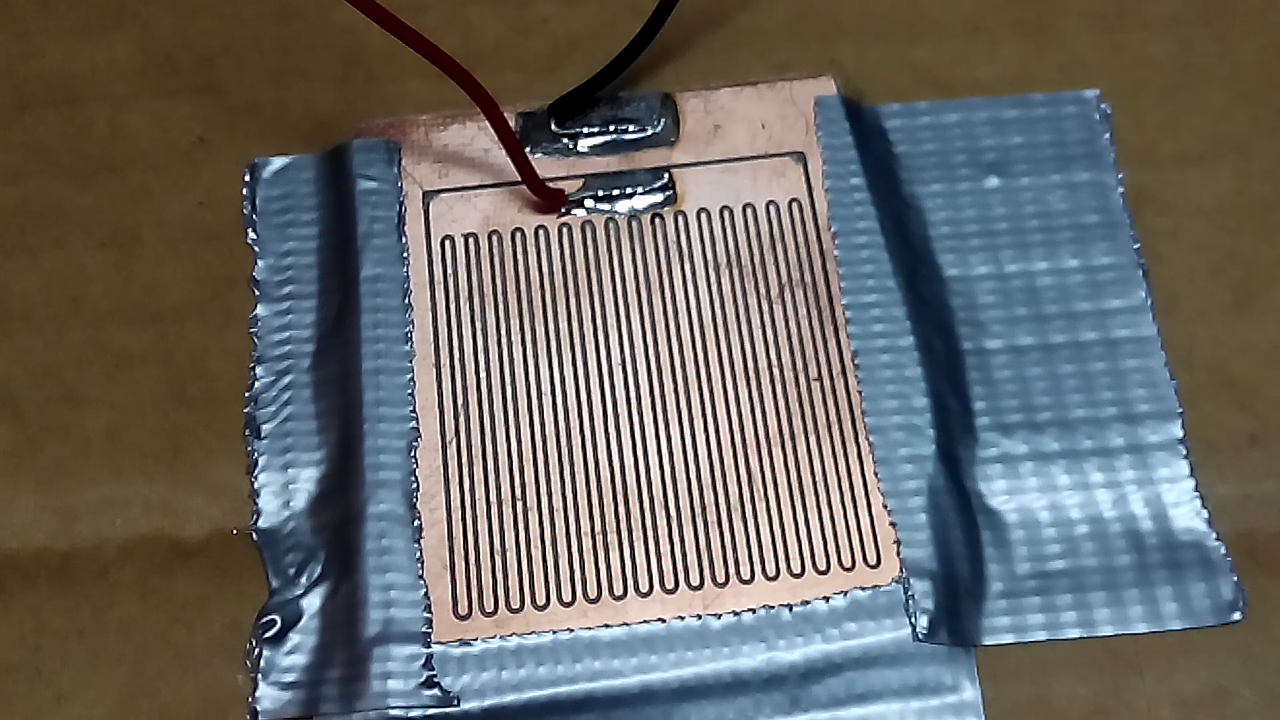
![]() An electric field is created between the electrode plate and the outer case. The ionized air is attracted by the electrodes, and a current can be measured. These ion-induced currents are proportional to the amount of radiation present.
An electric field is created between the electrode plate and the outer case. The ionized air is attracted by the electrodes, and a current can be measured. These ion-induced currents are proportional to the amount of radiation present.The interesting thing about this approach is that it uses a printed circuit board as part of the sensing element. This is the key to reduce manufacture costs.
The third iteration was built with a commercially available circuit shield. It also incorporated a ground plane behind the electrode to reduce the effect of static electricity over the measurement.
![]() This prototype actually worked!!
This prototype actually worked!!Bringing a radiation source near the detector generated a voltage on the multimeter:
![]() The first success was very rewarding - it proved that we were on the right track!
The first success was very rewarding - it proved that we were on the right track!For the next log entry we will review the amplifier circuit and the long term effect of temperature in the detector.
If you like this project, be sure to click the follow button to not miss any updates!
-
3 - First attempts: an alpha spark detector
10/04/2017 at 17:21 • 0 commentsToday I want to share my first attempt at building a spark particle detector.
Spark detectors consist on a strip of wires parallel to a high voltage plane. A strong electric field is created, and every time a high energy particle ionizes the air between the electrodes, it causes an avalanche effect and a spark appears.
From my ignorance as a novice in the field, I initially thought that the most important part of spark detectors were the parallel cables. So I went ahead and designed a circuit board with a "finger electrode" with a flat arrangement. A prototype was quickly made using a Cyclone PCB Factory:
![]()
The next video shows the ""spark detector"" in action. The high voltage was generated using the flyback circuit from a document scanner, and was fed into the electrode through a protection resistance of several megohms.
First time on, the circuit was already creating very promising spikes!
Unfortunately, it was too good to be true. The sparks observed were NOT due to background radiation. This became evident after bringing a radiation source (from a smoke sensor) near the detector and seeing no change in activity at all.
Among the many reasons for failure were the small and non-homogeneous electric field and tiny ionization volume. The randomness of the sparks seems to arise from local changes in humidity: every time a spark occurs, it dries the air around it and reduces the chance of a spark happening in the same spot.
So this prototype was left behind as an anecdotal, tiny light show. In the next updates we will show the newer designs that actually work as a radiation detector. Be sure to follow the project to stay tuned.
And thanks for reading! Have you ever tinkered with spark particle detectors? Share your experience and comments below!
-
2 - The background: lots of DIY projects
10/03/2017 at 09:13 • 0 commentsI've been there: you've just read that article about the potential danger of some household items being radioactive. You now have a strong need to check your granite countertops, camera lenses, smoke detectors and every weird-color dishes at home - for the sake of safety of course (note: these are very rarely an actual threat).
You quickly find out that radiation detectors are surprisingly expensive. The only affordable options are labeled as "electromagnetic detectors" and don't really measure the harmful ionizing radiation that we want to check for.
As a a maker yourself, avid reader of Hackaday, you go for the next logical option which is to build your own detector. A quick search yields lots of weird and wonderful projects:
![]()
You quickly reach the most important page on the subject: a very detailed explanation by Charles Wenzel with a tutorial on how to build your own "ionization chamber" using a tin can, a transistor and a multimeter.
These home made detectors are very cool, and a really nice option if you have the ability and free time to build them. In my case, I spent some time building a DIY detector and actually struggled during the way: it was very difficult to get consistent results. Every tin can was different from the one in the tutorial, the transistors required were not available at any store, the multimeter had too low internal resistance, lots of leakage, then the sensor was affected by static electricity, etc.
It was after being bit by all of these variables, I decided to go ahead and design my own detector. It had to be built only from standard components. No more messing around with recycled tin cans, vintage transistors or cold-war vacuum tubes.
Thanks for reading! Follow this project to get notified of the next updates.
-
1 - Introduction to radiation detectors
10/02/2017 at 23:32 • 0 commentsQuick disclaimer before we begin: I'm not a physicist. The information in here must be taken with a pinch of salt. This project started as a personal learning exercise and by sharing it I hope to get valuable feedback from the community!
Radiation monitoring is a technical challenge at many levels. We basically want to detect particles that travel very fast and have weak interactions with matter. This involves lots of physics, mechanics and electronics.
Most radiation detectors don't read the particles directly. Instead, they monitor a volume of matter and watch out for ionization events that occur when high energy particles interact with the material. Here is a brief overview on some of the existing detector types:
- Geiger counters are by far the most popular type of detector. They work by applying a high voltage to an electrode inside a low pressure gas tube. Each time a high energy particle goes through the tube, they ionize some of the gas and discharge the electrode. These events are read by an electronic circuit that translates them into audible "clicks".
- Scintillation counters use scintillation as the detection principle. They include a special crystal that flashes whenever a particle passes through. These scientific grade detectors are way more accurate, but also more expensive and complex.
- Ionization chambers are similar to Geiger counters, but have a lower voltage applied to the electrode. A weak electric field is enough to separate the ion-electron pairs that are generated each time a high energy particle passes through the chamber. Instead of watching for individual ionization events, these detectors measure the aggregated currents that are induced in the electrodes when the ions arrive. For more information check out this fantastic page by Charles Wenzel.
- Spark detectors are a special case, and are very well explained in this video by Carl Willis:
My favourite type of detector. You can almost see the particles!
- There are many other techniques such as using photo-diodes to measure gamma radiation. See a related project also in Hackaday: https://hackaday.io/project/1749-solid-state-ionising-radiation-detector
For the Open Radiation Detector, we will use an open-air ionization chamber like the ones studied by Charles Wenzel & Alan Yates (http://www.techlib.com/science/ion.html & http://www.vk2zay.net/category/30) among others. These decision comes from the following facts:
- Ionization chambers don't require high voltages (they are safe).
- They can work at ambient pressure and temperature (they are robust & easy to build since no vacuum is involved).
- As opposed to counting detectors, ionization chambers have a linear response. Reading is proportional to the amount of radiation (less corrections are needed).
- The detection circuit is basically a current amplifier (it can be simple & low cost).
- Another consideration is that ionization chambers are specially sensitive to alpha radiation. Most Geiger counters block alpha radiation, giving false readings when presented with pure alpha sources. So this feature would complement many commercial counters very well.
Theory is soo pretty, isn't it? (It should be!). However there are some practical considerations that must be taken into account when designing a detector of this type.
In the following updates we will show you some of the prototypes and iterations that have been necessary towards a validation of the final design.
Thanks for reading! Please share your questions or concerns in the comments section below.
Open Radiation Detector
Quickly identify radioactive materials with a pocket-sized ion chamber. Built from standard parts for easy manufacture and low cost.
 Instead of applying a high voltage that causes sparks, using it as a ionization chamber means we applied a low potential (12V) and measured the tiny ion currents induced by radiation.
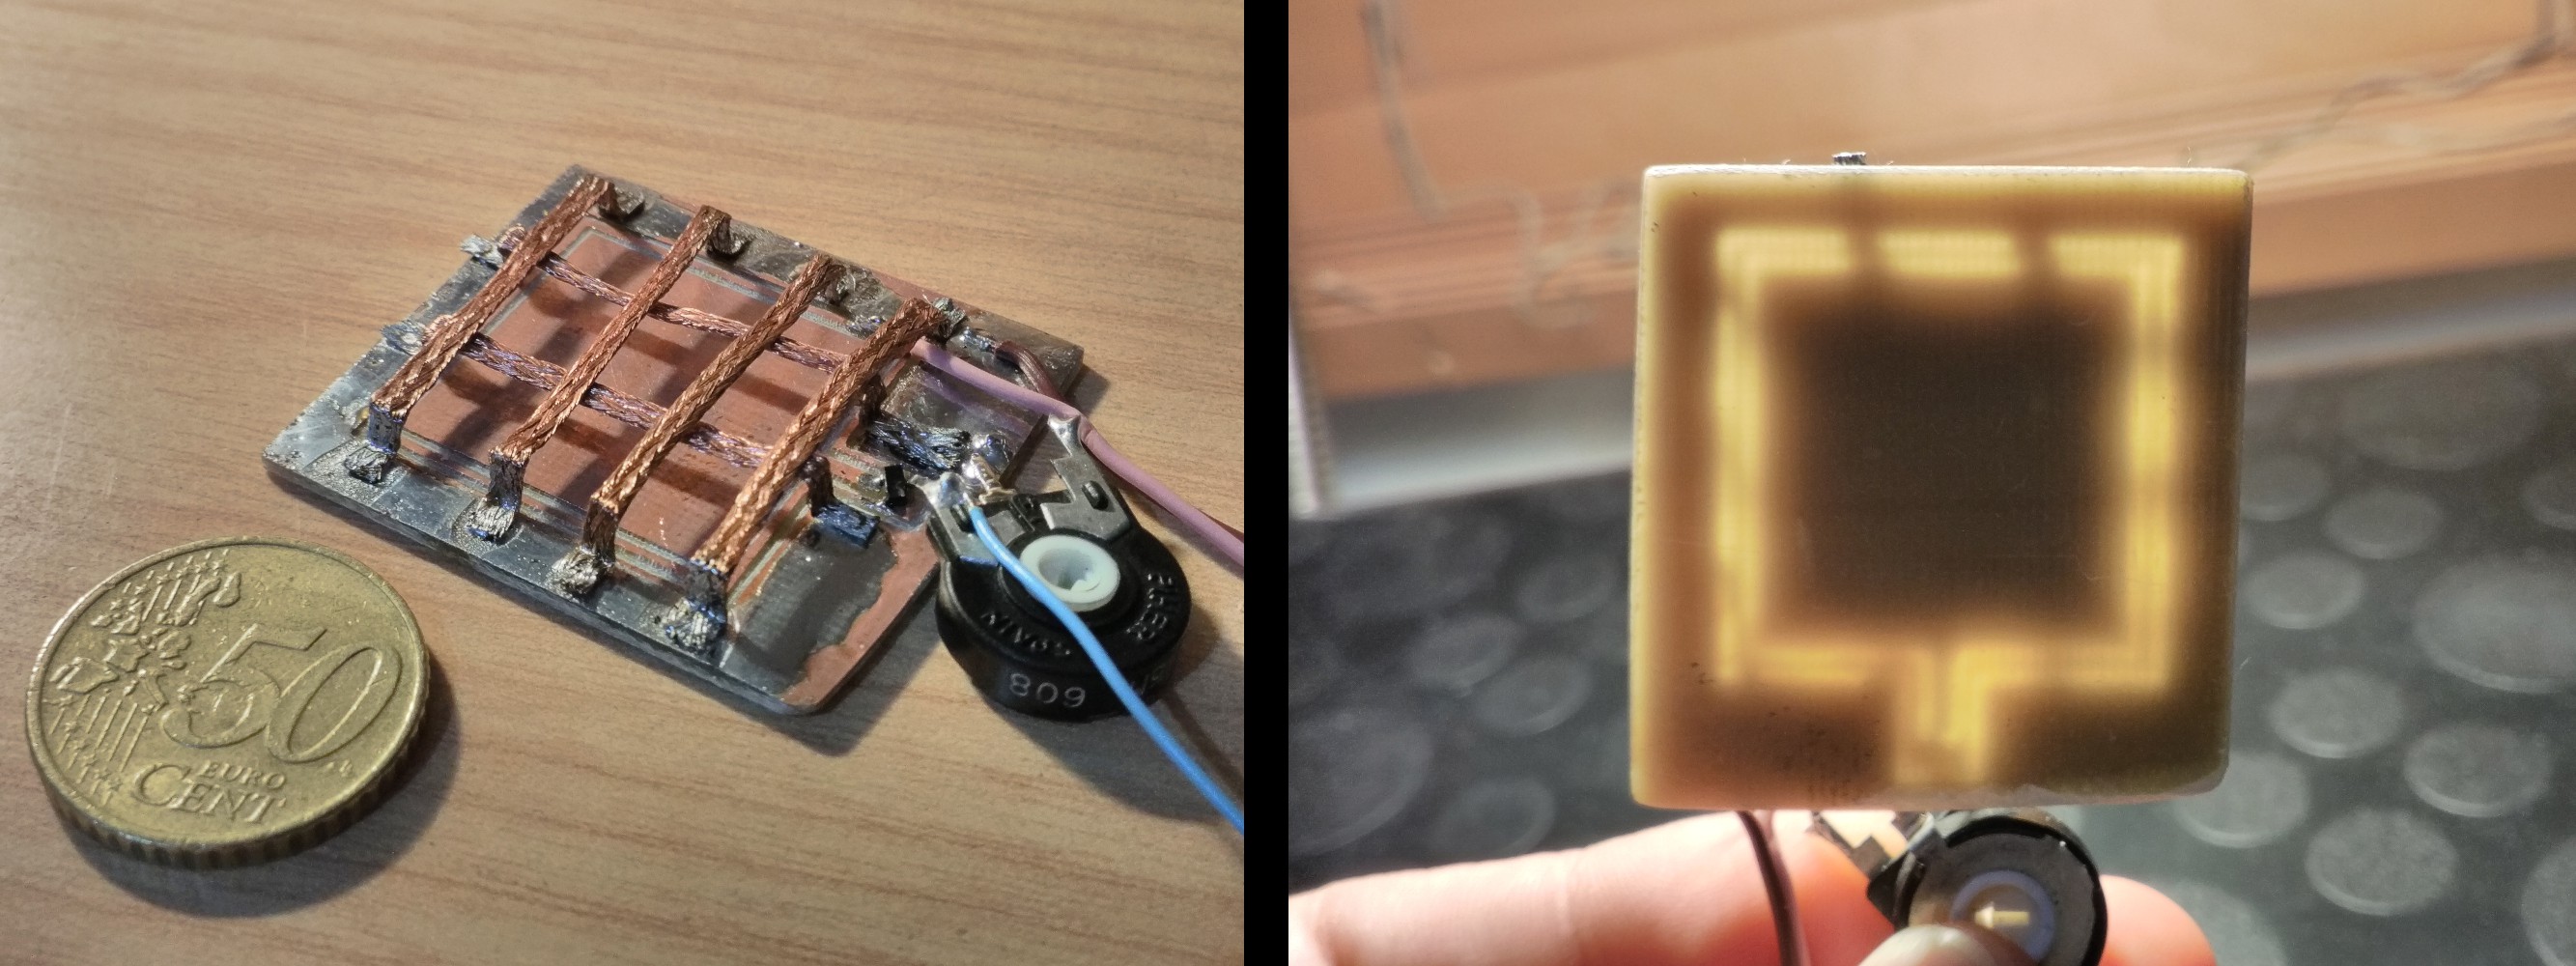 Let's focus on the "pretty" prototypes instead.
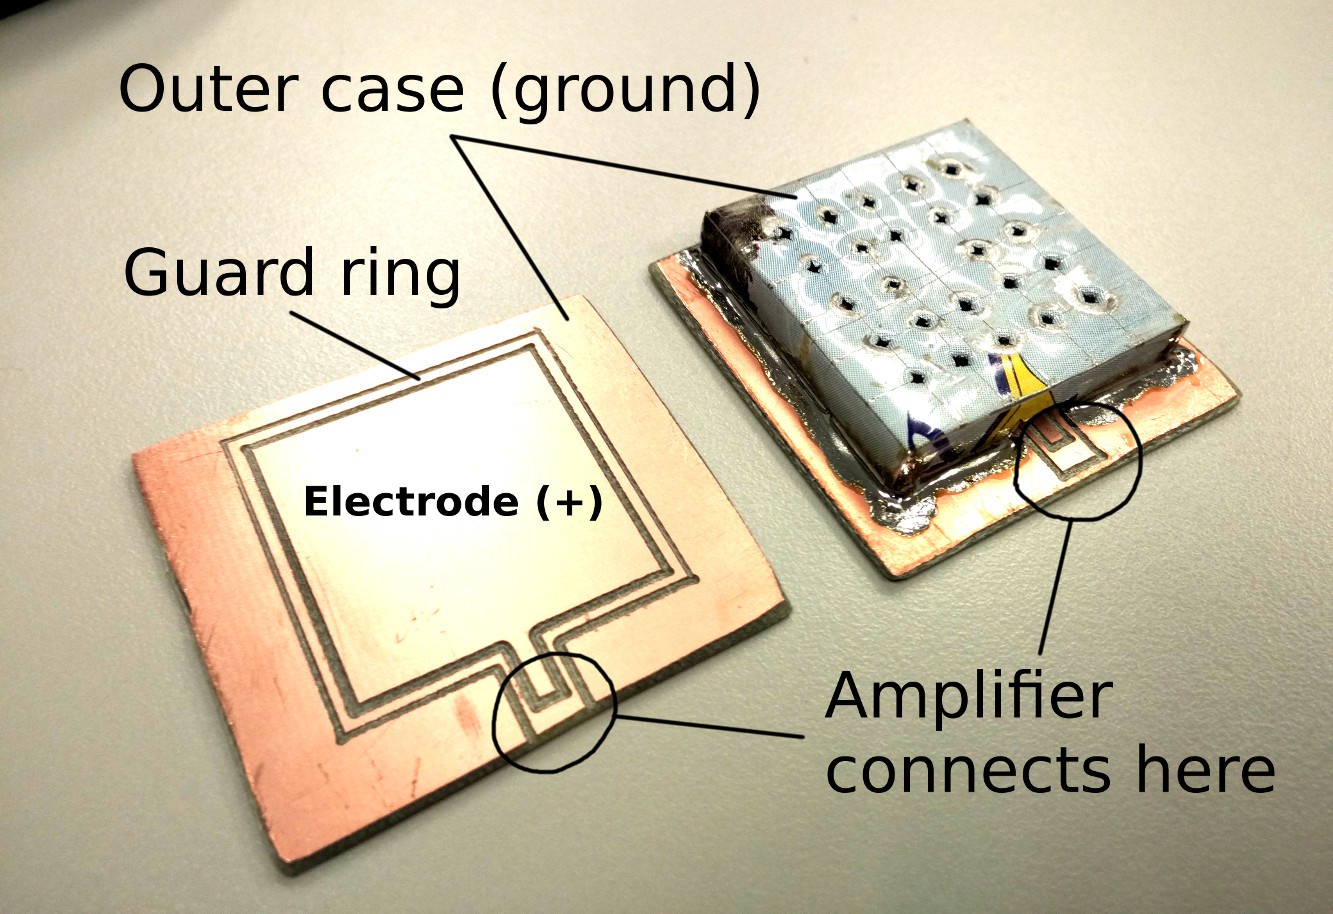 An electric field is created between the electrode plate and the outer case. The ionized air is attracted by the electrodes, and a current can be measured. These ion-induced currents are proportional to the amount of radiation present.
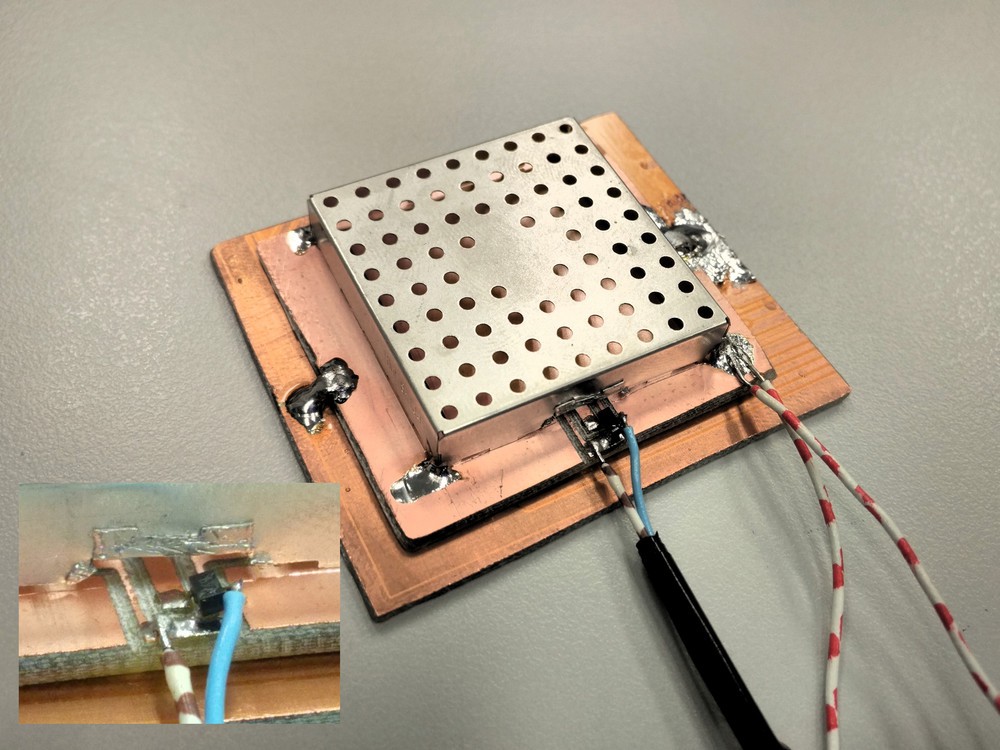 This prototype actually worked!!
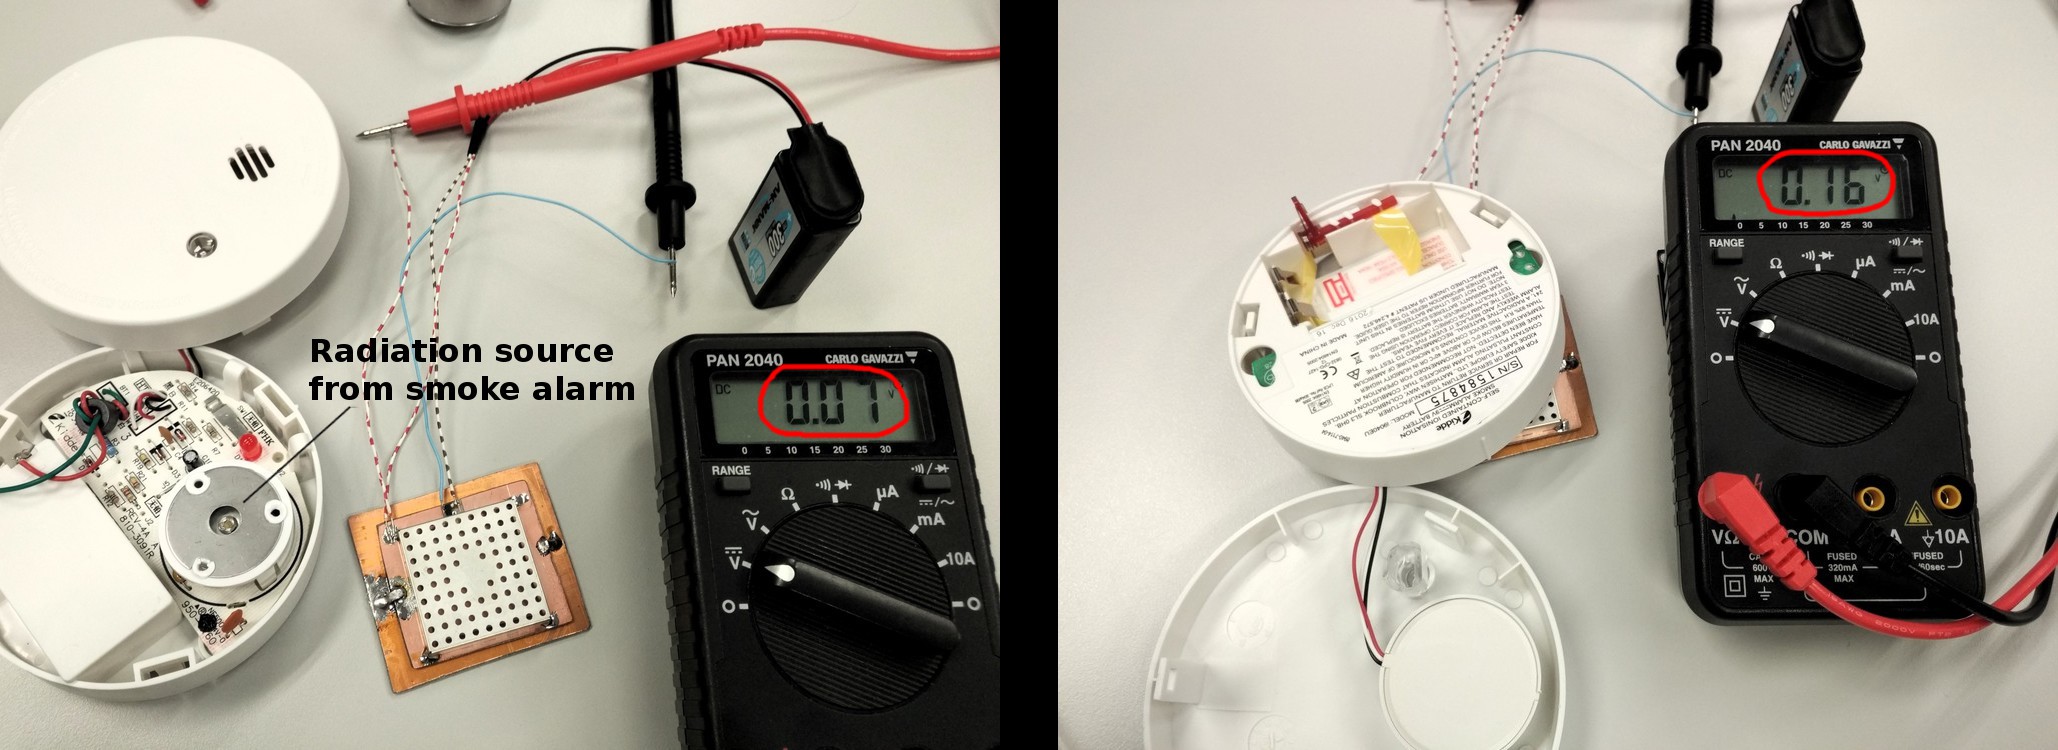 The first success was very rewarding - it proved that we were on the right track!