agp.cooper
-
Update: Controlling the LED
12/05/2017 at 12:01 • 0 commentsAdded a command line tool to set GPIOs
Here is the tool in action on gpio0:
root@mylinkit:~/Code# ./mraa_gpio.run -gpio 0 -dir out -val 1
gpio0 write is 1
root@mylinkit:~/Code# ./mraa_gpio.run -gpio 0 -dir in
gpio0 read is 1
root@mylinkit:~/Code# ./mraa_gpio.run -gpio 0 -dir out -val 0
gpio0 write is 0
root@mylinkit:~/Code# ./mraa_gpio.run -gpio 0 -dir in
gpio0 read is 0
root@mylinkit:~/Code# ./mraa_gpio.run -gpio 0 -dir close
gpio0 closedSo it works as expected. It also works on the WiFi LED (gpio44).
I note that the LED logic is inverted.
Here is the code:
#include <stdio.h>
#include <stdlib.h>
#include <string.h>
#include <stdbool.h>
#include <mraa.h>

int main(int argc, char** argv)
{
  // Pin No GPIO No  Function
  //     P1      43  Eth LED
  //     P8      20  UART TX2, PWM2
  //     P9      21  UART RX2, PWM3
  //    P10       2  I2S WS
  //    P11       3  I2S CLK
  //    P12       0  I2S SDI
  //    P13       1  I2S SDO
  //    P14      37  REF_CLK
  //    P15      44  WiFi LED
  //    P16      46  UART RX1
  //    P17      45  UART TX1
  //    P18      13  UART RX0
  //    P19      12  UART TX0
  //    P20       5  I2C SDA
  //    P21       4  I2C SCL
  //    P25       6  SPI CS
  //    P26      18  PWM0
  //    P27      19  PWM1
  //    P28      17  SPIS MOSI
  //    P29      16  SPIS MISO
  //    P30      15  SPIS SCK
  //    P31      14  SPIS CS

  bool gpioFlag=false;
  bool dirFlag=false;
  bool valFlag=false;
  bool helpFlag=false;
  int gpio=-1;
  int pin=-1;
  char dir[16]="";
  int val=-1;

  // Get parameters
  {
    long k;
    double f1;
    for (k=1;k<argc;k++) {
      if (strcmp(argv[k],"-pin")==0) {
        if (k+1<argc) sscanf(argv[k+1],"%lf",&f1);
        gpio=-1;
        pin=(int)f1;
        if (pin==1) gpio=43;
        if (pin==8) gpio=20;
        if (pin==9) gpio=21;
        if (pin==10) gpio=2;
        if (pin==11) gpio=3;
        if (pin==12) gpio=0;
        if (pin==13) gpio=1;
        if (pin==14) gpio=37;
        if (pin==15) gpio=44;
        if (pin==16) gpio=16;
        if (pin==17) gpio=45;
        if (pin==18) gpio=13;
        if (pin==19) gpio=12;
        if (pin==20) gpio=5;
        if (pin==21) gpio=4;
        if (pin==25) gpio=6;
        if (pin==26) gpio=18;
        if (pin==27) gpio=19;
        if (pin==28) gpio=17;
        if (pin==29) gpio=16;
        if (pin==30) gpio=15;
        if (pin==31) gpio=14;
        if (gpio!=-1) gpioFlag=true;
      }
      if (strcmp(argv[k],"-gpio")==0) {
        gpioFlag=false;
        if (k+1<argc) sscanf(argv[k+1],"%lf",&f1);
        gpio=(int)f1;
        if ((gpio>=0)&&(gpio<=6)) {
          gpioFlag=true;
        } else if ((gpio>=12)&&(gpio<=21)) {
          gpioFlag=true;
        } else if (gpio==37) {
          gpioFlag=true;
        } else if ((gpio>=43)&&(gpio<=46)) {
          gpioFlag=true;
        }
        if (gpioFlag) gpio=(int)f1;
      }
      if (strcmp(argv[k],"-dir")==0) {
        dirFlag=true;
        if (k+1<argc) strcpy(dir,argv[k+1]);
      }
      if (strcmp(argv[k],"-val")==0) {
        valFlag=true;
        if (k+1<argc) sscanf(argv[k+1],"%lf",&f1);
        val=(int)f1;
        if (val<0) val=0;
        if (val>1) val=1;
      }
      if (strcmp(argv[k],"-help")==0) {
        helpFlag=true;
      }
    }
  }

  // Do it
  if ((gpioFlag)&&(dirFlag)&&(!helpFlag)) {

    mraa_gpio_context mraa_gpio=NULL;
    mraa_result_t mraa_res;

    mraa_gpio=mraa_gpio_init(gpio);
    if (mraa_gpio==NULL) {
      printf("gpio%d error\n",gpio);
      return(-1);
    }
    if (strcmp(dir,"in")==0) {
      mraa_gpio_dir(mraa_gpio,MRAA_GPIO_IN);
      printf("gpio%d read is %d\n",gpio,mraa_gpio_read(mraa_gpio));
      return (0);
    } else if (strcmp(dir,"close")==0) {
      mraa_res=mraa_gpio_close(mraa_gpio);
      if (mraa_res==MRAA_SUCCESS) {
        printf("gpio%d closed\n",gpio);
        return(0);
      } else {
        printf("gpio%d closed with error\n",gpio);
        return(-1);
      }

    } else if ((valFlag)&&(strcmp(dir,"out")==0)) {
      mraa_gpio_dir(mraa_gpio,MRAA_GPIO_OUT);
      mraa_gpio_write(mraa_gpio,val);
      printf("gpio%d write is %d\n",gpio,val);
      return(0);
    } else {
      return(-1);
    }

  } else {

    printf("mraa gpio - Written by Alan Cooper (agp.cooper@gmail.com)\n");
    printf("usage:    ./mraa_gpio.run -gpio n -pin n -dir [in|out|close] -val [0|1]\n");
    printf("options:  -gpio n              Set gpio number\n");
    printf("          -pin n               Set gpio number by using pin number\n");
    printf("          -dir [in|out|close]  Set gpio as input, output or close the gpio\n");
    printf("          -val [0|1]           Set gpio output value\n");

  }

}
The command line format is:
./mraa_gpio.run -gpio n -pin n -dir [in|out|close] -val [0|1]
The parameter order is not important and are only as required.
Note you can use pin number instead of gpio. There is a "-help" option, if I forget!
The PHP code:
<!-- Preprocessor -->
<html>
  <body>
    <form action="btnLED.php" method="get">
      <?php
        if (isset($_GET['on'])) {
          echo '<input type="submit" name="on"  value="on"  style="color:red; height:150px; width:300px; font-size:72px">';
        } else {
          echo '<input type="submit" name="on"  value="on"  style="color:blue; height:150px; width:300px; font-size:72px">';
        }
        if (isset($_GET['off'])) {
          echo '<input type="submit" name="off" value="off" style="color:red; height:150px; width:300px; font-size:72px">';
        } else {
          echo '<input type="submit" name="off" value="off" style="color:blue; height:150px; width:300px; font-size:72px">';
        }
        if (isset($_GET['end'])) {
          echo '<input type="submit" name="end" value="end" style="color:red; height:150px; width:300px; font-size:72px">';
        } else {
          echo '<input type="submit" name="end" value="end" style="color:blue; height:150px; width:300px; font-size:72px">';
        }
      ?>
    </form>
  </body>
</html>

<!-- Postprocessor -->
<?php
  $GPIO=44;
  if (isset($_GET['on'])) {
    onFunc();
  } elseif (isset($_GET['off'])) {
    offFunc();
  } elseif (isset($_GET['end'])) {
    endFunc();
  } else {
    startFunc();
  }

  # Functions
  function onFunc() {
    global $GPIO;
    echo "<font size='32' face='Arial'>";
    echo "Turned On GPIO$GPIO<br>";
    // Turn on GPIO
    if ($GPIO==44) {
      exec("./mraa_gpio.run -gpio ".$GPIO." -dir out -val 0");
    } else {
      exec("./mraa_gpio.run -gpio ".$GPIO." -dir out -val 1");
    }
  }
  function offFunc() {
    global $GPIO;
    echo "<font size='32' face='Arial'>";
    echo "Turned Off GPIO$GPIO<br>";
    // Turn off GPIO
    if ($GPIO==44) {
      exec("./mraa_gpio.run -gpio ".$GPIO." -dir out -val 1");
    } else {
      exec("./mraa_gpio.run -gpio ".$GPIO." -dir out -val 0");
    }
  }
  function endFunc() {
    global $GPIO;
    echo "<font size='32' face='Arial'>";
    echo "Close GPIO$GPIO<br>";
    // Remove GPIO
    exec("./mraa_gpio.run -gpio ".$GPIO." -dir close");
  }
  function startFunc() {
    global $GPIO;
    echo "<font size='32' face='Arial'>";
    echo "Ready to use GPIO$GPIO<br>";
  }
?>
Works fine.
AlanX
-
WiFi Server
12/04/2017 at 10:08 • 0 commentsIntroduction
WiFi Server
A WiFi Server is like an IoT (Internet of Things) but it is only connected to your local WiFi network (rather than the Internet). So it can only be controlled by a "client" that is connected to your local WifI network. This in most cases is all you need to play with IoT at home.
Web Server Options
There are many ways to do this but after some research I selected "uhttpd" and "php". I am a beginner here (i.e. I have never used these programs before) so this selection may not be "optimal" (what ever that means!).
"uhttpd" is the default OpenWrt web server and there is not much reason to go for anything better.
PHP is a server-side scripting language designed primarily for web development but also used as a general-purpose programming language. It should be more than sufficient for IoT type applications.
Task
The task is pretty simple. Turn on or off the LED on the LinkIt board.
Set Up
Log on to the LinkIt
You should know by now that you need to use a secure shell in a command window to work on the LinkIt, for example:
ssh root@mylinkit.local
Installation of uhttpd
It should be installed but it does not hurt to do the following:
opkg update
opkg install uhttpd
Install PHP
opkg install php5 php5-cgi php5-cli
The last package (php5-cli) allows you to run PHP scripts from the command line and is optional.
Nano text editor
I don't particularly like the "vi" text editor so I also install "nano":
opkg install nano
Edit the uhttpd configuration file
nano /etc/config/uhttpd
This is what my uhttpd configuration file looks like after being edited:
config uhttpd 'main'
    list listen_http '0.0.0.0:80'
    list listen_http '[::]:80'
    list listen_https '0.0.0.0:443'
    list listen_https '[::]:443'
    option redirect_https '1'
    option home '/www'
    option rfc1918_filter '1'
    option max_requests '3'
    option max_connections '100'
    option cert '/etc/uhttpd.crt'
    option key '/etc/uhttpd.key'
    option cgi_prefix '/cgi-bin'
    option script_timeout '60'
    option network_timeout '30'
    option http_keepalive '20'
    option tcp_keepalive '1'
    option ubus_prefix '/ubus'
    list interpreter ".php=/usr/bin/php-cgi"
    option index_page 'index.php'

config cert 'px5g'
    option days '730'
    option bits '1024'
    option country 'ZZ'
    option state 'Somewhere'
    option location 'Uknown'
    option commonname 'OpenWrt'
I have added:
    list interpreter ".php=/usr/bin/php-cgi"
    option index_page 'index.php'
Next, creating the Web Server Directory with:
mkdir /www/php
Add your "index.php" file to "/www/php", my index file contains:
<?php
  echo "Hello World, this is LinkIt running PHP!"
?>
Now, restart the uhttp server:
/etc/init.d/uhttpd restart
Finally, check the web-page by typing in a web browser:
http://mylinkit.local/php/If it all works then magic!
Controlling the LinkIt WiFi LED
Unlike the Omega2 the LinkIt does not appear to have a "fast_gpio" command line tool. I could write my own code using the "mraa" library but I came across the "sysfs interface for user space" for control of GPIOs. This seems to be ideal for GPIO control for web applications. Basically on the command line you could do something like this:
// Goto the sysfs-gpio directory
cd /sys/class/gpio/

// Create the gpio directory for gpio1
echo 1 > export

// Go into the gpio1 directory
cd gpio1

// Set the pin direction (i.e. in or out)
echo out > direction

// Set gpio1 high (i.e. 1)
echo 1 > value

// Set gpio1 low (i.e. 0)
echo 0 > value

// Done, go up a directory
cd ..

// Remove the gpio directory
echo 1 > unexport
This does work but not for the WiFi LED (i.e. gpio44), it appears as if as soon as you take control of the LED, the WiFi process takes back control. Code written using the "mraa" library would not have this problem.
HTML Code for Controlling GPIO1
Okay, change in task, control of GPIO1.
Here is the PHP code that creates three buttons for:
- Turn on gpio1
- Turn off gpio1
- End using gpio1
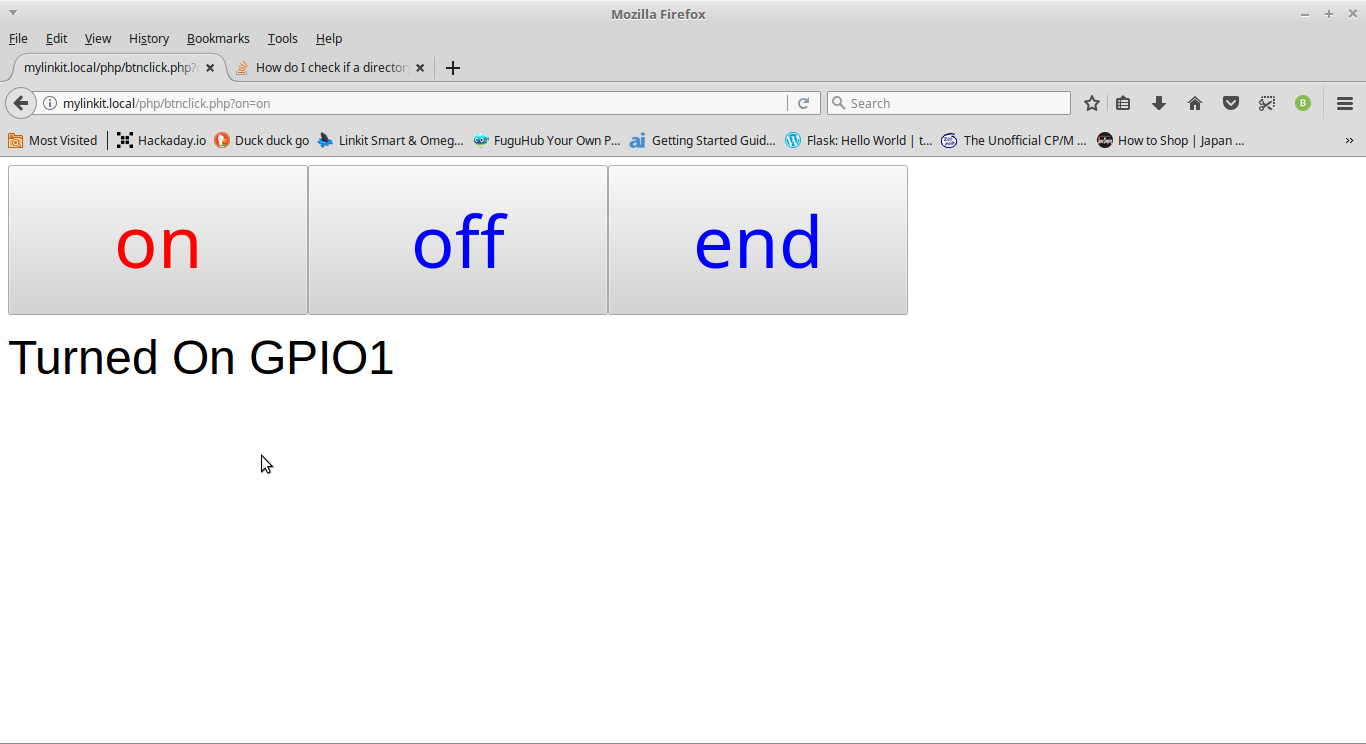
<!-- Preprocessor -->
<html>
  <body>
    <form action="btnclick.php" method="get">
      <?php
        if (isset($_GET['on'])) {
          echo '<input type="submit" name="on"  value="on"  style="color:red; height:150px; width:300px; font-size:72px">';
        } else {
          echo '<input type="submit" name="on"  value="on"  style="color:blue; height:150px; width:300px; font-size:72px">';
        }
        if (isset($_GET['off'])) {
          echo '<input type="submit" name="off" value="off" style="color:red; height:150px; width:300px; font-size:72px">';
        } else {
          echo '<input type="submit" name="off" value="off" style="color:blue; height:150px; width:300px; font-size:72px">';
        }
        if (isset($_GET['end'])) {
          echo '<input type="submit" name="end" value="end" style="color:red; height:150px; width:300px; font-size:72px">';
        } else {
          echo '<input type="submit" name="end" value="end" style="color:blue; height:150px; width:300px; font-size:72px">';
        }
      ?>
    </form>
  </body>
</html>

<!-- Postprocessor -->
<?php
  $GPIO=1;
  if (!file_exists("/sys/class/gpio/gpio".$GPIO)) {
    // Create GPIO as output
    exec('echo '.$GPIO.' > /sys/class/gpio/export');
    exec('echo out > /sys/class/gpio/gpio'.$GPIO.'/direction');
    exec('echo 0 > /sys/class/gpio/gpio'.$GPIO.'/value');
  }
  if (isset($_GET['on'])) {
    onFunc();
  } elseif (isset($_GET['off'])) {
    offFunc();
  } elseif (isset($_GET['end'])) {
    endFunc();
  } else {
    startFunc();
  }

  # Functions
  function onFunc() {
    global $GPIO;
    echo "<font size='32' face='Arial'>";
    echo "Turned On GPIO$GPIO<br>";
    // Turn on GPIO
    exec('echo '.$GPIO.' > /sys/class/gpio/gpio'.$GPIO.'/value');
  }
  function offFunc() {
    global $GPIO;
    echo "<font size='32' face='Arial'>";
    echo "Turned Off GPIO$GPIO<br>";
    // Turn off GPIO
    exec('echo 0 > /sys/class/gpio/gpio'.$GPIO.'/value');
  }
  function endFunc() {
    global $GPIO;
    echo "<font size='32' face='Arial'>";
    echo "Removed GPIO$GPIO<br>";
    // Remove GPIO
    exec('echo 0 > /sys/class/gpio/gpio'.$GPIO.'/value');
    exec('echo in > /sys/class/gpio/gpio'.$GPIO.'/direction');
    exec('echo '.$GPIO.' > /sys/class/gpio/unexport');
  }
  function startFunc() {
    global $GPIO;
    echo "<font size='32' face='Arial'>";
    echo "Ready to use GPIO$GPIO<br>";
  }
?>
And this is what the client sees:
![]()
AlanX
-
Simple Analog Input
11/03/2017 at 02:02 • 0 commentsSimple Analog Input
Simple as in real simple!
I had a look at two I2S or SPI analog chips:
- ADS1115 (16 bit 3.3 ksp)
and
- MCP3008 (10Bit 200ksp)
But I said simple as in real simple!
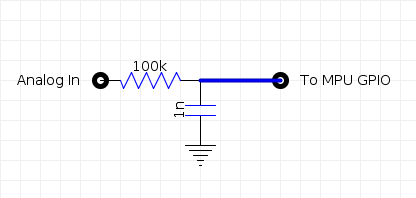
Here is my first design:
![]()
How does that work?
- The GPIO shorts the capacitor to ground (i.e. output low).
- the GPIO turns into an input and times the rising capacitor voltage until it exceeds 1.65 volts (i.e. 50% of 3.3v).
The main limitation is that the input voltage must be more than 1.65 volts.
The rise time of this network is in the order of 30 us to 150 us.
Extending the range down to zero
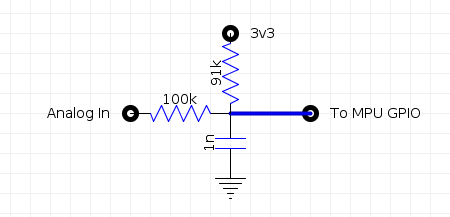
My second design:
![]()
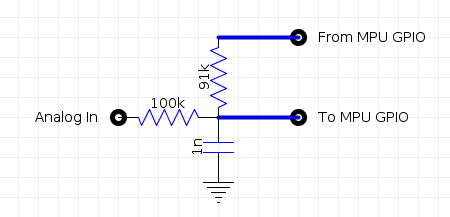
Dual Slope?
If I connect the 91k resistor to another GPIO pin, I can measure the rise and fall times.
This give a more accurate result.
![]()
Lets get serious!
During my Internet search I came across Sigma-Delta ADC:
https://www.parallax.com/sites/default/files/downloads/AN008-SigmaDeltaADC-v1.0.pdf
Here is the design:
![]()
The second 1nF capacitor is to minimise supply voltage noise. The nominal voltage range is -0.825 V to +4.125 volts.
The following web-pages have calculators for the resistor values but some thought is required for the capacitor values or the time constant:
http://www.pulsedpower.net/Applets/Electronics/SigmaDeltaADC/SigmaDelta.html
http://www.pulsedpower.net/Applets/Electronics/SigmaDeltaADC/SigmaDeltab.html
Using with OpenWRT linux
To start I would use a timer running at 4 uS intervals (I not sure how fast signal works!).
This suggests for 8 bits precision (not accuracy!) a sample time of 1024us or a sample rate of 977 Hz.
- The timer interrupt would test the GPIO (in) and set the GPIO (out) the inverted value.
- The clock counter is incremented.
- If GPIO (out) was set high then the value counter is incremented.
- When the clock counter reaches 255, the value counter is exported (as the read value), and then both counters are reset.
Here is my untested code (waiting for me to make up an ADC board):
#include <stdio.h>
#include <string.h>
#include <signal.h>
#include <sys/time.h>
#include <unistd.h>
#include <stdbool.h>
#include <mraa.h>

int running=true;
void sig_handler(int signo)
{
  if (signo==SIGINT) {
    printf("\nClosing down nicely\n");
    running=false;
  }
}

mraa_result_t result=MRAA_SUCCESS;
mraa_gpio_context gpioIn=NULL;
mraa_gpio_context gpioOut=NULL;

// Sigma-Delta ADC
volatile value=0;
void timer_handler (int signum)
{
  static int count=0;
  static int highCount=0;
  static int state=0;

  state=mraa_gpio_read(gpioIn);
  mraa_gpio_write(gpioOut,1-state);
  count++;
  if (state==1) highCount++;
  if (count>255) {
    count=0;
    value=highCount;
    highCount=0;
  }
}

int main(int argc, char** argv)
{
  // Install ^C trap
  signal(SIGINT, sig_handler);

  // Install timer_handler as the signal handler for SIGVTALRM
  struct sigaction sa;
  struct itimerval timer;
  memset(&sa,0,sizeof(sa));
  sa.sa_handler=&timer_handler;
  sigaction(SIGVTALRM,&sa,NULL);

  // Configure the timer to expire after 4us
  timer.it_value.tv_sec=0;
  timer.it_value.tv_usec=4;
  // and every 4us after that
  timer.it_interval.tv_sec=0;
  timer.it_interval.tv_usec=4;
  // Start the virtual timer
  setitimer(ITIMER_VIRTUAL,&timer,NULL);

  // Initialise "mraa"
  mraa_init();

  const char* board_name=mraa_get_platform_name();
  fprintf(stdout,"Welcome to MRAA\n");
  fprintf(stdout,"Version: %s\n",mraa_get_version());
  fprintf(stdout,"Running on %s (^C to exit)\n",board_name);

  // Set up gpios
  gpioIn=mraa_gpio_init(20);
  gpioOut=mraa_gpio_init(21);
  if ((gpioIn==NULL)||(gpioOut==NULL)) {
    fprintf(stdout,"Could not initialise GPIOs\n");
    return(1);
  } else {
    fprintf(stdout,"GPIO20 is input pin\n");
    fprintf(stdout,"GPIO21 is output pin\n");
  }
  mraa_gpio_dir(gpioIn,MRAA_GPIO_IN);
  mraa_gpio_dir(gpioOut,MRAA_GPIO_OUT);


  // The main loop
  while (running) {
    // Assuming 150k input and 100k feedback resistors
    float voltage=(4.950*value/255-0.825);
    fprintf(stdout,"ADC %5.2f\n",voltage);
    usleep(100000); // 100ms
  }


  // Goodbye (after ^C trap)
  mraa_gpio_close(gpioIn);
  mraa_gpio_close(gpioOut);

  return(0);
}
Here is my board design:
![]()
Found a reference to the component selection:Basically:
Feedback Resistor (Rf) 100000 R Capacitor (C) 0.000000001000 F Low Pass Freq (Flp) 1592 Hz Nyquist Freq (Fn) 3183 Hz Clock Freq (Fclk) 250000 Hz Oversampling Ratio (M) 79 SNR 53.4 ENOB 8.6 - calculate the low pass corner frequency (Flp=1/2/Pi/Rf/C)
- calculate the Nyquist frequency (Fn=2*Flp)
- calculate the oversampling ratio (M=Fclk/Fn)
- calculate the Signal Noise Ratio (SNR=30*log(M)-4.31)
- calculate the Effective Number Of Bits (ENOB=(SNR-1.76)/6.02)
If the Flp (>Fbw) and the ENOB are okay, then good.
Board Done
I made up the board but the LinkIt does not like machine sockets.
I will have to replace them with something else, in the mean time a rubber band holds LinkIt in place:
![]()
It does not work at the moment, no surprise.
I wrote some code to check the link between GPIO20 (input) and GPIO21 (output) and it works as expected (including the RC delay).
I checked the timer interrupt code and it only works at the 10 ms scale.
I think I have to look a polling thread?
Fork Instead
Here is some code that uses fork() to start a child process and mmap() to share variables:
#include <unistd.h>
#include <sys/types.h>
#include <sys/mman.h>

#include <stdio.h>
#include <stdlib.h>
#include <stdbool.h>

int main(void)
{
  pid_t childPID;

  /* Parent creates mapped region prior to calling fork() */
  int *addr;              // Pointer to shared memory region
  addr=mmap(NULL,sizeof(int),PROT_READ|PROT_WRITE,MAP_SHARED|MAP_ANONYMOUS,-1,0);
  *addr=0;                // Initialize integer in mapped region
  bool *test;             // Pointer to shared memory region
  test=mmap(NULL,sizeof(bool),PROT_READ|PROT_WRITE,MAP_SHARED|MAP_ANONYMOUS,-1,0);
  *test=true;             // Initialize bool in mapped region

  childPID=fork();
  if (childPID>=0) {
    // fork was successful
    if (childPID == 0) {
      // Timer
      while (true) {
        usleep(1000);
        (*addr)++;
        if ((*addr)%1000==0) *test=true;
      }
    } else {
      //Parent process
      while (true) {
        if (*test) {
          if ((*addr)%1000==0) {
            printf("Test %d\n",*addr);
          }
          *test=false;
        }
      }
    }
  } else {
    // fork failed
    printf("\n Fork failed, quitting!!!!!!\n");
    return(1);
  }
  munmap(addr,sizeof(int));

  return(0);
}
How fast will it go? I suspect context switching time will be in the order of 10 to 100 us. Too slow to work here!
Perhaps I am looking for a "magic bullet" where there is none? The answer may be to use a SPI and a ADC chip or board.Blink Without Delay
I was trying to avoid this approach but it works. I suppose getting it working first and then making it tidy is an option. The following code increments the counter every 4us and after 250,000 iterations prints out the elapsed time. Time slip is allowed:
#include <stdlib.h>
#include <stdio.h>
#include <stdbool.h>

int main(void)
{
  double elapsedTime;
  struct timespec timer_start,timer_end;

  bool timeout_flag=false;
  unsigned long timeout_nsecs=4000;

  struct timespec ts_start,ts_end;
  signed long duration_nsecs;
  unsigned long cnt=0;

  // start timer
  clock_gettime(CLOCK_MONOTONIC, &timer_start);
  clock_gettime(CLOCK_MONOTONIC,&ts_start);
  while (true) {

    clock_gettime(CLOCK_MONOTONIC,&ts_end);
    duration_nsecs=ts_end.tv_nsec-ts_start.tv_nsec;
    if (duration_nsecs<0) duration_nsecs+=1000000000;
    if (duration_nsecs>=timeout_nsecs) {
      timeout_flag=true;
      ts_start.tv_nsec=ts_end.tv_nsec;
    }

    if (timeout_flag) {
      timeout_flag=false;
      cnt++;
      if (cnt%250000==0) {
        // stop timer
        clock_gettime(CLOCK_MONOTONIC, &timer_end);
        // compute and print the elapsed time in millisec
        elapsedTime=(timer_end.tv_sec-timer_start.tv_sec)*1000.0;         // sec to ms
        elapsedTime+=(timer_end.tv_nsec-timer_start.tv_nsec)/1000000.0;   // nsec to ms
        printf("Elapsed time %lf ms\n",elapsedTime);
        // restart timer
        clock_gettime(CLOCK_MONOTONIC, &timer_start);
      }
      sched_yield();
    }

  }

  return(0);
}
I am getting an elapsed time of about 1096 ms which means I am missing 1 in 10 ticks due to task switching. The sched_yield() helps a bit.
This version catches up on missed ticks:
#include <stdlib.h>
#include <stdio.h>
#include <stdbool.h>

int main(void)
{
  double elapsedTime;
  struct timespec timer_start,timer_end;

  bool timeout_flag=false;
  unsigned long timeout_nsec=10000;

  struct timespec ts_start,ts_end;
  unsigned long duration_nsec;
  unsigned long cnt=0;

  // start timer
  clock_gettime(CLOCK_MONOTONIC, &timer_start);
  clock_gettime(CLOCK_MONOTONIC,&ts_start);
  while (true) {

    clock_gettime(CLOCK_MONOTONIC,&ts_end);
    if (ts_end.tv_sec==ts_start.tv_sec) {
      duration_nsec=ts_end.tv_nsec-ts_start.tv_nsec;
    } else {
      duration_nsec=1000000000+ts_end.tv_nsec-ts_start.tv_nsec;
    }
    if (duration_nsec>=timeout_nsec) {
      timeout_flag=true;
      // ts_start.tv_sec=ts_end.tv_sec;
      // ts_start.tv_nsec=ts_end.tv_nsec;
      ts_start.tv_nsec+=timeout_nsec;
      if (ts_start.tv_nsec>=1000000000) {
        ts_start.tv_nsec-=1000000000;
        ts_start.tv_sec++;
      }
    }

    if (timeout_flag) {
      timeout_flag=false;
      cnt++;
      if (cnt%100000==0) {
        // stop timer
        clock_gettime(CLOCK_MONOTONIC, &timer_end);
        // compute and print the elapsed time in millisec
        elapsedTime=(timer_end.tv_sec-timer_start.tv_sec)*1000.0;         // sec to ms
        elapsedTime+=(timer_end.tv_nsec-timer_start.tv_nsec)/1000000.0;   // nsec to ms
        printf("Elapsed time %lf ms\n",elapsedTime);
        // restart timer
        clock_gettime(CLOCK_MONOTONIC, &timer_start);
      }
      // sched_yield();
    }

  }

  return(0);
}
I tried using usleep() to slow down any missed ticks but usleep() does not work too well at the 1 us scale. There are other ways of achieving this (later). Next is to add MRAA code and perhaps (later) pushing the code into a thread. Anyway, here is the basic code:
#include <stdio.h>
#include <string.h>
#include <signal.h>
#include <sys/time.h>
#include <unistd.h>
#include <stdbool.h>
#include <mraa.h>

bool running=true;
void sig_handler(int signo)
{
  if (signo==SIGINT) {
    printf("\nClosing down nicely\n");
    running=false;
  }
}

mraa_result_t result=MRAA_SUCCESS;
mraa_gpio_context gpioIn=NULL;
mraa_gpio_context gpioOut=NULL;


int main(int argc, char** argv)
{
  // Install ^C trap
  signal(SIGINT, sig_handler);

  // Initialise "mraa"
  mraa_init();

  const char* board_name=mraa_get_platform_name();
  fprintf(stdout,"Welcome to MRAA\n");
  fprintf(stdout,"Version: %s\n",mraa_get_version());
  fprintf(stdout,"Running on %s (^C to exit)\n",board_name);

  // Set up gpios
  gpioIn=mraa_gpio_init(20);
  gpioOut=mraa_gpio_init(21);
  if ((gpioIn==NULL)||(gpioOut==NULL)) {
    fprintf(stdout,"Could not initialise GPIOs\n");
    return(1);
  } else {
    fprintf(stdout,"GPIO20 is input pin\n");
    fprintf(stdout,"GPIO21 is output pin\n");
  }
  mraa_gpio_dir(gpioIn,MRAA_GPIO_IN);
  mraa_gpio_dir(gpioOut,MRAA_GPIO_OUT);


  /* The main loop */
  int value=0;
  unsigned int count=0;
  unsigned int highCount=0;
  unsigned int state=0;

  // Timer
  struct timespec ts_start,ts_end;
  unsigned long duration_nsec;
  unsigned long timeout_nsec=4000;
  bool timeout_flag=false;

  // start timer
  clock_gettime(CLOCK_MONOTONIC,&ts_start);
  while (running) {

    clock_gettime(CLOCK_MONOTONIC,&ts_end);
    if (ts_end.tv_sec==ts_start.tv_sec) {
      duration_nsec=ts_end.tv_nsec-ts_start.tv_nsec;
    } else {
      duration_nsec=1000000000+ts_end.tv_nsec-ts_start.tv_nsec;
    }
    if (duration_nsec>=timeout_nsec) {
      timeout_flag=true;
      // ts_start.tv_sec=ts_end.tv_sec;
      // ts_start.tv_nsec=ts_end.tv_nsec;
      ts_start.tv_nsec+=timeout_nsec;
      if (ts_start.tv_nsec>=1000000000) {
        ts_start.tv_nsec-=1000000000;
        ts_start.tv_sec++;
      }
    }

    if (timeout_flag) {
      timeout_flag=false;
      // Sigma-Delta ADC
      state=mraa_gpio_read(gpioIn);
      if (state==1) highCount++;
      mraa_gpio_write(gpioOut,1-state);
      count++;
      if (count>255) {
        count=0;
        value=(value+highCount)>>1;
        highCount=0;
      }
    }

  }


  // Goodbye (after ^C trap)
  mraa_gpio_close(gpioIn);
  mraa_gpio_close(gpioOut);

  // Print the read value
  printf("Average value %d\n",value);
  printf("Average voltage %6.3f\n",4.95*value/255-0.825);


  return(0);
}
With the analog in grounded I got:
root@mylinkit:~/Code# ./mraa_ADC.run
Welcome to MRAA
Version: v0.8.0
Running on LinkIt Smart 7688 (^C to exit)
GPIO20 is input pin
GPIO21 is output pin
^C
Closing down nicely
Average value 37
Average voltage -0.107---
With the analog in at 3.3v I got:
root@mylinkit:~/Code# ./mraa_ADC.run
Welcome to MRAA
Version: v0.8.0
Running on LinkIt Smart 7688 (^C to exit)
GPIO20 is input pin
GPIO21 is output pin
^C
Closing down nicely
Average value 122
Average voltage 1.543---
Which is wrong but at least it is going in the right direction.
---
Okay, the problem was the rubber band fix!
The 3v3 pin was not making contract.
On the oscilloscope the duty cycle was not even so I need to balance the code.
---
With no code edits here is analog in grounded:
root@mylinkit:~/Code# ./mraa_ADC.run
Welcome to MRAA
Version: v0.8.0
Running on LinkIt Smart 7688 (^C to exit)
GPIO20 is input pin
GPIO21 is output pin
^C
Closing down nicely
Average value 36
Average voltage -0.126---
With the analog in at 3.27 volts:
root@mylinkit:~/Code# ./mraa_ADC.run
Welcome to MRAA
Version: v0.8.0
Running on LinkIt Smart 7688 (^C to exit)
GPIO20 is input pin
GPIO21 is output pin
^C
Closing down nicely
Average value 202
Average voltage 3.096---
With the analog in at 4.94 volts:
root@mylinkit:~/Code# ./mraa_ADC.run
Welcome to MRAA
Version: v0.8.0
Running on LinkIt Smart 7688 (^C to exit)
GPIO20 is input pin
GPIO21 is output pin
^C
Closing down nicely
Average value 255
Average voltage 4.125(i.e. maximum value)
---
With the analog in floating:
root@mylinkit:~/Code# ./mraa_ADC.run
Welcome to MRAA
Version: v0.8.0
Running on LinkIt Smart 7688 (^C to exit)
GPIO20 is input pin
GPIO21 is output pin
^C
Closing down nicely
Average value 121
Average voltage 1.524
root@mylinkit:~/Code#---
So other than some tweaks, it works!
---
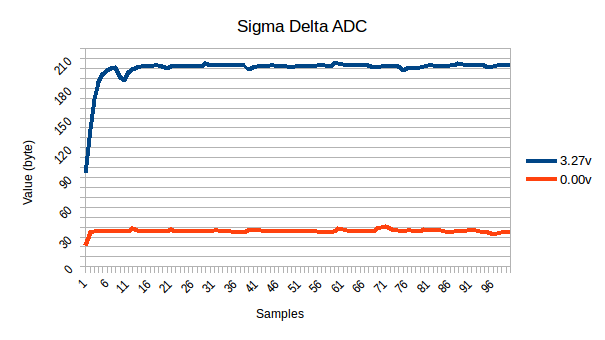
Calibrated the ADC with:
- voltage=(value-36)/50.4
Here is a plot of the (raw) data for 0v (value=36) and 3v29 (value=201):
![]()
Not the noise (due to task switching).
Here is is smoothed (as per the code above):
![]()
---
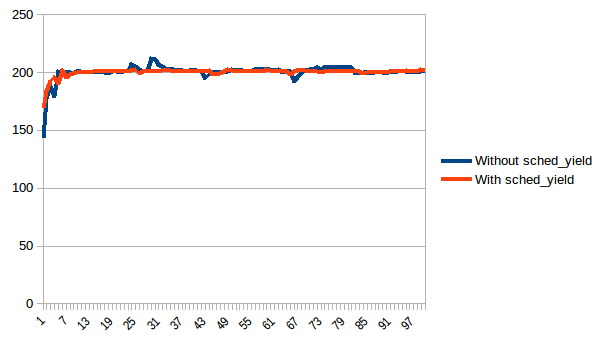
Reworked the code to read samples twice as fast (1.95 ksps) and minimised context switches with "sched_yield()" here are the (smoothed) results:
![]()
This looks to be as good as it gets.
AlanX
-
Elapsed Time
11/02/2017 at 10:29 • 0 commentsElapsed Time
There is a need for measuring elapsed time. This code seems to work well:
#include <stdlib.h>
#include <stdio.h>
#include <sys/time.h>
#include <mraa.h>

int main(void) {
  double elapsedTime;

  struct timespec ts_start;
  struct timespec ts_end;

  // start timer
  clock_gettime(CLOCK_MONOTONIC, &ts_start);

  // do something
  usleep(1000000);

  // stop timer
  clock_gettime(CLOCK_MONOTONIC, &ts_end);

  // compute and print the elapsed time in millisec
  elapsedTime=(ts_end.tv_sec-ts_start.tv_sec)*1000.0;         // sec to ms
  elapsedTime+=(ts_end.tv_nsec-ts_start.tv_nsec)/1000000.0;   // nsec to ms
  printf("Elapsed time %lf ms\n",elapsedTime);

  // start timer
  clock_gettime(CLOCK_MONOTONIC, &ts_start);
  // stop timer
  clock_gettime(CLOCK_MONOTONIC, &ts_end);

  // compute and print the elapsed time in millisec
  elapsedTime=(ts_end.tv_sec-ts_start.tv_sec)*1000.0;         // sec to ms
  elapsedTime+=(ts_end.tv_nsec-ts_start.tv_nsec)/1000000.0;   // nsec to ms
  printf("Elapsed time adjustment %lf ms\n",elapsedTime);


  return 0;
}
It is pretty consistent:
root@mylinkit:~/Code# ./elapsedTime.run
Elapsed time 1000.084598 ms
Elapsed time adjustment 0.001242 ms
root@mylinkit:~/Code# ./elapsedTime.run
Elapsed time 1000.079080 ms
Elapsed time adjustment 0.001376 ms
root@mylinkit:~/Code# ./elapsedTime.run
Elapsed time 1000.083097 ms
Elapsed time adjustment 0.001431 ms
root@mylinkit:~/Code# ./elapsedTime.run
Elapsed time 1000.081609 ms
Elapsed time adjustment 0.001255 ms
root@mylinkit:~/Code# ./elapsedTime.run
Elapsed time 1000.079716 ms
Elapsed time adjustment 0.001248 ms
root@mylinkit:~/Code# ./elapsedTime.run
Elapsed time 1000.080426 ms
Elapsed time adjustment 0.001445 msThe "elsaped time adjustment (~1.33 uS) is the time it takes to do the measurement.
The "usleep()" function is off about 81 us (over 1000000 uS) which seem consistent with the definition that:
- " The usleep() function suspends execution of the calling thread for (at least) usec microseconds. The sleep may be lengthened slightly by any
system activity or by the time spent processing the call or by the granularity of system timers."
So all good!
AlanX
- " The usleep() function suspends execution of the calling thread for (at least) usec microseconds. The sleep may be lengthened slightly by any
-
Analog IO
10/30/2017 at 03:06 • 0 commentsAnalog IO
I was wondering what the conversion speed and other specifications for the LinkIt were?
I came across this webpage (for the Intel Edison Galileo):
https://navinbhaskar.wordpress.com/2016/04/25/cc-on-intel-edisongalileo-part4adc/
It had an example of reading a potentiometer (i.e. a variable resistor) that controlled (i.e. PWM) the brightness of an LED.
The page reinforced the idea of properly shutting down the program. Okay, I get the message.
I was a bit surprised it compiled because of the problem with mraa_hello of "common.h" not being referenced in "mraa.h" but then I remembered that if you call any other set of functions they contain "common.h".
I don't understand the "(arg);" in the signal handler, it seems like some "compiler trick":
// Signal handler used to stop this application cleanly
void handler(int arg) {
  (arg);
  keepRunning = 0;
}
But otherwise the code is straight forward.
I was also a little surprised that "usleep(500);" did not ask for the "unistd.h" header.
But after I checked the "mraa" function headers I found:
- #include <stdio.h>
- #include <unistd.h>
- #include <stdint.h>
So problem solved, and now I understand the difference between <*.h> and "*.h", the first version reads any additional include files in the include file while the second version does not.
Here is my slightly edited version:
#include <stdio.h>
#include <stdint.h>
#include <mraa.h>
#include <signal.h>
#include <unistd.h>

#define PWM_PIN      5                 // The pin where the LED is connected
#define ADC_PIN      0                 // The ADC pin
#define ADC_MAX   (1024.0)             // Maximum value output by a 10-bit ADC

volatile int keepRunning;

// Signal handler used to stop this application cleanly
void handler(int arg) {
  (arg);
  keepRunning = 0;
}


int main(void) {
  mraa_pwm_context       pwmPin;     // The PWM pin context
  mraa_aio_context       adcPin;     // ADC pin context

  float                  intensity;  // Intensity with which LED is to glow
  float                  adcValue;   // Read ADC value

  // Step 1: Intialize the mraa system
  mraa_init();

  // Step 2: Initalize analog port 0 for ADC operation
  adcPin = mraa_aio_init(ADC_PIN);

  // Step 3: Initialize D5 for PWM operation
  pwmPin = mraa_pwm_init(PWM_PIN);

  // Step 4: Set the period on the PWM pin
  mraa_pwm_period_us(pwmPin, 5000);  // Set the period as 5000 us or 5ms

  /* Step 5: Enable the PWM pulse on the pin
  mraa_pwm_enable(pwmPin, 1);

  keepRunning = 1;

  /*
   * Associate ctrl+c with our handler that clears the 'keepRunning'
   * flag that allows us to stop the PWM and ADC when exiting
   */
  signal(SIGINT, handler);

  while (keepRunning) {
    // Step 6: Read the ADC value using the function 'mraa_aio_read()'
    adcValue = mraa_aio_read(adcPin);
    intensity = adcValue/ADC_MAX;

    // Step7: Set the intensity of the LED at port D5 using PWM
    mraa_pwm_write(pwmPin, intensity);

    usleep(500);
  }

  // Step 8: Stop the PWM and ADC when not required
  mraa_pwm_enable(pwmPin, 0);
  mraa_aio_close(adcPin);

  return 0;
}
Now if I read it correctly:
- "PWM_PIN 5" is GPIO5 and maps to Pin20 on the LinkIt.
- "ADC_PIN 0" is GPIO0 and maps to Pin12 on the LinkIt.
I am not sure what the ARef (the analog reference voltage) is, I am going to guess it is 3.3v rather than 5v, as the CPU is running at 3.3v.
I still don't know what the conversion speed is? I could measure it as it will likely be a blocking function.
Okay, now I know why I can not find anything on ADC for the LinkIt Smart MT7688, it does not have ADC! The LinkIt Smart MT7688 Duo has ADC however but still the key specifications are missing.
So if I want ADC I will have to use an external card.
AlanX
-
How Fast?
10/29/2017 at 07:39 • 0 commentsHow fast is the LinkIt?
The answer is 312 ns +/- 5 ns or about 3.2 MHz. I coded this simple toggle program:
#include <stdio.h>
#include <string.h>
#include "mraa/gpio.h"
#include "mraa/common.h"
#include <stdbool.h>

int main(int argc, char** argv)
{
  mraa_gpio_context gpio = NULL;
  const char* board_name = mraa_get_platform_name();
  int pinstate = 0;

  gpio = mraa_gpio_init(0);
  fprintf(stdout, "Welcome to libmraa\n  Version: %s\n  Running on %s (Ctrl+C to exit)\n", mraa_get_version(), board_name);

  if (gpio == NULL) {
    fprintf(stdout, "Could not initilaize gpio\n");
    return 1;
  }
  mraa_gpio_dir(gpio, MRAA_GPIO_OUT);

  pinstate = 0;
  while (true) {
    mraa_gpio_write(gpio, pinstate);
    pinstate = !pinstate;
  }

  return 0;
}
By comparison using the PINX command for an Arduino (Nano) was 375 ns +/-33ns:
void setup() {
  // initialize the digital pin as an output.
  pinMode(2, OUTPUT);
}

void loop() {
  while (true) {
    PIND=B00000100;
  }
}
Not using PINX, it is still 375 ns but the duty cycle is about 33%:
void setup() {
  // initialize the digital pin as an output.
  pinMode(2, OUTPUT);
}

void loop() {
  while (true) {
    PORTD|=B00000100;
    PORTD&=B11111011;
  }
}
If your wondering what straight Arduino code would look like (i.e. less the direct port manipulations):
void setup() {
  // initialize the digital pin as an output.
  pinMode(2, OUTPUT);
}

int state=0;
void loop() {
  while(true) {
    digitalWrite(2,state);
    state=!state;
  }
}
But now it takes 11.12 us!
Now there is upside for the LinkIt with direct port manipulations as well but this is a project for another day!
AlanX
-
The Timer
10/29/2017 at 02:49 • 0 commentsThe Timer
The MT7688 has a timer but I cannot find documentation how to access it (even if that is appropriate). So I have written a simple timer (uTime.c) using <signal.h> and <sys/time.h>:
#include <signal.h>
#include <stdio.h>
#include <string.h>
#include <sys/time.h>

void timer_handler (int signum) {
  static int count = 0;
  printf ("timer expired %d times\n", ++count);
}

int main () {
  struct sigaction sa;
  struct itimerval timer;

  // Install timer_handler as the signal handler for SIGVTALRM
  memset(&sa, 0, sizeof(sa));
  sa.sa_handler = &timer_handler;
  sigaction (SIGVTALRM, &sa, NULL);

  // Configure the timer to expire after 1 second
  timer.it_value.tv_sec = 1;
  timer.it_value.tv_usec = 0;
  // and every 1 second after that
  timer.it_interval.tv_sec = 1;
  timer.it_interval.tv_usec = 0;
  // Start a virtual timer
  //   It counts down whenever this process is executing
  setitimer (ITIMER_VIRTUAL, &timer, NULL);

  // Do something that can be interrupted
  while (1);
 }
The code should be good for microsecond timing but I have not tested it.
Example Run
alanx@alanx ~/LinkIt-cc/uTimer $ make
/home/alanx/LinkIt-cc/toolchain-mipsel_24kec+dsp_gcc-4.8-linaro_uClibc-0.9.33.2/bin/mipsel-openwrt-linux-uclibc-gcc -I. -I/home/alanx/LinkIt-cc/toolchain-mipsel_24kec+dsp_gcc-4.8-linaro_uClibc-0.9.33.2/usr/include -I/home/alanx/LinkIt-cc/toolchain-mipsel_24kec+dsp_gcc-4.8-linaro_uClibc-0.9.33.2/include -o uTimer.run uTimer.c -L. -L/home/alanx/LinkIt-cc/toolchain-mipsel_24kec+dsp_gcc-4.8-linaro_uClibc-0.9.33.2/usr/lib -L/home/alanx/LinkIt-cc/toolchain-mipsel_24kec+dsp_gcc-4.8-linaro_uClibc-0.9.33.2/lib -lmraa -pthread -ldl
alanx@alanx ~/LinkIt-cc/uTimer $ ls -lah
total 28K
drwxrwxr-x 2 alanx alanx 4.0K Oct 29 09:53 .
drwxr-xr-x 8 alanx alanx 4.0K Oct 29 09:02 ..
-rw-rw-r-- 1 alanx alanx 829 Oct 29 09:03 Makefile
-rw-rw-r-- 1 alanx alanx 295 Oct 29 09:11 uTimer01.c
-rw-rw-r-- 1 alanx alanx 972 Oct 29 09:49 uTimer.c
-rwxrwxr-x 1 alanx alanx 7.4K Oct 29 09:53 uTimer.runalanx@alanx ~/LinkIt-cc/uTimer $ scp uTimer.run root@mylinkit.local:~/Code/uTimer
root@mylinkit.local's password:uTimer.run 100% 7534 7.4KB/s 00:00
alanx@alanx ~/LinkIt-cc/uTimer $ ssh root@mylinkit.local
root@mylinkit.local's password:BusyBox v1.23.2 (2015-11-18 16:34:33 CET) built-in shell (ash)
_______ ________ __
| |.-----.-----.-----.| | | |.----.| |_
| - || _ | -__| || | | || _|| _|
|_______|| __|_____|__|__||________||__| |____|
|__| W I R E L E S S F R E E D O M
-----------------------------------------------------
CHAOS CALMER (15.05+linkit, r47501)
-----------------------------------------------------
* 1 1/2 oz Gin Shake with a glassful
* 1/4 oz Triple Sec of broken ice and pour
* 3/4 oz Lime Juice unstrained into a goblet.
* 1 1/2 oz Orange Juice
* 1 tsp. Grenadine Syrup
-----------------------------------------------------root@mylinkit:~# cd Code/uTimer
root@mylinkit:~/Code/uTimer# ls -lah
drwxr-xr-x 2 root root 4.0K Oct 29 01:54 .
drwxr-xr-x 6 root root 4.0K Oct 29 01:52 ..
-rwxr-xr-x 1 root root 7.4K Oct 29 01:54 uTimer.runroot@mylinkit:~/Code/uTimer# ./uTimer.run
timer expired 1 times
timer expired 2 times
timer expired 3 times
timer expired 4 times
timer expired 5 times
timer expired 6 times
timer expired 7 times
^Croot@mylinkit:~/Code/uTimer# exit
Connection to mylinkit.local closed.
alanx@alanx ~/LinkIt-cc/uTimer $
AlanX
-
Access to the GPIOs
10/29/2017 at 02:29 • 0 commentsAccess to the GPIOs
The MRAA library is a low level skeleton for "communication" on linux devices. It can be found here:
https://iotdk.intel.com/docs/master/mraa/
That is, "communication" as in GPIO, SPI, I2C, AIO (i.e. analog IO), PWM and UART (i.e. serial. Look there for examples and the "API" documentation.
Note that the "Mraa Hello" example on the home page does not compile as the functions are found in common.h and not mraa.h. You need to '#include "mraa/common.h"' in the source code! Here is my version:
#include "mraa.h"
#include "mraa/common.h"
int main(int argc, char** argv)
{
    const char* board_name = mraa_get_platform_name();
    fprintf(stdout, "hello mraa\n Version: %s\n Running on %s\n", mraa_get_version(), board_name);
    mraa_deinit();
    return MRAA_SUCCESS;
}
Getting the pre-compiled library for the cross-compiler
The mraa library and include files are not in the toolchain but they are in the SDK. Look in:
- OpenWrt-SDK-ramips-mt7688_gcc-4.8-linaro_uClibc-0.9.33.2.Linux-x86_64/staging_dir/target-mipsel_24kec+dsp_uClibc-0.9.33.2/usr/lib
and
- OpenWrt-SDK-ramips-mt7688_gcc-4.8-linaro_uClibc-0.9.33.2.Linux-x86_64/staging_dir/target-mipsel_24kec+dsp_uClibc-0.9.33.2/usr/include
The libraries are:
- libmraa.so
- libmraa.so.0
- libmraa.so.0.8.0
Note that libmraa.so and libmraa.so.0 are symbolic links to libmraa.so.0.8.0 .
The includes are:
- mraa.h
- mraa/aio.h
- mraa/common.h
- mraa/gpio.h
- mraa/i2c.h
- mraa/pwm.h
- mraa/spi.h
- mraa/types.h
- mraa/uart.h
I have added an archive to the files download area of this project for the mraa library for your convenience.
An Example Run (Mraa hello)
alanx@alanx ~/LinkIt-cc/mraa_hello $ make
/home/alanx/LinkIt-cc/toolchain-mipsel_24kec+dsp_gcc-4.8-linaro_uClibc-0.9.33.2/bin/mipsel-openwrt-linux-uclibc-gcc -I. -I /home/alanx/LinkIt-cc/toolchain-mipsel_24kec+dsp_gcc-4.8-linaro_uClibc-0.9.33.2/usr/include -I /home/alanx/LinkIt-cc/toolchain-mipsel_24kec+dsp_gcc-4.8-linaro_uClibc-0.9.33.2/include -o mraa_hello.run mraa_hello.c -L. -L/home/alanx/LinkIt-cc/toolchain-mipsel_24kec+dsp_gcc-4.8-linaro_uClibc-0.9.33.2/usr/lib -L/home/alanx/LinkIt-cc/toolchain-mipsel_24kec+dsp_gcc-4.8-linaro_uClibc-0.9.33.2/lib -lmraa -pthread -ldl
alanx@alanx ~/LinkIt-cc/mraa_hello $ scp mraa_hello.run root@mylinkit.local:~/Code/mraa_helloroot@mylinkit.local's password:
mraa_hello.run 100% 7562 7.4KB/s 00:00
alanx@alanx ~/LinkIt-cc/mraa_hello $ ssh root@mylinkit.local
root@mylinkit.local's password:BusyBox v1.23.2 (2015-11-18 16:34:33 CET) built-in shell (ash)
_______ ________ __
| |.-----.-----.-----.| | | |.----.| |_
| - || _ | -__| || | | || _|| _|
|_______|| __|_____|__|__||________||__| |____|
|__| W I R E L E S S F R E E D O M
-----------------------------------------------------
CHAOS CALMER (15.05+linkit, r47501)
-----------------------------------------------------
* 1 1/2 oz Gin Shake with a glassful
* 1/4 oz Triple Sec of broken ice and pour
* 3/4 oz Lime Juice unstrained into a goblet.
* 1 1/2 oz Orange Juice
* 1 tsp. Grenadine Syrup
-----------------------------------------------------
root@mylinkit:~# cd Code/mraa_helloroot@mylinkit:~/Code/mraa_hello# ls -lah
drwxr-xr-x 2 root root 4.0K Oct 27 12:10 .
drwxr-xr-x 6 root root 4.0K Oct 29 01:52 ..
-rwxr-xr-x 1 root root 7.4K Oct 29 02:56 mraa_hello.runroot@mylinkit:~/Code/mraa_hello# ./mraa_hello.run
hello mraa
Version: v0.8.0
Running on LinkIt Smart 7688root@mylinkit:~/Code/mraa_hello# exit
Connection to mylinkit.local closed.
alanx@alanx ~/LinkIt-cc/mraa_hello $
AlanX
Setting up the LinkIt C cross-compiler
Are you a "dyed in the wool" C programmer. Love your Arduino but want something more powerful. The LinkIt Smart MT7688 board may for you!