 4D Makers
-
1Setup the Display
The widgets on the gen4 Display were created using the ViSi-Genie environment in Workshop4. ViSi-Genie is an environment that allows users to create GUIs (Graphical User Interface) by drag-and-drop method. The ViSi-Genie project file for this demo can be found inside the attached zip file
-
2Download and Install Workshop4
- To get started, download and install the Worskhop4 IDE from the 4D Systems website, then open the attached project.
- Extract the attached zip file to a folder then open the ViSi-Genie project “demo1”, as shown below.
![]()
- Download the project here.
- You can edit the widgets in each form by using the Object Inspector.
![]()
-
3Check the Project Settings
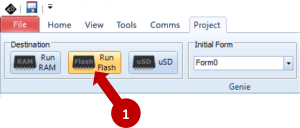
- After opening the project file, go to the Project menu and make sure that the Comms Speed and Display parameters are correct as shown below.
![]()
![]()
Connect gen4-uLCD-35DT to the PC
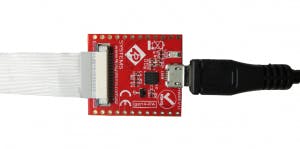
- Use gen4-interface board and uUSB PA-5 to connect the display to the PC as shown in the image below.
![]()
- Or if you have gen4-PA board, connect the display to the PC as shown in the image below. You can also use the gen4-PA board if you want to use its GPIO pins.
![]()
- Now go to the Comms Menu and select the correct COM port for the uUSB-PA5, then click on the red button, as shown below.
- If the gen4 Display is properly connected to the PC, the red button should now turn blue and the name of the display module should be displayed, as shown below.
-
4Load the Program to gen4-uLCD-35DT
- At this point, mount the uSD card to the PC using a uSD card reader or adaptor. Go to the Home menu and click on the (Build) Copy/Load button, as shown below.
- The project should now start the build and compile process.
- Worshop4 will prompt for the correct drive for the uSD card. Select the appropriate drive from the drop-down menu.
- Workshop4 will then compile the source code and download the program to the flash memory of the display module
-
5Test the Visi-Genie Program
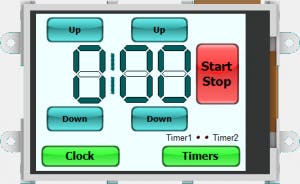
- Now unmount the uSD card from the PC and mount it to the uSD card slot of the gen4-uLCD-35DT. Winbutton widget should now appear on the display. It is now ready to receive commands from a host.
![]()
Download the ViSi-Genie-RaspPi Library
- The Raspberry Pi must now run a program which will communicate with the uLCD-220RD. The source code for the program is attached. To be able to compile the source code on the Raspberry Pi, you need to install first the ViSi-Genie-RaspPi-Library, which can be downloaded from this link:
https://github.com/4dsystems/ViSi-Genie-RaspPi-Library
- Follow the instructions on how to install the library on that link.
-
6Connect the Raspberry Pi to the uLCD-220RD
- Connect the 4D-Serial-Pi Adaptor to the Raspberry Pi, then connect the 5-way cable to the 4D-Serial-Pi Adaptor. Lastly, connect the other end of the 5-way cable to the gen4-IB of the gen4 module.
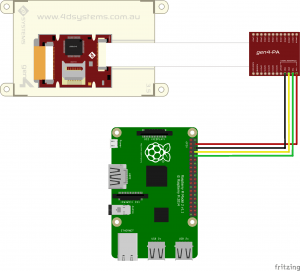
- Or you can interface gen4 module and Raspberry Pi with the gen4-PA using the image below.
![]()
-
7Setup the Raspberry Pi Host
- After installing the library and connecting the hardware, you can now compile the source code and run the program on the Raspberry Pi. Follow the procedure below.
- After Downloading the file, open the terminal and go to the folder which contains this file: Kitchen-Timer-Code
- Unzip the file using this command:
pi@raspberry: ~ $ sudo unzip Kitchen-Timer-Code.zip- Navigate to the folder where the contents of “Kitchen-Timer-Code.zip” were extracted to.
pi@raspberry: ~ $ cd Kitchen-Timer-Codepi@raspberry: ~ $ cd kitchenPi- In LX Terminal type the command to compile :
pi@raspberry: ~$ sudo make- Run the program using this command:
pi@raspberry: ~$ ./kitchenPi
Kitchen Timer
A Project using Raspberry Pi acts as a host which controls the gen4-uLCD-35DT.


Discussions
Become a Hackaday.io Member
Create an account to leave a comment. Already have an account? Log In.