Close
0%
0%

PWM examples with multiple architectures

This is the cheat sheet for the Embedded Hardware Workshop

Similar projects worth following
I'm going to store sample code here for driving servo motors in case the workshop attendees at Hackaday Munich just can't get it to work ;-)

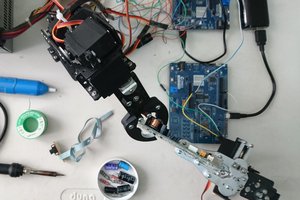
Both of the robot bodies we will provide for the Roboto workshop use servo motors. That means the first task you have in front of you is to set up the PWM with the proper timing for driving servo motors.

My advice is to first use PWM to dim an LED on the board you have chosen. This gives immediate feedback that you have things working.

From there you must implement the following timing:

  • Period of exactly 20ms
  • Pulse Widths (the time the pin is high):
    • 1ms moves the servo to its limit in one direction
    • 2ms moves the servo to its limit in the other direction
    • 1.5ms centers the servo motor

In the case of the wheeled robs the 1 and 2 ms widths will move the motors forward or back while the 1.5ms timing will stop the movement.

In the case of the MeARM the settings between 1 and 2ms will position the arm. I suggest writing a function wrapper that can divide up the with into increments of 180 (for positioning in degrees). Moving 1 degree every 15ms results in fairly reliably motion for me.

  • Reading from a US-100 Ultrasonic Sensor

    Mike Szczys11/09/2014 at 19:03 0 comments

    Reading the US-100 ultrasonic distance sensor is easy:

    • Make sure the jumper is not in place
    • Power from 3.3V or 5V to match your logic levels
    • Pull trigger pin high for 10uS then low
    • Watch echo pin to go high, measure time before it goes low. This correlates to distance
    It would be better to use a hardware timer but this does work. This code example is for the Tiva C Launchpad board.
    /*################################################
    # Reading US-100 Ultrasonic Sensor using
    # the Tiva C Launchpad
    #
    #
    # This example reads from a US-100 ultrasonic sensor
    # * Jumper should not be in place
    # * VCC to 3.3V
    # * GND to GND
    # * Trigger to PF2
    # * Echo to PF4
    #
    # It would be much better to use a hardware time
    # instead of incrementing "counter" as I've done here
    #
    # The blue LED is on the same pin as trigger so it
    # will flash like crazy
    #
    # When working correctly the red LED will light up
    # when an obstacle is close to the sensor
    #
    #################################################*/
    
    
    #include "driverlib/pin_map.h"
    #include <stdint.h>
    #include <stdbool.h>
    #include "inc/hw_gpio.h"
    #include "inc/hw_types.h"
    #include "inc/hw_memmap.h"
    #include "driverlib/sysctl.h"
    #include "driverlib/pin_map.h"
    #include "driverlib/gpio.h"
    #include "driverlib/rom.h"
    
    //Max wait time for reading the sensor:
    #define MAX_TIME 7500
    
    void delayMS(int ms) {
        SysCtlDelay( (SysCtlClockGet()/(3*1000))*ms ) ;
    }
    
    uint32_t measureD(void) {
        //Pull trigger high
        GPIOPinWrite(GPIO_PORTF_BASE, GPIO_PIN_2, GPIO_PIN_2);
        //wait appropriately
        SysCtlDelay(SysCtlClockGet()/(3*10)) ; //Delay 10uS
        //Pull trigger low
        GPIOPinWrite(GPIO_PORTF_BASE, GPIO_PIN_2, 0);
        //Monitor echo for rising edge
        while (ROM_GPIOPinRead(GPIO_PORTF_BASE, GPIO_PIN_4) == 0) { }
        uint32_t counter = 0;
        
        //loop counter checking for falling edge; MAX_TIME make sure we don't miss it
        while ((ROM_GPIOPinRead(GPIO_PORTF_BASE, GPIO_PIN_4) != 0) && (counter < MAX_TIME)) { counter++; }
        
        //return value
        return counter;
       
    }
    
    int main(void)
    {
        //Set the clock
        SysCtlClockSet(SYSCTL_SYSDIV_1 | SYSCTL_USE_OSC |   SYSCTL_OSC_MAIN | SYSCTL_XTAL_16MHZ);
    
        //Enable PortF
        ROM_SysCtlPeripheralEnable(SYSCTL_PERIPH_GPIOF);
    
        //LED Pins as outputs
        ROM_GPIOPinTypeGPIOOutput(GPIO_PORTF_BASE, GPIO_PIN_1 | GPIO_PIN_2 ); //LED on PF1, Trigger on PF2 (there's also an LED there)
        GPIOPinWrite(GPIO_PORTF_BASE, GPIO_PIN_2, 0);
        ROM_GPIOPinTypeGPIOInput(GPIO_PORTF_BASE, GPIO_PIN_4);
        ROM_GPIOPadConfigSet(GPIO_PORTF_BASE, GPIO_PIN_4, GPIO_STRENGTH_2MA, GPIO_PIN_TYPE_STD_WPD);


        while(1)
        {   
            if (measureD() < 750) { GPIOPinWrite(GPIO_PORTF_BASE, GPIO_PIN_1, GPIO_PIN_1); } //LED ON
            else { GPIOPinWrite(GPIO_PORTF_BASE, GPIO_PIN_1, 0); } //LED OFF
    
            delayMS(20);
    
        }
    
    }

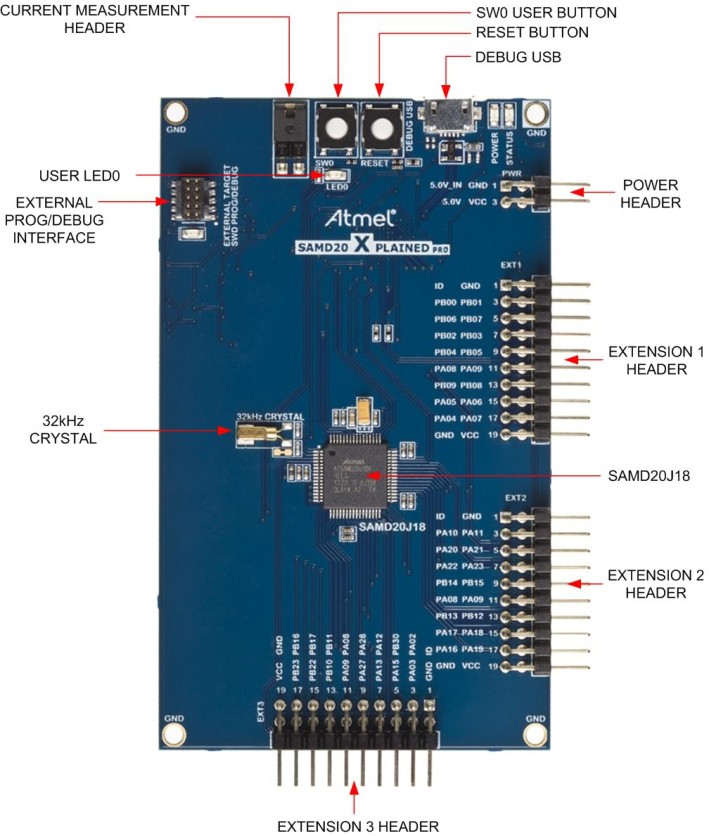
  • Atmel SAMD20 Xplained Pro

    Mike Szczys11/08/2014 at 03:53 0 comments

    This one's a bit of a kludge but it does work. There's a bit of drift (or something) but I didn't have time to scope the output and fix it. Sorry.

    This uses the GCC example for "delay" in the Atmel Software Framework:

    http://www.atmel.com/tools/avrsoftwareframework.aspx?tab=overview

    There are 3 files you need to edit:

    common2/services/delay/example/

    /**
     * \file
     *
     * \mainpage
     *
     * \section title Delay service example
     *
     * \section file File(s)
     * - \ref delay_example.c
     *
     * Copyright (c) 2011 - 2014 Atmel Corporation. All rights reserved.
     *
     * \asf_license_start
     *
     * \page License
     *
     * Redistribution and use in source and binary forms, with or without
     * modification, are permitted provided that the following conditions are met:
     *
     * 1. Redistributions of source code must retain the above copyright notice,
     *    this list of conditions and the following disclaimer.
     *
     * 2. Redistributions in binary form must reproduce the above copyright notice,
     *    this list of conditions and the following disclaimer in the documentation
     *    and/or other materials provided with the distribution.
     *
     * 3. The name of Atmel may not be used to endorse or promote products derived
     *    from this software without specific prior written permission.
     *
     * 4. This software may only be redistributed and used in connection with an
     *    Atmel microcontroller product.
     *
     * THIS SOFTWARE IS PROVIDED BY ATMEL "AS IS" AND ANY EXPRESS OR IMPLIED
     * WARRANTIES, INCLUDING, BUT NOT LIMITED TO, THE IMPLIED WARRANTIES OF
     * MERCHANTABILITY, FITNESS FOR A PARTICULAR PURPOSE AND NON-INFRINGEMENT ARE
     * EXPRESSLY AND SPECIFICALLY DISCLAIMED. IN NO EVENT SHALL ATMEL BE LIABLE FOR
     * ANY DIRECT, INDIRECT, INCIDENTAL, SPECIAL, EXEMPLARY, OR CONSEQUENTIAL
     * DAMAGES (INCLUDING, BUT NOT LIMITED TO, PROCUREMENT OF SUBSTITUTE GOODS
     * OR SERVICES; LOSS OF USE, DATA, OR PROFITS; OR BUSINESS INTERRUPTION)
     * HOWEVER CAUSED AND ON ANY THEORY OF LIABILITY, WHETHER IN CONTRACT,
     * STRICT LIABILITY, OR TORT (INCLUDING NEGLIGENCE OR OTHERWISE) ARISING IN
     * ANY WAY OUT OF THE USE OF THIS SOFTWARE, EVEN IF ADVISED OF THE
     * POSSIBILITY OF SUCH DAMAGE.
     *
     * \asf_license_stop
     *
     */
    #include <asf.h>
    
    #define PWM_MODULE EXT1_PWM_MODULE
    #define PWM_OUT_PIN EXT1_PWM_0_PIN //PB02
    #define PWM_OUT_MUX EXT1_PWM_0_MUX
    
    struct tc_module tc_instance;
    
    
    void configure_tc(void)
    {
         struct tc_config config_tc;
         tc_get_config_defaults(&config_tc);
         config_tc.counter_size = TC_COUNTER_SIZE_16BIT;
         config_tc.wave_generation = TC_WAVE_GENERATION_NORMAL_PWM;
         //config_tc.counter_16_bit.compare_capture_channel[0] = (0xFFFF / 2);
         config_tc.counter_32_bit.compare_capture_channel[0] = (8000);
         config_tc.pwm_channel[0].enabled = true;
         config_tc.pwm_channel[0].pin_out = PWM_OUT_PIN;
         config_tc.pwm_channel[0].pin_mux = PWM_OUT_MUX;
         tc_init(&tc_instance, PWM_MODULE, &config_tc);
         tc_set_top_value(&tc_instance,160000);
         tc_enable(&tc_instance);
    }
    
    void setDuty(uint32_t duty) {
        tc_set_compare_value(&tc_instance, TC_COMPARE_CAPTURE_CHANNEL_0, duty);
        //Do we need to reset the counter? What if we already passed top?
    }
    
    int main(void)
    {
    	system_init();
    	delay_init();
    
        configure_tc();
    
    	struct port_config pin;
    	port_get_config_defaults(&pin);
    	pin.direction = PORT_PIN_DIR_OUTPUT;
    
    	port_pin_set_config(LED0_PIN, &pin);
    	port_pin_set_output_level(LED0_PIN, LED0_INACTIVE);
    
    	while (true) {
    
            delay_s(2);
            setDuty(16000);
            
            delay_s(2);
            setDuty(12000);
    
            delay_s(2);
            setDuty(8000);
    
    	}
    }

    common2/services/delay/example/samd20_xplained_pro/gcc/asf.h

    Just add this before the last #endif:

    #include <tc.h>

    common2/services/delay/example/samd20_xplained_pro/gcc/config.mk

    To this file we're just adding the includes for tc.c and the tc path but I'll paste the entire file:

    #
    # Copyright (c) 2011 Atmel Corporation. All rights reserved.
    #
    # \asf_license_start
    #
    # \page License
    #
    # Redistribution and use in source and binary forms, with or without
    # modification, are permitted provided that the following conditions are met:
    #
    # 1. Redistributions...
    Read more »

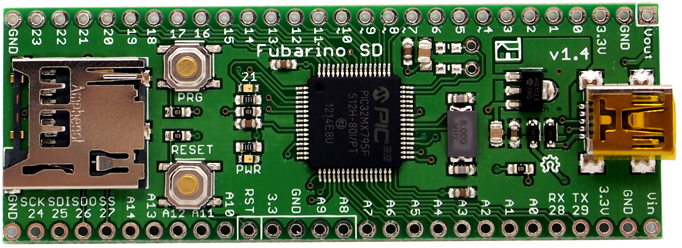
  • Fubarino SD

    Mike Szczys11/05/2014 at 22:46 0 comments

    I couldn't find a nice pinout image for the Fubarino SD like I did for the previous 2 boards. If you know of one please leave a comment below.

    This board has a silk-screen with the tilde symbol (~) next to some of the pins. I believe these are your options if you are using the Servo library.

    The board is programmed using the MPIDE. It's a fork of the Arduino IDE meaning that you can use the Arduino libraries (and code) for this. That makes PWM extremely simple. Here's a servo example:

    #include <Servo.h> 
     
    //Variable for a Servo object
    Servo hobby_servo;
     
    // variable to store the servo position
    int pos = 0;
     
    void setup() 
    { 
      // attaches the servo on pin 7 to the servo object
      hobby_servo.attach(7); 
    
      // tell servo to go to center position
      hobby_servo.write(90); 
      delay(15);
    } 
     
     
    void loop() 
    { 
      // tell servo to go to 135 degrees
      hobby_servo.write(135);
      // waits 15ms for the servo to reach the position   
      delay(15);                       
    
      //Do nothing for 2 seconds
      delay(2000);  
    
       // tell servo to go to 90 degrees
      hobby_servo.write(90);
      // waits 15ms for the servo to reach the position   
      delay(15);                       
    
      //Do nothing for 2 seconds
      delay(2000);  
    }

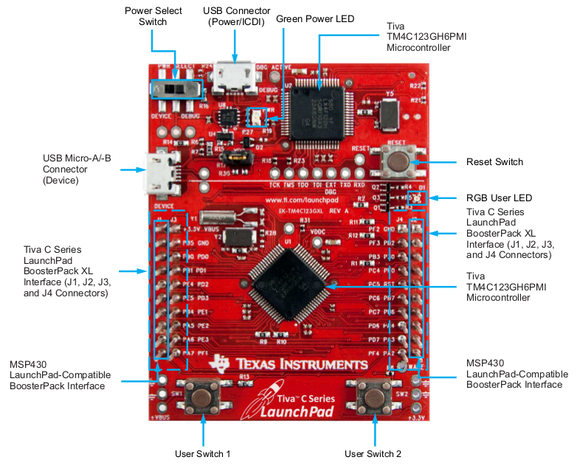
  • Texas Instruments Tiva C Launchpad

    Mike Szczys11/05/2014 at 16:53 1 comment

    Use the TivaWare peripheral library to get PWM working on the Tiva C launchpad: http://www.ti.com/tool/sw-tm4c

    I made an example of dimming LEDs that can be complied with GCC: https://github.com/szczys/tiva-c-launchpad-hardware-pwm/blob/master/main.c

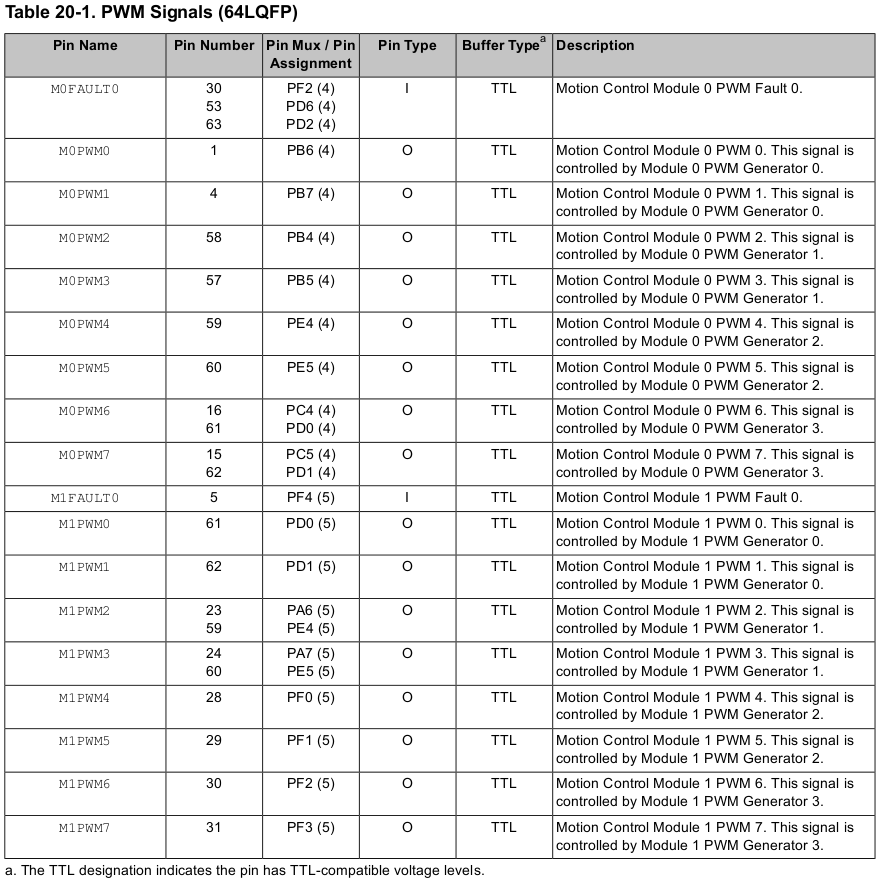
    Specific code for servo timing is found below. The datasheet for the TM4C123GH6PM includes this table which can be used to find out the PWM module, generator, pin, and other values:

    /*################################################
    # Hardware PWM proof of concept using
    # the Tiva C Launchpad
    #
    # Started with example code by
    # lawrence_jeff found here:
    # http://forum.stellarisiti.com/topic/707-using-hardware-pwm-on-tiva-launchpad/
    # 
    # Altered to use code found on section
    # 22.3 of the TivaWare Peripheral Driver
    # Library User's Guide found here:
    # http://www.ti.com/lit/ug/spmu298a/spmu298a.pdf
    #
    #
    # This example drives servo motors on PF1, PF2, and PF3
    #
    #################################################*/
    
    
    #include "driverlib/pin_map.h"
    #include <stdint.h>
    #include <stdbool.h>
    #include "inc/hw_gpio.h"
    #include "inc/hw_types.h"
    #include "inc/hw_memmap.h"
    #include "driverlib/sysctl.h"
    #include "driverlib/pin_map.h"
    #include "driverlib/gpio.h"
    #include "driverlib/pwm.h"
    
    void delayMS(int ms) {
        SysCtlDelay( (SysCtlClockGet()/(3*1000))*ms ) ;
    }
    
    int
    main(void)
    {
        uint32_t period = 5000; //20ms (16Mhz / 64pwm_divider / 50)
        uint32_t duty = 250;    //1.5ms pulse width
    
        //Set the clock
       SysCtlClockSet(SYSCTL_SYSDIV_1 | SYSCTL_USE_OSC |   SYSCTL_OSC_MAIN | SYSCTL_XTAL_16MHZ);
    
       //Configure PWM Clock divide system clock by 64
       SysCtlPWMClockSet(SYSCTL_PWMDIV_64);
    
       // Enable the peripherals used by this program.
        SysCtlPeripheralEnable(SYSCTL_PERIPH_GPIOF);
        SysCtlPeripheralEnable(SYSCTL_PERIPH_PWM1);  //The Tiva Launchpad has two modules (0 and 1). Module 1 covers the LED pins
    
        //Configure PF1,PF2,PF3 Pins as PWM
        GPIOPinConfigure(GPIO_PF1_M1PWM5);
        GPIOPinConfigure(GPIO_PF2_M1PWM6);
        GPIOPinConfigure(GPIO_PF3_M1PWM7);
        GPIOPinTypePWM(GPIO_PORTF_BASE, GPIO_PIN_1 | GPIO_PIN_2 | GPIO_PIN_3);
    
        //Configure PWM Options
        //PWM_GEN_2 Covers M1PWM4 and M1PWM5
        //PWM_GEN_3 Covers M1PWM6 and M1PWM7
        PWMGenConfigure(PWM1_BASE, PWM_GEN_2, PWM_GEN_MODE_DOWN | PWM_GEN_MODE_NO_SYNC); 
        PWMGenConfigure(PWM1_BASE, PWM_GEN_3, PWM_GEN_MODE_DOWN | PWM_GEN_MODE_NO_SYNC); 
    
        //Set the Period (expressed in clock ticks)
        PWMGenPeriodSet(PWM1_BASE, PWM_GEN_2, period);
        PWMGenPeriodSet(PWM1_BASE, PWM_GEN_3, period);
    
        //Set PWM duty
        PWMPulseWidthSet(PWM1_BASE, PWM_OUT_5,duty);
        PWMPulseWidthSet(PWM1_BASE, PWM_OUT_6,duty);
        PWMPulseWidthSet(PWM1_BASE, PWM_OUT_7,duty);
    
        // Enable the PWM generator
        PWMGenEnable(PWM1_BASE, PWM_GEN_2);
        PWMGenEnable(PWM1_BASE, PWM_GEN_3);
    
        // Turn on the Output pins
        PWMOutputState(PWM1_BASE, PWM_OUT_5_BIT | PWM_OUT_6_BIT | PWM_OUT_7_BIT, true);
    
        while(1)
        {
            delayMS(2000);
    
            //Drive servo to 135 degrees
            PWMPulseWidthSet(PWM1_BASE, PWM_OUT_5,duty+(duty/2));
            PWMPulseWidthSet(PWM1_BASE, PWM_OUT_6,duty+(duty/2));
            PWMPulseWidthSet(PWM1_BASE, PWM_OUT_7,duty+(duty/2));
    
            delayMS(2000);
    
            //Drive servo to 90 degrees
            PWMPulseWidthSet(PWM1_BASE, PWM_OUT_5,duty);
            PWMPulseWidthSet(PWM1_BASE, PWM_OUT_6,duty);
            PWMPulseWidthSet(PWM1_BASE, PWM_OUT_7,duty);
    
        }
    
    }

  • Freescale KL25z Freedom Board

    Mike Szczys11/04/2014 at 22:10 0 comments

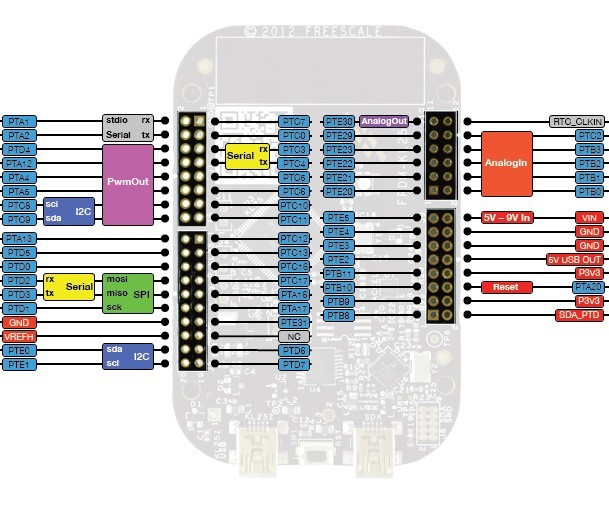
    I used the mbed platform to program PWM on this chip. Links to setup your board for mbed and the mbed pwm api are located here: http://hackaday.io/event/3178/log/10740

    You need to use the pins that have PwmOut capability shown in this image:

    #include "mbed.h"
     
    PwmOut servo(PTD4);
     
    int main() {
        servo.period_ms(20);
        servo.pulsewidth_ms(2);
        while(1) {
            wait(2);
            servo.pulsewidth_ms(1);
            wait(2);
            servo.pulsewidth_ms(2);
        }
    }

View all 5 project logs

Enjoy this project?

Share

Discussions

The Big One wrote 11/04/2014 at 22:55 point
Hi Mike,

Not sure if you are planning on using AVRs, but if you are, feel free to steal / modify / abuse my PWM code. You can drive as many waveforms as you have available pins, with the only limitation being that you must run all pins at the same period (20ms for servos). It is very efficient (I can generate a clean signal on 21 pins using a 12MHz clock wile still doing all sorts of stuff in the main control loop).

See http://git.digitalcave.ca/gitweb/?p=projects.git;a=tree;f=lib/avr/pwm;hb=HEAD for the code, and the Stubby project for a sample implementation using it.

Cheers

  Are you sure? yes | no

Mike Szczys wrote 11/05/2014 at 16:29 point
Thanks!

We have the SAMD20 Xplained Pro board which have an ARM chip on them. I abused the ASF example code to compile a PWM output.

You don't happen to have a GCC Makefile and template to make this part easier do you?

  Are you sure? yes | no

The Big One wrote 11/05/2014 at 20:28 point
Yeah, I have a sample implementation in the same repo, at http://git.digitalcave.ca/gitweb/?p=projects.git;a=tree;f=samples/avr/atmega328/pwm;hb=HEAD . The makefile itself uses includes for most of the content; you can just follow the include statements up and copy / paste the included data if it makes things easier to understand.

(BTW, I never seem to get emails about replies to my comments... the notification shows up in my feed, but nothing in my inbox. Not sure if that is a feature or a bug, but it would be nice to at least have the option).

Cheers

  Are you sure? yes | no

Mike Szczys wrote 11/05/2014 at 20:55 point
Yeah, I know there are problems with the emails about updates. There's an open ticket for this but I'm not sure when it will be fixed.

I'm actually looking for a makefile and supporting files for compiling for Atmel's ARM line of controllers.

  Are you sure? yes | no

The Big One wrote 11/05/2014 at 22:29 point
Ahh, gotcha. Sorry, I only have experience with AVRs. 20MHz should be more than enough for anyone, right? ;-)

  Are you sure? yes | no

Mike Szczys wrote 11/05/2014 at 22:40 point
Oh man, the ARM chips (and their similar-in-class counterparts like PIC32) have *amazing* peripherals.

There's a lot more nonsense up front with the startup and linker code. But once you get the hang of it you feel like a microcontroller Jedi.

  Are you sure? yes | no

The Big One wrote 11/06/2014 at 16:57 point
Yeah, getting into ARM is on my TODO list... I guess the main thing so far is that I have not had any projects which need the extra stuff, and not enough time to play with the chips for the sake of playing. Who knows, if there are some ARM boards in THP semifinalists grab bags, that may give me the push needed to jump in... ;-)

  Are you sure? yes | no

Similar Projects

Does this project spark your interest?

Become a member to follow this project and never miss any updates