 Cassio Batista
-
1Speech Recognition w/ PocketSphinx (Debian)
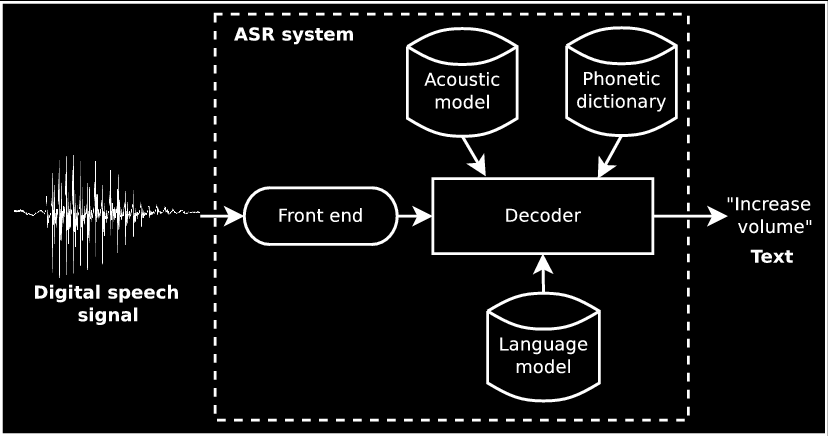
Speech is the main input method of the system, so we'll start describing the process we followed to build an automatic speech recognition (ASR) system, whose overall architecture is shown in the figure below. To do so, we have used the CMU Sphinx software toolkit. The system is currently working for both American English (EN_US) and Brazilian Portuguese (PT_BR) languages.
![]()
In short terms:
- the phonetic dictionary (also called lexicon model) provides a mapping from graphemes to phonemes (G2P). Phonemes basically describe how a piece of sound is pronounced. An example can be seen at the table below.
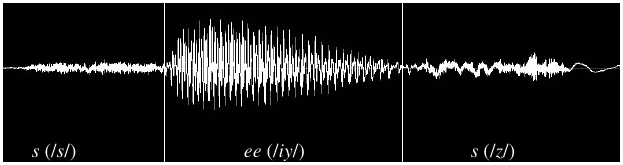
he HH IH ele e l i sees S IY Z vê v e a EY uma u˜ m a chair CH EH R cadeira k a d e j r a - the acoustic model (AM) provides a mapping from each phoneme to a sound representation extracted from audio files. Machine learning techniques are usually applied to train hidden Markov Models (HMM) and Gaussian mixture models (GMM) to be store on the AM. A very simplified example can be found at the image below, where the word “sees” is aligned to its correspondent spoken audio.
![]()
- the language model (LM) describes the probability of occurrence of a given word based on n-1 previous words (n-gram model, with typically n=3 for the so called trigram LMs). For example, “I eat bread” would be more likely to occur than “I eat dead”. Therefore:
Although LMs are necessary for training an ASR system from scratch, they might be used in production only if you are dealing with an application based on the dictation task (thousand of words on the recognition vocabulary). However, if you application is about command and control, you might be interested in context-free grammars rather than n-gram language models.
- the front-end contains all the signal processing steps to apply on raw audio data. It is responsible for computing the Mel frequency cepstral coefficients (MFCCs), which are not really useful to be explained in this tutorial.
- the decoder is the software that actually performs the conversion from speech to text. On this project we are using PocketSphinx for that.
To train an acoustic model using CMU Sphinx tools, the reader is referred to this link on their official documentation. The SphinxTrain package takes care of all the AM training. For the language model, SRILM has been the state-of-the-art software package for decades. There's also a nice tutorial on CMU Sphinx official webpage that explains how to train an LM. The phonetic dictionary is often obtained though a seed lexicon (a full dictionary that is available beforehand), where just a set of words is extracted from. For well-represented languages, such as English, plenty of lexicons can be found available at the Internet. For non-mainstream ones such as Brazilian Portuguese, a G2P software is normally used to generate the dict.
But how the heck did we do that?
For American English:
- AMs can be found available for download here (cmusphinx-en-us-5.2.tar.gz).
- Since our application is a command-and-control task and we are downloading an acoustic model for American English, the LM is no longer required and can be replaced by a context-free grammar. We'll explain the details about the grammar later.
- a phonetic dictionary can also be found available for download here.
- a continuous acoustic model was trained with approximately 170 hours of recorded speech. Audio data is in an uncompressed, linear, signed PCM (WAV) format, sampled at 16 kHz with 16 bits per sample. The audio corpora used belongs to Group FalaBrasil, which we are part as well. The number of Gaussians (or densities) was set to 32 and number of senones (tied-states on Sphinx's decision tree) was set to 4,000. The mean word error rate (WER) value obtained was 9%.
- a language model was trained with SRILM tool. CETENFolha text corpora was used as data input. The perplexity value obtained was 170. It is important to remember the LM is only used at the acoustic model training step. After that, the language model is no longer required. In other words, when using our application in production, the context-free grammar “becomes” our LM.
- the phonetic dictionary was built with a G2P software provided by FalaBrasil Group. Graphemes were taken from the transcribed audio data itself.
Our application is a command-and-control task with the following possible sentences:
American English Brazilian Portuguese turn tv on ligar televisão turn tv off desligar televisão increase volume aumentar volume | volume mais decrease volume diminuir volume | volume menos next channel próximo canal | canal mais previous channel canal anterior | canal menos switch to portuguese mudar pro inglês wake up system* acordar sistema* Limiting the vocabulary to a few set of possibilities like that can be achieved through the construction of a context-free grammar in the JSGF format (Java speech grammar format), which is the one supported by Sphinx (see this section for details). JSGF files for both English and Portuguese languages are shown below.
#JSGF V1.0;
grammar gram_en_US;

public <command> = turn tv ( on | off ) |
                   ( increase | decrease ) volume |
                   ( previous | next ) channel |
                   switch to portuguese ;
#JSGF V1.0; grammar gram_pt_BR; public <command> = ( ligar | desligar ) televisão | ( aumentar | diminuir ) volume | próximo canal | canal anterior | ( volume | canal ) ( mais | menos ) | mudar pro inglês ;The tool sphinx_jsgf2fsg then takes grammar files as input to generate the deterministic automaton in FSG format (finite state grammar). Below is a graphical representation of the FSG file that PocketSphinx understands. It is nothing but a DFA :)
![]()
Keyword Spotting vs. Grammar
I bet you haven't noticed the last item on the table of sentences contains an asterisk on its right side. It means that those words represent a special sentence that is not used to control any function of our TV set, but rather to activate the system before the user can speak an actual command. This is used to prevent the system to stay “listening” all the time for commands, which would certainly cause a lot of unintended actions at the TV set. Therefore, “wake up system” and “acordar sistema” are the keywords (or keyphrases, as you like :) passed to the decoder's “spot module” of recognition. The task of expecting for a single sentence is known in ASR field as keyword spotting. So, to summarize, the system only initializes the context-free grammar after the user has spoken the keyphrase, as depicted in the figure below.
![]()
PocketSphinx accepts a threshold as input parameter, which is used to set a level of confidence to the keyword to be spotted. The API official documentation explains the switch between keyword and grammar modes at its search section. Below you can see a snippet of the code that loads both recognition modules switches between them.
#include <pocketsphinx.h>
ps_decoder_t *ps;     // access to the decoder engine
ad_rec_t     *ad;     // access to the mic device (ADC)
cmd_ln_t     *config; // define configs

ps_set_keyphrase(ps, "kws", "wake up system"); // define keyphrase

ps_set_jsgf_file(ps, "jsgf", "gram.jsgf");      // load JSGF file
ps_set_fsg(ps, "fsg", ps_get_fsg(ps, "jsgf"));  // define grammar

ps_set_search(ps, "kws"); // switch to “keyword spotting” mode

std::string sent = "";
do {
    sent = ps_decode_from_mic(ps, ad); // look for keyphrase only
} while(sent == ""); // a rejection returns “”

ps_set_search(ps, "fsg"); // switch to “grammar” mode

/* look for one out of the 10 possible sentences */
sent = ps_decode_from_mic(ps, ad);
std::cout << "sentence: " << sent << std::endl;
The overall algorithm to translate user's spoken works to remote commands to the TV is summarized at the flowchart below. I'm not going into details about the code, since most of it is well commented and freely available on our GitHub repo. The routine to send commands to the TV via infrared (IR) light will be addressed in another instruction later.
![]()
- the phonetic dictionary (also called lexicon model) provides a mapping from graphemes to phonemes (G2P). Phonemes basically describe how a piece of sound is pronounced. An example can be seen at the table below.
-
2Send Commands from C.H.I.P. to the TV
The remotes usually follow a protocol that is manufacturer specific. Since we're using a Samsung TV, we just followed the S3F80KB MCU Application Notes document, which is the IC embedded into the Samsung's remote control. Take a look if you're really really curious :) In general terms, the Samsung protocol defines a sequence of 34 bits, in which the values “0” and “1” are represented by a flip on the state of the PWM pulses, whose carrier frequency is 37.9 kHz. If you know nothing about pulse width modulation, here's a nice tutorial at Arduino's official documentation: [PWM].
We have actually already dealt with Samsung protocol before on a previous project, however we had to use an Arduino Uno to send the commands to the TV set while C.H.I.P. was kept exclusively for the image processing required by the gesture recognition module. Fortunately we made some progress (thanks to Erick, mainly) and now we could get rid of the Arduino, which means we're using C.H.I.P. for both speech input and remote control output altogether. If you're curious about how infrared-based remote controls actually work, I recommend this nice article from How Stuff Works: [How Remote Controls Work].
At first, we thought there was no way to access C.H.I.P's PWM pin at all. Most tutorials, including (the dead) Next Thing Co's official documentation, suggested to emulate a PWM by just switching the state of a common GPIO pin. But with my experience with Beaglebone Black during my term paper development, this would be very slow and would simply not attend the PWM's relatively high frequency. Thanks to Erick's curiosity, he heard about UDOO, a not-so-cheap Mini PC with Android, Linux and Arduino together. Since UDOO's website has its own tutorial for using the board's own PWM pin, we decided to try our own luck by testing the same steps on C.H.I.P.. Surprisingly, it worked like a charm.
The step 1 from UDOO's tutorial is about enabling features by editing Linux device tree. Apparently, PWM is not available on the kernel by default, so the programmer needs to enable it by hand, which is pretty much the same situation that occurred on C.H.I.P.. However, UDOO's device tree configuration is not the same of C.H.I.P., but God knows where we found a gist with a script that did just what we wanted on C.H.I.P.'s device tree! Now we could finally start to use the pin 18 of C.H.I.P.'s U13 header (U13_18, named PWM0).
The process to control C.H.I.P.'s PWM pin is pretty much similar to the process of controlling a regular GPIO pin. We begin by exporting that pin, which is like telling the kernel we're gonna use it as PWM. Next, we set the duty cycle and period (inverse of the carrier frequency, i.e., 1/37,900). Now we just enable the pin and the PWM will continue to pulse until we disable and unexport that pin. All those operations are performed inside the directory /sys/class/pwm/pwmchip0/ as long as you have root permissions. The following snippet in bash summarizes the steps described here. As you can see, all operations are performed through Linux file system (SysFS), so we just have to overwrite values on files.
echo  0     > /sys/class/pwm/pwmchip0/export     # export U13_18 pin
echo  26385 > /sys/class/pwm/pwmchip0/period     # set PWM period (ns)
echo  13192 > /sys/class/pwm/pwmchip0/duty_cycle # set duty cycle (50%)
echo  1     > /sys/class/pwm/pwmchip0/enable     # enable PWM (start)
sleep 1
echo  0     > /sys/class/pwm/pwmchip0/enable     # disable PWM (stop)
echo  0     > /sys/class/pwm/pwmchip0/unexport   # unexport U13_18 pin
At this point all we had to do was to code Samsung's protocol using C/C++ and integrate that with PocketSphinx speech recognition API. Erick has made a lib to emulate Samsung's protcol with CHIP's PWM pin on his GitHub page. The following snippet summarizes the operation for a single 34-bit command.
#define PERIOD 26385 // 1/37900 in nanoseconds

void main() {
    /* Samsung's 34-bit command */
    char *stream = "1111000001110000001000000101111110";

    pwm_export();       // export pin
    pwm_period(PERIOD); // set PWM period
    pwm_start();        // turn PWM on

    for(int j=0; j<1; j++) {
        mark(4500);     // 1st half of the 1st bit
        space(4500);    // 2nd half of the 1st bit
        for(int i=1; i<34; i++) {
            mark(560);  // regular bit always begins high
            if(stream[i]=='1')
                space(1690);
            else
                space(560);
        }
    }

    pwm_duty(0); // reset PWM
    pwm_stop();  // turn PWM off
}

void mark(int us) {
    pwm_duty(PERIOD/3); // set duty to 1/3 of the PWM period (33%)
    usleep(us-150);
}

void space(int us) {
    pwm_duty(PERIOD) ; // set duty to 1/1 of the PWM period (100%)
    usleep(us-150);
}
TV Remote Control via Offline Speech Recognition
A low cost, open-source, universal-like remote control system that translates the user's spoken words into commands to electronic devices.


Discussions
Become a Hackaday.io Member
Create an account to leave a comment. Already have an account? Log In.