Close
0%
0%

BeagleLogic

Turns your BeagleBone Black/Green into a 14-channel 100Msps Logic Analyzer

Similar projects worth following
BeagleLogic realizes a logic analyzer on the BeagleBone Black using the Programmable Real-Time units and matching firmware and Linux kernel modules on the BeagleBone Black. Supports capturing into up to 300+ MB of memory (out of the 512 MB) of the BeagleBone Black.

With the sigrok project, BeagleLogic gets support for software triggering and decoding a large variety of digital communication protocols. There's also a small web interface that allows plug-and-play debugging if you are not capturing tons of data once everything is up and running.

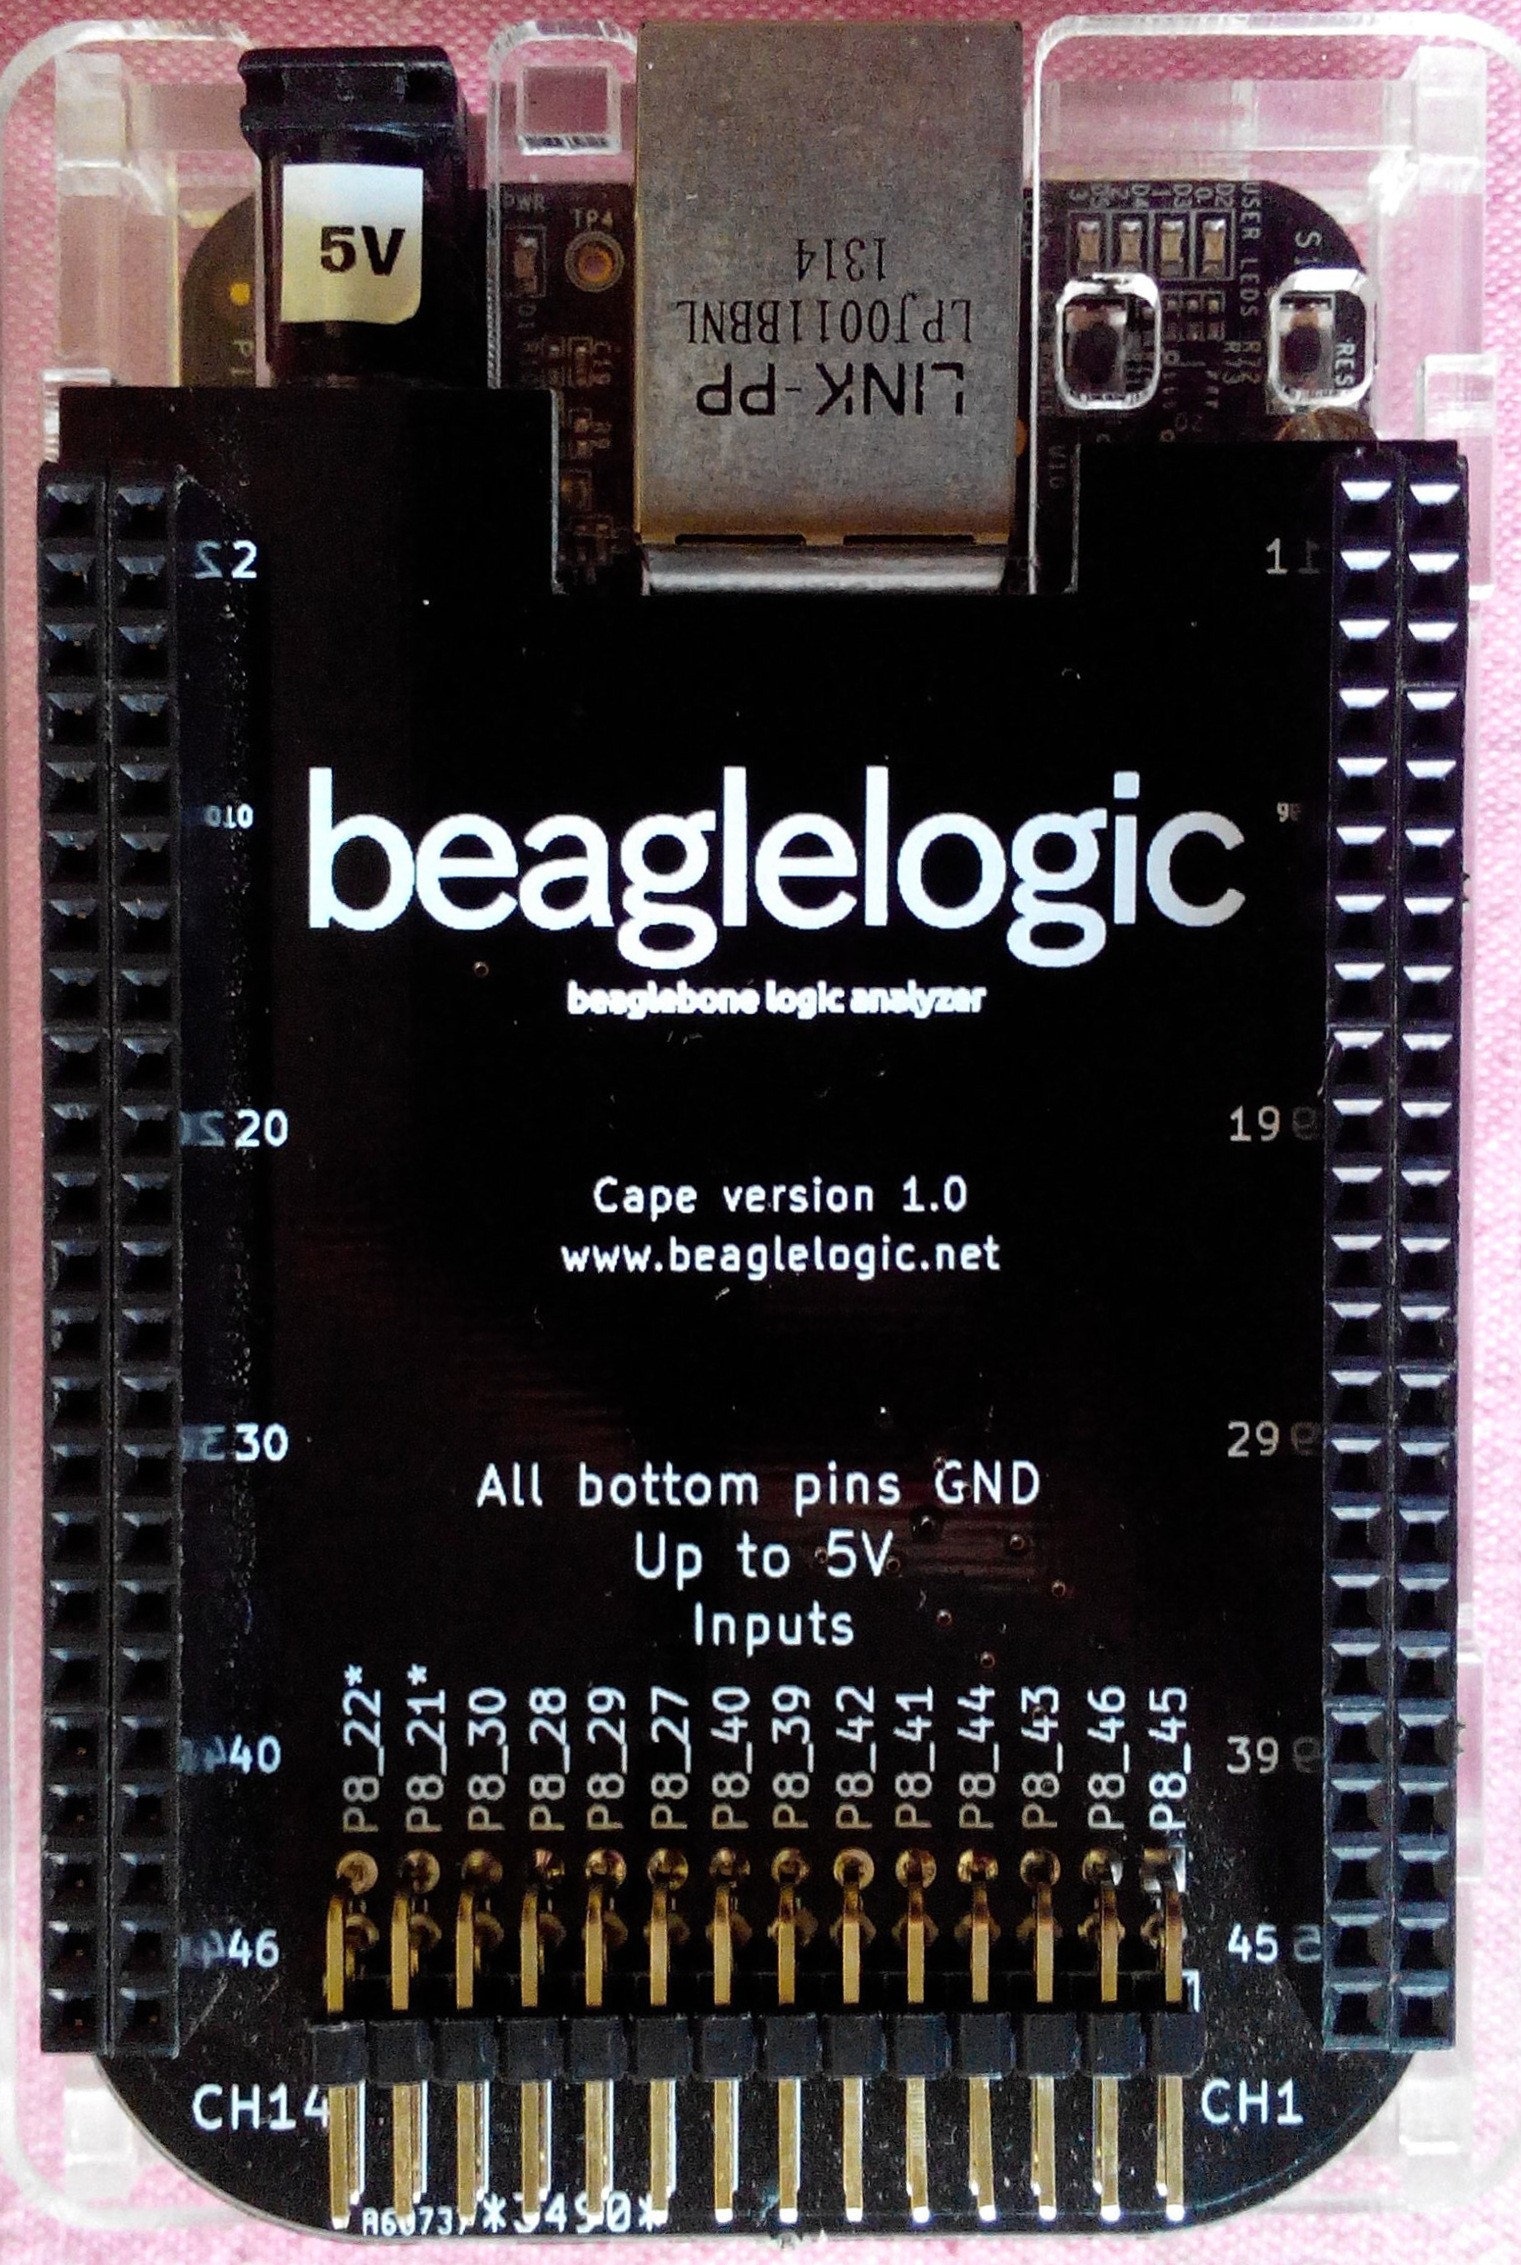
I recently designed a cape to help interface BeagleLogic with external circuits and protect the BeagleBone from 5V circuits. You are seeing the photos of the cape.

The possibilities with BeagleLogic are great, and this page should follow future development of BeagleLogic as it gradually evolves with more cool features.

Visit BeagleLogic GitHub at https://code.beaglelogic.net

BeagleLogic is a part of a vision of inexpensive Single Board Computers being repurposed as a useful debugging tool, a logic analyzer. It should be the first in a series of tools to make high quality, feature-rich and well-connected instruments accessible to more people over a familiar Linux environment. I see BeagleLogic as an educational tool that can help in understanding digital protocols as well, as one can use the same BeagleBone to send SPI and I2C signals which can be looped back into the inputs to BeagleLogic.

BeagleLogic is delivered as a combination of a ready-to-run BeagleLogic System Image (Software) that can be flashed onto a SD card and which is preloaded with the kernel modules, firmware and software necessary to run BeagleLogic right after the system boots up and a BeagleLogic Cape (Hardware) that logic level translates 5V signals so you can debug 5V logic circuits with the BeagleBone Black.

This infographic compares BeagleLogic to other leading Logic Analyzers:
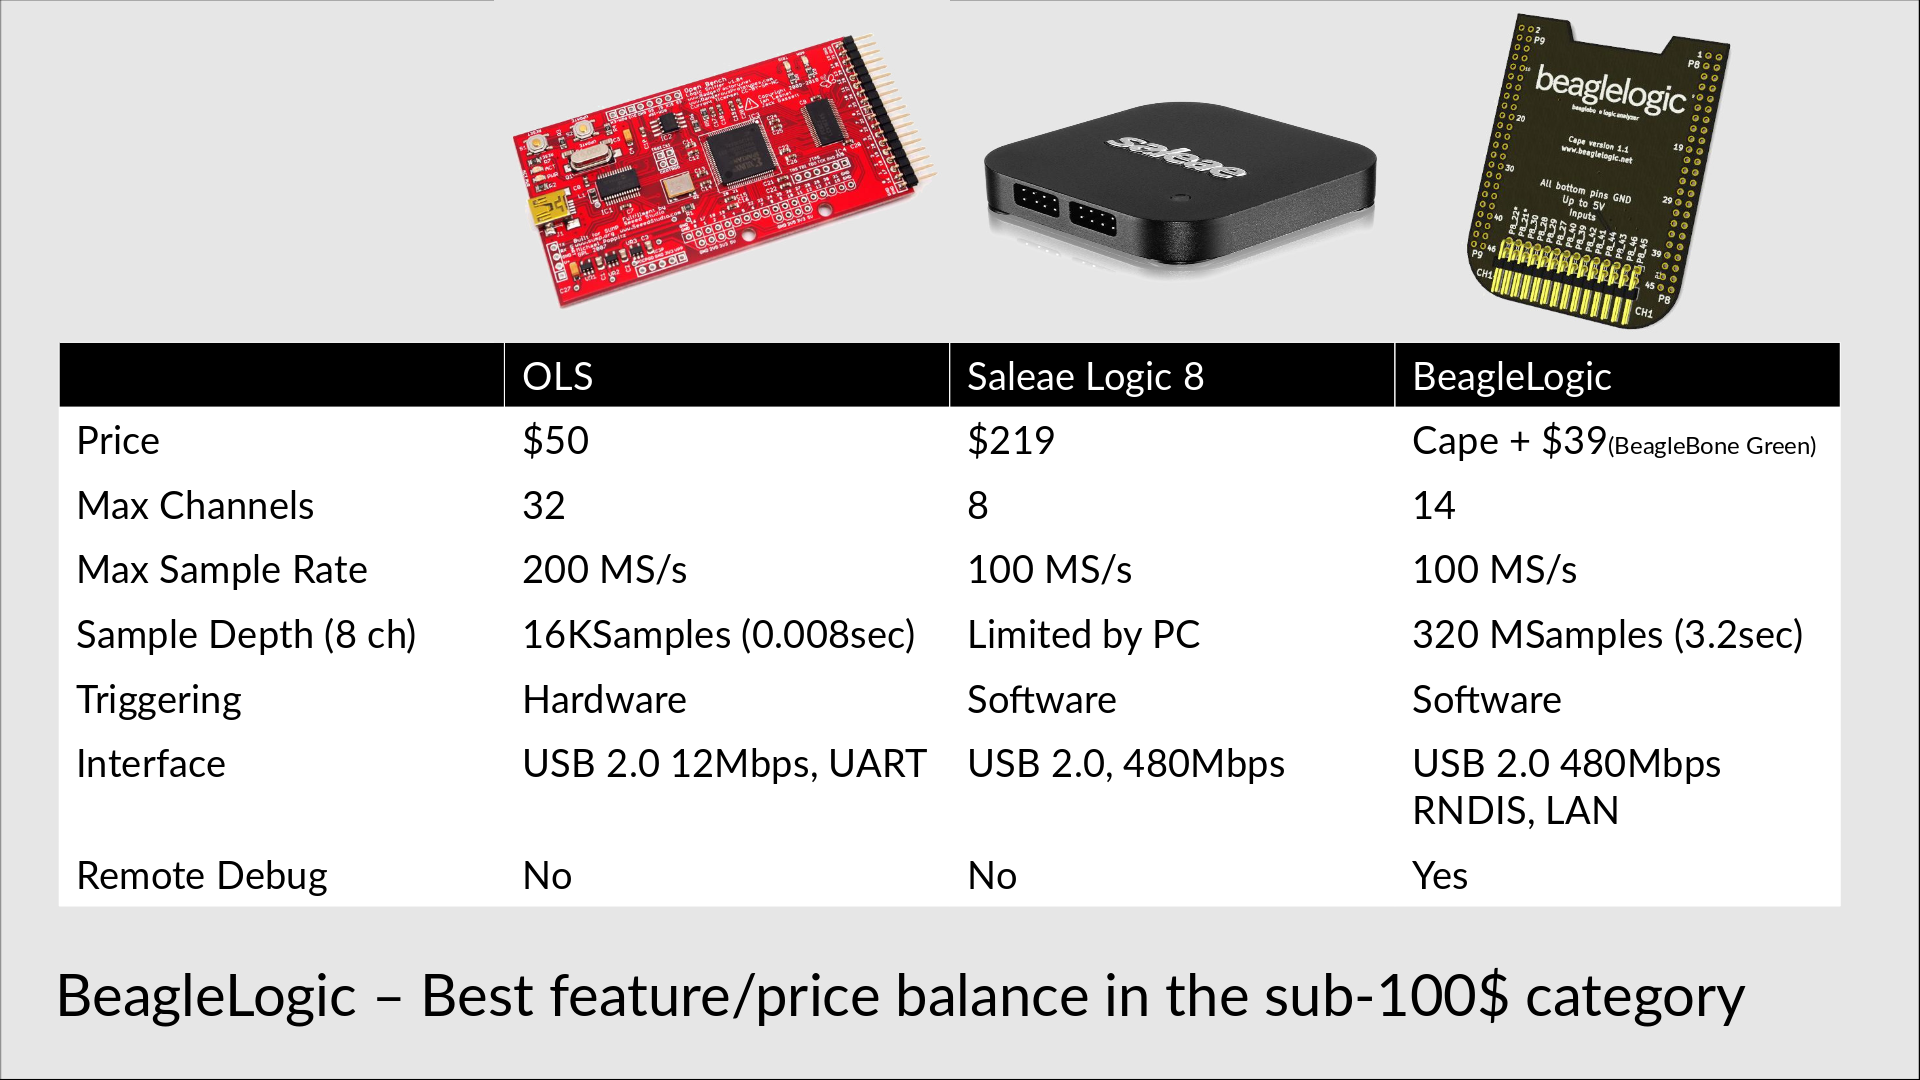
BeagleLogic makes use of the powerful sigrok library that provides a standardized interface to DMMs, scopes and logic analyzers. For logic analyzers, sigrok tools support decoding over 50 different digital protocols (see complete list here) for supported protocols. Since BeagleBone runs Linux, it can run the whole sigrok tool set by itself, but it is usually better to process data on a PC as it's faster.

There's a series of technical explanation walkthorughs on my blog that detail how BeagleLogic works:

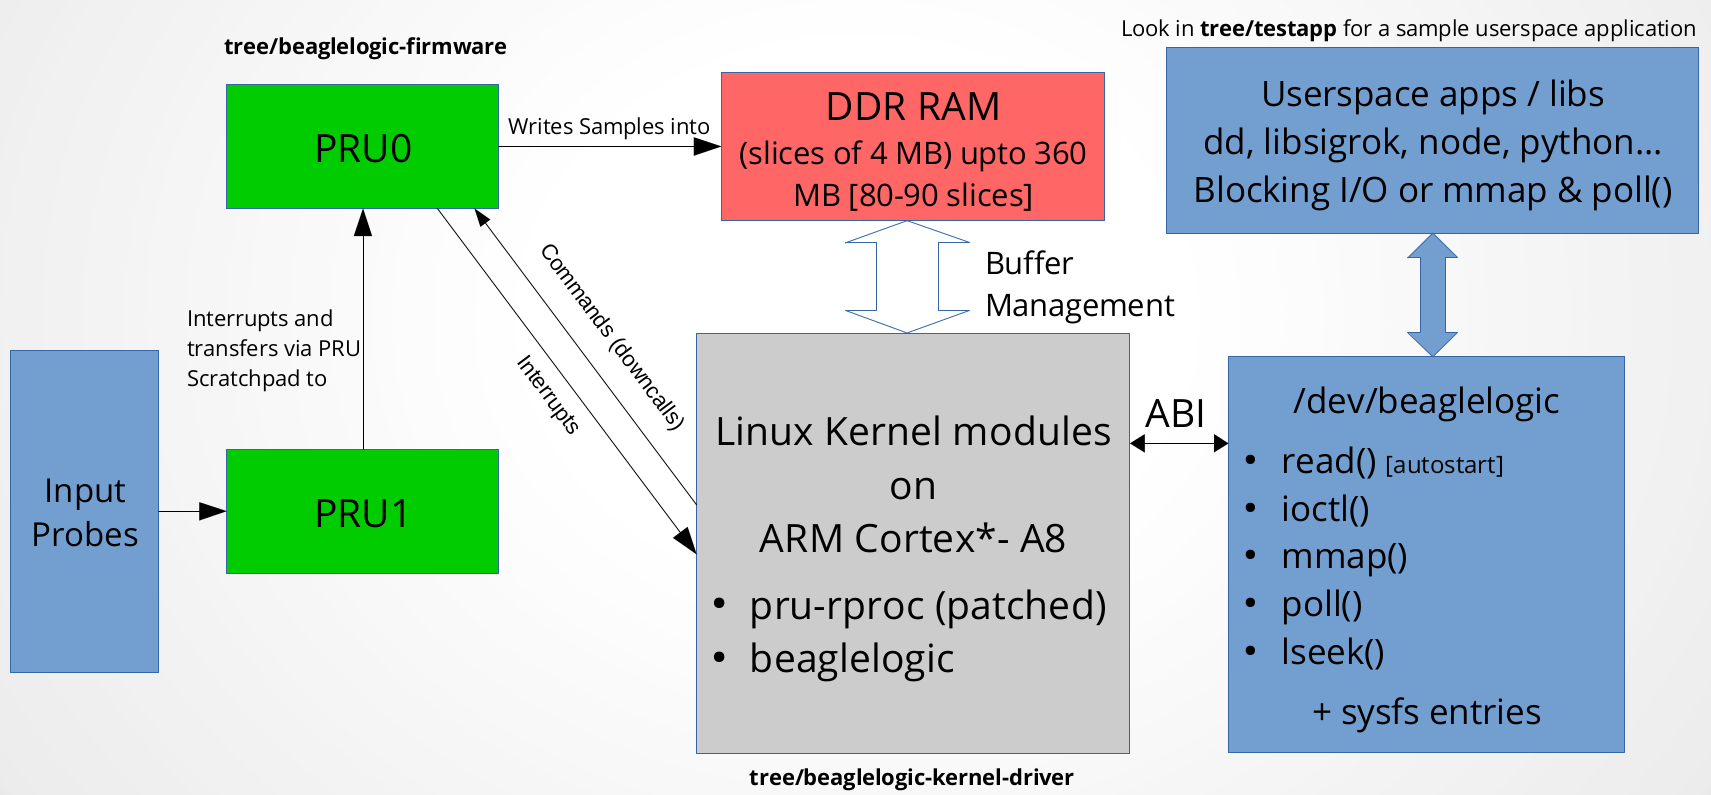
Here's a system-level block diagram that explains how BeagleLogic works:
License Details

Each component of the project as seen above is individually licensed as follows:

(i) The PRU Firmware is under GPLv2 only license.

(ii) The Linux Kernel Module is under GPLv2 only license.

(iii) The sigrok bindings form a part of the sigrok suite, so fall under GPLv3 or later license.

(iv) The Web Interface and the NodeJS backend is under MIT License

(v) The BeagleLogic cape is licensed under the CERN Open Hardware License

(vI) The BeagleLogic logo on the PCB and the video (created by me with Inkscape) is licensed under CC-BY-SA-4.0 http://creativecommons.org/licenses/by-sa/4.0/


  • 1 × BeagleBone Black / Green Flashed with BeagleLogic system image
  • 1 × BeagleLogic cape PCB If you are debugging 3.3V I/O or a BeagleBone based circuit.
  • 1 × 74LVCH16T245 Logic ICs / Receivers, Transceivers
  • 1 × BSS138 Discrete Semiconductors / Diode-Transistor Modules
  • 1 × BC847 Discrete Semiconductors / Transistors, MOSFETs, FETs, IGBTs

View all 9 components

  • Purple BeagleLogic(s)

    Kumar, Abhishek01/24/2016 at 18:03 0 comments

    Drew Frustini shared pictures of the BeagleLogic cape which arrived from OSHPark.

    (credits to Drew for the original pic)

    For more photos, go to the Google+ post

  • BeagleLogic discussion group

    Kumar, Abhishek01/11/2016 at 20:43 0 comments

    BeagleLogic now has a discussion group at https://groups.google.com/forum/#!members/beaglelogic.

    You are invited to join and participate in the discussion on how to make BeagleLogic better, or share your experience with BeagleLogic, any issues you faced, how you want to see this going in the future.

    See you there!

  • BeagleLogic v1 cape shared on OSHPark

    Kumar, Abhishek12/15/2015 at 10:01 0 comments

    I saw on my GitHub traffic stats today that my original cape design has been shared on OSHPark.

    Link here - https://oshpark.com/shared_projects/7qWc3cde if anyone would like to order.

    [Design sharing credits - blundar]

  • Enabling channels 13 & 14

    Kumar, Abhishek10/12/2015 at 15:15 1 comment

    These instructions are for the BeagleLogic system image, and are now verified on a BeagleBone Black.

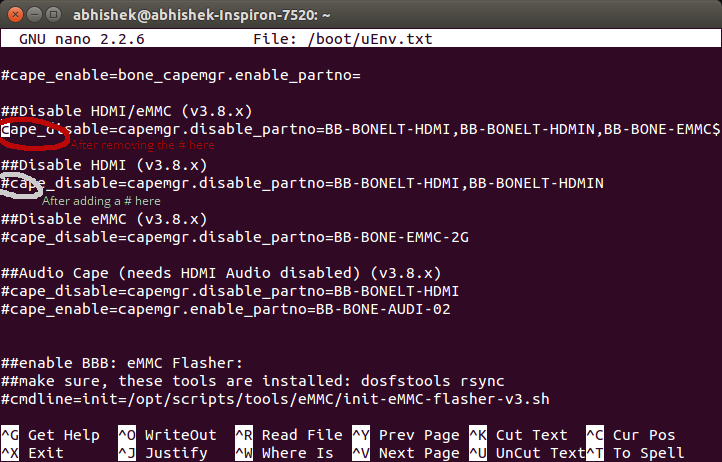
    Open up a SSH to the BeagleBone and edit "/boot/uEnv.txt" in nano/vi. Scroll down a bit until you see these lines and make sure they appear the same as in this screenshot by removing a '#' from the red circled area and adding a '#' at the white circled area. Then save it and reboot.

    This disables the eMMC. Now solder two 0R resistors on the bottom of the BeagleLogic cape (R8 & R9) to connect them to the logic inputs.

    The device tree file also needs to be recompiled to multiplex the 13&14 pins into the BeagleLogic inputs. Download the precompiled version from here - note that this file is called BB-BEAGLELOGIC14-00A0.dtbo to differentiate it from the existing dtbo file which enables only 12 channels. Copy it into /lib/firmware.

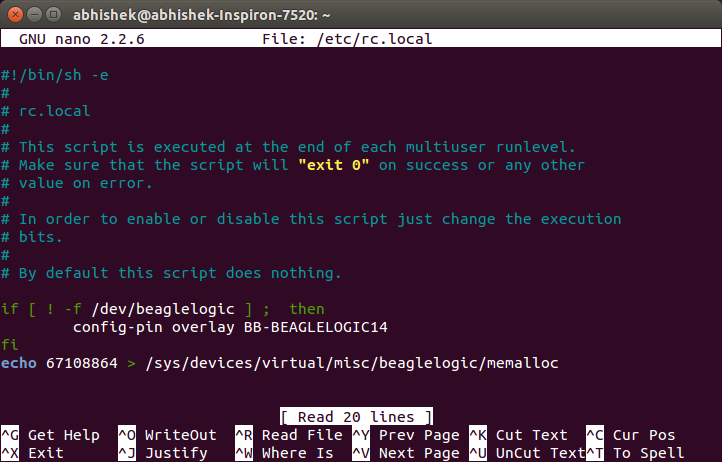
    Next, we need to edit the startup script to load our new device tree overlay to use all 14 pins. For this, edit /etc/rc.local , go to the line that says 'config-pin overlay BB-BEAGLELOGIC' and edit it to 'config-pin overlay BB-BEAGLELOGIC14'. It should now look like this:

    Save it and reboot. After rebooting your system it disables the eMMC and then multiplexes the eMMC pins onto the PRU inputs. Thus you can use all 14 inputs on BeagleLogic.

    IMPORTANT NOTE: Do not apply signals on these channels until the BeagleBone has finished booting. It is also a general precaution not to apply signal at any pin of the BeagleBone until it is fully powered up.

    [ P.S. Thanks to @David Bacungan for reporting issues in the previous version of these instructions. These have now been addressed with this version of the guide. ]

  • Best Product Finals Video

    Kumar, Abhishek09/20/2015 at 20:50 0 comments

    This is the Best Product Finals video for BeagleLogic:

    Judges, please take a moment to go through this note I sent to team Hackaday along with the product samples - it contains important release notes for the prototype that will be in your hands!

    This is a small playlist containing the Quarter Final and Semi Final Video presentations, I recommend you go through them as well once.

    Thank you for your attention.

    Wishing the other Best Product Finalists and 2015THP Semifinalists the very best!

    ~Abhishek

  • New Revision of the BeagleLogic cape WIP

    Kumar, Abhishek09/20/2015 at 20:46 9 comments

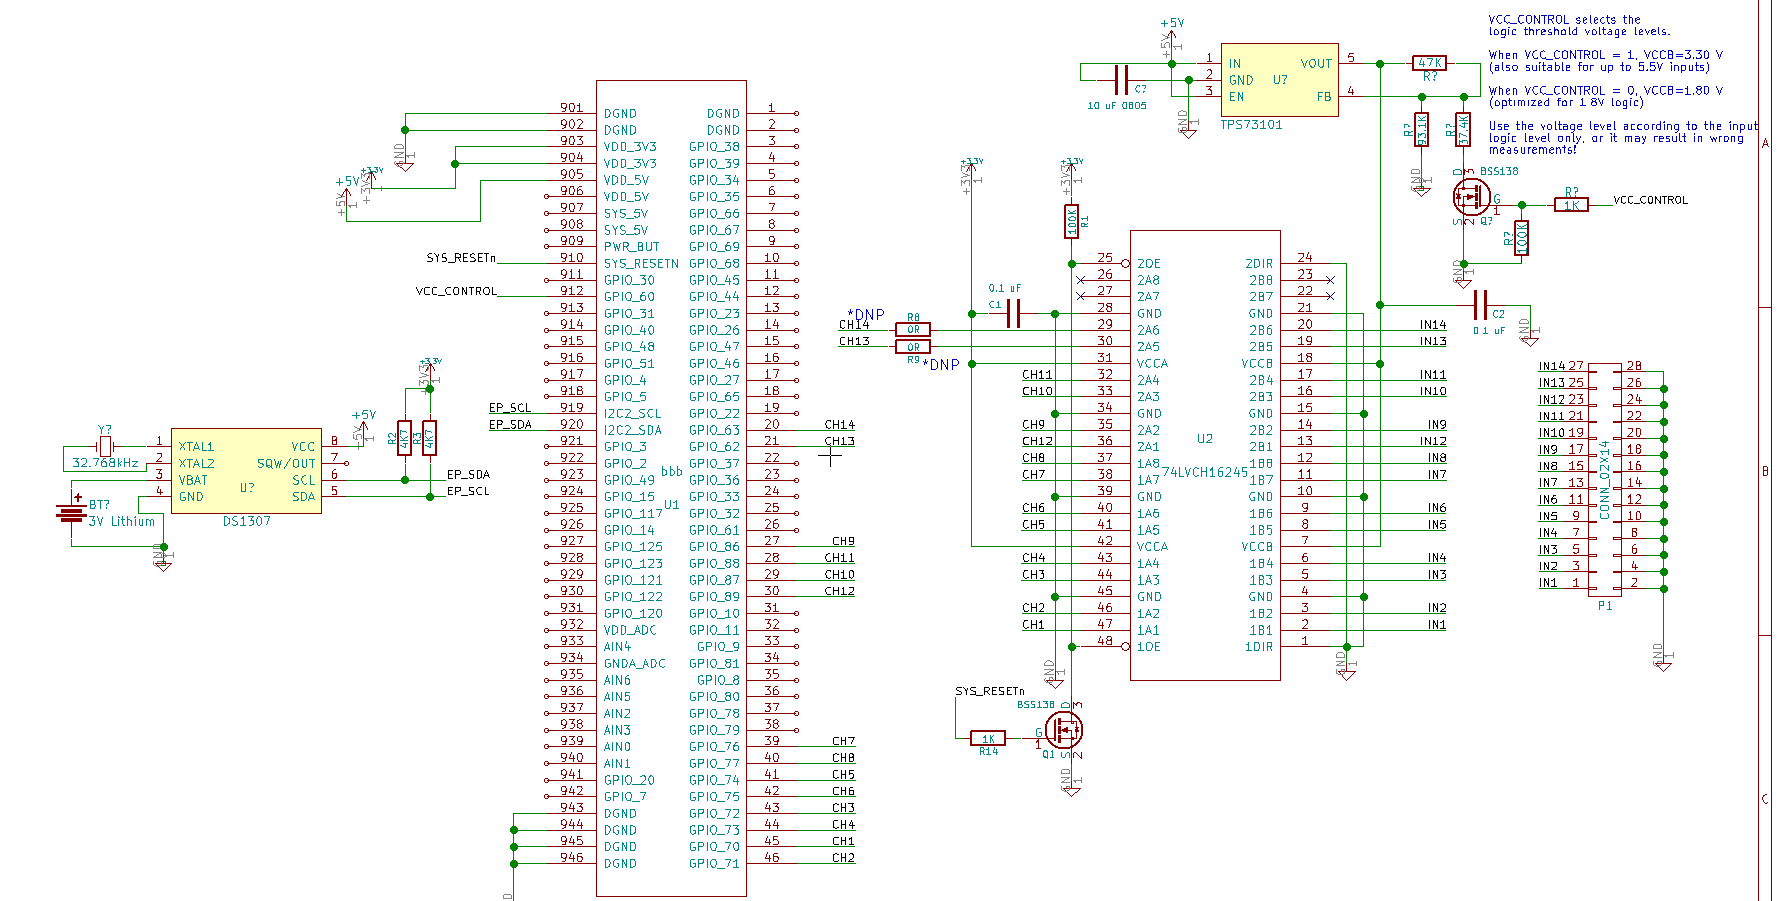
    What's new:

    Removed the cape EEPROM as it wasn't being utilized. All the configuration is handled in the BeagleLogic system Image.

    Added a DS1307 RTC to keep time so that logic captures can be correctly timestamped. This will be reflected in the software as well.

    Add a LDO with 3.3V / 1.8V select on Input side for configurable logic level thresholds. BeagleLogic should also be able to tolerate +/-12V logic signals, will be working out the best way to make it happen.

    Stay tuned for more rev2 updates!

  • BeagleLogic Cape Schematics & Explanation

    Kumar, Abhishek09/20/2015 at 20:46 0 comments

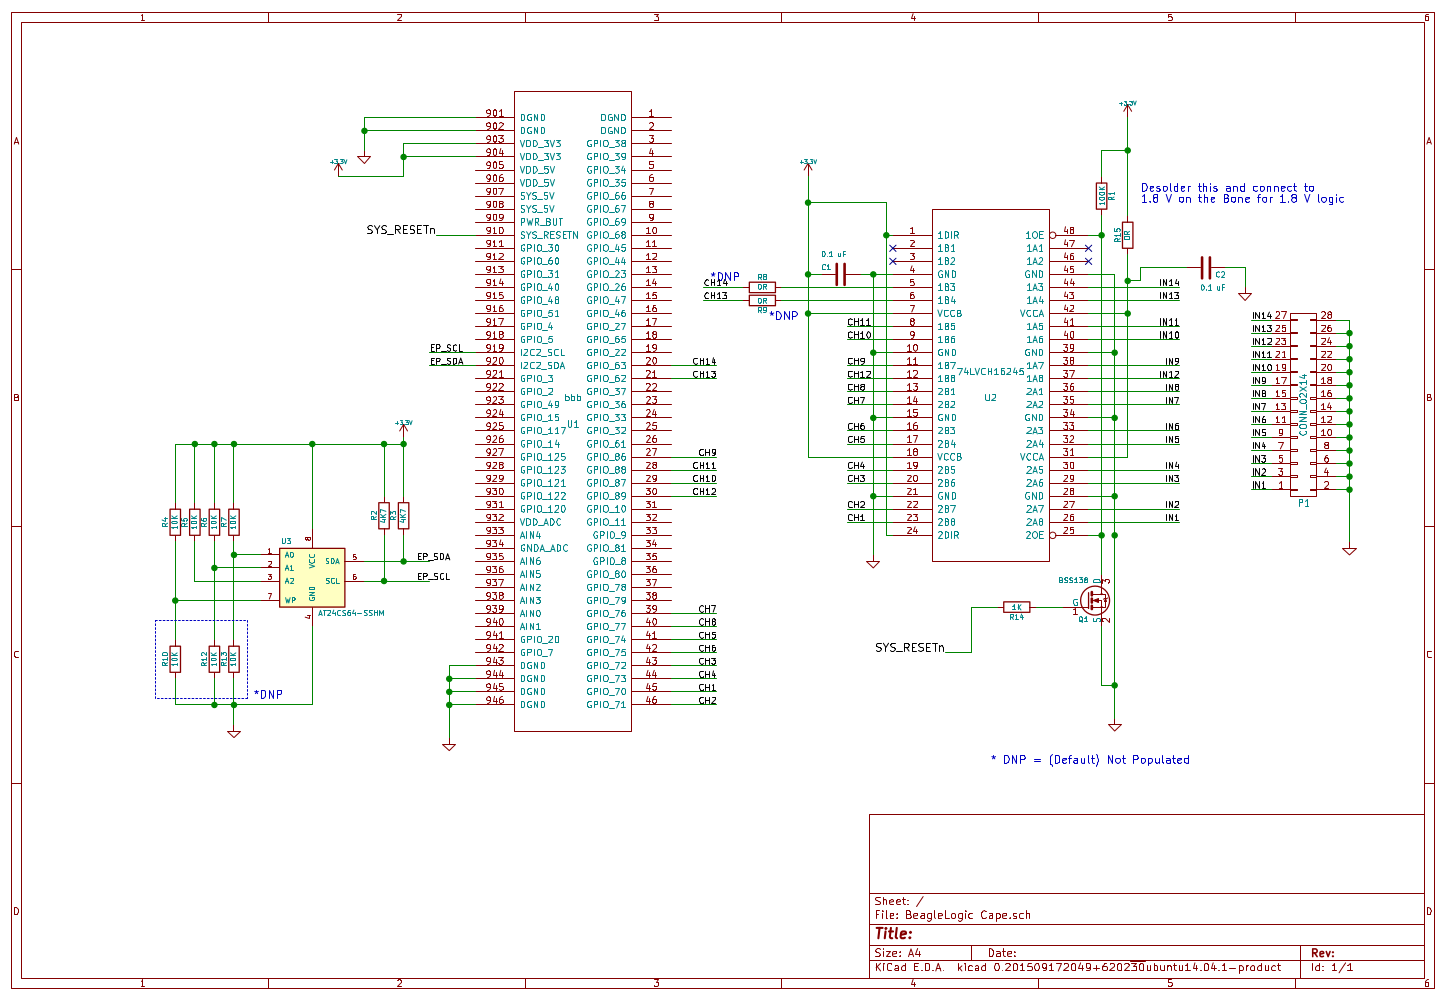
    In this log I explain the BeagleLogic cape schematic.

    At the heart of the schematic is a 74LVCH16T245 logic level translator IC. This translator inputs are 5V tolerant so it shields (and up to a limited level in case of overvoltage transients) the BeagleBone Black from external circuit logic levels. Therefore with the cape you can debug TTL circuits and Arduino circuits without fear of harming the BeagleBone Black in normal usage.

    The inputs of BeagleLogic are also the boot pins for the AM335x and hence must not be changed by external circuitry during the boot phase of the SoC. How do we ensure that external pin disturbances do not cause the BeagleBone to lock up at boot?

    The answer is - through the little BSS138 MOSFET connected to the SYS_RESETn pin of the AM335x SoC. This pin is pulled low during the SoC boot and goes high after the SoC has booted up. When the pin is pulled low, the MOSFET is off, hence the OE pin of the 74LVCH16T245 buffer is pulled high by the 100K resistor causing all the outputs of the 74lVCH16T245 (the B rail in this case) to go high-impedance thus not disturbing the logic levels on those pins. Once SYS_RESETn is high, the MOSFET turns on and pulls OE low so that the outputs are enabled and follow the BeagleLogic inputs.

    Thus using a cape not only provides a layer of logic translation but also a layer of isolation so that if connected to an external circuit with the BeagleBone powered down, the inputs do not accidentally parasitically power the AM335x SoC.

    The EEPROM is there for cape configuration, however may be removed from the next iteration of capes as the BeagleLogic system image handles the configuration automatically.

  • BeagleLogic Cape Design Files

    Kumar, Abhishek09/20/2015 at 20:45 0 comments

    This Project Log references the rule of the 2015 Best Product Finals in which participants are required to post Gerber and Drill files of their builds.

    The BeagleLogic design files are located here on the project GitHub repository:

    https://github.com/abhishek-kakkar/BeagleLogic/tree/master/cape

    For the gerbers and PDF copy of the schematics and board layouts, this is the Google Drive Folder:

    BeagleLogic Cape Fabrication Outputs (Generated on 21st September)

    The KiCAD design files are always the latest design while the fabrication outputs are of the last hardware release. They will be updated when a new revision is released.

  • Semifinal Demo Video

    Kumar, Abhishek08/17/2015 at 20:34 0 comments

    Judges: Please take a few minutes to read this note that I had enclosed along with the BeagleLogic prototypes. Thanks!

    Just in time, the semifinal video!

    SFTP mapping is created using the File explorer by clicking on "Connect to server" button and adding the address - sftp://192.168.7.2/root ( or change to your IP ) . Then enter "root" as username and leave the password blank.

    On Windows, for the same effect one can use WinSCP available at https://winscp.net/eng/download.php to browse the file system on the BeagleBone.

  • Channel Naming Convention

    Kumar, Abhishek08/17/2015 at 19:36 0 comments

    Here's the image for a quick reference.

    Note that:

    • Channel "x" is bit "x - 1" in the channel binary data (which is stored little endian) Right to left is channel 14 to Channel 1 ( ie bit 13 to bit 0)
    • Default data captured is in 8 bits, but can be set to capture 16 bits. See sysfs attributes reference for a complete list of parameters that can be changed.
    • The label alongside each channel pin is the name to be used while using the "sigrok-cli" app. So if you wanted to capture channels 1, 2 and 3 you would use the names P8_45, P8_46 and P8_43 respectively and not refer to them as 1,3 and 5.
    • However if you process raw binary data, you must use the bit numbers ( channel number - 1) with sigrok to receive correctly.

View all 16 project logs

  • 1
    Step 1

    Assemble the BeagleLogic cape using the required components in the BOM posted above. SMT components are best reflowed and the pin headers soldered manually.

  • 2
    Step 2

    Download the BeagleLogic system image (*.img) from here . There should only be one image in this folder in the .img.xz format.

  • 3
    Step 3

    (i) Unzip the .img.xz using 7zip on Windows and then use a tool such as Win32 Disk Imager to write to the SD card
    (ii) In case you are running Ubuntu, Double-clicking the downloaded .img.xz would automatically start a tool such as "Disks" to write the image into a blank SD card. Alternatively something like `xzcat <image>.img.xz | dd of=/dev/sdX` where X = ID of your SD card (b, c, d, ...)

    Make sure that the correct drive is selected in this case.

View all 10 instructions

Enjoy this project?

Share

Discussions

Garlicbread wrote 12/21/2016 at 02:01 point

I'm looking into building a BeagleLogic myself
from what I understand the one thing holding back the V2 schematic is the HV clamping for 12V / -12V inputs
any news on where this might be up to. If it's still in progress do you know which IC your planning on using for the HV clamping?

Edit, it looks like the Saleae Logic Pro uses a series of individual Fet's to buffer the input for a max range of 10V to -10V, then feeds the inputs via a series of ADA4891-4 comparators

  Are you sure? yes | no

kelu124 wrote 03/07/2016 at 11:40 point

Hey there! I'm a big fan of your work, and want to learn from it for our ultrasound imaging dev kit - where we need ADCs at 20Msps =)

  Are you sure? yes | no

kelu124 wrote 07/21/2016 at 08:49 point

And... as a miracle, Abishek managed to get the board of my dreams at https://google-opensource.blogspot.fr/2016/07/announcing-open-source-adc-board-for.html ! Well done, my friend, well done!

  Are you sure? yes | no

oshpark wrote 07/21/2016 at 20:13 point

Yeah, very exciting!

  Are you sure? yes | no

kelu124 wrote 08/28/2016 at 16:45 point

And... work closed! I've been using the Beaglelogic distrib dedicated to PRUDAQ, and have been getting the setup to work and get ultrasound images https://hackaday.io/project/9281-murgen-open-source-ultrasound-imaging/log/44528-getting-an-image-from-an-ultrasound-fantom !

  Are you sure? yes | no

deʃhipu wrote 11/22/2015 at 18:04 point

The github link in the project description is cut off :(
I suppose that happened when our evil overlords forced a hard limit on the length of description.

  Are you sure? yes | no

alpha_ninja wrote 11/22/2015 at 22:23 point

Oh no!

  Are you sure? yes | no

Kumar, Abhishek wrote 11/25/2015 at 17:41 point

Fixed, and the new link looks much better now :)

  Are you sure? yes | no

David Bacungan wrote 09/26/2015 at 03:51 point

Has BeagleLogic been tested on BeagleBoneGreen?

  Are you sure? yes | no

Kumar, Abhishek wrote 09/26/2015 at 04:14 point

It has been reported to me that BeagleLogic has been successfully tested on a BeagleBone Green, however I have not tested it personally as I am yet to get one. 

If you try it on a BeagleBone Green and face any issues let me know through a PM so that I can fix it.

  Are you sure? yes | no

AVR wrote 09/21/2015 at 21:40 point

when can I buy a cape? :)

  Are you sure? yes | no

Kumar, Abhishek wrote 09/21/2015 at 21:52 point
I'm finalizing the revision 2 design which I've just announced in the project logs - https://hackaday.io/project/4395-beaglelogic/log/25553-new-revision-of-the-beaglelogic-cape-wip . As soon as I validate them it will be immediately released for pre-ordering.

  Are you sure? yes | no

Jason Kridner wrote 05/28/2015 at 13:55 point

Just an awesome project. Thanks Abishek_!

For those that don't know, this was originally done as a Google Summer of Code project. To learn more about GSoC, visit http://beagleboard.org/gsoc. Patches welcome.

  Are you sure? yes | no

Kumar, Abhishek wrote 05/28/2015 at 14:06 point

A big thanks to you, the BeagleBoard community and Google (Summer of Code) for helping bring the project to reality!

  Are you sure? yes | no

Kumar, Abhishek wrote 02/23/2015 at 11:46 point

The 3.8.13 is as of now the only version of the Linux kernel on the BeagleBone Black which allows dynamically loadable/unloadable capes using "device tree overlays" as of now. However the overlay thing was hacky and couldn't make it to the mainline then.

Developers from the BeagleBoard community are working on getting dynamic device tree loading/unloading into the upstream kernel, and there has been progress lately (http://www.spinics.net/lists/kernel/msg1927792.html)

The BeagleBone Black should technically be able to load the latest kernel and boot from it, but the drivers for PRU for the remoteproc subsystem (which is used by BeagleLogic) aren't there yet. It is planned to port the drivers and establish a framework which would make it to upstream (which is the reason I put it in the form in the first place), but there is no definite timeframe for this. Once the framework is in place upstream, BeagleLogic should follow soon.

  Are you sure? yes | no

PointyOintment wrote 02/23/2015 at 11:10 point

On your interest form, I voted for support for kernels beyond 3.8.13. I'm curious as to why it doesn't currently support any kernel version that came out in the past two years (according to Wikipedia), especially when that version is not a long-term release. I'm not an embedded Linux expert, so maybe newer versions of Linux just aren't available for ARM yet…?

  Are you sure? yes | no

Similar Projects

Does this project spark your interest?

Become a member to follow this project and never miss any updates